Meike MK-2106 User manual
MK-2106
ELEKTRONICZNY KEYBOARD DO NAUKI (61 KLAWISZY)
ELECTRONIC KEYBOARD FOR LEARNING (61 KEYS)
Instrukcja obsługi
User manual
OSTRZEŻENIE
Przed użyciem, przeczytaj OSTRZEŻENIE!
UWAGA
Używaj tylko dedykowanego dla danego urządzenia zasilacza. W razie uszkodzenia
zasilacza, należy go niezwłocznie wymienić
Instrument powinien być rozmontowywany jedynie przez specjalistę, w taki sposób,
aby nie dokonać zmian w wewnętrznej strukturze instrumentu. W razie
nieprawidłowości w funkcjonowaniu instrumentu podczas użytkowania należy
zaprzestać gry na instrumencie i przekazać instrument do serwisu
W przypadku podłączania instrumentu z innym urządzeniem upewnij się, że obydwa
urządzenia są wyłączone przed podłączeniem
Nie utrzymuj maksymalnej lub uciążliwej głośności instrumentu podczas użytkowania
Trzymaj urządzenie z dala od źródła ogrzewania, aby chronić urządzenie przed
zniszczeniem
Nie dopuszczaj, aby do urządzenia dostały się płyn, kurz, drobiny lub inne drobne
materiały, które mogłyby przeniknąć do obwodu urządzenia
Odłącz urządzenie od zasilania przed czyszczeniem instrumentu. Nie wyciągaj wtyczki
mokrą ręką
Używaj miękkiej i suchej ścierki do czyszczenia instrumentu. Farba, alkohol lub
rozpuszczalnik nie powinny być używane do czyszczenia, z uwagi na możliwość
uszkodzenia obudowy instrumentu
Odłączaj urządzenie po użyciu lub jeśli instrument pozostaje nieużytkowany przez
dłuższy czasu
Zawartość instrukcji
Panel kontrolny i porty zewnętrzne
Przygotowania przed użyciem
Podstawy grania
Tryb automatycznego akompaniamentu
Tryb Auto Bass Chord
Kontrola efektu
Nagrywanie i programowanie rytmu
Nauka gry w 3 krokach
Załącznik I. Timbre Table
Załącznik II. Rhythm Table
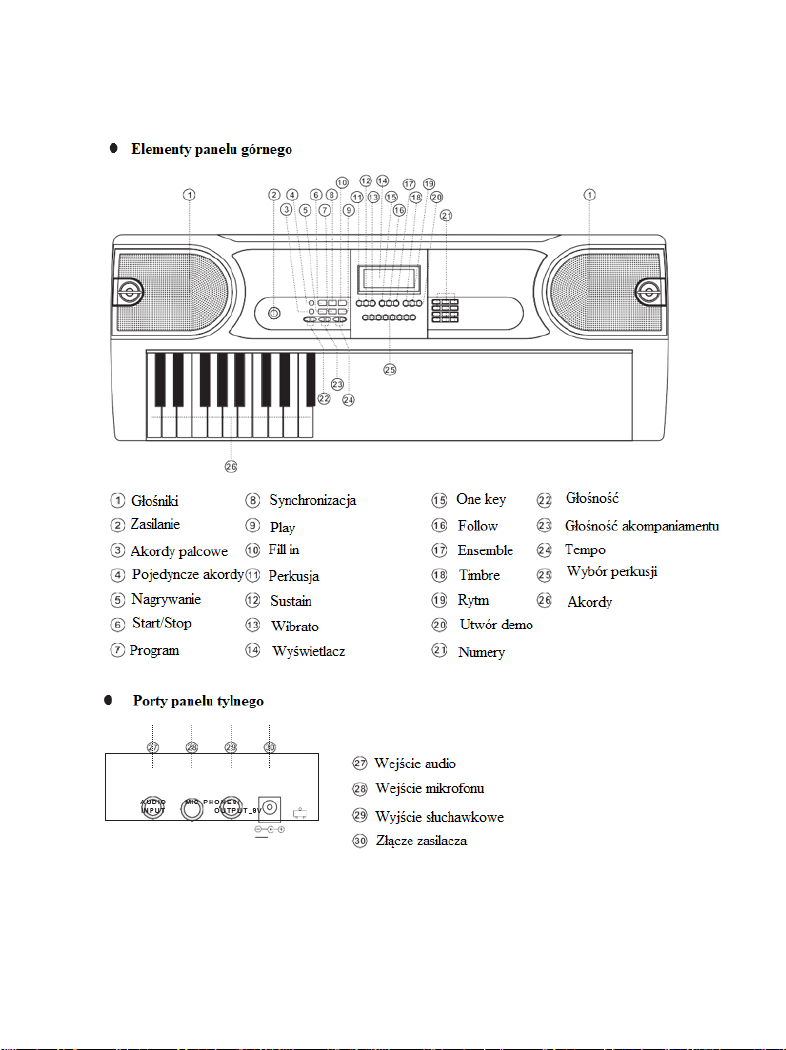
I. Panel kontrolny i porty zewnętrzne
II. Przygotowania przed użyciem
Zasilacz
Urządzenie powinno być podłączone poprzez dedykowany zasilacz. Podłącz końcówkę wyjściową
zasilacza do portu zasilania na panelu tylnym instrumentu, a następnie podłącz wtyczkę do
kontaktu. (UWAGA: napięcie wejściowe zasilacza powinno odpowiadać wartości źródła zasilania)
Wyjście Audio / zewnętrzne słuchawki
Wyjście Audio: Po pierwsze, wyłącz instrument i zewnętrzne urządzenia audio,
następnie podłącz odpowiednio końcówki kabla audio do wyjścia
PHONES/OUTPUT instrumentu oraz odpowiedniego portu audio podłączanego
urządzenia audio.
Podłączanie słuchawek: W trakcie podłączenia słuchawek do portu
PHONES/OUTPUT instrumentu, głośniki będą wyłączone automatycznie. W taki
sposób możesz grać na instrumencie nie przeszkadzając innym.
※UWAGA!: Podczas używania słuchawek nie należy ustawiać maksymalnej głośności, gdyż
może to spowodować utratę słuchu.
Wejście Mic i wejście Audio
Wejście Mic: podłącz mikrofon do portu MIC, aby zacząć grać i śpiewać.
Instrument posiada funkcję wejścia stereo. Dźwięki z telefonu komórkowego,
odtwarzacza MP3, komputera i innych urządzeń audio mogą być odtwarzane na
instrumencie i używane do gry. Najpierw wyłącz instrument, potem podłącz
odpowiednio końcówki kabla audio do portu wyjściowego urządzenia audio oraz
do portu AUDIO INPUT na tylnym panelu instrumentu, po czym uruchom
instrument.
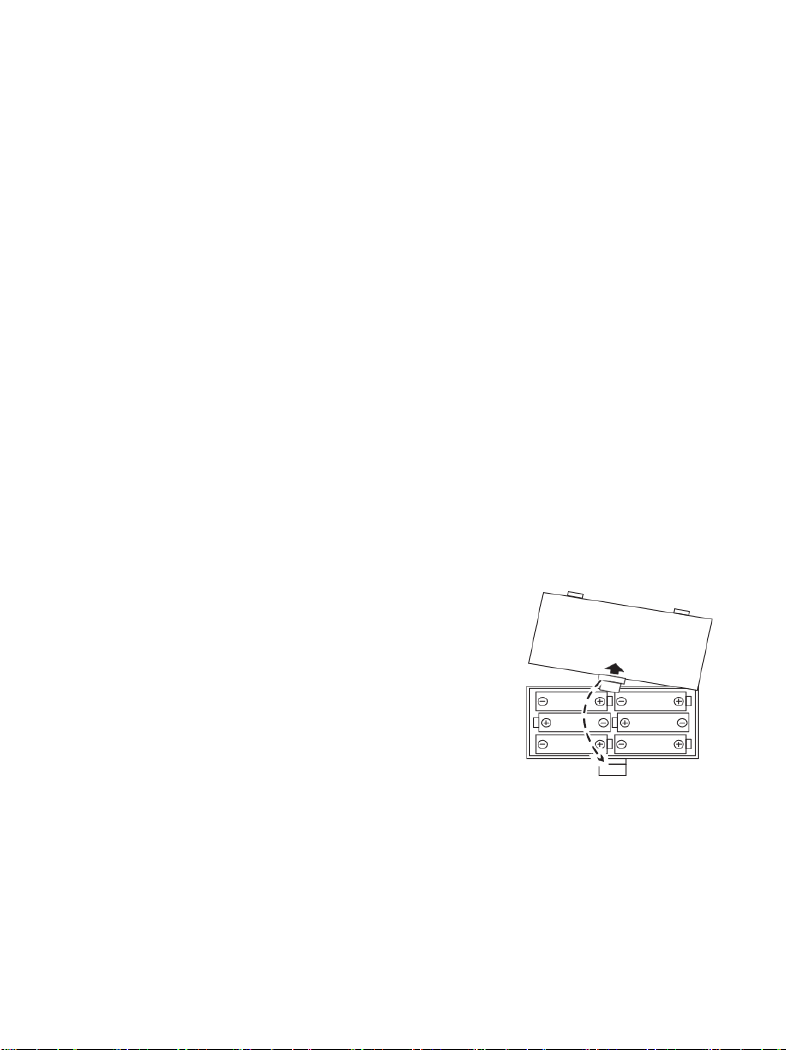
Instalacja baterii
Do zasilania tego klawisza możesz również użyć 6 baterii AA.
Otwórz pokrywę pojemnika na baterie, znajdującego się w
dolnej części urządzenia. Włóż baterie zgodnie z polaryzacją i
załóż ponownie pokrywę.
※Długie użytkowanie i niska moc baterii mogą powodować
zmniejszenie głośności i zniekształcenia. W celu poprawy
jakości należy wymienić baterie. W przypadku długotrwałego
nieużywania wyjmij baterie, może to zapobiec uszkodzeniu
instrumentu. III. Podstawy grania
Naciśnij przycisk [POWER ON/OFF], aby uruchomić urządzenie. Instrument podświetli się z obu
stron, włączy się wyświetlacz LED i pokaże obecne ustawienia tonu, tempa oraz innych efektów.
Następnie, możesz przystąpić do ustawienia instrumentu wedle potrzeby.
Dostosowanie głośności
Naciśnij przycisk [MASTER VOL +/–], aby zwiększyć lub zmniejszyć poziom głośności. Poziom
głośności „VOLUME” będzie pokazany na wyświetlaczu. Naciśnij przyciski [MASTER VOL +/–]

jednocześnie, aby zresetować poziom głośności do ustawień fabrycznych.
Przycisk regulacji głośności może służyć także do regulacji głośności akompaniamentu.
Regulacja głośności akompaniamentu
Naciśnij przycisk [ACCOM Vol +/–], aby. “RC-VOLUME” oraz obecny poziom głośności będą
pokazane na wyświetlaczu. Naciśnij przyciski [ACCOM Vol +/–] jednocześnie, aby zresetować
poziom głośności do ustawień fabrycznych.
Wybór barwy dźwięku
Instrument posiada wbudowanych 255 barw dźwięku, do wyboru od „000” do „254”. Wybór
barwy dźwięku jest włączony automatycznie po uruchomieniu instrumentu. Będąc w innym menu,
wciśnij [Timbre Selection], aby włączyć funkcję wyboru barwy dźwięku, na wyświetlaczu pojawi
się „TnE”. Fabrycznie, instrument ustawiony jest na barwę „000”, aby dokonać zmiany wprowadź
odpowiedni dla wybranej barwy numer lub zmieniaj barwę naciskając przyciski “+” /“-”.
Granie w trybie perkusji
Instrument posiada wbudowanych 61 rodzajów perkusji. Naciśnij przycisk [KEYBOARD
PERCUSSION], aby zmienić tryb instrumentu w perkusję. Każdy klawisz odpowiada jednemu
instrumentowi perkusji. Naciśnij w/w przycisk ponownie, aby wyłączyć tryb perkusji.
Odtwarzanie przykładowych ścieżek dźwiękowych
Instrument posiada wbudowanych 24 ścieżek dźwiękowych „demo” do wyboru, od „000” do
„023”. Naciśnij przycisk [DEMO SONG], aby odtworzyć w kolejności wszystkie przykładowe
ścieżki dźwiękowe. Naciśnij przycisk [DEMO SONG] ponownie, aby zakończyć odtwarzanie.
Naciśnij przyciski “+”/“-”, aby wybrać dowolną ścieżkę dźwiękową. W przypadku naciśnięcia
przycisku [Timbre] podczas odtwarzania ścieżki dźwiękowej „demo”, barwa dźwięku „TnE”
pojawi się na wyświetlaczu. Jeżeli chcesz dokonać zmiany barwy dla ścieżki „demo”, naciśnij
przyciski klawiatury numerycznej lub przycisk “+”/“-” w przeciągu 3 sekund. Naciśnij przycisk
[START / STOP] lub [DEMO SONG] ponownie, aby zatrzymać odtwarzanie ścieżki „demo”
IV.Tryb automatycznego akompaniamentu
Wybór akompaniamentu
Instrument posiada wbudowanych 255 akompaniamentów, do wyboru od „000” do „254”.
Fabrycznie ustawienia akompaniamentu są na „000”. Naciśnij przycisk [Rhythm], aby włączyć
funkcję wyboru akompaniamentu. “rhy” i obecny numer akompaniamentu będzie pokazany na
wyświetlaczu. Następnie, naciśnij użyj przycisków klawiatury numerycznej lub przycisku “+”/“-”
aby wybrać inne akompaniamenty.
Kontrola akompaniamentu
1. Włączenie akompaniamentu
Naciśnij przycisk [start/stop], aby uruchomić akompaniament.
Naciśnij przycisk [SYNC], “SYN” zostanie pokazany na wyświetlaczu oraz
cztery wskaźniki rytmu będą migać jednocześnie, następnie zagraj
którymkolwiek z klawiszy w części akompaniamentowej (klawisze od 1. do 19.
od lewej), aby zmieniać rytm akompaniamentu.

2. Przejście
Kiedy akompaniament zostanie uruchomiony, naciśnij przycisk [FILL-IN], aby wprowadzić
tymczasowe przejście rytmu. Jeśli przytrzymasz przycisk [FILL-IN], przejście będzie nadal
trwało.
3. Zatrzymaj akompaniament
※ Podczas trwania akompaniamentu, naciśnij przycisk [START/STOP], aby zatrzymać
akompaniament.
●Regulacja tempa
Podstawowe tempo to 120 tempo/min, wciśnij [Tempo +] lub [Tempo -] aby zmienić szybkość.
Wciśnij obydwa przyciski na raz aby zresetować do podstawowego tempa 120 tempo/min.
V. Tryb Auto Bass Chord
Pojedynczy akord
W trakcie odtwarzania akompaniamentu, naciśnij przycisk [SINGLE], wtedy “Sin” zostanie
pokazane na wyświetlaczu, po czym zagraj wybrany akord na klawiszach w części
akompaniamentowej. Naciśnij dany przycisk ponownie, na wyświetlaczu pojawi się „OFF”, a
funkcja zostanie wyłączona.
Funkcja FINGERED
W trakcie odtwarzania akompaniamentu, naciśnij przycisk [FINGERED] , “Fin” zostanie
pokazane na wyświetlaczu, po czym zagraj wybrany akord pojedynczym klawiszem w części
akompaniamentowej. Naciśnij dany przycisk ponownie, na wyświetlaczu pojawi się „OFF”, a
funkcja zostanie wyłączona.

Funkcja Fingered (C Key)
(Palcowanie C jest przedstawione na poniższym obrazku,
pozostałe mogą zostać uzyskane analogicznie)
VI. Kontrola efektu
Efekt Sustain
Naciśnij przycisk [SUSTAIN], “SUS” zostanie pokazane na wyświetlaczu i włączony zostanie
efekt Sustain. Naciśnij dany przycisk ponownie, aby wyłączyć efekt.
Efekt Vibrato
Naciśnij przycisk [VIBRATO], “VIB” zostanie pokazane na wyświetlaczu i włączony zostanie
efekt vibrato. Naciśnij dany przycisk ponownie, aby wyłączyć efekt.
VII. Nagrywanie i programowanie rytmu
Nagrywanie
Naciśnij przycisk [ REC ], aby uruchomić funkcję nagrywania, “rEC” pojawi się na wyświetlaczu.
Podczas włączonej funkcji nagrywania, wszystkie zagrane dźwięki zostaną nagrane. Kiedy pamięć
instrumentu się zapełni, na wyświetlaczu pojawi się “FUL”, a nagrywanie zatrzyma się
automatycznie.
Naciśnij przycisk [ PLAY ], aby odtworzyć nagraną melodię, na wyświetlaczu
pojawi się wtedy “PLy”. Po zakończeniu odtwarzania danej melodii, instrument
przejdzie w tryb nagrywania i “rEC” pojawi się na wyświetlaczu. Możesz wtedy
nagrać nową melodię lub naciśnij przycisk [ PLAY ], aby ponownie odtworzyć
daną melodię.
Naciśnij przycisk [ START/STOP ] lub [ REC ] ponownie, aby wyłączyć funkcję
nagrywania.
Programowanie rytmu
Naciśnij przycisk [PROG], aby uruchomić funkcję programowania rytmu, “Prg” pojawi się na
wyświetlaczu oraz aktywowana zostanie perkusja, dzięki której możesz tworzyć dowolne rytmy.
Maksymalnie można nagrać 32 perkusje, wtedy na wyświetlaczu pojawi się
“FUL”, następnie programowanie automatycznie się wyłączy.
Naciśnij przycisk [Play], aby odtworzyć zaprogramowany rytm. Naciśnij przycisk
[PLAY] ponownie, aby zatrzymać odtwarzanie, “Prg” pojawi się na wyświetlaczu

i włączy się funkcja programowania. Możesz ponownie zaprogramować rytmy
lub naciśnij [PLAY], aby odtworzyć rytm ponownie.
Naciśnij przycisk [START/STOP] lub przycisk [PROG] ponownie, aby wyłączyć
funkcję programowania.
VIII.Nauka gry w 3 krokach
ONE-KEY
Naciśnij przycisk [ ONE-KEY ], aby uruchomić naukę gry w trybie ONE-KEY. Możesz wybrać
dowolną melodię używając przycisków “+”/“-”. Funkcja ta nie wymaga od użytkownika
poprawności wciskania klawiszy. Pomimo błędów popełnianych przez ucznia, instrument nadal
będzie odgrywał właściwe nuty oraz wskazywał je na wyświetlaczu. Kiedy dana melodia się
skończy, możesz odtworzyć ją ponownie.
Naciśnij przycisk [ START/STOP ] lub [ ONE-KEY ], aby wyłączyć funkcję.
FOLLOW (Naśladuj)
Naciśnij przycisk [ FOLLOW ], aby uruchomić naukę gry w trybie Follow. Możesz wybrać
dowolną melodię używając przycisków “+”/“-”. Funkcja ta prowadzi użytkownika, aby odgrywał
właściwe nuty melodii. Możesz nauczyć się właściwych nut, podążając za tymi wskazanymi na
wyświetlaczu. Instrument będzie na Ciebie czekał, aż zagrasz prawidłowy dźwięk, zanim przejdzie
do kolejnego.
※ Uwaga: w trakcie trwania funkcji, keyboard odtwarza jedynie prawidłowe dźwięki melodii, nie
reaguje na wciśnięcie tych niewłaściwych.
Naciśnij przycisk [ START/STOP ] lub [ FOLLOW ], aby wyłączyć funkcję.
ENSEMBLE
Naciśnij przycisk [ ENSEMBLE ], aby uruchomić naukę gry w trybie Ensemble. Możesz wybrać
dowolną melodię używając przycisków “+”/“-”. Funkcja ta ukierunkowana jest na granie
właściwych dźwięków melodii. Instrument będzie wskazywał na wyświetlaczu prawidłowe
dźwięki i je odtwarzał. Użytkownik musi grać właściwe dźwięki w normalnym tempie melodii,
jeśli dźwięk nie zostanie przez użytkownika zagrany przez 3 sekundy, instrument automatycznie
odtworzy dalszy ciąg melodii. Kiedy dana melodia się skończy, możesz odtworzyć ją ponownie.
Naciśnij przycisk [ START/STOP ] lub [ ENSEMBLE ], aby wyłączyć funkcję.

Appendix I. Timbre Table
00
Acoustic Grand Piano 045 Crystal 090 Multi Reed
01
Music Box 1 046 Attack Clav. 2 091 Electric Piano 2
02
Vibraphone 047 Synth Harpsi. 2 092 Wood Barafon 2
03
Accordion 048 Woodblock 1 093 Muted Horn
04
Acoustic Bass 049 Tenor Sax 1 094 Flugel Horn
05
Electric Bass (Finger) 050 Steel Bell 2 095 Jazz Bass
06
Pad 051 Kalimba 2 096 Uillean Harp
07
Violin 052 Koto 1 097 Feedback Gt.
08
Cello 053 Shamisen 1 098 Pi Pa 2
09
Orchestral Harp 054 Electric Guitar (Clean) 1 099 Jungle Bass 2
10
String Ensemble 1 055 English Horn 1 100 Hard Barsoon 1
11
Trumpet 1 056 Dulcimer 1 101 Tron Flute
12
Synth Brass 1 057 Shanai 1 102 Kawala 1
13
Alto Sax 058 Xylophone 1 103 Jazz Organ
14
Clarinet 059 Koto 2 104 Soft Accord
15
Lead (square) 060 Electric Guitar (Clean) 2 105 Wind Organ
16
Dual Horns 1 061 Reed Organ 1 106 Viola Attack
17
Soft Santur 062 Dulcimer 2 107 Bari & Tenor
18
Nay 063 Marimba 1 108 Soft Sax 2
19
Mute Barafon 1 064 Church Bells 109 Attack Harp 2
20
Attack Barafon 065 Celesta 1 110 Didgeridoo 2
21
Didgeridoo 1 066 Clavi 1 111 Dual Horns 2
22
Grow Guitar 067 Indian Flute 112 Hard Barsoon 2
23
Soft Guitar 1 068 Jungle Bass 1 113 Kawala 2
24
Soft Clav. 069 Bright String 114 Soft Guitar 2
25
Soft Sax 1 070 Slow Violin 115 Mute Barafon 2
26
Electric Vibraphone 071 Guitar Pinch 1 116 Lead (Sawtooth)
27
Attack Harp 1 072 12-str. Gt 117 Lead (Calliope)
28
Castanets 073 Ukulele 118 Lead (Bass+Lead)
29
Suona 074 Puff Harmonica 119 Pad (Warm)
30
Tubular Bells 1 075 Reed Organ 2 120 Sitar
31
Bodhran 076 Santur 121 Banjo
32
Oct Harp 077 Marimba 2 122 Shamisen 2
33
Tsugaru 078 Music Box 2 123 Koto 3
34
Steel Bell 1 079 Wood Barafon 1 124 Kalimba 3
35
Chorus Guitar. 080 Hard Vibe 2 125 Bag Pipe 2
36
Attack Clav. 1 081 Electric Piano 1 126 Fiddle
37
Synth Harpsi. 1 082 Upright Piano 127 Shanai 2
38
Twin Bones 083 Pi Pa 1 128 Trumpet 2
39
Hard Vibe 1 084 Mellow Fm 129 Electric Grand Piano 1
40
Reed Horn 085 Harpsichord 1 130 Honky-tonk Piano 1
41
Kalimba 1 086 Celesta 2 131 Rhodes Piano 1
42
Organ Flute 087 Clavi 2 132 Chorused Piano 1
43
Barafon 088 Multi Wind 133 Harpsichord 2
44
Bag Pipe 1 089 Guitar Pinch 2 134 Clavi 3

Appendix II. Rhythm Table
135
Disco Latin 2 180 68 Beat Blues 1 225 Tarantella 3
136
Disco Party 2 181 16 Beat Ballad 1 226 SchlagerAlp 2
137
Disco Samba 2 182 68 Beat Ballad 1 227 Schlager Rock 4
138
Dixie Jazz 2 183 Big Band Ballad 1 228 Samba 5
139
Pop New Age 2 184 West Shuffle 229 Samba 6
140
Uk pop 2 185 Calypso 230 Pasodoble 3
141
USA March 2 186 Casa 231 Modern R&B 3
142
Club Dance 2 187 Chrlston 232 Modern Country Pop 3
143
Rumba 2 188 Detroit 233 Medium Jazz 3
144
8 Beat Modern 2 189 Dance Pop 234 Love Song 3
145
Country Ballad 2 190 Espag Nol 235 Jive 3
146
Hard Rock 2 191 Fast Gospel 236 Hully Gully 3
147
Hully Gully 2 192 Ground Beat 237 Hard Rock 3
148
Jive 2 193 Guad Dance 238 Country Ballad 3
149
Love Song 2 194 Modern Cha Cha 239 8 Beat Modern 3
150
Medium Jazz 2 195 Merengue 240 Rumba 3
151
Modern Country Pop 2 196 Ballet 241 Club Dance 3
152
Modern R&B 2 197 Rave 242 USA March 3
153
Pasodoble 2 198 Sy Boogie 243 Uk pop 3
154
Samba 3 199 Seville 244 Pop New Age 3
155
Samba 4 200 Big Band Ballad 2 245 Dixie Jazz 3
156
Schlager Rock 3 201 68 Beat Ballad 2 246 Disco Samba 3
157
SchlagerAlp 1 202 16 Beat Ballad 2 247 Disco Party 3
158
Tarantella 2 203 68 Beat Blues 2 248 Disco Latin 3
159
Tijuana Beat 1 204 Show Tune 3 249 Disco Hands 3
160
Electro Pop 2 205 Analog Ballad 3 250 Disco Funk 3
161
Fusion 2 206 Salsa 3 251 Disco Fox 3
162
Hip Beat 1 207 Jazz Rock 3 252 Disco Chocolate 3
163
Limbo Rock 2 208 Jazz Beat 3 253 Club Latin 3
164
Acoustic Ballad 2 209 Jazz Beat 4 254 Bright Pop 2
165
Piano Ballad 2 210 Jazz Club 3
166
R&B Ballad 2 211 Jazz Big Band 3
167
Rock Ballad 2 212 Pub Piano 3
168
Reggae 2 213 Swing Beat 2
169
Slow & Easy 2 214 Slow & Easy 3
170
Swing Beat 1 215 Reggae 3
171
Pub Piano 2 216 Rock Ballad 3
172
Jazz Big Band 2 217 R&B Ballad 3
173
Jazz Club 2 218 Piano Ballad 3
174
Jazz Beat 1 219 Acoustic Ballad 3
175
Jazz Beat 2 220 Limbo Rock 3
176
Jazz Rock 2 221 Hip Beat 2
177
Salsa 2 222 Fusion 3
178
Analog Ballad 2 223 Electro Pop 3
179
Show Tune 2 224 Tijuana Beat 2

UWAGA! URZĄDZENIA NIE WOLNO WYRZUCAĆ DO ODPADÓW DOMOWYCH.
To oznaczenie oznacza, że produkt nie może być wyrzucany razem z odpadami
domowymi w całej UE. W celu zapobiegnięcia potencjalnym szkodom dla środowiska lub
zdrowia, zużyty produkt należy poddać recyklingowi. Zgodnie z obowiązującym prawem,
nie nadający się do użycia sprzęt elektryczny i elektroniczny należy zbierać osobno, w
specjalnie do tego celu wyznaczonych punktach zbierania zużytego sprzętu, celem ich
przetworzenia i ponownego wykorzystania na podstawie obowiązujących norm ochrony
środowiska.
Informacja o zużytym sprzęcie elektrycznym i elektronicznym
Głównym celem regulacji europejskich oraz krajowych jest ograniczenie ilości odpadów
powstałych ze zużytego sprzętu elektrycznego i elektronicznego, zapewnienie odpowiedniego
poziomu jego zbierania, odzysku i recyklingu oraz zwiększenie świadomości społecznej o jego
szkodliwości dla środowiska naturalnego, na każdym etapie użytkowania sprzętu elektrycznego i
elektronicznego. W związku z powyższym należy wskazać, iż gospodarstwa domowe spełniają
kluczową rolę w przyczynianiu się do ponownego użycia i odzysku, w tym recyklingu zużytego
sprzętu. Użytkownik sprzętu przeznaczonego dla gospodarstw domowych jest zobowiązany po jego
zużyciu do oddania zbierającemu zużyty sprzęt elektryczny i elektroniczny. Należy jednak
pamiętać, aby produkty należące do grupy sprzętu elektrycznego lub elektronicznego utylizowane
były w uprawnionych do tego punktach zbiórki.

WARNING
Before use, read the WARNING!
WARNING
Use only the dedicated power supply for your device. If the power supply is damaged,
replace it immediately
The instrument should be disassembled only by a specialist, in such a way that no
changes are made to the internal structure of the instrument. If the instrument
malfunctions during use, stop playing the instrument and send the instrument for service
When connecting the instrument with another device, make sure that both devices are
turned off before connection
Do not keep the instrument at maximum or strenuous volume during use
Keep the instrument away from a heating source to protect the instrument from damage
Do not allow liquid, dust, fines or other small materials to enter the instrument circuitry
Unplug the unit from the power supply before cleaning the instrument. Do not pull the
plug with a wet hand
Use a soft and dry cloth to clean the instrument. Paint, alcohol or solvent should not be
used for cleaning, due to the possibility of damaging the instrument case
Unplug the instrument after use or if the instrument is left unused for a long time
Contents of the user manual
Control panel and external ports
Preparations before use
The basics of playing
Automatic accompaniment mode
Auto Bass Chord mode
Effect control
Rhythm recording and programming
Learning to play in 3 steps
Appendix I. Timbre Table
Appendix II. Rhythm Table

I. Control panel and external ports

II. Preparations before use
Power adapter
The device should be connected via a dedicated power adapter. Connect the output end of the
power adapter to the power port on the instrument's rear panel, and then connect the plug to a
contact. (NOTE: the input voltage of the power adapter should match the value of the power
source).
Audio output / external headphones
Audio Output: First, turn off the instrument and external audio devices, then
connect the ends of the audio cable to the PHONES/OUTPUT of the instrument
and the corresponding audio port of the connected audio device, respectively.
Connecting headphones: when connecting headphones to the instrument's
PHONES/OUTPUT port, the speakers will be turned off automatically. This way
you can play the instrument without disturbing others.
※ CAUTION: When using headphones, do not set the maximum volume, as this may cause
hearing loss.
Mic input and Audio input
Mic input: plug the microphone into the MIC port to start playing and singing.
Instrument has a stereo input feature. Sounds from your cell phone, MP3 player,
computer and other audio devices can be played on the instrument and used for
playing. First turn off the instrument, then connect the ends of the audio cable to
the output port of the audio device and to the AUDIO INPUT port on the rear
panel of the instrument, respectively, then start the instrument.
Battery installation
You can also use 6 AA batteries to power this key. Open the
cover of the battery compartment, located at the bottom of the
device. Insert the batteries according to the polarity and put the
cover back on.
※Long use and low battery power may result in reduced
volume and distortion. To improve the quality, replace the
batteries. Remove the batteries if not used for a long time, this
may prevent damage to the instrument.
III. The basics of playing
Press the [POWER ON/OFF] button to start the instrument. The instrument will light up on both
sides, turn on the LED display and show the current settings for timbre, tempo and other effects.
Then, you can proceed to set the instrument as needed.
Volume adjustment
Press the [MASTER VOL +/-] button to increase or decrease the volume level. The volume level
"VOLUME" will be shown on the display. Press the [MASTER VOL +/-] buttons simultaneously
to reset the volume level to the factory setting.

The volume control button can also be used to adjust the volume of the accompaniment.
Accompaniment volume adjustment
Press the [ACCOM Vol +/-] button to. "RC-VOLUME" and the current volume level will be shown
on the display. Press the [ACCOM Vol +/-] buttons simultaneously to reset the volume level to the
factory setting.
Timbre selection
The instrument has 255 built-in sound timbres, selectable from "000" to "254." Timbre selection is
enabled automatically when the instrument is powered on. While in another menu, press [Timbre
Selection] to enable the timbre selection function, the display will show "TnE". At the factory, the
instrument is set to timbre "000", to make a change enter the corresponding number for the selected
timbre or change the timbre by pressing the "+" /"-" buttons.
Playing in percussion mode
The instrument has 61 built-in percussion types. Press the [KEYBOARD PERCUSSION] button
to turn the instrument into percussion mode. Each key corresponds to one percussion instrument.
Press the aforementioned button again to turn off the percussion mode.
Playback of demo songs
The instrument has 24 built-in "demo" sound tracks to choose from, from "000" to "023". Press the
[DEMO SONG] button to play all the sample sound tracks in order. Press the [DEMO SONG]
button again to finish playback. Press the "+"/"-" buttons to select any soundtrack. If you press the
[Timbre] button while playing a "demo" sound track, the timbre "TnE" will appear on the display.
If you want to change the timbre for the "demo" track, press the numeric keypad buttons or the
"+"/"-" button within 3 seconds. Press the [START / STOP] or [DEMO SONG] button again to
stop playback of the "demo" track.
V. Automatic accompaniment mode
Accompaniment selection
The instrument has 255 built-in accompaniments, selectable from "000" to "254." The default
accompaniment setting is at "000". Press the [Rhythm] button to activate the accompaniment
selection function. "rhy" and the current accompaniment number will be shown on the display. Then,
press use the numeric keypad buttons or the "+"/"-" button to select other accompaniments.
Accompaniment control
1. Enabling accompaniment
Press the [start/stop] button to start the accompaniment.
Press the [SYNC] button, "SYN" will be shown on the display and the four rhythm
indicators will flash simultaneously, then play any of the keys in the
accompaniment section (keys 1. to 19. from the left) to change the rhythm of the
accompaniment.
2. FILL-IN
When the accompaniment is started, press the [FILL-IN] button to enter a temporary rhythm
transition. If you hold down the [FILL-IN] button, the transition will continue.

3. Stop the accompaniment
※ While the accompaniment is in progress, press the [START/STOP] button to stop the
accompaniment.
●Tempo adjustment
The basic tempo is 120 tempo/min, press [Tempo +] or [Tempo -] to change the speed. Press both
buttons at once to reset to the basic tempo of 120 tempo/min.
VI.Auto Bass Chord mode
Single chord
While playing the accompaniment, press the [SINGLE] button, then "Sin" will be shown on the
display, then play the selected chord on the keys in the accompaniment section. Press the respective
button again, "OFF" will be shown on the display, and the function will be turned off.
FINGERED function
While playing the accompaniment, press the [FINGERED] button , "Fin" will be shown on the
display, then play the selected chord with a single key in the accompaniment section. Press the key
in question again, "OFF" will be shown on the display, and the function will be turned off.

Fingered function (C Key)
(Fingering C is shown in the image below,
other can be played by analogy)
VIII.Effect control
Sustain effect
Press the [SUSTAIN] button, "SUS" is shown on the display and the Sustain effect is turned on.
Press the given button again to turn off the effect.
Vibrato effect
Press the [VIBRATO] button, "VIB" is shown on the display and the vibrato effect is turned on.
Press the given button again to turn off the effect.
IX. Rhythm recording and programming
Recording
Press the [ REC ] button to start the recording function, "rEC" will appear on the display. While
the recording function is on, all played sounds will be recorded. When the instrument's memory
fills up, "FUL" will appear on the display, and recording will stop automatically.
Press the [ PLAY ] button to play the recorded melody, "PLy" will then appear on
the display. When you finish playing the melody in question, the instrument will
enter the recording mode and "rEC" will appear on the display. You can then
record a new melody or press the [ PLAY ] button to play the melody again.
Press [ START/STOP ] or [ REC ] again to turn off the recording function.
Rhythm programming
Press the [PROG] button to start the rhythm programming function, "Prg" will appear on the display
and percussion will be activated, so you can create any rhythm you want.
A maximum of 32 percussions can be recorded, then the display will show "FUL",
then the programming will automatically turn off.
Press the [PLAY] button to play the programmed rhythm. Press the [PLAY] button
again to stop playback, "Prg" will appear on the display and the programming
function will turn on. You can program the rhythms again or press [PLAY] to play
the rhythm again.
Press the [START/STOP] button or the [PROG] button again to disable the
programming function.

IX. Learning to play in 3 steps
ONE-KEY
Press the [ ONE-KEY ] button to start learning to play in ONE-KEY mode. You can select any tune
using the "+"/"-" buttons. This function does not require the user to press the keys correctly. Despite
mistakes made by the student, the instrument will still play the correct notes and indicate them on
the display. When a particular melody is over, you can play it again.
Press the [ START/STOP ] or [ ONE-KEY ] button to turn off the function.
FOLLOW
Press the [ FOLLOW ] button to start learning to play in Follow mode. You can select any melody
using the "+"/"-" buttons. This function guides you to play the correct notes of the melody. You can
learn the right notes by following those indicated on the display. The instrument will wait for you to
play the correct note before moving on to the next one.
※ Note: during the function, the keyboard plays only the correct melody sounds, it does not respond
to pressing the wrong ones.
Press [ START/STOP ] or [ FOLLOW ] to disable the function.
ENSEMBLE
Press the [ ENSEMBLE ] button to start learning to play in Ensemble mode. You can select any
melody using the "+"/"-" buttons. This function is aimed at playing the correct sounds of the melody.
The instrument will indicate the correct sounds on the display and play them. The user must play the
correct sounds at the normal tempo of the melody, if a sound is not played by the user for 3 seconds,
the instrument will automatically play the continuation of the melody. When a melody is over, you
can play it again.
Press [ START/STOP ] or [ ENSEMBLE ] to turn off the function.

Appendix I. Timbre Table
45
Acoustic Grand Piano 045 Crystal 090 Multi Reed
46
Music Box 1 046 Attack Clav. 2 091 Electric Piano 2
47
Vibraphone 047 Synth Harpsi. 2 092 Wood Barafon 2
48
Accordion 048 Woodblock 1 093 Muted Horn
49
Acoustic Bass 049 Tenor Sax 1 094 Flugel Horn
50
Electric Bass (Finger) 050 Steel Bell 2 095 Jazz Bass
51
Pad 051 Kalimba 2 096 Uillean Harp
52
Violin 052 Koto 1 097 Feedback Gt.
53
Cello 053 Shamisen 1 098 Pi Pa 2
54
Orchestral Harp 054 Electric Guitar (Clean) 1 099 Jungle Bass 2
55
String Ensemble 1 055 English Horn 1 100 Hard Barsoon 1
56
Trumpet 1 056 Dulcimer 1 101 Tron Flute
57
Synth Brass 1 057 Shanai 1 102 Kawala 1
58
Alto Sax 058 Xylophone 1 103 Jazz Organ
59
Clarinet 059 Koto 2 104 Soft Accord
60
Lead (square) 060 Electric Guitar (Clean) 2 105 Wind Organ
61
Dual Horns 1 061 Reed Organ 1 106 Viola Attack
62
Soft Santur 062 Dulcimer 2 107 Bari & Tenor
63
Nay 063 Marimba 1 108 Soft Sax 2
64
Mute Barafon 1 064 Church Bells 109 Attack Harp 2
65
Attack Barafon 065 Celesta 1 110 Didgeridoo 2
66
Didgeridoo 1 066 Clavi 1 111 Dual Horns 2
67
Grow Guitar 067 Indian Flute 112 Hard Barsoon 2
68
Soft Guitar 1 068 Jungle Bass 1 113 Kawala 2
69
Soft Clav. 069 Bright String 114 Soft Guitar 2
70
Soft Sax 1 070 Slow Violin 115 Mute Barafon 2
71
Electric Vibraphone 071 Guitar Pinch 1 116 Lead (Sawtooth)
72
Attack Harp 1 072 12-str. Gt 117 Lead (Calliope)
73
Castanets 073 Ukulele 118 Lead (Bass+Lead)
74
Suona 074 Puff Harmonica 119 Pad (Warm)
75
Tubular Bells 1 075 Reed Organ 2 120 Sitar
76
Bodhran 076 Santur 121 Banjo
77
Oct Harp 077 Marimba 2 122 Shamisen 2
78
Tsugaru 078 Music Box 2 123 Koto 3
79
Steel Bell 1 079 Wood Barafon 1 124 Kalimba 3
80
Chorus Guitar. 080 Hard Vibe 2 125 Bag Pipe 2
81
Attack Clav. 1 081 Electric Piano 1 126 Fiddle
82
Synth Harpsi. 1 082 Upright Piano 127 Shanai 2
83
Twin Bones 083 Pi Pa 1 128 Trumpet 2
84
Hard Vibe 1 084 Mellow Fm 129 Electric Grand Piano 1
85
Reed Horn 085 Harpsichord 1 130 Honky-tonk Piano 1
86
Kalimba 1 086 Celesta 2 131 Rhodes Piano 1
87
Organ Flute 087 Clavi 2 132 Chorused Piano 1
88
Barafon 088 Multi Wind 133 Harpsichord 2
89
Bag Pipe 1 089 Guitar Pinch 2 134 Clavi 3

Appendix II. Rhythm Table
180
Disco Latin 2 180 68 Beat Blues 1 225 Tarantella 3
181
Disco Party 2 181 16 Beat Ballad 1 226 SchlagerAlp 2
182
Disco Samba 2 182 68 Beat Ballad 1 227 Schlager Rock 4
183
Dixie Jazz 2 183 Big Band Ballad 1 228 Samba 5
184
Pop New Age 2 184 West Shuffle 229 Samba 6
185
Uk pop 2 185 Calypso 230 Pasodoble 3
186
USA March 2 186 Casa 231 Modern R&B 3
187
Club Dance 2 187 Chrlston 232 Modern Country Pop 3
188
Rumba 2 188 Detroit 233 Medium Jazz 3
189
8 Beat Modern 2 189 Dance Pop 234 Love Song 3
190
Country Ballad 2 190 Espag Nol 235 Jive 3
191
Hard Rock 2 191 Fast Gospel 236 Hully Gully 3
192
Hully Gully 2 192 Ground Beat 237 Hard Rock 3
193
Jive 2 193 Guad Dance 238 Country Ballad 3
194
Love Song 2 194 Modern Cha Cha 239 8 Beat Modern 3
195
Medium Jazz 2 195 Merengue 240 Rumba 3
196
Modern Country Pop 2 196 Ballet 241 Club Dance 3
197
Modern R&B 2 197 Rave 242 USA March 3
198
Pasodoble 2 198 Sy Boogie 243 Uk pop 3
199
Samba 3 199 Seville 244 Pop New Age 3
200
Samba 4 200 Big Band Ballad 2 245 Dixie Jazz 3
201
Schlager Rock 3 201 68 Beat Ballad 2 246 Disco Samba 3
202
SchlagerAlp 1 202 16 Beat Ballad 2 247 Disco Party 3
203
Tarantella 2 203 68 Beat Blues 2 248 Disco Latin 3
204
Tijuana Beat 1 204 Show Tune 3 249 Disco Hands 3
205
Electro Pop 2 205 Analog Ballad 3 250 Disco Funk 3
206
Fusion 2 206 Salsa 3 251 Disco Fox 3
207
Hip Beat 1 207 Jazz Rock 3 252 Disco Chocolate 3
208
Limbo Rock 2 208 Jazz Beat 3 253 Club Latin 3
209
Acoustic Ballad 2 209 Jazz Beat 4 254 Bright Pop 2
210
Piano Ballad 2 210 Jazz Club 3
211
R&B Ballad 2 211 Jazz Big Band 3
212
Rock Ballad 2 212 Pub Piano 3
213
Reggae 2 213 Swing Beat 2
214
Slow & Easy 2 214 Slow & Easy 3
215
Swing Beat 1 215 Reggae 3
216
Pub Piano 2 216 Rock Ballad 3
217
Jazz Big Band 2 217 R&B Ballad 3
218
Jazz Club 2 218 Piano Ballad 3
219
Jazz Beat 1 219 Acoustic Ballad 3
220
Jazz Beat 2 220 Limbo Rock 3
221
Jazz Rock 2 221 Hip Beat 2
222
Salsa 2 222 Fusion 3
223
Analog Ballad 2 223 Electro Pop 3
224
Show Tune 2 224 Tijuana Beat 2
Table of contents
Languages:
Other Meike Musical Instrument manuals

Popular Musical Instrument manuals by other brands


Allen Organ Company LLC
Allen Organ Company LLC MDS-10 owner's manual

BYO Guitar
BYO Guitar SG Guitar Kit Assembly instructions

Allen Organ Company LLC
Allen Organ Company LLC Historique III owner's manual

Allen Organ Company LLC
Allen Organ Company LLC Protege C-19C user guide

Generalmusic
Generalmusic GEM pRP8 owner's manual

Odiseimusic
Odiseimusic Travel Sax TS-V1 user manual