Melissa & Doug 2369 User manual
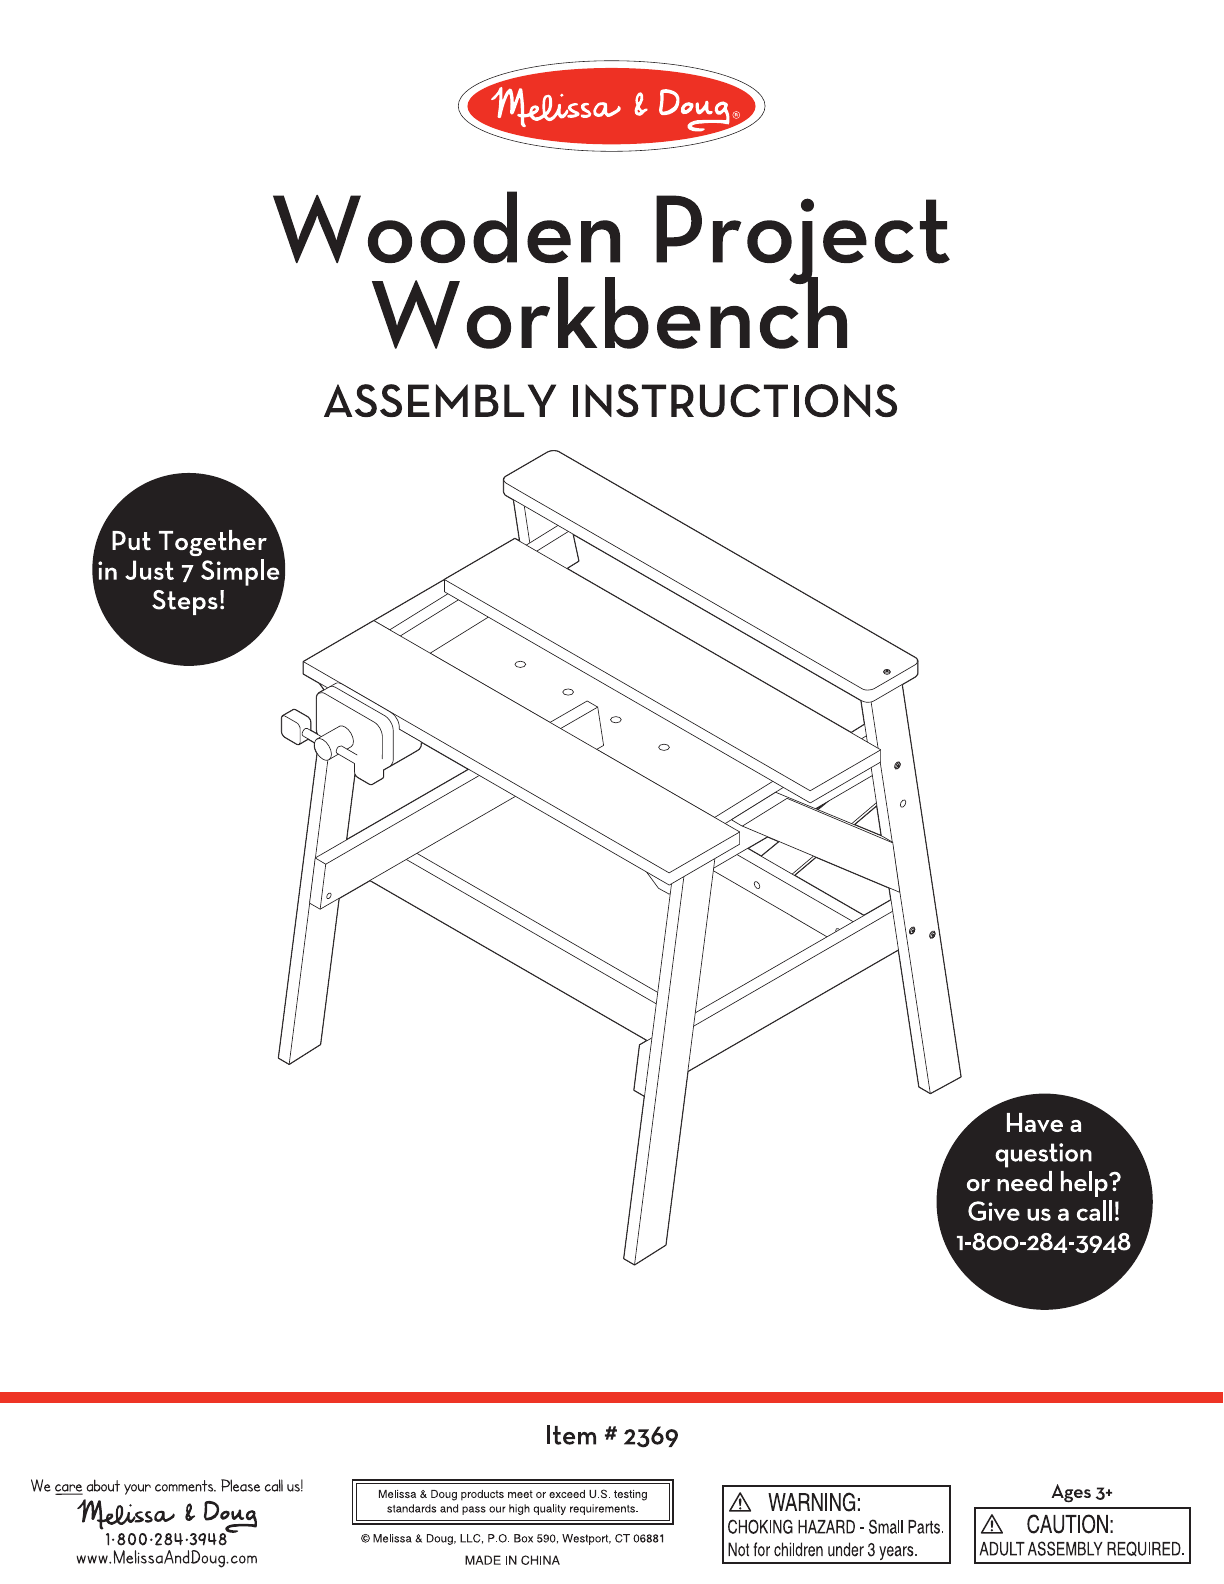
Wooden
Pro·
ect
We
Workbenc
ASSEMBL
V INSTRUCTIONS
Item#
2369
~
about
your
comments.
Please
call
us!
~sa.-tDo~
1·
800·284
·3q48
www
.
MelissoAndDoug.com
Melissa
&
Doug
products meet or
exceed
U.S.
testing
standards
and
pass
our
high
quality requirements.
© Melissa &
Doug
,
LLC,
P.O
.
Box
590,
Westport, CT
06881
MADE IN CHINA
&
WARNING
:
CHOKING
HAZARD
•
Small
Parts
.
Not
for
children
under
3
years.
Ages3+
&
CAUTION:
ADULT
ASSEMBLY
REQUIRED
.
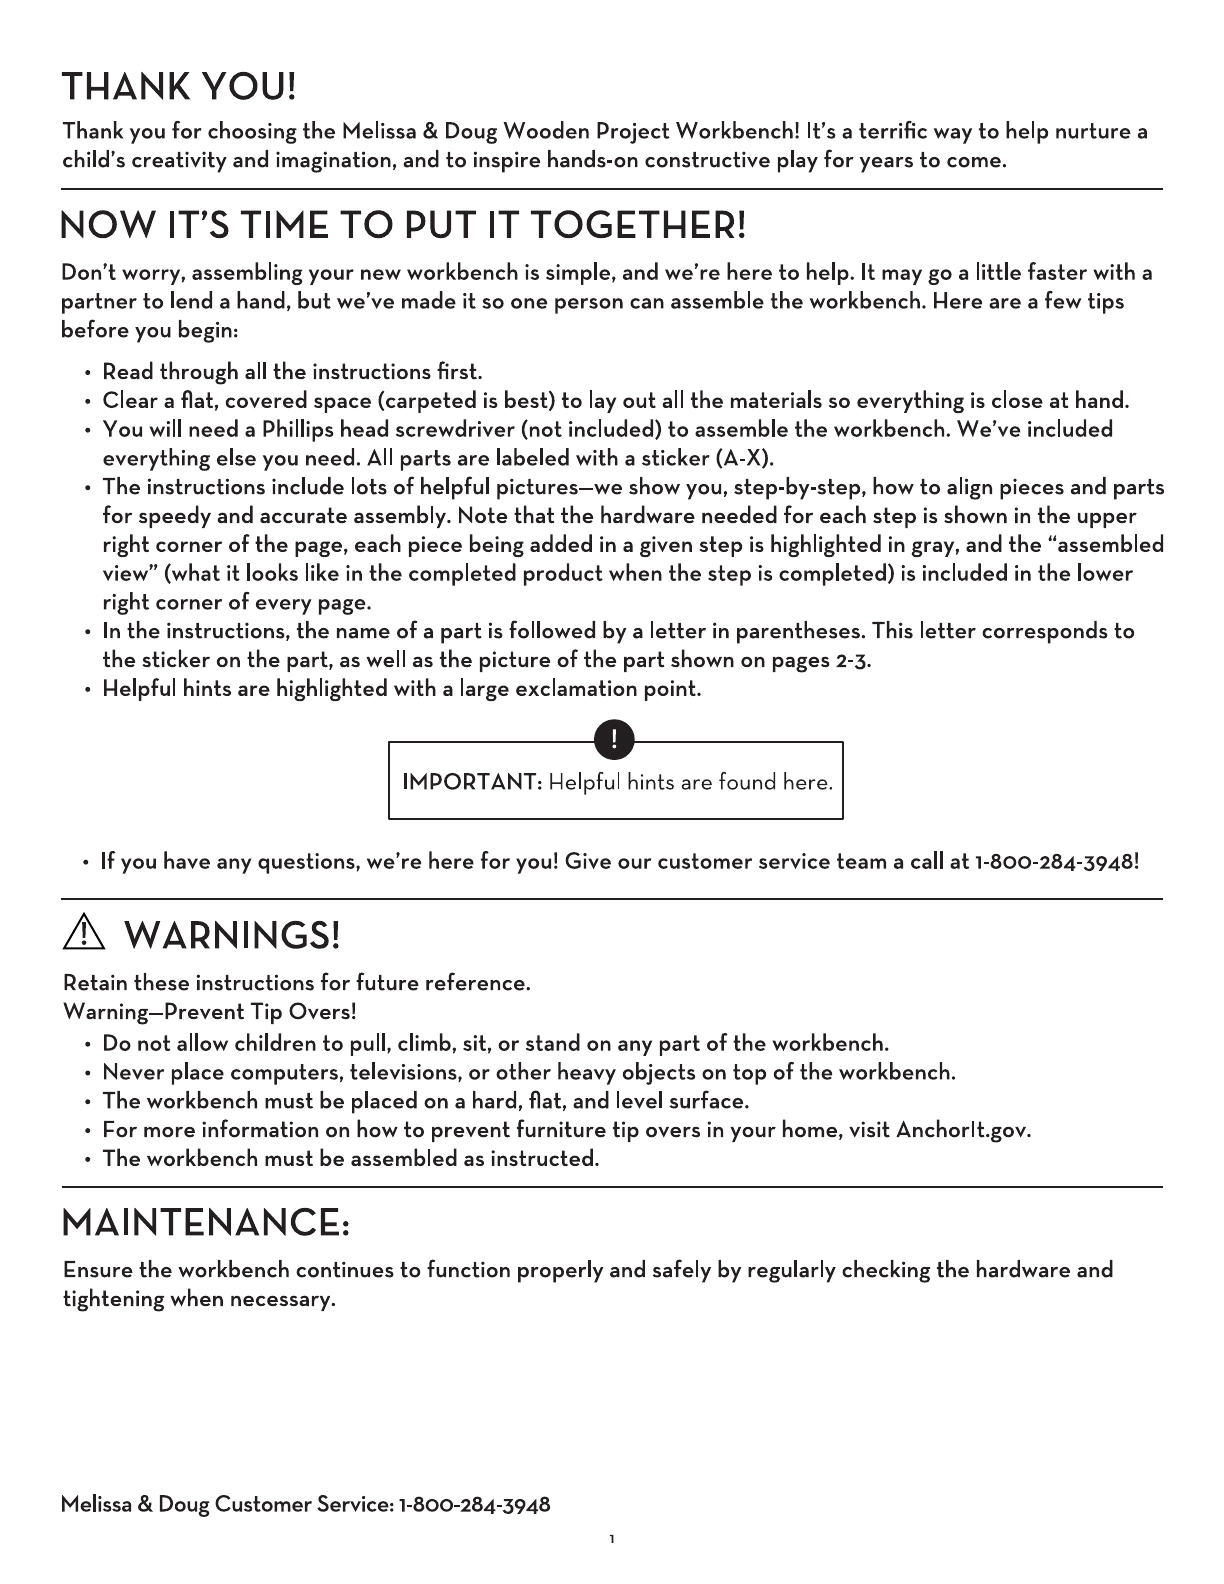
T~ANK
YOU!
Thank you for choosing
the
Melissa & Doug
Wooden
Project
Workbench! It's a terrific way
to
help
nurture
a
child's creativity
and
imagination,
and
to
inspire hands-on
constructive
play for
years
to
come.
NOW
IT'S
Tl
Mt
TO
PUT IT
TOGtT~tR!
Don't worry, assembling your new
workbench
is
simple,
and
we're
here
to
help. It may go a little
faster
with a
partner
to
lend a hand,
but
we've
made
it
so
one
person
can
assemble
the
workbench. 1-lere
are
a few
tips
before
you begin:
• Read
through
all
the
instructions first.
•
Clear
a flat,
covered
space
{carpeted
is
best)
to
lay
out
all
the
materials
so
everything
is
close
at
hand.
• You
will
need
a Phillips
head
screwdriver
{not included)
to
assemble
the
workbench.
We've
included
everything
else
you
need.
All
parts
are
labeled with a
sticker
{A-X).
•
The
instructions include lots
of
helpful
pictures-we
show you,
step-by-step,
how
to
align
pieces
and
parts
for
speedy
and
accurate
assembly.
Note
that
the
hardware
needed
for
each
step
is
shown
in
the
upper
right
corner
of
the
page,
each
piece
being
added
in
a given
step
is
highlighted
in
gray,
and
the
"assembled
view" {what it looks like
in
the
completed
product
when
the
step
is
completed)
is
included
in
the
lower
right
corner
of
every
page.
•
In
the
instructions,
the
name
of
a
part
is
followed by a
letter
in
parentheses.
This
letter
corresponds
to
the
sticker
on
the
part,
as
well
as
the
picture
of
the
part
shown
on
pages
2-3.
• 1-lelpful hints
are
highlighted with a large exclamation point.
IMPORT
ANT:
1-lelpful
hints
are
found here.
•
If
you have any questions,
we're
here
for you! Give
our
customer
service
team
a call
at
1-800-284-3948!
& WARNINGS!
Retain
these
instructions for
future
reference.
Warning-Prevent
Tip Overs!
• Do
not
allow children
to
pull, climb, sit,
or
stand
on
any
part
of
the
workbench.
•
Never
place
computers,
televisions,
or
other
heavy
objects
on
top
of
the
workbench.
•
The
workbench
must
be
placed
on
a hard, flat,
and
level
surface.
• For
more
information
on
how
to
prevent
furniture
tip
overs
in
your home, visit Anchorlt.gov.
•
The
workbench
must
be
assembled
as
instructed.
MAINTtNANCt:
Ensure
the
workbench
continues
to
function
properly
and
safely by regularly checking
the
hardware
and
tightening
when
necessary.
Melissa & Doug
Customer
Service: 1-800-284-3948

PARTS -
Be
Smart-Sort
Your Parts
Before you begin assembly, make sure you have
all
the
parts listed below. Use
the
Allen wrench (part
X)
to
attach
bolts and a Phillips head screwdriver (not included)
to
attach the screws and align
the
barrel nuts.
0
left
tray rail
G)
right tray rail e
front
tray rail
0 0
G)
rear tray rail
G lower tray panel G
front
legs (2)
G,
left
rear leg O right rear leg 0
upper
side rails (2)
~
o/
f)
left
side brace
/a
0~
0 right side brace
I I
@ 0 0 0 0 @
I
@ 0 0 0 0 . I
C,
middle and rear
top
planks (2)
I
@ 0 0 0 0
@ @ . I
-,
front
top
plank
I 0 = 0 0
<=>
0 tool
holder
0
6)
left
rear brace
0
G right rear brace e vise
2
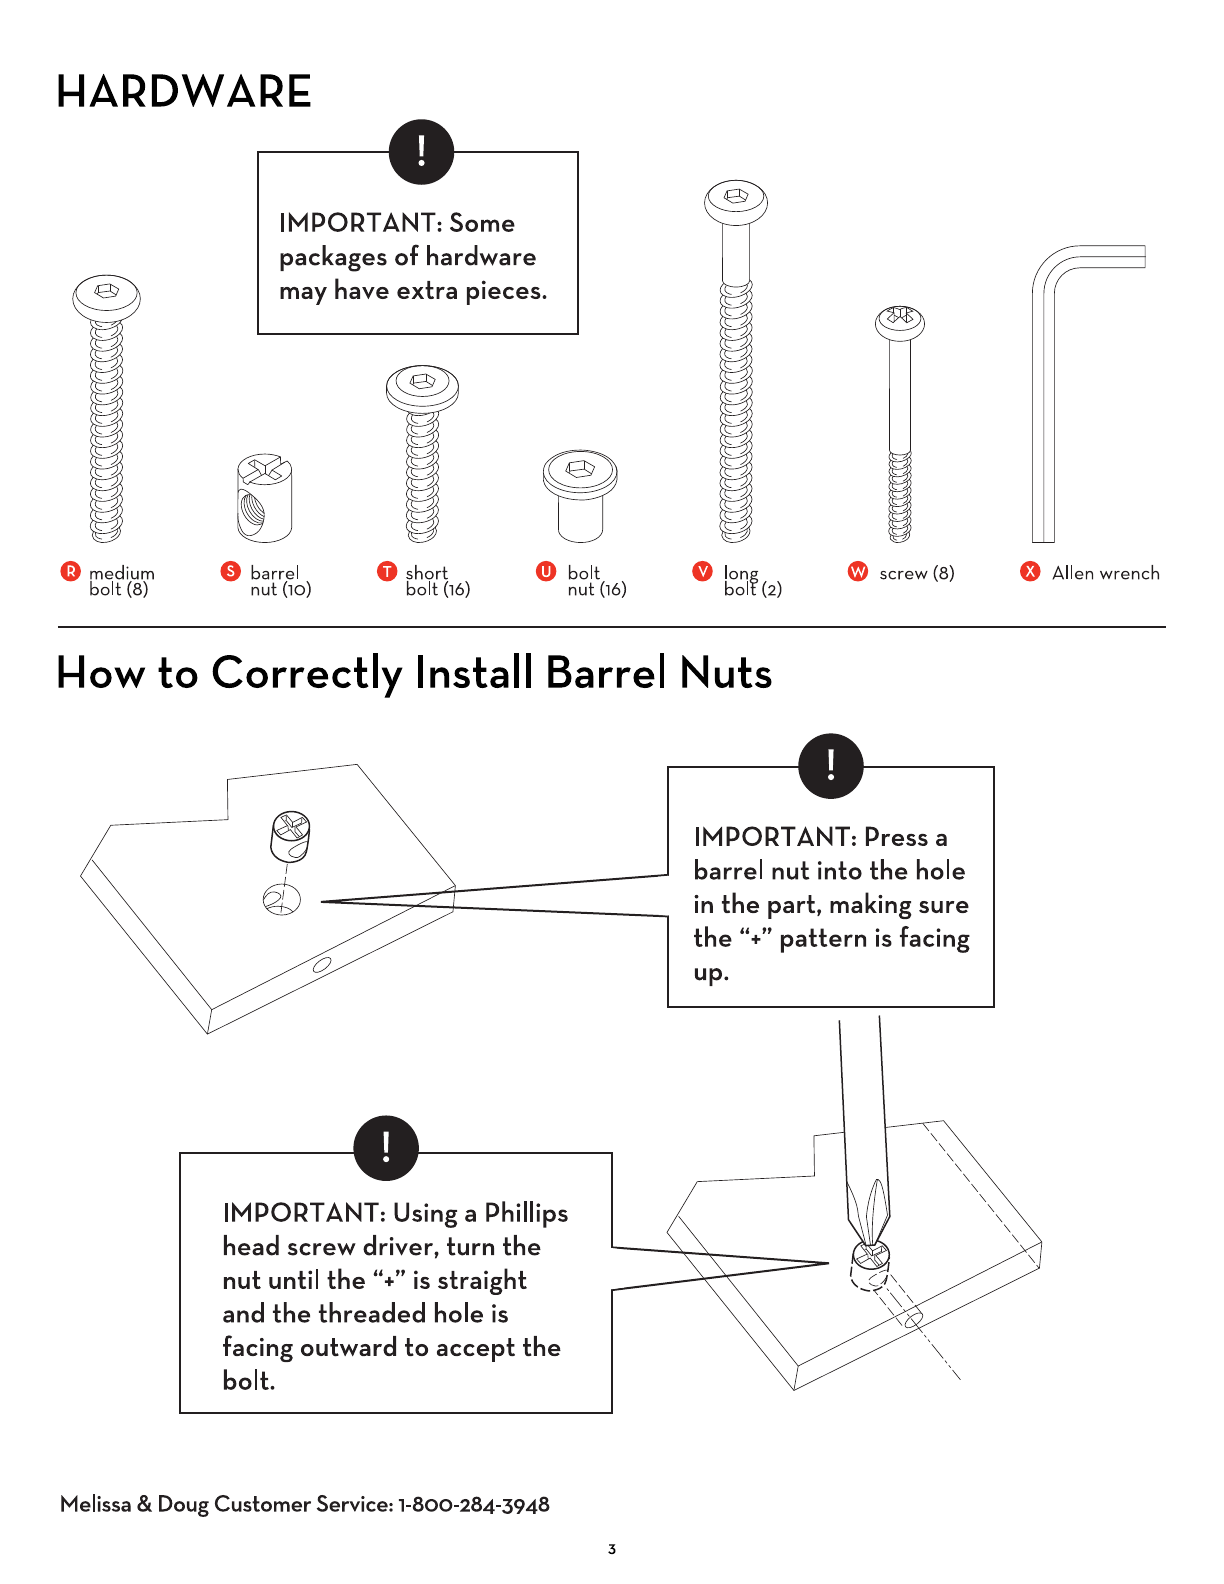
I-IARDW
ARI;:
IMPORTANT:
Some
packages
of
hardware
may have
extra
pieces.
G medium
bolt
(8)
lJ
9 barrel
nut (10) 0 short
bolt
(16)
~
C!)
bolt
nut
(16)
G
lonf
bol (2) G screw (8) 0 Allen wrench
I-low to Correctly Install Barrel Nuts
IMPORT
ANT:
Press
a
barrel
nut
into
the
hole
in
the
part, making
sure
the
"+"
pattern
is
facing
up.
'\
'\
'\
'\
'\
'\
'\
'\
'\
'\
'\
IMPORT
ANT:
Using a Phillips
head
screw
driver,
turn
the
nut
until
the"+"
is
straight
and
the
threaded
hole
is
facing
outward
to
accept
the
bolt.
Melissa &
Doug
Customer
Service:
1-800-284-3948
3
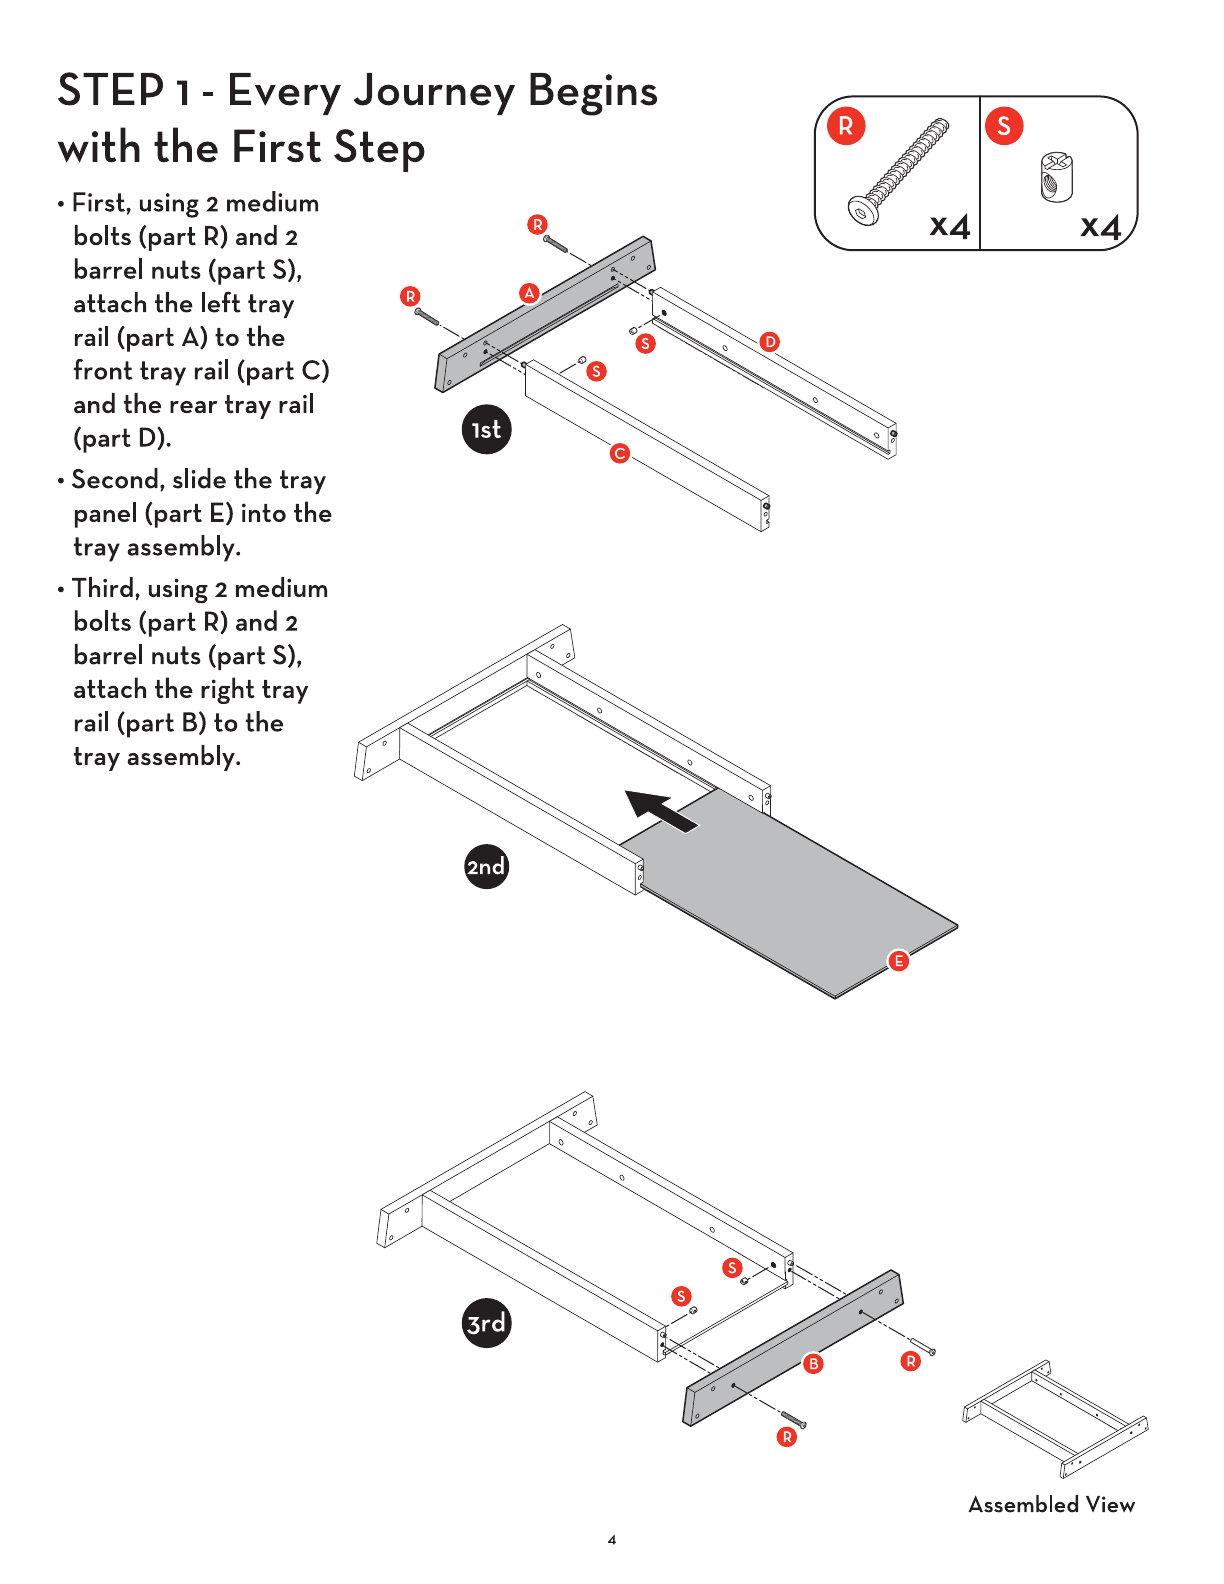
STEP 1 - Every Journey Begins
with
the
~irst
Step
• J:irst, using 2 medium
bolts
(part
R)
and
2
barrel
nuts
(part
S),
attach
the
left
tray
rail
(part
A)
to
the
front
tray
rail
(part
C)
and
the
rear
tray
rail
(part
D).
•
Second,
slide
the
tray
panel
(part
E)
into
the
tray
assembly.
• Third, using 2 medium
bolts
(part
R)
and
2
barrel
nuts
(part
S),
attach
the
right
tray
rail
(part
B)
to
the
tray
assembly.
•
Assembled View
4

S1£P 2 -
Ge\:
a Leg
Up
Using 8 short bolts {part
i)
and 8
bolt
nuts {part
U),
attach
the
front
legs {part
F)
and
the
rear left and
right legs {parts G &
1-1)
to
the
tray
assemb\y.
•
✓
· ~
x8 x8
(9
(9
~ -~ --
-----
-
-----
--------
(9
0-
---
9
----
--
------
------
--
-----
qp
q§/
(9
(
0
(9
A.ssemb\ed
View
Melissa
&
Doug
Customer
5e,vice,
,.soo-284·39All
5
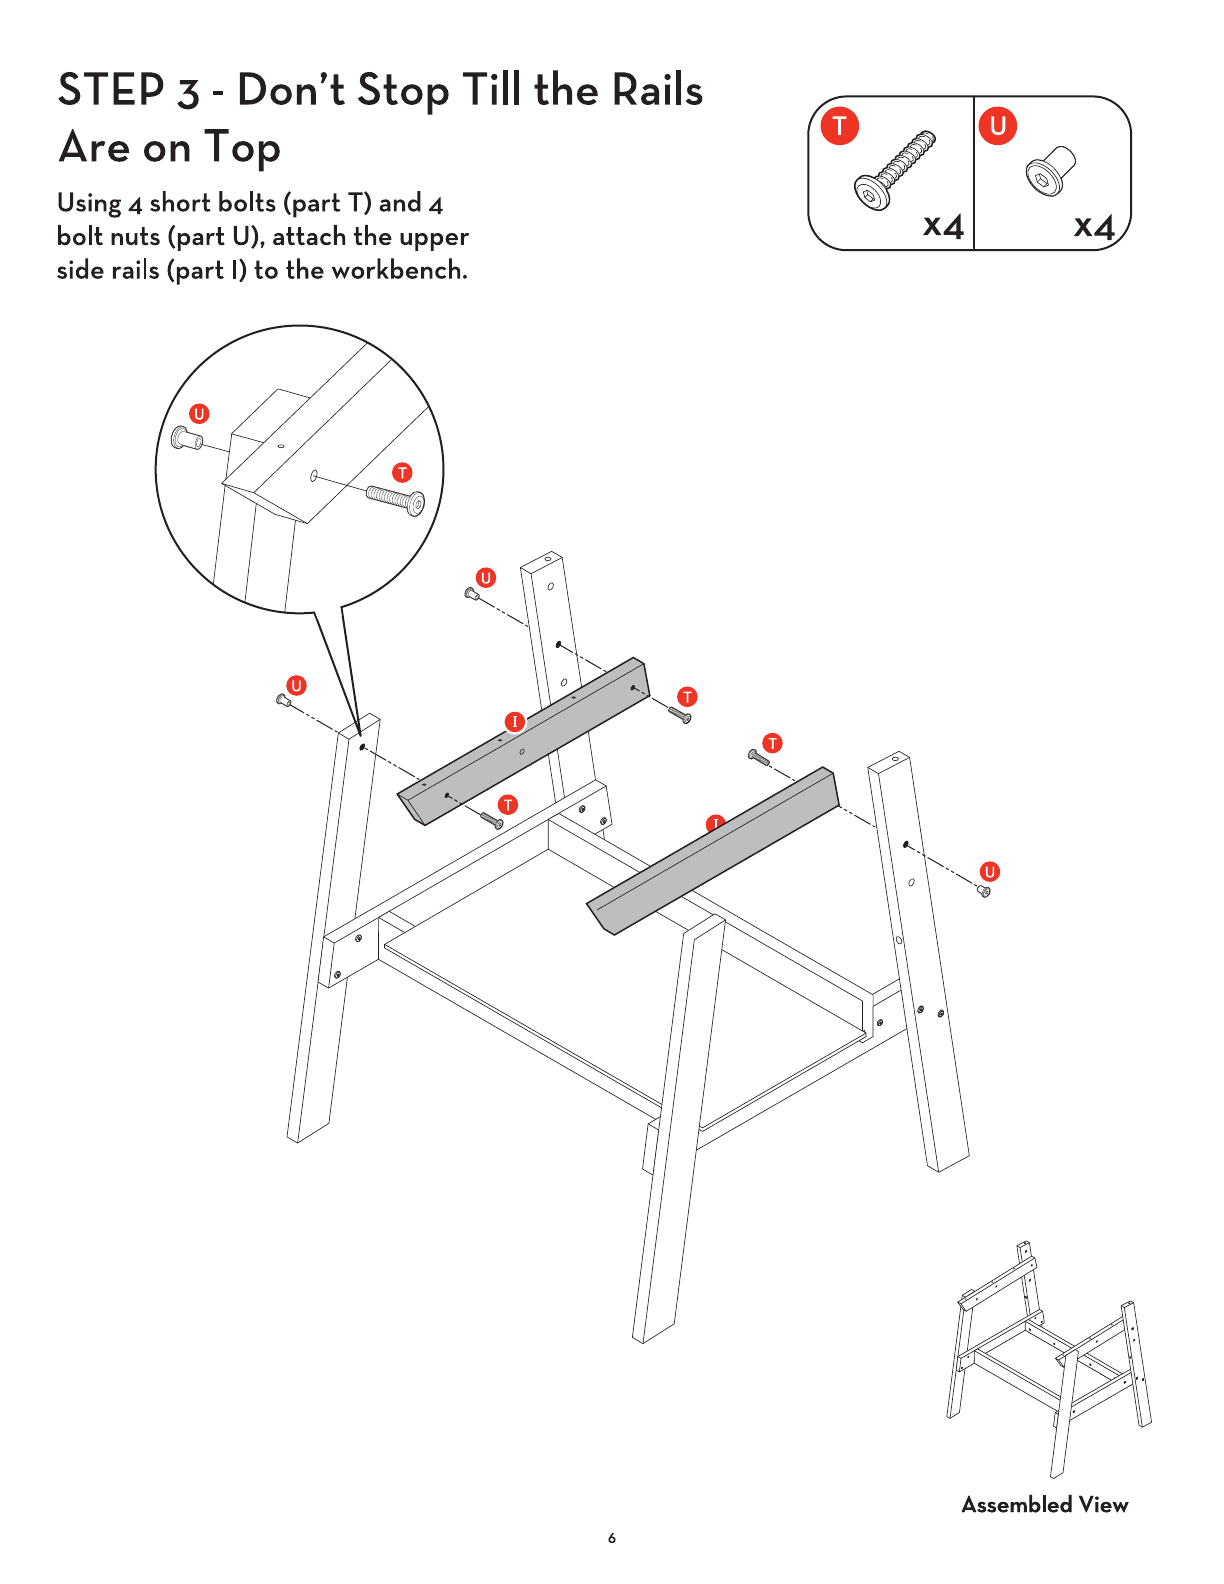
STtP
3 - Don't
Stop
Ti\\
the
Rai\s
Are
on
Top
Using 4
short
bolts
lpart
T)
and 4
bolt
outs
lpart
U),
attach
the
upper
side rails
lpart
I)
to
the
workbench-
0 ·~
xA xA
~
---
Assemb\ed
View
6

STEP
4 -
Brace
Yourself
• l=irst, using 1
short
bolt
(part
T)
and
1 bolt
nut
(part
U},
attach
the
top
of
the
left
side
brace
(part
J)
to
the
left
side
rail. Then, using 1 barrel
nut
(part
S) and 1 long bolt
(part
V},
attach
the
bottom
of
the
left
side
brace
to
the
workbench.
• Second, using 1
short
bolt
(part
T)
and
1 bolt
nut
(part
U},
attach
the
top
of
the
right
side
brace
(part
K)
to
the
right
side
rail. Then, using 1 barrel
nut
(part
S) and 1 long bolt
(part
V},
attach
the
bottom
of
the
right
side
brace
to
the
workbench.
G
~
x2
x2
•
~
G
x2
~
x2
e
Assembled
View
Melissa & Doug
Customer
Service: 1-800-284-3948
7
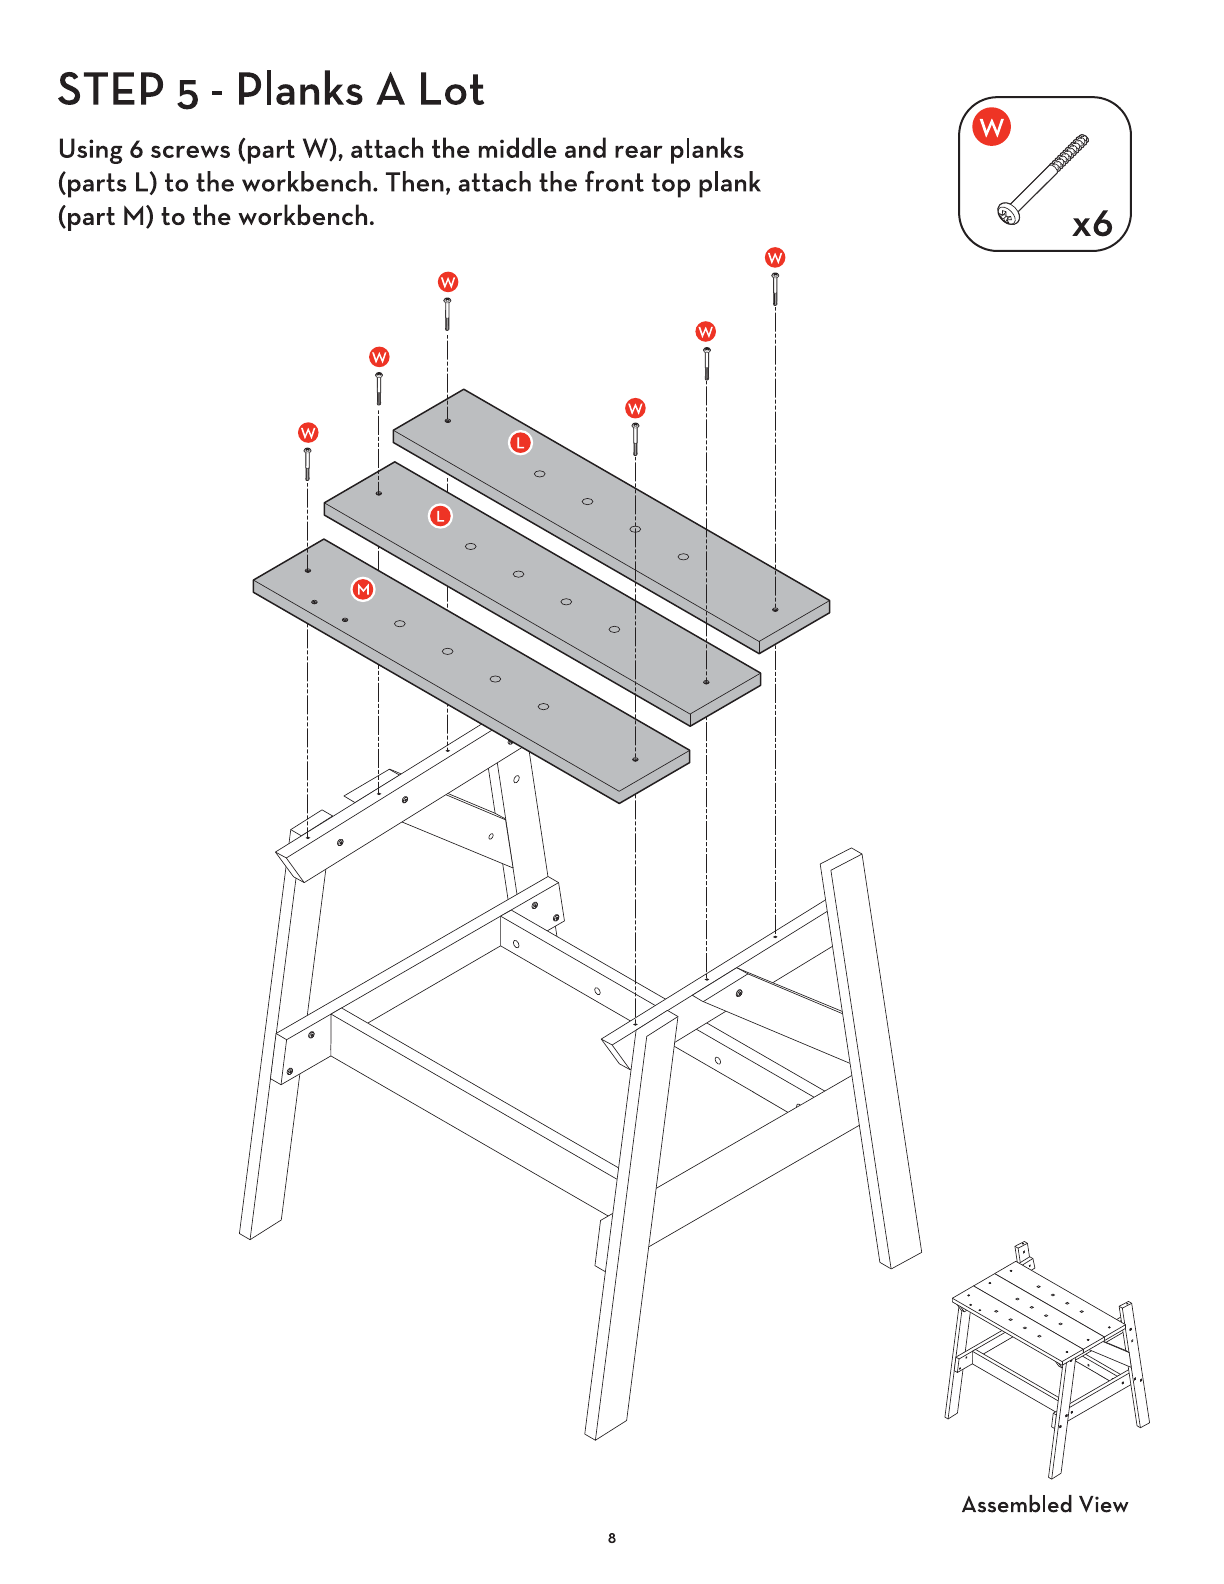
STEP
s -
Planks
A
Lot
Using 6
screws
(part
W),
attach
the
middle
and
rear
planks
(parts
L)
to
the
workbench. Then,
attach
the
front
top
plank
(part
M)
to
the
workbench.
Assembled View
8
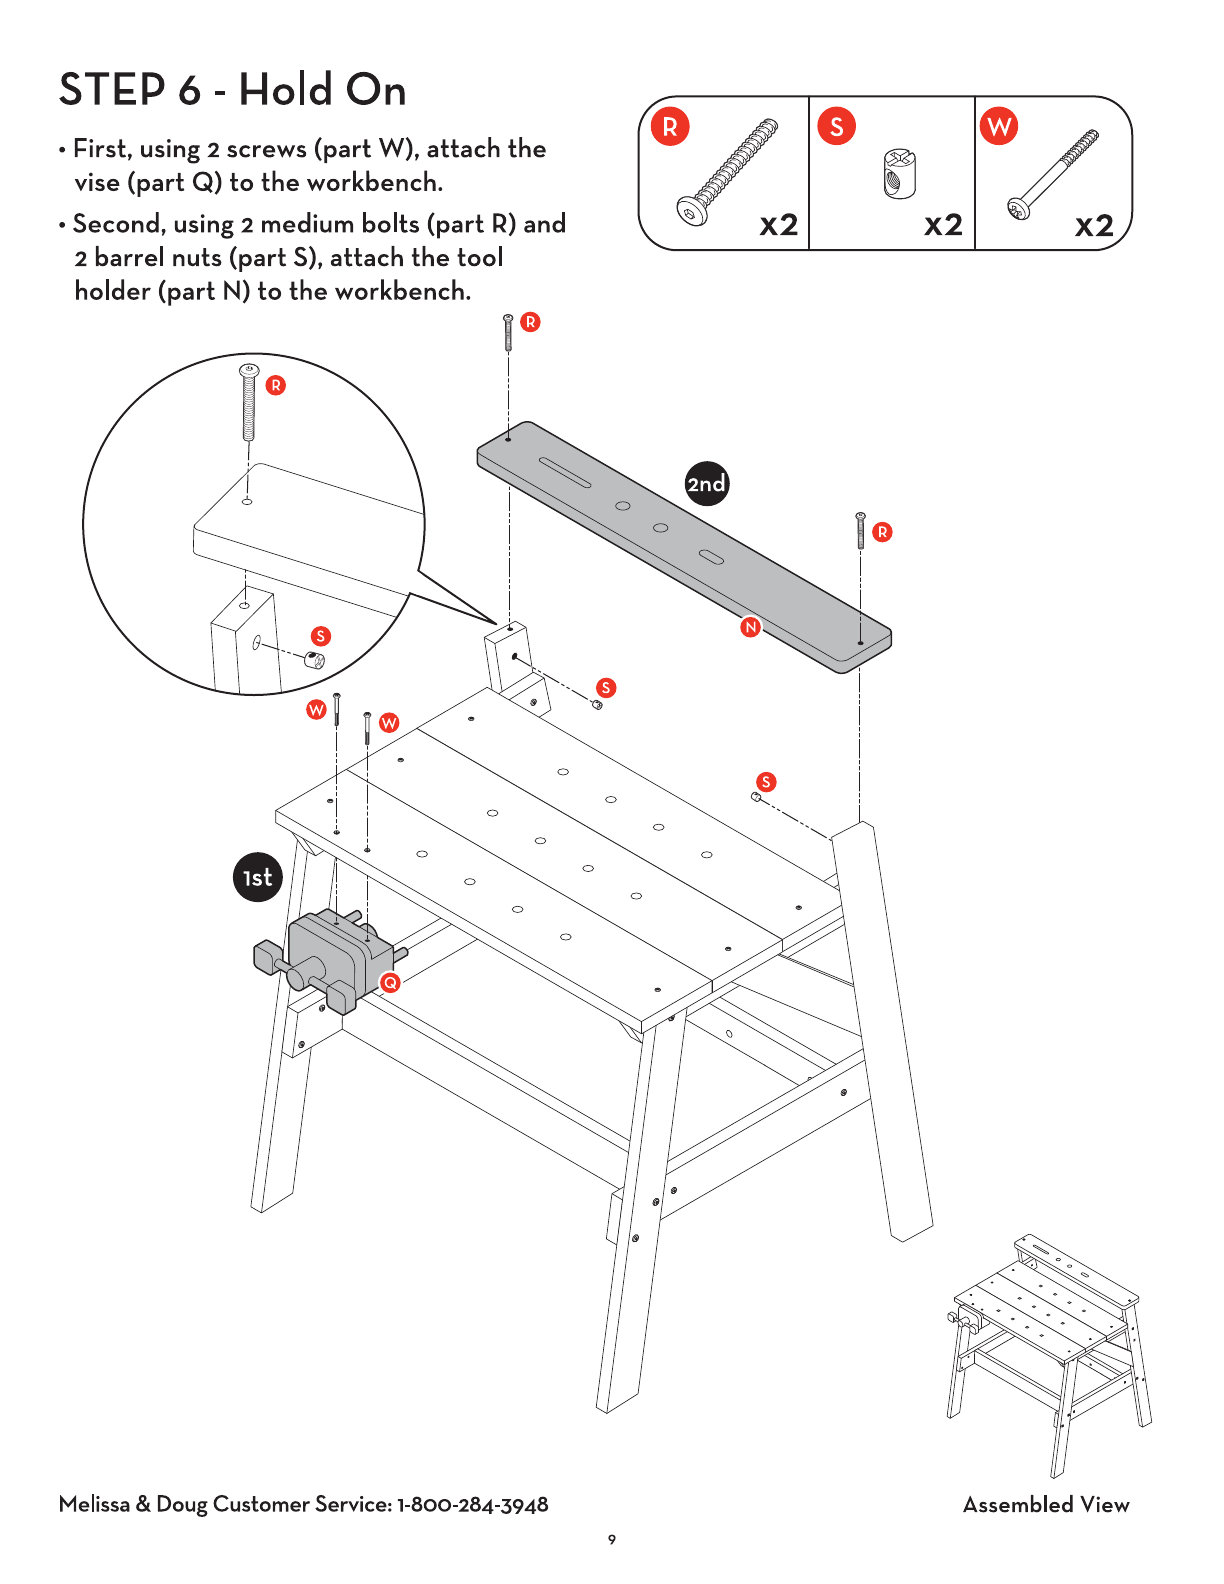
STEP
6 -
l-lold
On
• J:irst, using 2
screws
(part
W),
attach
the
vise
(part
Q)
to
the
workbench.
•
Second,
using 2 medium bolts
(part
R)
and
2
barrel
nuts
(part
S),
attach
the
tool
holder
(part
N)
to
the
workbench.
e
x2 x2
0
0
0
0
0
0
0
0
,
--
.........
_
0 '
.........
.
0
0
Assembled
View
Melissa & Doug
Customer
Service: 1-800-284-3948
9

STEP 7 - What ~un-You're Done
• l=irst, using 1 medium
bolt
(part
R)
and
1 barrel
nut
(part
S),
attach
the
top
of
the
right
rear
brace
(part
P)
to
the
workbench. Then, using 1
short
bolt
(part
T)
and
1
bolt
nut
(part
U),
attach
the
bottom
of
the
rear
brace
to
the
workbench.
•
Second,
using 1 medium
bolt
(part
R)
and
1 barrel
nut
(part
S),
attach
the
top
of
the
left
rear
brace
(part
0)
to
the
workbench. Then, using 1
short
bolt
(part
T)
and
1
bolt
nut
(part
U),
attach
the
bottom
of
the
rear
brace
to
the
workbench.
G
rJ
x2
x2
•
G
t?)
~
x2 x2
--
~
--------
~ G
Assembled View
10
YOU
DID IT!
Now
the
real fun
begins-it's
time
to
get
building! l-lere
are
some
of
the
special
features
of
the
Wooden
Project
Workbench:
•
WOODEN
TOOLS:
These
handy
wooden
tools
are
kid-friendly,
but
built
to
get
the
job
done! Twist,
tighten, bang,
and
pound
with
the
lightweight, easy-to-grip screwdriver, hammer,
and
wrench.
Practice
making
straight
and
angled
cuts
in
the
sawing
board
with
the
wooden
toy
saw.
• WORKING
WOODEN
VISE: Turn
the
working vise
attached
to
the
workbench
to
hold
pieces
firmly
in
place.
• 55
WOODEN
CONSTRUCTION PIECES:
Connect
different-sized blocks
and
boards
with plenty
of
screws, nuts, bolts, wood nails,
and
washer.
The
colored
pieces, pre-drilled with holes,
are
easy
for small
hands
to
maneuver
and
manipulate.
All
the
pieces
and
hardware
are
reusable
for building
and
re-building
countless
creations.
•
TOOL
I-IOLDER: A place for everything
and
everything
in
its place! Keep your work
area
neat
and
organized.
There
are
holes
to
conveniently
store
the
wrench, screwdriver, hammer,
and
saw.
• BOTTOM STORAGE TRA V: Keep
wooden
pieces
out
of
the
way,
but
close
at
hand. It's also
is
the
perfect
place
to
keep
the
project
booklet
for
easy
reference
and
completed
projects
to
play with later!
• LARGE WORKSPACE: With
tools
and
pieces
stored
out
of
the
way,
there's
plenty
of
room for truly
constructive
play!
• PROJECT BOOKLET:
The
illustrated
book
guides young builders
through
six
easy
but
impressive
projects
they
can
make again
and
again!
Projects
include a helicopter,
race
car,
dune
buggy, motorcycle,
airplane,
and
a
robot.
The
fun
and
simple
creations
are
sure
to
build
confidence
and
spark
imaginations,
inspiring
countless
unique inventions! Then,
of
course,
encourage
young builders
to
devise
their
own
unique
contraptions,
structures,
or
inventions with
the
pieces!
ACCESSORIZE
The
Melissa & Doug
Construction
Set
in
a Box
(#5151)
and
the
Deluxe Tool Belt
Set
(#5174)
are
designed
to
play
perfectly
with your
Wooden
Project
Workbench! Add
even
more
tools, pieces,
and
constructive
project
options
with
the
Construction
Set
in
a Box
that
includes
48
wooden
pieces
(including nuts, bolts,
drilled
bars
to
connect,
and
a child-size screwdriver). Keep
all
your
tools
handy with
the
14-piece Deluxe
Tool Belt
Set
that
can
also
be
personalized! To find
these
items
and
more, visit us
at
MelissaAndDoug.com!
Popular Tools Storage manuals by other brands


Menards
Menards MASTERFORCE 245-1932 Operator's manual

Weinmann
Weinmann ULM CASE Circulation Instructions for use

Sealey
Sealey AP26479TBRG instructions

Sears
Sears 706.650770 owner's manual

Wolfcraft
Wolfcraft MASTER 200 Original operating instructions

Rutland County Garden Furniture
Rutland County Garden Furniture Rutland workbench with back board Assembly instructions

drew & jonathan
drew & jonathan Scott Living Keoki SL63WBKK-2 manual

Clarke
Clarke CWB300LS Assembly instructions

Seville Classics
Seville Classics UltraHD 20296 Assembly instructions

Clas Ohlson
Clas Ohlson YH-6036 Assembly instructions

Husky
Husky H5TR2LEC Use and care guide

Clarke
Clarke CERT1225 Assembly instructions