MEMUP MediaGate LNX HD User manual
User GuideUser Guide
User Guide
Mediagate LNX HDMediagate LNX HD
USER GUIDE
SAFETY AND OTHER INSTRUCTIONS 1
PRODUCT VIEW 2
REMOTE CONTROL 3
CONNECTION 4
INTERFACE 6
BROWSE MEDIA 7
USB DEVICE 7
NETWORK 8
UPNP 8
SETUP 9
TRANSCODE SERVER 14
FILE EDIT MENU 17
FILE MANAGER (COPY/PASTE) 17
PLAYLIST 18
SPECIFICATIONS 19
TROUBLESHOOTING 20
- 1 -
Mediagate LNX HD is a Home Media Center, can play High Definition media files (movies, audios and
photos) through TV and when connected to PC, can also copy and play shared files via network.
SAFETY AND OTHER INSTRUCTIONS
Please use MEDIAGATE LNX HD carefully and read following instructions.
>>> Copyright
Software, audio, video or any intellectual
properties are protected by copyright and
international laws.
It is user’s responsibility when reproducing or
distributing content(s).
>>> Codec Check
This product may not support some media formats.
Please check available codec types.
>>> Data Backup
Please backup datas stored in this product in a
safe place. We are not responsible for any data
loss or damage.
>>> Drop / Shock
Do not give shock or drop the MEDIAGATE LNX
HD. This may damage it.
>>> Foreign Substance
Do not insert any metal or inflammable foreign
substances into player. This may damage it.
>>> Disassembly / Modification
Do not attempt to disassemble or modify any part
of MEDIAGATE LNX HD. This may damage it.
Any product modification may void the warranty.
>>> Load
Do not place any heavy object on the top of the
MEDIAGATE LNX HD. This may damage it.
>>> Chemicals
Do not clean product using chemicals cleaners.
This may damage the MEDIAGATE LNX HD.
>>> Water / Moisture
Do not contact the MEDIAGATE LNX HD with
water or liquid.
This may cause fire or electric shock. If any
conductive liquid enters, turn off the MEDIAGATE
LNX HD and disconnect power adapter
immediately.
>>> Magnet or Magnetic Properties
Do not place the MEDIAGATE LNX HD near a
magnetic field. This may cause a malfunction or
damage stored data.
>>> Heat
Do not place the MEDIAGATE LNX HD under
direct sunlight or near a heat source. Do not keep
it for long time in high temperature. This may
damage it.
>>> Vision / Hearing
Do not watch TV or hear loud sound for long time.
This may cause vision or hearing problem.
>>> Fire
During MEDIAGATE LNX HD use, if you detect
smoke or unusual smell, turn off product,
disconnect adapter immediately, and call the
aftersales department if required.
>>> Power
Do not use many electronic products with single
outlet.
Firmly insert power plug. When working, do not
unplug.
>>> Formats
The MEDIAGATE LNX HD playback depends on
codecs used. Some files are incompatible. Check
updates on www.memup.com
- 2 -
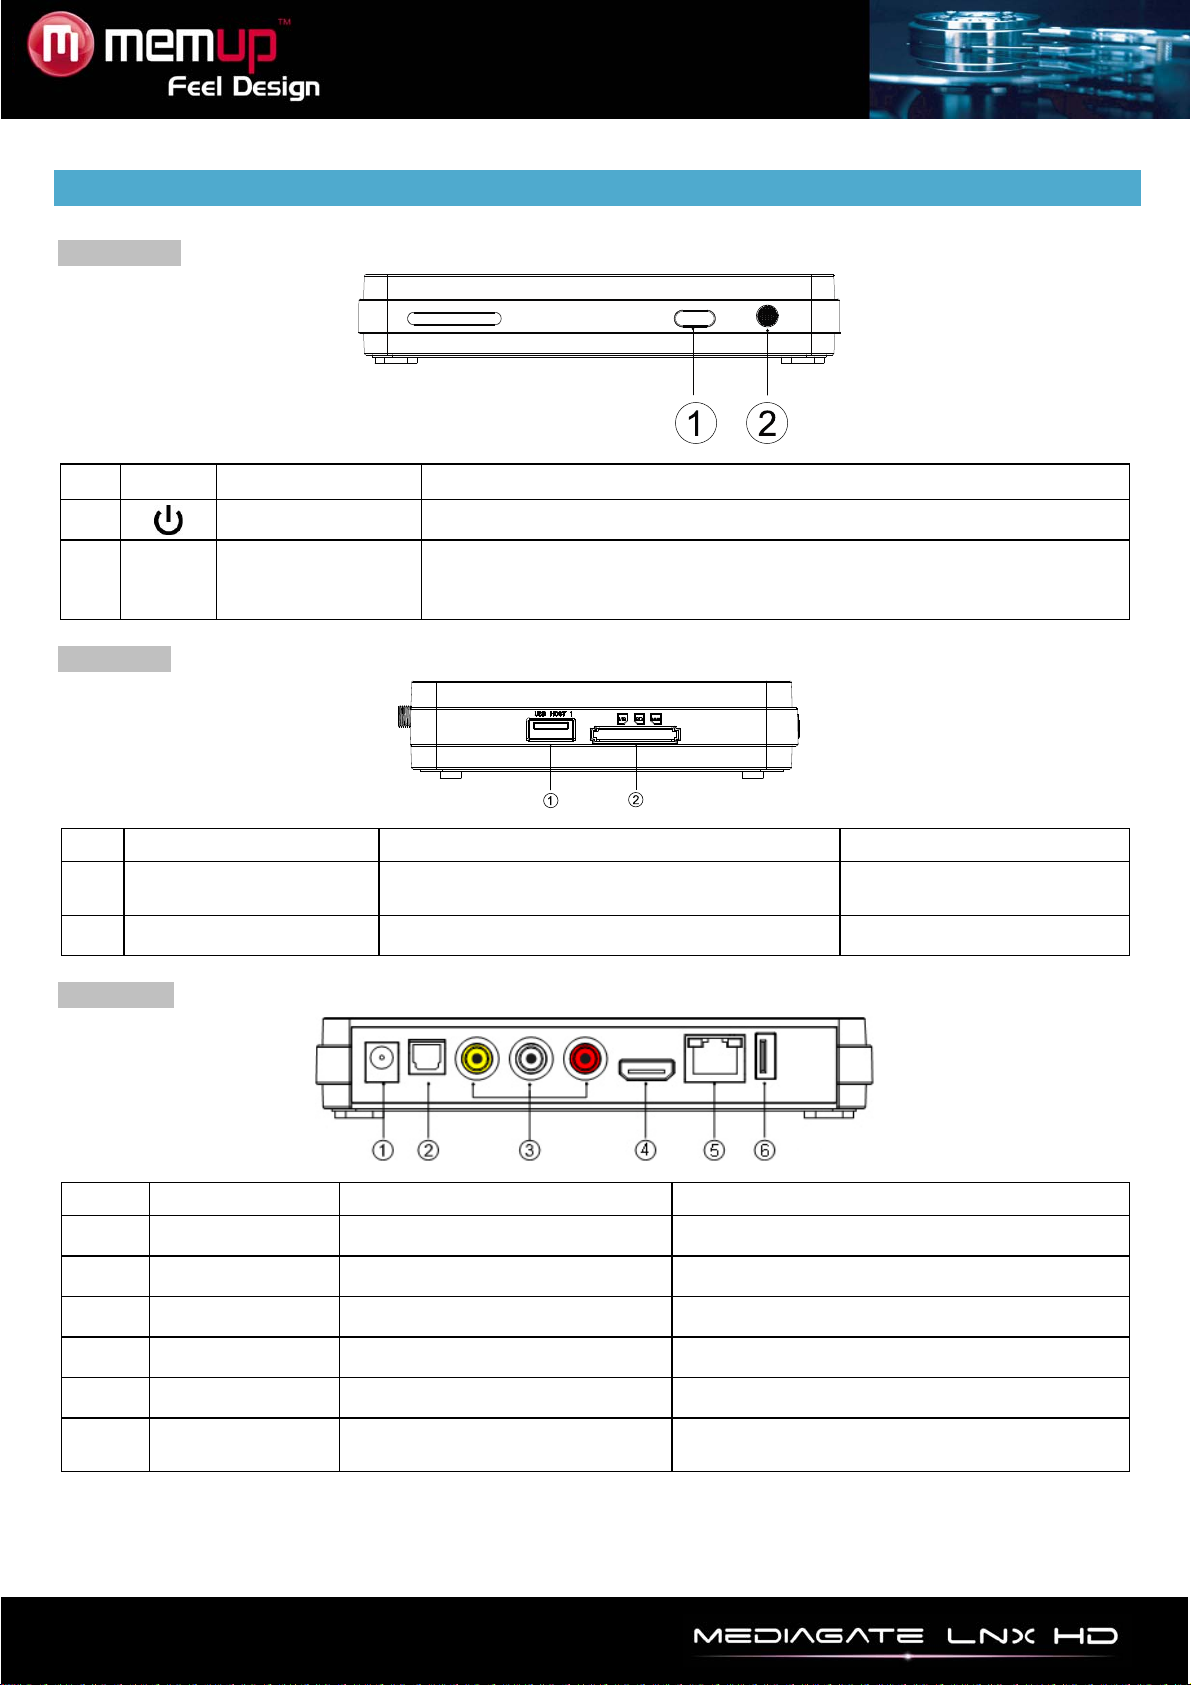
PRODUCT VIEW
Front panel
Button Definition Instruction
1 Power on/off A short press on the button turns on or turns off power
2 IR Infrared receiver
Receives signals from the remote control. Point the tip of the
remote control to the infrared receiver and ensure that the path
between the two is unobstructed.
Side panel
Port Definition Instruction
1 USB HOST Support multiple external USB storage
devices USB HOST
2 3-in-1 card reader Support MS, SD HC, MMC 3-in-1 card reader
Rear panel
Port Definition Instruction
1 DC IN Power port Can input power
2 Optical Audio output port Can output digital audio signal
3 AV Composite video output port Can output composite video and audio
4 HDMI High definition port Can output digital signal via HDMI port
5 LAN Network port Can connect to network via internet port
6 USB HOST Outside USB port Can read outside USB storage via USB
port
- 3 -
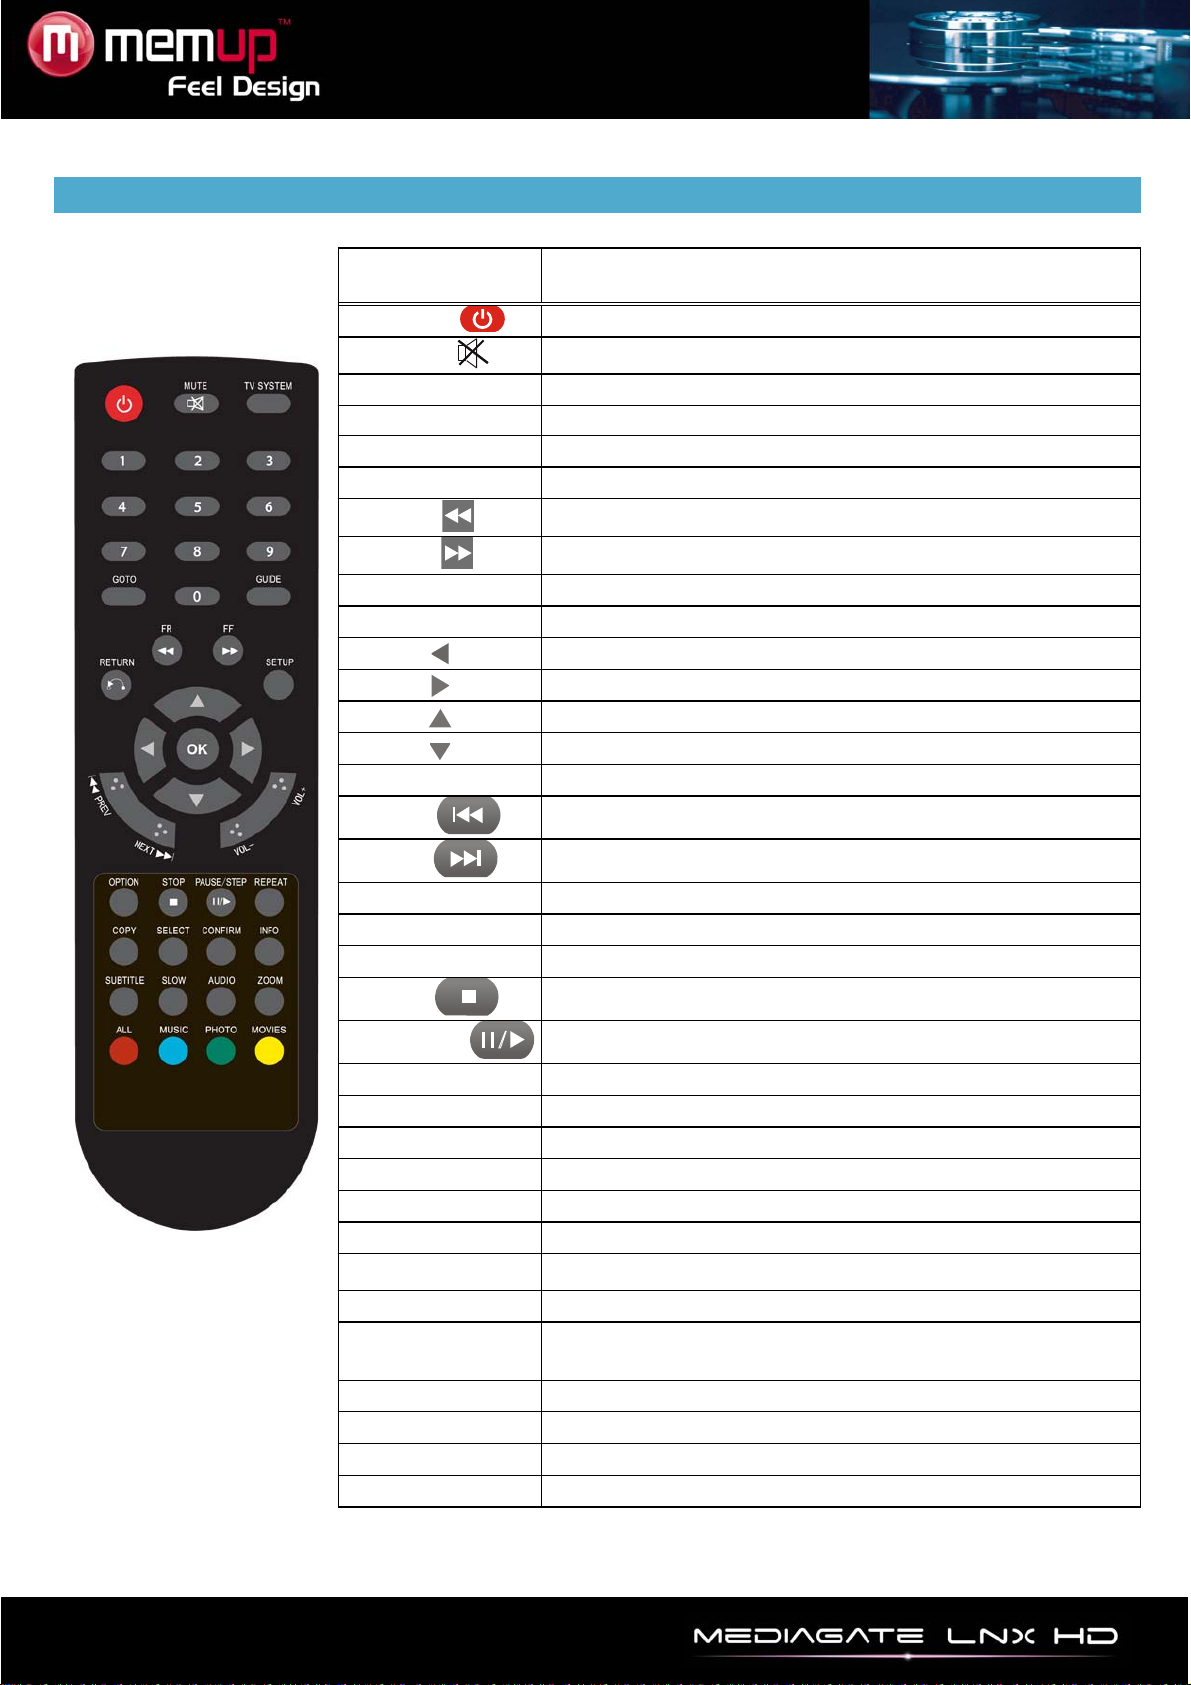
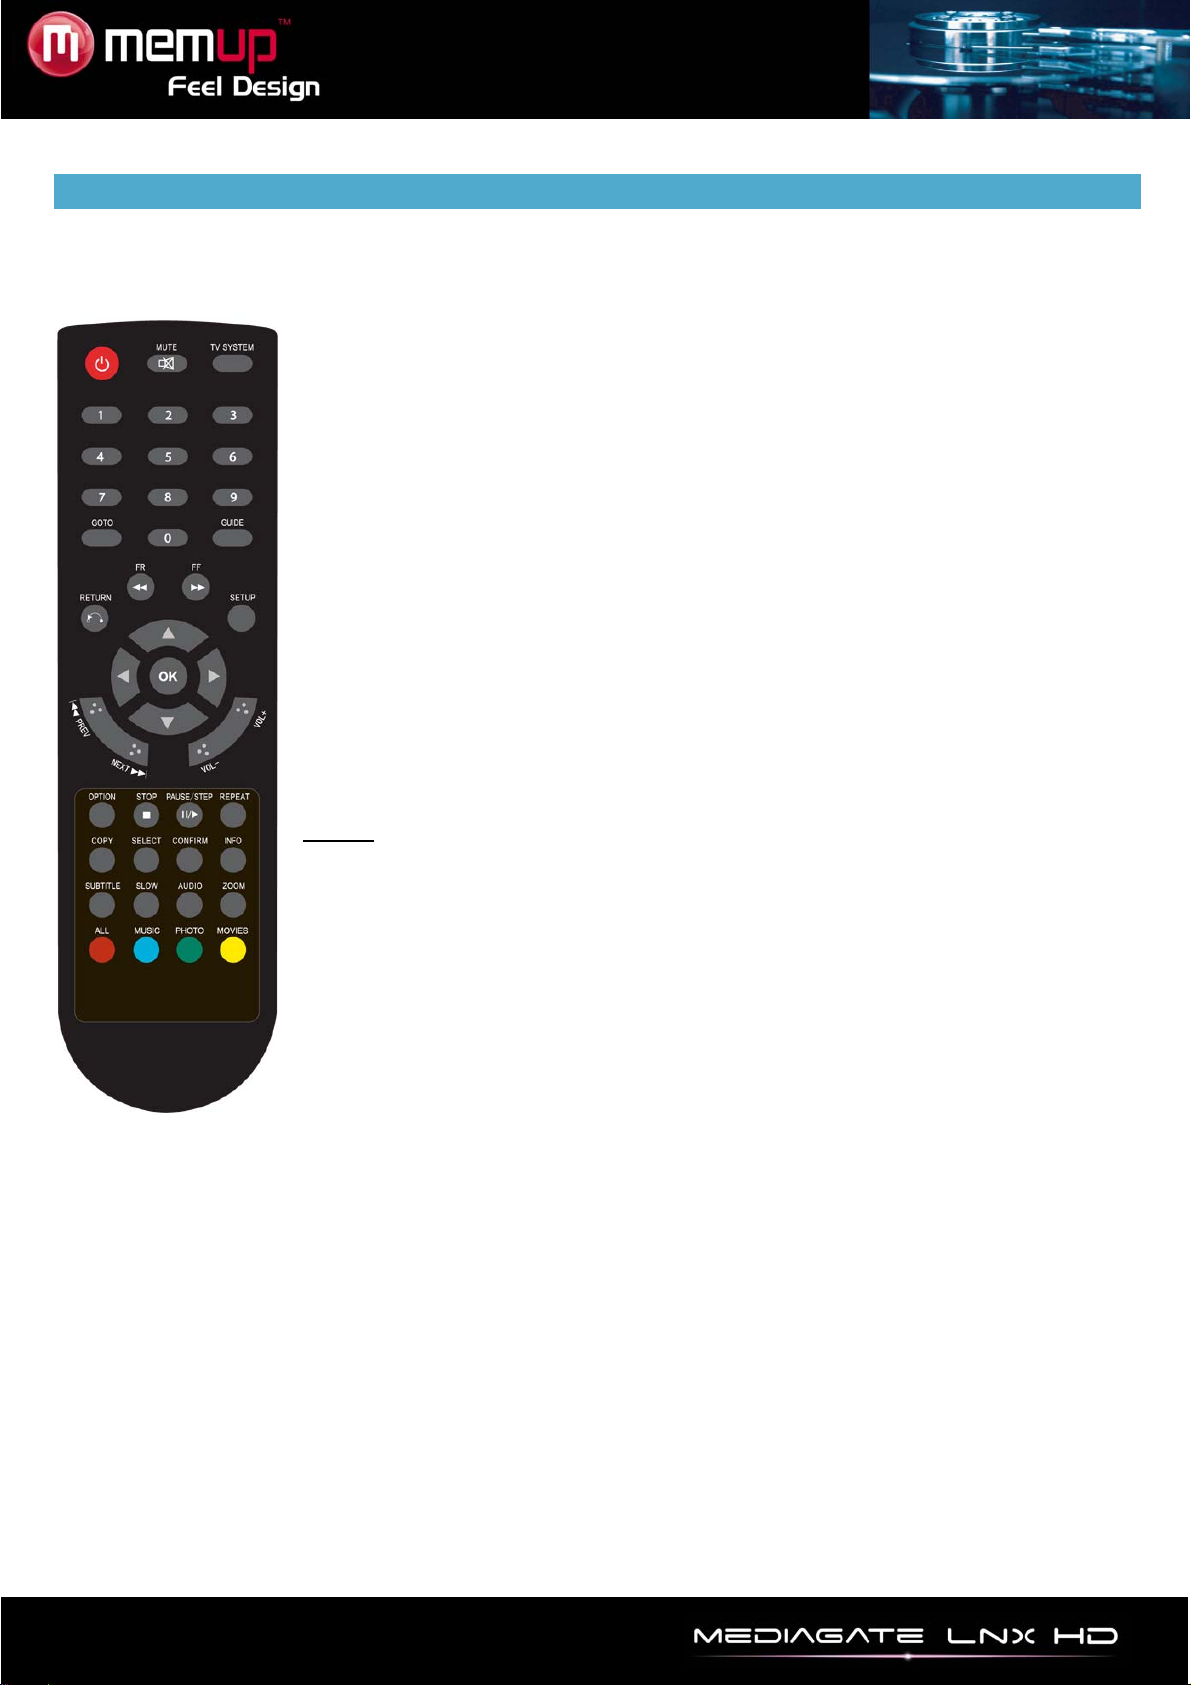
REMOTE CONTROL
BUTTON FUNCTION
POWER Turn on and off
MUTE Turn on or shut audio
TV SYSTEM Switch between Video output
0-9 Input digital
GOTO Play video on moment defined
GUIDE Switches to the main menu.
FR Fast rewind. Press again to select speed
FF Fast forward. Press again to select speed
RETURN Return to the previous menu
SETUP Enter the menu
Move cursor left
Move cursor right
Move cursor up
Move cursor down
OK Press to confirm
PREW Return to previous file
NEXT Go to next file
VOL- Decrease volume
VOL+ Increase tvolume
OPTION Opens the options menu in the browser to rename or delete the file
STOP Stop play
PAUSE/STEP Pause play and press again for step playing
REPEAT Set repeat option: chapter, Title or off
COPY Enter the copy mode
SELECT Select file. Press “confirm” to add or delete files in playlist.
CONFIRM Add or delete option in playlist
INFO Display time, title, information of chapter
SUBTITLE Switch subtitle if file is supported
SLOW Slow motion. Press OK to resume play mode.
AUDIO Switch the audio format output
ZOOM Zoom when playing back photos or Video programs
Photo zoom levels:2X,4X,8X,16X - Video zoom levels:2X,3X,4X,8X
ALL Show all files
MUSIC Show all audio files
PHOTO Show all picture files
MOVIE Show all video files
- 4 -
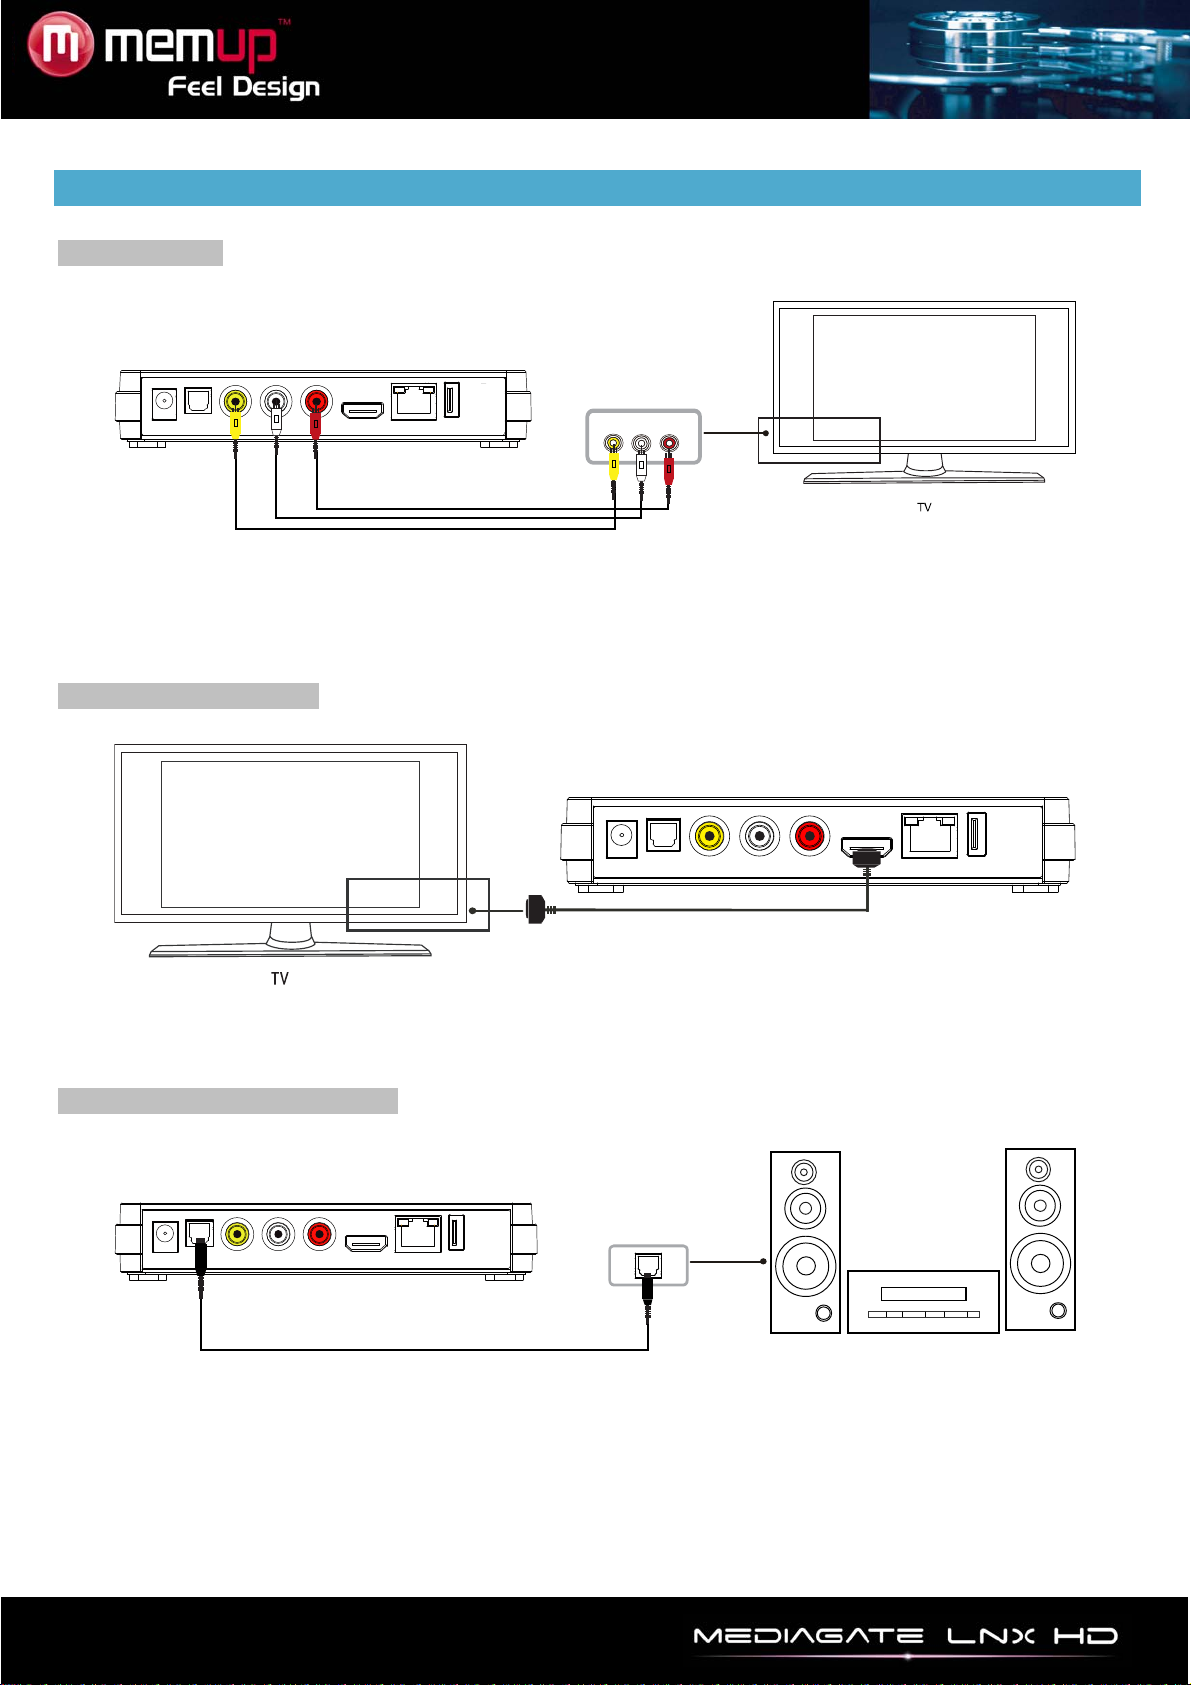
CONNECTION
A/V connection
Plug the yellow connector into the AV output of product to the TV AV input.
Plug the red and white connector into the audio input of TV or HIFI.
Select AV mode on TV and the Mediagate output with [TV system] of the remote control.
HDMI output connection
HDMI is a output with best audio and video effect. Connect HDMI cable to the output of the LNX HD.
Select HDMI mode on TV and the Mediagate output with [TV system] of the remote control.
Digital audio device connection
Connect the optical connector with the audio device by optical cable.
Then, enter the audio interface, select Digital Output option "SPDIF LPCM" or "SPDIF RAW".
Enjoy 5.1 high quality sounds through a multi channel decoder/amplifier with optical input.

- 5 -
Ethernet connection
The LNX HD can play files stored in the computer directly through network. Please connect the player and
computer according to the following illustration.
Connect the RJ45 cable to the LNX HD. Press [Setup] key to enter in the initiation interface. Select
“Network” option. You will have to choose between automatic and manual IP setup. Press [Setup] again to
exit after setup.
Before accessing the router through network, some media files must be shared in the network.
File sharing under Windows XP
1. Select folder, right click on mouse and select” Sharing and safety”.
2. Select “Sharing” in property option, select “share this folder on the network” and click “Apply” to
confirm.
3. Open “Control panel- Management tool-Computer management-Local users and groups” and click
“Users”. Right click “Guest” and select “Properties”.
4. Select “Users can not change your password' and “password never expires'”.
5. Open “Control panel- Network connection” select “Local Area connection” and right click to select
“Properties”.
6. In the Pop-up window, select “Internet protocol (TCP/IP)”
7. Set up the IP address, subnet mask and gateway, you can also choose to automatic.
8. Completion of Windows XP network sharing.
9. Close the Windows Network Connection Firewall.
Operation of file sharing under Windows Vista
1.From the desktop select ”start- setup-control panel” and select “user account”.
2.Open User account and select “open a new account” and name it “Guest” .
3.Select the folder to share and right click on mouse, then select “sharing” option”.
4.Open shared folder and add guest account to the list .
5.Give the right to all the users after adding the Guest into the list.
6.Select and finish “sharing”.
7.Operate the device as same as in XP system operation.

- 6 -
INTERFACE
Power on the system, and after a few seconds, you will enter the main interface. If there is no screen, press
[TV System] to check manually the proper output.
Main interface
USB Device
Browse all your USB device folders and files.
Memory Card
Browse all your Memory card device folders and files.
External DVD
Browse all your external DVD device folders and files.
Network
Connect to get shared files from other computers who belong to the network.
UPnP
Connect your Mediagate LNX HD to UPnP compatible device.
Playlist
Play your selection done among all your folders and files
Setup
Change your settings.
- 7 -
BROWSE MEDIAS
To make it easier, there are 4 function keys named “All”, “Music”, “Photo” and “Movie” on remote control, to
switch from a media to another.
Browsing All
Press [ALL] on remote control to display all folders.
Select the folder containing your files, whatever the media type and select the file you want to play.
Browsing Music
Press [MUSIC] on remote control to display the music files only.
Select folder containing your audio files and a thumbnail strip appears at the bottom of the screen with
song information. Then, select the file you want to play.
LNX HD supports MP3, WMA, WAV, AAC, OGG, Dolby digital, DTS Digital.
Browsing Photos
Press [PHOTO] on remote control to display the photo files only.
Select folder containing your photo files. Select the photo you want to view and it will be displayed full
screen.
Note: a) When the photo is displayed in full screen mode, the slide show starts automatically.
b) While listening to audio files, you can browse photos at the same time.
While browsing a photo, you can press and to rotate a photo in any angle. You can also press
[ZOOM] to zoom in/out, three levels are available.
LNX HD supports High Definition Photo (JPG, BMP) Playback.
Browsing Movies
Press [MOVIES] on remote control to display the video files only.
Select folder containing your movie files. Select the movie you want to view and it will be displayed full
screen.
LNX HD supports High Definition Video (1080p) Playback.
USB DEVICE
Browse Medias
Enter USB device to browse all your folders and files.
To make it easier, there are 4 function keys named “All”, “Music”, “Photo” and “Movie” on remote control,
each can switch to any media.

- 8 -
NETWORK
My Shortcut
When you are browsing network, you can choose the computer name from menu or you can set “Specific
File Server IP” and access it from “My Shortcut” in the menu.
My shortcut is the easiest way to get files from a computer previously configured.
My Neighbors
When you are browsing network. You can choose the PC name from menu or select “My Neighbors” to
access.
My Neighbors is used when exploring another computer or differently contents.
Note:
When datas are connected on computer with a HDD, USB device or Card reader Network through the
network, you can also browse photos, listen to music or watch videos from these devices.
UPNP
UPNP means Universal Plug and Play, based on TCP/IP protocol as well as new internet protocols aim at
communication between facilities. All the facilities connected to the internet can communicate without being
interrupted by gateway, so that communication in the internet can become more fluently, documents
transmission can become more convenient and internet applications which cannot be used before can be
operated. These are all the convenience brought by UPNP.
The Mediagate supports UPNP. Before using UPNP function, please make sure that connected computer
in LAN has software that supports UPNP.
If not, please install a software or shared software that supports UPNP gateway protocol.
For example, connect the player to the family LAN, and then share multimedia documents in Media Player
11 to access the living room through UPNP.
Steps to proceed:
1/ Connect the Mediagate to the family LAN. Refer to network connection instructions to connect the
player.
2/ Install software supporting UPNP gateway protocol.
Before using UPNP function, you need to install software that support UPNP gateway protocol.
3/ Share documents through software settings.
Open the software’s interface, choose “Media Base” in main interface, and then choose “add to the media
base” in the pull-down menu. After adding some documents or folders to the media base, choose “media
share”. You can also set the types and positions for the shared documents, such as “music, picture or
video” and so on.
4/ Use the Mediagate UPNP function.
Choose UPNP option in the main interface of the Mediagate to enter, and then the player can search out
computers installed with UPNP software in LAN. Enter your computer, and you can see multimedia
documents shared through Media Player 11 in your computer. Using UPNP is more convenient and faster
than using the player’s network function. The Mediagate can access to computers without being interrupted
by gateway, avoiding operations like inputting user name, password and so on.

- 9 -
SETUP
Setup option is to configure Photo, Audio, Video, Network and System.
Press [Return] or [Setup] button again to exit from this menu.
Photos Settings
Slide Show Set slide show time by selecting the required interval time.
Transition Effect
Set the transition effect of photos.
1) Cross Fade – fade in and fade out
2) Left to Right
3) Top to Bottom
4) Waterfall
5) Snake
6) Dissolve
7) Strip Left Down – like strip cover from top left to bottom right
8) Shuffle
Background Music Play the music file under same folder.
Select position of the background music and then “off” to close the function.
Changing Audio Settings
Night Mode Chose between “ON”, “OFF” and “COMFORT” mode.
In comfort mode, it limits the volume automatically but makes it clearer so that it
would not disturb people around.
Digital output Choose according to your Audio connection: HDMI LPCM,HDMI RAW,SPDIF
LPCM and SPDIF RAW
Changing Video Settings
Screen Ratio
Set aspect ratio from Pan Scan 4:3, Letter Box 4:3, or 16:9.
Pan Scan 4:3 displays a wide picture on the entire screen and cuts off the
redundant portions when a standard 4:3 TV is connected.
Letter Box 4:3 displays a wide picture with two black borders on top and bottom of
4:3 screen when a standard 4:3 TV is connected.
16:9 compresses the image to convert the whole image when a 16:9 TV is
connected.
Brightness Set brightness level. The new setting is previewed on screen.
Contrast Set contrast level. The new setting is previewed on screen.
TV System Adjust TV system, depending on your viewing preferences and Video output
connection.
Changing HDMI settings
Adjust HD Resolution, depending on your viewing preferences.
- 10 -
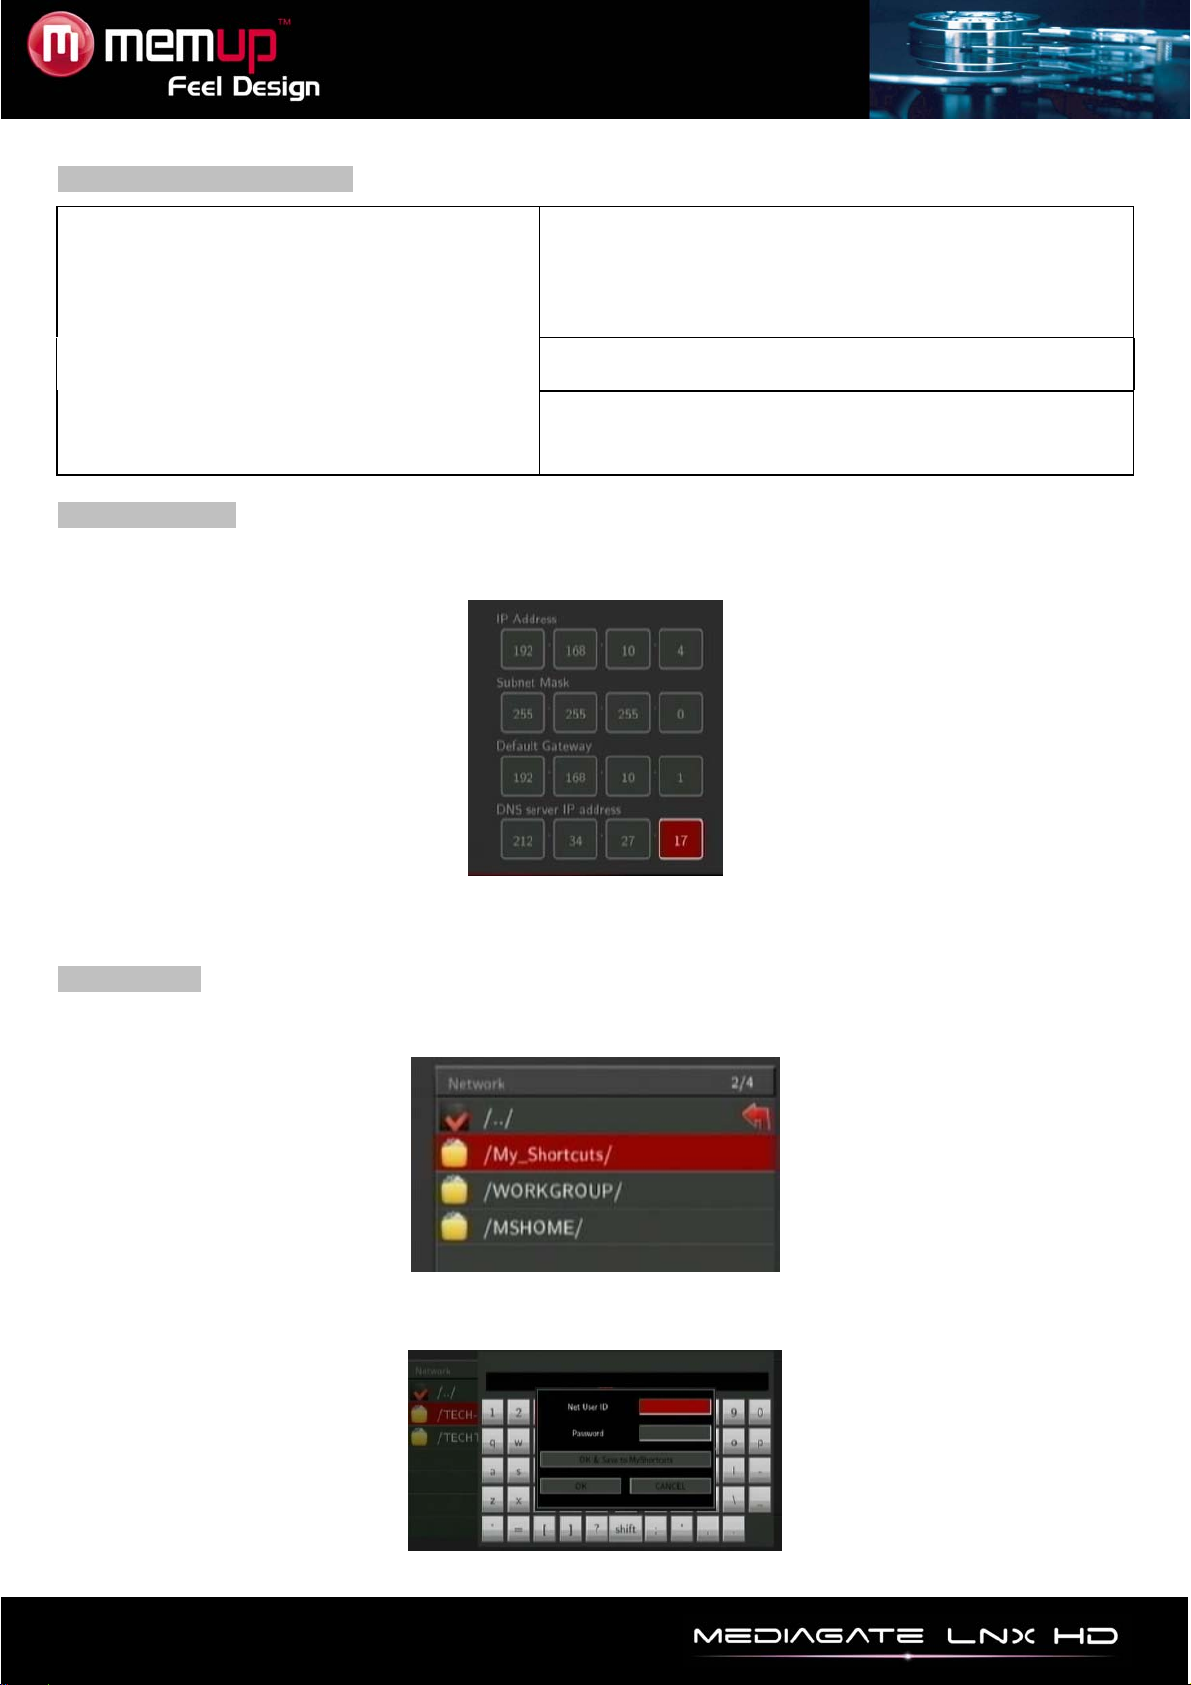
Changing Network Settings
Check the following items before use :
- Connection between LNX HD and network
- Availability of Network protocol
- PC firewall must be shut down
- Files must be shared
Wired Lan Setup and Wireless Lan Setup
Auto:Automatically set IP address
Manual: Select IP address, subnet mark address and
default gateway. It is available through navigation and
numeric key
Wired Lan Setup
DHCP IP(AUTO) : Set the DNS server IP address by auto.
FIX IP (MANUAL) : Use Fixed IP by entering IP address, Subnet Mask, Default Gateway.
When selecting NET, you can locate the multimedia files shared on your local network by browsing through
My Shortcuts or My Neighbors.
My Shortcuts
When you are browsing NET, you can choose the PC name from menu or you can set “Specific File Server
IP” and access it from “My Shortcuts”.
1) Press [OPTION] into My_Shortcuts interface. Then, choose Add, Modify, Delete, Return.
2) Input Net User ID, Password, Specific File Server IP address.

- 11 -
3) When you complete settings, you can browse photos, listen to music, and watch videos through the
network account.
Wireless Setup
You need to use a compatible USB Wifi dongle to use this function. Indeed, some models could not work
with the LNX HD. Press [SETUP] on remote control and select NETWORK. Then, choose Modify.
Please select INFRASTRUCTURE or PEER TO PEER.
INFRASTRUCTURE
This method is to connect direct from the LNX HD.
You need Wifi systems on LNX HD’s USB HOST and on computer (via USB interface or directly built-in).
Auto is set as default to allow Wireless search SSID automatically. If the search is successful. Select the
SSID you want to enter.
Press [ENTER] to enter WIRELESS SETUP, you can choose DHCP IP (AUTO) to obtain a dynamic IP.

- 12 -
Some of the parameters set will be displayed in SETTING LIST.
Press [RETURN] on remote control, you’ll see the IP address of the communication. The green scale on
right side shows the signal strength.
Go to BROWSER into the NET, you’ll see MY_SHORTCUTS, MY_NEIGHBORS and another folder that
indicates the success of wireless network settings.
Set the product name in wireless network as wireless SSID. Set the IP address host, as long as the IP
addresses do not conflict with the USB wireless adapter IP addresses.
Save Settings and test. If successful, the information network interface will be shown, you can see the
automatic access to the parameters.
Into the main interface of "NETWORK", select MY_SHORTCUTS or MY_NEIGHBORS. The operation is
same as the wired network settings. Please refer to the Wired Lan Setup for more details.

- 13 -
Changing System Settings
Menu Language Select to choose the OSD (On Screen Display) language. Press and
to select the language. Press OK to confirm.
Text Encoding Select to choose the text encoding language.
Press and to select the text encoding language.
Press OK to confirm.
Screen Saver ON/OFF.
System Updata View the current software version and update the software of the product.
Restore Default Reset the language and network.
- 14 -
TRANSCODE SERVER
If you install the “Transcode Server” in your PC, the LNX HD will support formats including codecs not
installed on your MEDIADISK but present on your PC, it increases the compatibility.
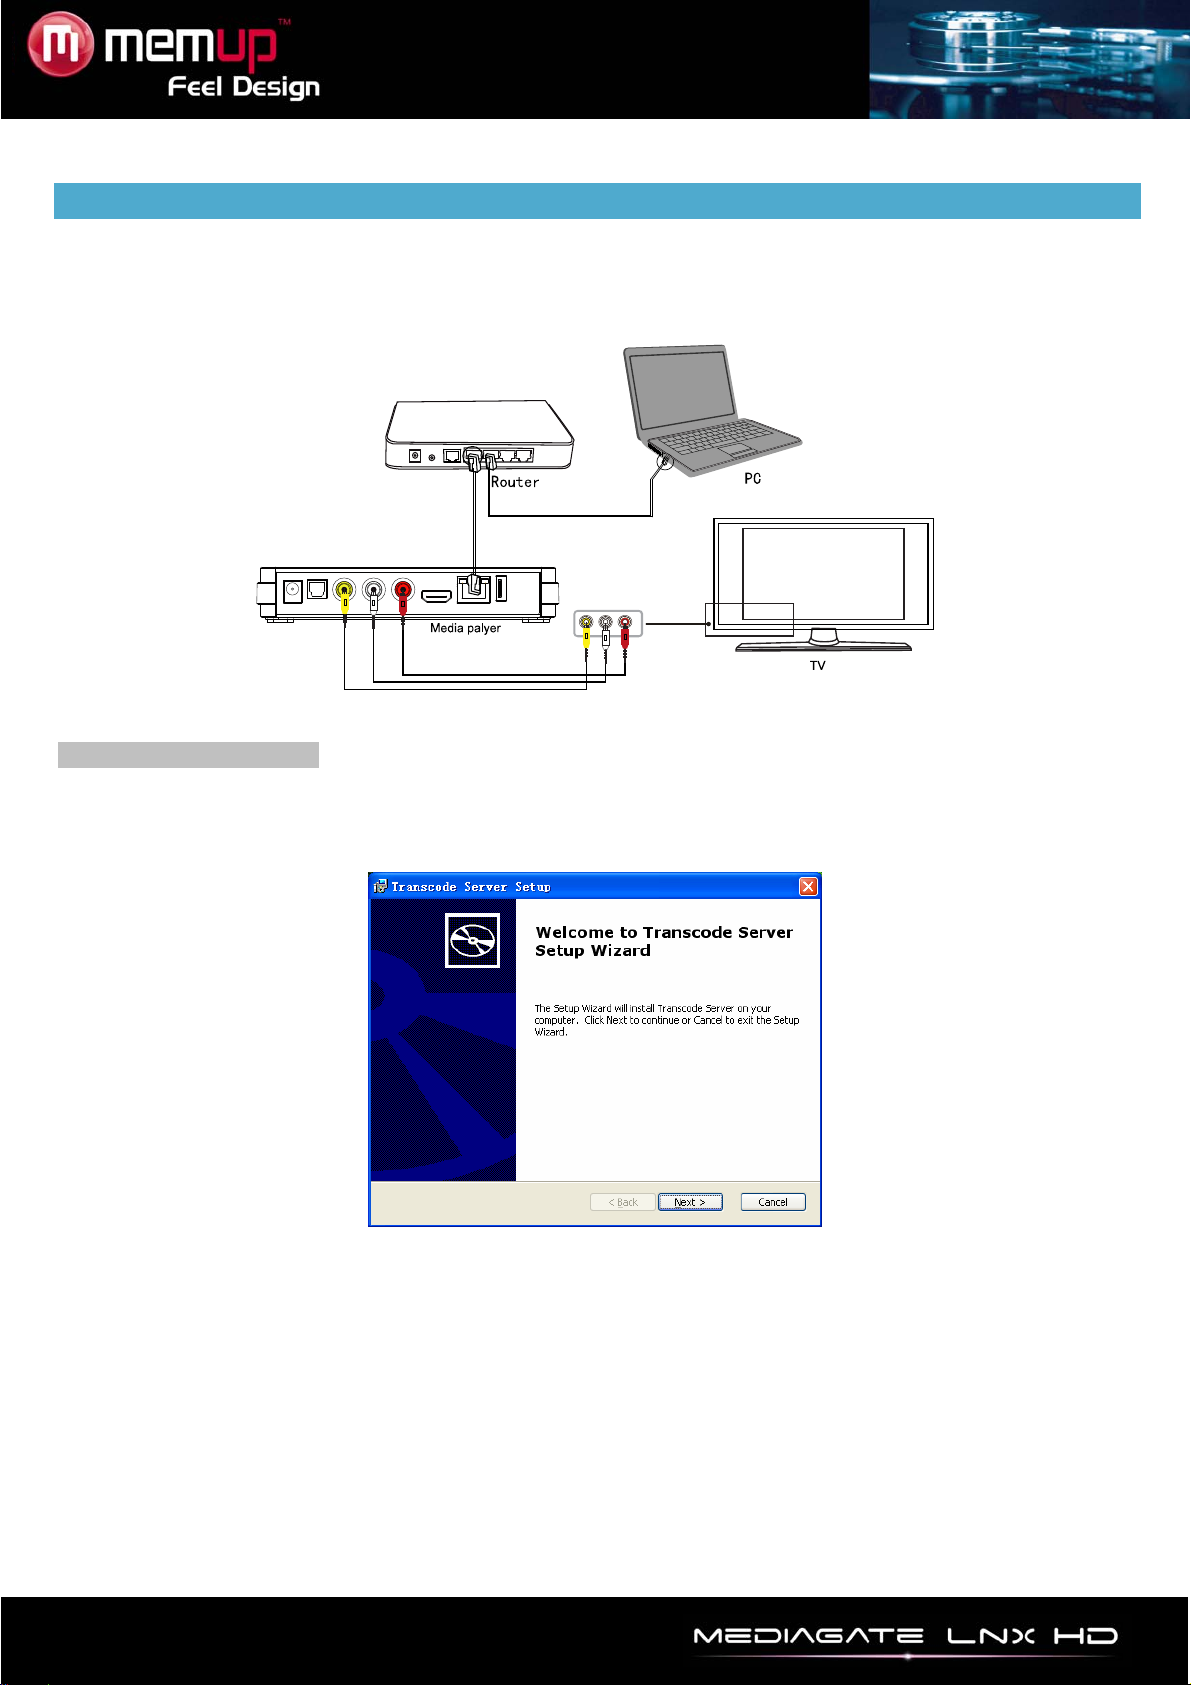
The LNX HD should be connected as the picture below to play shared files.
Install Transcode Server
Transcode server is a media transition software and is a communication bridge to connect LNX HD and a
computer.
Insert the LNX HD CD-Rom and launch Transcode Server install, double click on “Transcode Server.msi”
and start the install.
- 15 -
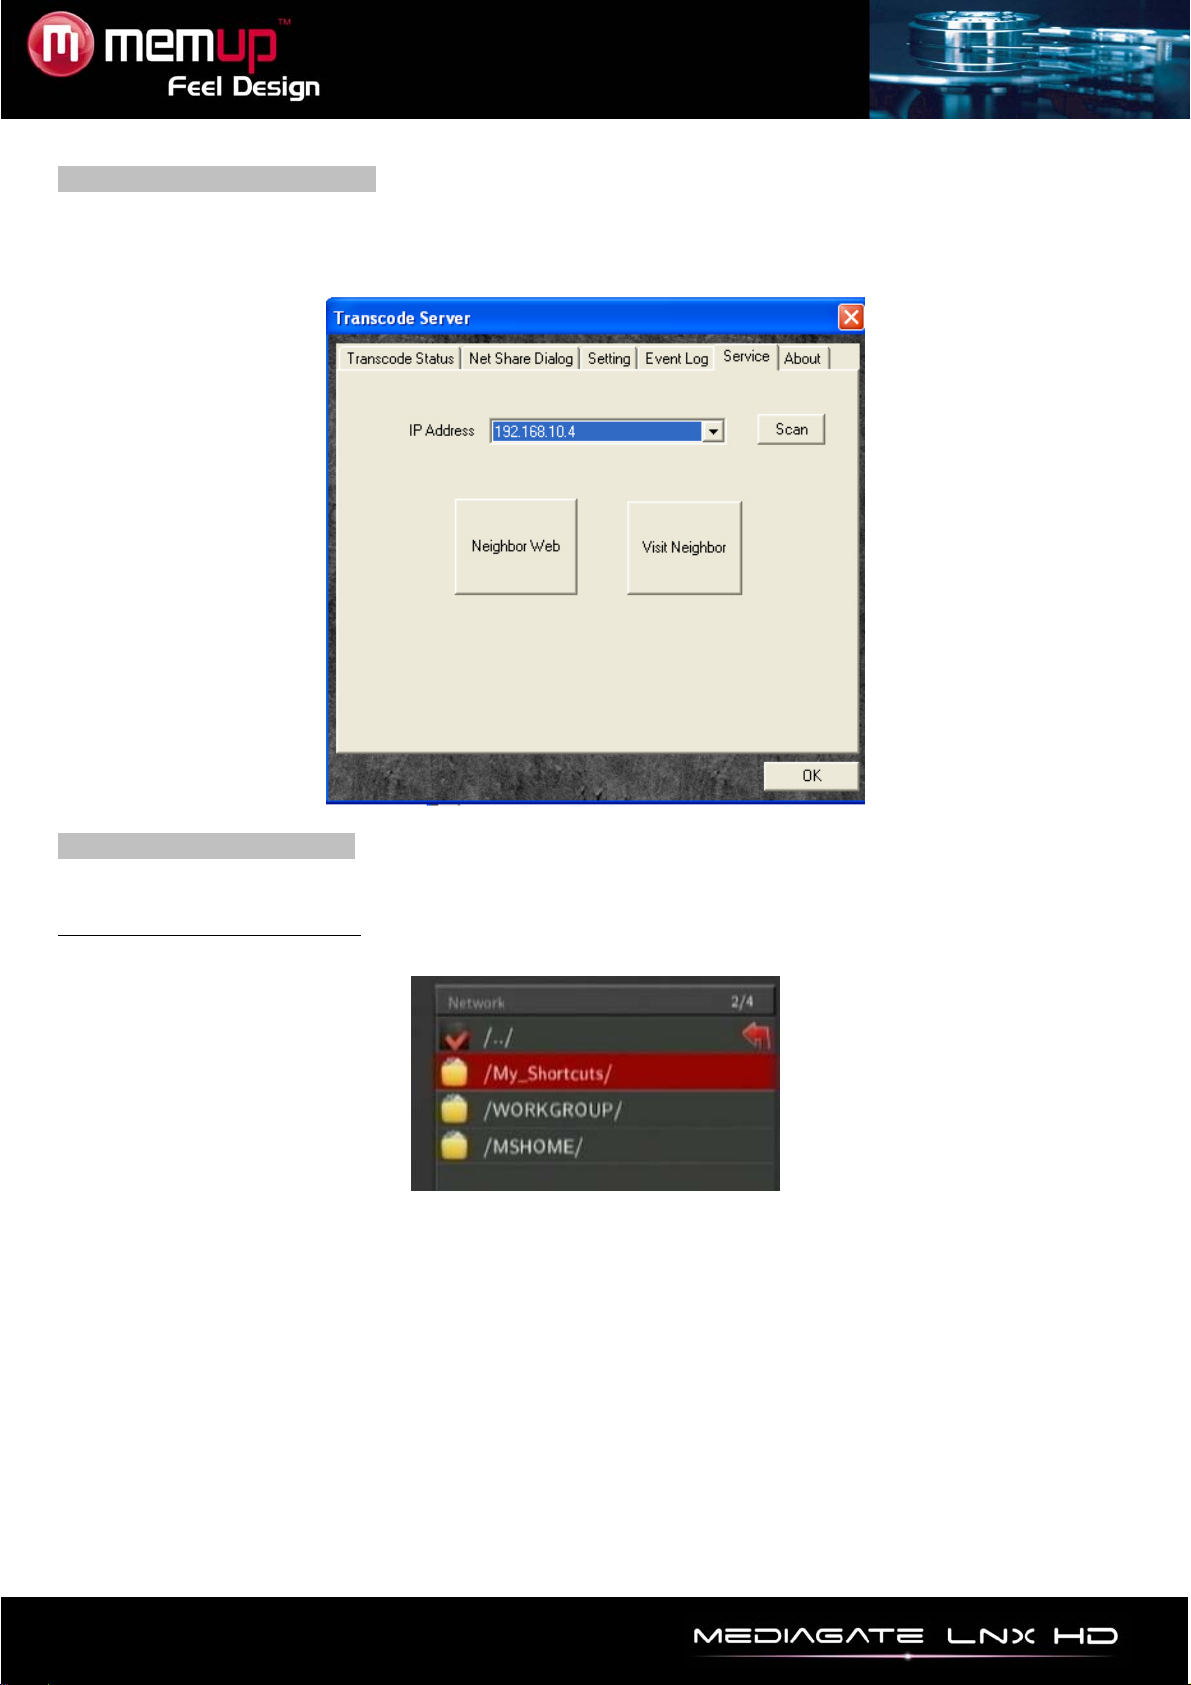
Transcode Server connection
The Transcode Server icon will appear on desktop.
Press “Service ” tab, then “Scan” and Transcode will search your LNX HD’s IP. If not, check the Network
settings on your LNX HD.
Operation of product usage
Select Browser from the Guide menu. When you are browsing NET and “Transcode Server” is installed in
your PC, there are two ways to locate multimedia files shared on your local network.
Browse through My Shortcuts:
Set “Specific File Server IP” and access it from “My Shortcuts” in the menu.
- 16 -
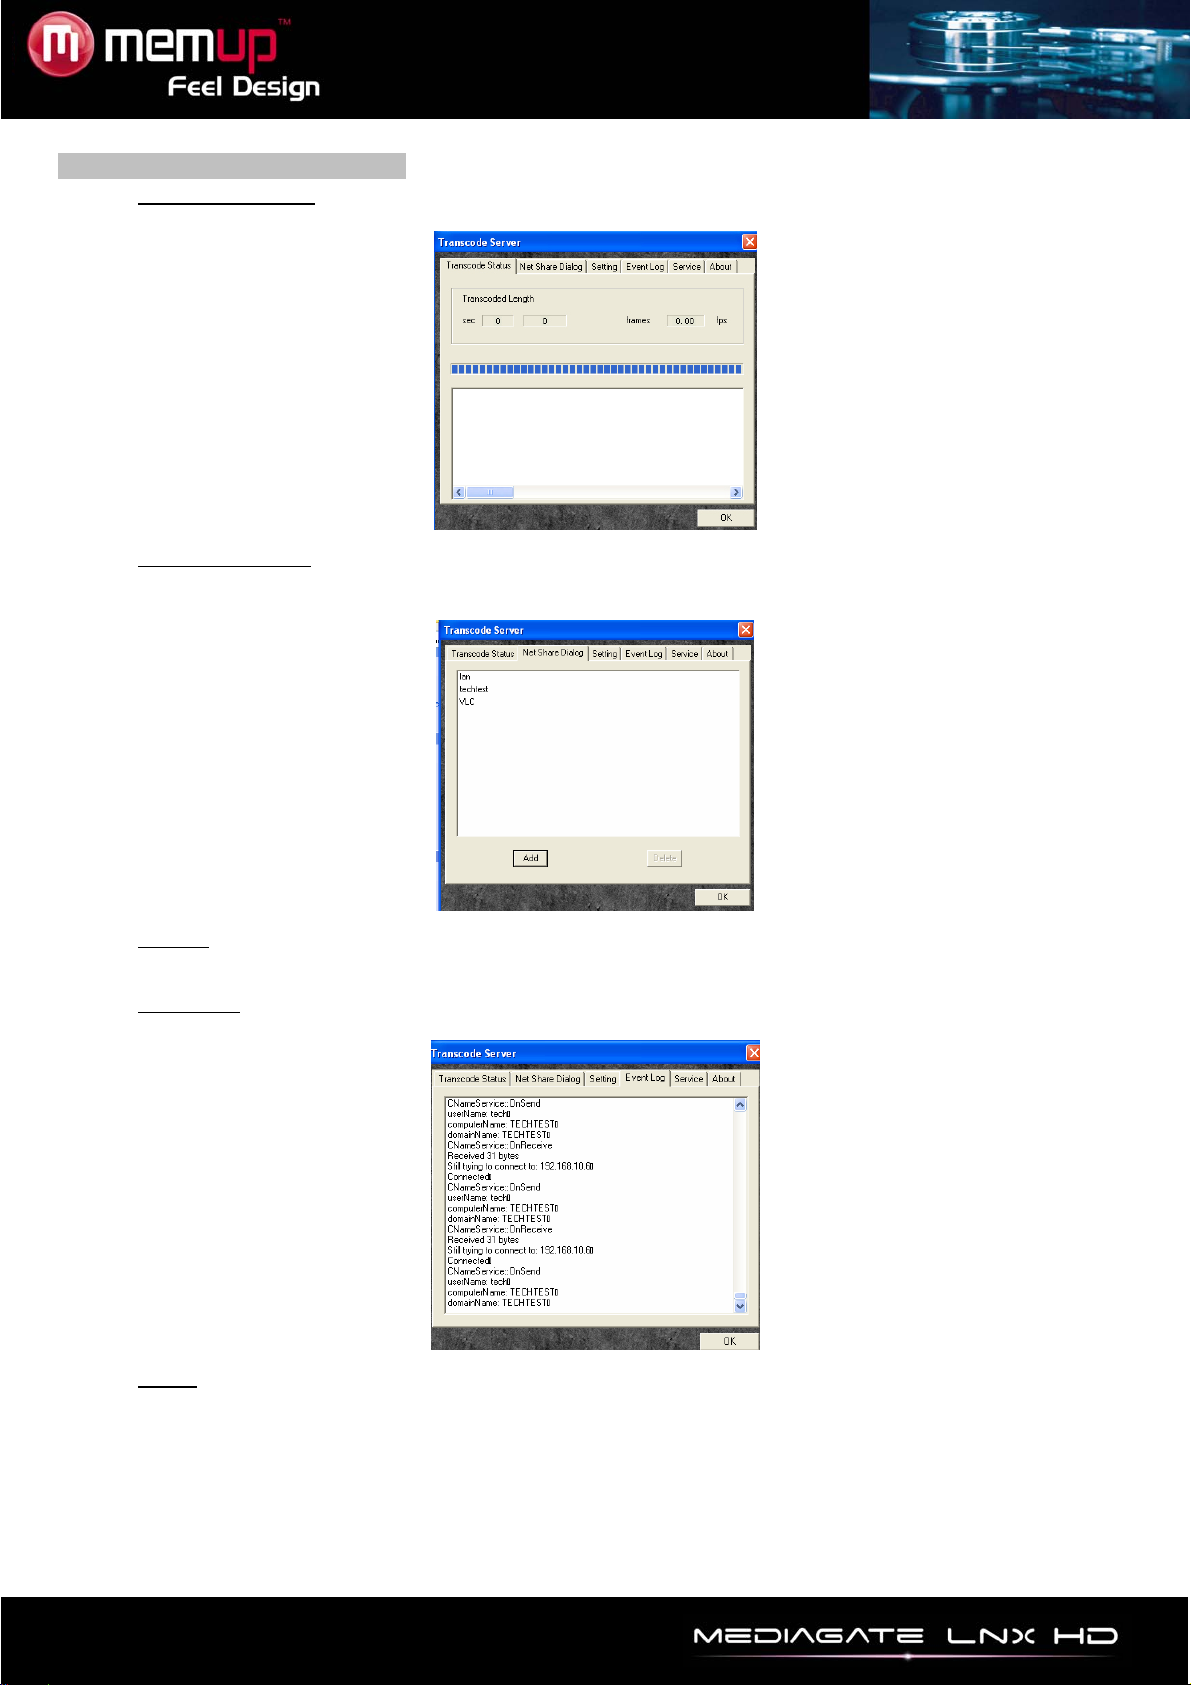
Transcode Server other function
1) Transcode Status
Press “Transcode Status” tab to display the files information.
2) Net Share Dialog
Press “Transcode status” tab to display shared folders at local computer, “Add” to make a new
shared folder and “Delete” to erase selected folder.
3) Setting
Press “Setting” tab to select if “Auto Run on System Startup”.
4) Event Log
Press “Event Log” tab to display PC and Media player communication information.
5) About
Press “About” tab to display Transcode server version.
WARNING:
During Playback, you need to press pause a few seconds to buffer video files so that playback will be
smoother.
- 17 -
FILE EDIT MENU
Select file or folder and press [OPTION] on remote control to rename and delete files, press “ENTER” to
confirm.
Return Return to the main screen.
Rename
Rename a file :
1. Press and on remote control to select the Rename tab.
2. Press [ENTER]. The name entry screen will appear.
3. Press [ENTER] to input each letter or number.
4. Once you have entered the new name, confirm all changes.
If you want to cancel, press [RETURN].
Delete
To delete a title :
1. Press and on remote control to select the Delete tab.
2. Press [ENTER] to confirm and delete file.
3. A confirmation message will appear.
4. Press [ENTER] to confirm deleting the selected file. Press [Return] to cancel.
FILE MANAGER (COPY/PASTE)
Press [COPY] on remote control to access to the File Manager interface, it allows copying files between
HDD, USB and NET.
Copying operation
Step 1: Select Source Device
Select the device where is located your file you need to copy.
Step 2: Select Destination Device
Press to Destination device, or to return.
Step 3: Select copy files or folders
At Source sector, press and to select and press [SELECT] to select file or folder which need to
be copied.
The sign “√” will appear at right side of selected file or folder.
Then press to continue or to return.
Step 4: Select Destination folders
Press and to select a target folder at the Destination sector.
Then press to continue or to return.
Step 5: Copy Status
At top menu, select “Enter” to copy or “No” to cancel.
Once finished, the system will display “File Copy is completed!” or “File Copy failed!”.
Select “Enter” to browse files or “No” to return.
- 18 -
PLAYLIST
The Playlist allows you to select music files, photos and videos stored on your external device.
To build your playlist, enter the folder, select the file and press [SELECT] to add the selected files to the
playlist, then press [CONFIRM].
Use slideshow mode with a playlist:
1 - In the Music menu, select background Slideshow then "Playlist".
2 - Selectdevice, then press blue button on remote to select “Music".
3 - When in Music mode, press [select] on remote to add files to playlist, then
press [Confirm] to save selection.
4 - Go to menu device, then press red button on remote control to select "All
Media".
5 - In "All Media", start slideshow by pressing [Play], and the music starts
automatically.
Use the slideshow mode with the contents of a folder:
1 - In the Setup menu Entertainment, select background Slideshow, then "Folder".
2 - Copy photos and music you want to play during slideshow in same folder.
3 - Then start the slideshow by pressing [Enter]. The photos and music in the
folder will be read simultaneously.
Notes:
Only documents contained in the disk can be added to the playlist. The primary
partition of the hard disk will be used.
Table of contents


