Merging Pyramix User manual

6.0
™
USER MANUAL
Quickstart
Guide
Quickstart Guide

No part of this documentation may be reproduced in any form whatsoever or be stored in any
data retrieval system without prior written permission of the copyright owners.
This documentation is supplied on an as-is basis. Information contained within this documenta-
tion is subject to change at any time without notice and must not be relied upon.
All company and product names are ™ or Registered Trademarks ® of their respective owners.
Windows Vista, Windows XP and Windows 2000 are trademarks of Microsoft Corporation.
Merging Technologies makes no warranties express or implied regarding this software, its qual-
ity, performance, merchantability or fitness for a particular purpose. The software is supplied “as
is” you, the purchaser, are assuming the entire risk of the results of using this Merging Technolo-
gies software.
In no circumstances will Merging Technologies, its owners, directors, officers, employees or
agents be liable to you for any consequential, incidental or indirect loss or damages including
loss of time, loss of business, loss of profits, loss of data or similar resulting from the use of or
inability to use the Merging Technologies hardware and or software or for any defect in the
hardware software or documentation.
©Copyright Merging Technologies Inc. 2010. All rights reserved
Merging Technologies
Le Verney 1070 Puidoux Switzerland
Tel: +41 21 946 04 44 •Fax: +41 21 946 04 45
www.merging.com

Contents Page 3
Contents 3
Welcome to Pyramix Virtual Studio! 7
Introduction 7
Overview 7
Pyramix documentation and Help 7
Conventions 8
Native, Card and Software Set or Pyramix Turnkey? 8
Pyramix Versions 8
MassCore™ 9
NEW USERS START HERE 9
System Requirements For Pyramix Virtual Studio 9
Installing Pyramix Virtual Studio Hardware 10
Mykerinos Board Installation 10
Multi-board installation 11
Pyramix Virtual Studio Board I/O 11
Time Code and Video Sync Option 11
Cabling Pyramix in your System Environment 12
Digital Audio Synchronization and TimeCode 12
Installing Pyramix Virtual Studio Software 13
Installation Overview: 13
Driver Signing 14
Running the Installer 14
Authorization System 15
Enabling Pyramix Virtual Studio with your Software Key 15
First launch 16
Starting Pyramix Virtual Studio 17
Pyramix User Interface 18
Mouse Modifier Keys 18
Context Menus 18
Keyboard Shortcuts 18
Macros 18
Pyramix Concepts 18
Project 18
Mixer 19
Monitor 19
Meter Bridge 19
Composition 20
Timeline 20
EDL 20
Media Files 20
Master Clips 20
Contents

Contents Page 4
Clips 20
Media Management - Housekeeping 20
Media Drives and Folders 20
Libraries 21
User Libraries 21
Automation in libraries 22
Global Libraries 22
Project Libraries 22
Offline / Reference Libraries 22
A First Simple Project 23
Start Pyramix 23
Connect Physical I/O to Logical I/O 23
Open a New Project 24
Configure the Mixer 26
Before Recording 27
Record and Playback Audio 27
Edit Audio 29
Starting a New Project 30
Project Templates 30
New Project from scratch 30
Pyramix Virtual Studio Window Orientation 33
Settings 34
Recording 36
Recording Audio into a Pyramix Virtual Studio Project 36
Virtual Multi-track 37
Dubbing Mode 39
The Timeline 39
Tracks 39
Clips and Compositions 40
Editing 41
Clips in a Composition on the Timeline 41
Selecting a Range 41
Making Edits 41
Fades 42
Edit Command highlights: 42
Navigation 43
Time Scale Rulers 44
Cursor & Timescale Ruler Toolbars 45
Cursor Toolbar 45
Jog / Shuttle 47
Transport Controls 48
Scroll Wheel 49
The Overview 50
Markers or User Flags 50
Using the Mixer 51
Mixer Components 51
Show / Hide 51

Contents Page 5
Creating and Configuring Mixers 52
I/O Busses Explained 52
Internal Return Busses 52
Input Strips 52
Groups 52
Mixing/Monitoring/Aux Buses 52
External Effects 54
Configuring a Blank or Existing Mixer 54
Synchronized Creation/Deletion of Tracks/Strips 54
Adding Strips 54
Mixer I/O Assignments 55
Adding Plug-ins 55
Mixer Surround Components 56
Strip and Bus Tools - Plug-ins 57
Eq, Comp/Limiter/Expander 57
Bus Tools 66
Simple Mixer Automation 67
Mixing Down Projects 67
Exporting a Composition to a File 67
Archiving Projects 67
CD Mastering 67
Quick CD 67
CD Markers 70
Exporting Projects to CD Image Files 71
Burning a CD-R 72
Customizing the User Interface 73
Workspaces 73
Keyboard Shortcuts 73
User Macros 74
Appendix I Mouse Modifier Keys 75
Main Editor 75
Overview 77
Notes 77
Media Folder 77
Appendix II I/O Daughter-card Options 78
Index 81

Quickstart Guide :
Quickstart Guide : Page 6
Quickstart Guide
Document: Pyramix™ Quickstart Guide 7 1
Date: 28th October 2010

Quickstart Guide : Welcome to Pyramix Virtual Studio! Page 7
Welcome to Pyramix Virtual Studio!
Introduction
Thank you!
Congratulations on your purchase of Pyramix Virtual Studio. More than just a product, this is a gateway to the
future of sound recording, editing, mixing and mastering. You have joined a worldwide community of users who
have already discovered the Pyramix advantage.
Note: IMPORTANT! - The first thing you need to do is register your software to acquire
your Pyramix key(s) and to be included in our user support list.
Please also subscribe to the User Forum at:
http://www.merging.com/forum/
Overview
VERY IMPORTANT!
We strongly recommend you consult the other Pyramix guides, the User Manual and other Guides for a more com-
plete understanding of all the features and functions of Pyramix.
HOWEVER,
recognizing that most people do not read manuals until they have to, this shorter version will enable you to
achieve (almost) instant gratification! This guide will introduce you to Pyramix Virtual Studio and lead you
through a simple set-up, recording and importing audio, simple editing, mixing, adding effects, and CD recording.
Pyramix documentation and Help
ToolTips
Pyramix Software is equipped with ‘ToolTips’. Hovering the mouse cursor over a tool icon pops-up a box with the
name of the function. A longer description is shown bottom-left of the Pyramix program window.
Documentation
All the Pyramix documentation is in the Adobe Acrobat pdf format. (.pdf file extension)
In order to read the documentation you will need to have Adobe Acrobat Reader V5 or later installed on your
computer.
This Quick Start Guide and the Pyramix User Manual may be opened from the Help menu. Other documenta-
tion can be found in the Windows Start menu in All Programs > Pyramix > Docs. Please check for the most
recent versions at:
http://www.merging.com
Support
If you cannot find an answer to a query in the documentation, please consult the on-line support at:
http://www.merging.com
where you will find answers to F.A.Q.s (Frequently Asked Questions) and further support.
Assumptions
This Quick Start Guide and the other Pyramix documentation assume you are thoroughly familiar with PCs and
Windows terms and concepts. If self installing to a new PC new, please ensure the machine is working correctly
before attempting to install Pyramix Virtual Studio.

Quickstart Guide : Overview Page 8
Conventions
Conventions used in Pyramix documents:
Names found on Pyramix screens and menus are shown in bold. E.g. Information & Settings
Menu and sub-menu selections are shown like this:
View > Tracks > Show all Tracks
Which means:
Go to the View pull-down menu, mouse down to the Tracks sub-menu and choose Show all Tracks.
Where a dialog box has several Pages, Tabs are used to ‘turn’ the pages. Tab page selection is shown thus:
Settings > Keyboard Shortcut Editor : Active Machine
Which means:
Go to the Settings pull down menu, choose Keyboard Shortcut Editor then click on the Active machine tab.
The Pyramix Settings > All Settings dialog Has its own hierarchical tree structure in the left hand pane with fold-
ers leading to pages.
Native, Card and Software Set or Pyramix Turnkey?
Your Pyramix Virtual Studio will have been supplied in one of three forms:
Pyramix Native (or Media Bundle), Pyramix Card and Software Set or Pyramix Turnkey.
Pyramix Turnkey systems are complete, ready to go, rack-mounted PCs with the Pyramix Card and Software Set
already installed and properly configured at the Merging Technologies factory. As such, no user installation or
configuration is needed. You can connect audio sources and destinations (and sync and TimeCode if appropriate)
and launch and run Pyramix immediately.
Pyramix Card and Software Set consists of the Mykerinos hardware and the Pyramix software ONLY. You must
provide an appropriate computer platform and software environment in which to install the board and software,
and install these yourself. Guidelines for an appropriate Pyramix system environment can be found in the follow-
ing section.
Pyramix Native (or Media Bundle) comes with software and USB Security Key only. You must provide an appro-
priate computer platform and software environment, and install these yourself. Guidelines for an appropriate
Pyramix system environment can be found in the following section.
Future Expansion is of course, possible, whether you start with Turnkey or a Card and Software Set.
Pyramix Versions
Pyramix Virtual Studio is a powerful and flexible Digital Audio Workstation (DAW) integrating hard disk record-
ing and editing, digital audio mixing, effects processing, machine control, video, and CD-R mastering.
There are now several versions of Pyramix. Pyramix Native, Pyramix Native Media Bundle, Pyramix LE and Pyramix
Virtual Studio Core. Numerous options and option packs are also available. This guide covers all versions of Pyra-
mix and many optional functionalities and features.
Note: Depending on the version and options purchased, some of the functions and fea-
tures detailed in this manual may not be available in your version of Pyramix or may vary
in capacity.
The Pyramix software runs Native, using the host CPU and soundcard and on the Merging Technologies Mykeri-
nos hardware platform, depending on the version purchased. Each Mykerinos board is capable of up to 128
channels of 24-bit digital audio, 64 recording and 64 playback. External access to these 128 channels is deter-
mined by your choice of physical inputs and outputs to the Mykerinos board. In XDTDM mode the total number
of Live inputs and outputs plus Internal Busses is 128 in and 128 out. In HDTDM mode these numbers are halved.

Quickstart Guide : NEW USERS START HERE Page 9
Pyramix Native
Pyramix Native offers 100% compatibility with the main Pyramix Virtual Studio (VS) system. Both the Pyramix
Native and the Pyramix VS can be connected on the same standard Ethernet network and directly interchange
audio and video media, or a Pyramix complete project between them.The Native software is USB dongle pro-
tected and runs on Windows 2000 or Windows XP desk-top or lap-top computers. It does have restrictions when
compared with the main Pyramix Virtual Studio capabilities, as you would expect, but the Native software main-
tains all the real-time editing capabilities expected of a professional system.
MassCore™
MassCore™ is an extremely powerful Pyramix option. A truly deterministic real-time engine that does not rely on
the Windows operating system. This avoids the inherent restrictions and latencies introduced by the operating
system and allows the channel/track-count to be increased to an unprecedented level. MassCore is scalable from
16 to 256 input and output channels with a massive 256 channel bus structure.
MassCore™ enables a number of new features:
• Larger Mixer configurations
• Extra 2.66ms and Ultra 1.33ms latency options
• Full Delay Compensation (VS3 and VST)
• VST inserts on Buses and Auxes
• VST Multi-channel support
• External Inserts (physical effects)
• External Monitor Inputs and Talkback
Where features are MassCore™ specific you will see the Masscore™ logo:
NEW USERS START HERE
Note: If you are a new user with a Pyramix Turnkey system, please go to Cabling Pyra-
mix in your System Environment on page 12. If you are a new user with a card and
software set, please start here:
System Requirements For Pyramix Virtual Studio
For recommended PC specifications please see the Pyramix Installation Guide and especially:
Support > Hardware Recommmendation : Recommended PC configuration
http://www.merging.com
• Sufficient HD space and speed for your audio media files. The speed and amount of disk space required
depends on sample rate, bit depth, number of tracks and length of program material. A fast (10k rpm or
better 15k rpm) SCSI drive (e.g. Seagate Cheetah) or a fast RAID array is recommended for larger multi-
track projects, high sample rate and DSD work. Low cost SATA or IDE drives are fine for smaller projects of
up to 24 channels.

Quickstart Guide : Installing Pyramix Virtual Studio Hardware Page 10
• We recommend disks should be formatted as NTFS volumes.
Hard Disk Space Requirements
A complete software installation will require around 50MB of disk space for the Pyramix software itself and
approximately 10MB of disk space for the Virtual Transport.
In addition, you will need hard disk storage for any captured audio media files. As a rule of thumb, one Gigabyte of
disk storage equals:
• 185 track minutes at 44.1 kHz 16 bits
• 125 track minutes at 44.1 kHz 24 bits
• 170 track minutes at 48 kHz 16 bits
• 115 track minutes at 48 kHz 24 bits
• 55 track minutes at 96 kHz 24 bits
For continuous multi-track recording applications, divide total available mono track time by the number of tracks
you will be using.
Please note that these are very rough estimates, and should be used only as a general indication of storage
requirements.
Operating System
32 bit Windows 7 Professional, Windows Vista Business, or Windows XP Pro, installed. (Use Administrator User
Account)
Power Management
N.B. As with all Digital Audio Workstations and Non-Linear Editors, we recommend setting the PC to an Always
On Power management scheme. (Start > Control Panel double-click Power Options. Choose Always On from
the Power Schemes combo box.) This allows the monitor to be turned off by the system but disables hard-disk
turn off and Standby.
Note: The Mykerinos card is not designed to support Standby modes.
Other Applications
Like all Digital Audio Workstations, Pyramix works best when there are no other unnecessary applications or ser-
vices running.
Video and Pyramix on one PC
To ensure a very smooth system (especially for seeking) playing video with Pyramix on the same computer, we rec-
ommend a Quad Processor PC, a dedicated hard drive for the video and Windows XP
Installing Pyramix Virtual Studio Hardware
Mykerinos Board Installation
Depending on whether you have a PCI or a PCIe board version, the Merging Technologies Mykerinos board can be
installed in any free PCI or PCIe slot in your PC. In general, it is best NOT to install the board in the slot adjacent to
an the graphics adapter; or in a PCI slot which may be physically shared with an ISA slot.
Please consult the:
www.merging.com
website for current compatibility information.
Make absolutely certain the PC power is OFF before installing the board!

Quickstart Guide : Installing Pyramix Virtual Studio Hardware Page 11
With most of the current generation motherboards this means either the mains switch on the power supply or the
power outlet switch. Where no switch is provided, either on the PC or the supply socket, then the PC should be
unplugged.
Always observe proper static precautions when handling any PC boards! Use a static strap, and/or be sure to firmly
ground yourself to the computer power supply, chassis or if the PC is unplugged, to a known good earth before
handling and installing the Mykerinos board.
Some PCs have batteries, cables, jumpers, etc. which could prevent proper board seating in one or more slots.
Make certain the board is firmly and fully seated before switching on.
Multi-board installation
Multiple boards must be installed in adjacent slots. To enable multi-board operation, all Mykerinos cards in the PC
have to be connected together using a special HDTDM ribbon cable. This cable has to be plugged into the multi-
pin connectors located on the top edge of the I/O daughter cards. Please contact your Merging Technologies
dealer for information on how to order this HDTDM ribbon cable.
HDTDM/XDTDM
The HDTDM board linking cable has the following functions in a multiple Mykerinos board installation:
a) synchronization (to 1/512th of an audio sample accuracy) This enables Pyramix to "see" a single system com-
prised of a large pool of DSP power and I/O resources spread over separate cards.
b) transfers all audio signals (Live Inputs, Internal Send/Return Busses, Mix busses, Aux busses, Live Outputs, etc.
between all the Mykerinos I/O daughter-cards which comprise the multi-board system.
Pyramix Virtual Studio Board I/O
Audio I/O Options
Mykerinos is a modular board which can have any one of several optional audio I/O daughter cards attached.
When ordering Pyramix Virtual Studio from Merging Technologies or one of its distributors, be sure to specify the
daughter card appropriate to your specific needs. (Please see Appendix II I/O Daughter-card Options on
page 78)
On-board Analog Audio I/O
Regardless of which I/O daughter card is chosen, you can simultaneously use the 3.5mm stereo mini-phone jack
on the Mykerinos board as an unbalanced, analog stereo audio monitor output for all projects up to 384 kHz, with
levels programmable from within the Pyramix software. Sources at sample rates higher than 96 kHz are automati-
cally Sample Rate Converted to 96 kHz, 24 bit. This stereo mini-jack connection may be connected to headphones
or to a line level audio monitor input.
External Audio D/A-A/D Converter Boxes
Most of the I/O options for the Mykerinos board are digital. Pyramix will often be used with external audio D/A (for
playback) and A/D (for recording) converters. Many such converters are available from Merging Technologies as
options: for example, the Merging Technologies Dua II and Sphynx 2. Contact your local Merging Technologies
Sales representative for more information.
Capabilities of third party A/D - D/A converter boxes are widely variable. Please check with the manufacturer to
ascertain which sample rates, word lengths and number of I/O channels are supported. You will need this informa-
tion later to appropriately configure the Pyramix software.
Time Code and Video Sync Option
The Pyramix Synchronization option provides SMPTE / EBU LTC and VITC time code in/out, video sync in/out and
word clock sync. A multi-pin circular mini-DIN connector, on the back plate of the Mykerinos board carries all the
system synchronization, time code and video sync signals. An optional break-out cable is provided for connec-
tions to time code, sync and video I/O. The Synchronization option allows Pyramix to be configured as a master or
slave lock to external time code, video or word clock. It also enables VITC and/or a visible time code burn-in win-
dow (BITC) to be added to video output/throughput.
Quickstart Guide : Cabling Pyramix in your System Environment Page 12
Cabling Pyramix in your System Environment
Please read this in conjunction with the guide or guides for your specific interface daughter-cards and external
interfaces/converters.
Due to the number of possible I/O options and the variety of user environments it is impossible to cover all the
variations of cable connections to and from Pyramix. However, here are some general rules and examples:
Mykerinos Back-plate
Audio Connections
Many users will have A/D Converters for feeding analog audio sources into Pyramix, and D/A Converters for play-
ing analog audio out of Pyramix. In this case, connect your analog audio sources to the A/D Converter analog
audio inputs, and the A/D digital audio output(s) to the Mykerinos digital audio input(s). Similarly, connect the
Mykerinos digital audio output(s) to your D/A Converter digital audio input(s), and the D/A Converter analog
audio outputs to your studio monitors or recorders. It may be also be useful to connect the stereo mini-phone out-
put on the Mykerinos card to either stereo headphones or a stereo monitor console input. The source for this jack
can be configured inside the Pyramix software.
Digital Audio Synchronization and TimeCode
THERE MUST BE ONLY ONE SOURCE OF SYNC FOR AUDIO AND TIMECODE
Digital audio relies on extremely accurate timing. In any digital audio system there can only be one source of sync
at one time. This is particularly important when planning multi-machine systems. If TimeCode is not locked to the
same sync source as the digital audio then either the audio will work properly, or the Time-Code. But NOT BOTH
AT THE SAME TIME.
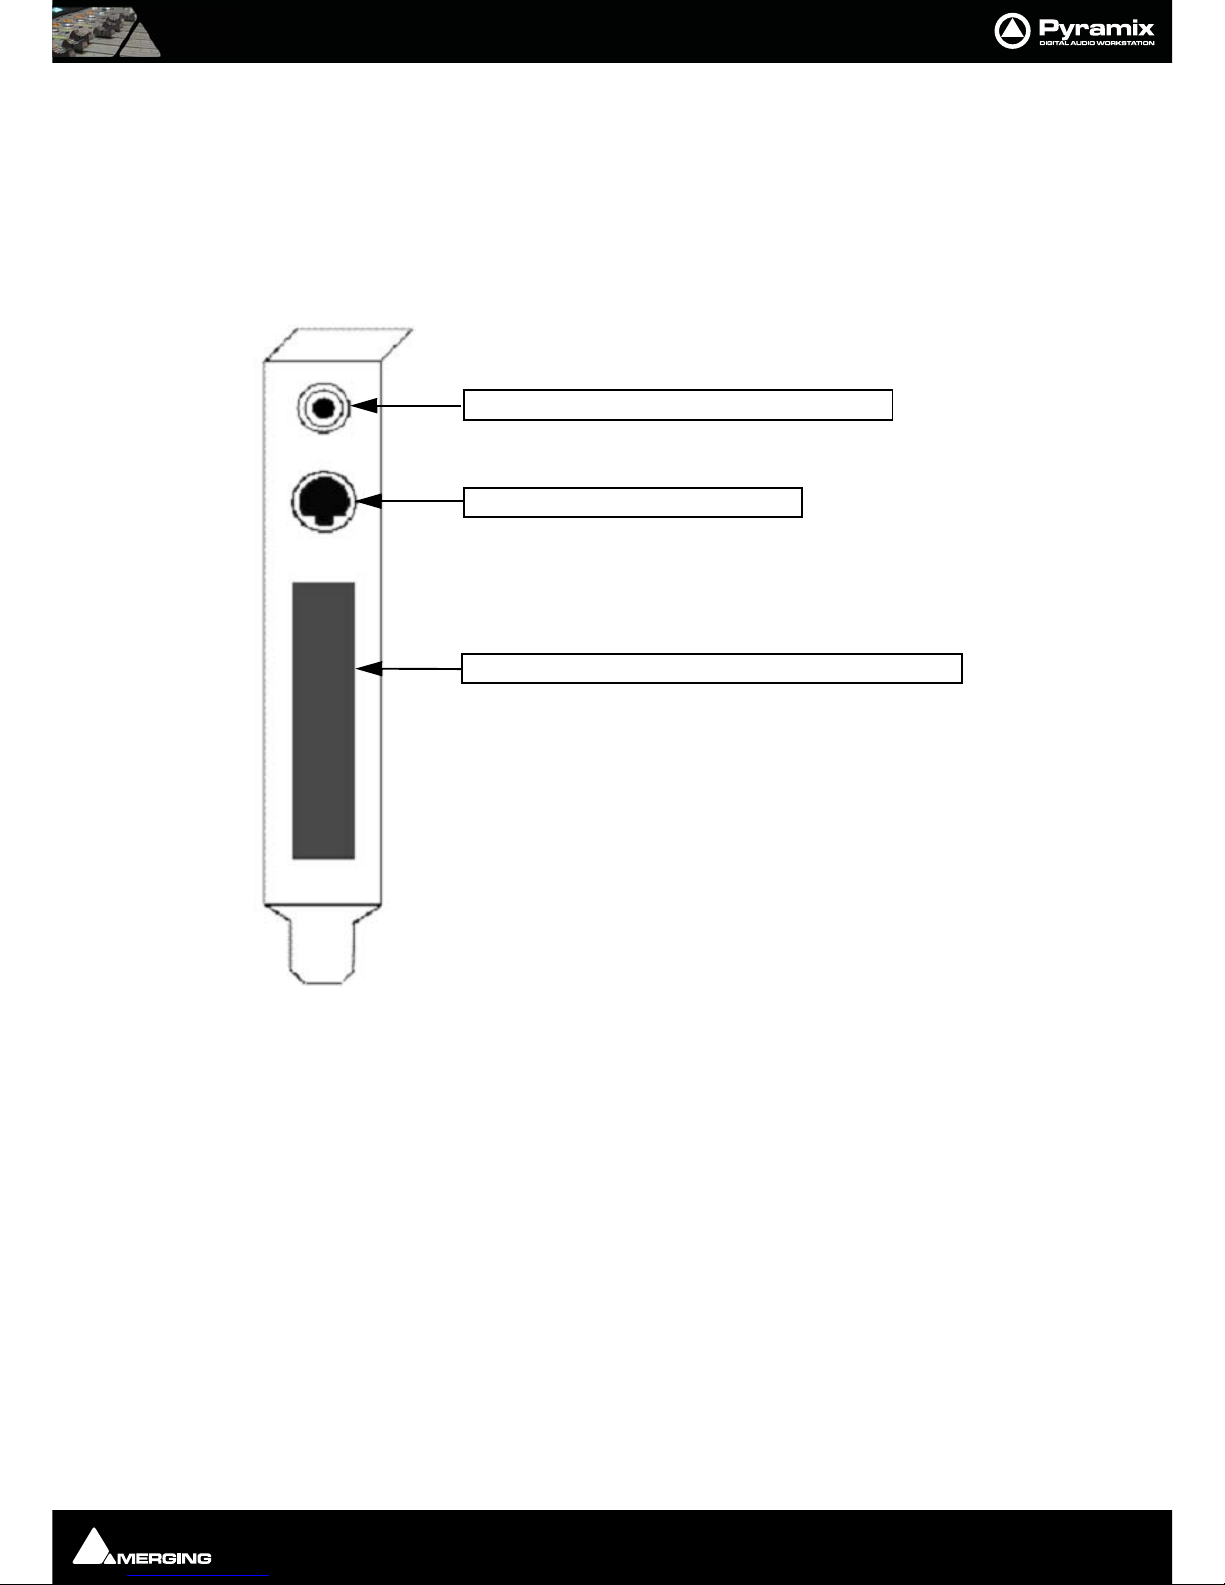
3.5mm Mini-Phone Jack for analog monitor output
8-pin Mini-DIN for sync breakout cable
Area where I/O Daughter Card output connectors appear
Mykerinos Backplate

Quickstart Guide : Installing Pyramix Virtual Studio Software Page 13
Ideally, in any system with more than one device, there will also be an independent source of sync. E.g. a word-
clock generator with multiple outputs. Each device is fed by a single output and configured to use this source as
its sync reference.
Sync, Video and Time Code Connections
In any digital audio system, it is VERY IMPORTANT all interconnected units are locked to the same sync reference.
A digital audio signal itself can sometimes be used as the master sync source, but a high stability video or word-
clock signal is usually preferable.
The Mykerinos board can be configured inside the Pyramix software to act as either a sync master, or to slave to a
variety of incoming signals.
Decide which device in your system will provide the master sync reference, then ensure that all other digital audio
devices in your system take their synchronization from it. This will require routing appropriate cables --whether
digital audio, video or wordclock cables-- to the various other devices and may also involve a separate sync refer-
ence generator and or distribution amplifiers.
If Pyramix is configured as the master (Internal sync), other digital audio devices will probably be able to lock to
the digital audio output from Pyramix. However, Pyramix can also be configured to output a wordclock signal at
the Video output BNC connector (Pyramix Synchronization option required).
If Pyramix is configured as a slave to an external device, Various synchronization signals can be accepted.
• To lock to incoming digital audio, connect an appropriate digital audio signal to a Pyramix digital audio
input.
• To lock to incoming video, connect an appropriate video signal to the Pyramix Video Reference input
(Pyramix Synchronization option required).
• To lock to incoming wordclock, connect an appropriate master wordclock signal to the Pyramix Video 2
Input (Pyramix Synchronization option required).
• To set the termination jumpers provided on the Mykerinos board, please see the Mykerinos User Guide.
• Pyramix can either output or lock to incoming SMPTE / EBU TimeCode.
•IfamasterLTC Time Code output from Pyramix is needed, cable the Pyramix LTC time code out RCA jack
or XLR to any other devices slaving to this output (Pyramix Synchronization option required). Pyramix
always generates time code when playing.
• To lock Pyramix to an incoming LTC time code signal, cable the LTC TimeCode output from the TimeCode
source to the Pyramix LTC input RCA jack or XLR (Pyramix Synchronization option required).
• Pyramix can accept and generate VITC in standard PAL/NTSC formats. It can also provide BITC (Burnt In
TimeCode) on its video outputs.
MIDI Connections
To use Pyramix MIDI functionality with external equipment, you will require a MIDI interface. Many current moth-
erboards include an on-board MIDI interface. If yours does not, it is a simple matter to add one. This can be either
an internal PCI card or an external unit connected via a USB port or an RS232 serial COM port.
Installing Pyramix Virtual Studio Software
Installation Overview:
Note: Note: If you have purchased hardware options such as Mykerinos cards, the USB
Sync Board and or an AJA video card, please install these first following the instructions
in the accompanying documentation.
The Pyramix software uses an automated installer wizard which will install all necessary prerequisites. We use a
unified installer package containing the current versions of Pyramix, VCube and Ovation. The initial installer
screen offers the choice of Pyramix, VCube and Ovation. Choosing Ovation will also install Pyramix.
Quickstart Guide : Installing Pyramix Virtual Studio Software Page 14
You may exclude the installation of any of the individual components in the wizard, if the device in question is not
present on your machine or if you do not intend to use an item, by un-ticking the tick boxes next to the items
listed in the wizard.
Note: Note: The security dongle (or Mykerinos card) must be in place and the security
keys entered before attempting to launch Ovation
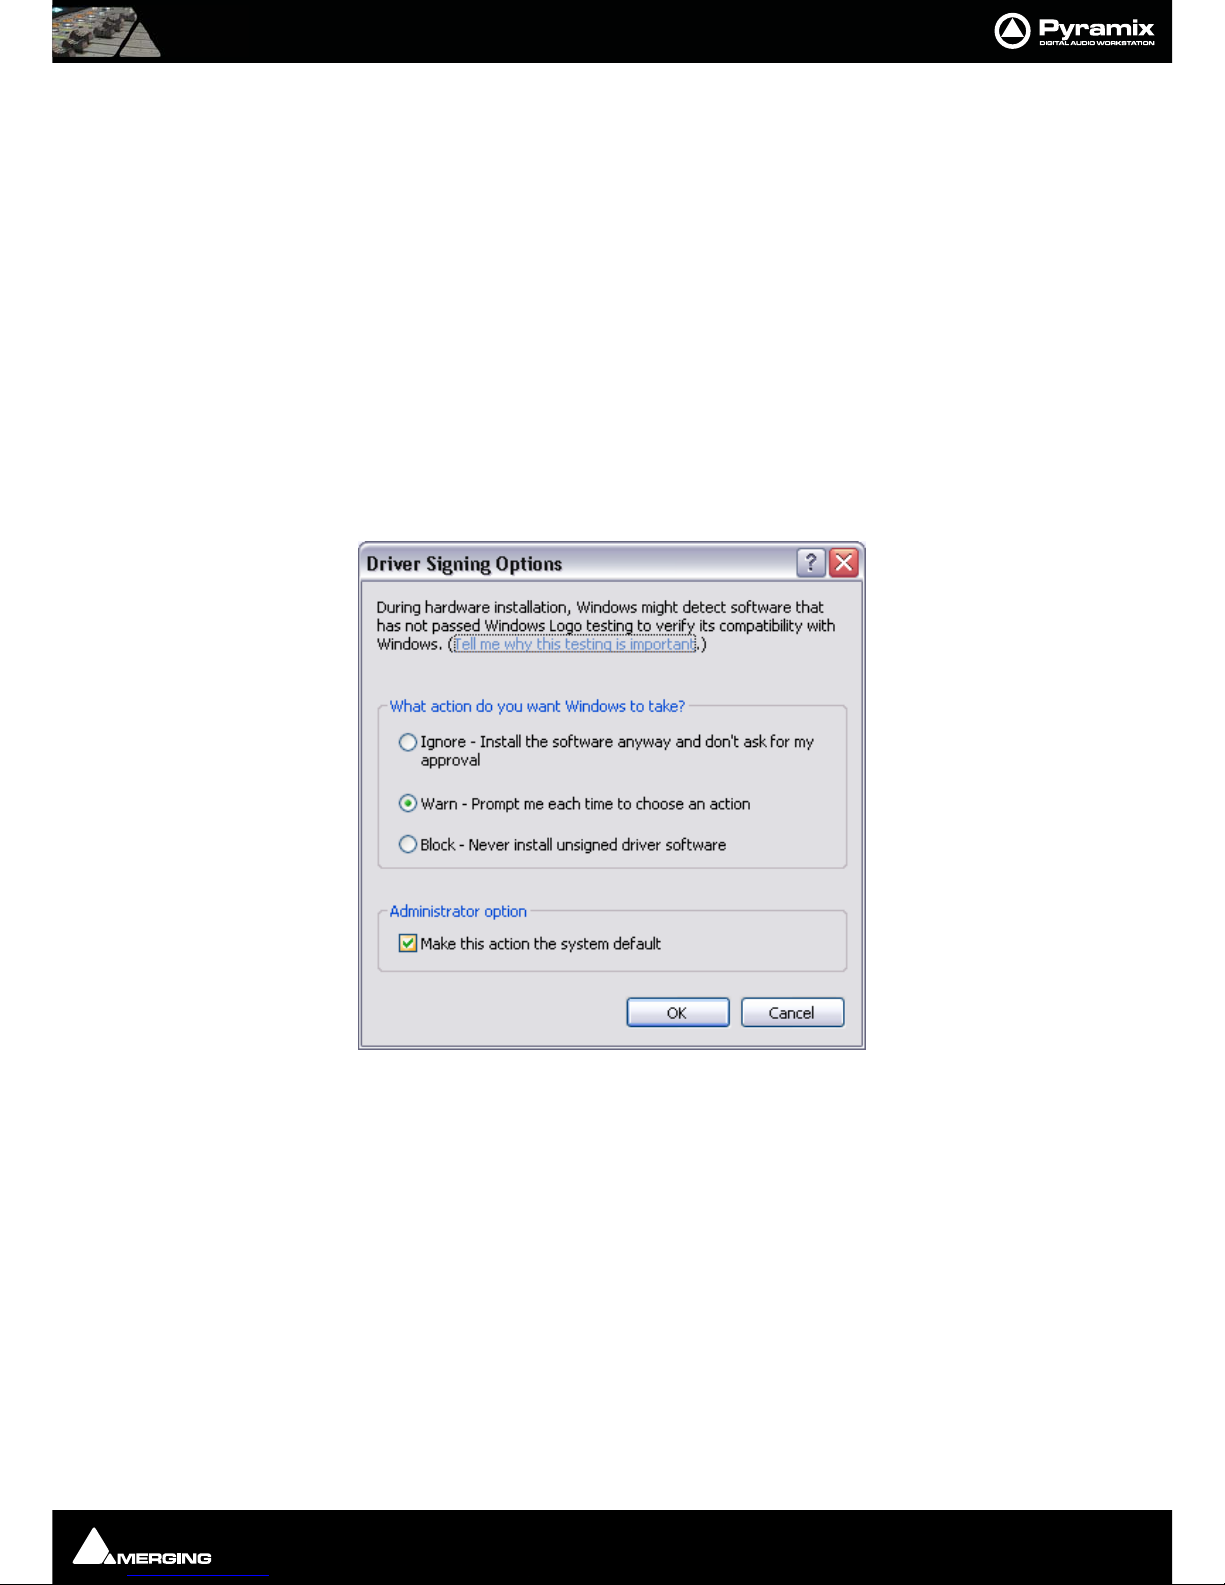
Driver Signing
Important! During installation in Windows 7 and Windows Vista you will experience a number of warn-
ings about installing drivers which are not ‘digitally signed’. Please choose the “Install anyway” option in
each case.
Important! Before attempting to install the Pyramix Virtual Studio software in Windows XP please check
the following setting:
Start > Control Panel > System : Hardware
Click on the Hardware Tab, then click on Driver Signing. The Driver Signing Options dialog opens:
Make sure the middle option Warn is selected.
If installing on a Windows Vista system you ust be logged in as an Administrator and, if a dialog warning that a
driver is not ‘digitally signed’ appears simply click on the ‘Install Anyway’ option.
Running the Installer
Note: You must have full Administrator Access to install Pyramix.
1. Insert the Merging Technologies USB memory stick or installation CD/DVD, as applicable, into a suitable
socket or drive.
2. Unless you have disabled the function the installer will run automatically.
3. If necessary locate and run the installer manually.
4. Choose Pyramix when prompted
5. At the next screen, de-select any items you do not require.
Driver Signing Options dialog

Quickstart Guide : Installing Pyramix Virtual Studio Software Page 15
6. Override any warnings about unsigned drivers during the installation process.
7. Plug in the security USB dongle.
8. Enter the optional keys in MT Security Settings, if necessary.
9. Restart the PC..
10. Before attempting to launch Pyramix, please read First launch on page 16
Note: If the installation appears to freeze for a long period please check that the Driver
Signing warning dialog is not hidden behind another Window. Installation will not con-
tinue until you click OK in this dialog.
WARNING: Certain computers do not properly shut down despite the reboot command issued by the installer but
only perform a log off.
In this case, please activat a full shut down manually.
Authorization System
The Pyramix software and its various software options are protected by an authorization key mechanism which
uses a unique registration key number generated by Merging Technologies. Based on purchased software compo-
nents, this key is unique to your Sentinel or HASP USB dongle serial number or Mykerinos board serial number,
your Company Name and your User name. Once you have registered your software you will be provided with this
Key or Keys (depending on the options chosen).
When you receive your Pyramix Package you should also receive either an email from your Merging technologies
Sales Partner or a printed copy of the email containing your security setting details. If you did not receive this key,
have lost it or would like to change the user and/or company name, please contact your Merging Sales Partner
with your Mykerinos serial #, your User Name, your Company Name and the list of purchased software compo-
nents. Usually, a key can be issued within one business day, after the verification of your personal data has been
completed.
Enabling Pyramix Virtual Studio with your Software Key
Pyramix Virtual Studio is protected by a special software Key. Once you have registered your software you will be
provided with this Key or Keys (depending on the chosen options).
Entering your Key(s)
After the Pyramix installation process you will be prompted to enter your Authorization Key. If you click Ye s the
MT Security Settings dialog will be launched automatically, allowing the Key or Keys to be entered immediately.
If you choose not to enter your Key at this point you can do so later by choosing one of the following procedures:
1. Double-click the file YourPersonalKeyXXXXX.mtk. This is attached to the email containing your Key(s).
2. Open the MT Security Settings Control Panel
(Windows Task Bar Start > Control Panel > MT Security Settings),
click the Import Key button and browse for your Key file called
YourPersonalKeyXXXXX.mtk
3. Open the MT Security Settings Control Panel (as above), in the Registration section select the board num-
ber corresponding to the serial number for your Keys or HASP Key for a dongle, click the Enter Key button
and type your User Name, Company Name and Key then click OK. Repeat this step for each Keys listed in the
email.
Changing or re-entering a Key
Should you need to subsequently change or re-enter a Key, follow the appropriate option above.
The key system is "smart". Only one key or set of keys is required regardless of the number of boards in a system.
Any card can hold this key set as the authorization is processed based on a "Logical OR" of all keys present on any
and all Mykerinos boards. Of course this Logical OR will only process keys with identical User Name and Company
Name to the one entered in the key enabling window.
Quickstart Guide : First launch Page 16
First launch
Important! After installation has been completed, please reboot the PC before attempting to launch
Pyramix Virtual Studio. Then open the VS3 control panel application.
Start > Programs > Pyramix > VS3 control panel
For Pyramix systems with a single Mykerinos board:
Leave all default selections as they are for now, making sure the On Bus checkbox for your Mykerinos card is
indeed checked then save and exit the VS3 control panel application.
For Pyramix systems with a multiboard configuration:
• Make sure there is a check mark in the On Bus boxes for each board installed.
• Check that the Application combo box is showing Pyramix. If not, select Pyramix from the list.
• Select XDTDM from the Buses Mode combo box
• Select which board is to provide an external Video/TC reference with the radio buttons next to the board
icons.
• For now, leave the default DSP Allocation settings as they are.
• When the VS3 Control Panel Do you want to save this board selection? dialog box appears, click on OK
• the VS3 Control Panel will close
VS3 Control Panel
Quickstart Guide : Starting Pyramix Virtual Studio Page 17
Double-click on the Pyramix Virtual Studio desktop icon to launch Pyramix.
Alternately, choose Start > Programs > Pyramix > Pyramix Virtual Studio.
The main User Manual is available from within Pyramix and may be accessed via the Help menu or by pressing F1,
or online at merging.com
ASIO and Rewire
Please see the main User Manual for details about how to use the Rewire and ASIO support.
Starting Pyramix Virtual Studio
By default the Installer will put Pyramix Virtual Studio into your Programs folder. It also places a Pyramix short-
cut icon on the Windows desktop.
The first time Pyramix Virtual Studio is launched, you will need to enter your special Key to enable the program
properly (Please see: Enabling Pyramix Virtual Studio with your Software Key on page 15). On program
launch, you will see the main Pyramix Virtual Studio by Merging Technologies window with its Toolbar at the
top, and transport controls and status displays at the bottom.

Quickstart Guide : Pyramix User Interface Page 18
Pyramix User Interface
The Pyramix user interface has evolved into an extremely powerful tool for manipulating audio. Commands and
functions can be accessed from pull-down menus, pop-up menus, tab windows and keyboard shortcuts.
There are generally several ways of accessing any given function in Pyramix. This helps users to work in the way
they find most comfortable for the type of projects they are undertaking. It also means ‘Power Users’ can develop
highly efficient operating procedures.
It is perfectly possible to casually use Pyramix without discovering all of the many possibilities on offer. However,
by looking deeper, a far more rewarding experience awaits.
Mouse Modifier Keys
The range of possible actions resulting from a mouse click are massively extended by the use of Keyboard Modi-
fiers. These greatly aid productivity and are well worth learning. Please see: Appendix I Mouse Modifier Keys
on page 75
Context Menus
Right-clicking over objects on screen such as Clips, Mixer Strips and controls and Track Headers pops-up menus
with commands and options relevant to the object.
Keyboard Shortcuts
In particular we would encourage users to use keyboard shortcuts and preferably the standard Pyramix layout.
Keyboard shortcuts can be fully customized and users of other workstations will discover we have also provided
familiar keyboard layouts to help them on their learning curve.
Macros
The Macro is another powerful feature of Pyramix. Macros are sequences of commands which can be invoked by a
single key or key combination. Some macros are conditional. I.e their precise action depends on variables in the
Project. A considerable library of pre-programmed macros is provided together with an editor which enables
users to construct their own macros.
Pyramix Concepts
Project
A Project is the top level of organization. Projects are saved with the file extension .PMT. A Project controls and
keeps track of all the various elements you are assembling at a given time. A Project always contains a Mixer and

Quickstart Guide : Pyramix Concepts Page 19
a Composition, viewed on the Timeline, or as an Edit Decision List (EDL), plus Libraries containing Master
Clips, Compositions, Mixer settings, and Fade settings.
Mixer
The Mixer, is the nexus of the Virtual Studio. The Mixer routes all audio into and out of a Pyramix Project. It also
determines audio sample rates and synchronization. The user can configure the Mixer as appropriate, for the num-
ber and type of inputs strips and output buses needed for a Project. Without a properly configured Mixer, no audio
can be recorded, mixed, or monitored. The mixer has a number of pages, accessed from the M A C R & Obuttons at
top-right of the Mixer window. The default Mix ! page resembles a conventional hardware mixer and is the one we
shall concentrate on in this guide. The other pages deal with Routing, Automation, Configuration and Organiza-
tion. Full details of these pages can be found in the Pyramix User Manual.
Monitor
Pyramix features an extremely powerful monitoring module. This takes a feed from all output buses and offers
sophisticated control options. However, you do not have to use the Monitor and not doing so will save DSP power.
For this Quick Start Guide, we will simply use the main bus outputs for monitoring. For full details of the Monitor,
please see the Pyramix User Manual.
Meter Bridge
Pyramix also features a meter bridge. This can display levels for all input strips, all buses and external sources. This
is an advanced feature and not necessary for simple use. For full details of the Meter Bridge, please see the Pyra-
mix User Manual.
Pyramix Virtual Studio Window

Quickstart Guide : Pyramix Concepts Page 20
Composition
A Composition is any number of Clips complete with edits and fades, level settings etc. placed on a Track or
tracks in a time relation to each other and to the Timeline.
Note: A Composition can contain other Compositions.
Timeline
The Timeline shows a graphic representation of the current Composition. and its location in relation to the Play-
head Cursor, In and Out Marker Cursors and various other Markers. All editing is undertaken in the Timeline,
EDL, Fade Editor and Trimmer windows.
EDL
The EDL (Edit Decision List), is a textual and numeric representation of the same information shown in the Time-
line and Fade Editor. Changes made here are reflected in the Timeline and vice-versa.
Media Files
These are the actual audio data files which can only be seen at the Windows level, e.g. in Windows Explorer. In
Pyramix, they are represented by Master Clips which reference the raw data files.
Master Clips
The concept of Master Clips is one of the keys to the power of Pyramix. An individual Master Clip is a set of point-
ers that reference one or more Media Files.
Note that a single Master Clip references all Media Files in a multi-channel audio recording. E.g. a stereo record-
ing can have one or two Media Files, (depending on whether there is a tick in the One file per track box in the
Media Option section of the Record page of Settings > All Settings > Project.
When One file per track is checked,one invisible Media File is generated for each channel of a recording but only
one Master Clip. So.a stereo Master Clip references two invisible Media Files and a Multi-channel Master Clip
references as many invisible Media Files as there are channels in the recording. check box ‘One file per track’),
but will only generate one Master Clip.
A Master Clip can be mono, stereo, four channels, six channels, 24 channels, in fact there is no limit to the number
of channels that can be contained within a Master Clip. When a Master Clip is placed into a Composition there is
the option to place it where it was originally recorded.
Master Clips also contain attributes which identify parameters such as a File name, time code stamp and other
information.
Clips
The individual Clips shown on the Timeline contain pointers to Master Clips which in turn point to audio Media
Files.
Media Management - Housekeeping
The Windows hierarchical filing system can easily become confusing and cluttered. Complex audio projects gener-
ate thousands of more or less enigmatically named files. Keeping track of all the files used in a project can become
a nightmare even if the user is meticulous.
Pyramix uses the concepts of Media Folders and Libraries to reduce the clutter and provides management tools
specifically designed for audio. This Media Management helps users to work in a structured and simple manner
whilst keeping track of all the Project components.
Media Drives and Folders
Media Drives or Media Folders are Windows folders which contain Media Files. Pyramix needs to specifically
mount these Media Folders in order to access the Media Files contained therein. Once mounted, suitable files
are shown as Master Clips.
Other manuals for Pyramix
5
This manual suits for next models
1
Table of contents
Other Merging Musical Instrument manuals


