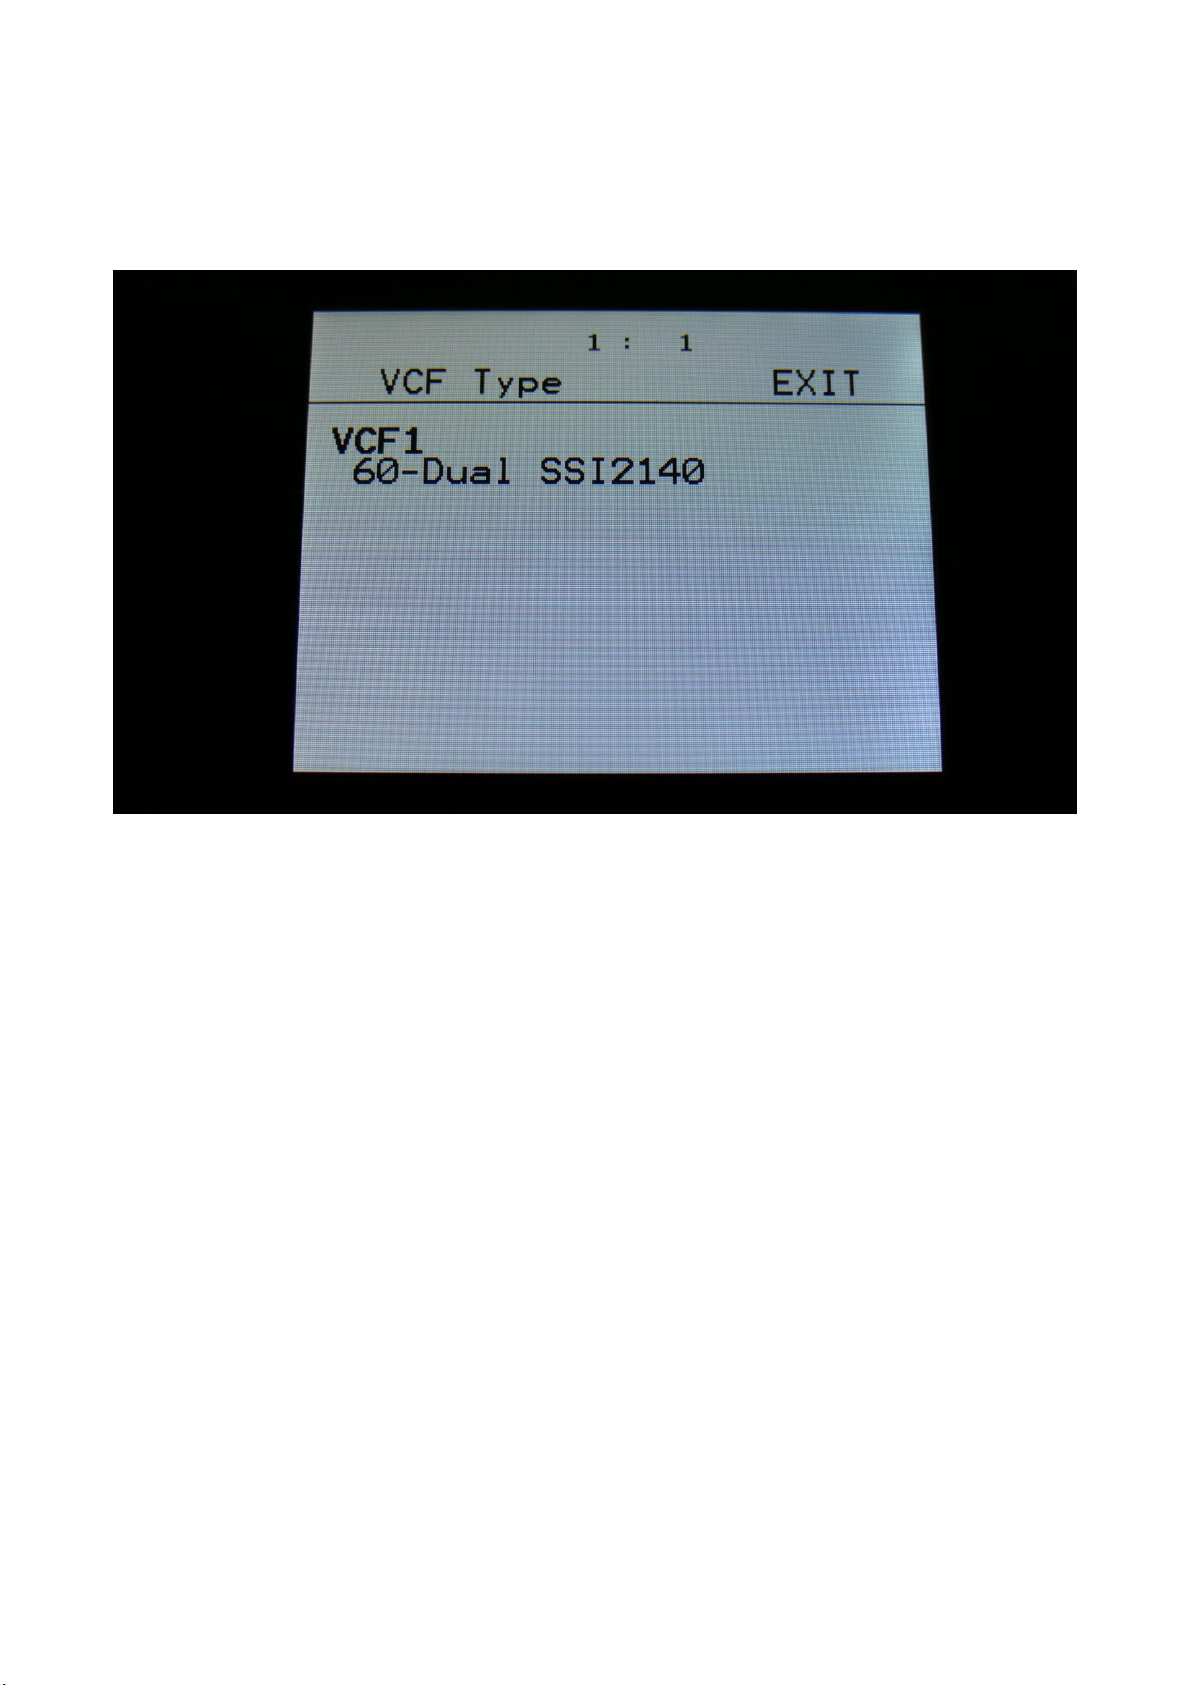
manuals.online logo
Brands
  1. Home
  2. •
  3. Brands
  4. •
  5. Gotharman
  6. •
  7. Musical Instrument
  8. •
  9. Gotharman Gotharman's Tiny LD Technical manual

Gotharman Gotharman's Tiny LD Technical manual

1
Gotharman’s Tiny LD
Granular Workstation
Update Manual 12.96
2
-Tiny LD only: Now compatible with new dual line SSI2140 filterboard –VCF conn V2 required
Page 4
-Tiny LD only: The LOWR button can now function as a Freeze button Page 11
-Parametric EQ insert effects added Page 12
-All sequencer steps on a subtrack can now be offset adjusted with one knob movement Page 15
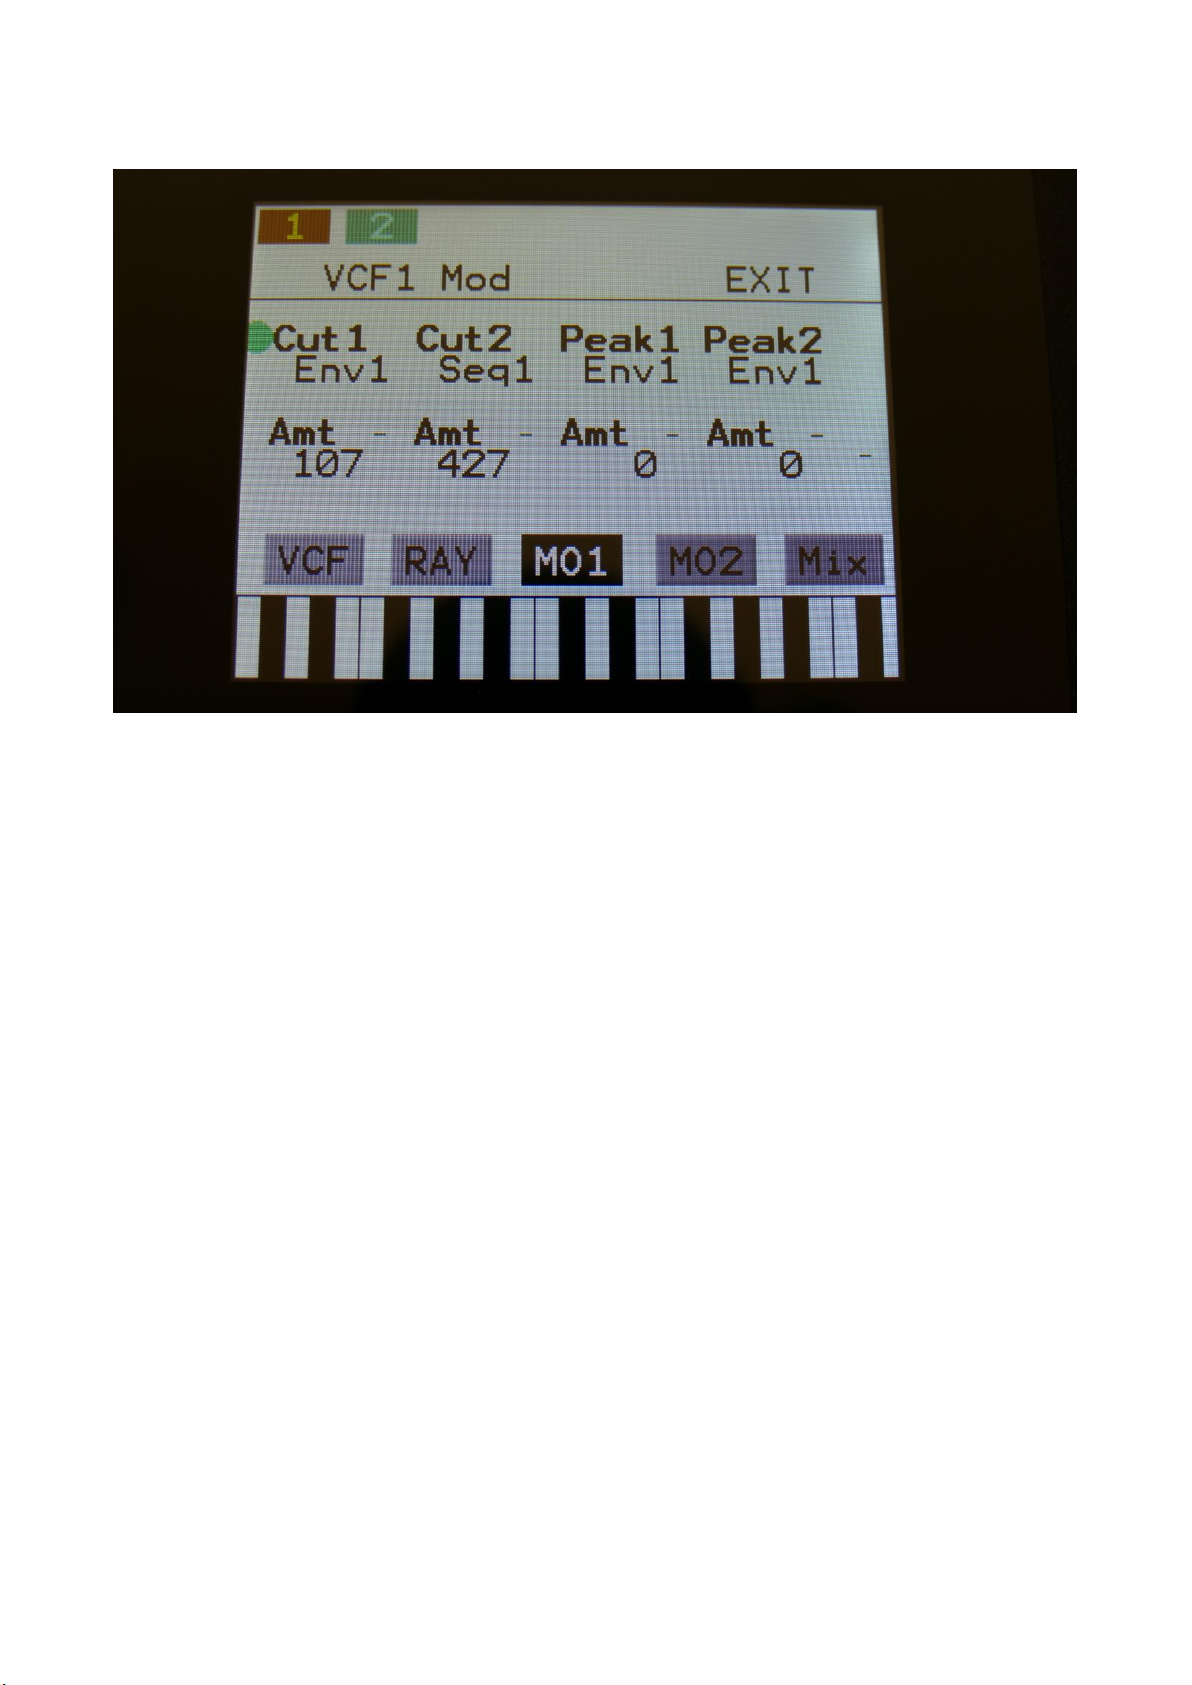
-Position Rotation Modulation added to the Sequencer note tracks Page 16
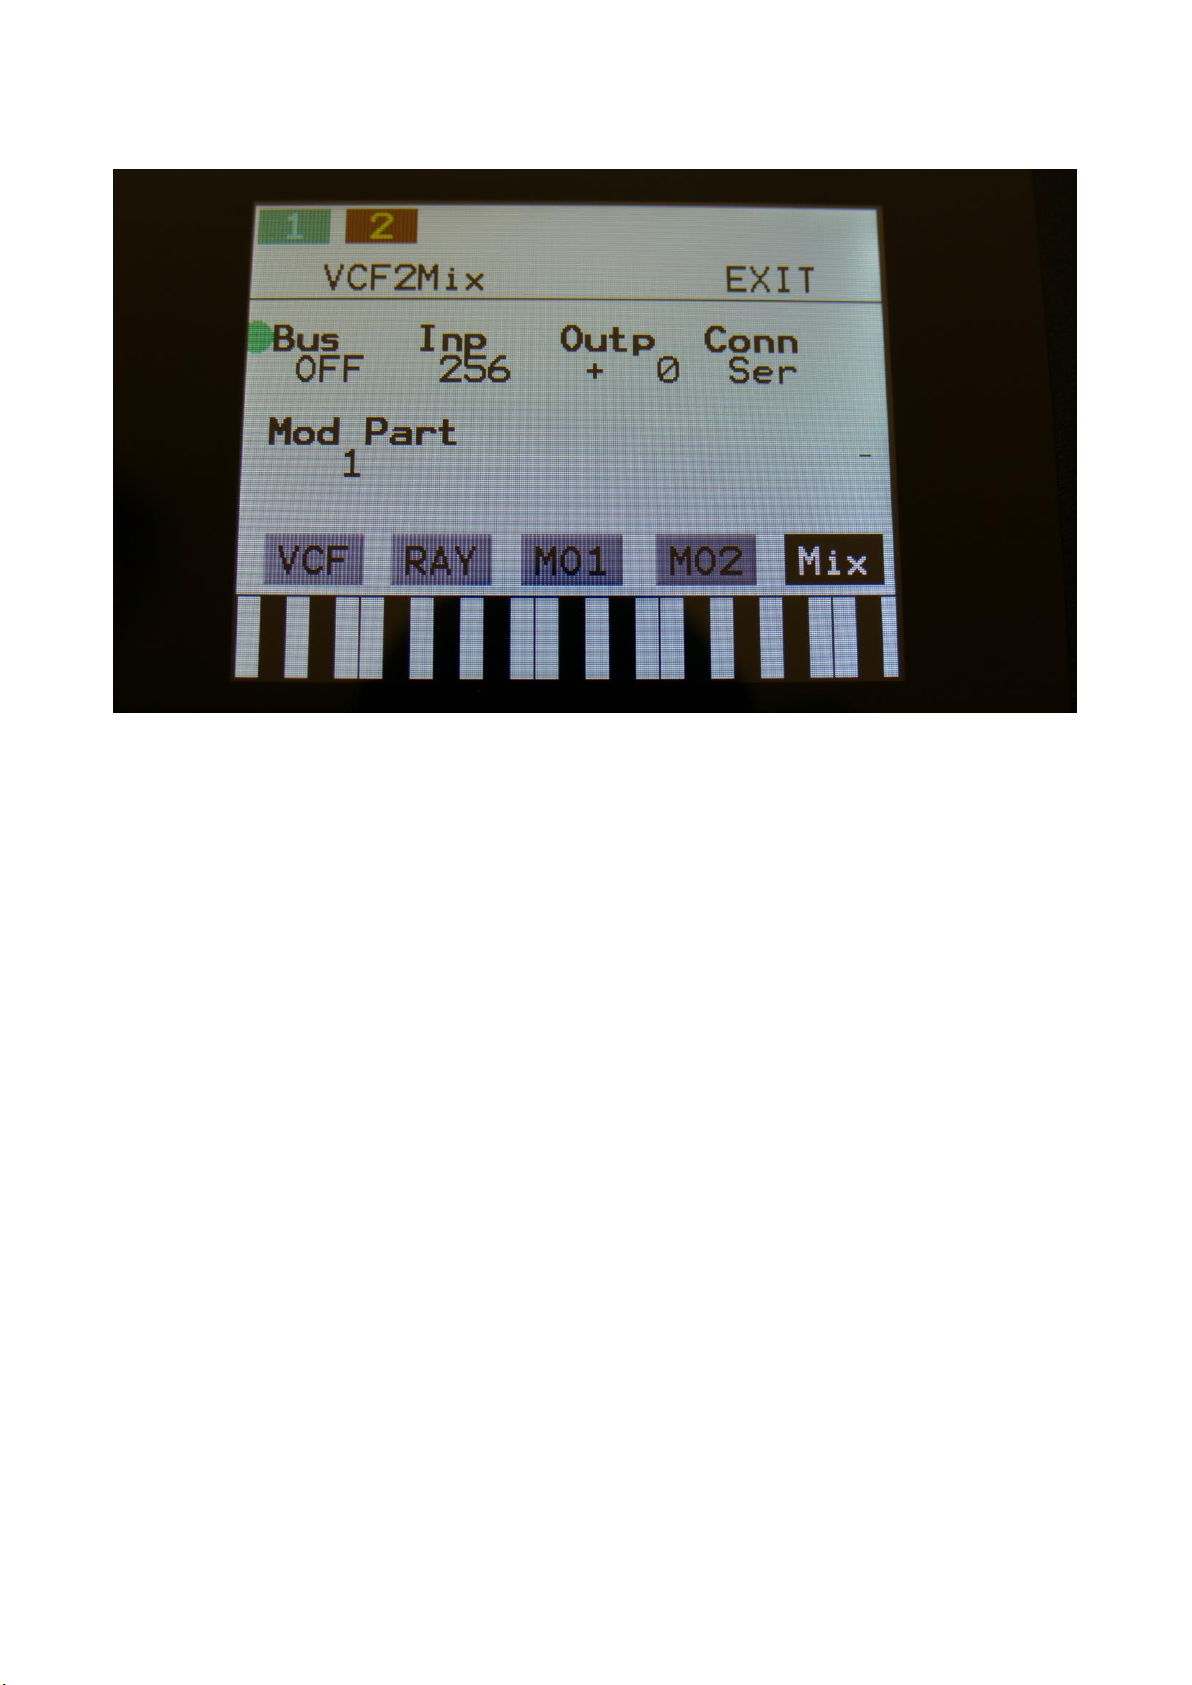
-It is now possible to output one Audio BUS to another Audio BUS. Page 17
-A BUS Follower/Envelope OFF position has been added. Page 18
-Insert effects input gain can now be adjusted Page 19
-When recording an audio track, the BPM of this is now included in the sample name
Page 20
-Audio inputs can now be swapped Page 21
-Quick Edit Knob can now be switched off Page 22
-Some page names on the BUS pages have been changed, to make it look less cryptic. Page 23
A few things, that were missing in the User Manual, has now been added:
-Chop Mode parameter description Page 26
-How to set up (stereo) samplings Page 27
Bug Fixes:
In my eager to make everything run as fast as possible, I unfortunately managed to create a bug, in
an earlier update, which got the audio inputs sample frequency lowered. I sincerely apologize for
this, but now it is back to 44.1 KHz. Thanks a ton to Joakim Gleisner for doing all the necessary
measurements, to detect this.
The 2 Morph knobs would not work in their entire range, when controlled via MIDI. Now they will.
If a part that was set to external, was the selected part, the Morph knobs stopped working. This
has now been fixed.
3
If a knob was set up to modulate the output effects Mix and Pan, the Quick Edit function would
not be switched off. This has now been fixed.
Clear Controller Track were using the track number selected by the Note Tracks. Now it is using
the Controller Track number.
Tiny LD only: When selecting mod sources for parameters, CC4-15 was incorrectly displayed as
CC5-16. This has now been corrected.
Tiny LD only: The green dot and parameter row selection was missing on the WaveBuilder page.
This has now been fixed.
Tiny LD only: When accessing the Random page, and the lower row of parameters were selected,
it would not be possible to adjust the random range. Now it will.
4
SSI2140 Dual Line Filterboard
A new dual line multi-mode filterboard, based on the great new SSI2140 filter chip, are now
compatible with Tiny LD.
Please note that your Tiny LD must have the VCF connector MkII installed, in order for this to
work. All Tiny LD MkII’s, that were ordered with a VCF connector, has this connector installed.
Later MkI’s might also have this installed. Please check on your receipt. The price of the MkII
connector is currently EUR 170, while the MkI connector costed EUR 150. If your Tiny LD has the
MkI VCF connector installed, and you would like to use it with the new dual line filter, it can be
upgraded at Gotharman’s for the price difference.
The Dual SSI2140 filterboard has 2 analog multimode filters. Each of these filters can be assigned
to their own Audio Bus, doubling the Tiny LD analog filter power!
Each of the filters has 4 filter blocks. By combining these blocks, using VCA’s, it is possible to obtain
a number of different filter modes.
It comes with a number of pre-programmed filter types, but it is also possible to adjust these, to
obtain an even wider range of filter types.
If different filter types are selected for morph layer A and B, it will morph between the filter types.
5
After installing the SSI2140 filterboard in your Tiny LD, you must go to MOR>VCF TYPES, to set it
up.
Select VCF number 60-Dual SSI2140.
After you have selected this, turn your Tiny LD off and then on again, to make it set up things right.
6
On the Synth VCF pages, you will now find the Dual SSI2140 parameters.
On the top of the VCF pages, you will find 2 touch buttons, named “1” and “2”. Touch these to
switch between the settings for VCF1 and VCF2.
Since the settings for VCF1 and VCF2 are the same, only the settings for VCF1 will be explained
here.
Cut: 0 to 511. Adjusts the filter cutoff frequency.
Reso: 0 to 511. Adjusts the resonance of the filter.
Inp: 0 to 511. The audio input level for the filter.
Type: Selects a pre-programmed filter type, that can be adjusted using Adj1-4. Different filter
types can be selected for morph layer A and B, to make it morph between the filter types.
The pre-programmed filter types are: LPF4, LPF3, LPF2, LPF1, BPF1, BPF2, BPF3, B3_2, BPF4, B3L1,
B3L2, B4L1, H3L1, HPF3, APF3, A3L1, Not1, Not2, Dst1, Dst2, Dst3, Dst4, Dst5, Dst6, Free (design
your own filter type, by adjusting Adj1-4).
Adj1-4: -128 to +127. Adjusts the level of the filter block 1-4 VCA’s, to obtain different filter types.
7
Touch the RAY touch button, to enter this page.
G-Ray: Adjusts the amount of g-RAY intermodulation. 0: no g-RAY, 3: max g-RAY. Range: 0 to 3.
Mode: G-Ray mode.
-Norm: Normal 1:1 feedback.
-Neg: 1:1 feedback with the signal inverted (a 180 degree phase shift)
-Ultr: Boosted feedback.
-Uneg: Boosted feedback with the signal inverted (a 180 degree phase shift)
Feed: 0 to 511. G-Ray feedback level.
FmBus: 1 to 8. The audio bus, that will apply the audio signal for FM.
Cut3: Has currently no effect on this filter.
Out2: Has currently no effect on this filter.
FM: 0 to 511. The amount of frequency modulation (audio range), that are applied to all of the
filter cutoff frequencies, from the audio Bus selected by the FmBus parameter.
8
Touch the MO1 touch button, to enter this page.
The VU-meter at the right of the screen, shows the filter output activity.
For each parameter, that can be modulated, it is possible to select a modulation source, and to
adjust the modulation amount. Only the positive modulation sources, can be selected by the Edit
Knobs. To make a modulation source negative, touch the modulation source parameter. For a
complete list of modulation sources, see the list in the start of this section.
The upper row of parameters selects the modulation sources, The lower row of parameters
(Labelled Amt) adjusts the modulation amount in the range 0 to 511.
Cut1, Cut2: Will modulate the Cutoff Frequency.
Peak1, Peak2: Has currently no effect on this filter.
9
Touch the MO2 touch button, to enter this page.
The VU-meter at the right of the screen, shows the filter output activity.
For each parameter, that can be modulated, it is possible to select a modulation source, and to
adjust the modulation amount. Only the positive modulation sources, can be selected by the Edit
Knobs. To make a modulation source negative, touch the modulation source parameter. For a
complete list of modulation sources, see the list in the start of this section.
The upper row of parameters selects the modulation sources, The lower row of parameters
(Labelled Amt) adjusts the modulation amount in the range 0 to 511.
Reso: Will modulate the amount of resonance applied to all filters.
Feed: Has currently no effect on this filter.
Out: Has currently no effect on this filter.
Gfeed: Will modulate the amount of G-Ray feedback applied.
10
Touch the Mix touch button, to enter this page.
The VU-meter at the right of the screen, shows the filter output activity.
Bus: 1 to 8. The audio Bus, that the filter will be placed on.
Inp: 0 to 511. The audio input level for the filters.
Outp: -128 to +383. The output level of the filters.
Conn: Ser/Par. (Only on VCF2). Places this filter in either serial or parallel to VCF1, when the filters
are placed on the same Audio Bus.
ModPrt: 1 to 16. The part from which, the filter modulation sources will be added.
11
Lowr Button As Freeze Button
Since it is now possible to select the upper and lower parameter rows, simply by touching the
screen, the Lowr button might no longer be super useful. So now it is possible to use it as an effect
freeze button instead.
Go to MOR>COMMON2, and select the Lowr button to be either Lowr of Freez.
12
Parametric EQ insert effect
A parametric EQ with different characteristics has been added to the insert effects.
The parameters:
Mix: The output of the EQ is inverted. This means, that when the Mix parameter is set to 256, the
EQ is actually subbed from the audio input. Set the Mix parameter to different values, to obtain
different EQ effects, or just turn it fully up to 511, to get a normal parametric EQ.
Freq: Sets the frequency, at which the EQ will cut or boost.
Q: Sets the width of the frequency band, that will be cutted/boosted.
Type: Sets the EQ characteristics. The types available are:
Band1: Cut/boost the frequency/range, selected by Freq/Q.
Band2: Like Band1, but with a slightly sharper sound.
Band3: Like Band2, but with an even sharper sound.
Low: Cut/boost the frequencies below the frequency selected by Freq.
High1: Cut/boost the frequencies above the frequency selected by Freq.
High2: Like High1, but with a sharper sound.
FAT: Like Band3, but it fattens the sound a bit.
Nrw: Turning this up, will narrow the frequency band affected by the EQ.
Boost: Turning this up, will boost the output gain of the EQ.
13
C/B: Cut/Boost. Setting this to a negative value, will damp frequencies on the input signal. Setting
it to a positive value, will boost frequencies on the input signal.
14
EQ Modulation
Freq1/Freq2: Will modulate the EQ frequency.
Q: Will modulate the EQ frequency width.
C/B: Will modulate the cut/boost parameter.
15
Sequencer Steps Offset Adjust
It is now possible to adjust the offset of all steps in a sequencer sub track, from step 1 to the
selected last step, by turning one knob.
To do this, touch the knob select bars in the bottom of any steps page, to select step editing with
knobs. Now touch the active knob select bar one more time, and it will switch to “All”.
You can now, by turning Edit Knob 1, adjust the offset of all steps at the same time. Middle
position of Edit Knob 1 is zero, above middle will turn the offset up, below middle will turn the
offset down.
SPECIAL NOTE FOR THE POSITION SUB TRACK:
When adjusting the offset of the step positions on the position sub track, the positions will “roll
over” around the selected last step. This means, that if you are turning the offset up, the last steps
before the last step, will now be placed on the first steps of the track. Likewise, if you turn the
offset down, the first steps of the track, will now be placed on the last steps of the track.
SPECIAL NOTE FOR THE SUB-POSITION SUB TRACK:
Offsets can’t be adjusted on this. If “All” is selected on the sub-position track, the offset of the
position track will be adjusted, without any visualizing.
16
Position Rotation Modulation
Position Track Rotation has now been added as a modulation destination on the sequencer note
tracks.
This will do exactly the same, as when adjusting the offset of all steps of the position track, but it is
done by a modulation source.
On the Note Track Mod page, simply select “Rota” as the modulation destination, select the
modulation source, and turn up the modulation amount.
17
Output An Audio BUS to another Audio BUS
Many LD3 users has let me know, that they often needs to connect the output of an audio bus, to
another audio bus, in order to place effects before/after the audio bus follower VCA. This could be
done by adding a jack cable from an audio output to an input.
But now you can save the cable! Now you can simply output a bus to another bus internally in Tiny
LD! Bus1 can output to Bus2, Bus3 can output to Bus4, Bus5 can output to Bus6, Bus7 can output
to Bus8.
To do this, simply go to the BUS OUT page, and select the Bus output to be another Bus, instead of
an audio output or output effect.
18
BUS Follower/Envelope OFF position
If you would like to just use the Audio Bus Follower as a modulation source, without it affecting
the output level of the Bus itself, this is now possible, by setting the Env to OFF, on the BUS ENV
page.
19
Insert Effects Input Gain
On the Insert Effects Mo2 page, it is now possible to adjust the Insert Effect input gain, using the
new Gain parameter:
20
Audio Track BPM
When recording an audio track, the BPM of this is now included in the sample name –
A058_05_120_AUDTR -Preset number_Track Number_BPM.

Other Gotharman Musical Instrument manuals

Gotharman Fuzion User manual

Gotharman

Gotharman Fuzion User manual

Gotharman Little deFormer 3 User manual

Gotharman

Gotharman Little deFormer 3 User manual

Popular Musical Instrument manuals by other brands

Casio Privia PX-100 Safety precautions

Casio

Casio Privia PX-100 Safety precautions

Yamaha Electone HC-2 user guide

Yamaha

Yamaha Electone HC-2 user guide

thomann DP-30 user manual

thomann

thomann DP-30 user manual

Casio PX830ES1B user guide

Casio

Casio PX830ES1B user guide

Mattel Disney PIXAR COCO instructions

Mattel

Mattel Disney PIXAR COCO instructions

Roland FP-10 ACR owner's manual

Roland

Roland FP-10 ACR owner's manual

ItsImagical electro-keyboard manual

ItsImagical

ItsImagical electro-keyboard manual

SONOR Orff SMART Series instruction manual

SONOR Orff

SONOR Orff SMART Series instruction manual

Roland JV-1000 manual 

Roland

Roland JV-1000 manual 

UHL X3-1 owner's manual

UHL

UHL X3-1 owner's manual

Roland DJ-70 MK II Service notes

Roland

Roland DJ-70 MK II Service notes

Yamaha Clavinova CLP-525 Quick operation guide

Yamaha

Yamaha Clavinova CLP-525 Quick operation guide

ns design NXTa Omni Bass instructions

ns design

ns design NXTa Omni Bass instructions

Becker BDGP-1 owner's manual

Becker

Becker BDGP-1 owner's manual

ns design NS WAV4 Radius owner's manual

ns design

ns design NS WAV4 Radius owner's manual

Yamaha GranTouch owner's manual

Yamaha

Yamaha GranTouch owner's manual

Bontempi Toy Band Star iGirl 13 3242 owner's manual

Bontempi

Bontempi Toy Band Star iGirl 13 3242 owner's manual

Casio SK-5 - SERVICE Service manual & parts manual

Casio

Casio SK-5 - SERVICE Service manual & parts manual

manuals.online logo
manuals.online logoBrands
  • About & Mission
  • Contact us
  • Privacy Policy
  • Terms and Conditions

Copyright 2025 Manuals.Online. All Rights Reserved.