Meridian MConfig User manual

Meridian Configuration Program Guide

Preface
ii
Copyright and acknowledgements
Sales and service in the UK
Meridian Audio Ltd
Stonehill
Stukeley Meadows
Cambridgeshire
PE29 6EX
England
Tel +44 (0)1480 445678
Fax +44 (0)1480 445686
Sales and service in the USA
Meridian America Inc
3800 Camp Creek Parkway
Building 2400
Suite 122
Atlanta GA 30331
USA
Tel +1 (404) 344 7111
Fax +1 (404) 346 7111
Developed in the UK by Meridian Audio Ltd,
http://www.meridian-audio.com/
Copyright © 2003 Meridian Audio Ltd
Boothroyd|Stuart Meridian, Meridian, Meridian Digital Theatre,
Meridian Lossless Packing, MHR, MHR Smart Link, the MHR
logo, and MLP are registered trademarks of Meridian Audio Ltd.
Microsoft, MS-DOS, Windows, Windows NT, and the Windows
logo are either registered trademarks or trademarks of Microsoft
Corporation.
Part no: MCP/1
This guide was produced by Human-Computer Interface Ltd,
http://www.interface.co.uk/

Contents
iii
Contents
Getting started 1
Explains how to install the Meridian Configuration Program,
and gives a general overview of it key features
Overview 1
Installing the Meridian Configuration Program 4
Quick tour 5
Provides information to create a complete configuration for
a simple system, and information about the more advanced
features of the Meridian Configuration Program.
Running the Configuration Program 5
Products: Adding a controller 7
Products: Inserting a source 10
Products: Adding speakers 14
Soft keys 17
Bass management 18
Speaker distances 20
Pre-calibration store 21
Post-calibration fetch 22
Speaker properties 23
Room Correction store 24
Preset properties 25
Preset mapping 26
Store settings 27
Finish 28
Room Correction 29
Explains how to run the Meridian Room Correction program
and create profiles for use with the digital surround controller.
Introduction 29
Auto set up 31
Viewing and repeating measurements 36
Creating multiple profiles 41
Editing filters 44
Changing settings at a later date 46
Troubleshooting 48
Index 53

Contents
iv

Getting started
1
Getting started
This chapter explains how to install the Meridian Configuration Program, and gives a general
overview of its key features.
Overview
The Meridian Configuration Program is a Windows application
that lets you design the configuration of your G Series system
to suit both your own personal preferences and the particular
configuration of other equipment in your system.
It uses an intuitive graphical interface that prompts you at every
stage for the information it needs to complete the system. When
you have designed the system to your requirements you can save
the configuration to the appropriate Meridian products in the
system via a serial link connected to the back of each product.
How it works
The Meridian Configuration Program reflects Meridian’s system
approach to designing audio products and presents a graphical
representation of your whole system. It allows you to create a
single configuration file representing the settings of each product in
your system and the way they are interconnected. This file is stored
in the controller of the system for future reference. As well as being
far more convenient than configuring each product independently,
this approach also enables the Meridian Configuration Program to
check that the settings you are proposing are appropriate for the
particular combination of products in the system.
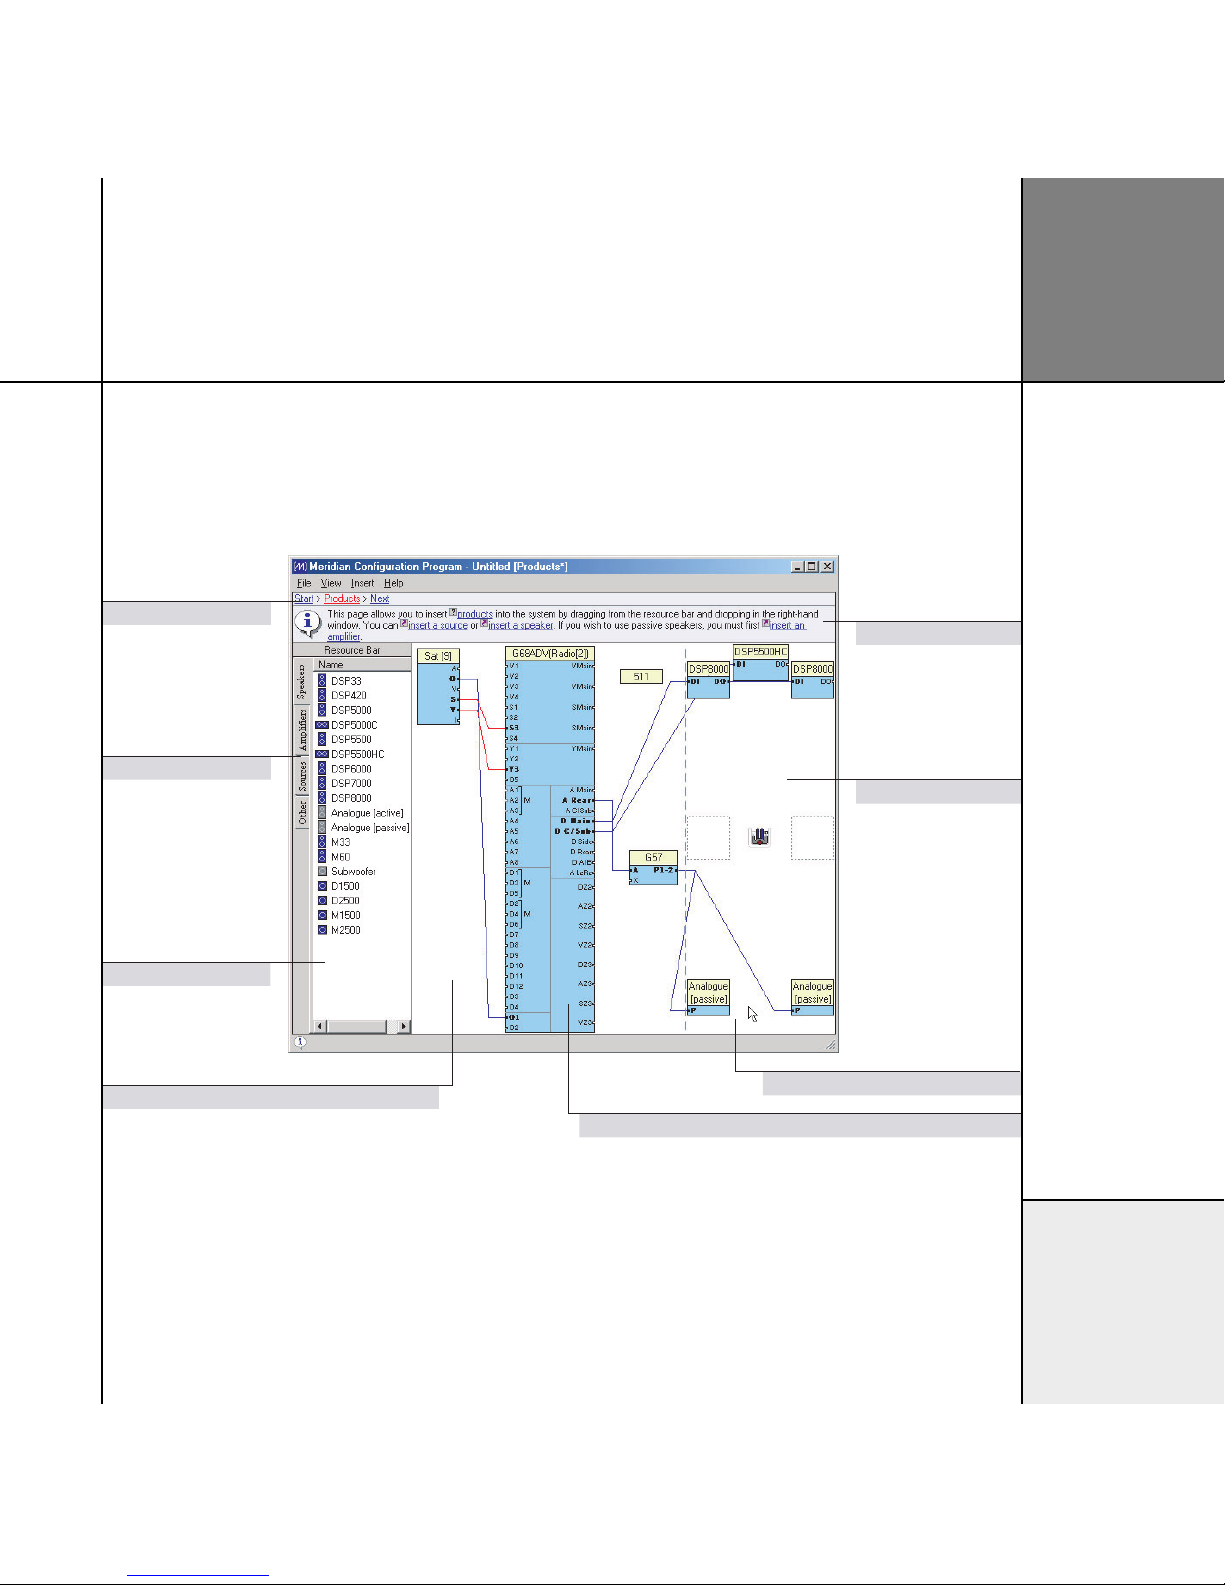
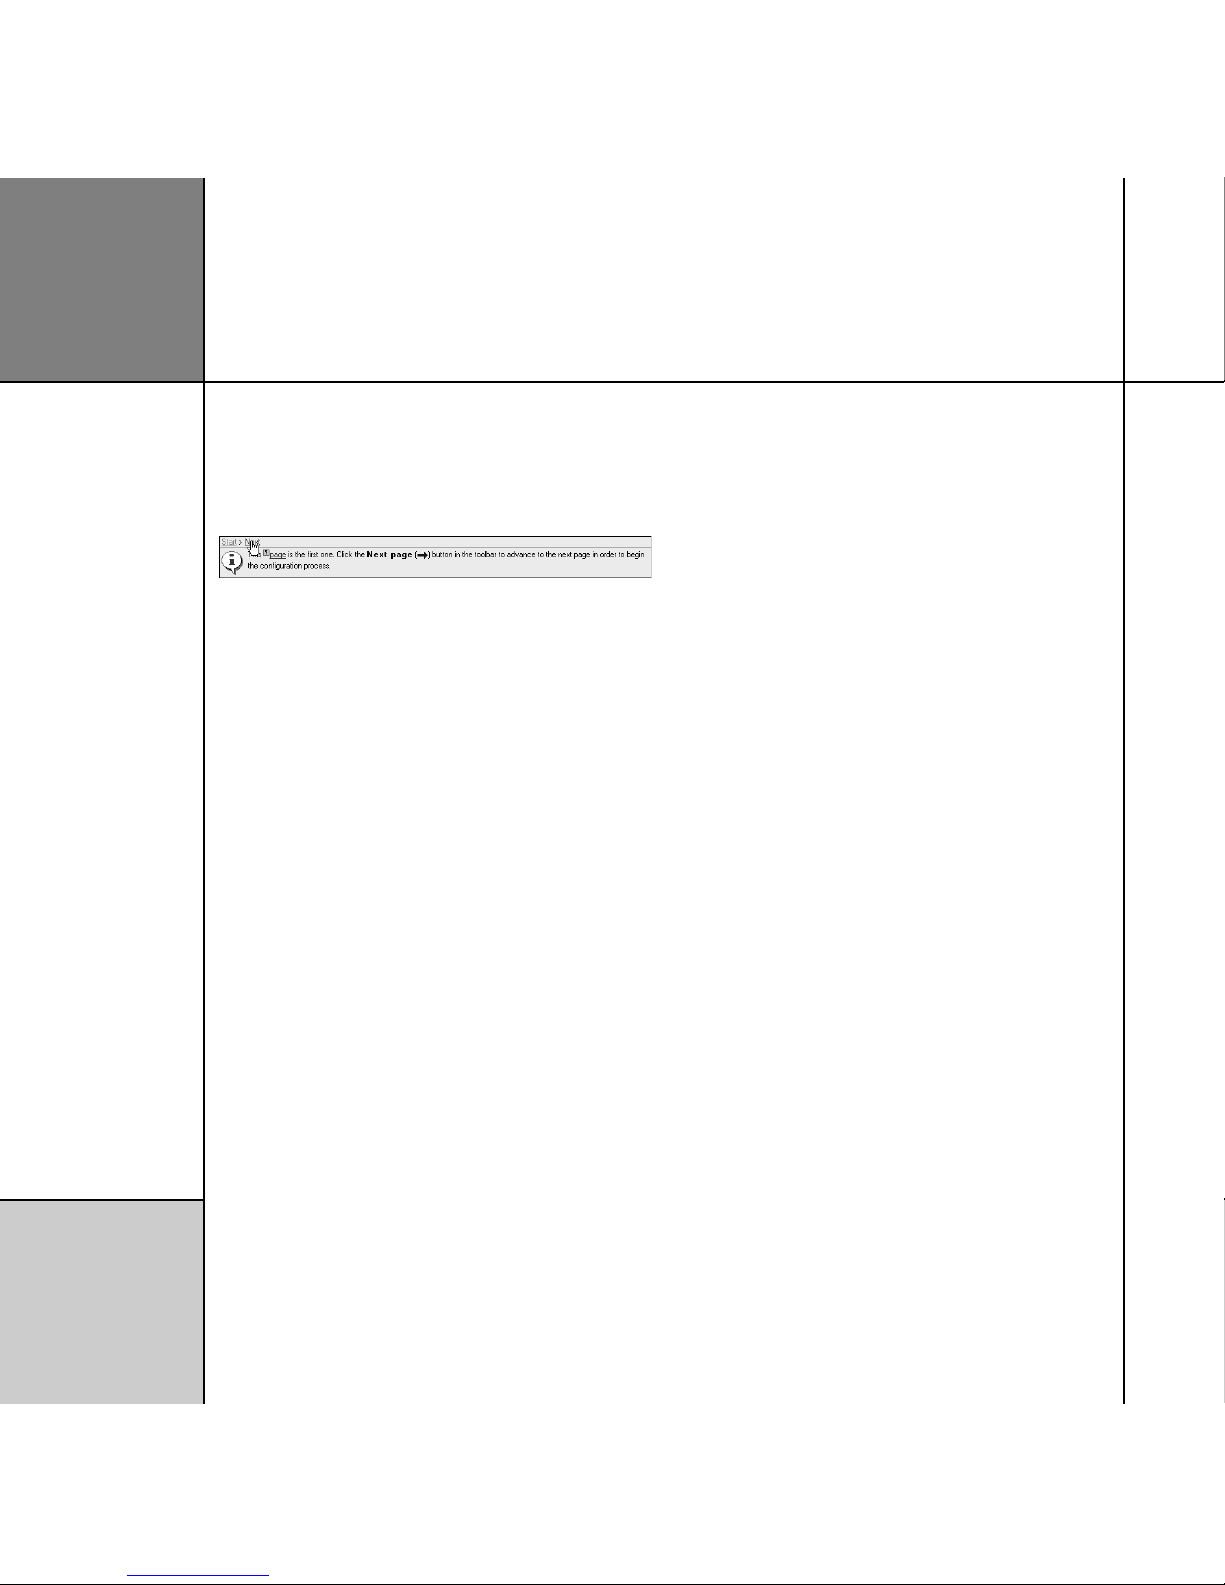
The Meridian Configuration Program is structured as a wizard;
it leads you through a series of stages from the Welcome
page through to the Finish page, which is reached when the
configuration has been completed. A Breadcrumb trail below the
toolbar at the top of the Meridian Configuration Program
window shows your current position in the sequence of pages and
allows you to jump back to an earlier page to check a particular
setting you made.

Getting started
2
Benefits of using the Meridian
Configuration Program
Configuring your system with the Meridian Configuration Program
offers several important benefits. In particular:
• You can configure the entire system in a single operation.
• It is more convenient and more intuitive than using the front-
panel menus.
• You have access to many advanced configuration options that are
not available from the front-panel menu.
• You can conveniently edit source, DSP preset, and other names
using the keyboard.
• You can edit the G Series soft keys.
• If your controller is a digital surround controller you can take
advantage of Meridian Room Correction.
• You can set up multiple systems far more conveniently than by
manually configuring each product.
• You can keep a record of the configuration of your entire system
in a single document on your PC.
If you have made manual adjustments to the configuration of
a product from the front panel, you can fetch the product’s
configuration into the Meridian Configuration Program as the
starting point for the configuration of your system, in order to
retain the settings, such as calibration settings.

Breadcrumb trail
Information bar
Products area
Tabs to add new products
Resource Bar
Controller
Sources Speakers
Getting started
3
The Meridian Configuration Program
window
The following illustration shows the key features of the Meridian
Configuration Program window:

Getting started
4
Requirements
To use the Meridian Configuration Program you need:
• A computer running Windows 95, 98, 2000, NT 4, ME, or XP.
• 10Mbytes of free disk space.
• A 9-pin serial port.
The software requires a mouse or similar pointing device – it
cannot be operated solely from the keyboard.
To install the Meridian Configuration Program
• Insert the Meridian Configuration Program Installation CD-ROM.
The Setup program should be run automatically when the CD-ROM
is inserted. If not, locate setup.exe on the CD-ROM and run it.
The Setup program Welcome page will be displayed.
• Follow the wizard.
Note: Entering your personal details is optional; this information is
only kept on your computer.
On the Preferences page:
• Leave Install for all users selected, unless you want to restrict
use of the program to yourself on a multi-user machine.
Installing the Meridian Configuration Program

Quick tour
5
Quick tour
This section is designed to give you a quick tour of the Meridian Configuration Program. It
shows how to create a complete configuration for a typical simple system.
At each stage the Quick tour shows information about some of the more advanced features of
the Meridian Configuration Program in grey tinted boxes.
Running the Configuration
Program
• Click Start, point at All Programs, Meridian, then click
Configuration Program:
T he Welcome page will be displayed. This provides links to useful
information.
Using the Meridian Configuration
Program
The simplest way to use the Meridian Configuration Program is to
click the links in the Breadcrumb trail and Information bar at the
top of the window; for example:
The Breadcrumb trail shows a sequence of hyperlinks to pages you
have already visited; this is indicated by the blue underline. Clicking
one of the links takes you to the corresponding page to allow you
to check your settings on that page, or make changes. The last
entry on the Breadcrumb trail is usually Next, which takes you to
the next page.
The Information bar provides help about the current page, and
tells you what to do next. The Information bar contains two types
of hyperlink: definitions, prefixed by a question mark icon, which
display a pop-up window with a definition of the item, and jumps,
prefixed by an arrow icon, which perform an action or jump to
another page.

Quick tour
6
Starting a configuration
To start creating a configuration from the Welcome page:
• Click the Next link in the Breadcrumb trail:
T he Products page will then be displayed. This allows you to
define the products in your system and indicate how they are
connected together.
Getting help
For more detailed information about the Meridian Configuration
Program see the on-line help. To display the help:
• On the Help menu, click Configuration Program Help.

Quick tour
7
Products: Adding a controller
The controller is defined as the product that selects sources and
controls the volume for the system; it is the digital surround
controller, preamplifier, or combination product. In this example it is
a G68 Digital Surround Controller.
• Click the Insert a Controller link in the Information bar.
An Insert dialogue box is displayed to allow you to specify the
type of controller.
• Select G68ADV from the drop-down list and click the OK button
to add the product:
You will then be asked whether you want to fetch an existing
configuration from the controller. If you are starting from scratch, as
in this Quick tour, you do not need to do this. For more information
see the
Advanced tips
on the next page.
• Select Remember my decision to avoid further prompts of this
type.
• Click the No button to indicate that you do not want to fetch
data from the digital surround controller:
T he Products page will then show the G68ADV Digital Surround
Controller:

Advanced tips
Adding products by dragging them from the Resource Bar
The most flexible way of adding products is to drag an appropriate
icon from the Resource Bar (to the left of the Products page)
into the Meridian Configuration Program window:
Fetching settings from a product
If you have changed any settings on a product from the front
panel since making a previous configuration, you can retain the
settings by using the Meridian Configuration Program to fetch the
configuration from the product, rather than starting from a default
configuration as described above. This is also useful if you cannot
locate the file on the computer.
• Connect a serial cable between the product and your PC.
Follow the instructions in
Post-calibration fetch
, page 22.
Performing other actions
• Click with the right mouse button on most objects in the
Meridian Configuration Program window to display a
context menu of actions appropriate to that object:
For example, to delete a product:
• Click the product with the right mouse button and click Delete
on the context menu.
Note: If you delete the controller you will need to restart the
configuration from scratch.
Displaying or changing product properties
Many products provide a range of properties that you can change
for specific situations. To display the product properties:
• Click the product with the right mouse button and click
Properties on the context menu or double-click the product
icon.
8
Quick tour

T he Properties dialogue box shows a list of the properties
associated with the product, and allows you to view or change
their values:
Changing the value of a property
• Click the value of the property.
• Choose an option from the drop-down list:
If it is a numeric property you will get a spin button rather than a
drop-down list:
If you have changed the value of a property an * is shown after its
name.
Restoring a property to its default value
• Click the property with the right mouse button and click Revert
to Default on the context menu:
The menu option shows the default value.
For detailed information about what each of the properties mean
refer to the Configuration chapter in the Installation Guide for the
product, or the FAQ in the Meridian Configuration Program on-line
help.
Quick tour
9

Quick tour
10
The next step is to add the sources in your system. For this Quick
tour we will assume a satellite receiver is required.
• Click the Insert a source link in the Information bar.
An Insert Source dialogue box is displayed to allow you to select
the type of source.
• Choose Satellite from the drop-down list, and click the OK
button to add the source:
T h e Connection Wizard is then displayed to assist you in
connecting the source to your other equipment:
• Leave Yes selected to make the recommended connections
between the source and the controller.
The Meridian Configuration Program will use a set of connections
which match the back panel screening of the controller to make
wiring up straightforward
• Click the Finish button to make the recommended connections.
The connections will be displayed on the Products page:
This shows the audio connection between the satellite receiver
optical output and the optical input O1 on the digital surround
controller, and the S-video and component video connections
between the satellite receiver and the digital surround controller.
You can now proceed to add the other sources in your system in a
similar way. In this example we are only inserting a single source.
See the
Advanced tips
opposite for information about modifying
these connections; eg to use analogue rather than optical for
audio.
Products: Inserting a source

Advanced tips
Showing a list of the recommended connections
If you choose the Yes (recommended) option in the Connection
Wizard dialogue box, you can preview the recommended
connections.
• Click the Details… button in the Connection Wizard dialogue
box:
Renaming a source
You can give each source a name of up to five characters to
identify it on the front-panel display:
• Click the source with the right mouse button, then click
Rename… on the context menu:
The following dialogue box allows you to enter a new name:
Changing the MSR+ key for a source
You can choose which MSR+ key selects each source:
• Click the source with the right mouse button, then click
Properties on the context menu.
•Click the Source tab in the Properties dialogue box.
• Choose the MSR+ key from the MSR+ key drop-down list:
Quick tour
11

Showing and hiding connections
You can choose whether or not source connections are displayed
by clicking the View or hide source connections button in the
toolbar:
To display information about the style of each connection line:
• On the View menu, click Legend.
Connecting using drag and drop
You can also connect between any two compatible connectors
using drag and drop:
• Drag between the output on the source and the input on the
controller that you want to connect:
When you release the mouse button the cable will be connected:
If the connectors are incompatible a stop cursor will be displayed:
Removing a connection
• Drag from one of the connectors and release the mouse button:
The cable connecting the two products will be removed.
Making a multichannel connection
If you are connecting a product with multichannel outputs, such
as a G98DH DVD Player, to a digital surround controller with
multichannel inputs, the Meridian Configuration Program can
create a multichannel configuration when you drag between two
appropriate connectors:
Quick tour
12

A prompt allows you to choose whether to make a single or
multichannel connection.
If you choose Yes the multichannel connection will automatically
be made:
Adding or removing inputs or outputs
You can add new inputs or outputs, or remove inputs or outputs,
to reflect the connectors provided by your source. For example, if
your satellite receiver includes a digital coax output you can add a
connector for this:
• Click one of the source’s existing connectors with the right mouse
button, point to Connection, then click New… on the context
menu:
T he Add connector dialogue box allows you to define the new
connector.
• Specify the type of connector using the Class and Type drop-
down list, enter a name, and choose Output or Input as
appropriate:
• Click the OK button to add the connector.
Quick tour
13

Quick tour
14
The next step is to add the speakers in your system.
• Click the Insert a Speaker link in the Information bar.
T he Insert Speaker dialogue box allows you to select which type
of speaker you want to add, and the positions in which to add it.
• Select the type of speaker from the Type drop-down list.
• Select the appropriate Location option.
Size will automatically be set to Large for speakers known to have
good bass handling, or Small otherwise:
• Click the OK button to add the speakers.
The speakers will be added to the appropriate points in the layout,
and the connections will automatically be made between the
speakers and the controller:
• Click the Insert a Speaker link again and click DSP5500HC on
the Type drop-down list to add a centre speaker:
The program will offer to add a 511 patch box to the layout to
connect the Comms cables for the speakers.
• Click the Yes button to confirm.
•Click the Insert a Speaker link again and click Analogue
Passive on the Type drop-down list to add, for example, small
analogue rear speakers.
Products: Adding speakers

Quick tour
15
• In the Size section select Small to indicate that these speakers
should not handle bass:
• Click the OK button to add the speakers.
The Meridian Configuration Program will automatically prompt you
to add an amplifier to the layout to drive the passive speakers.
• Click the Yes button.
• Click G57 on the Amplifier type drop-down list, and click the
OK button to add the amplifier:
The G57 will automatically be connected up to the appropriate
analogue output on the digital surround controller:
Finally insert a subwoofer into the layout:
• Click the Insert a speaker link in the Information bar and click
Subwoofer on the Type drop-down list:
You can proceed to add any other speakers in your layout in a
similar way.
• Click the Next link in the Breadcrumb trail to proceed to the next
page.

Advanced tips
Adding a speaker by dragging it from the Resource Bar
• Drag an icon from the Speakers panel of the Resource Bar (to
the left of the Products page):
• Drop it onto the appropriate speaker position.
Adding a speaker at a specific position
• Click the position with the right mouse button, point to Insert,
then click Speaker…, on the context menu:
Alternatively, double-click the speaker position.
Reviewing and printing the source and speaker
connections
You can display a list of the source and speaker connections, as a
checklist, and print out a copy for help in wiring up the system.
• On the View menu, click Review Pages.
Additional Speaker connections and Controller connections
pages will be available in the Breadcrumb trail.
• Click Speaker connections or Controller connections to
display the appropriate list of connections:
Displaying or changing the speaker properties
To display the speaker properties, double-click the speaker icon
or click the speaker icon with the right mouse button and click
Properties on the context menu:
You can edit the properties in the same way as for source
properties.
Specifying whether the speaker should handle bass
If you do not want a speaker to handle bass click its icon with the
right mouse button and click Treat as Small on the context menu:
Quick tour
16
This manual suits for next models
1
Table of contents
Other Meridian Software manuals
Popular Software manuals by other brands

Avaya
Avaya Communication Manager IP DECT Installation, administration and maintenance manual

AMIGOPOD
AMIGOPOD PowerConnect W Clearpass 100 Software manual

Native Instruments
Native Instruments Reaktor Prism manual

Adaptec
Adaptec ICP 5045BL user guide

ESET
ESET SMART SECURITY 4 - V4.2 Guide de l'utilisateur

Brother
Brother BT-1000 user guide