Merlin CozyNSafe EST-101 User manual

n s t r u c t i o n a n u a lI M
M
C N S

CONTENTS
Thank you for purchasing the Merlin car seat.
User instructions
We are pleased that the Merlin will be accompanying your child safely through this
new stage of their life.
In order to protect your child correctly, the Merlin must always be used and installed
as described in these instructions. Please keep this instruction manual in a safe place.
If you have any other questions regarding its use, please contact us.
1. Important Notice........................................................................................................................................................01
2. Features.............................................................................................................................................................................03
3. The attention for car using............................................................................................................................05
4. The adjustment and using of the child car seat......................................................................05
4-1 Recline position adjustment...................................................................................................................05
4-2 Harness adjustment.......................................................................................................................................
4-3 Headrest adjustment....................................................................................................................................07
4-4 Buckle adjustment..........................................................................................................................................07
4-5 ISOFIX installation and removing.......................................................................................................08
4-6 Support leg installation and adjustment....................................................................................09
4-7 Infant insert using..............................................................................................................................................09
4-8 Removing and refitting the cover....................................................................................................10
5. Installation........................................................................................................................................................................11
5-1 Rearward facing...................................................................................................................................................11
5-2 Forward facing....................................................................................................................................................12
5-3 Change groups....................................................................................................................................................12
6. Side facing installation........................................................................................................................................14
7. Cleaning and maintenance...............................................................................................................................14
8. Notice..................................................................................................................................................................................15
06
INSTRUCTION MANUAL
Birth - 18kg (Approx. Birth - 4 years)
Model: EST-101
Group: 0+/1
Please read this manual carefully before use
INSTRUCTION MANUAL
Birth - 18kg (Approx. Birth - 4 years)
Model: EST-101
Group: 0+/1
Please read this manual carefully before use

01
1. Important Notice:
1. This child car seat is suitable for children with a weight less than 18kg.
2. Please get the instruction manual from the compartment in the back cover of
the child seat, and read carefully.
3. Please read carefully before installation, serious injury will occur if installed
incorrectly. The manufacturer won't take responsibility for any risks if the seat is
not installed as per the instruction manual.
4. Never use the child car seat without cover. Never use any cover which is not
recommended by the manufacturer to replace an old cover because the cover
constitutes an integral part of the child car seat performance. Keep away from
sunlight, otherwise it may be too hot for child's skin.
5. Never place the child car seat in a vehicle seat with an active airbag.
6. The child car seat should be changed when it has been subject to violent stress
in an accident.
7. Please ensure all passengers in the car use a safety belt, goods in car must be
fixed, otherwise the passengers and goods may injure the child when in emergency
brake situation.
8. Ensure that the buckle is not in a semi-locked status. Always confirm the child car
seat is locked before using in case of emergency the child can be taken out quickly.
9. Do not make any changes, additions or change the way of harness system in the
child car seat, otherwise this could seriously affect the security and functionality.
10. The child should not be left in the child car seat alone.
11. Keep the child seat away from corrosive substances.
12. Always keep the child car seat secured in the vehicle even when it is unoccupied.
Ensure that children are not left in their child car seat un-attended.
13. Do not use a second-hand child car seat.
14. Please ensure that any lap strap is worn low down,so that the pelvis is firmly
engaged.
15. Any straps holding the child car seat to the vehicle should be tight. Any straps
restraining the child should be adjusted to be suitable to the child's body. Ensure
that straps are not twisted.
02
16. If you have any questions about using and installing the child seat, please
contact our customer services team.
17. Do not to use any load bearing contact points other than those described in the
instructions and marked on the child restraint.
18. Do not use forward-facing child car seat when child weighs less than 9kg.
19. The instructions can be stored in the child car seat for it’s life period, and
please take good care of the instruction manual.
20. The rigid items and plastic parts of a child restraint must be so located and
installed that are not liable,during everyday use of the vehicle,to become
trapped by a movable seat or in a door of the vehicle.
Product Description
9KG-18KG
0-13KG
Group Installation Methods Approval type The scope of
application
0+
I
ISOFIX
ISOFIX Semi-Universal
Semi-Universal
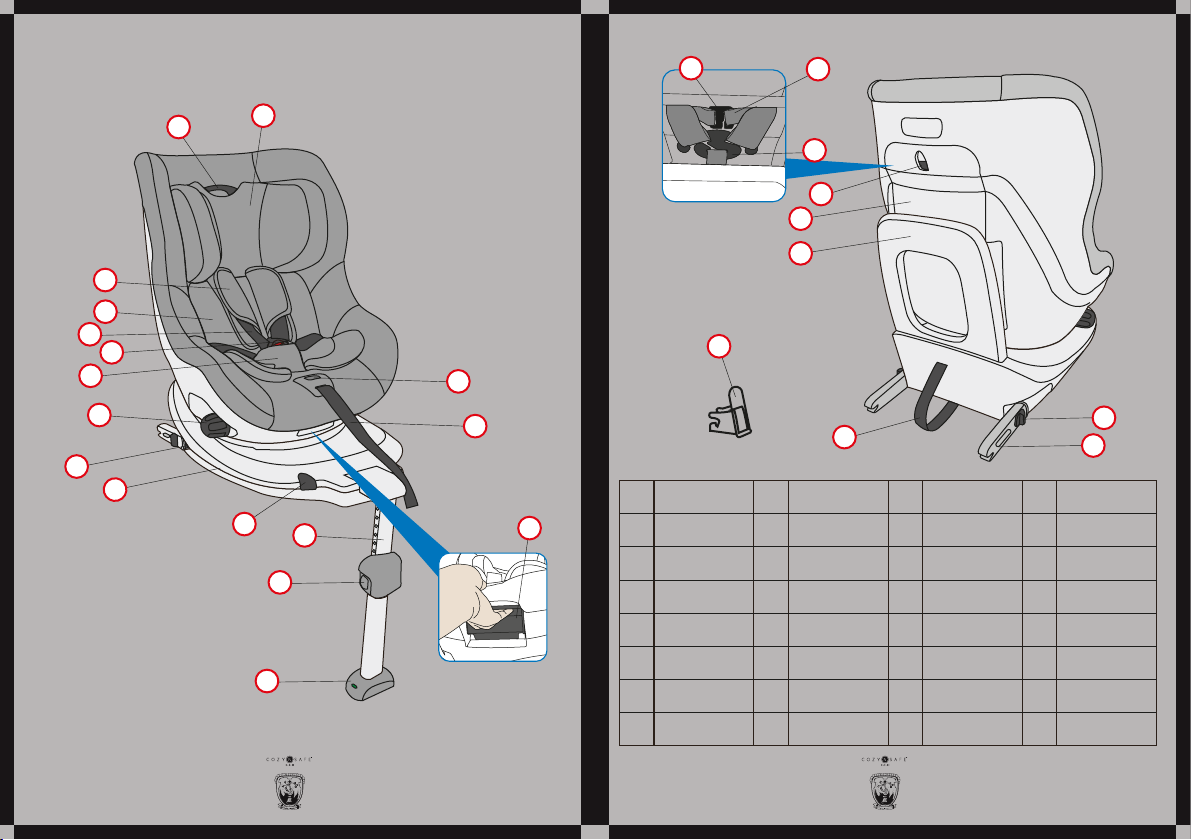
2. Features
27
21
3
4
5
6
7
8
9
10 11
12
13
16
15
14
03
17 18
19
20
21
22
26
23
25
24
PARTNO. PART PART PARTNO. NO. NO.
1
5
9
13
17
21
25
2
6
10
14
18
22
26
3
7
11
15
19
23
4
8
12
16
20
24
Headrest Shoulder pad Infant insert
Recline knob
Harness
Adjusting button
ISOFIX
Instruction cabin
cover button
Support leg
adjustment button
Buckle pad
Support leg
Harness yoke
ISOFIX
adjustment strap
Adjustment strap
Harness buckle
Second lock button
for group 0
Rotation handle
Shoulder pad strap
Rebound board
ISOFIX
insert guider
Headrest
adjustment handle
Shoulder straps
Car seat base
Instruction
cabin cover
ISOFIX
release button
Support leg
indicator
Connector of
shoulder pad
27 ISOFIX
second lock button
04
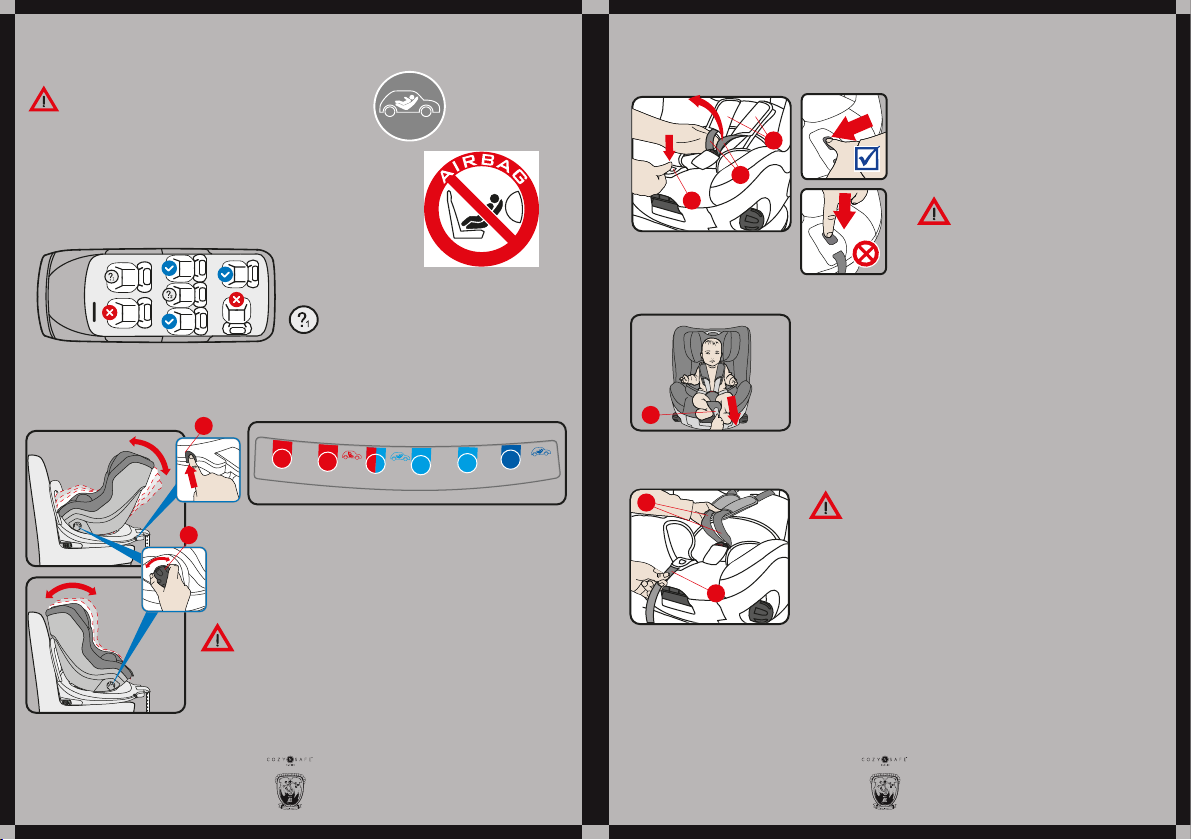
3. The attention for car using
Danger! DO NOT use on a passenger seat with
an active airbag. If hit by the airbag, death or
serious injures can occur.
In order to properly protect your child, Please read the
instructions carefully.
DO NOT use on a passenger seat
with an active airbag.
4. The adjustment and using of the child car seat
4-1 Recline position adjustment
Change the recline positions by turning the recline
knob 8.
when you would like to turn to recline position 4
(the most reclined position), please press the second
lock button 10 while turning the recline knob 8.
Caution:
1. When the child weight is less 13kg (group 0+),
rearward facing, only the recline position 4 is suitable.
2. When the child weight is 9-18kg (group I), rearward
facing, only the recline position blue 1,2,3 are suitable.
3. When the child weight is 9-18kg (group I), forward
facing, only the recline position red 1,2,3 are suitable.
Rearward facing
9-18kg Y
Rearward facing
0-13kg Y
Forward facing
9-18kg Y
Pressed safety button for
the most reclined position
1234
2
3
10
8
05
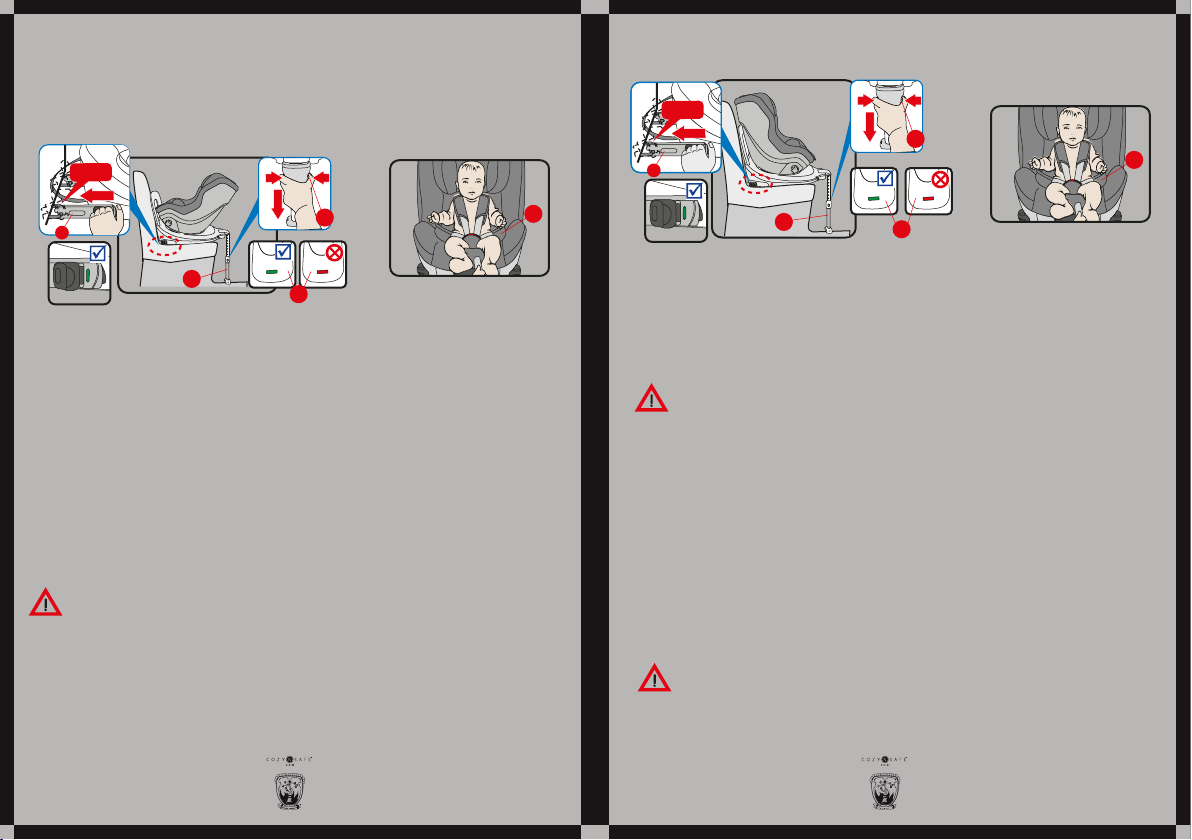
4-2 Harness adjustment
Caution: Adjusting button 16
with mis-operation function,
please operate correctly
according to the picture.
Loosen: press adjusting button 16 and
at the same time pull both shoulder
straps 5forwards (Do not pull on the
shoulder pads 3).
3
5
16
Tighten: Pull on the adjustment strap 15 until the harness
lies flat and is close against your child's body.
15
Caution:
Grasp both shoulder straps 5 by one hand
(with index finger and middle finger), and pull the
adjustment strap 15 forwards with the other
hand slowly, when the hand holding the shoulder
straps comes into contact with the childs body
then stop pulling the adjustment strap 15.
5
15
06
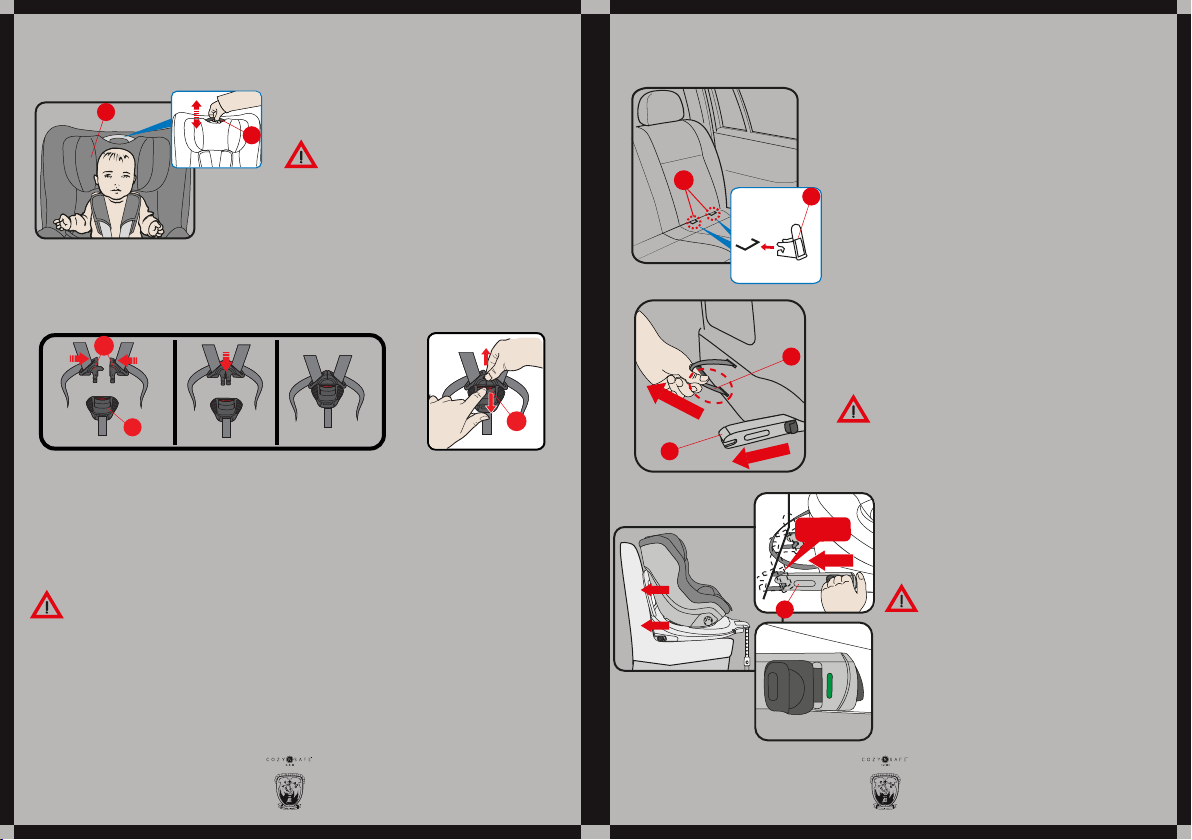
ISOFIX installation
K
26
1. If your vehicle is not equipped with the ISOFIX
insert guides as standard, clip the two insert guides
26 which are included with the seat with the cut-out
facing upwards onto the two ISOFIX attachment
point Kof your vehicle.
TIP: The ISOFIX attachment points K are located
between the surface and the backrest of the vehicle
seat.
2. Pull the grey fabric loop 23 to pull out both
locking arms 24 and make sure the ISOFIX has been
completely pulled out, there will be a clicking noise
during movement.
3. Insert the ISOFIX 24 using the ISOFIX insert
guides, push both sides untill there is a click.
4. Push the child seat with a substantial
amount of force as far as it will go.
5. Shake the child car seat to make sure it is
safely attached and re-check the ISOFIX
indicator to make sure that both of them are
completely green.
Caution:
Please be aware when pulling the lower end of
strap. (see picture marked with red circle)
23
24
CLICK
24
4-5 ISOFIX installation and removing
08
Caution: The locking arms are only
correctly engaged if both of the
ISOFIX indicators are completely green.
4-4 Buckle adjustment
2
1Pull up: Pull the adjusting handle 2of the
headrest upwards.
Push down: Push the adjusting handle 2 of the
headrest downward.
1. Guide the two buckle latches Dtogether and engage them before putting them
into the harness buckle 6, this should make a clicking noise. Pull on the shoulder
straps 5until the harness lies flat and is close against your child's body. (See details
4-2 for how to adjust shoulder strap)
2. Press red button Fto release the buckle.
Caution:
Please loose the should straps 5 before
adjust the headrest 1 (See details 4-2).
Caution:
Please make sure the shoulder straps 5 are not crossed and twisted.
4-3 Headrest adjustment
07
D
6F
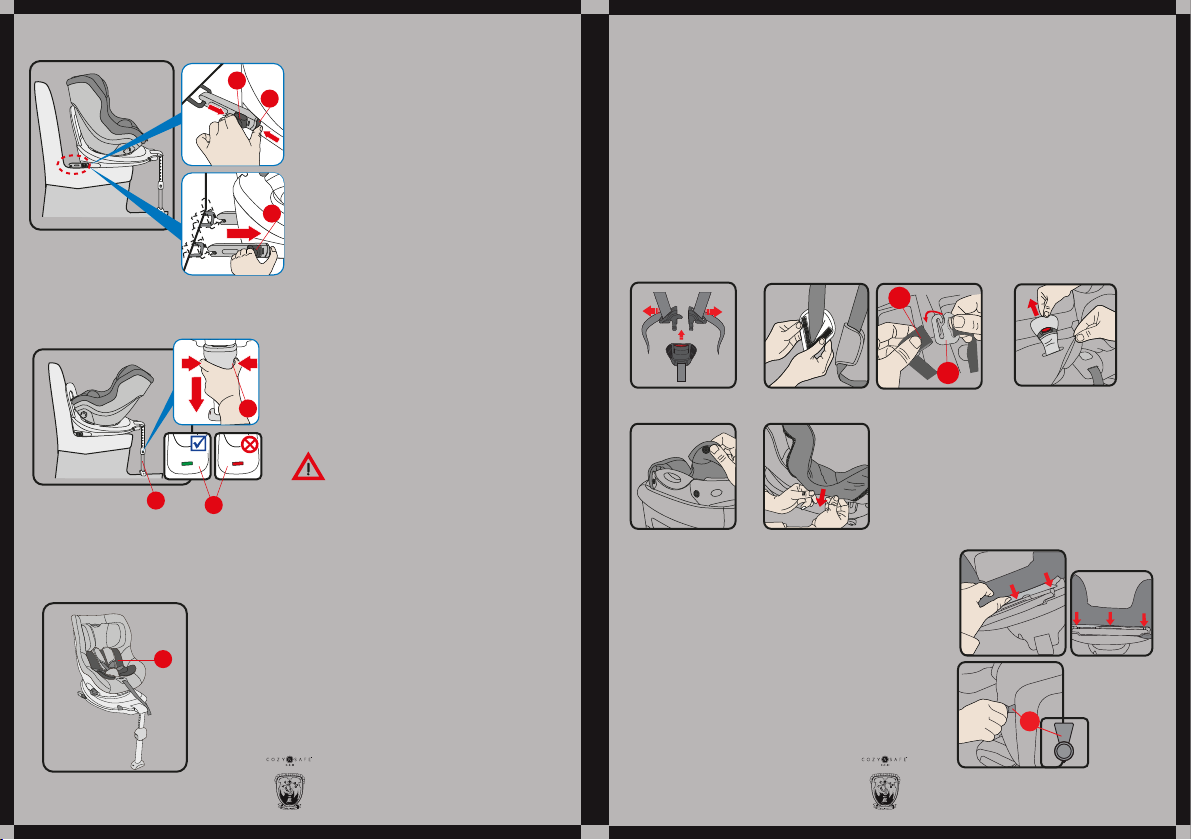
4-6 Support leg installation and adjustment
4-7 Infant insert using
Support leg adjustment and installation
pull the support leg as far away from the
back of the child car seat as possible.
Push both adjustment buttons 12 and pull
out the support leg 11 until it rests firmly on
the floor of the vehicle.
The infant insert 4should be used when infant body
weight is below 13kg.
TIP: The infant insert ensures that your baby's spine
is supported during travel.
TIP: The support leg should be pulled down
more if the indicator is not green.
Caution:
the support leg indicator 13 must be
completely green.
Isofix Removing from Vehicle Seat
1. Press Isofix second lock button 27 and
Isofix release button 25 together, press Isofix
release button 25 towards the red arrow
direction until Isofix 24 separate from the
vehicle seat.
2. Press both Isofix 24 until it retracts into
car seat base.
25
25
27
13
12
11
4
09
1.Turn the child car seat into the forward facing postion and recline to the upright
position. (See details 4-1), raise the headrest to the highest position. (See details 4-3)
and take out the infant insert.
2.Open the harness buckle (Pic1), remove the shoulder pad (Pic 2) and buckle pad(Pic
3).
TIP: Split the shoulder pads before removing, then take down the shoulder pad
strap 18 from connector 17 and pull the shoulder pads forwards.
1. Put the child seat into the most upright position.
and pull the headrest to the top,then put on the
headrest cover on and insert the plastic sheet into
the hole between plastic and EPS and button up.
2. Put on the cover on the shell carefully.
3. Fitting the shoulder pad and buckle pad.
Cover removing
Cover refitting
Pic 1
Pic 5
18
17
Pic 2 Pic 3
Pic 4
3. Pull the headrest to highest position,
release the button (pic 4), and take off the
headrest cover carefully.
4. Pull out the cover carefully (pic 5), and
take off the cover.
4-8 Removing and Refitting the cover
10
TIP: The round plate R will be helpful when fitting
cover. This can be found with the instruction
manual.
R
Caution:
1. Check the ISOFIX,support leg and harness system are properly working, make
sure your child is always securely fastened.
2. The ISOFIX locking arms are only correctly engaged if both of the ISOFIX
indicators are completely green. The support leg indicator 13 must be
completely green.
3. Ensure no cross or twist of the harness system.
4. The infant insert 4 should be used when infant body weight is below 13kg.
5. ISOFIX insert guides are very helpful for ISOFIX installation 26.
1. Installed ISOFIX 24 with vehicle seat(See details in 4-5), make sure it is completely
engaged and close to vehicle seat.
2. Pull out support leg 11 until it rests firmly on the floor of the vehicle. The indicator
must be green to ensure this is done correctly.
3. Turn the child car seat to the most reclined position (See details 4-1 )
4. Have your child lay down in the child car seat.
1. Installed ISOFIX 24 with vehicle seat(See details in 4-5), make sure it is completely
engaged and close to vehicle seat.
2. Pull out support leg 11 until it rests firmly on the floor of the vehicle. The indicator
must be green to ensure this is done correctly.
3. Turn the child car seat to the recline position blue 1,2,3 (See details 4-1 )
4. Have your child sit down in the child car seat.
TIP: The child car seat should always be secured in the car via the ISOFIX anchoring,
even when there is no child in the seat.
5-1 Rearward facing
Suitable for group 0+: weight 0-13kg (approx. birth-15 months)
Suitable for group 1: weight 9-18kg (approx. 9 months-4 years)
4
13
11
12
24
CLICK
5 Installation
11
The child car seat has a safety button 10 which must be pressed when changing
between group 0+ and group 1. The safety button 10 prevents the child seat being
used in the wrong group by mistake.
Caution: Rearward facing is suitable for group 0+ and group 1, forward
facing only suitable for group 1.
Suitable for group 1: weight 9-18kg (approx. 9 months-4 years)
5-3 Change groups
4
13
11
12
24
CLICK
5-2 Forward facing
12
Caution:
1. Check the ISOFIX,support leg and harness system are properly working,
make sure your child is always securely fastened.
2. The ISOFIX locking arms are only correctly engaged if both of the
ISOFIX indicators are completely green.The support leg indicator 13 must
be completely green.
3. Ensure no cross or twist of the harness system.
4. ISOFIX insert guides are very helpful for ISOFIX installation 26.
Installed ISOFIX 24 with vehicle seat(See details in 4-5), make sure it is completely
engaged and close to vehicle seat.
2. Pull out support leg 11 until it rests firmly on the floor of the vehicle. The indicator
must be green to ensure this is done correctly.
3. Turn the child car seat to the recline position red 1,2,3 (See details 4-1 )
4. Have your child seat down in the child car seat.

Caution:
1. Before every journey, make sure that the
rotating part of the child seat is fully engaged
by trying to turn the seat around in both
directions.
2. Do not use the child seat forward facing
when your child is below 9 kg.
Caution:
Before every journey, make sure that the child
seat is in the right group and configuration for
your child.
1. Grasp the turning knob 8whilst pressing the safety
button 10 simultaneously, turn to the lowest recline
position.
2. Pull the rotation handle 14 and turn the seat into the
direction of travel.
Pull the rotation handle 14 and turn the seat into the
correct direction of travel.
TIP: Grasp the turning knob 8whilst pressing the safety
button 10 simultaneously, change to the lowest reline
position for group 0+.
A) Rotation function (from rearward to forward facing)
B) Rotation function (from forward to rearward facing)
10
8
14
10
8
14
13
14
This child car seat rotates 360° which makes it easier
to get your child into or out of the child seat (Easy
access function).
Pull the rotation handle 14 and turn to 90°and into easy access mode.
Caution:
When the child seat in group 0+ mode, it can be only
turned to 90°,when the child seat in group I mode, it can
be turned 360°
6. Side facing installation
Important:
The cover is a safety feature. Never use the child car seat without it, don’t put your
child’s safety at risk by using other replacement covers, they could stop the child
seat from protecting your child as well as it should.
Washing instruction:
The cover is removable and washable at 30°C, line dry only.
7. Cleaning and Maintenance
Machine wash, cold Do not bleach Do not dry clean Do not tumble dry Do not iron
14

1. This is an ISOFIX CHILD RESTRAINT SYSTEM. It is approved to Regulation No. 44, 04
series of amendments for general use in vehicles fitted with ISOFIX anchorages
systems.
2. It will fit vehicles with positions approved as ISOFIX positions (as detailed in the
vehicle handbook), depending on the category of the child seat and of the fixture.
3. The mass group and the ISOFIX size class for which this device is intended is:
Group 0+ (birth - 13kg) D, group I (9-18kg) B1.
Notice 2
This Child Restraint is classified for "Semi-universal" use and is
suitable for fixing into the seat positions of the following cars:
CAR
(See the car list) Yes Yes No
FRONT REAR
Outer Centre
Seat positions in other cars may also be suitable to accept this child restraint.
If in doubt, consult either the child restraint manufacturer or the retailer.
8. Notice 1
15
Cozy N Safe
Oxford Street, Wolverhampton, West Midlands, WV14 7DP, U.K.
Tel: +44 (0) 1902 494905
Fax: +44 (0) 1902 490211
Email: [email protected]
Website: www.cozynsafe.com
INSTRUCTION MANUAL
Birth - 18kg (Approx. Birth - 4 years)
Model: EST-101
Group: 0+/1
Please read this manual carefully before use
Table of contents


