Jole Trillo LX User manual

2/3(15–36kg)
trillo LX
high back booster
Instruction Manual
Manual de Instruções
Manual de instrucciones
Mode d’emploi
Bedienungsanleitung
Handleiding
Manuale di istruzioni
Kullanma kalvuzu
Bruksanvisningen
사용 설명서
GB
PT
ES
FR
DE
NL
IT
TR
SE
KR
Εγχειρίδιο Ελληνικών
EL

2
Welcome to Joie™
Congratulations on becoming part of the Joie family! We are so excited
to be part of your journey with your little one. While traveling with Joie
trilloTM LX high back booster you are using a high quality, fully certified
safety Group 2/3 booster. This product is suitable for use with children
weighing 15-36kg (approximately 3-12 years old). Please carefully read
this manual and follow each step to ensure a comfortable ride and best
protection for your child.
Please confirm
This booster can be installed using a 3 point retractable adult seat belt
approved to ECE Regulation No. 16 or other equivalent standards.
Booster
! IMPORTANT: KEEP FOR FUTURE REFERENCE. PLEASE READ CARE-
FULLY.
Please keep the instruction manual in the
storage compartment at the bottom of
the booster as right figure.
GB
1
2
3
7
10
8
4
Parts List
Make sure all parts are available before assembly. If any part is missing,
please contact local retailer. No tools are required for assembly.
5
1 Head Support
2 Lower Back Support
3 Armrest
4 Base
5 Adjustment Button
6 Cupholders
7 Head Support Adjustment Lever
8 Shoulder Belt Guide
9 Side Impact Shield
10 Latch Connector
6
9

3 4
12
1
2
3
5
4
8
910
11
Concerns on Installation
Booster Assembly
12
7
6

5 6
16
14 15
18 19
17
!
!
21 22
2
13 1
20
3
1
24

7 8
24
23
26
1
12
25
Detach Soft Goods
Use Cupholders
PULL
NOTE

910
WARNING
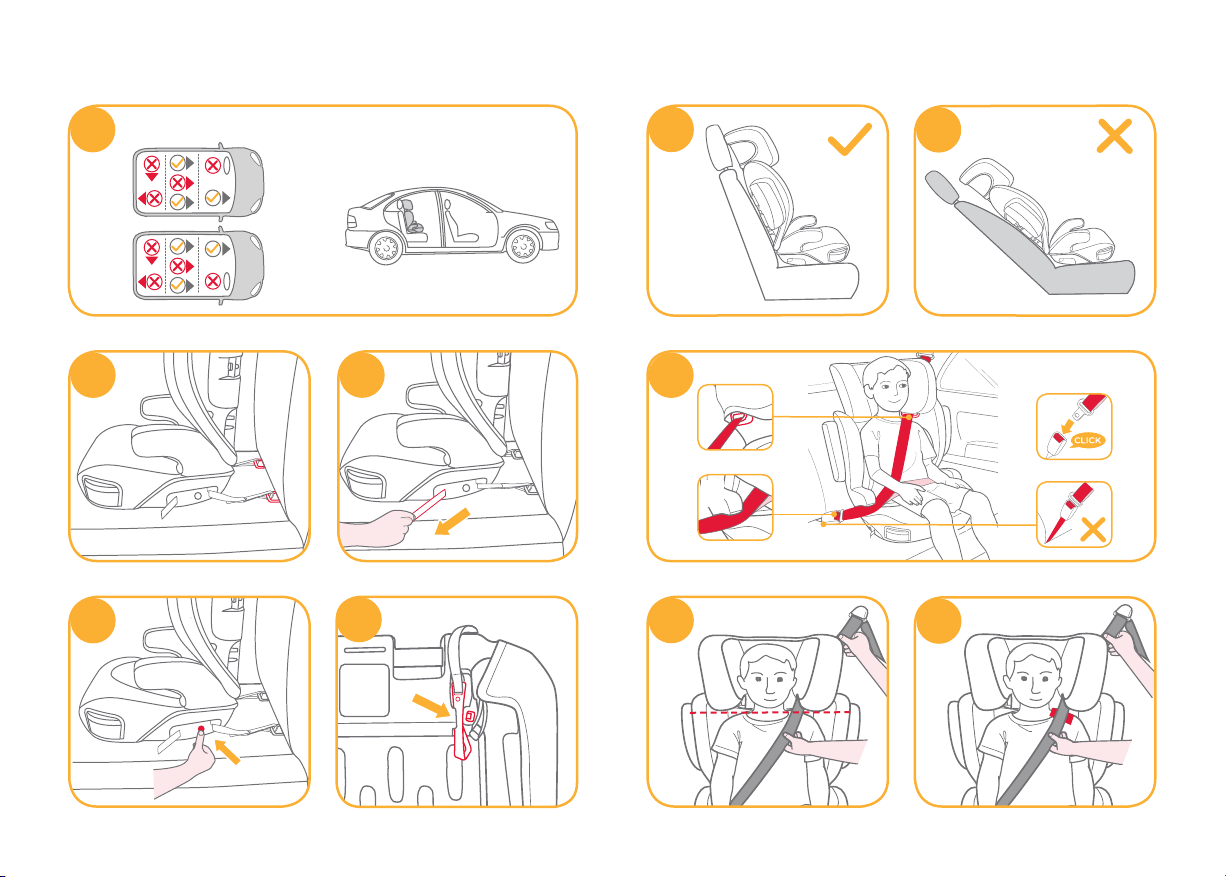
!Do take care to locate and install the booster seat
so that it is not liable to become trapped by a
moveable seat or in a door of the vehicle.
!This booster is designed ONLY for child weighing
15-36kg (approximately 3-12 years old or under).
!Any straps of vehicle seat should be tightened and
not twisted.
!Failure to properly use this booster seat increases
the risk of serious injury or death in a sharp turn,
sudden stop or crash.
!DO NOT use another manufacturers soft goods
with this booster seat. See your retailer for Joie
replacement parts only.
!DO NOT use in any configuration not shown in the
instructions.
!According to accident statistics, Children are safer
when properly restrained in rear vehicle seating
positions, rather than front seating positions. For a
vehicle with a front passenger air bag, refer to your
vehicle owner’s manual as well as these instruc-
tions for a booster seat installation.
!NEVER leave your child unattended.
!NEVER leave a booster seat unsecured in your
vehicle. An unsecured booster seat can be thrown
around and may injure occupants in a sharp turn,
sudden stop or crash. Remove it or make sure that
it is securely belted in the vehicle.
!NEVER leave luggage or other objects unsecured
in a vehicle, they are liable to cause injuries in the
event of a collision.
!Replace the booster seat after an accident of any
kind. An accident can cause damage to the boost-
er seat that you cannot see.
!DO NOT modify your booster seat or use any
accessories or parts supplied by other manufac-
turers.
!NEVER use a booster seat if it has damaged or
missing parts. DO NOT use a cut, frayed or dam-
aged vehicle seat belt.
!The booster seat can become very hot if left in the
sun. Contact with these parts can burn your child’s
skin. Always touch the surface of any metal or
plastic parts before putting your child in the
booster seat.
!NEVER give this booster seat to someone else
without also giving them this manual.
!NEVER use a second-hand booster seat or a
booster whose history you do not know.
!DO NOT use this booster without the soft goods.
!The soft goods should not be replaced with any
besides the ones recommended by the manufac-
turer, because the soft goods constitute an inte-

11 12
gral part of the booster performance.
!DO NOT use any load bearing contact points other
than those described in the instructions and
marked on the booster.
!DO NOT face your booster toward the rear of the
vehicle.
!To avoid burns, never put hot liquids in your
cupholders.
! DO NOT use this booster for more than 10 years
after the date of purchase, as parts may degrade
over time, or from exposure to sunlight, and may not
perform adequately in a crash.
! After your child is placed in this booster, the safety
belt must be used correctly, and ensure that any lap
strap is worn low down, so that the pelvis is firmly
engaged.
Emergency
In case of emergency or accidents, it is most important to have
your child taken care of with first aid and medical treatment
immediately.
Product Information
Read all the instructions in this manual before using this
product. If in doubt, consult either the booster manufacturer or
the retailer.
1. This booster is a ‘Universal’ child restraint. It is approved
to UN ECE regulation 44, 04 series of amendments, for
general use in vehicles and it will fit most, but not all, car
seats.
2. A correct fit is likely if the vehicle manufacturer has declared
in the vehicle handbook that the vehicle is capable of
accepting a ‘Universal’ child restraint for this age group.
3. This booster has been classified as ‘Universal’ under
more stringent conditions than those which applied to earlier
designs which do not carry this notice.
For Installation with Latch System and 3-point-belt
1. This booster is a ‘Semi-Universal’ child restraint. It is
approved to UN ECE regulation 44, 04 series of amendments
for general use in vehicles fitted with ISOFIX anchorages
systems.
2. It will fit vehicles with positions approved as ISOFIX
positions (as detailed in the vehicle handbook), depending on
the category of the booster and of the fixture.
3. If in doubt, consult either the booster manufacturer or
vehicle manufacturer.
Product Booster
Suitable for Child weighing15-36kg
Mass Group Group 2/3
Materials Plastics, metal, fabrics
Patent No. Patents pending

13 14
Booster Assembly
Assemble Head Support
see images 1- 3
1. Booster taken from the carton as 1
2. Flip head support and lower back support over as shown. 2
!Squeeze adjustment lever 2-1 and slide two pieces
together until they snap into place. 2-2
Assemble Lower Back Support
see images 4- 5
When attaching backrest to base, please press backrest
down strongly.“U”-shaped hooks on bottom of backrest will
interlock with bars on base. 4
!Shake the backrest to make sure the recline mount is
correctly fixed.
!Do not use this booster seat base separately.
Assemble Side Impact Shield
see images 6- 8
Align the side impact shield with the slot of lower back
support plastics mounts, and then insert to lock. 67
The completely assembled booster is shown as 8
Height Adjustment
for Head Support
see images 9
Concerns on Installation
see images 10 - 13
Installation with 3-point-belt
see images 14 - 24
If vehicle is equipped with ISOFIX, the vehicle lower anchor
points may be visible at the vehicle seat crease. See your
vehicle owner’s manual for exact locations, anchor
identification, and requirements for use.
1. Place the booster in forward-facing position on a forward-
facing vehicle seat with anchors, hook latch connectors to
vehicle anchors. 14
!NEVER put two latch connectors on one vehicle ISOFIX
anchor unless specifically allowed by the vehicle
manufacturer.
!The latch connectors can be detached for use from the
compartment on the bottom where it is stored. 17
2. Secure the booster firmly by pushing it downward with knee
or hand while pulling the adjustment belt. 15

15 16
Use Cupholders
see images 25
Detach Soft Goods
see images 26
Open 2 pairs of buttons and 6 pairs of elastics on the back
of soft goods to remove it. 26
!Pull down to remove button as 26 -1
To refit the seat pad simply reverse the steps above.
Care and Maintenance
!Please wash the soft goods and inner padding with cold
water under 30°C.
!Do not iron the soft goods.
!Do not bleach or dry clean the soft goods.
!Do not use undiluted neutral detergent, gasoline or other
organic solvent to wash the booster. It may cause damage
to the booster.
!Do not twist the soft goods and inner padding to dry with
great force. It may leave the soft goods and inner padding
with wrinkles.
!Please hang dry the soft goods and inner padding in the
shade.
!Please remove the booster from the vehicle seat if not in
use for a long period of time. Put the booster in a cool, dry
place and somewhere your child cannot access it.
3. For ease of unhooking, extend the adjustment belt to its
maximum length while pressing the adjustment button. 16
4. DO NOT use a booster seat beyond reclined position. 19
Pull the vehicle safety belt and pass through the belt
path 20 , and then buckle it up. 20 -3
! Position shoulder belt through the shoulder belt guide
shown in 20 -1
! DO NOT position vehicle belt over top of the armrests. It
must pass underneath the armrests. 20 -2
!The booster can not be used if the vehicle safety belt
buckle (female buckle end) is too long to anchor the
booster securely. 20 -4
! The lap belt must be low down on hips. The booster is
shown as 20
! To ensure the correct head support height is obtained,
the bottom of the headrest MUST be even with the top of
child’s shoulders as shown in 21 and the shoulder belt
must be positioned in the red zone as shown in 22 .
! Place a booster seat firmly against the back of a
forward-facing vehicle seat equipped with a lap/shoulder
belt.
! Have your child sit in a booster seat with their back flat
against back of a booster seat.
! NOT as shown in 24 . Fasten buckle and pull up on the
shoulder belt to tighten.
! If the belt lays across child neck, head or face, readjust
head support height.
! Belt must not be twisted.

17 18
Vehicle Fitting Information
The Joie booster with latch is classified for “Semi-Universal”
child restraint system use.It is suitable for fixing into the seat
positions of most cars. The letters on the diagram below
correspond with the vehicle fitting positions listed in the
following pages.
Seat positions in other cars may also be suitable to accept the
booster. The following Vehicle Fitting Information is only for
vehicles sold in European markets. If in doubt, consult either
the booster manufacturer or the distributor.
ALWAYS give priority to the rear seats of your vehicle.
If your booster can be fitted, it is marked with
If your booster can not be fitted, it is marked with
If your vehicle is not listed in this manual or it is not marked
with either a or then please refer to your vehicle’s
handbook or contact the manufacturer for further information.
2
1
3 2
1
3
Other manuals for Trillo LX
1
Table of contents
Other Jole Car Seat manuals

Jole
Jole i-Juva User manual

Jole
Jole trillo eco User manual

Jole
Jole transcend 1 User manual

Jole
Jole Steadi R129 User manual

Jole
Jole STAGES FX C1719 User manual

Jole
Jole Spin 360 User manual

Jole
Jole Spin 360 GTi User manual

Jole
Jole stages ISOFIX I1507 User manual

Jole
Jole every stage fx User manual

Jole
Jole every stage R129 User manual