MEROTEC Yard force YF48vRX-RER38 User manual

YF48vRX-RER38
YF48vRX-RER38
RIDING LAWN MOWER
OWNER'S MANUAL
Our Customer Service staff is ready to provide assistance.
In the case of a damaged or missing part, most replacement parts ship directly from Merotec
USA in Atlanta or from one of our service partners in the US.
For immediate help with assembly, or for additional product information, email support@
MerotecUSA.com or call 866-902-9690 M-F 8:30am – 5:00pm ET. More information can be
found on www.YardForceUSA.com.
SAVE THIS MANUAL FOR REFERENCE
You will need this manual for safety
instructions, operating procedures, and Warranty.
The original sales receipt is required for warranty service.

2
Safety Instructions……………….........….........….........….........….........…....…....…....…....….........3
Safety Rules for Charger………….......…...........….........….........….........…....…....…....…....….........7
Description of Symbols………….......…..........….........….........….........…....…....…....…....…...........9
Parts List………….......….........….........….........….........…....…....…....…....…............…....….........11
Technical Specications……….......….........….........….........….........…....…....…....…....…............15
Assembly…………….......….........….........….........….........…....…....…....…....…............…............16
Operation………………….......….........….........….........….........…....…....…....…....…...................21
Maintenance and Storage……….......…..........….........….........….........…....…....…....…....….........29
Troubleshooting………… .......….........….........….........….........…....…....…....…....….........…........41
Warranty…………….......….........….........….........….........…....…....…....…....….................…........43
TABLE OF CONTENTS
YF48vRX-RER38 Original Instructions

3
SAFETY INSTRUCTIONS
WARNING!
To reduce the risk of injury, the user must read and understand the operator’s manual
before using this product.
WARNING!
READ AND UNDERSTAND ALL INSTRUCTIONS. Failure to follow all instructions listed
below and on the machine could result in electric shock, re, serious personal injury
and/or death.
READ ALL INSTRUCTIONS
• This cutting machine is capable of amputating hands and feet and throwing objects. Failure to
observe all safety instructions could result in serious injury or death.
• Avoid dangerous environment — Do not use the lawn mower in damp or wet conditions or
operate in the rain.
• Keep children away — Keep all bystanders, children, and pets at least 100 ft. away. Stop the
mower and turn off the machine if anyone enters the area.
• Tragic accidents can occur if the operator is not alert to the presence of children. Children
are often attracted to the machine and the mowing activity. NEVER assume that children will
remain where you last saw them.
• Keep children out of the mowing area and in the watchful care of a responsible adult other
than the operator.
• Be alert; stop and turn machine off if a child enters the area.
• Before and while backing, look behind and down for small children, bystanders, and pets.
• Be especially careful before and when backing with the bagger kit installed, as it may limit
visibility. Always look closely behind and down for small children, bystanders, and pets, and
move the mower slowly.
• Never carry children, even with the blades shut off. They may fall off and be seriously injured
or interfere with safe machine operation. Children who have been given rides in the past may
suddenly appear in the mowing area for another ride and be run over or backed over by the
machine.
• Never allow children to operate the machine.
WARNING!
CHILDREN CAN BE KILLED OR SERIOUSLY INJURED BY THIS EQUIPMENT. The
American Academy of Pediatrics recommends that children be a minimum of 16
years of age before operating a riding lawn mower.
• Use extreme care when approaching blind corners, shrubs, trees, or other objects that may
block your view of a child.
• Dress properly — Do not wear loose clothing or jewelry. They can be caught in moving
parts. The use of rubber gloves and substantial, fully enclosed footwear with good traction is
recommended when using this mower.
• Never leave a running machine unattended. Always turn off blades, set parking pedal, stop
motor, and remove key before dismounting.
• Check brake operation before each use and frequently during use. Adjust and service as
required.
• Keep hands and feet away from cutting area, which is located under the mower deck and
inside the side discharge chute. Keep clear of the side discharge chute opening at all times.
Do not reach under the mower deck.

4
• Operate the lawn mower only in daylight or good articial light.
• Use safety glasses — Always wear eye protection with side shields marked to comply with
ANSI Z87.1. Use face mask if operation is dusty.
• Use the right appliance — Do not use the lawn mower for any job except that for which it is
intended.
• Do not force the lawn mower — It will do the job better and safer at the rate for which it was
designed.
• Do not charge lawn mower in rain, or in wet locations.
• Stay alert — Watch what you are doing and use common sense when operating the lawn
mower. Do not operate the mower while tired, upset, or under the inuence of drugs, alcohol,
or medication. A moment of inattention while operating the lawn mower may result in serious
personal injury.
• Maintain lawn mower with care — Keep machine in good working condition. Keep blades
sharp and guards in place and in working order. To prevent serious personal injury, damage to
the mower, and for best performance, replace damaged or unevenly worn blades.
• Check all nuts, bolts, and screws before each use for proper tightness to be sure the
equipment is in safe working condition. Mower blades are sharp. Wrap the blades or wear
gloves, and use extra caution when servicing them.
• Stop the motor, wait until blades come to a complete stop, and remove the start key before
cleaning the lawn mower, removing the bagger, or removing the mulch cover.
• Replace blade if it is bent or cracked. An unbalanced blade causes vibration that could
damage the motor drive unit or cause personal injury. Sharpen a dull blade equally at each end
to maintain the balance. Clean the blade thoroughly and check its balance by supporting it
horizontally on a thin nail through its center hole. The nail should be in a horizontal position. If
either end of the blade rotates downward, remove some metal from the heavy lower end until
the blade is balanced. It is balanced when neither end drops.
• The side discharge chute is a spring-loaded guard that covers the side discharge opening
on the mower deck and deects grass clippings and debris away from the operator. Always
ensure that the motor is off and the blades have stopped moving before inspecting, moving,
cleaning, or performing maintenance on the side discharge chute.
• Always use safety protective devices. Do not operate the mower without the side discharge
chute in place and working properly. Mulch cover should be correctly installed and working
properly during mulching operation and bagger kit should be correctly installed and working
properly during bagging operation.
• Never interfere with the intended function of a safety device or reduce the protection provided
by a safety device. Check their proper operation regularly.
• Never tamper with safety devices. Check for proper operation regularly.
• Follow manufacturer’s instructions for proper operation and installation of accessories. Only
use accessories approved by the manufacturer. The use of other accessories may increase the
risk of injury.
• Clear the work area before each use. Remove all objects such as rocks, sticks, metal, wire,
bones, toys, fallen tree limbs, tree nuts, or other objects which can be thrown by the blade.
• Objects struck by the lawn mower blades can cause severe injuries to persons. The lawn
should always be carefully examined and cleared of all objects prior to each mowing. If the
lawn mower strikes a foreign object, follow these steps:
• Stop the lawn mower, set the parking pedal, wait until the blades come to a complete stop,
and then remove start key.
• Thoroughly inspect the mower for any damage.
SAFETY INSTRUCTIONS

5
• Replace the blade if it is damaged in any way. Repair any damage before restarting and
continuing to operate the mower.
• Slopes are a major factor related to loss of control and tip-over accidents, which can result in
severe injury or death. Operation on all slopes requires extra caution. If you cannot back up
the slope or if you feel uneasy on it, do not mow it. Never use on steep slopes greater 15°.
• Never attempt to ride on a steep slope or mow a slope that is greater than 15°. To determine
the angle of your slope, use the Slope Guide at the back of this manual.
• Mow up and down slopes, not across.
• Watch for holes, ruts, bumps, rocks, or other hidden objects. Uneven terrain could overturn
the machine. Tall grass can hide obstacles.
• Use a slow speed so you will not have to stop suddenly or accidentally accelerate while on a
slope.
• Do not mow on wet grass. Tires may lose traction and you may lose control.
• Always keep the direction control switch in the forward position when going down slopes. Do
not shift to neutral and coast downhill, which may cause you to lose control of the mower.
• Avoid starting, stopping, or turning on a slope. If the tires lose traction, disengage the blades
and proceed slowly straight down the slope.
• Keep all movement on slopes slow and gradual. Do not make sudden changes in speed or
direction, which could cause the machine to roll over.
• Use extra care while operating machine with baggers or other attachments; they can affect the
stability of the machine. Do not use on steep slopes greater than 15°.
• Do not try to stabilize the machine by putting your foot on the ground.
• Do not mow near drop offs, ditches, or embankments. The machine could suddenly roll over
if a wheel goes over the edge or if the edge caves in and result in death or serious personal
injury.
• Never direct discharged material toward anyone. Plan your mowing pattern to avoid discharge
of material toward bystanders, roads, sidewalks, windows, cars, and the like. Also, avoid
discharging material against a wall or obstruction, which may cause the material to ricochet
back toward the operator.
• Stop the blade when crossing gravel surfaces to avoid discharging gravel and rocks and drive
the mower slowly and carefully to avoid loss of control.
• Use extra care when approaching blind corners, shrubs, trees, or other objects that may block
your view.
• Never make any adjustments or repairs with the motor running and/or blades moving. Turn off
power switch and remove key.
• Stop the motor, set the parking pedal, wait until the blades come to a complete stop, and
remove start key before unclogging the side discharge chute or opening. The cutting blades
continue to rotate for a few seconds after the motor is shut off. Never place any part of the
body in the blade area until you are sure the blades have stopped rotating.
• If the mower should start to vibrate abnormally, stop the motor and check immediately for
the cause. Replace the blades if they are unevenly worn or damaged in any way. Vibration is
generally a sign of a damaged mower blade.
• Disengage mower blades when not mowing.
• Service on the product and charger must be performed by qualied repair personnel only.
Service or maintenance performed by unqualied personnel could result in injury to the user or
damage to the product.
• Use only authorized replacement parts when servicing the product. Use identical replacement
SAFETY INSTRUCTIONS

6
blades only. Use of unauthorized parts may create a risk of serious injury to the user or
damage to the product.
• Maintain or replace safety instructions labels, as necessary.
• Remove start key — Remove start key from the mower before storing, servicing, or changing
accessories such as blades. Such preventive safety measures reduce the risk of starting the
mower accidentally.
• Stop the unit and remove the start key when not in use. Transport the unit with the motor
stopped and the start key removed from the mower.
• Battery tools do not have to be plugged into an electrical outlet; therefore, they are always in
operating condition. Be aware of possible hazards when not using your battery tool or when
changing accessories. Following this rule will reduce the risk of electric shock, re, or serious
personal injury.
• Do not use battery-operated mower in rain.
• Remove the start key before servicing, cleaning, or removing material from the gardening
appliance.
• Store idle lawn mower indoors — When not in use, mower should be stored indoors in a dry,
locked place out of the reach of children. The start key should also be removed and stored in
a separate location out of the reach of children.
• Follow instructions for lubricating and changing accessories.
• Only allow responsible adults, who are familiar with and understand the instructions, to
operate this machine.
• Never carry passengers.
• Never operate machine in a closed area.
• Do not mow in reverse unless absolutely necessary. Always look down and behind before and
while backing.
• Slow down before turning.
• Watch for trafc when operating near or crossing roadways.
• Use extra care when loading or unloading the machine into a trailer or truck and press the
brake pedal as needed to control the speed. The mower will freely roll if it is moved on an
inclined surface without pressing the brake pedal or setting the parking pedal. When loading
or unloading the mower, do not exceed the maximum recommended operation angle of 15°.
• Data indicates operators age 60 years and above are involved in a large percentage of riding
mower related injuries. These operators should evaluate their ability to operate the riding
mower safely enough to protect themselves and others from serious injury.
• Keep machine free of grass, leaves, or other debris build up. Allow machine to cool before
storing.
• Do not spray with a garden hose to clean. Use an air moving device, such as a compressor or
leaf blower to clean the mower.
• The bagger assembly (if equipped) is subject to deterioration and wear and should be checked
each time the mower is used. If replacement is needed, make sure the new bagger meets
original manufacturer’s recommendations and specications.
ADDITIONAL SAFETY RULES FOR BATTERIES
Do not open or mutilate the batteries. Released electrolyte is corrosive and may cause damage to
the eyes or skin. It may be toxic if swallowed.
• Do not dispose of the batteries in a re. The batteries could explode. Check with local codes
SAFETY INSTRUCTIONS

7
for possible special disposal instructions.
• When batteries are not in use, keep away from other metal objects like paper clips, coins,
keys, nails, screws, or other small metal objects that can make a connection from one terminal
to another. Shorting the battery terminals together may cause serious burns or a re.
• Exercise care in handling batteries in order not to short the battery with conducting materials
such as rings, bracelets, and keys. The battery or conductor may overheat and cause burns.
• Under extreme usage or temperature conditions, battery leakage may occur. If liquid comes
in contact with your skin, wash immediately with soap and water. If liquid gets into your eyes,
ush them with clean water for at least 10 minutes, then seek immediate medical attention.
Following this rule will reduce the risk of serious personal injury.
• Do not charge battery in an area of extreme heat or cold. Batteries will charge best at
temperatures from 32˚F to 104˚F.
• Only use YARD FORCE Electric Riding Lawn Mower 75Ah (LPC12-75) lead acid battery.
ADDITIONAL SAFETY RULES FOR TOWING
• Use common sense when towing. Too heavy of a load while on a slope is dangerous. Tires can
lose traction with the ground and cause you to lose control of your mower.
• Follow manufacturer’s recommendations for wheel weights or counterweights.
• Total towed weight must not exceed the weight that you can safely control with the mower.
• Do not attach towed equipment except at the approved hitch point.
• Never allow children or others in or on towed equipment.
• Stopping distance increases with speed and weight of load being towed. Travel slowly and
allow extra time and distance to stop.
• Do not turn sharply when towing. Use additional caution when turning or operating under
adverse surface conditions. Use care when reversing.
1. SAVE THESE INSTRUCTIONS - DANGER - TO REDUCE RISK OF FIRE OR ELECTRIC
SHOCK, CAREFULLY FOLLOW THESE INSTRUCTIONS. This manual contains important
safety and operating instructions for battery charger YF48vRX-RER38 7.5A-CHG.
2. Before using battery charger, read all instructions and cautionary markings on battery charger,
battery, and product using battery.
CAUTION!
To reduce the risk of injury, charge only YARD FORCE Electric Riding Lawn Mower 75 Ah
lead acid battery. Other types of batteries may burst, causing personal injury or damage.
DANGER!
TO REDUCE THE RISK OF FIRE, ELECTRIC SHOCK, DEATH, OR SERIOUS PERSONAL
INJURY, CAREFULLY FOLLOW THESE INSTRUCTIONS.
• This manual contains important safety and operating instructions for the charger. Refer to them
frequently and use them to instruct others who may use this product. If you loan someone
this product, loan them these instructions also to prevent misuse of the product and possible
injury.
• Before using the charger, read and understand all instructions and cautionary markings in this
manual, on battery charger, batteries, and 48V mower to prevent misuse of the products and
possible injury or damage.
SAFETY RULES FOR CHARGER
SAFETY INSTRUCTIONS

8
• This charger is to be used only for charging this 48V mower. Use with other products or
batteries may cause personal injury as well as damage to the product or charger.
• Lead acid batteries may generate explosive hydrogen gas during normal operation. Keep
sparks, ames, and smoking materials away from batteries.
• The charger is not meant for use by children.
• Provide adequate ventilation for the charger to dissipate heat during charging. The charger will
get hot. Keep away from ammable and combustible material and do not cover the charger.
• Risk of Burn Hazard — Charger surfaces may be hot during operation. Use the charger handle
only. Mount charger on a table or wall with the cooling ns vertical.
• Risk of electric shock. Do not touch uninsulated portion of output connector or uninsulated
battery terminal.
• Do not use charger outdoors or expose to wet or damp conditions. Water entering charger
will increase the risk of electric shock. The charger must be plugged into a Class A GFCI
receptacle when used outdoors.
• Keep charger and charger plug free of contamination and dirt. Do not let gasoline, oils,
petroleum-based products, etc. come in contact with plastic parts. They contain chemicals
that can damage, weaken, or destroy plastic.
• Keep cord and charger away from heat to prevent damage to housing or internal parts.
• Do not operate charger with a damaged cord or plug, which could cause shorting and electric
shock. If damaged, have the charger replaced by an authorized service person.
• Do not operate charger if it has received a sharp blow, been dropped, or otherwise damaged
in any way. Take it to an authorized service person for electrical check to determine if the
charger is in good working order.
• Make sure cords are located so that they will not be stepped on, tripped over, come in contact
with sharp edges or moving parts, or otherwise subjected to damage or stress. This will
reduce the risk of accidental falls, which could cause injury, and damage to the cords, which
could result in electric shock.
• An extension cord should not be used unless absolutely necessary. Use of improper extension
cord could result in a risk of re and electric shock. If extension cord must be used, make
sure:
a. That pins on plug of extension cord are the same number, size, and shape as those of plug
on charger.
b. That extension cord is undamaged and in good electrical condition; and
c. That wire size is large enough for AC ampere rating of charger as specied below:
Cord Length (Feet) 25' 50' 100'
Cord Size (AWG) 14 14 12
NOTE: AWG = American Wire Gauge
• Do not disassemble charger. Opening the charger will void its warranty. If charger requires
service or repair during the warranty period, take it to an authorized service center to be
replaced.
• Service person must unplug charger from the AC wall outlet and from the mower charge port
before attempting any maintenance or cleaning to reduce the risk of electric shock.
SAFETY RULES FOR CHARGER

9
The following symbols are used on the product and in this manual to alert the operator of potential
safety hazards. Read them carefully, and understand their meaning.
DANGER!
Indicates an imminently hazardous situation which, if not avoided, will result in death or
serious injury.
WARNING!
Indicates a potentially hazardous situation which, if not avoided, could result in death or
serious injury.
CAUTION!
Indicates a potentially hazardous situation which, if not avoided, may result in minor/
moderate injury.
NOTICE!
Indicates a practice not related to personal injury which, if not avoided, may result in
property damage.
Other Symbols
Some of the following symbols may be used on this product. Please study them and learn their
meaning. Proper interpretation of these symbols will allow you to operate the product better and
safer.
Look for this symbol to point out important safety precautions. It means: Attention!
Become Alert! Your Safety Is Involved.
Read operator’s manual before operating this machine. Failure to follow directions could
result in serious injury.
Wear eye protection complying with ANSI Z78.1 and hearing protection.
Keep children out of the mowing area and in the watchful care of a responsible
adult other than the operator.
Wet Conditions Alert. Do not expose to rain or use in damp locations.
Failure to use in dry conditions and to observe safe practices can result in electric shock.
Keep hands and feet away from blade and cutting area.
Do not reach hands or feet under mower deck.
Do not operate on steep slopes or inclines greater than 15º. Mow up and down the face
of slopes, never across.
DESCRIPTION OF SYMBOLS
Keep children safe
and away from mower.
Supervise Children!

10
Keep all children, bystanders, and animals at least 100 ft. away.
Thrown objects can ricochet and result in personal injury or property damage.
Thrown objects can ricochet and result in personal injury or property damage. Never
direct discharged material toward anyone.
Never carry children or anyone, even when the blades are off.
Always look down and behind you before and during backing and make sure
children, bystanders, and pets are clear of the area.
Mower can be operated in reverse with blades engaged when RMO button is pushed and
red button light is on. Always look down and behind you before and when manuevering in
reverse. Mowing in reverse is not recommended
Lift the blade engagement button up to engage. Press the blade engagement button
down to disengage.
This product uses lead acid (Pb) batteries. Local, state or federal laws may prohibit
disposal of batteries in ordinary trash. Consult your local waste authority for information
regarding available recycling and/or disposal options.
DESCRIPTION OF SYMBOLS

11
KNOW YOUR LAWN MOWER (See Fig.1)
PARTS LIST
1. Brake Pedal
2. Accelerator Pedal
3. Parking Pedal
4. Charging Port
5. Hitch Point
6. Wash Port
7. Cup Holder
8. Deck Height Adjustment Lever
9. Seat Adjustment Lever
10. Headlight
11. Side Discharge Chute
12. Control Pannel
12a. Media Holder
12b. Power Switch with Start Key
12c. Headlight Button
12d. Reverse Mode Button
12e. Blade Engage Knob
12f. Direction Control Switch
F= Forward
N=Neutral
R=Reverse
12g. Cruise Control Button (CCS)
12h. Battery Level Indicator/
Odometer/Parking Brake Indicator
12i. USB Port
13. Mulch Cover
14. Charger
1
12f
12e
12c
12d
12h
12b
12a
12
9
10 13
14
11
12g
12i
2
34
5
8
7
6
Fig. 1

12
The safe use of this product requires an understanding of the information on the product and in this
operator’s manual as well as a knowledge of the project you are attempting. Before use of this product,
familiarize yourself with all operating features and safety rules.
• ACCELERATOR PEDAL
The accelerator pedal controls the speed of the mower.
• BATTERY LEVEL INDICATOR/ODOMETER/PARKING BRAKE INDICATOR
The battery level indicator shows the amount of battery charge remaining. The odometer tracks the total
distance the mower has been used (key in on position) for maintenance purposes.
• BLADE ENGAGE KNOB
Pull the blade engage knob up to activate the mower’s cutting blades. Push the knob down to stop the
cutting blades.
NOTE: For cutting in reverse, the reverse mode button must also be activated.
• BRAKE PEDAL
The brake pedal is used for slowing down and stopping the mower.
• CHARGER
The mower’s charger has a eyelets for convenient mounting or space saving storage. When mounting
the charger, use screws in both holes of the mounting ange to secure in place. Always mount in such a
way that the charger’s LED status light is visible while charging.
• CRUISE CONTROL BUTTON (CCS)
The cruise control button allows you to continue forward at a set speed without needing to press the
accelerator pedal. While active, pressing the brake pedal or CCS button will stop cruise control.
• DECK HEIGHT ADJUSTMENT LEVER
The deck height adjustment lever is used to raise or lower the cutting deck.
• DIRECTION CONTROL SWITCH
The direction of movement of the mower is controlled using the direction control switch. Available
settings are forward (F), neutral (N) and reverse (R).
• HEADLIGHT BUTTON
Turn the headlights on and off using the headlight button.
• MEDIA HOLDER
The media holder offers a convenient place to store your cell phone or MP3 player when charging with
the USB port.
• MULCH COVER
Your mower is equipped with a mulch cover that covers the side discharge opening, which allows the
mower blade to cut and recut for ner clippings.
• PARKING PEDAL
Use the parking pedal to lock the mower in the braked position. Brake pedal must be depressed before
the parking pedal will lock.
• POWER SWITCH WITH START KEY
The power switch is used to turn the mower on and off. The start key must be inserted before the switch
can be operated.
• REVERSE MODE BUTTON
Press the reverse mode button to allow the mower to cut when maneuvering in the reverse direction.
The blades will disengage if mower is operated in reverse without rst pressing the reverse mode
button. Once the button is engaged the mower will remain in both reverse and forward mowing mode
until the button is pressed again or the blades are disengaged. NOTE: The blade engage knob must also
be pulled up for mowing to occur when driving in reverse.
• SEAT ADJUSTMENT LEVER
Use the seat adjustment lever to move the seat to the desired position.
• USB PORT
The USB charging port provides charging power of 5 Volts DC at up to 2 amps for your cell phone,
MP3 player, or other USB devices. Consult the owner’s manual for your device for specic charging
requirements. Connect one end of a USB cable (not provided) to your device and the other end to the
USB charging port on the mower, to begin charging your device.
NOTE: The USB port is only powered when the start key is in the ON position.
PARTS LIST

13
NOTICE!
Attempting to charge devices rated more than 2 amps could damage the USB charging port and/or
the mower.
WARNING!
Never use headphones or any electronic device, such as a smart phone or tablet, while operating
the mower. Distracted operation can result in an accident that could result in death or serious
personal injury to the operator or a bystander.
WARNING!
If any parts are damaged or missing, do not operate this lawn mower until the missing parts are
replaced. Failure to heed this warning could result in serious personal injury.
NOTICE!
Always recycle the packaging in accordance with local recycling programs.
WARNING!
This item requires a two-person lift to remove from the packaging. Make sure that you have sufcient
space to put the lawn mower down. Keep your feet apart so that you have a stable position, bend at
the knees and keep your back straight.
PARTS LIST
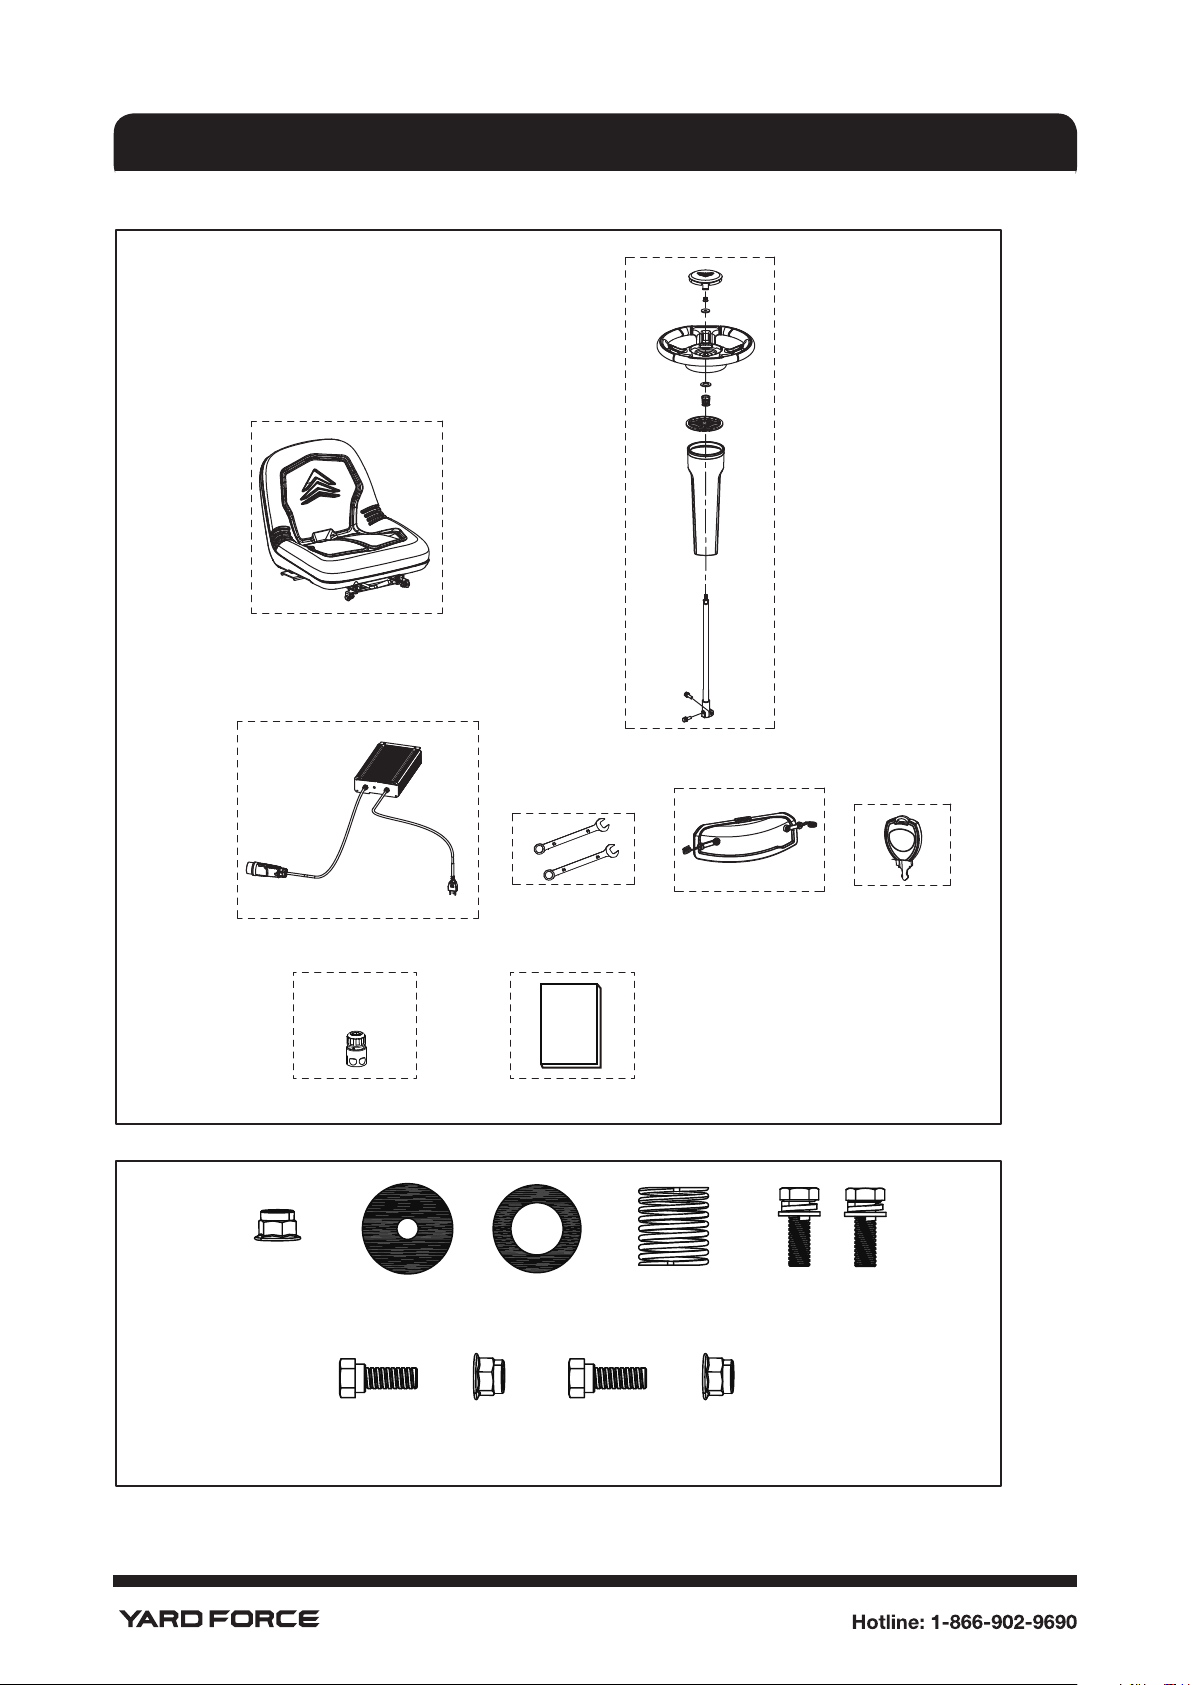
Carefully remove all parts from their packaging and check that the following parts are included. See Fig 2 &
Fig. 2A:
A. Seat Assembly with Safety Interlock Cable 1pc
Flange Nut (A) 2pcs
Bolt (B) 2pcs
B. Steering Column Assembly
Spring (C) 1pc
Washer (D) 1pc
Washer (E) 1pc
Flange Nut (F) 1pc
Bolt (G) 2pcs
Spring Washer (H) 2pcs
Washer (I) 2pcs
Upper Steering Shaft 1pc
Steering Column 1pc
Steering Column Cover 1pc
Steering Wheel 1pc
Steering Wheel Cover 1pc
C. Charger 1pc
D. Wrenches 2pcs
E. Mulch Cover 1pc
F. Key 3pcs
G. Wash-port Quick Coupler 1pc
H. Owner’s Manual 1pc
PARTS LIST
14
PARTS LIST
Fig. 2
A
C
DEF
HG
B
MANUAL
Fig. 2a
Flange Nut (A) Washer (E) Washer (D) Spring (C) Bolt (G),
Spring Washer (H),
Washer (I)
Flange Nut (A)Bolt (B)
Flange Nut (A)Bolt (B)
BoFlange Nuts (A) and Bolt (B) are attached to seat for shipment.lt (B)

15
Dimension
Assembled Length 63.5" (1610mm)
Assembled Height 45.5" (1155mm)
Assembled Width Without Discharge Deector 38" (960mm)
Net Weight 595 lb (270 kg)
Mower & Deck
Pneumatic Tire Sizes 15" x 6" x 6" Front, 16" x 6.5" x 8" Rear
Cutting Width 38" (96cm)
Blade Cutting Diameter 19" (49cm)
Number Of Blades 2
Number Of Deck Wheels 2
Cold Tire Pressure 20 PSI (138 kPa)
Blade Speed 3500 rpm
Deck Lift System Hand operation
Minimum Cutting Height 1.5" (38mm)
Maximum Cutting Height 4.5" (114mm)
Number of Cutting Height Positions 12
Battery
Battery Type Lead-acid
Battery Voltage(V) 48
Battery Amp Hours (Ah) 75
Charge Time (hours) 10
Number of Batteries 4
Charge Cycle 300~350
Charger and Mower Operating Temperatures 32°F~104°F
Charger
Type Input:100~240V,50~60HZ, Max. 4.5A;
Output: 48V DC,7.5A
Performance
Maximum Forward Speed 8 mph(12.9 km/h); 5 mph (mow, 8 km/h)
Maximum Reverse Speed 3 mph (4.8 km/h)
PRODUCT SPECIFICATIONS
16
ASSEMBLY
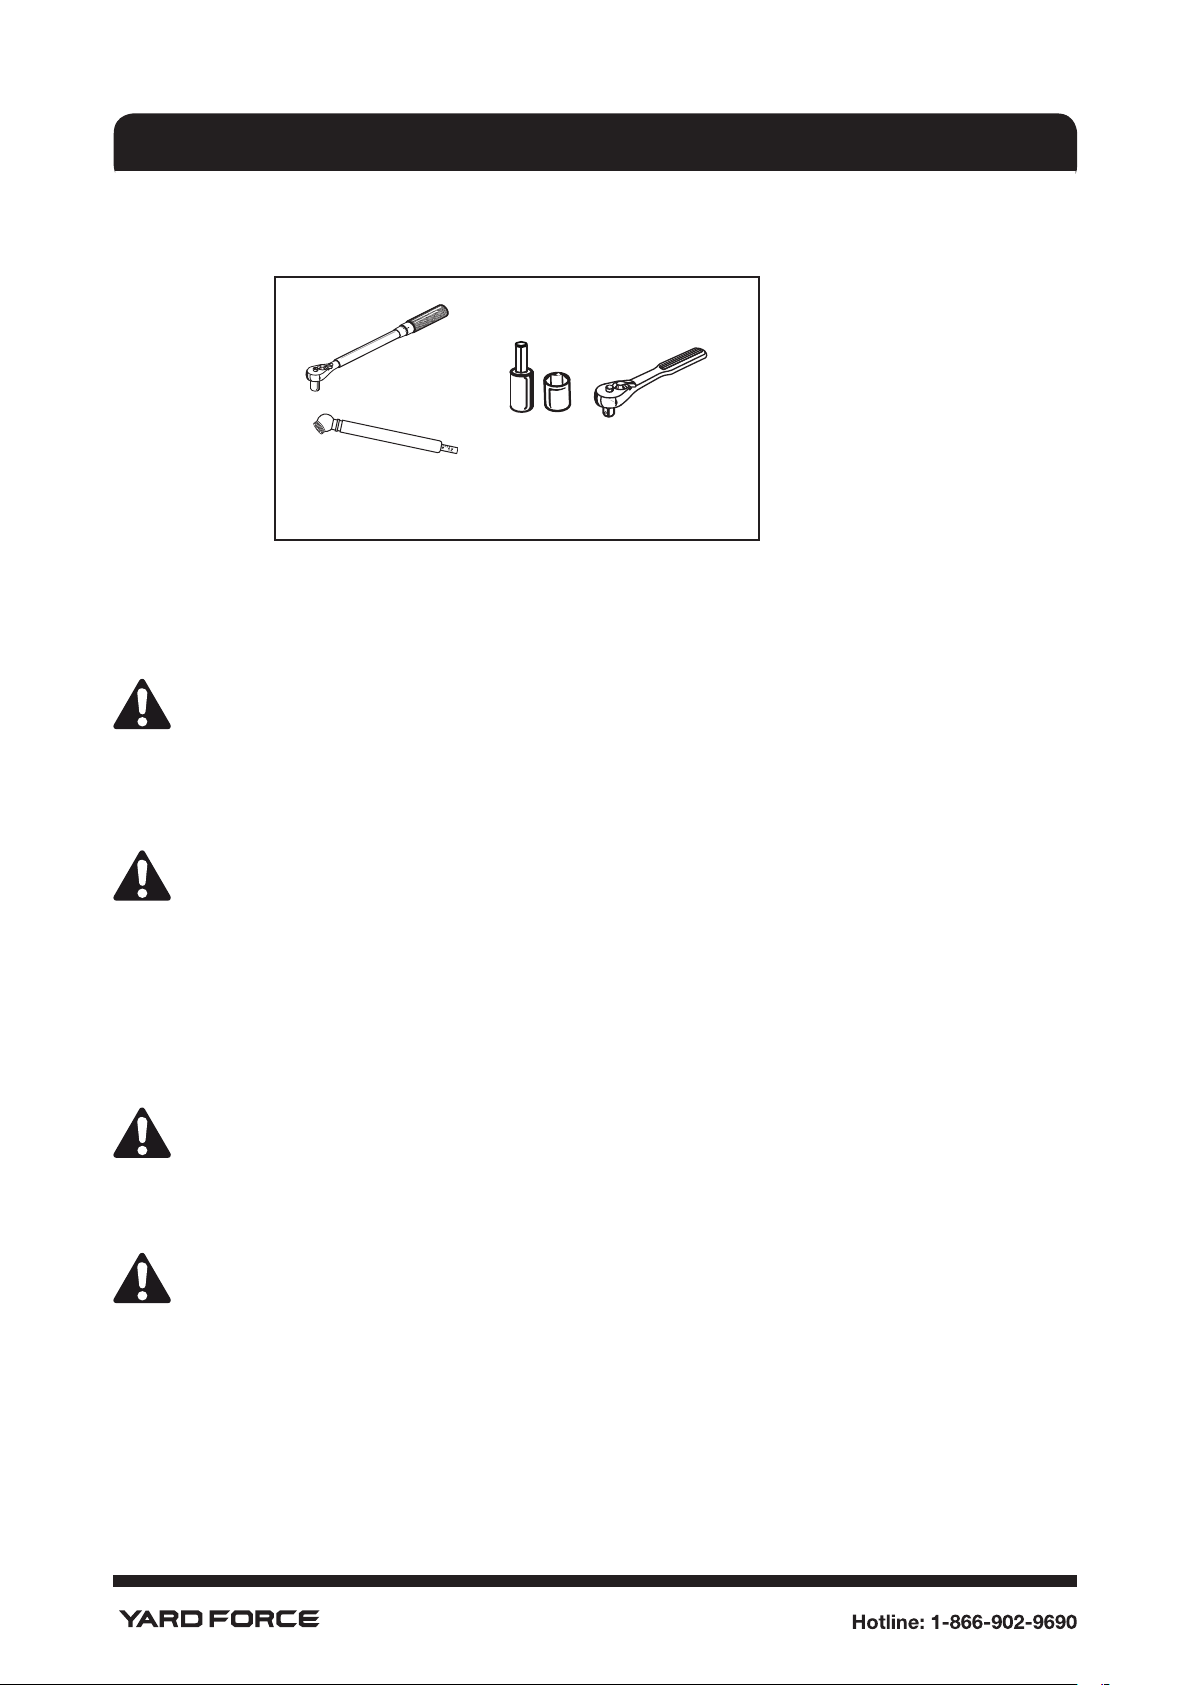
TOOLS NEEDED
The following tools (not included or drawn to scale) are needed for assembly:(See Fig. 3)
UNPACKING (See Fig. 4)
• Remove the hardware securing the corner and side braces to the frame bottom, then lift the braces to
remove.
WARNING!
Do not discard the hardware to avoid any personal injury.
• Cut the nylon straps securing the front and rear wheel axles to the frame.
• Remove and set aside all accessible packaging and wrap from unit and parts. Do not discard the
packing material until you have carefully inspected and satisfactorily operated the product.
WARNING!
If any parts on the Parts List are already assembled to your product when you unpack it, verify
the part is assembled correctly, are properly tightened, and is torqued correctly (where applicable)
before proceeding to the next assembly step. Use of a product that may have been improperly
assembled could result in serious personal injury.
• Inspect the product carefully to make sure no breakage or damage occurred during shipping.
• If any parts are damaged or missing, please call Yard Force customer service at 866-902-9690.
NOTE: Mower should be assembled while positioned on the frame bottom. Once assembly is complete,
raise the cutting deck to its highest position. Position a board such as a standard 2"x4" along the front of
the pallet to create a gradual transition between the frame and the ground. Slowly drive the mower forward.
WARNING!
Use care when driving the mower off of the frame and press the brake pedal as needed to
control the speed. The mower will freely roll if it is moved on an inclined surface without
pressing the brake pedal or setting the parking brake. Failure to follow these instructions
can result in loss of control and result in death, serious personal injury, or property damage.
NOTICE!
Driving the mower off the frame in the forward direction without a transition board can
cause damage to the mower’s cutting deck.
Torque Wrench
Tire Pressure Gauge
20
30
40
0
50
Socket Wrench with 12 mm, 13 mm,
and 14 mm sockets And 6mm Hex Bit
Fig. 3

17
ASSEMBLY
ASSEMBLY
WARNING!
Strictly adhere to all torque wrench tightening specications. Failure to do so could cause
serious personal injury.
WARNING!
Do not attempt to modify this product or create accessories not recommended for use with
this product. Any such alteration or modication is misuse and could result in a hazardous
condition leading to possible serious personal injury.
WARNING!
To prevent accidental starting that could cause serious personal injury, always remove the
start key from the tool when you are assembling parts.
CONNECT THE BATTERY (See Fig. 5)
When shipped from the factory, the mower’s batteries are disconnected. To connect:
• Press the tabs on the wiring cover and lift the cover to remove.
• Connect the two ends of the battery quick-connect plug together.
NOTE: Before reinstalling the wiring cover, install the seat as described in the next section.
INSTALL THE SEAT (See Fig. 6)
• Remove ange nuts (A) and bolts (B) from seat mounting brackets.
• Place the seat assembly over the mounting brackets and align holes as shown.
• Reinstall ange nuts (A) and bolts (B) and tighten securely.
• Route seat safety interlock cable through hole in wiring cover, then attach to plug on mower.
• Reinstall wiring cover and make sure it is securely seated.
Fig. 5
Tab
Tab
Battery Quick-
connect Plug
Battery Quick-
connect Plug
Wiring Cover
Fig. 4
18
ASSEMBLE THE STEERING COLUMN (See Fig. 7&8)
• Install the upper steering shaft onto the lower steering shaft, rotate as needed to align the holes in both
shafts.
• Install washers (I), spring washers (H), bolts (G) and tighten securely. Torque to 6 ft.lbs.
• Insert steering column over shaft. Note the tabs on the bottom of the steering column that t into the
holes in the opening and make sure steering column is securely seated.
• Align the groove on the steering column cover with the top of the steering column then install the
steering column cover. The upper steering shaft will protrude through the opening in the cover.
• Install spring (C) and washer (D) onto the upper steering shaft.
• Make sure the mower's wheels are pointed straight ahead, then install the steering wheel onto the upper
steering shaft.
• Install washer (E) and ange nut (A), tighten securely, Torque nut to 6ft.lbs.
• Install the steering wheel cover.
ASSEMBLY
Fig. 7
Bolt (G)
Bolt (G)
Bolt Hole
Lower Steering Shaft
Bolt Hole
Upper Steering Shaft
Fig. 8
Steering Wheel Cover
Flange Nut (A)
Spring (C)
Tab
Hole
Washer (E)
Steering Wheel
Washer (D)
Steering Column Cover
Steering Column
Upper Steering Shaft
Fig. 6
Seat Asembly
Wiring Cover
Safety Interlock
Cable
Plug
Flange Nut (A)
Bolt (B)
Bolt (B) Mounting Bracket

19
FINAL PREPARATION
CHECK TIRE PRESSURE
Check the air pressure in all tires before use. Improper air pressure will affect handling, steering response,
traction, tire life, level cutting, and operator comfort. Be sure tires are inated to the pressure shown below.
NOTE: Tire pressure should only be measured or adjusted when tires are cold.
Recommended Pressure: 20 PSI (137 kPa)
WARNING!
Check the tire pressure carefully while inating. Too much air in the tire could cause the tire to burst,
causing serious personal injury.
CHARGE THE MOWER (See Fig.9.)
Mower batteries must be fully charged before rst use. To verify mower batteries are fully charged, check
the battery level indicator. It is recommended the batteries are charged for minimum 4 hours before rst use
regardless of battery level indicator reading 100% charge.
To charge:
Insert charger plug into charging port on mower, making sure it is properly connected.
Connect charger to power supply using normal household current of 120 V, AC only, 60 Hz.
Do not charge in an area of extreme heat or cold.
Remove the charger from the mower once it is fully charged and ready for use.
WARNING!
To avoid accidental starting or movement of the mower that could result in serious personal injury,
always remove the start key and set the parking pedal when leaving the mower unattended.
NOTICE!
Always connect the mower to the charger when the unit is not in use. If it is not possible to leave the
mower charger connected, make sure to charge the batteries fully at least once a month.
ASSEMBLY
Fig. 9
Charger
Plug
Charging
Port

20
Fig. 10
TEST THE SAFETY INTERLOCK SYSTEM (See Fig. 10.)
This mower features a Safety Interlock System to protect the operator by shutting off the blades if the
operator leaves the seat with the blades running. Test the system to be sure it is working correctly.
To test:
• Make sure direction control switch is in neutral (N) position and blade engage knob is down.
• Install start key and turn to ON position.
• Raise blade engage knob to activate blades.
• Briey lift off the seat, but do not get off the mower.
• The blades should shut off within 5 seconds. If they don’t, verify you connected the safety interlock
cable as described on page 17. If the cable is connected but the system still doesn’t function, contact
Yard Force Customer Service at 866-902-9690. Do not operate the mower until the safety interlock
system has been repaired.
ASSEMBLY
Table of contents
Other MEROTEC Lawn Mower manuals


