manuals.online logo
Brands
  1. Home
  2. •
  3. Brands
  4. •
  5. Mesa/Boogie
  6. •
  7. Music Pedal
  8. •
  9. Mesa/Boogie Three Channel Dual & Triple Rectifier Solo... User manual

Mesa/Boogie Three Channel Dual & Triple Rectifier Solo... User manual

Owner’s Manual
SAFETY PRECAUTIONS:
• Readtheseinstructions.
• Keeptheseinstructions.
• Heedallwarnings.
• Followallinstructions.
• Donotusethisapparatusnearwater.
• Cleanonlywithdrycloth.
• Besuretouseonlyproperlyratedpoweradaptors or
universalpowersupplies(pedalboardpowersupplies)
withappropriate attention paid to propervoltage,am-
perageandgroundschemes.Impropervoltage/amper-
agebeingprovidedtothepedalmaycausepoortone,
inconsistentperformance,damagetotheunitor allof
the above. Proper voltage, amperage and grounding
specsaresuppliedattheendofthismanual.
• REPLACE THE BOTTOM LID after battery replace-
ment or switch adjustment before the unit is used.
Some electronic parts inside are static sensitive and
canbedamagedfromevenasmallstaticchargefrom
contactwithcarpetorotherconductivesurfaces.Todo
an A/B comparison between BOOST and NORMAL
withthebottom removed–playtheunitupsidedown.
DO NOT SET A POWERED UNIT “CONTROLS UP”
ONAMETAL(orany)SURFACEWITHTHEBOTTOM
REMOVED!
CongratulationsonyourchoiceofMESA/Boogieandwelcome
totheMESAFamily!Thesamepassionforexcellence,commit-
menttoqualityanddedicationtocustomersatisfactionispres-
entineachandeveryproductwemakeinourone-and-only
shopinPetaluma,California,U.S.A.Restassuredthatthevery
samepeoplethathand-buildthenestampliersintheworld
builtyourpedaland you haveaccess to the same resources
forhelpthatallourcustomersdo.Callonusanytimeandenjoy!
THROTTLE BOX™
The THROTTLE BOX is all about GAIN.  This beast serves
up Rock and Metal with cut and aggression but retains the
signaturewarmthandorganicsonicqualityfoundinallourin-
struments.Whileitsmainstrengthsliein the heaviersounds,
theTHROTTLEBOXisalsoversatileandthelowerregionof
the GAIN control should not be overlooked for Classic Rock
orhowlingBlues-bothrhythmandlead.Themiddlerangeof
the GAIN control delivers tight, stinging Modern Crunch with
plentyofattitudeandpercussion.Andwhenyouputthispedal
toMetal,the upperone-thirdoftheGAIN controlunleashesa
HeavyRockhot-rodthat’sblisteringwithbothgainandsearing
top-endharmonics.
FEATURES & CONTROLS
IN: This¼”phonojackis the Instrument Inputforthede-
vice.PlugtheOutputofyourguitarintothisjackwithashielded
cableofgoodquality.Thejackisaswitchingtypejackandthe
circuitisturnedonwhenacableisinserted.Whenthecircuitis
activatedbyinsertingacable,theinternalbatteryisbeingused
topowerit–so be sure tounplug the cable from the INPUT
whenit’snotinuse.
NOTE: The internal battery is switched to an “ON” state
(drawing voltage) by a switching element in the INPUT jack.
To prolong battery life, disconnect the cable from the ¼”
INPUT jack whenever the unit is not in use.
NOTE: If you wish to leave the INPUT connected perma-
nently – as in a pedal board scenario – it is advisable to
power the unit with an external 9V power supply. When an
external (plug-in) AC 9-volt power supply is used to power
the unit the DC Receptacle on the pedal automatically dis-
connects the battery to avoid battery wear and preserve its
useful life. If you are going to use external AC power either
for long periods or permanently in a pedal board set-up,
remove the internal battery to prevent (forgotten) battery
corrosion.
OUT:   This 1/4” phono jackis the OUTPUT forthe device.
Connect the OUTPUT to the Input of your amplier - or the
INPUTofthenextdeviceinlineinyourpedalboard.
NOTE: A Word on Cables… Always use shielded instru-
ment cables of the best quality and shortest length possible
when connecting these types of devices. This will minimize
degradation of your sound, particularly high frequency
roll-off, due to the added capacitance in longer lengths of
cable. We recommend no more than 18-20 feet total (Input
and Output combined) between your instrument and the
termination at the INPUT of the amplifier. If you must use
longer cable lengths, you might consider the use of a Buffer
or Line Driver to keep the tonal integrity intact. While these
change the sound slightly, it will usually be preferable to
top end roll-off. And yes – those little 4” interconnects count
too, so count them in your cable length.
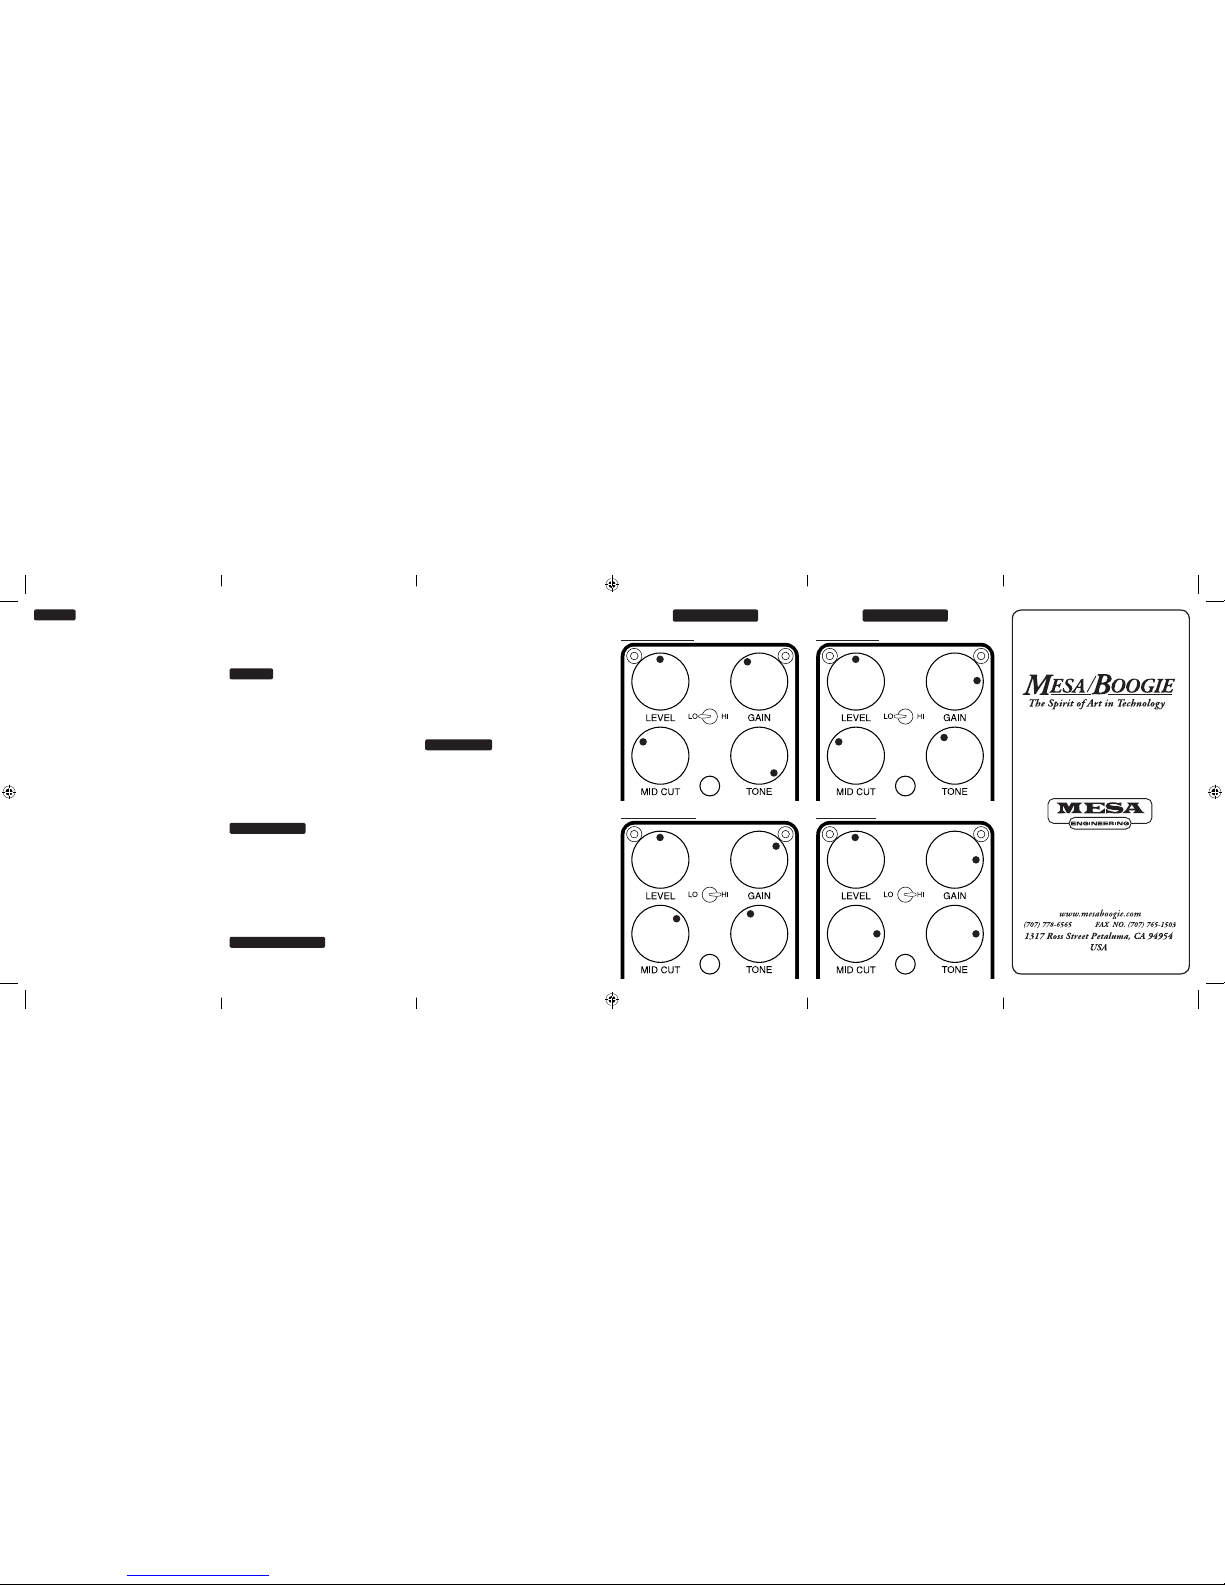
LEVEL: Thisisthemasteroutputlevelanditcontrolsthe
amountof signalprovidedto thehostamplier.Itcanbe
usedeithertobalancelevelstocompensateforhighGAIN
settings- so that no jump in leveloccurs when switched
outofBYPASS. AnotherapplicationishigherLEVELset-
tingstopurposefullysendahottersignaltothehostamp
and“slam”theinputstageforincreasedclip,driveorgain.
LO/HI: The LO/HI switchincorporatedintotheGAIN
circuit creates two different gain regions or saturation
amounts.  LOworksgreatforCrunch orclippedchording
andmedium gainsolosounds. HIprovidesanincreased
levelofsaturationthatisbettersuitedforreallyheavyRock
/Metalrhythmstylesandsmolderingsinglenoteleadwork.
Try the LO Modewiththe BOOST bypassed forthebest
balancewhensearchingforlowertomidgainsounds(see
BOOSTsectionlaterinthismanual).Thebalancebetween
lowendandtopendwillbemorein-syncandeven,mak-
ingthesoundsweeterand more dynamic.Checkout the
HIModewith the BOOST engagedforhighgain applica-
tionswhereyouneedthunderous,tunedlow-endforHeavy
styles.
GAIN: Thiscontroldeterminestheamountofgain(over-
drive)inthesignalpath.
Setlow(8:00–10:30)itproducesarangeofsubtleover-
drive that’s soft and furry, yet featuring the classic mid-
punchassociated withthesetypesofcircuits.Thisrange
isgreat forpushed andclip-thresholdrhythmsoundsand
toaddaslightbumpforBluessolosounds.
The middle range (10:30 – 1:30) offers the most useful
regionofgainthatbeginstosaturatebutstillretainsady-
namicpunchthatkeeps notesexpressiveand tight.This
works well for both Rhythm and Solo work across many
stylesofmusic.
ThehighrangeoftheGAINcontrol(1:30–5:30)isallabout
thicksaturation.Thisregionwillbetheobviouschoicefor
extremeRock,Metal andHeavystylesyet,shouldnotbe
overlookedforsearingsustaininsingle-notesoloing.
MID-CUT:    In addition to the standard “blend-type”
TONE control, theTHROTTLE BOX incorporates a MID
CUTcontrolthatscoopsoutthemidrangefortheclassic
Boogie“V”EQcurve.Thishasbeenanessentialingredi-
ent for the many Artists that have employed this power-
fultool on our ampliers fordecadesto get some of the
heaviest sounds around. This control works backwards
fromwhatyoumightbeusedtowithTonecontrols.Asyou
increasethecontrolyouareincreasingthe“cut”andcutting
outmoremids–untilatthemaximumsetting(5:30)there
ishardlyanymidrangeleftinthesignalpath.
TONE:   This control is found on devices that do not
incorporate individual TREBLE and BASS controls.  It
providessimple,globaladjustment of theentire range of
frequencieswithonecontrol–butyourearmayperceiveit
asmostactiveontheamountofhighfrequenciespresent
inthe mix.Asetting of 12:00represents a “at”setting
with highs neither boosted or cut.  Increasing the TONE
controlpast 12:00 boosts a broadband of high frequen-
cies.DecreasingtheTONEbelow12:00cuts(rollsoff)the
samespectrumofhighfrequencies.
®
®
BOOST: Anothervaluablefeatureisthe selectable
BOOSTthatallows youtofurthershapetheEQcurveto
yourneeds.Withthelowercoverremoved,thisblackDIP
switchislocatedattheedgeofthebatterycompartmenton
thelowestcircuitboard’slowerrightcorner(facingthebot-
tomoftheunitandtheknobsawayfromyou).Itsleveris
ushwiththecircuitboardandaslightcutoutontheboard
furtheridentiesit.YoumaypulltheBatteryoutforeasier
accesstothisswitch.
RemovethefourPhillips-headscrewsontheBottomLidto
accesstheswitch-justasyouwouldtoreplacethebattery.
SettingtheswitchtotheRIGHT/OUTSIDE(viewedfrom
bottom/knobsawayfromyou)BOOSTS(adds)gainand
lowend.Theunitisshipped from ourshopsetthisway-
BOOSTengaged.SettingtheswitchtotheLEFTremoves
theBOOSTvoiceprovidingamorebalancedresponse.
Heavy,highgainsoundsusuallybenetfromtheBOOST
positionengaged.Low to mediumgain sounds can work
withbothpositions,butoftenbenetfromthemoretapered
andbalancedlowendofthenon-BOOSTornormalposi-
tion.
NOTE: The unit is shipped from the Factory set to the
BOOST position. To remove the BOOST and its increased
low end, remove the Bottom Lid and flip the tiny black DIP
switch on the lower right edge of the circuit board to the
LEFT (NORMAL) position.
NOTE: REPLACE THE BOTTOM LID after setting the
BOOST switch before using the unit. Some electronic parts
inside are static sensitive and can be damaged from even
a small static charge from a carpet or other soft surfaces.
Always replace the bottom lid after battery replacement or
switch adjustment before the unit is used. To do an A/B
comparison with the bottom removed – play the unit upside
down. DO NOT SET THE UNIT ON A METAL (or any)
SURFACE WITH THE BOTTOM REMOVED!
AC POWER:  This standard femaleDCReceptacle on
thepedalistheExternalPowerSupplyJackanditaccepts
themaleplugfromastandard9-Volt“wall-wart”ACpower
supply.Wheninstallingyourunitintoapedalboardutilizing
auniversalpowersupply(multi-outputpedalboardpower
supplies), connect the external power source here. The
internalbatteryisautomaticallydisconnectedbyaswitch-
ingelementintheExternal DC Receptacle on the pedal.
However,ifyouknowyouwill not beusingbattery power
foranextendedperiod–forexample,ifyouaremounting
theunittoyourpedalboardpermanently-itiswisetore-
movethebatterytoavoidpossibledamagefromlong-term
batterycorrosion.
INTERNAL BATTERY: Thisunitcanoperateoneithera
9-Voltbatteryorastandard9-Volt“wall-wart”powersupply.
TheunitisshippedfromtheFactorywithalong-life9-Volt
Battery to facilitate easier trial demonstration in a music
storeenvironment.
NOTE: The internal battery is switched to an “ON” state
(drawing voltage) by a switching element in the INPUT jack.
Disconnect the cable from the ¼” INPUT jack whenever the
unit is not in use to prolong battery life.
BATTERY REPLACEMENT: Toaccessthe9-Voltbat-
tery for inspection, replacement or removal; make sure
theExternalPowerJackisdisconnected,removethefour
SAMPLE SETTINGS: SAMPLE SETTINGS:
TIGHT CRUNCH LIQUID SOLO
MODERN DRIVE HEAVY GAIN
Phillips-headscrewsfromthefourcornersofthebottomlid
andremoveit.Notetheorientation/directionofthebattery
andterminalsandreplaceitinthesameposition.
NOTE: Any type of 9-Volt battery will work in this device if
it is fully charged and functional. Carbon Zinc, Alkaline or
even Nickel Cadmium Rechargeable type batteries are all
acceptable replacements. Some pedal aficionados prefer
the “sweetness” they claim to hear from standard Carbon
Zinc type batteries, but you will have to decide what type
best serves your needs.
SPECIFICATIONS:
• Dimensions (W/D/H): 2.87” x 4.77” x 2.28” (73mm x
122mmx58mm)
• Weight: 0.865lbs (393g) with batter y, 0.765lbs (347g)
withoutbattery
• TrueBypassSwitching
• BatteryType:9VDC(one)
• PowerConsumption(CurrentDraw):9VDC/25mA
• AC Adapter (Optional): Power Jack 2.1mm x 5.5mm,
9VDCwithNegativeCenter(RegulatedRecommend-
ed)
• InputImpedance:1MOhm(500kOhmminimum)
• OutputImpedance:10kOhm

Other manuals for Three Channel Dual & Triple Rectifier Solo...

74

Other Mesa/Boogie Music Pedal manuals

Mesa/Boogie Three Channel Dual & Triple Rectifier Solo... User manual

Mesa/Boogie

Mesa/Boogie Three Channel Dual & Triple Rectifier Solo... User manual

Mesa/Boogie Three Channel Dual & Triple Rectifier Solo... User manual

Mesa/Boogie

Mesa/Boogie Three Channel Dual & Triple Rectifier Solo... User manual

Mesa/Boogie Three Channel Dual & Triple Rectifier Solo... User manual

Mesa/Boogie

Mesa/Boogie Three Channel Dual & Triple Rectifier Solo... User manual

Mesa/Boogie Tone-Burst User manual

Mesa/Boogie

Mesa/Boogie Tone-Burst User manual

Popular Music Pedal manuals by other brands

TC Electronic 3RD DIMENSION CHORUS quick start guide

TC Electronic

TC Electronic 3RD DIMENSION CHORUS quick start guide

MORLEY PEDALS VAI-2ES Wiring diagram

MORLEY PEDALS

MORLEY PEDALS VAI-2ES Wiring diagram

IK Multimedia AXE I/O SOLO user manual

IK Multimedia

IK Multimedia AXE I/O SOLO user manual

Yamaha HH80 owner's manual

Yamaha

Yamaha HH80 owner's manual

Mooer Micro Series owner's manual

Mooer

Mooer Micro Series owner's manual

Blockhead Rhythm Maker BH4010 Quick setup guide

Blockhead

Blockhead Rhythm Maker BH4010 Quick setup guide

MORLEY PWA-IIES manual

MORLEY

MORLEY PWA-IIES manual

Mooer Micro Series owner's manual

Mooer

Mooer Micro Series owner's manual

Hagerman THERMIONIC REINFORCER manual

Hagerman

Hagerman THERMIONIC REINFORCER manual

Duncan Polaron manual

Duncan

Duncan Polaron manual

Dunlop Authentic Hendrix 68 Shrine Series quick start guide

Dunlop

Dunlop Authentic Hendrix 68 Shrine Series quick start guide

Electro-Harmonix MICRO Q-TRON manual

Electro-Harmonix

Electro-Harmonix MICRO Q-TRON manual

Rolls 962 owner's manual

Rolls

Rolls 962 owner's manual

FLAMMA FV01 owner's manual

FLAMMA

FLAMMA FV01 owner's manual

Behringer TUBE AMP MODELER TM300 user guide

Behringer

Behringer TUBE AMP MODELER TM300 user guide

Asonix Texas Dirt user guide

Asonix

Asonix Texas Dirt user guide

Labo K Effects Spinyverb manual

Labo K Effects

Labo K Effects Spinyverb manual

Vox Tonelab LE owner's manual

Vox

Vox Tonelab LE owner's manual

manuals.online logo
manuals.online logoBrands
  • About & Mission
  • Contact us
  • Privacy Policy
  • Terms and Conditions

Copyright 2025 Manuals.Online. All Rights Reserved.