Mester MAL05100W27V40KDT3 User manual

LED AREA LIGHT Installa�on Guide
_____________________________________________________________________________________
WARNING!!!
PLEASE READ ALL INSTRUCTIONS BEFORE ATTEMPTING INSTALLATION
-To prevent personal injury or product damage only licensed electricians should install.
-To avoid electric shock or component damage disconnect power bef
or servicing.
-This product must be installed in electric code (NEC) and all
applicable federal, state, and local electric codes and safety standards.
-Disconnect product and allow cooling prior to servicing.
-
personal injury, death, property damage
-and/or electric shock this product must be properly grounded.
-This luminaire is designed to operate in ambient temperatures ranging from -40°C to 45°C and to
be horizontally mounted with the LEDs facing down.
-
familiar w hazards involved.
-MIN 75°
-
--
-
15 degrees.
-This product is not available for several special environments, such as places with corrosive gas
liquids or high pressure water vapor.
Square/Round Pole Mount
1.
2.
4. Slightly drag the wires to make sure the hole on bracket is sealed by silicon gasket.
5.
Silicone gasket
silicone gasket A
while using a
round pole.
Second, you need
to use two silicone
gaskets at the
using a square
pole.

LED AREA LIGHT Installa�on Guide
_____________________________________________________________________________________
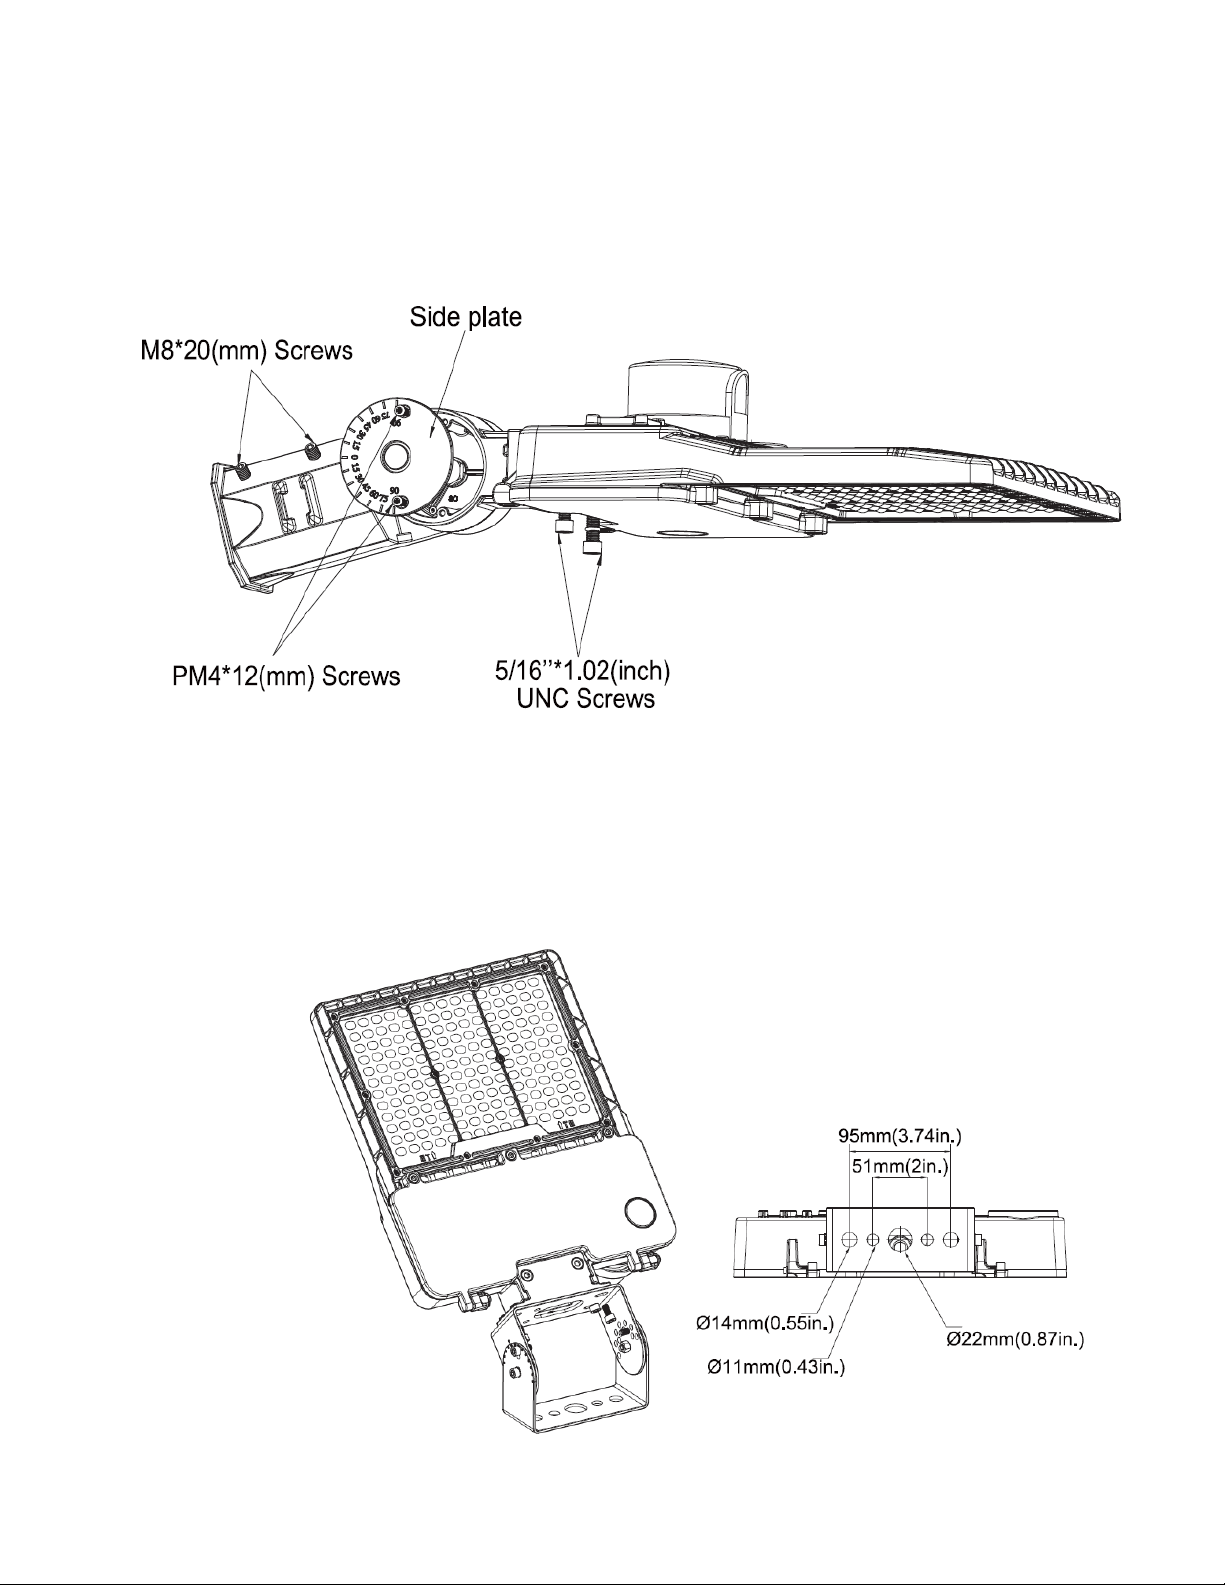
Adjustable Arm Mount
1. M4*12 screws.
2. -
Loosen the screws of M10 and adjust the appropriate angle.
4.
5.
Complete the wiring according to the wiring diagram.
7. Arrange the power cord and install 2 face covers, taking care that the power cord is not
and does not press the wire.
Silicone gasket usage
silicone gasket A
while using a round
pole. Second, you
need to use two
silicone gaskets at
using a square pole.
Wall Mount
1. ate by loosening the screws.
2.
on the wall with screws.
4.
5.
LED AREA LIGHT Installa�on Guide
_____________________________________________________________________________________
Slipfiter Mount
1. Connect the wires to L / N / GND.
2.
Yoke Mount
1. the trunnion bracket.
2. Loosen center bolts and set screw.
4. wire diagram below.
5.
manual
wrench.
LED AREA LIGHT Installa�on Guide
_____________________________________________________________________________________
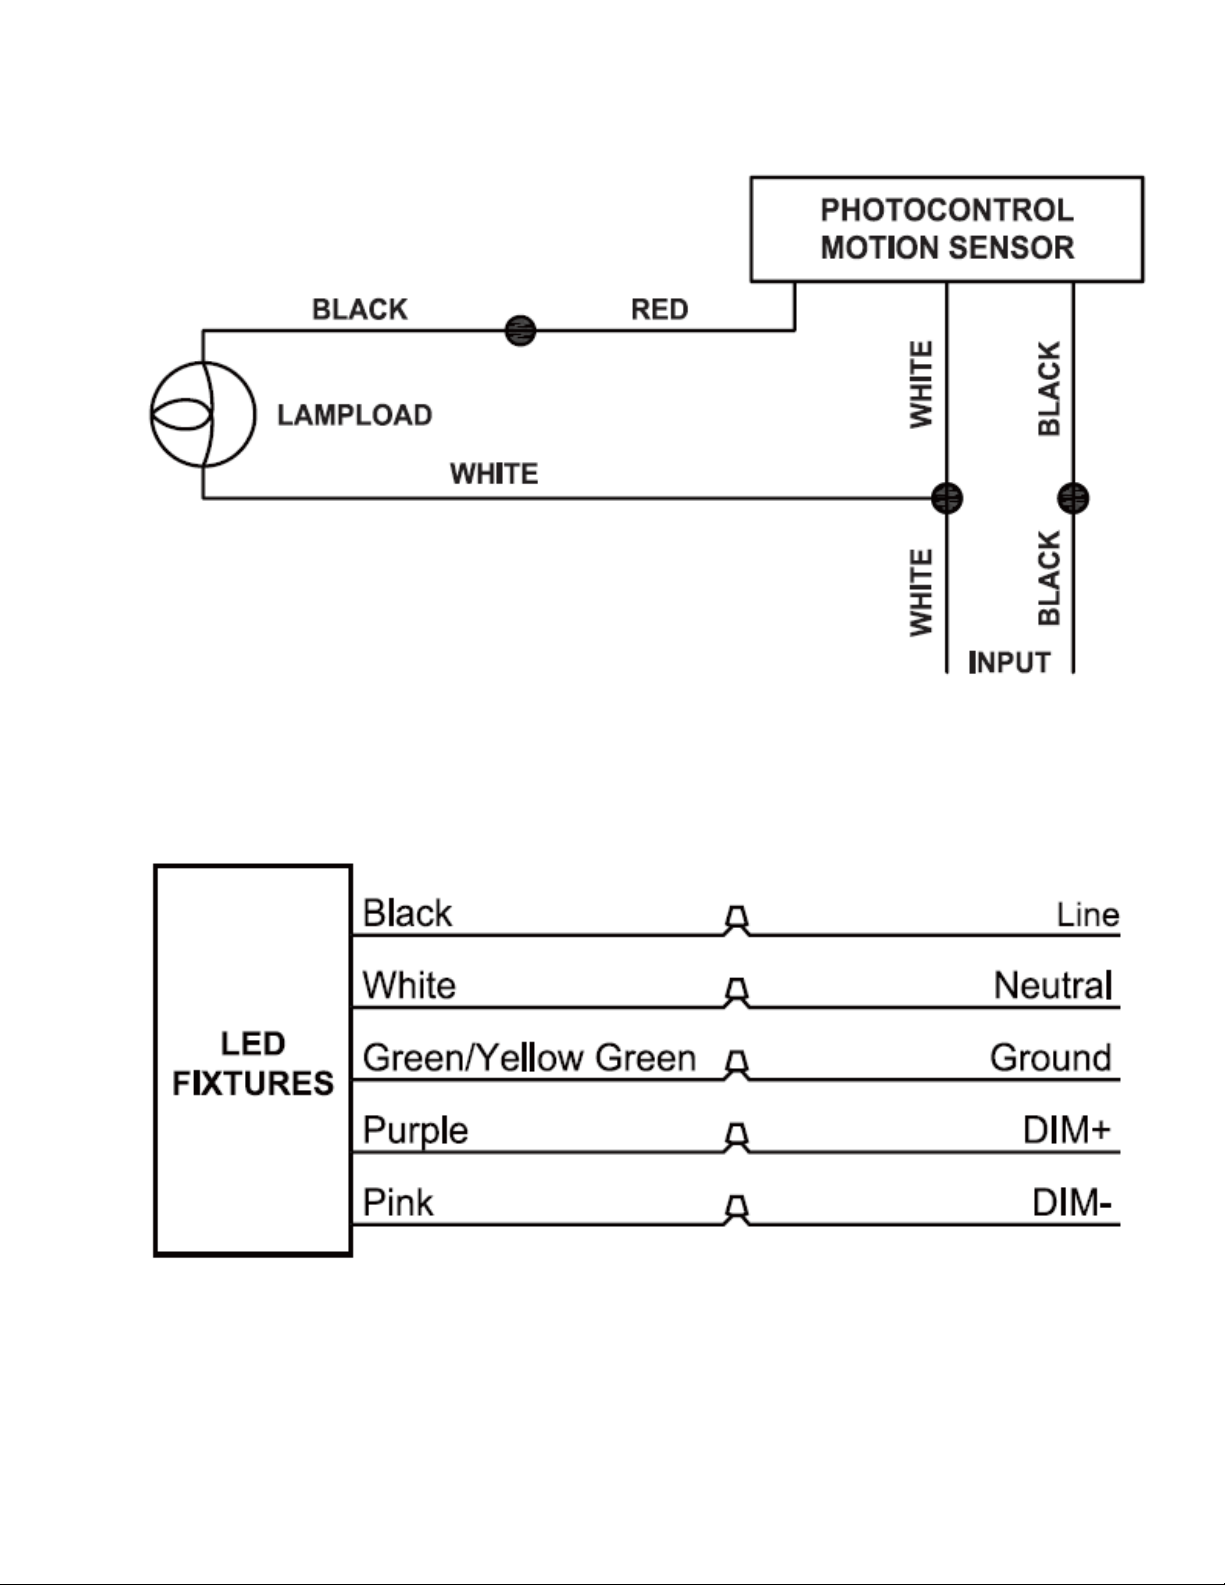
WIRING DIAGRAM
LED AREA LIGHT Installa�on Guide
_____________________________________________________________________________________
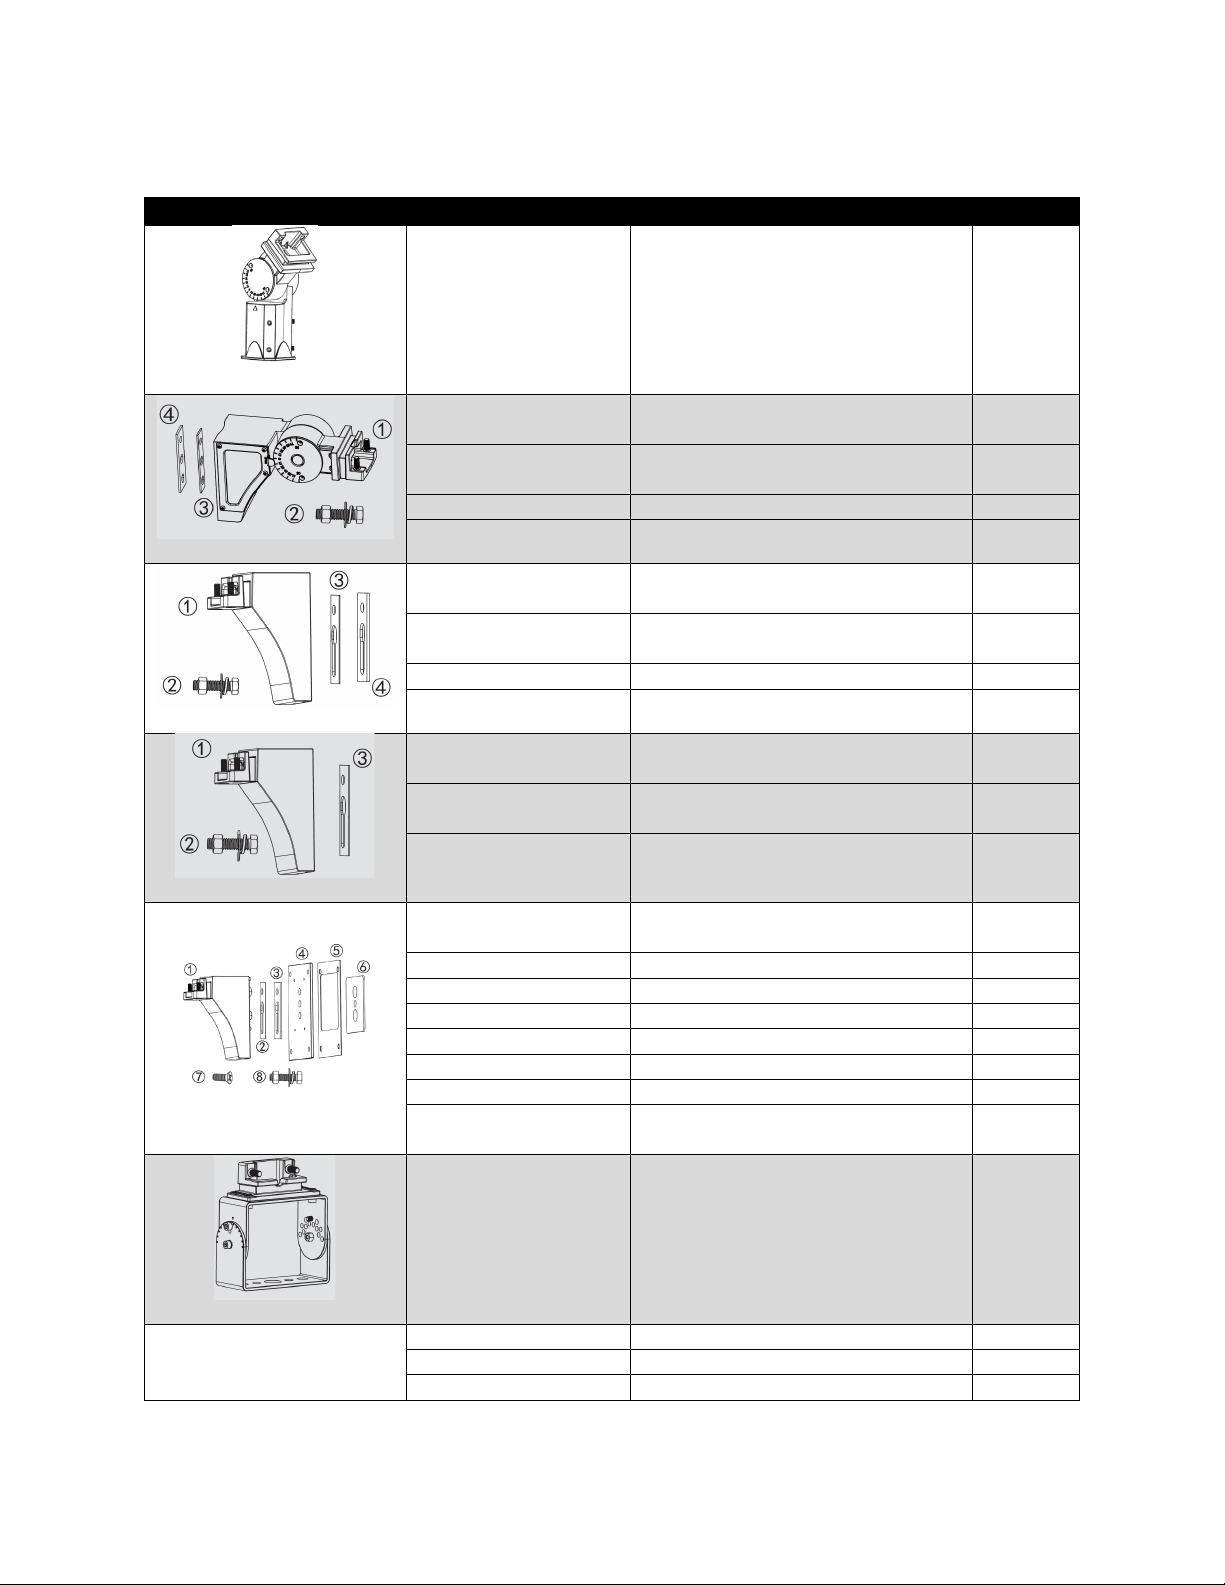
ACCESSORY LIST
Accessory
1
Adjustable Arm Mount
1 - Adjustable Arm
Mount
Mount
1
2 -
2
- Gasket A
1
4 -
1
Square Mount
1 -
arm
1
2 -
2
- Gasket A
1
4 -
1
1 -
arm
1
2 -
2
- Gasket A
1
Wall Mount
1 -
arm
1
2 - Gasket A
1
-
1
4 - Wall Mount
1
5 - Wall Mount Template
1
- EVA Gasket
°EVA Gasket
1
7 -
4
-
head bolt
2
1
Twist-lock photocell
120--
1
-
1
120-277V 0--level
1
This manual suits for next models
5
Table of contents
Popular Outdoor Light manuals by other brands

GRUPO T DIFFUSION
GRUPO T DIFFUSION VIBIA Palo Alto 4525 Assembly instructions

Faro Barcelona
Faro Barcelona KANE quick start guide

DPM
DPM GRD101 manual

Enchanted Garden
Enchanted Garden METAL SOLAR GECKO instructions

Dr. Mach
Dr. Mach Mach M5 Instructions for use

Philips
Philips ClearWay BGP303 Mounting instruction


