Metalcraft Hampton Specification sheet

User Manual and
Installation Instructions
BARBECUE GAS GRILL MODEL: Hampton
-USE OUTDOOR ONLY.
-READ THE INSTRUCTIONS BEFORE USING THE APPLIANCE
-WARNING: ACCESSIBLE PARTS MAY BE VERY HOT. KEEP YOUNG CHILDEN AWAY
-THIS APPLIANCE MUST BE KEPT AWAY FROM FLAMMABLE MATERIALS DURING USING.
-TURN OFF THE GAS SUPPLY AT THE GAS CYLINDER AFTER USING.

2
PLEASE DO
- Use spanner to tighten all gas fittings
- Check all gas hose and line connection for damage, cuts or cracks each time for using the appliance.
- Always leak test with soapy water
- Check all burners regularly for insect nets such as spiders, ants, etc. Nets are dangerous and need to be
fully cleaned.
- Have the gas cylinder filled by an authorized gas supplier
- Always wear protective gloves when handling hot component
- Clean and maintain the appliance after each using.
- USE grill at least 1.5 m from any wall or surface, combustible material, gasoline, flame liquids or vapors
- “Burning off” the appliance after every use (for approx 15 minutes) will keep excessive food residue to
a minimum.
PLEASE DO NOT
- Lean over appliance when lighting
- Store combustible material, gasoline or flammable liquids or vapors within vicinity of appliance
- Use appliance with any cover on
- Use plastic or glass utensils on the appliance.
- Use the appliance in strong winds
- Dismantle control valves
- Test for gas leaks with a naked flame
- Lay the gas cylinder down ( always keep upright)
- Use appliance indoors
- Modify the constructions of the appliance or the size of any burner, injector orifice or any other
components
- Move the appliance during using
- Obstruct any ventilation of the appliance
- Allow the flexible gas supply hose or any electrical cord to come in contact with any heated surface of
the appliance
- Use charcoal or any other solid fuel in this appliance
- Disconnect any gas fittings while the appliance is in using
- Use a rusty or dented gas cylinder with a damaged gas valve
- Fill the gas cylinder beyond 80% cap
GAS CATEGORY
This appliance is only for use with low-pressure butane, propane or their mixture gas and fitted with the appropriate
low-pressure regulator via a flexible hose. The appliance is set to operate
- 28-30 mbar regulator with butane gas @ category I3+
- 37mbar regulator with propane gas @ category I3+
- 37 mbar regulator with butane, propane or their mixtures @ category I3B/P(37)
- 30 mbar regulator with butane, propane or their mixtures @ category I3B/P(30)
ONLY THE GAS TYPE AND GAS CATEGORY LISTED IN THE RATING LABLE COUILD BE USED ON YOUR APPLIANCE.

3
GAS HOSE AND GAS REGULATOR
Use only regulator and hose approved for LP Gas at the correct pressures.
The pressure adjuster should comply with the standard EN16129 and current regulations in the country where it is
installed, which may be found at your nearest retailer of gas items. Refer to the technical date. It is strictly prohibited
to use adjustable pressure
It is recommended that the regulator is changed within 10 years of the date of manufacture or the national conditions
require it.
The type of replaceable hose should meet the standard of EN1763-1-Class 3.
The hose used must conform to the relevant standard for the country of use. The length of the
hose must be 0.7 meters (minimum) and 1.5 meters (maximum). Worn or damaged hose must be
replaced.
Ensure that the hose is not obstructed, kinked, or in contact with any part of the appliance other than at its connection.
It is recommended the hose is changed within 1 year of the date of manufacture or the national conditions required.
During serving or installation,make sure that the connection flexible tube is not subjected to twisting.
STORAGE
When the appliance is not in use, storage of an appliance indoors is only permitted when the cylinder is disconnected
and removed from the appliance. When the appliance is not to be used for a period of time it should be stored in its
original packaging and stored in a dry dust free environment.
Gas Cylinder
The gas cylinder should not be dropped or handled roughly! If the appliance is not in use, the cylinder must be
disconnected.
The precaution need to be taken when changing the gas cylinder which shall be carried out away from any source of
ignition
Cylinders must be stored outdoors in an upright position and out of the reach of children. The cylinder must never be
stored where temperatures can reach over 50C. Do not store the cylinder near flames, pilot lights or other sources of
ignition.
THE APPLIANCE IS SUITABLE FOR USING WITH GAS CYLIDER 13KGS (HEIGHT 575MM) OR LESS.
Connection to the Appliance
WARMING
THE APPLIANCE IS ATTENDEDTO BE USED WITH REGULATOR AND HOSE ASSEMBLY.
IF THEY ARE NOT SUPPLIED BY MANUFACTURER, THE USER MUST CHOOSE THE AUTHORIZED
REGULATOR AND HOSE COMPLYING WITH THE STANDARD AND LOCAL REGULATIONS.
PARTS SEALED BY THE MANUFACTURER OR HIS AGENT SHALL NOT BE MANIPULATED BY THE
USER.

4
Before connecting, please ensure there is no debris caught in the head of the gas cylinder, regulator, burner and burner
parts.
If the hose is replaced, it must be secured to the appliance and regulator connections.
After connecting, GAS LEAKGE CHECKING is a must. Please follow following method to check for gas leakage.
- Ensure the control valve is “OFF”.
- Connect the cylinder to the regulator, regulator to hose and hose to the appliance, ensure the connections are
secured then turn ON the gas.
- Brush the soapy water on the hose and all joints. If bubble appears, it means there is leakage. You have to reconnect
or replace the gas leakage part or joint.
- Retest after fixing the fault. Turn OFF the gas at the cylinder after testing.
LIGHTING THE APPLIANCE
1. Open the lid and make sure the knob is on the OFF ( )position.
2. Push down the knob and turn the knob anticlockwise to HIGH ( ) position, then the burner could be lit. If
the burner does not light, turn off the knob and wait for 5 minutes then repeat this process.
3. Adjust the heat by turning the knob to the High ( )/Low ( )position.
4. To turn the barbecue OFF, turn the cylinder valve or regulator switch to the “OFF” position and then turn all of
the control knobs on the barbecue clockwise to the “OFF” ( )position.
For Match- Lighting:
1. Open the lid and make sure the knob is on the OFF ( )position.
2. place a match into match holder chain and fire the match, then put the match into the burner then push down the knob
and turn the knob anticlockwise to HIGH ( ) position.
Before cooking for the first time, light on all the main burners and keep burning for 15 minutes with the lid closed
and knob at HIGH( ) position . This will “heat clean” the internal parts and dissipate odor from the painted finish.
The color of cooking area may get little change. It is normal and it is the nature of material.
IF LEAKAGE IS DETECTED AND CAN NOT BE FIXED, DO NOT ATTEMPT TO CURE LEAKAGE BUT CONSULT YOUR
GAS DEALER.

5
CLEAN AND MAINTENANCE
All cleaning and maintenance should be carried out when the appliance is cool and with the fuel supply turned OFF at
the gas cylinder after each time use.
DO NOT mistake brown or black accumulation of grease and smoke for paint. Interiors of gas grills are not painted at
the factory (and should NEVER be painted). Apply a strong solution of detergent and water or use a grill
cleaner with scrub brush on insides of grill lid and bottom. Rinse and allow to completely air dry.
DO NOT apply a caustic grill / oven cleaner to painted surfaces.
DO NOT use abrasive or flammable cleaners, as it will damage the parts of the product and may start a fire.
Plastic parts:wash with warm soapy water and wipe dry.
Stainless steel surfaces: Stainless steel would get rust if not maintain well. To maintain your grill’s high quality
appearance, wash with mild detergent and warm soapy water and wipe dry with a soft nonabrasive cloth after each use.
Use stainless steel protection liquid like WD-40 on the surface to avoid rust.
Cooking grid: Use a mild soapy water solution. Non-abrasive scouring power can be used on stubborn stains then
rinse with water.
Pizza Stone:
Cleaning the burner assembly
Follow these instructions to clean
1. Turn gas off at control knobs and LP Tank.
2. Remove cooking grates, grease tray and grease cup.
3. Remove screw at end of burner using a screwdriver.
4. Carefully lift each burner up and away from valve openings.
5. Wire brush entire outer surface of burner to remove food residue and dirt.
6. Clean any blocked ports with a stiff wire such as an open paper clip.
7. Check burner for damage, due to normal wear and corrosion some holes may become enlarged. If any large cracks
or holes are found replace burner.
8. Carefully refit burners.
9. Replace screw at the end of burner.
1.DO NOT use stone over on an open flame
2. Avoid extreme temperature change to the stone. DO NOT place frozen foods on a hot stone
3. The stone is fragile and can break if bumped or dropped
4. Pizza stone is very hot during use and keep hot for a longtime after use. Please use it until
it has cool down
5. DO NOT cool the pizza stone by water when the pizza stone is hot
6. After clean the pizza stone with water, please dry the stone before use

6
10. Replace grease tray and cooking grates.
Inspect burner for any damage (cracks or holes). If damage is found, replace with a new burner. Reinstall the
burner, check to ensure that the Gas valve orifices are correctly positioned and secured inside the burner inlet.
We suggest three ways to clean the burner tubes. Use the one easiest for you.
(A) Bend a stiff wire( a light weight coat hanger works well)
into a small hook. Run the hook through each burner tube
and burner several times.
(B) Use a narrow bottle brush with a flexible handle (DO NOT use a brass wire brush), run the brush through each
burner tube and burner several times.
(C) Wear eye protection: use an air hose to force air into the burner tube and out the air ports. Check each port to
make sure air comes out each hole.
SERVICING & SPARE PARTS
Your gas barbecue should be serviced annually by a competent registered person
Contact Details of distributors in case of any faults, problems in assemble
( your information)
NATURAL HAZARD SPIDERS
FACT: sometimes spiders and other insects climb into the grill tubes attached to the burners. The spiders spin
webs, build nests and lay eggs. The webs or nests can be very small, but they are very strong and can block the
flow of gas.
Clean burners prior to use after storing, at the beginning of grilling season or after a period of one month not
being used.
Spider guards are on the air intakes in an effort to reduce this problem, but it will not eliminate it! An
obstruction can result in a “flashback”(a fire in the burner tubes). The grill may still light, but the obstruction
does not allow full gas flow to the burners.

7
TECHNIAL INFORMTION
Appliance Name
Outdoor Use Gas Grill
PIN CODE:0845CQ0139
Model No.
Hampton
Appliance Category
I3+(28-30/37)
I3B/P(30)
Type of Gas
Butane
Propane
Butane, Propane or their mixtures
Gas Pressure
20-30mbar
37mbar
30mbar
Heat input
3.8kW
3.8kW
Heat Input (Qn)
277g/h
277g/h
Burner Injector
0.93mm
0.93mm
eg. 0.93mm indicates the diameter of the injector is 0.93mm
EXPANDED VIEW & PART LIST
No
Description
Qty
1
Temperature Gauge
1
2
Lid
1
3
Pizza Stone
1
4
Cooking grid
1
5
Main body
1
6
Grease tray
1
6
Standing feet
4

8
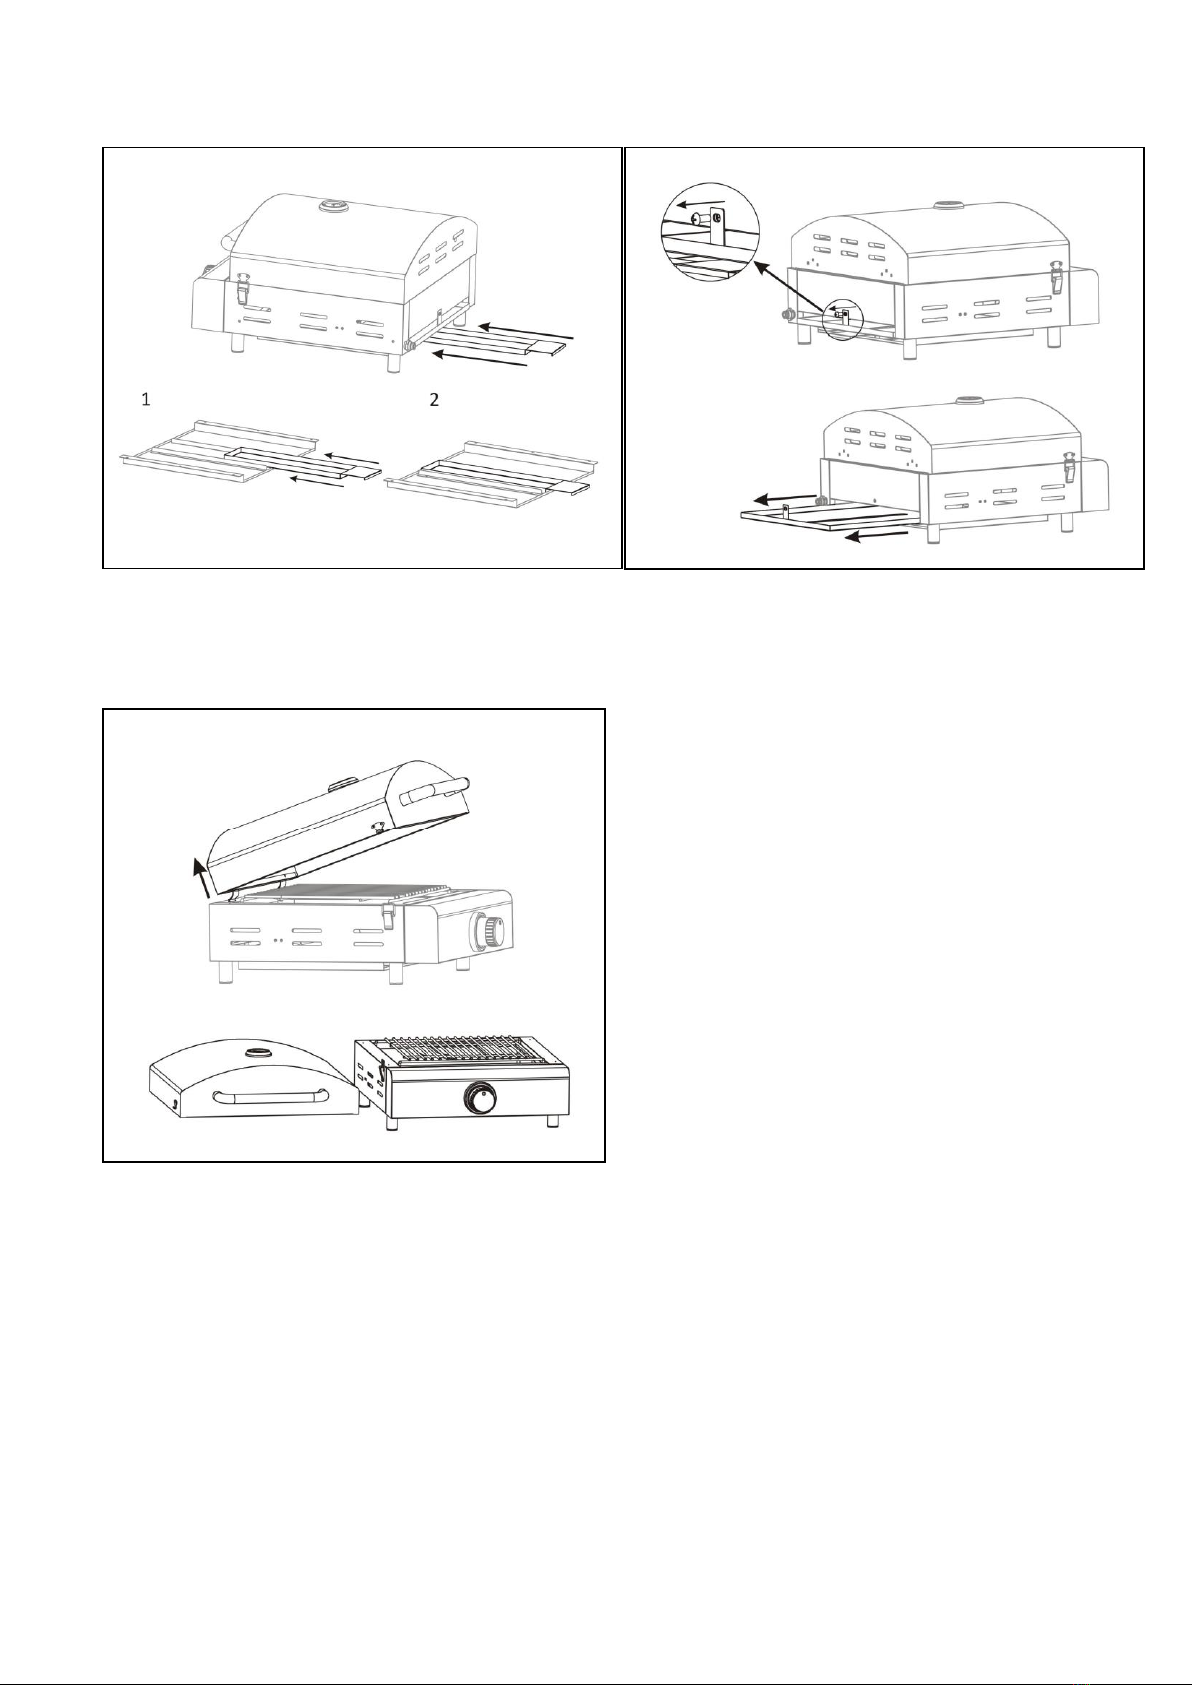
ASSEMBLY INSTRUCTION
1. Standing feet assembly 2. Temperature gauge assembly

9
3. Cooking grid assembly
4. Pizza stone
10
5. Grease tray
6. Way to remove the lid
Table of contents


