Activa 12241 Dakota Operator's manual

Art. Nr.: 12241 Dakota
Seite 1 von 23
D
Instructions for assembly and use
Item no.: 12241
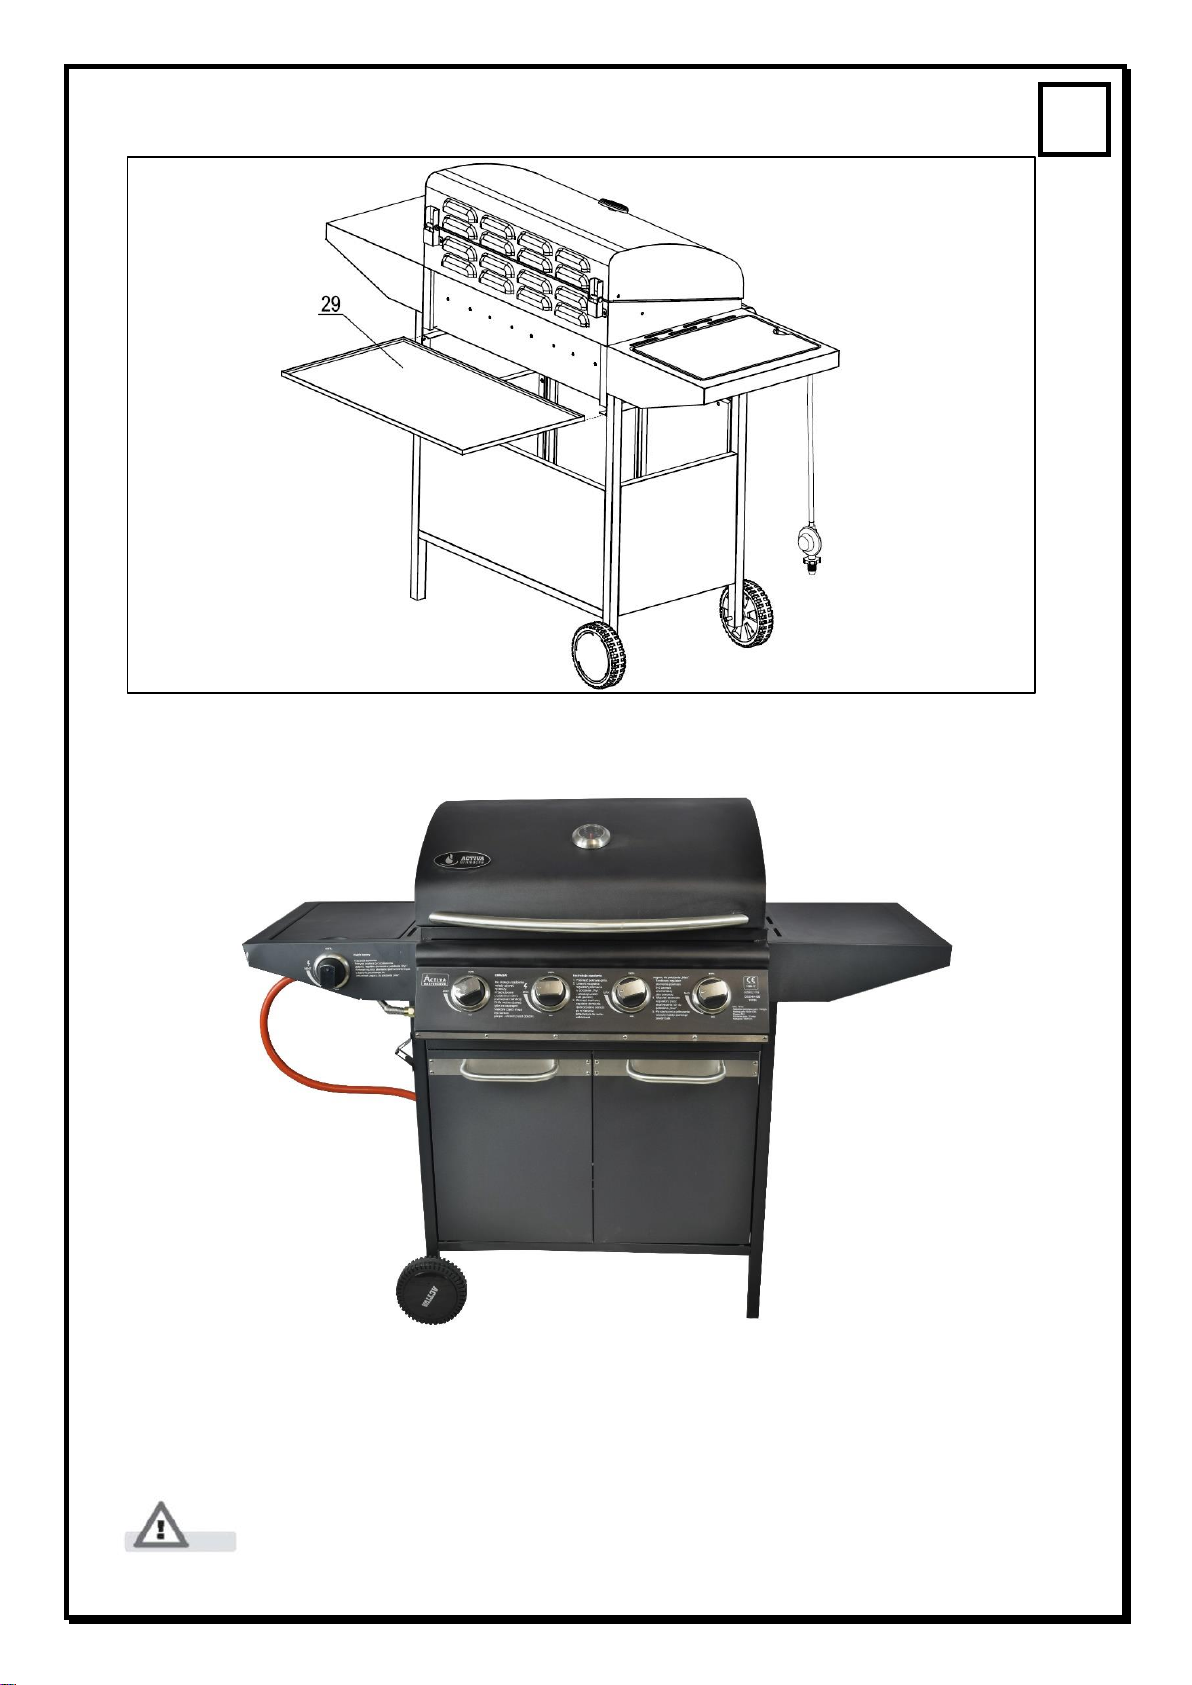
Dakota gas barbecue trolley
Before you start using this device, please read this installation and
instructions carefully.
Keep these operating instructions in a safe place for future reference.

Art. Nr.: 12241 Dakota
Seite 2 von 23
D
1. Table of contents
1. Table of contents ............................................................................................2
2. Product information........................................................................................2
3. Safety instructions..........................................................................................3
4. Intended use....................................................................................................4
5. Technical Data.................................................................................................4
6. Assembly instructions....................................................................................5
7. Exploded view.................................................................................................6
8. Parts list...........................................................................................................7
9. Fastening material ..........................................................................................7
10. Assembly.........................................................................................................8
11. Connecting the gas cylinder and checking for leaks.....................................16
12. Storage of the gas cylinder.............................................................................17
13. Installation.....................................................................................................18
14. Information on commercial use...................................................................19
15. Malfunctions..................................................................................................20
16. Cleaning and maintenance...........................................................................21
17. Device storage...............................................................................................21
18. Disposal.........................................................................................................22
19. Warranty.........................................................................................................22
20. Declaration of Conformity............................................................................23
2. Product information
•For easy relocation of the grill, it is equipped with wheels. Before use always block
the wheels with the brakes if any.
•You can grill on the grill grate with the hood open or closed. However, your grilled
food will cook faster and get a juicy taste by operating with the hood closed.
•The fat tray is located underneath the grill body. Clean the fat tray regularly after use.
•Use this device in a well-ventilated environment. Never operate the device in closed
rooms.
Art. Nr.: 12241 Dakota
Seite 3 von 23
D
3. Safety instructions
Please observe the following symbol notes:
Warnings:
•Only use the grill trolley outdoors! Never in an enclosed space such as a tent, boat or
mobile home.
•Do not move the grill cart during operation!
•This device must be connected in accordance with the applicable regulations.
•Protect liquid gas cylinders from sunlight and keep them far away from other heat
sources (max. 50°C).
•Close the valve on the gas cylinder after use!
•Check the presence and proper condition (no damage) of the seals on the cylinder
valve (also every time the cylinder is changed). Do not use an additional seal.
•After assembly, all connection points must be checked for leaks. A foaming agent,
e.g., gas control spray or a soap solution, must be used for this purpose. A leak test
with an open flame is strictly prohibited!
•The shut-off valve of the gas cylinder must be closed immediately in case of
malfunctions.
•Before each change of location, the device must be switched off and the gas cylinder
removed from the base cabinet.
•During grilling, the gas cylinder must not be adjusted inside the device. The hose
must not be kinked, twisted or under tension, and must not touch any hot parts of the
appliance. After grilling, the gas cylinder can be placed in the unit for storage
•The hose must be checked for cracks and damage at least every six months.
•If the hose is stored inside the burner body for transport reasons, it is essential to
expose it before assembly so that the hose does not touch any hot parts.
•The device must be set up horizontally on a secure level and non-flammable surface
and in a place protected from the wind!
•Before putting the appliance into operation, especially after a longer period of non-
use, check the gas-carrying parts for blockages caused by insects or similar. Blocked
gas pipes can cause a dangerous flashback.
Attention:
•Parts of the grill are very hot during operation, keep away the children!
•When grilling, wear grilling gloves, according to DIN-EN 407 or use suitable grilling
tongs!
•Any technical modification to the appliance can be dangerous and is not permitted!
•Mount the regulator on the gas hose with an SW 17 spanner and tighten the
connection firmly.
Warnings!
Attention!
Art. Nr.: 12241 Dakota
Seite 4 von 23
D
4. Intended use
The grill may only be used for grillable food. All the specifications in these operating instruc-
tions must be observed. Only use this barbecue as described in these operating instructions.
Any other use is considered improper and may result in damage to property or personal
injury.
Only for private use!
Any other or further use is not permitted. This applies in particular to the following reasonably
foreseeable misuse:
•Never use charcoal or other solid fuels in the gas fire chamber.
Do not operate the barbecue with fuel other than liquid gas (propane/butane)!
The manufacturer accepts no liability for damage caused by improper use of the product!
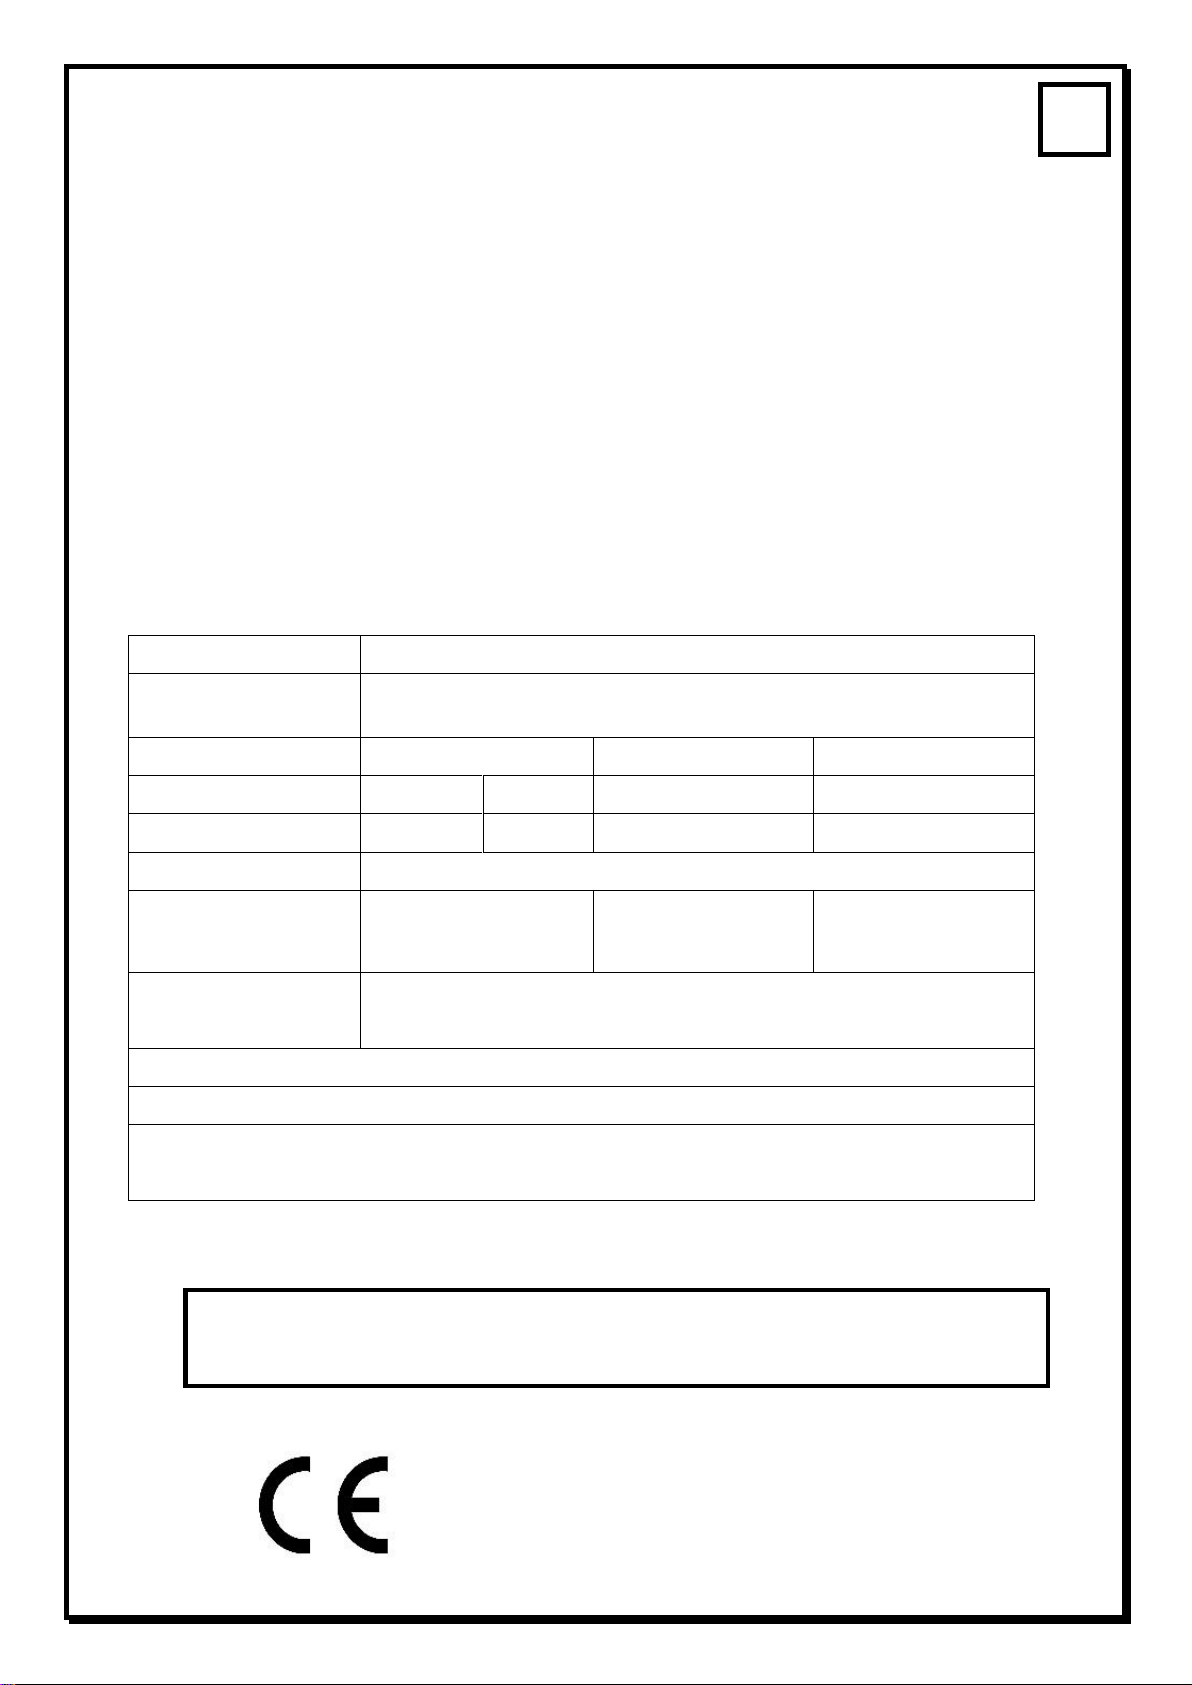
5. Technical Data
PRODUCT CODE
12241/G9204A-SB
TOTAL HEAT OUT-
PUT
16kW
GAS CATEGORY
I3+(28-30/37)
I3B/P(37)
I3B/P(50)
TYPES OF GAS:
Butane
Propane
LPG
LPG
GAS PRESSURE
28-30mbar
37mbar
37mbar
50mbar
CONSUMPTION
1165 g/h
INJECTOR SIZE
Main Burner: 0.85mm
Power Burner: 0.85mm
Main Burner: 0.80mm
Power Burner:
0.80mm
Main Burner: 0.75mm
Power Burner:
0.75mm
IDENTIFICATION
CODE:
2575DM28150
USE OUTDOOR ONLY.
READ THE INSTRUCTIONS BEFORE USING THE APPLIANCE
WARNING: ACCESSIBLE PARTS MAY BE VERY HOT.
KEEP YOUNG CHILDREN AT AWAY.
Attention:
Only a 50-mbar pressure reducer is included in the delivery. The burners are
equipped accordingly with nozzles Ø 0.75 mm.
2575-21
21

Art. Nr.: 12241 Dakota
Seite 5 von 23
D
6. Assembly instructions
•Read the assembly instructions carefully before assembly and start-up and follow the
assembly steps.
•Allow sufficient time for assembly.
•Create a working area of approx. 2 - 3 m².
•You will need an adjustable spanner, pliers and a medium-sized cross-head
screwdriver.
•Remove the parts from the packaging and check the completeness of the individual
parts before assembly.
•Keep the tools you need within easy reach.
•Despite all efforts on the part of the manufacturer to avoid sharp edges, you should
handle the parts carefully or, if necessary, wear gloves to avoid injury.
•If present, remove the protective foil before assembly.
Danger of suffocation!
•Packaging material is dangerous for children. Never allow children to play with
packaging material.
•Avoid using force to assemble the individual parts of the unit.
•Hand-tighten the screw connections first and only tighten them again properly after
the assembly step has been successfully completed.
•If, despite checking at the factory, something is missing, contact customer service.
(last page).
•We reserve the right to make minor technical changes to the unit, especially with
regard to the content of the fixing material.
•Some parts are already pre-assembled with other parts at the factory. Most of the
fastening material is screwed into the parts.
Unscrew first before assembly!
Set-up time:
ca. 1 Hour
Art. Nr.: 12241 Dakota
Seite 6 von 23
D
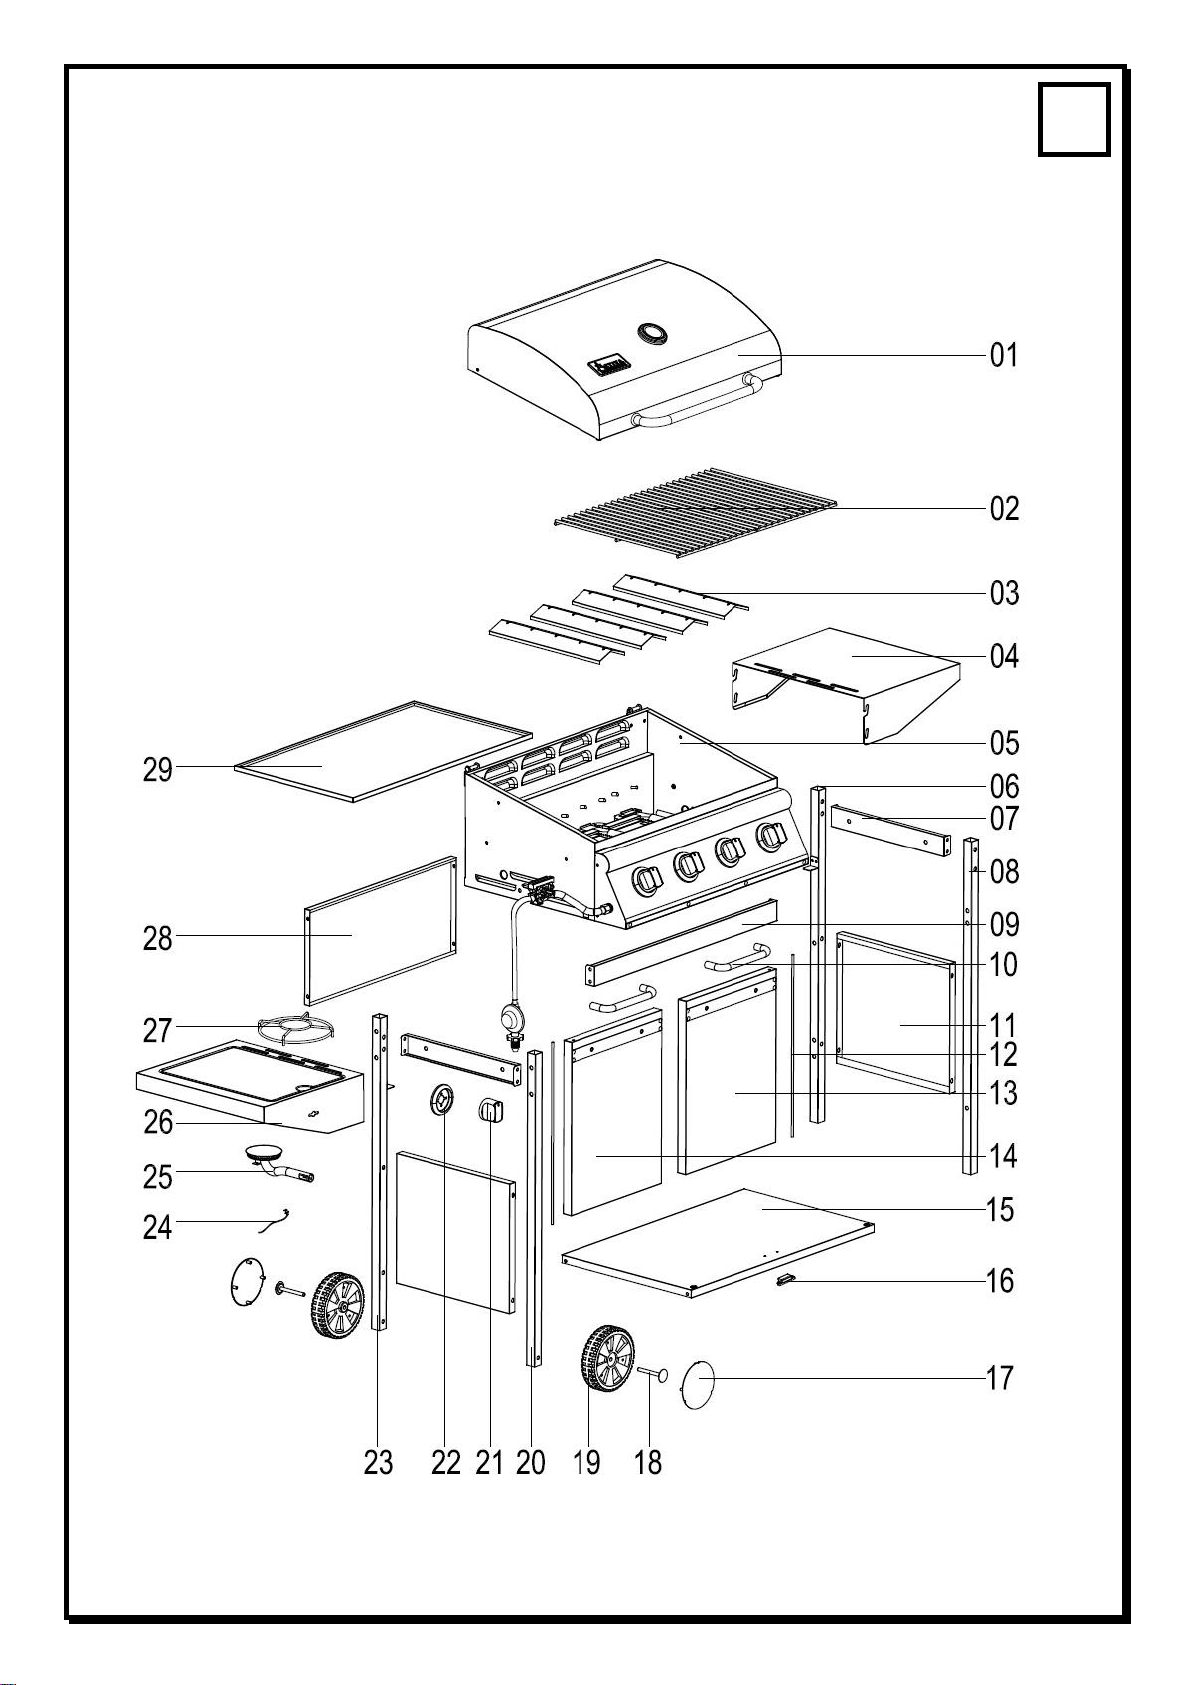
7. Exploded view
Art. Nr.: 12241 Dakota
Seite 7 von 23
D
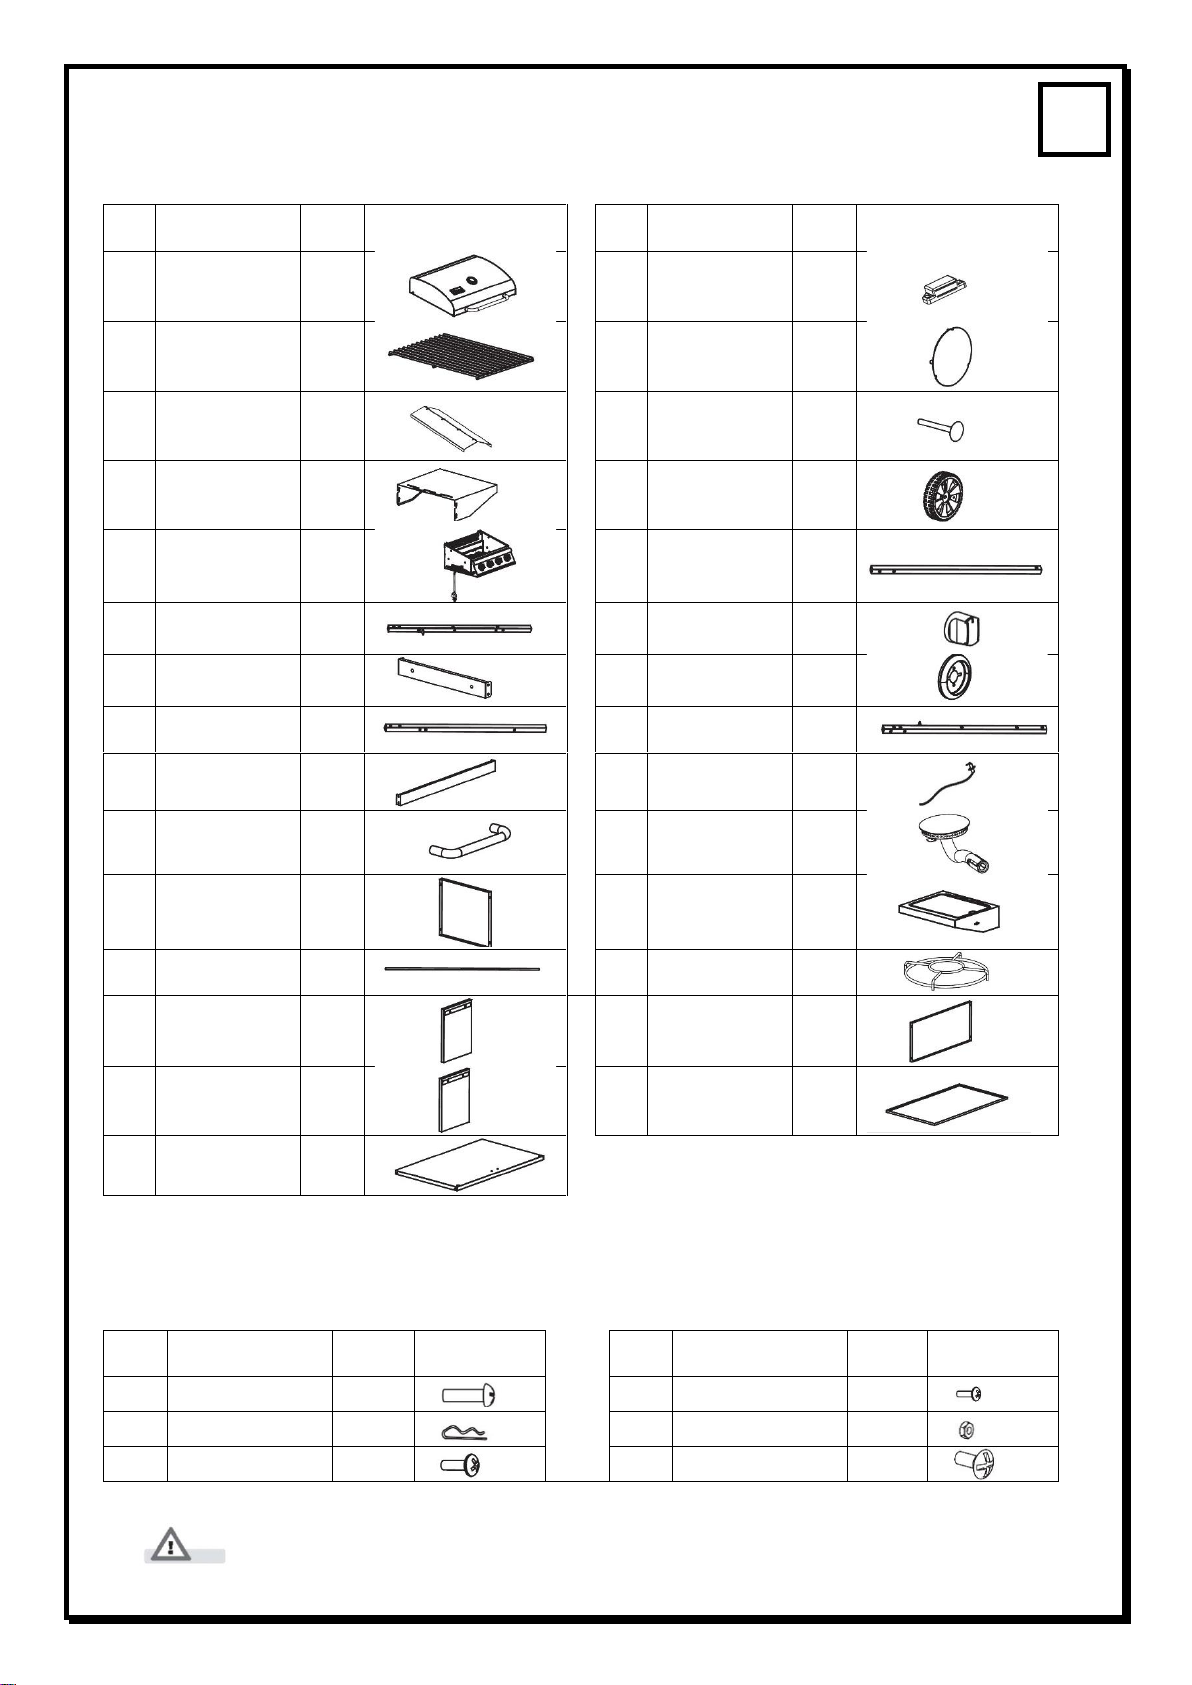
8. Parts list
Nr.
Description
Qty.
Image
Nr.
Description
Qty.
Image
I
Lid
1
16
Magnet
1
2
Cooking grid
2
17
Wheel lid
2
3
Burner
distributor
4
18
Wheel axle
2
4
Side shelf
1
19
Wheel
2
5
Grill body
20
Left front leg
1
6
Right back leg
1
21
Knob
1
7
Trolley support
2
22
Base regula-
tion knob
1
8
Right front leg
1
23
Left back leg
1
9
Door support
1
24
Ignition cable
1
10
Door handle
2
25
Side burner
1
11
Side wall
2
26
Side burner
shelf
1
12
Door Axle
2
27
Pot support
1
13
Right door
1
28
Back wall
1
14
Left door
1
29
Fat tray
1
15
Bottom plate
1
9. Fastening material
Nr.
Description
Qty.
Image
Nr.
Description
Qty.
Image
A
Screw M6x10
40
D
Screw M3x10
2
B
Clip Ø1,8
2
E
Nut M3
2
C
Screw M4x10
6
F
Collar screw
4
Please note that we must reserve the right to make minor factory
changes with regard to the fastening material.
Art. Nr.: 12241 Dakota
Seite 8 von 23
D
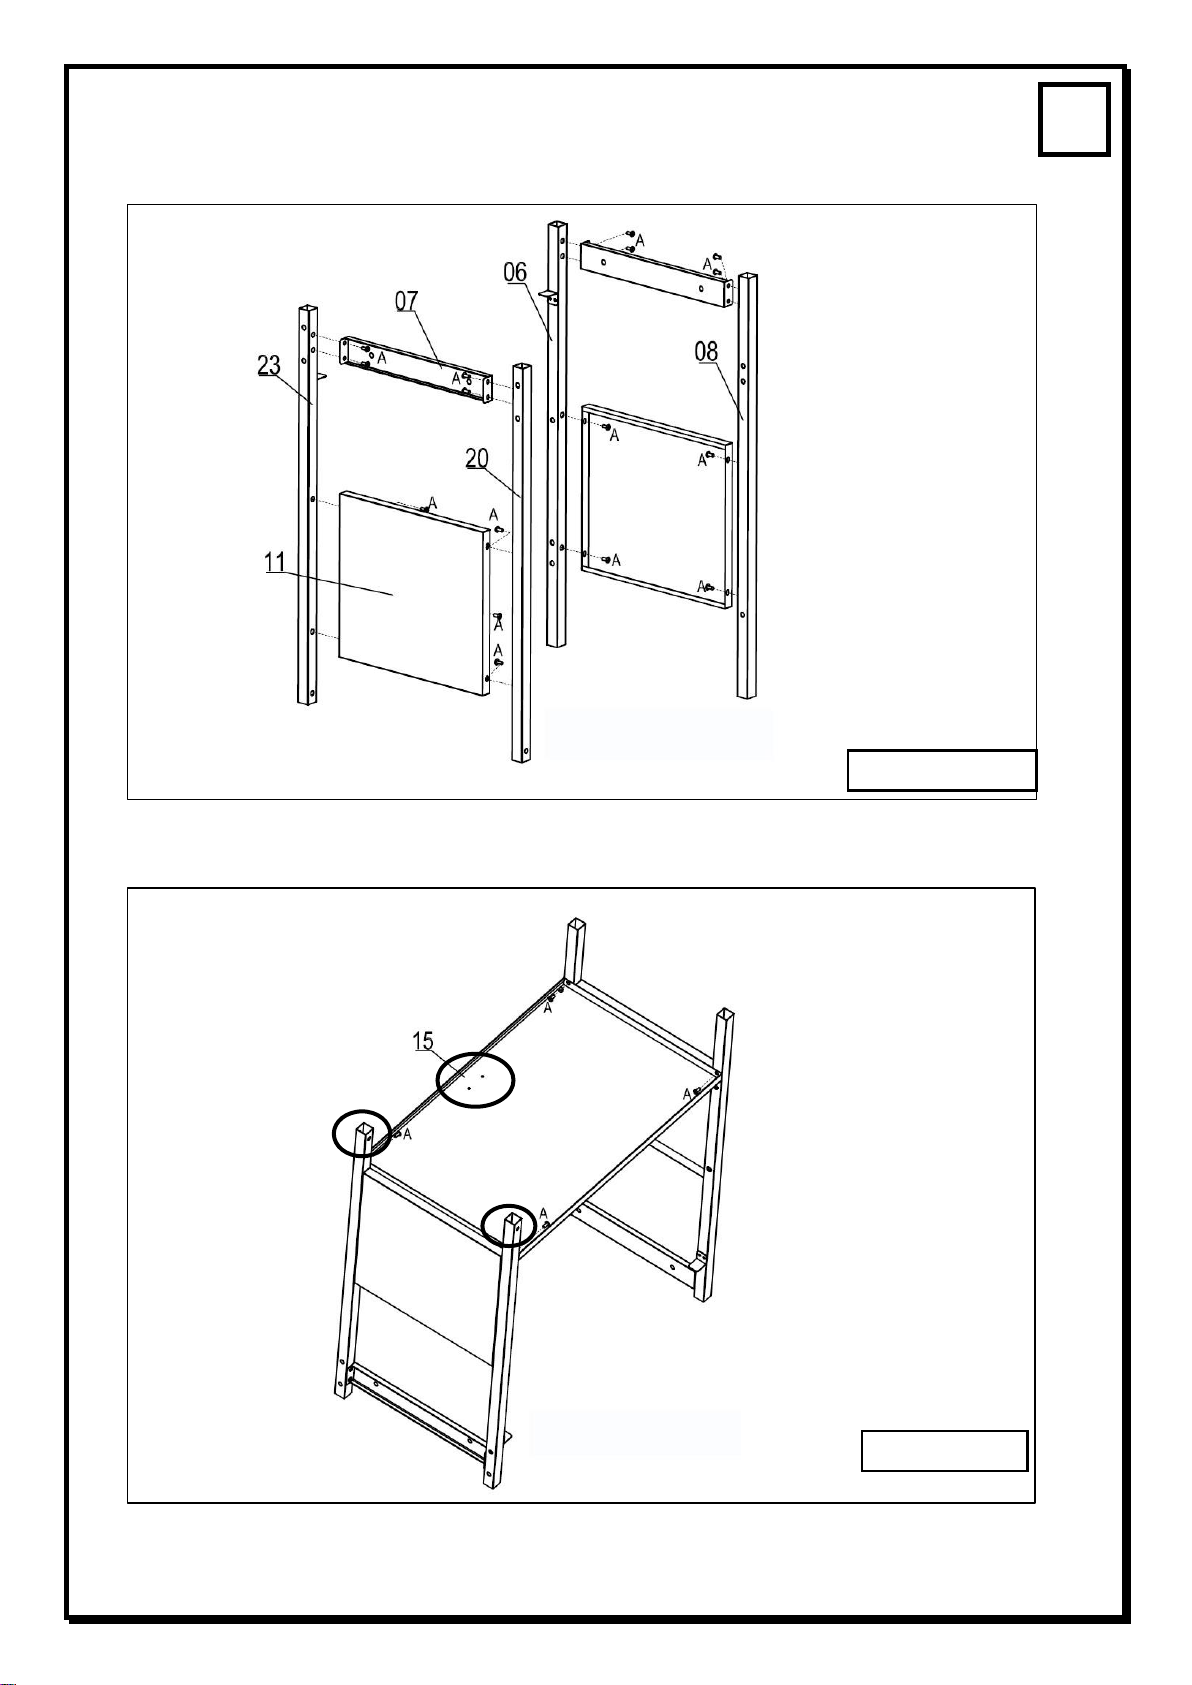
10. Assembly
Make sure that the holes for the magnet are correctly positioned in relation to the legs for the
wheels.
A M6x10 16 Pieces
Step 1
A M6x10 4 Pieces
Step 2
Art. Nr.: 12241 Dakota
Seite 9 von 23
D
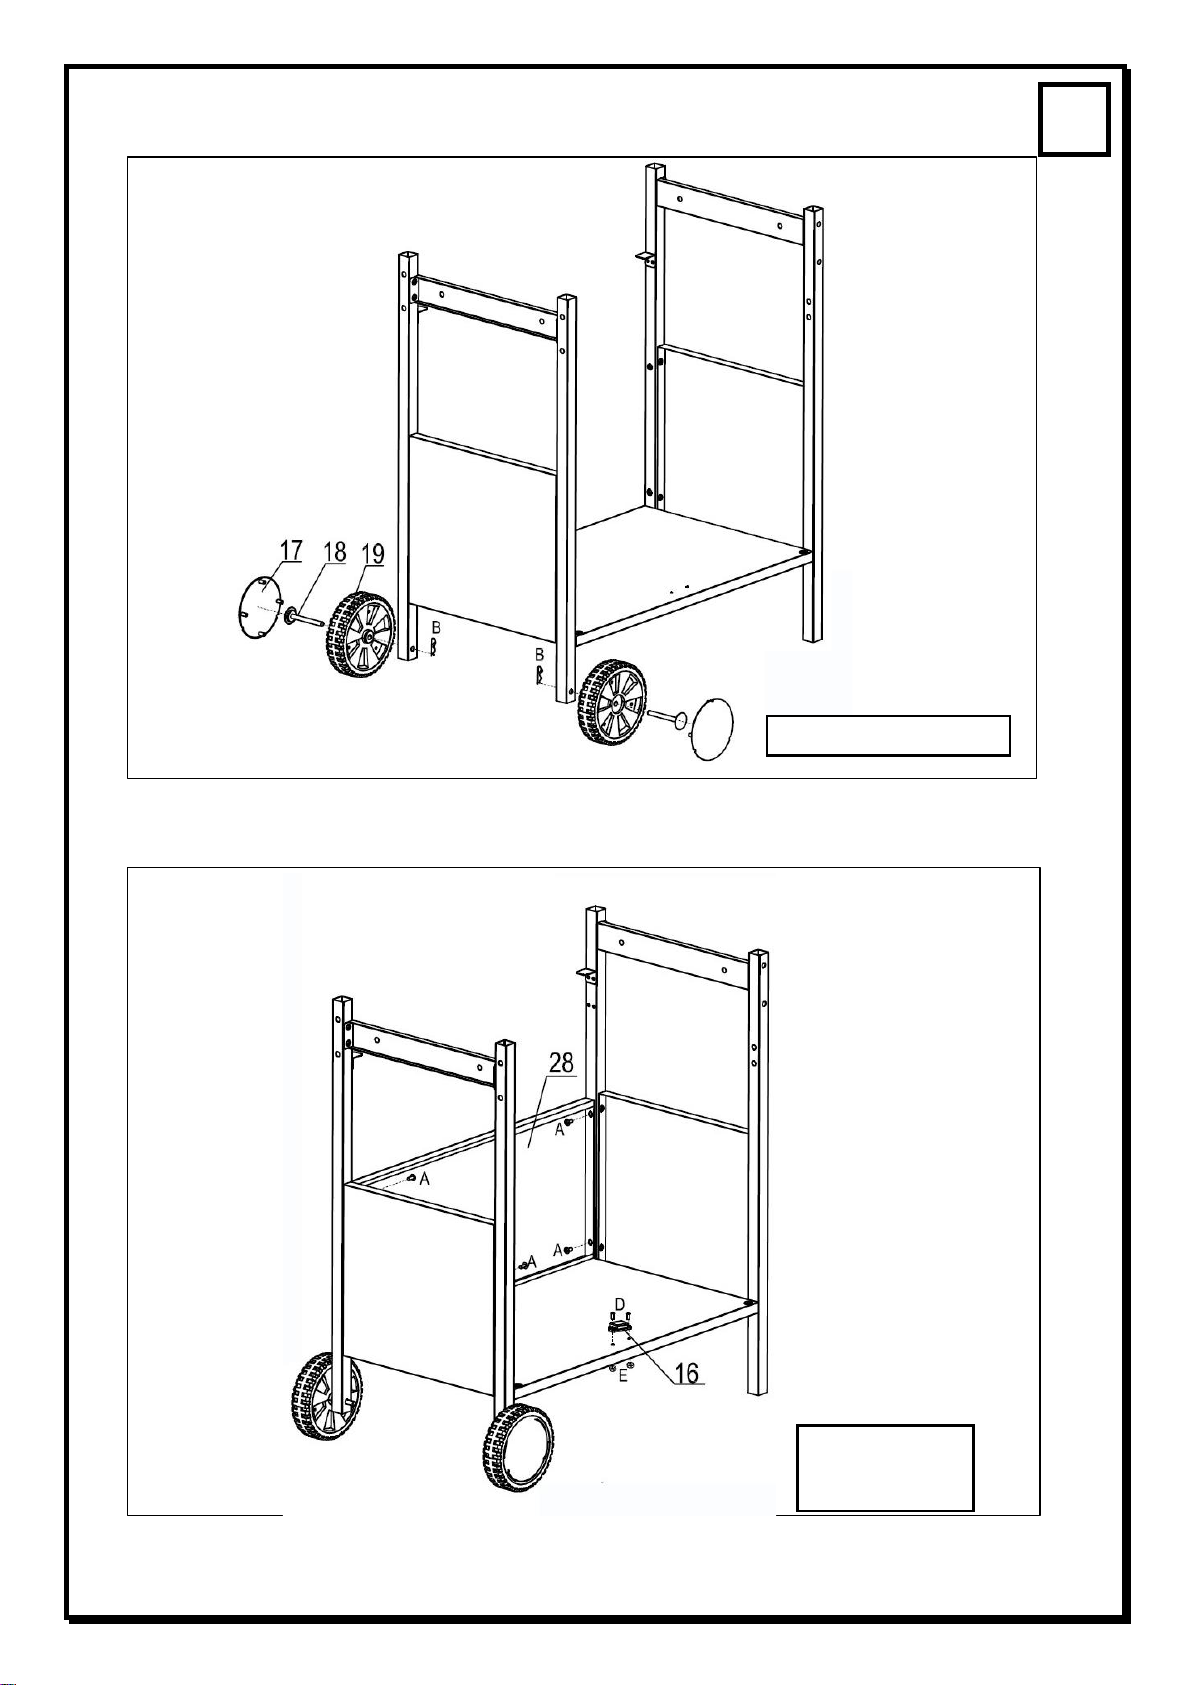
B Clip Ø1,8 2 Pieces
Step 3
A M6x10 4 Pcs.
D M3x10 2 Pcs.
E Nut M3 2 Pcs.
Step 4

Art. Nr.: 12241 Dakota
Seite 10 von 23
D
A M6x10 4 Pieces
Step 5
A M6x10 4 Pieces
Step 6
Art. Nr.: 12241 Dakota
Seite 11 von 23
D
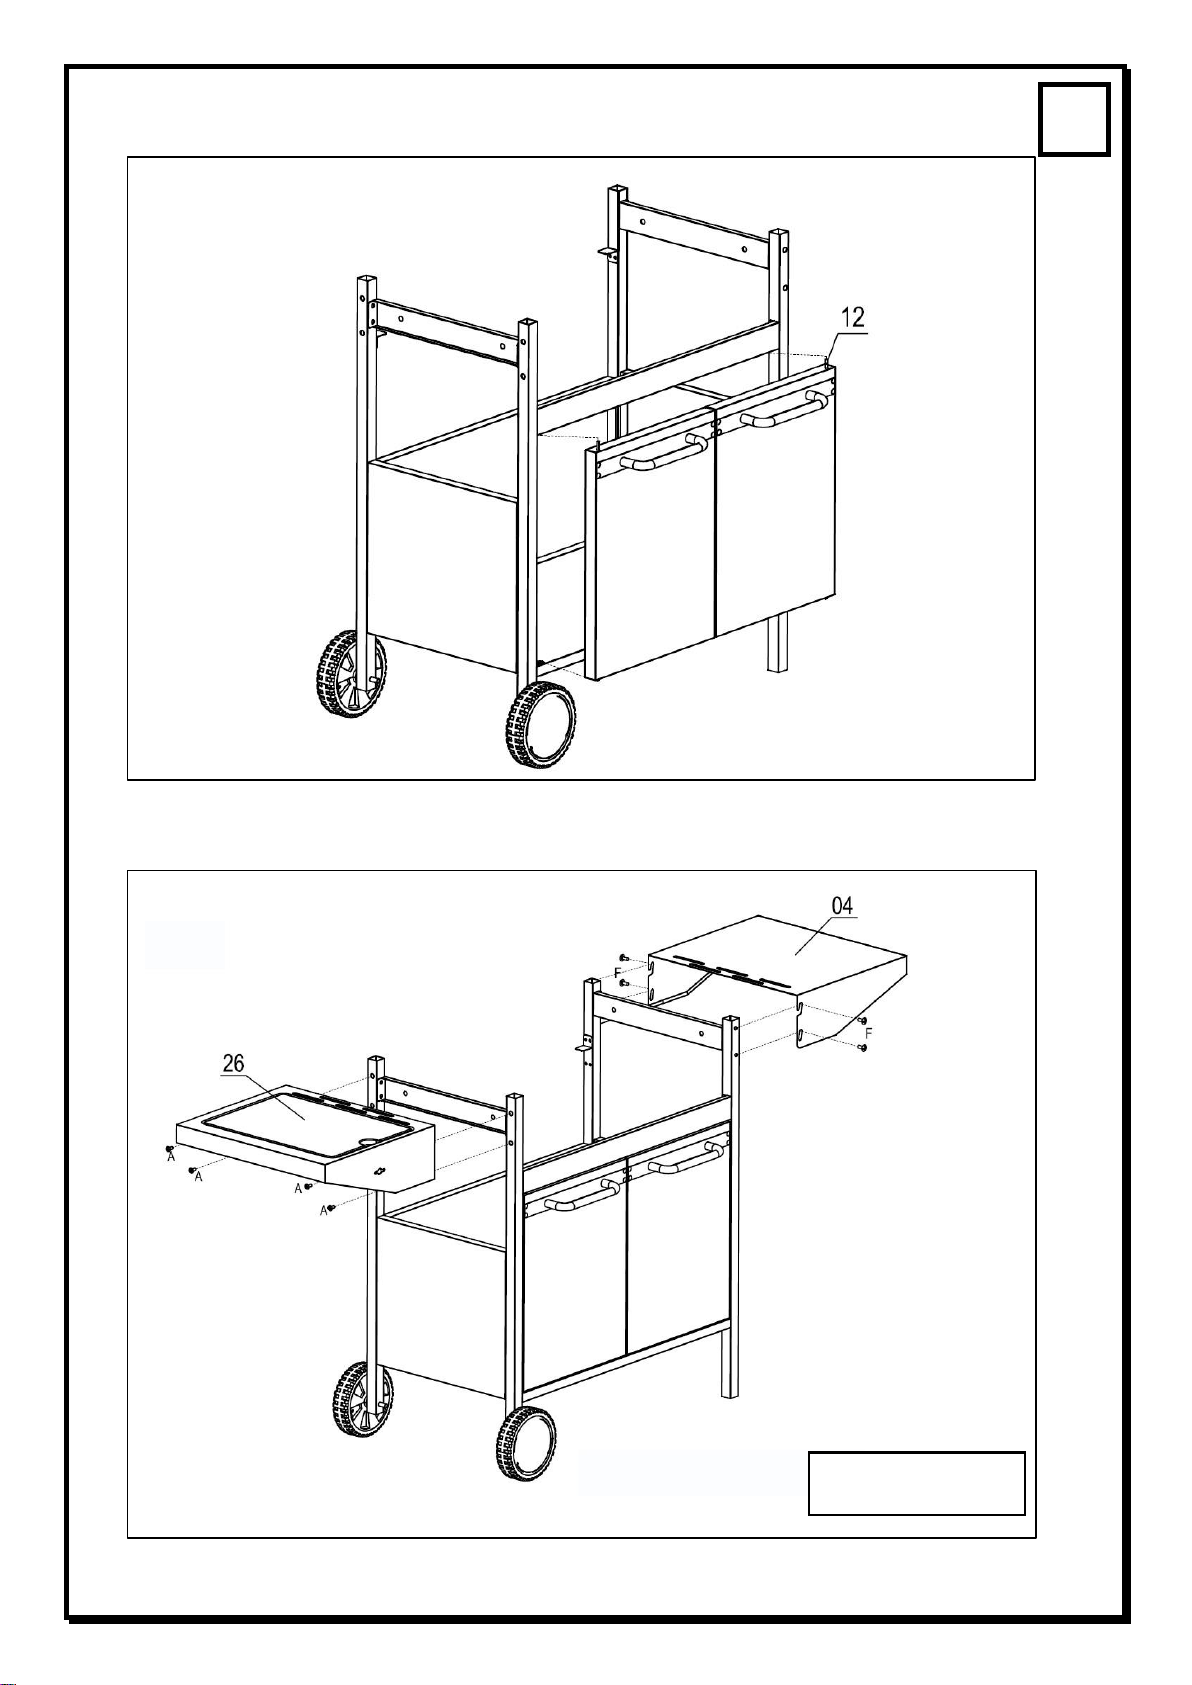
Step 7
A M6x10 4 Pcs.
F Collar screw 4 Pcs.
Step 8
Art. Nr.: 12241 Dakota
Seite 12 von 23
D
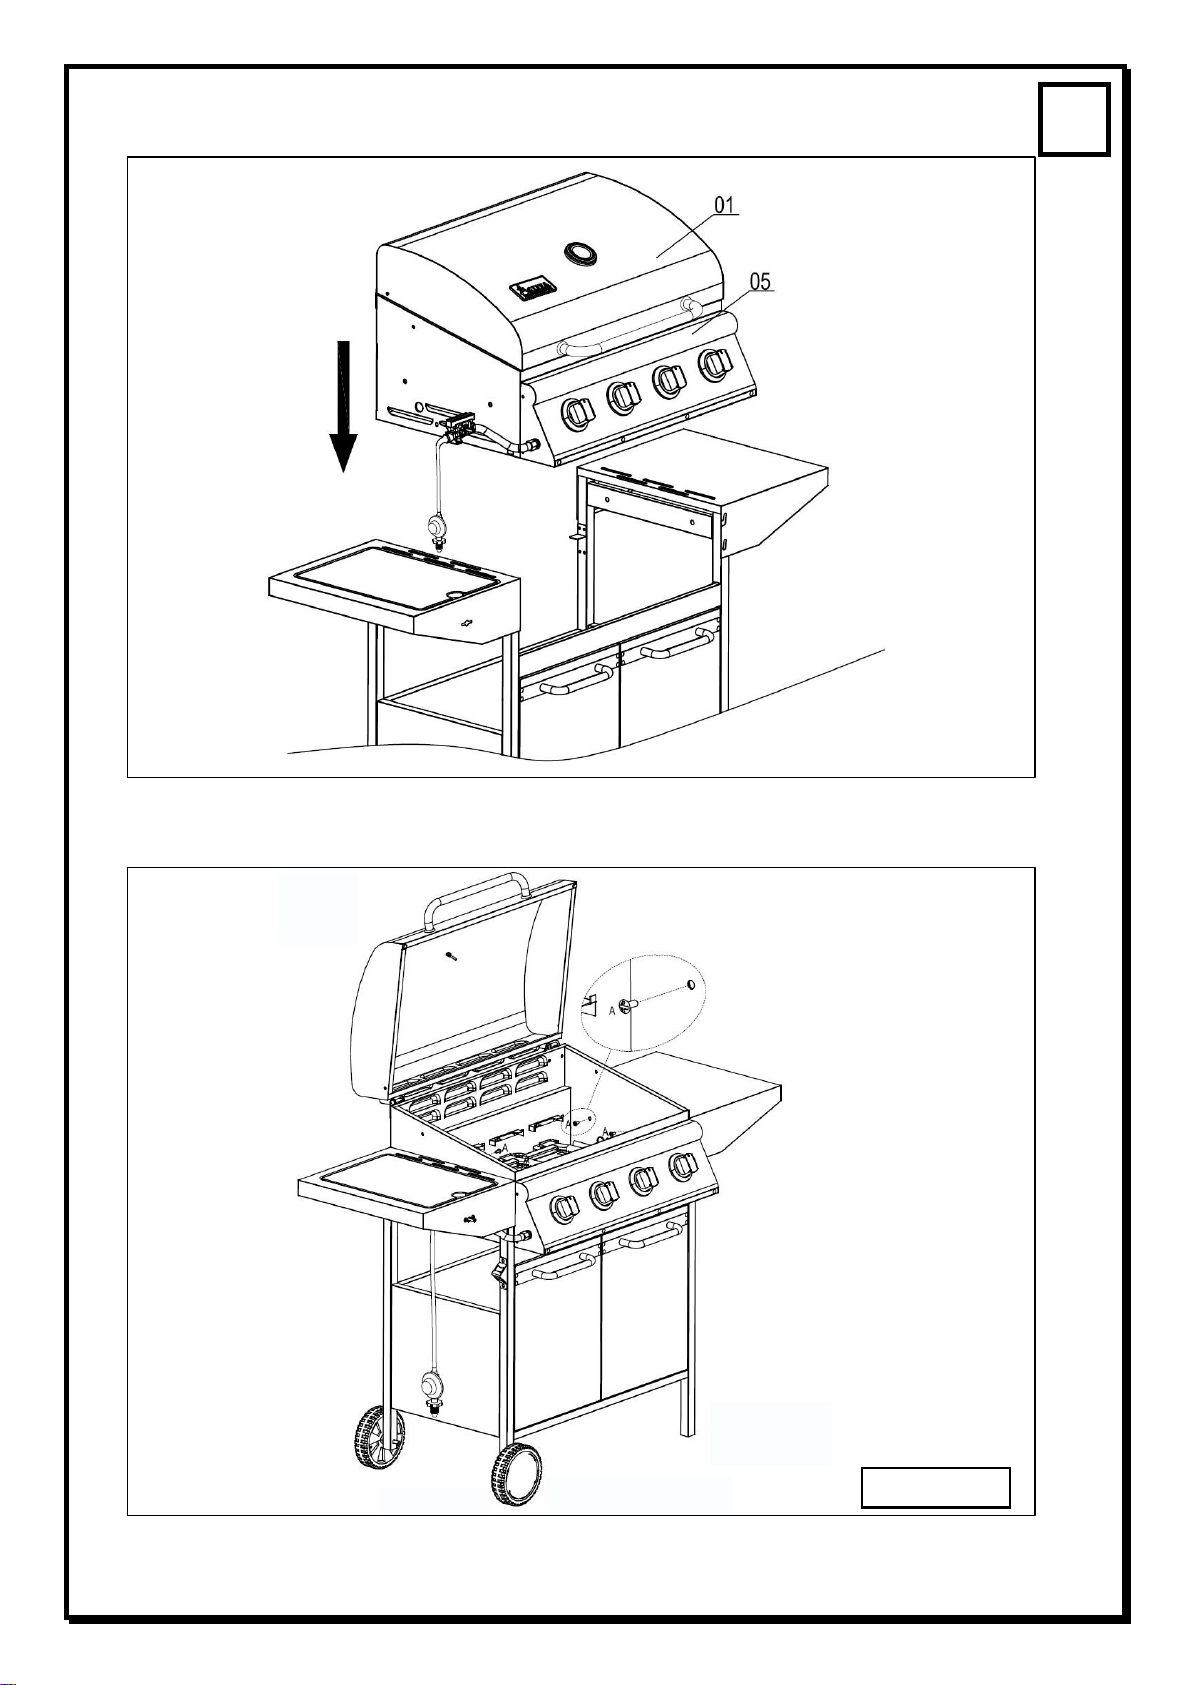
Step 9
A M6x10 4 Pcs.
Step 10

Art. Nr.: 12241 Dakota
Seite 13 von 23
D
C M4x10 2 Pcs.
Step 11
C M4x10 2 Pcs.
Step 12

Art. Nr.: 12241 Dakota
Seite 14 von 23
D
C M4x10 2 Pcs.
Step 13
Step 14
Art. Nr.: 12241 Dakota
Seite 15 von 23
D
The barbecue is now ready for operation!
Before using the appliance, carefully read the safety
instructions and the directions for lighting the barbecue!
Please note that we must reserve the right to make minor factory
changes regarding the fastening material.
Step 15
Art. Nr.: 12241 Dakota
Seite 16 von 23
D
11. Connecting the gas cylinder and checking for leaks
Observe the following safety-related instructions for the gas supply installation:
Read the instructions before installation!
Observe the recommended frequency of checking the pipelines and hose lines (at least
once a month and every time the liquid gas cylinder is replaced) and the need for regular
replacement if indicated on the pipelines or hose lines.
The following parts are required to connect the unit:
•Commercially available camping gas bottle 5 - 11kg filling weight, e.g., grey camping
propane gas bottle. You buy these from a liquid gas dealer. The empty cylinder is re-
placed for refilling.
•Fixed, DVGW-approved pressure reducer, max. 1.5 kg/h, operating pressure 50
mbar, suitable for the gas cylinder used included in delivery.
•DVGW-approved hose line of sufficient length (included in the scope of delivery)
which allows kink-free installation. It is part of the appliance. A porous or damaged
hose line must be replaced immediately. The hose line is already pre-assembled at
the factory.
•Leak detection agent, e.g., leak detection spray or soapy water.
1. Check the presence and proper condition of the cylinder valve thread seal, also at
each cylinder change. Do not use any additional seals.
2. Connect the union nut of the pressure regulator to the cylinder valve thread by turning
it counter clockwise by hand. Do not use any tools, as this may damage the cylinder
valve seal and thus the tightness is no longer guaranteed.
3. The hose line must be connected firmly and tightly to the pressure regulator outlet
thread by turning it to the left using an SW 17 spanner.
4. The connection of the other end of the hose line to the threaded connection piece of
the unit is already pre-assembled. This connection must also always be very tight. Al-
ways check all connections carefully before using the appliance.
5. Check all connections for leaks under operating pressure using a leak detector. Leak
tightness is ensured if no bubbles form.
Checking for leaks with an open flame is not permitted. Leaky or damaged hoses and
fittings must be replaced without exception
6. In the event of gas leaks, shut off the gas supply immediately and repair the leak or
replace the defective part.

Art. Nr.: 12241 Dakota
Seite 17 von 23
D
To replace the gas bottle, proceed as follows:
•Change the LPG cylinder in a well-ventilated room, away from open flames (candles,
cigarettes, other appliances with open flames);
•Close the cylinder valve.
•Loosen the union nut from the pressure reducer.
•Remove the pressure reducer from the bottle.
•Fit the bottle valve with a protective cap.
•Please connect the new bottle as described above.
12. Storage of the gas cylinder
The storage of gas cylinders is not permitted in rooms below ground level, in stairwells, cor-
ridors, passageways and driveways of buildings or in their immediate vicinity.
The valves must be fitted with valve protection caps and lock nuts.
Gas cylinders - even empty ones - must be stored upright. Before using the appliance, espe-
cially after a long period of non-use, check the gas-carrying parts for blockages caused by
insects or similar.
Blocked gas pipes can cause a dangerous flashback.
Cylinder valve screw with inserted seal
Connection nut (Left hand thread
Regulator output thread (Left-hand thread)
Hose pipe
Pressure
regulator
Cylinder valve
Gas cylinder

Art. Nr.: 12241 Dakota
Seite 18 von 23
D
13. Installation
Do not put your barbecue trolley into operation until you have checked that all gas con-
nections are tight. When starting up, keep a safe distance from the burner, as a pilot
flame could occur during start-up. A safe ignition process is guaranteed if you proceed as
follows:
1. Check gas tightness of all lines and valves.
2. Open the cylinder valve.
3. Open all hoods and lids to prevent gas mixture from forming.
➔Danger of explosion!
➔Warning!
To start the appliance for the first time or after changing the gas cylinder,
press and hold the regulator button for 2 minutes to vent the lines.
4. Turn all the control knobs clockwise (to the right) to the OFF/AUS position.
5. Press the control knob with the piezo symbol and turn it anticlockwise to the
large flame MAX position. During this process, the mechanical piezo ignition switches
on. You will hear a sound from the control knob. If this sounds, the burner should be
lit. If not, try several times. Once the burner is lit, press and hold the button for about
5 seconds.
6. If, in exceptional cases, ignition does not occur after the piezo igniter has been
pressed 3 - 4 times, repeat the procedure after waiting for approx. 2 minutes:
7. Light additional burners. The first burner ignites the nearby burner by skipping the
flame.
8. Always turn the regulation knob slowly to the larger flame MAX position. If you turn it
quickly, the flame may go out.
9. To switch off the burner, press and turn all the control knobs to the OFF position and
close the valve on the gas cylinder.
The appearance of the flame:
•The flame of the burner(s) must be blue and uniform. There must be no yellow
sparks, loud noises or gaps between the bottom of the flame and the nozzle.
•A yellow flame indicates insufficient oxygen supply. Loud noises or gaps
between the flame and the nozzle are signs of excessive oxygen supply.
•Check the appearance of the flame every time you use it. If the flame looks abnormal,
contact a specialist to have the appliance reset.

Art. Nr.: 12241 Dakota
Seite 19 von 23
D
Light the grill with a match:
1. Proceed as indicated.
2. Light a long match and insert it into the ignition hole on the right side of the firebox.
3. Press and turn the control knob of the selected burner to MAX.
4. Set a temperature between MIN and MAX with the control knob.
5. After the first burner ignites, ignite the other burners with the corresponding knobs.
Press the knob and turn it to MAX to ignite.The first burner ignites the nearby burner
by skipping the flame.
6. If the burner will not light after several attempts, this may indicate a problem in the
gas supply. Close the gas supply on the unit as well as on the gas cylinder. Do not
use the appliance until you have found the cause of the problem.
Attention!
Before first use, preheat the unit on maximum heat for about 10 minutes to allow the paint
smell of the new parts to dissipate.
Attention:
Attention:
When the lid is open, the grill can be operated with the small and the large flame!
When the lid is closed, the grill may only be operated with the small flame!
Grilling tips!
For smaller grilling quantities, it is recommended to use only one half of the grill.
With the lid closed during grilling, you will achieve the maximum heat development, as well
as a very juicy taste of the grilled food.
14. Information on commercial use
According to BGV D34 (VBG21) and TRF 96, a hose rupture safety device
according to DIN 30 693 and a safety pressure reducer according to DIN 589
must be used when the device is used commercially. Hose rupture
protection and safety pressure regulator are not included in the scope of
delivery.

Art. Nr.: 12241 Dakota
Seite 20 von 23
D
15. Malfunctions
If a malfunction should occur despite the use of quality materials as well as individual parts
tested by the German Technical and Scientific Association for Gas and Water (Deutscher
Verein des Gas- und Wasserfaches e.V.), please observe the following instructions:
Do not carry out any work on the gas-technical parts yourself, but leave
this to a specialist. In most cases, you can fix minor faults with the help of
the following table. In case of gas leakage, do not use the device and check
and repair it before using it again.
Malfunction
Examine
Repair
Gas smell emerges
Check the sealing ring on the bottle
Search all gas-carrying parts with leak de-
tection spray or soapy water.
If defective, replace.
Tighten loose connections.
Device does not ignite
immediately
Make sure that the gas valves are open.
Check that there are no sparks when the
appliance is lit.
Make sure that the burners are clean.
Check that the gas bottle is still full.
Open valve
Clean
Have gas cylinder refilled.
Burner does not ignite
Is there still gas in the bottle?
Is the cylinder valve open?
Regulator defective?
Is the igniter connected correctly?
Injection nozzle or valve tubes clogged?
Is there a spark from the igniter?
Let the bottle fill up.
Turn on the valve.
Clean burner tubes
Install the igniter correctly accord-
ing to the instructions.
Check cable for defects.
Noises at the pressure
regulator
Check whether the air vents on the pres-
sure regulator are blocked or clogged.
Clean the opening and wait 5
minutes before restarting the
unit.
Flame flashback.
In rare cases, flames can
flash back into the burner
tube.
This results in a bubbling sound, or a small
explosion.
Immediately close the gas supply
on the gas bottle. Wait one minute
and restart the grill. If the phe-
nomenon occurs again, the burn-
ers must be cleaned.
Flame ring unequal
Burner/burner tube defective or clogged?
Replace or clean burner
Flaring up of flames or
sparks
Fat drain system clogged?
excessive fat in the meat
too high grill temperature
Clean the grill
cut fat from meat beforehand
Reduce temperature.
Insufficient heat output
Injector or Venturi tubes clogged.
Carefully clean both.
Table of contents
Other Activa Grill manuals


Popular Grill manuals by other brands

Hamilton Beach
Hamilton Beach HealthSmart 840092400 operating instructions

Pit Boss
Pit Boss MEMPHIS ULTIMATE 2.0 owner's manual

Broil King
Broil King 06695000 Operator's manual

Char-Broil
Char-Broil 463731008 Product guide

MAYBAUM
MAYBAUM RAC 700 operating instructions

Weltevree
Weltevree Outdooroven product manual


TEFAL
TEFAL OPTGRILL GC705D Instructions for use

Westinghouse
Westinghouse OG12KS-CG instruction manual

Trebs
Trebs Comfortcook 99346 manual

Hamilton Beach
Hamilton Beach OG02 Assembly & operation manual

KitchenAid
KitchenAid 1902486 Installation Instructions and Use & Care Guide

izzy
izzy El. Barbeque FUEGO instruction manual