Metalworks WV 300 User manual

722313610GBNLF
MANUAL - HANDLEIDING- MANUEL D’UTILISATION
722313610 (WV 300)
Ventilator
Ventilator
Ventilateur
Please read and keep for future reference
Gelieve te lezen en voor later gebruik bewaren
Veuillez lire et conserver pour usage ultérieur
F
GB
NL
copyrighted document - all rights reserved by FBC

722313610GBNLF
2
NL
GB 1 Security
1. Use this fan only as described in this manual, other use not recommended may cause fire, electric shock or injury.
2. High Velocity fans are designed to create rapid air movement, therefore make sure the fan is not placed near drapes,
curtains or any objects that may be drawn into the fan inlet.
3. To protect against electrical shock, do not immerse unit, plug or cord in water or spray with liquids.
4. This appliance is not intended for use by children or other persons without assistance or supervision if their physical,
sensory or mental capabilities prevent them from using it safely. Children should be supervised to ensure that they do
not play with the appliance.
5. Unplug the fan from the outlet when not in use, when moving fan from one location to another, servicing and before
cleaning.
6. Children should be supervised to ensure that they do not play with the appliance.
7. Do not place the fan or any parts near an open flame, cooking or other heating appliance.
8. Avoid contact with moving fan parts.
9. To disconnect, grip the plug and pull it from the wall outlet, never yank the cord.
10. Always use on a dry level surface.
11. Do not hang or mount fan on a wall or ceiling.
12. Do not operate the fan without protective front and rear grilles in position.
13. Be careful not to place the fan too close to the edge of the surface.
14. Do not use outdoors.
15. Do not let the power cord hang over the edge of a table or counter or let is touch any hot surfaces.
If the supply cord is damaged, it must be replaced by the manufacturer or its service agent or a
similarly qualified person in order to avoid a hazard.
1 Veiligheid
1. Gebruik die ventilator zoals in die handleiding beschreven. Een andere gebuik kan tot brand, elektrische schok of
letsels leiden.
2. De ventilator draait heel snel. Daarvoor mag u deze niet in de nabijheid van gordijnen of andere voorwerpen plaatsen,
die door de waaiers meegetrokken kunnen worden.
3. Zet de ventilator of de voedingskabel nooit in contact met water of andere vloeistoffen.
4. Dit toestel mag niet door kinderen of mensen met verminderde lichamelijke of verstandelijke vermogens behandeld
worden.
5. Schakel de ventilator af wanneer deze niet gebruikt wordt, om deze te transporteren of voor deze te reinigen.
6. Laat kinderen niet met dit toestel spelen.
7. Plaats deze ventilator niet bij een open vuur, een fornuis of andere verwarmingstoestel.
8. Vermijd het contact met de bewegende delen van de ventilator.
9. Om de ventilator af te schakelen, trek op de stekker en niet op de kabel.
10. Zet de ventilator op een droge plaats.
11. Hang de ventilator niet op een wand op een plafond.
12. Gebruik de ventilator niet zonder zijn beschermrooster.
13. Zet de ventilator niet te dicht bij de rand van het oppervlak.
14. Gebruik de ventilator niet buiten.
15. Laat de voedingskabel niet over een tafel of een toonbank hangen, of op een warm oppervlak liggen.
Als de voedingskabel beschadigd is, moet deze door de fabrikant, of zijn klantendienst, of door een
gekwalificeerde elektricien vervangen worden.
copyrighted document - all rights reserved by FBC

722313610GBNLF
3
1 Sécurité
1. N’utilisez ce ventilateur que comme décrit dans ce manuel. Une autre utilisation peut conduite à un incendie ou à un
choc électrique.
2. Le ventilateur tourne très vite. Veillez à ne pas l’installer près de rideaux ou autres objets pouvant être entraînés par
l’hélice.
3. Ne mettez jamais le ventilateur en contact avec de l’eau ou autres liquides.
4. Cet appareil ne peut pas être manipulé par des enfants ou des personnes ayant des facultés physiques ou
intellectuelles réduites.
5. Débranchez l’appareil quand il n’est pas utilisé, pour le transporter ou avant de le nettoyer.
6. Ne laissez pas les enfants jouer avec l’appareil.
7. Ne placez pas le ventilateur près d’un feu ouvert, d’une cuisinière ou autre appareil de chauffage.
8. Évitez tout contact avec les parties en mouvement.
9. Pour débranchez le ventilateur, tirez sur la fiche et pas sur le câble.
10. Placez le ventilateur sur un surface sèche.
11. Ne suspendez pas le ventilateur au mur ou au plafond.
12. Ne faites pas fonctionner le ventilateur sans grille de protection.
13. Ne placez pas le ventilateur trop près du bord d’une surface.
14. N’utilisez pas le ventilateur à l’extérieur.
15. Ne laissez pas le câble d’alimentation pendre au-dessus d’une table ou d’un comptoir, et ne le laissez pas sur une
surface chaude.
Si le câble d’alimentation est endommagé, il doit être remplacé par le fabricant, le service après-vente
ou un électricien qualifié.
F
copyrighted document - all rights reserved by FBC
722313610GBNLF
4
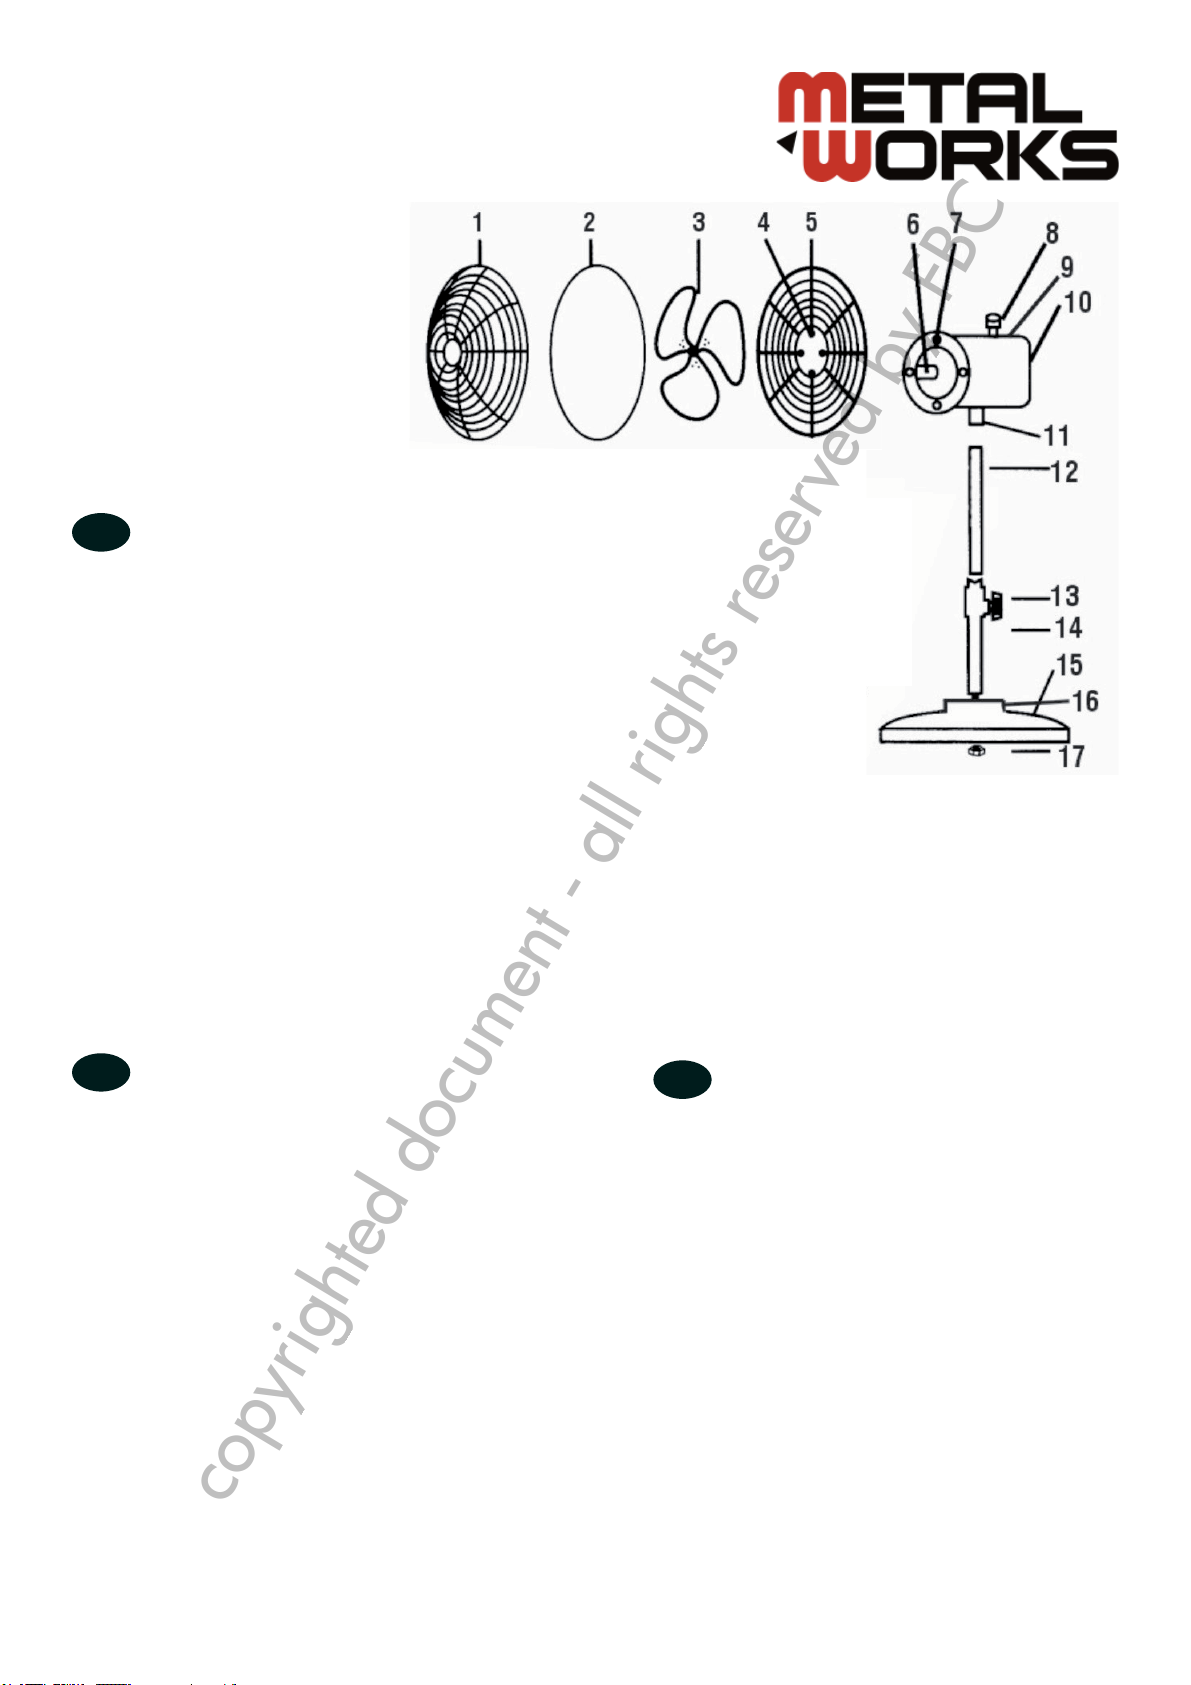
2 Description
1. Front grill
2. Grill button
3. Blade
4. Rear grill
5. Screw hole
6. Motor housing
7. Motor shaft
8. Screw hole
9. Rotary switch
10. Oscillating knob
11. Locking shaft
12. Upper extension
13. Locking screw
14. Lower extension
15. Fan past screw
16. Base
17. Base screw
2 Omschrijving
1. Voorrooster
2. Rooster knop
3. Waaier
4. Achterrooster
5. Schroefgat
6. Motorbehuizing
7. Motoras
8. Schroefgat
9. Draaiknop
10. Oscillatie knop
11. Blokkeerstaaf
12. Bovenste deel voet
13. Klemschroef
14. Onderste deel voet
15. Schroef
16. Sokkel
17. Sokkelschroef
2 Description
1. Grille avant
2. Bouton de la grille
3. Hélice
4. Grille arrière
5. Trou de vis
6. Logement du moteur
7. Axe du moteur
8. Trou de vis
9. Bouton rotatif
10. Bouton oscillation
11. Tige de blocage
12. Partie supérieure pied
13. Vis de serrage
14. Partie inférieure pied
15. Vis
16. Socle
17. Vis du socle
F
GB
NL
copyrighted document - all rights reserved by FBC
722313610GBNLF
5
3 Assembly instructions
Head Assembly:
1. Unscrew the 4 lock screw on the face of the fan housing, handle the rear grill to the motor housing by
matching its 4 screw hole to the 4 screw hole on the front motor housing, then screw the lock screw to
lock the rear grill and the front motor housing.
2. Insert the motor shaft into the fan blade by matching the motor shaft spindle to the D-shaped cut-out on
fan blade, then screw the lock screw.
3. Center the front grill. Allganing the logo, so it is horizontal and parallel to the floor, place onto the rear grill,
and snap in place. Secure by tightening the grill button screw at the bottom of the rear grill.
Pole Assembly:
Unscrew the screw in locking shaft at the bottom of fan housing. Insert the upper extension pole to the locking
shaft with the right hole position.
Base/Pole Assembly:
Unscrew the screw at the bottom of the lower extension pole, and insert the pole through the base, then
handtighten the base screw to securely fasten the lower extension pole to the base.
GB
NL 3 Assemblage
Kop assemblage
1. Schroef de 4 schroeven op de voorkant van de motorbehuizing. Breng de achterrooster op de
motorbehuizing aan door de 4 schroefgaten tegenover de 4 schroefgaten van de motorbehuizing te
plaatsen. Schroef de 4 schroeven vast om de rooster op de motorbehuizing te bevestigen.
2. Stop de motoras in de waaier door de motoras spindel met de D-vormende uitsparing in de waaier te
doen overeenkomen. Draai de klemschroef vast.
3. Centreer de voorrooster. Plaats de rooster zodat de logo horizontaal en parallel met de vloer is. Plaats de
voorrooster tegen de achterrooster en klik vast. Draai de schroef aan de onderkant van de achterrooster
vast.
Voet assemblage
Draai de schroef van de blokkeerstaaf aan de onderkant van de behuizing los. Plaats het bovenste deel van
de voet op de blokkeerstaaf met het gat in de goede positie.
Sokkel/voet assemblage
Draai de schroef aan de onderkant van het onderste deel van de voet los. Stop de voet in de sokkel en
schroef de klemschroef met de hand vast.
copyrighted document - all rights reserved by FBC

722313610GBNLF
6
F 3 Assemblage
Assemblage de la tête
1. Dévissez les 4 vis à l’avant du logement du moteur. Adapter la grille arrière au logement du moteur en
plaçant les 4 trous des vis en face des 4 trous à l’avant du logement du moteur. Ensuite, vissez les 4 vis
pour fixer la grille arrière.
2. Insérez l’axe du moteur dans l’hélice en faisant correspondre l’axe du moteur avec la découpe en D de
l’hélice. Vissez la vis de serrage.
3. Centrez la grille avant. Alignez le logo pour qu’il soit horizontal et parallèle au sol, placez la grille avant
contre la grille arrière et emboîtez-les. Serrez la vis à la base de la grille arrière.
Assemblage du pied
Dévissez la vis de la tige de blocage dans le bas du cadre du ventilateur. Assemblez la partie supérieure du
pied avec la tige de blocage, en veillant à bien positionner le trou.
Assemblage pied/socle
Dévissez la vis dans le bas de la partie inférieure du pied. Insérez le pied dans le socle, puis serrez la vis à la
main pour bien fixer.
F
GB
NL
4 Maintenance
1. Shut off power before cleaning or maintenance.
2. Wipe casing and impeller with care using a soft cloth soaked with water or neutral detergent. Ensure the
motor or other electrical parts can not touch the water.
3. Do not use any of the following as a cleaner: gasoline, thinner etc.
4 Onderhoud
1. Schakel uit voor het schoonmaken of onderhoud.
2. Maak de behuizing en de waaier schoon met water of neutraal schoonmaakmiddel op een doek. Zorg
ervoor dat de motor of andere elektrische delen niet in contact met water zijn.
3. Gebrruik geen benzine of verdunner om uw ventilator te reinigen.
4 Entretien
1. Éteignez l’appareil avant le nettoyage ou l’entretien.
2. Nettoyez le châssis et la turbine avec de l’eau ou un détergent neutre sur un chiffon. Veillez à ce que le
moteur ou les autres parties électriques ne soient pas en contact avec l’eau.
3. N’utilisez jamais de dissolvant ou d’essence pour nettoyer votre ventilateur.
copyrighted document - all rights reserved by FBC

722313610GBNLF
7
F
GB
NL
5 Specifications
Rated input Voltage: AC220-240V
Rated input Frequency: 50Hz
Rated Power: 180W
If the supply cord is damaged, it must be replaced by the manufacturer or its service agent or a
similarly qualified person in order to avoid a hazard.
5 Specificaties
Nominale ingangsspanning: AC220-240V
Nominale ingangssfrequentie: 50Hz
Nominale vermogen: 180W
Als de voedingskabel beschadigd is, moet deze door de fabrikant, of zijn klantendienst, of door een
gekwalificeerde elektricien vervangen worden.
5 Spécifications
Tension d’entrée nominale: AC220-240V
Fréquence d’entrée nominale: 50Hz
Puissance nominale: 180W
Si le câble d’alimentation est endommagé, il doit être remplacé par le fabricant, le service après-vente
ou un électricien qualifié.
6 Correct disposal of this product
This product should not be disposed with other household wastes throughout the EU. To
prevent possible harm to the environment or human health from uncontrolled waste disposal,
recycle it responsibly to promote the sustainable reuse of material resources. To return your
used device, please use the return and collection systems or contact the retailer where the
product was purchased. They can take this product for environmental safe recycling.
6 Correct verwijderen van dit product
Dit product mag nergens in de EG met de gewone afval verwijderd worden. Verwijder uw oude
ventilator op een milieuvriendelijke wijze. Sorteer de verschillende materialen en breng ze naar
de verzamelplaats van uw streek voor recyclage.
6 Élimination correcte de ce produit
Cet appareil ne peut, nulle part en CE, être jeté avec les déchets ordinaires. Débarrassez-vous
de votre appareil usagé de manière écologique. Triez les différents matériaux et portez-les à la
déchetterie de votre région pour leur recyclage.
F
GB
NL
copyrighted document - all rights reserved by FBC
722313610GBNLF
8
The Manufactuer/Retailer
Fabrikant/Invoerder
Fabricant/Importateur
Metalworks (Europe) Limited
Unit 5
Flitwick Industrial Estate
Commerce Way
Flitwick - Bedfordshire
MK45 1UF Great Britain
Hereby declares that the following product :
Verklaart hierbij dat het volgende product :
Déclare par ceci que le produit suivant :
Product
Produkt
Produit
Ventilator
Ventilator
Ventilateur
722313610 (WV 300)
Relevants EU directives
Geldende CE-richtlijnen
Normes CE en vigueur
2006/95/EC
EN 60335-1:2202 + A11:2004 + A1:2004 + A12:2006 +
A13:2008
EN 60335-2-80:2003 + A1:2004 + A2:2009
Meets the provisions of the aforementioned directive, including, any amendments valid at the time of
this statement.
Overeenstemt met de bestemming van de hierboven aangeduide richtlijnen - met inbegrip van deze
betreffende het tijdstip van de verklaring der geldende veranderingen.
Répond aux normes générales caractérisées plus haut, y compris celles dont la date correspond aux
modifications en vigueur.
7 EC declaration of conformity
7 EG conformiteitsverklaring
7 Déclaration de conformité CE
B. VYNCKIER
VYNCKIER TOOLS NV
Order nr.
copyrighted document - all rights reserved by FBC
This manual suits for next models
1
Table of contents
Other Metalworks Fan manuals


Popular Fan manuals by other brands


Harbor Breeze
Harbor Breeze RLG52NWZ5L manual

Allen + Roth
Allen + Roth L1405 instruction manual

ViM
ViM KUBAIR F400 ECOWATT Technical manual

HIDRIA
HIDRIA R10R-56LPS-ES50B-04C10 user guide

BLAUBERG Ventilatoren
BLAUBERG Ventilatoren CENTRO-M 100 L user manual

Triangle Engineering
Triangle Engineering HEAT BUSTER SPL Series owner's manual