MetaOptima MoleScope II User manual


2

#
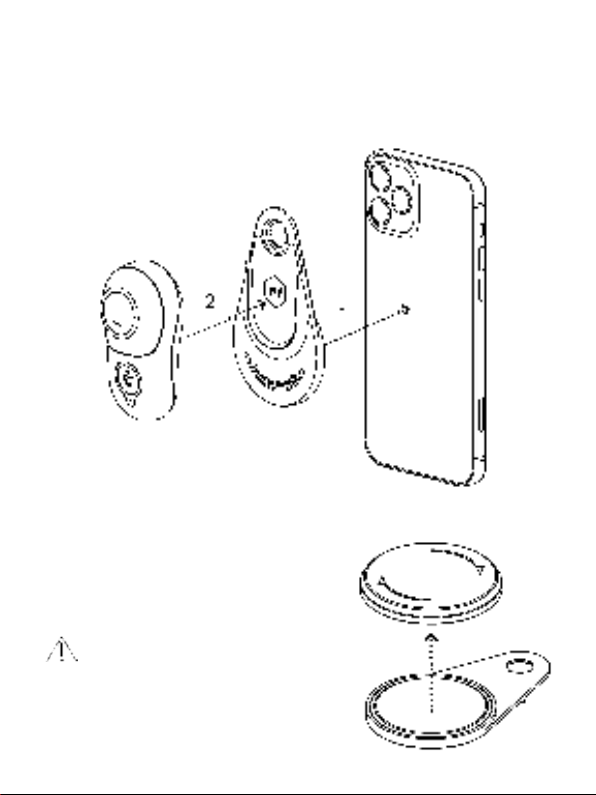
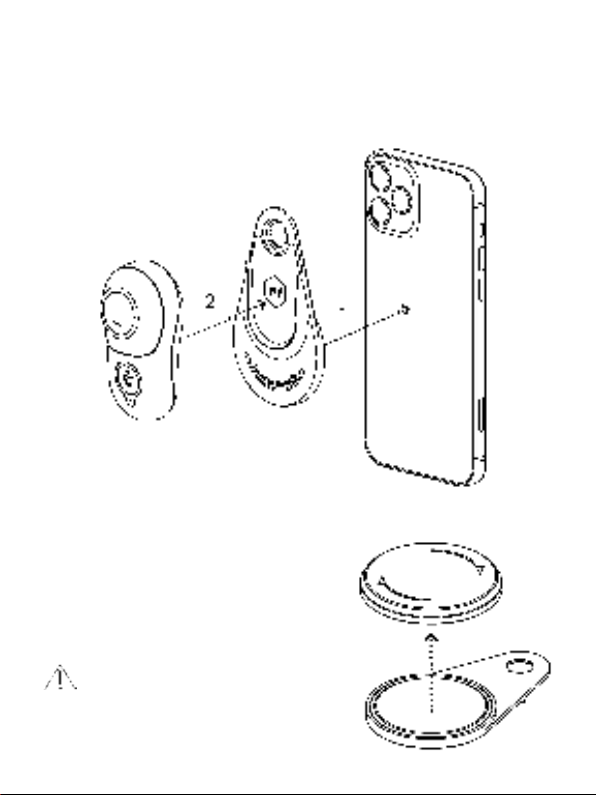
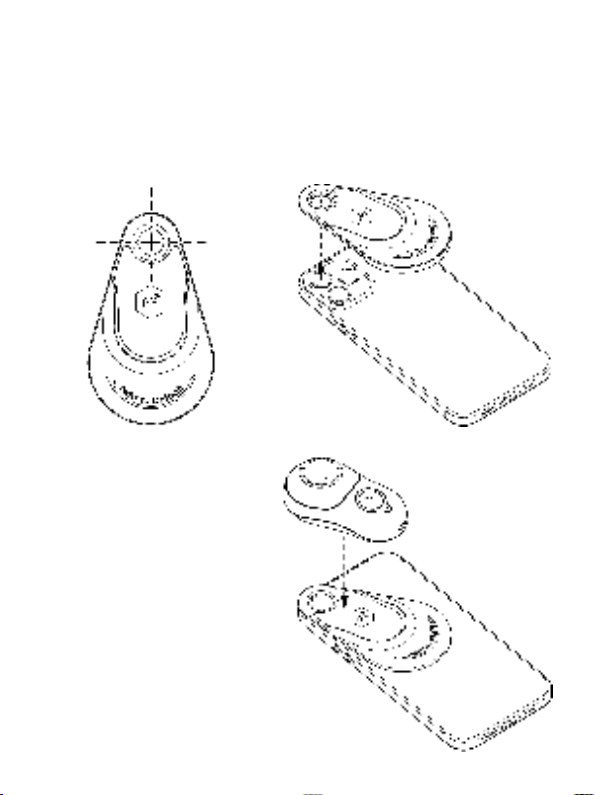
EN: Component Name
DE: Komponente
FR: Nom du composant
ES: Nombre del componente
IT: Nome del componente
NL: Naam onderdeel
1
Mobile Dermatoscope
Mobil-Dermatoskop
Dermatoscope mobile
Dermatoscopio móvil
Dermatoscopio mobile
Mobiele dermatoscoop
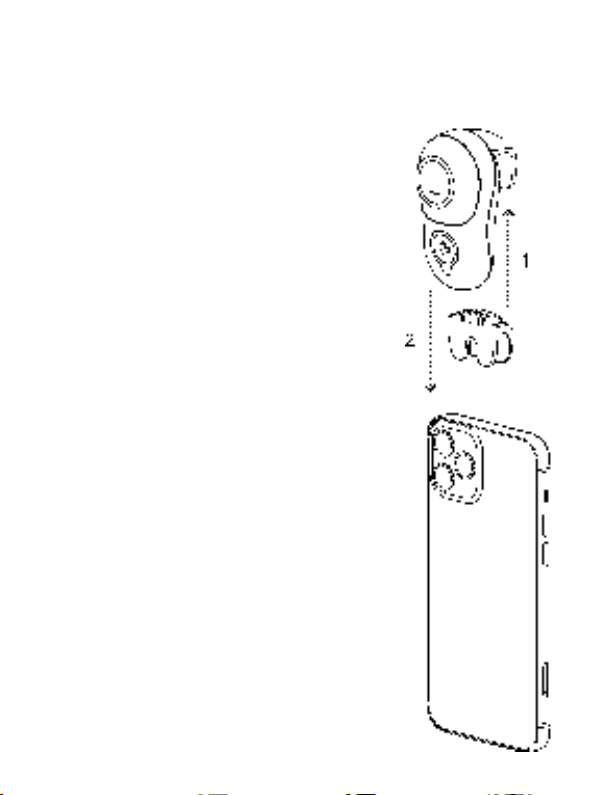
2
Contact Cap
Kontaktkappe
Capuchon de contact
Tapa de contacto
Cappuccio di contatto
Contactkapje
3
Non-Contact Cap
erührungslose Kappe
Capuchon sans contact
Tapa sin contacto
Cappuccio non di contatto
Niet-contactkapje
4
USB Charging Cable
USB-Ladekabel
Cabine de chargement USB
Cable de carga USB
Cavo di ricarica USB
USB-oplaadkabel
5
Universal Attachment Plate (for Model U)
Universal-Befestigungsplatte (Modell U)
Plaque de fixation universelle (pour le modèle U)
Placa de acoplamiento universal (para el modelo U)
Piastra di attacco universale (per il modello U)
Universele bevestigingsplaat (voor model U)
6
Rubber Attachment (for Models A, A+, B, B+)
Gummiaufsatz (Modelle A / A+ / B / B+)
Fixation en caoutchouc (pour les modèles A, A+, B, B+)
Accesorio de goma (para modelos A, A+, B, B+)
Attacco di gomma (per i modelli A, A+, B, B+)
Rubberen bevestigingsstuk (voor model A, A+, B, B+)
3

Please read this user manual carefully before using the device.
MoleScope is a battery-powered dermatoscope intended to be attached to smartphones and
tablets to take images of skin, scalp, hair, nail, and other body surfaces with high magnification
and cross-polarized light. It is a reusable, non-invasive device for imaging and documentation
only.
English
Intended Use
Indications of Use and Contraindications
The device is indicated for use in combination with a smartphone or a tablet when magnified
images of the skin, scalp, hair, nail, and other body surfaces of any patient demographic are
required. The device should not be used on open wounds or on any other sensitive areas. The
device is intended to be used by professional healthcare workers or lay persons.
Cautions
• Do not look directly into the bright LED light. Eyes must be closed during facial
examination.
• Do not attempt to open the device for any reason.
• Do not attempt to change the device battery. The battery is not replaceable.
• Do not use the device to image sensitive areas, open wounds, and surfaces near the
eyes, ears, nose, and mouth.
• Check your device before use if it has been dropped.
• Follow the instructions in this document to clean and disinfect contact and non-
contact caps in between patients.
• Keep the device and detachable components out of reach of children and pets. If
swallowed, seek medical attention immediately.
• Do not use the device while it is in charging mode.
• This device contains magnets. Do not use it without first consulting your doctor if you
wear a pacemaker or other medical implant.
Consult a healthcare professional to determine your skin assessment plan.
For EU/UK Residents
Any serious incident that has occurred in relation to the device should be reported to the
manufacturer and the competent authority of the EU Member State in which the user and/or
patient is established or in case of UK residents, to the manufacturer and to the secretary of
State in the United Kingdom.
Components Include
Device Models A / A+ / B / B+: A mobile dermatoscope device with a contact cap and a
rubber attachment, a non-contact cap, a microfiber cleaning cloth, a microfiber device bag
and a charging cable.
4

Set Up Instructions for Device Models
A / A+ / B / B+
These models come in dierent sizes to fit the specifications
of your smartphone/ tablet and are typically recommended
for medical professionals or patients looking for an
attachment to a specific smartphone/tablet device. Please
refer to MetaOptima’s website for the most updated list of
smartphones and tablets.
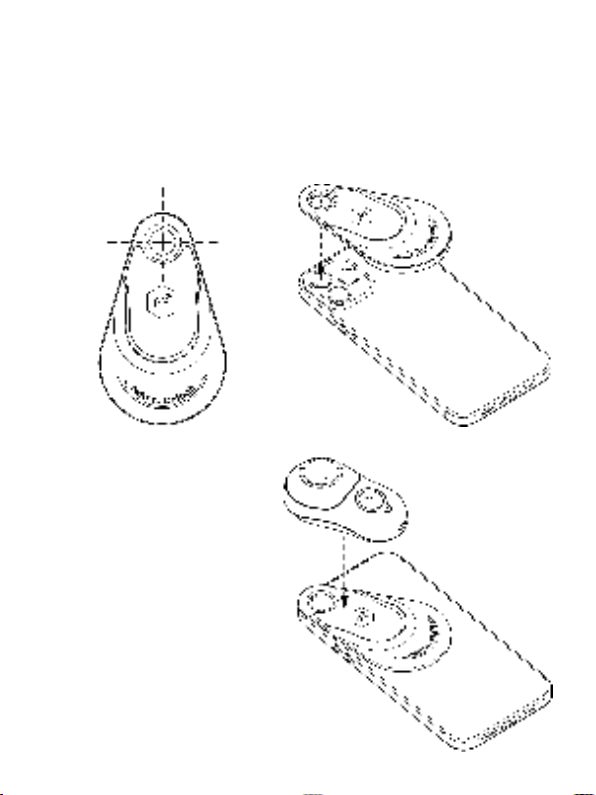
To attach the device to your smartphone/tablet, place it over
the smartphone camera and firmly squeeze the attachment
part together. The device lens should be perfectly aligned
with the camera lens. For best results, you should remove any
case and screen protectors you have on your smartphone/
tablet.
Device Model U: A mobile dermatoscope device with a contact cap, a universal attachment
plate, a non-contact cap, a microfiber cleaning cloth, a microfiber device bag and a charging
cable.
5
Set Up Instructions for Device Model U
This model is compatible with any smartphone/tablet and recommended for medical
professionals or patients with a smartphoneor/tablet that are not covered by MoleScope
models A, A+, B, B+ or want to switch between dierent smartphone/tablet devices.
Step 1: Twist and lift the lid to reveal the sticky pad
underneath. Make sure the sticky pad is clean and
free of dust, dirt and oil. If the pad is dirty or losing its
adhesive grip, simply wash under water and let air dry
prior to your next imaging session.
Do not use hot water, cleaning agents, or a
hair dryer to quicken the process. Avoid direct
contact with the sticky pad!
To learn how you can get started, follow the steps below.
6

Step 2: Clean the back of your smartphone, tablet, or device case with the provided microfiber
cloth to remove any smudges, dirt, or oil. Next, align the guide marks of the Attachment Plate
with the center of the smartphone/tablet camera and gently push to secure the plate. If the
adhesion is not adequate, you have the option of attaching the plate to your smartphone or
tablet case that has a hard and smooth back. Avoid rubber, leather, and textured surfaces.
If your smartphone has multiple camera lenses, align the attachment with the center of
the main camera. For a reference of popular smartphone model camera placements visit
www.molescope.com/molescope2
Step 3: Place the MoleScope device on
the universal attachment plate. You will
hear a clicking noise, indicating that the
device is magnetically locked into place.
Press the power button to turn on your
device and begin your imaging session.
7

Permanent Attachment to a Smartphone or Tablet Case
If your device will be used frequently, you may peel o
the sticky pad from the universal attachment plate and
replace with provided double-sided tape. Repeat steps
2 and 3, then simply pull to remove the MoleScope
device. Only use the permanent adhesive on the case
and do not attach directly to your smartphone or
tablet.
Battery and Charging
We recommend that customers fully charge their device before their first use. Complete
charging duration is 90 minutes. Do not use the device while it is on charging mode. To
conserve energy, this product is designed to automatically turn o after 4 minutes. The battery
can be expected to supply multiple sessions. The device has a low battery indicator. If the light
indicator is flashing red, the battery is low and it may need to be recharged. To charge, plug the
device into a USB port. While charging, the charge indicator will glow red; when fully charged,
it will appear green. This product uses a special rechargeable lithium-polymer battery, which
is not replaceable.
Cleaning and Disinfection
The exterior and contact plate of your MoleScope should be cleaned by wiping with isopropyl
alcohol (70% vol.) or a disinfectant solution in between users. Turn the device o and
disconnect it from the charging cable before cleaning and disinfection.
Troubleshooting
Your product is designed for trouble-free operation. There are no adjustments to be made nor
is any special servicing required. Never attempt to open the device for any reason.
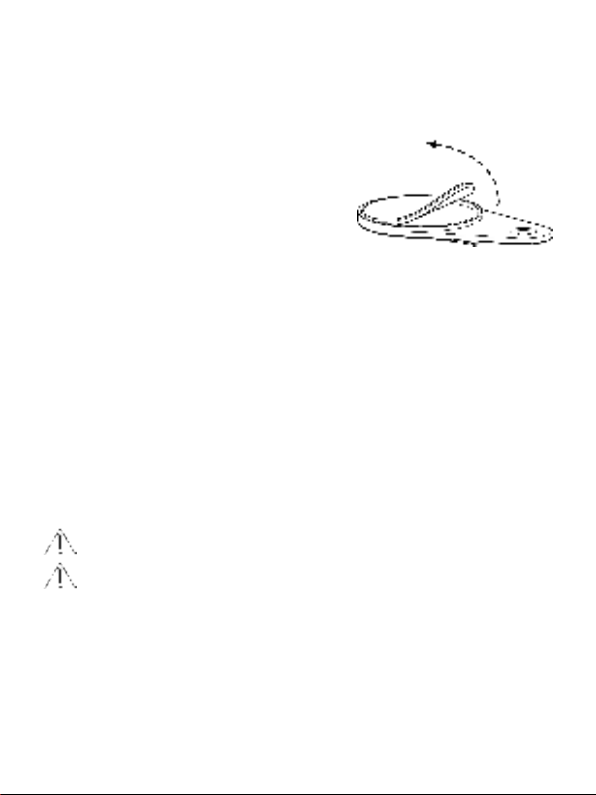
Step 4: When the imaging session is over, pull to remove the MoleScope device, then gently
twist the universal attachment plate to detach it from your smartphone or tablet and place the
lid back on the sticky pad. Do not grab and lift the plate!
Do not use alcohol or disinfectants in the optical areas of the unit.
Do not use abrasive material on any part of the equipment or immerse the device in
liquid. Do not autoclave.
This device lens should be treated as high-quality photographic equipment. It should be
cleaned with the provided microfiber cloth or an air duster, and protected from harmful
chemicals.
8

Warranty
Your device has a 2-year warranty. For warranty issues, please contact the reseller or store
where you bought the product. The serial number is labeled on the box and back of your
device.
No Light: Fully recharge the battery and check again. If the condition persists, stop using your
LED Fails: The LEDs used in your product are designed to last over 50,000 hours. If any
If your product has any other problems or is not working properly, please stop using it and
check our website (www.metaoptima.com) for the most current troubleshooting information.
Specications
• 10x Optical magnification with 16 mm wide field of view
• 6 bright white LEDs with polarization rate of 99.97%
• Contact and non-contact imaging caps with easy magnetic attachment
• Anti-reflective glass contact plate with scale
• ON/OFF switch with 4 minutes auto turn o and low-battery/charging indicator
• Rechargeable lithium-ion battery with 6 hours of working time
• USB 2.0 high speed charging cable
• Smartphone and tablet compatibility
Disposal
The product must be recycled as separated electrical and electronic devices. Please observe
the relevant state-specific disposal regulations.
Environmental conditions for operation
0 °C to +45 °C
45 % to 75 % Relative Humidity
700 hPa to 1060 hPa
Environmental conditions for storage
+5 °C to +35 °C
45 % to 75 % Relative Humidity
500 hPa to 1060 hPa
Environmental conditions for transport
-10 °C to +55 °C
45 % to 75 % Relative Humidity
500 hPa to 1060 hPa
9

Lesen Sie dieses Benutzerhandbuch vor Gebrauch des Gerätes sorgfältig durch.
Das MoleScope ist ein batteriebetriebenes Dermatoskop, das Benutzer an Smartphones und
Tablets anschließen können, um mit hoher Vergrößerung und kreuzpolarisierter Beleuchtung
Aufnahmen von Haut, Kopfhaut, Haar, Nägeln und anderen Körperstellen anzufertigen.
Das wiederverwendbare, nicht-invasive Gerät darf nur für Bildgebung und Dokumentation
eingesetzt werden.
DEUTSCH
Verwendungszweck
Verwendungszwecke und Kontraindikationen
Das Gerät ist für die Verwendung in Kombination mit einem Smartphone oder einem Tablet
geeignet, wo vergrößerte Aufnahmen von Haut, Kopfhaut, Haar, Nägeln oder anderen
Körperoberflächen beliebiger Patienten benötigt werden. Das Gerät darf nicht auf oenen
Wunden oder sonstigen empfindlichen Stellen angewendet werden. Das Gerät ist für die
Anwendung durch medizinisches Fachpersonal oder Laien vorgesehen.
Vorsichtshinweise
• Nie direkt in die LED-Beleuchtung blicken. Die Augen müssen bei Untersuchungen im
Gesichtsfeld geschlossen sein.
• Nicht versuchen, das Gerät aus irgendeinem Grund zu önen.
• Nicht versuchen, die Gerätebatterie auszuwechseln. Die Batterie ist nicht austauschbar.
• Verwenden Sie das Gerät nicht zur Abbildung von empfindlichen Stellen, oenen
Wunden und Hautflächen in der Nähe von Augen, Ohren, Nase und Mund.
• Prüfen Sie vor Gebrauch des Geräts, ob es zuvor auf den Boden gefallen ist.
• Reinigen und desinfizieren Sie die kontaktbehafteten und berührungslosen
Bildgebungskappen vor dem Einsatz am nächsten Patienten entsprechend den
Anweisungen in diesem Dokument.
• Bewahren Sie das Gerät und abnehmbare Komponenten außerhalb der Reichweite von
Kindern und Haustieren auf. Suchen Sie bei Verschlucken umgehend einen Arzt auf.
• Das Gerät nicht verwenden, solange es aufgeladen wird.
• Das Gerät enthält Magnete. Verwenden Sie das Gerät erst nach Rücksprache mit Ihrem
Arzt, wenn Sie einen Herzschrittmacher oder ein anderes medizinisches Implantat
tragen.
Legen Sie zusammen mit medizinischem Fachpersonal einen Hautuntersuchungsplan fest.
Für in der EU/im Vereinigten Königreich ansässige Personen
Jeder schwerwiegende Vorfall im Zusammenhang mit dem Produkt sollte dem Hersteller
und der zuständigen Behörde des EU-Mitgliedstaats, in dem der Anwender und/oder Patient
niedergelassen ist, bzw. im Falle von im Vereinigten Königreich ansässigen Personen dem
Hersteller und dem Minister des Vereinigten Königreichs gemeldet werden.
Komponenten des Geräts
Gerätemodelle A / A+ / B / B+: Ein mobil einsetzbares Dermatoskop-Gerät mit einer
Kontaktkappe und einem Gummiaufsatz, einer berührungslosen Kappe, einem Mikrofaser-
Reinigungstuch, einem Mikrofaser-Aufbewahrungsbeutel und einem Ladekabel.
10
Einrichtung Gerätemodelle A / A+ / B / B+
Diese Modelle sind unterschiedlich groß, je nach
Smartphone/Tablet. Sie werden in der Regel für
medizinisches Fachpersonal und Patienten empfohlen, die
ihr Gerät an ein bestimmtes Smartphone/Tablet anschließen
möchten. Eine aktuelle Liste kompatibler Smartphones und
Tablets finden Sie auf der Website von MetaOptima.
Um das Gerät auf das Smartphone/Tablet zu setzen,
positionieren Sie es über der Smartphone-Kamera und
drücken Sie den Befestigungsteil fest zusammen. Die Linse
muss genau über dem Kameraobjektiv stehen. Die besten
Ergebnisse erzielen Sie, wenn auf dem Smartphone/Tablet
keine Gehäusehülle/Bildschirmschutzfolie angebracht ist.
Gerätemodell U: Ein mobil einsetzbares Dermatoskop-Gerät mit einer Kontaktkappe,
einer Universal-Befestigungsplatte, einer berührungslosen Kappe, einem Mikrofaser-
Reinigungstuch, einem Mikrofaser-Aufbewahrungsbeutel und einem Ladekabel.
11

Einrichtung Gerätemodell U
Dieses Modell ist mit jedem Smartphone/Tablet kompatibel und wird für medizinisches
Fachpersonal oder Patienten empfohlen, deren Smartphone/Tablet nicht für die MoleScope-
Modelle A, A+, B, B+ geeignet ist oder zwischen verschiedenen Smartphone/Tablet-Geräten
wechseln möchten.
Schritt 1: Die Schutzkappe drehen und abheben.
Die darunter liegende Haftscheibe wird sichtbar. Die
Haftscheibe muss sauber und frei von Staub, Schmutz
bzw. Öl sein. Falls die Haftscheibe verschmutzt ist
oder Klebekraft verliert, Haftscheibe vor den nächsten
Aufnahmen unter fließendem Wasser abwaschen und
lufttrocknen lassen.
Nicht mit heißem Wasser, Reinigungsmittel
oder Föhn arbeiten, um die Trocknung zu
beschleunigen. Direkten Kontakt mit der
Haftscheibe vermeiden.
Gehen Sie wie nachfolgend beschrieben vor, um sich mit dem Gebrauch des Gerätes vertraut
zu machen.
12
Schritt 2: Reinigen Sie die Rückseite Ihres Smartphones, Tablets oder Ihrer Gerätetasche mit
dem mitgelieferten Mikrofasertuch, um Flecken, Schmutz oder Öl zu entfernen. Richten Sie
dann die Führungsmarkierungen der Befestigungsplatte an der Mitte der Smartphone-/Tablet-
Kamera aus und drücken Sie die Platte leicht an, um sie zu befestigen. Wenn die Haftung nicht
ausreicht, haben Sie die Möglichkeit, die Platte an der harten und glatten Rückseite der Hülle
Ihres Smartphones oder Tablets zu befestigen. Vermeiden Sie Gummi, Leder und strukturierte
Oberflächen. Wenn Ihr Smartphone über mehrere Kameralinsen verfügt, richten Sie den
Aufsatz auf die Mitte der Hauptkamera aus. Eine Übersicht über die Platzierung von Kameras
bei gängigen Smartphone-Modellen finden Sie unter www.molescope.com/molescope2
Schritt 3: MoleScope-Gerät auf die
Universal-Befestigungsplatte setzen.
Wenn der optische Aufsatz hörbar
einrastet, ist das Gerät magnetisch
angedockt. Die An/Aus-Taste drücken,
um das Gerät einzuschalten und mit
den Aufnahmen beginnen.
13

Dauerhafte Befestigung an einer Smartphone- oder Tablet-Hülle
Wenn Sie das Gerät häufig benutzen, können Sie das
Klebepad von der universellen Befestigungsplatte
abziehen und durch das mitgelieferte doppelseitige
Klebeband ersetzen. Wiederholen Sie die Schritte 2
und 3 und entfernen Sie das MoleScope-Gerät dann
einfach, indem Sie es abziehen. Verwenden Sie das
permanente Klebeband nur auf der Hülle und nicht
direkt an Ihrem Smartphone oder Tablet.
Akku und Auadevorgang
Das Gerät sollte vor der ersten Verwendung vollständig aufgeladen werden. Es dauert 90
Minuten, den Akku vollständig aufzuladen. Das Gerät nicht verwenden, solange es aufgeladen
wird.
Um Strom zu sparen, schaltet sich dieses Produkt nach 4 Minuten automatisch aus. Der Akku
liefert Strom für mehrere Aufnahmerunden. Das Gerät zeigt an, ob der Akkuladestand niedrig
ist. Wenn die Leuchtanzeige rot blinkt, ist der Akku schwach und muss möglicherweise wieder
aufgeladen werden. Um den Akku aufzuladen, schließen Sie das Gerät an einen USB-Anschluss
an. Während des Aufladevorgangs leuchtet die Ladeanzeige rot; wenn der Akku vollständig
aufgeladen ist, leuchtet die Ladeanzeige grün. In diesem Produkt ist ein speziell entwickelter
Lithium-Polymer-Akku verbaut, der nicht austauschbar ist.
Reinigung und Desinfektion
Die Oberfläche und die Kontaktplatte Ihres MoleScope muss vor jedem Gebrauch mit
Isopropylalkohol (70 % vol) oder einer Desinfektionslösung gereinigt werden. Schalten Sie das
Gerät vor der Reinigung und Desinfektion ab und trennen Sie es vom Ladekabel.
Fehlerbehebung
Ihr Produkt ist so konzipiert, dass es störungsfrei funktioniert. Es müssen keine Einstellungen
vorgenommen werden und es ist keine besondere Wartung erforderlich. Versuchen Sie nie,
das Gerät aus irgendeinem Grund zu önen.
Schritt 4: Nach den Aufnahmen am MoleScope-Gerät ziehen, um es zu entfernen. Die
Universal-Befestigungsplatte vorsichtig drehen, bis sie sich vom Smartphone oder Tablet löst.
Die Schutzkappe wieder auf die Haftscheibe setzen. Auf keinen Fall die Befestigungsplatte
packen und anheben!
Die optischen Flächen des Geräts dürfen nicht mit Alkohol oder Desinfektionsmittel in
Berührung kommen.
Keine scheuernden Materialien an Teilen des Geräts verwenden und Gerät nicht in
Flüssigkeiten eintauchen. Nicht autoklavieren.
Die Linse des Geräts ist wie hochwertige fotografische Ausrüstung zu behandeln. Reinigen Sie
sie mit dem mitgelieferten Mikrofasertuch oder einem Druckluftreiniger. Die Linse muss vor
schädlichen Chemikalien geschützt werden.
14

Gewährleistung
Auf Ihr Gerät werden 2 Jahre Gewährleistung gewährt. Bei gewährleistungspflichtigen
Problemen wenden Sie sich bitte an den Händler oder das Geschäft, in dem Sie das Produkt
gekauft haben. Die Seriennummer ist auf dem Karton und der Rückseite des Geräts angegeben.
Keine Leuchtanzeige: Akku vollständig aufladen und Anzeige kontrollieren. Falls das Problem
schreiben.
LED kaputt: Die LED in Ihrem Produkt sind auf über 50.000 Stunden Betriebsdauer
ausgelegt. Falls eine LED ausfällt, den Gebrauch des Gerätes einstellen und E-Mail an
[email protected] schreiben.
Mechanische Fehlfunktion: Gebrauch des Gerätes einstellen und E-Mail an
[email protected] schreiben.
Falls Ihr Produkt andere Probleme verursacht oder nicht richtig funktioniert, stellen Sie
MetaOptima-Händler. Die aktuellen Fehlerbehebungshinweise finden Sie auf unserer Website:
www.metaoptima.com
Technische Daten
• 10fache optische Vergrößerung mit 16 mm breitem Sichtfeld
• 6 hellweiß leuchtende LED mit 99,97 % Polarisierung
• Kontaktbehaftete und berührungslose Bildgebungskappen mit einfacher magnetischer
Anbringung
• Reflexionsarme Glaskontaktplatte mit Skala
• EIN/AUS-Schalter mit 4-Minuten-Abschaltautomatik und Akkustand-/Ladeanzeige
• Lithium-Ionen-Akku mit 6 Stunden Betriebszeit
• Schnellladekabel USB 2.0
• Kompatibel mit Smartphones und Tablets
Entsorgung
Das Produkt muss separat als elektrisches/elektronisches Gerät wiederverwertet werden. Bitte
beachten Sie die staatlichen Entsorgungsvorschriften.
Betriebsbedingungen
0 °C bis +45 °C
45 – 75 % rel. Luftfeuchtigkeit
700 – 1060 hPa
Lagerbedingungen
+5 °C bis +35 °C
45 – 75 % rel. Luftfeuchtigkeit
500 – 1060 hPa
Transportbedingungen
-10 °C bis +55 °C
45 – 75 % rel. Luftfeuchtigkeit
500 – 1060 hPa
15

Veuillez lire attentivement ce manuel d’utilisation avant d’utiliser l’appareil.
MoleScope est un dermatoscope alimenté par batterie, destiné à être fixé sur des smartphones
ou tablettes pour prendre des images de la peau, du cuir chevelu, des cheveux ou poils,
des ongles et d’autres surfaces corporelles avec un fort grossissement et une lumière à
polarisation croisée. C’est un appareil réutilisable, non invasif, destiné uniquement à l’imagerie
et à la documentation.
FRANÇAIS
Utilisation prévue
Indications of Use and Contraindications
Cet appareil est conçu pour être utilisé en combinaison avec un smartphone ou une tablette
afin d’obtenir des images agrandies de la peau, du cuir chevelu, des cheveux ou poils, des
ongles et d’autres surfaces corporelles d’un patient, sans restriction démographique. L’appareil
ne doit pas être utilisé sur des plaies ouvertes ou sur toute autre zone sensible. L’appareilest
destiné à être utilisé par des professionnels de la santé ou des profanes.
Précautions
• Ne regardez pas directement la lumière des LED. Les yeux doivent être fermés pendant
l’examen du visage.
• N’essayez pas d’ouvrir l’appareil pour quelque raison que ce soit.
• N’essayez pas de changer la batterie de l’appareil. La batterie n’est pas remplaçable.
• N’utilisez pas l’appareil pour photographier des zones sensibles, des plaies ouvertes et
des surfaces proches des yeux, des oreilles, du nez et de la bouche.
• Vérifiez votre appareil avant de l’utiliser s’il est tombé.
• Suivez les instructions de ce document pour nettoyer et désinfecter les capuchons de
contact et sans contact entre deux patients.
• Gardez l’appareil et les composants détachables hors de portée des enfants et des
animaux domestiques. En cas d’ingestion, consultez immédiatement un médecin.
• N’utilisez pas l’appareil lorsqu’il est en mode de charge.
• Cet appareil contient des aimants. Ne l’utilisez pas sans consulter votre médecin si vous
portez un stimulateur cardiaque ou un autre implant médical.
Consultez un professionnel de la santé pour déterminer votre plan d’évaluation de la peau.
Pour les résidents de l’UE/du Royaume-Uni
Tout incident grave survenu en rapport avec l’appareil doit être signalé au fabricant et à
l’autorité compétente de l’État membre de l’UE dans lequel l’utilisateur et/ou le patient est
établi ou, dans le cas des résidents du Royaume-Uni, au fabricant et au secrétaire d’État du
Royaume-Uni.
Les composants incluent
Modèles d’appareils A / A+ / B / B+: Un appareil dermatoscope mobile avec un capuchon de
contact et une fixation en caoutchouc, un capuchon sans contact, un chion de nettoyage en
microfibres, un sac en microfibres pour l’appareil, et un câble de chargement.
16

Instructions de mise en place pour les modèles
d’appareils A / A+ / B / B+
Ces modèles existent en diérentes tailles pour s’adapter
aux spécifications de votre smartphone/tablette et sont
généralement recommandés pour les professionnels de la
santé ou les patients qui recherchent une compatibilité avec
un smartphone ou une tablette spécifique. Veuillez consulter
le site Web de MetaOptima pour obtenir une liste mise à jour
de smartphones et tablettes compatibles.
Pour fixer l’appareil à votre smartphone/tablette, placez-le
au-dessus de la caméra du smartphone et serrez fermement
le composant de fixation. L’objectif de l’appareil doit être
parfaitement aligné avec l’objectif de la caméra. Pour de
meilleurs résultats, vous devez retirer tout étui et toute
protection d’écran de votre smartphone/tablette.
Modèle de dispositif U: Un appareil dermatoscope mobile avec un capuchon de contact,
une plaque de fixation universelle, un capuchon sans contact, un chion de nettoyage en
microfibres, un sac en microfibres pour l’appareil et un câble de charge.
17
Instructions de mise en place pour le modèle d’appareil U
Ce modèle est compatible avec tout smartphone/tablette et est recommandé pour les
professionnels de la santé ou les patients disposant d’un smartphone/tablette non couvert(e)
par les modèles A, A+, B, B+ de MoleScope ou qui souhaitent alterner entre plusieurs
smartphones/tablettes.
Étape 1: Tournez le couvercle et soulevez-le pour
révéler le tampon adhésif qui se trouve en dessous.
Assurez-vous que le tampon adhésif est propre et
exempt de poussière, saleté ou graisse. Si le tampon est
sale ou perd son adhérence, vous pouvez simplement
le laver à l’eau et le laisser sécher. à l’air libre avant la
prochaine session d’imagerie.
N’utilisez pas d’eau chaude, de produits de
nettoyage ou de sèche-cheveux pour accélérer
le processus. Évitez tout contact direct avec le
tampon adhésif!
Pour savoir comment vous pouvez commencer, suivez les étapes ci-dessous.
18
Étape 2: Nettoyez l’arrière de votre smartphone, tablette ou étui avec le chion en microfibre
fourni pour éliminer les taches, la saleté ou l’huile. Ensuite, alignez les marques de guidage de
la plaque de fixation avec le centre de l’appareil photo du smartphone/de la tablette et poussez
doucement pour fixer la plaque. Si l’adhérence n’est pas adéquate, vous avez la possibilité de
fixer la plaque à l’étui de votre smartphone ou de votre tablette qui a un dos dur et lisse. Évitez
le caoutchouc, le cuir et les surfaces texturées. Si votre smartphone est équipé de plusieurs
objectifs d’appareil photo, alignez l’accessoire avec le centre de l’appareil photo principal. Pour
une référence des emplacements d’appareils photo de modèles de smartphones populaires,
visitez le site www.molescope.com/molescope2
Étape 3: Placez l’appareil MoleScope
sur la plaque de fixation universelle.
Vous entendrez un clic, indiquant que
le dispositif est verrouillé en place
magnétiquement. Appuyez sur le
bouton d’alimentation pour allumer
votre appareil et commencer votre
session d’imagerie.
19
Fixation permanente à un étui de smartphone ou de tablette
Si votre appareil est appelé à être utilisé fréquemment,
vous pouvez décoller la pellicule adhésive de la plaque
de fixation universelle et la remplacer par le ruban
adhésif double face fourni. Répétez les étapes 2 et 3,
puis tirez simplement pour retirer l’appareil MoleScope.
Utilisez uniquement l’adhésif permanent sur l’étui et ne
le fixez pas directement sur votre smartphone ou votre
tablette.
Batterie et charge
Nous recommandons aux utilisateurs de charger complètement leur appareil avant sa
première utilisation. La durée de la charge complète est de 90 minutes. N’utilisez pas l’appareil
lorsqu’il est en mode de charge.
Pour économiser l’énergie, ce produit est conçu pour s’éteindre automatiquement après
4 minutes. La batterie est prévue pour alimenter plusieurs sessions. L’appareil dispose d’un
indicateur de batterie faible. Si l’indicateur lumineux clignote en rouge, la batterie est faible et
doit être rechargée. Pour la charger, branchez l’appareil sur un port USB. Pendant la charge, le
témoin de charge s’allume en rouge ; lorsque la charge est complète, il devient vert. Ce produit
utilise une batterie spéciale rechargeable au lithium-polymère, qui n’est pas remplaçable.
Nettoyage et désinfection
L’extérieur et la plaque de contact de votre MoleScope doivent être nettoyés entre deux
utilisations avec de l’alcool isopropylique (70% vol.) ou une solution désinfectante. Éteignez
l’appareil et débranchez-le du câble de charge avant de le nettoyer et de le désinfecter.
Dépannage
Votre produit est conçu pour fonctionner sans complication. Il n’y a pas de réglage à faire ni
d’entretien particulier à prévoir. N’essayez jamais d’ouvrir l’appareil pour quelque raison que
ce soit.
Étape 4: Une fois la session d’imagerie terminée, tirez pour retirer l’appareil MoleScope, puis
tournez doucement la plaque de fixation universelle pour la détacher de votre smartphone
ou tablette, et replacez le couvercle sur le tampon adhésif. Ne saisissez pas la plaque pour
la soulever !
N’utilisez pas d’alcool ou de désinfectant dans les zones optiques de l’appareil.
N’utilisez pas de matériau abrasif sur une partie quelconque de l’équipement et
n’immergez pas l’appareil dans un liquide. Ne stérilisez pas l’appareil dans un autoclave.
L’objectif de l’appareil doit être considéré comme un équipement photographique de haute
qualité. Il doit être nettoyé à l’aide du chion en microfibre fourni ou d’un plumeau, et protégé
des produits chimiques dangereux.
20
This manual suits for next models
2
Table of contents
Languages:


