Mezzo PFS-3335 User manual

PFS-3335
Mains/Rechargeable
Washable
2 Foils and 1 Center Slot Trimmer
Extendable Rear Foil
5 LED Indicator
Worldwide Voltage
Please Read Instructions
Completely Before Use.
Model PFS-3335
1 2
IMPORTANT INSTRUCTIONS FOR YOUR SAFETY
Basic precautions should always be observed when using any
electrical appliance. Please read all instructions carefully before
using the shaver.
To minimize the risk of electric shock...
NEVER REACH
for a shaver that has been dropped into water.
Unplug the unit immediately.
DO NOT USE
the shaver while bathing or showering.
ALWAYS UNPLUG
the shaver after use or prior to cleaning
the unit, except when charging the unit.
DO NOT PLACE OR STORE
the shaver in water or any other
liquid or where it may accidentally fall or be pulled into water.
To avoid burns, fire, electric shock or other injury...
Except when recharging the shaver, never leave the unit
unattended when plugged in.
Always provide close adult supervision when using the shaver
near children or the disabled.
Follow all instructions in this manual carefully. Do not use
attachments with the shaver that have not been specifically
recommended by us.
Do not use a unit that is not operating normally, has been
immersed in water or other liquid, or has a damaged cord or plug.
DANGER:
WARNING:
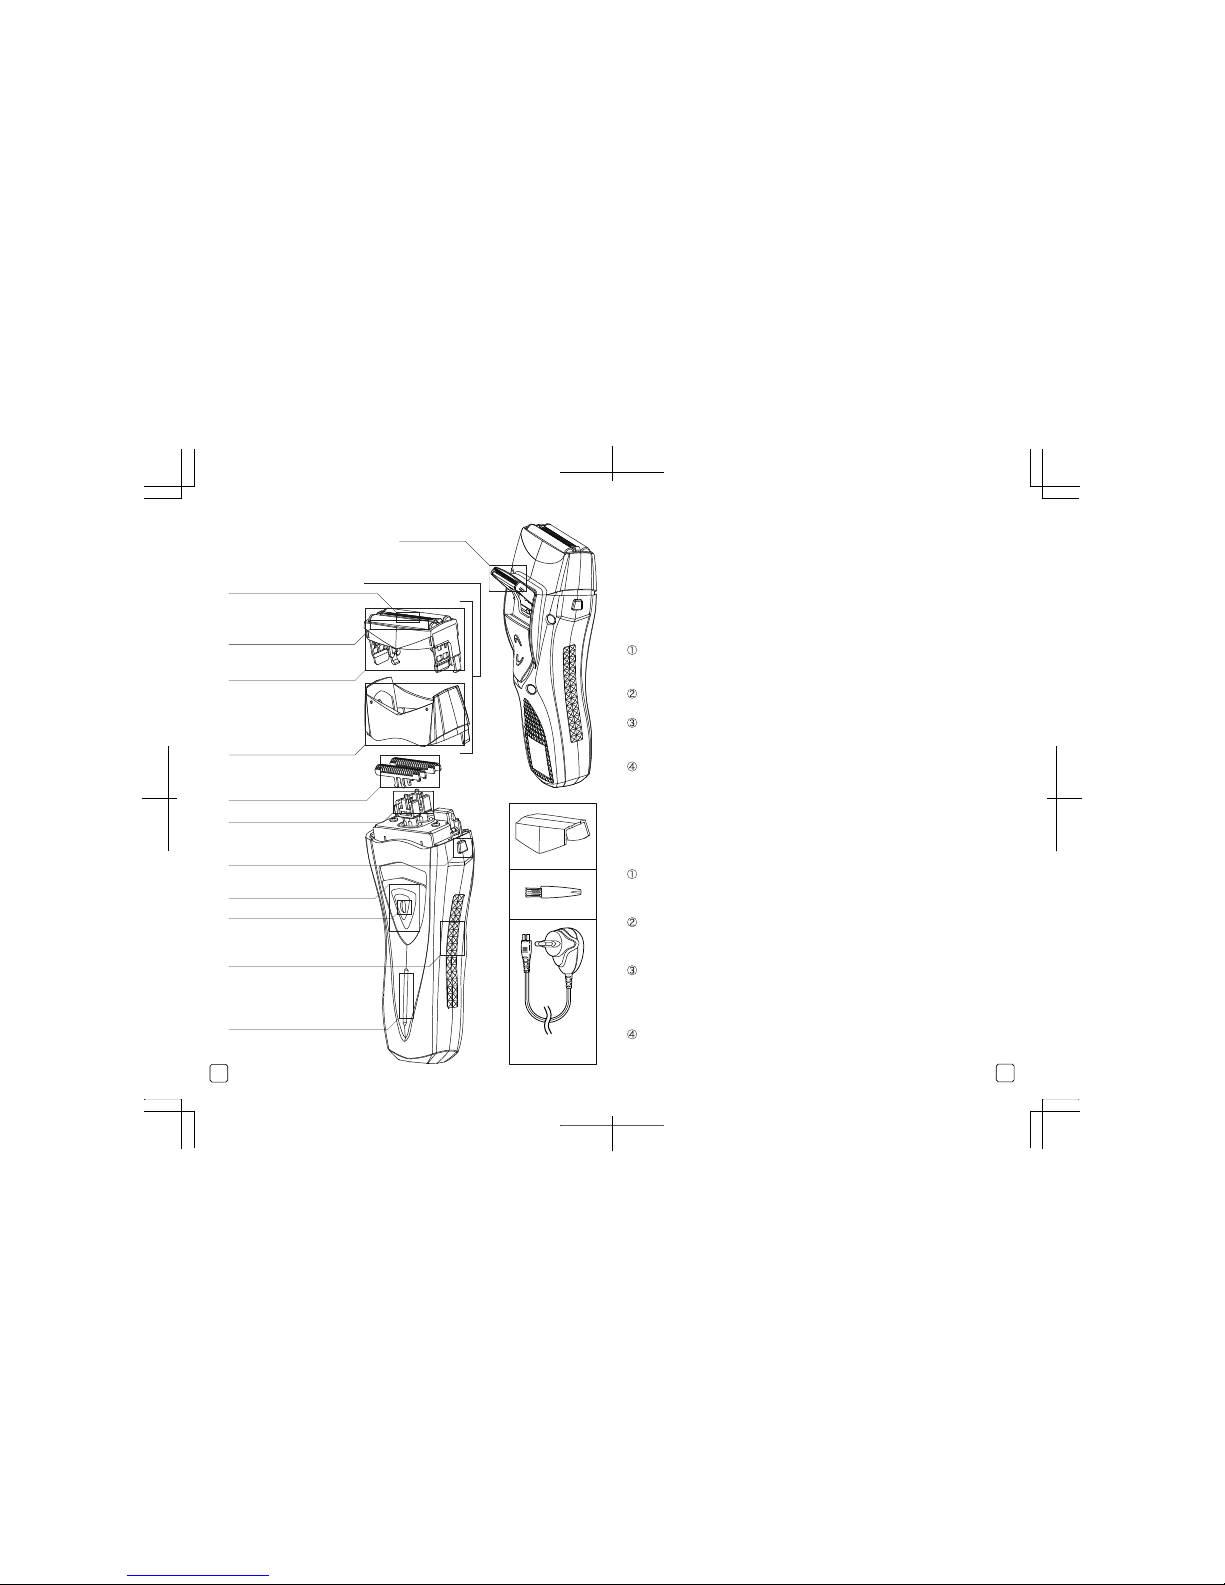
Headguard
Cleaning Brush
Outer Foils
Outer Foil Frame
Center Slot Trimmer Foil Screen Assembly
Trimmer
Inner Cutters
Oscillator
Foil Screen Assembly
Release Buttons
On/Off switch
Side Panels
LED Charging Indicator and
Low Battery Indicator
AC Power/Recharging
Cord with Safety Plug
Switch Lock Button
Outer Foil Frame Base

3 4
Warning! Detach the hand held part from the supply cord before
cleaning it in water.
Warning! If the supply cord or adaptor is damaged, it must be
replaced with one of the same type and make.
Warning! Children. This shaver is not intended for use by young
children or infirm persons. Young children must be supervised by
a responsible person to ensure that they can operate the shaver
safely. Young children must be supervised to ensure that they do
not play with the shaver. This shaver is not intended for use by
young children or infirm persons unless they have been
adequately supervised by a responsible person to ensure that
they can use the shaver safely.
Warning! Do not immerse. Do not immerse any part of the supply
cord in water or other liquid. Do not use with wet hands or use in
damp situations.
Never operate the shaver outdoors. Avoid use in the vicinity of
aerosol products or where oxygen is being administered. Also,
keep the cord away from heated surfaces.
When plugging in the shaver, first attach the cord to the unit
and then plug the cord into an electric outlet. When disconnect-
ing, be sure to switch the unit off, unplug the cord from the
electric outlet and then detach the cord from the shaver.
Do not insert foreign objects into any of the openings in the unit.
Never store the shaver with the cord attached.
Store the shaver and power cord in a dry place.
Avoid exposing the unit to direct sunlight or ambient tempera-
tures above 60˚C (140˚F).
To avoid injury to the face, do not use the unit if the cutters or
head assembly have been damaged.
Never wrap the power cord around the unit. Damage to the
power cord may result.
This shaver is intended and designed for use on human facial
hair only.
Never unplug or plug-in the shaver when your hands are moist
or wet.
For home use only.
SAVE THESE INSTRUCTIONS
SAVE THESE INSTRUCTIONS

5 6
Keep the unit clean and dry at all times.
Wash and dry your skin thoroughly prior to shaving.
In order to achieve the closest shave and avoid unnecessary wear on
the foils, be sure that both foils contact the skin simultaneously. Do not
hold the shaver at an angle where only one foil contacts the skin - this
will cause distortion of the foil and may result in skin irritation.
Stretch your skin with your free hand while using short, circular
strokes. This will make the hairs stand out from your face and allow
the cutting heads to reach them more easily. Shave against the grain
for optimum results.
To facilitate cutting and avoid foil wear, do not apply the shaver to
your skin with high pressure.
The normal replacement period for the foil screens is about 6 to 12
months. In order to maintain shaving performance and comfort,
replace the cutters at least once a year. To order replacement parts,
please refer to the "Ordering Replacement Parts" section of this
manual.
Shaving Tips:
BE SURE TO READ THE ENTIRE MANUAL CAREFULLY BEFORE
OPERATING THE SHAVER.
Congratulations!
This shaver is designed and manufactured to exacting standards in order
to provide you with years of close, comfortable shaves.
It normally takes about three weeks for your skin to adjust to a new
electric shaver. As you use the shaver, you will develop a shaving style
that is most comfortable and effective for you. This "breaking in" period
may be somewhat longer for those with sensitive skin or those who vary
their shaving techniques.
Upon unpacking the shaver, you may notice a white/gray powder on the
inner cutters and surface of the foil screens. This is a factory-applied
lubricant that will help ease the breaking in period and disappear with
normal use.
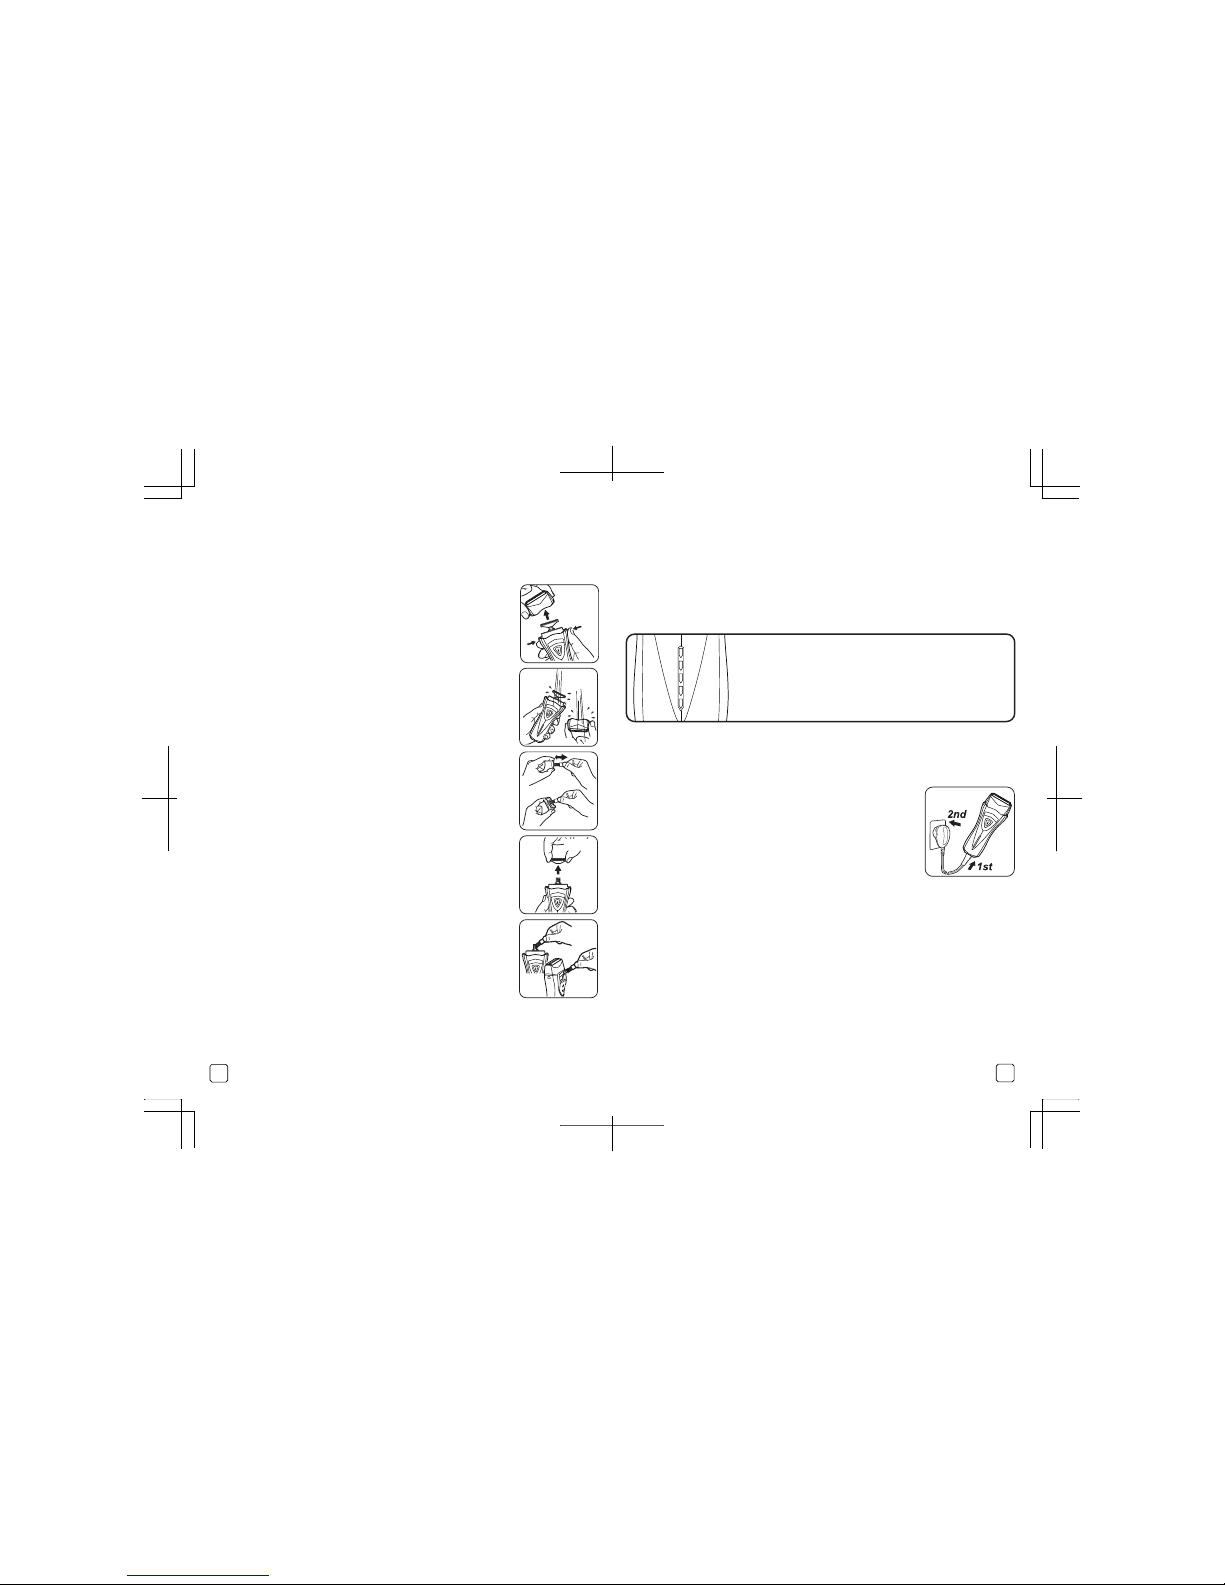
Remove the protective plastic headguard. (Figure 1)
Ensure that the foil screens and inner cutters are not damaged.
Replace damaged parts before using. To obtain replacement
parts, refer to the “Ordering Replacement Parts” section of
this manual.
To turn the shaver on, depress the lock button and slide the
on/off switch up to the “on” position. (Figure 2)
Gently stretch the skin of your face with your free hand while
moving the shaver slowly and smoothly against the grain of
your beard. Hold the shaver at a 90˚ angle to your face while
maintaining contact with the foils.
To shave the chin area, gently pull the skin upward and stroke
the shaver in an easy up and down motion. To avoid
damaging the delicate foils, do not apply high pressure.
Turn shaver off and replace protective headguard.
Turn the shaver on.
Push up the trimmer switch button into its locked position.
To trim sideburns, hold so that the trimmer lightly touches the
skin at a 90˚ angle and move downwards. To avoid draining
the battery, keep the trimmer in its off position when not in use.
Turn the shaver on.
Slide the on/off switch up to the “FINE” position.
Place the adjustable foil in gentle contact with your skin.
Move the shaver slowly while gently stretching your skin.
To Shave Longer Hairs, Sideburns or Beards:
The trimmer easily cuts the longer, hard to reach hairs of the face
and neck.
To shave mustaches:
Using this Shaver:
①
②
③
④
⑤
⑥
①
②
③
①
②
③
Fig.1
Fig.2
7 8
Wet Cleaning:
Using the Cleaning Brush:
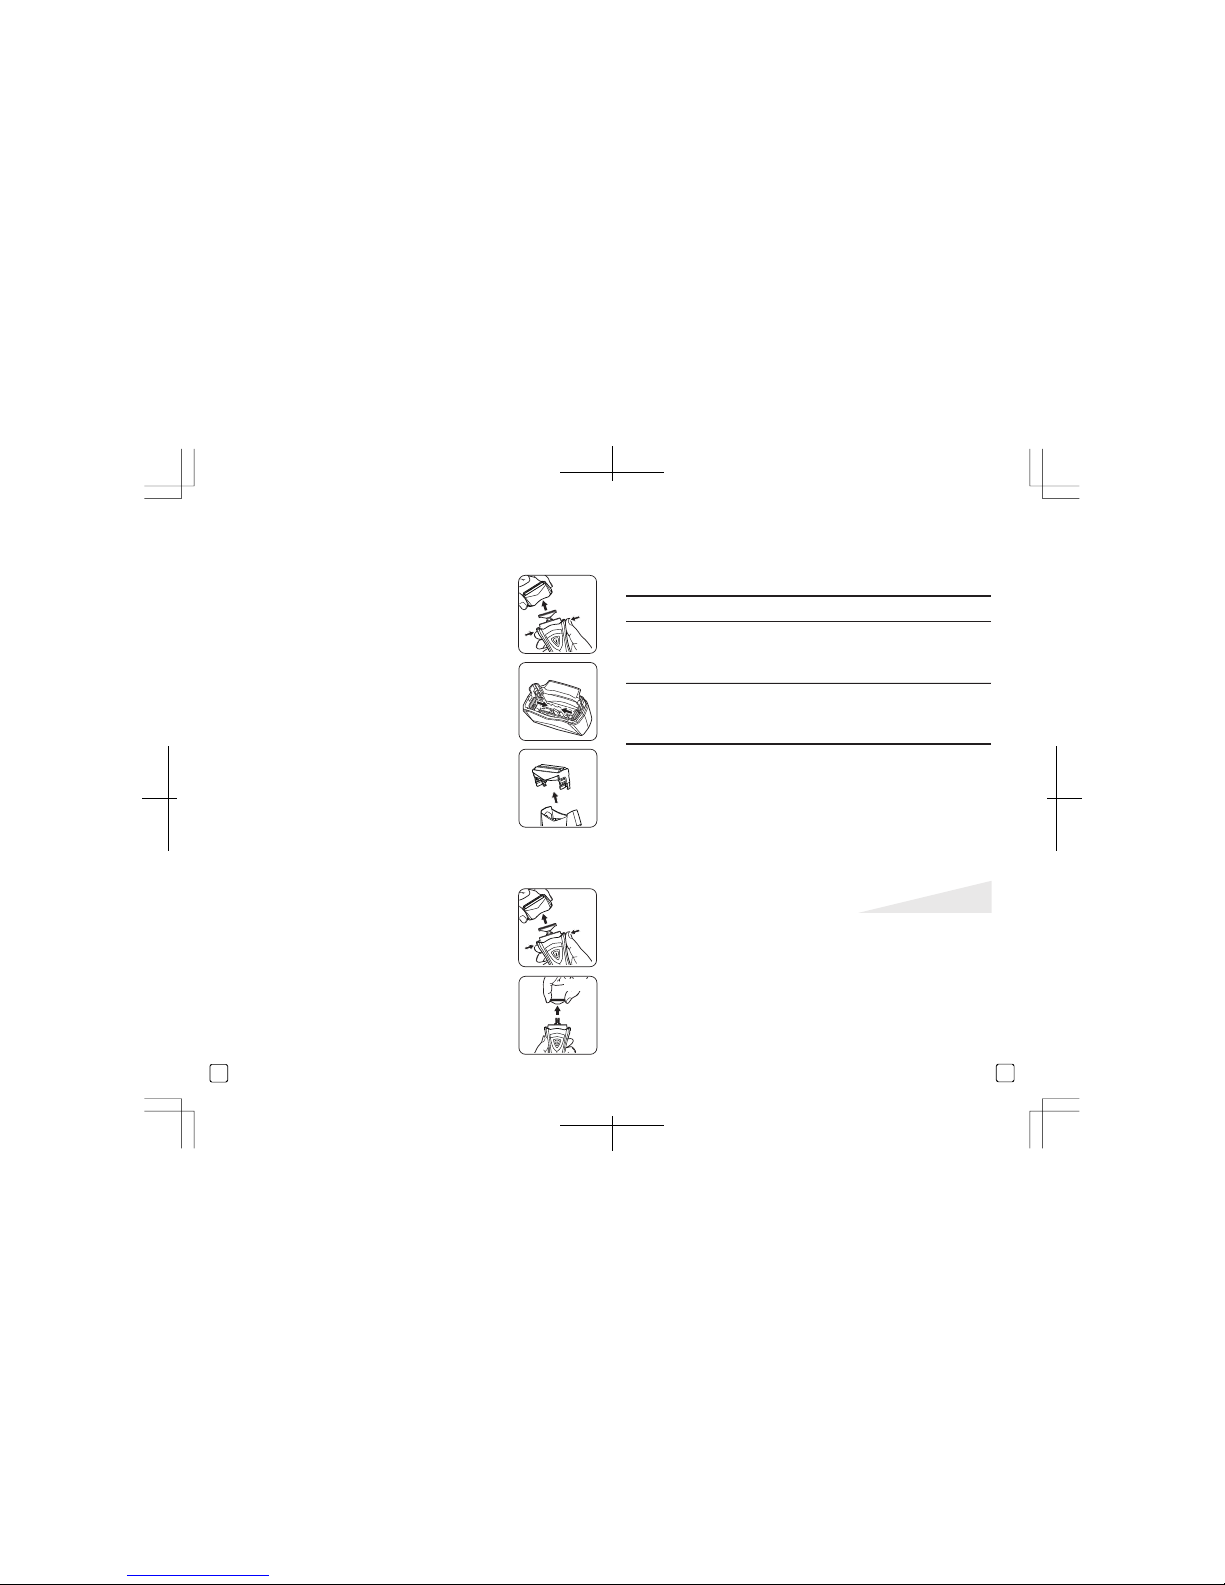
Switch the shaver off and ensure that the power cord is not
attached. Depress the foil screen assembly release buttons on
both sides of the unit and gently lift the foil screen assembly off.
(Figure 1)
Switch the shaver on and allow fresh, cold or lukewarm water to
run over the cutters. (Figure 2)
When finished cleaning, switch the shaver off and replace the
foil screen assembly, making sure it locks into place.
Switch the shaver off and ensure that the power cord is not
attached. Depress the foil screen assembly release buttons on
both sides of the unit and gently lift off the foil screen assembly
off. (Figure 1)
Gently brush the hairs from the inner cutters, the inside surface
of the foil screen assembly and the shaverʼs case. (Figure 3) To
remove the inner cutters for cleaning, gently lift straight up from
its mount. (Figure 4)
To clean the delicate outer foil screens, gently wipe the surface
of the foils with tissue paper, being sure not to apply a great
deal of pressure.
When finished cleaning, reseat the inner cutters on the mounts
and replace the hairpocket, making sure it locks into place.
Note: to ensure proper operation, the outer foil frame
assembly must be properly seated. To avoid damaging the
delicate foil screens, do not remove them from their frame.
To clean the trimmer, switch the shaver off and slide trimmer
upwards to deploy the trimmer. Gently brush the hairs from the
trimmer blades. (Figure 5)
This shaver should be cleaned with the brush provided after every
three wet cleanings.
NOTE: To avoid damage, be sure to thoroughly wipe pre-shave lotion
or shaver oil from the shaver's body.
Fig. 1
Fig. 2
Fig. 3
Fig. 4
Fig. 5
Cleaning the Head and Cutter Assembly:
Regular cleaning is necessary in order to maintain the optimal performance and maximum
comfort from the shaver. Wipe the shaverʼs body using a damp cloth and mild soap or
detergent. To avoid damaging the shaver, do not use harsh cleansers or solvents.
①
②
③
④
*
①
②
③
Worldwide Voltage:
Recharging the Shaver:
This shaver features worldwide automatic dual voltage conversion for 100-240 volt,
50-60 Hz AC current. You can plug the power/recharging cord into an electric outlet
virtually anywhere in the world (an adapter plug may be necessary), and the shaver
will adjust automatically to the required voltage.
IS-3335 features a 5-stage LED power indicator. (figure 1)
Insure that the On/Off switch is in the “Off” position.
First, connect the power cord to the shaver and then plug it
into an electric outlet. (Figure 2)
During recharging, the LEDs will flash and then remain lit
as the unit recharges. Recharging generally takes one
hour. When fully charged, the shaver will provide
approximately one week of shaving run time.
When using the shaver for the first time or if the shaver has not been used for a
long time, charge the shaver for 16 hours.
Storing the Shaver and Power cord:
If the shaver is to remain unused for a long period of time, store the unit and power
cord in a cool, dry place. Do not wrap the cord around the unit during storage.
Avoid twisting the power cord. Be sure to unplug and untwist the cord if it becomes
twisted during use or while charging.
Fig. 2
①
②
5 Stage Power Indicator
Bottom LED Flashing - Recharging Required
LEDs Flash Sequentially and Then Lit - Shaver is Recharging
All LEDs Lit - Shaver is Fully Recharged
LEDs Light Sequentially - Shaver is Operating Normally
Fig. 1
WARNING! To avoid the risk of bursting and the subsequent release of toxic
materials, never mutilate or place the batteries in fire. To prevent acciden-
tal burns, avoid short-circuiting the batteries. Dispose of batteries in
accordance with local disposal / recycling requirements.
9 10
Ordering Replacement Parts:
Replacement parts can be ordered by referring to the separate,
inserted leaflet which lists the service centre details. Part numbers of
spare parts are listed in the table below for your reference.
Part number Description
A-3335F
Replacement Outer Foil Frame
for Model PFS-3335
A-3335FC
Replacement Outer Foil Frame
and Inner Cutters for Model
PFS-3335
Repair Service Requirements:
Technical Specifications:
If your shaver needs repair service, please refer to the leaflet
included in this manual which lists the service centre details.
Input Power (Automatic): 100-240V 50-60Hz
Output 12V dc 650 mAh
To Replace Foil Screens:
To Replace the Inner Cutters:
Skin irritation or a deterioration of shave quality typically indicate
that your foils need to be replaced. Replacement intervals will
vary with individual use and hair types.
NOTE: Always replace foil screens when replacing the inner cutters.
(Please refer to the “Ordering Replacement Parts” section)
(Please refer to the “Ordering Replacement Parts” section)
Remove the foil screen assembly by pressing the release
buttons on both sides of the shaver and lifting off the assembly
off. (Figure 1)
The Outer Foils are mounted to the Outer Foil Frame. Release
the Foil Frame from the Foil Frame Base by gently sliding a
fingernail between the side of the Foil Frame and the Foil
Frame base. (Figure 2) Inverting the Foil Base will allow the Foil
Frame to drop out. (Figure 3)
Position the replacement Outer Foils over the cutters. Be careful
not to damage the foils. Gently slide the head assembly down
until it seats firmly into place.
Remove the foil screen assembly by pressing the release buttons
on both sides of the shaver and lifting it off. (Figure 1)
Remove the inner cutters by grasping and lifting upwards.
(Figure 2)
Be sure to hold the replacement cutters firmly as you carefully
insert them into the inner cutter mounts.
Push the replacement cutters down firmly until they lock into
place.
Replace the foil screen assembly and gently slide it down until
you hear it lock into place.
IMPORTANT:
For the best shaving performance and results, we recom-
mend that you replace the shaverʼs foil screens every six months and
inner cutters at least once a year.
①
②
③
①
②
③
④
⑤
Fig. 3
Fig. 2
Fig. 2
Fig. 1
Fig. 1
Table of contents
Other Mezzo Electric Shaver manuals


