Mezzo EIR 100-2 User manual

USERS MANUAL PREMIUM STEAM IRON
Model: EIR 100-2 08/06
Premium Steam Iron
Thank you for choosing to purchase one of our MEZZO products, we appreciate your business and believe
that we have provided you with a product that is both reliable and value for money. We encourage you and
your friends to choose from our range of MEZZO products again in future.
PACKAGE CONTENTS
1 Premium Steam Iron
1 Measuring Cup
1 Instruction manual
Confirm all parts before disposing of carton.
SAFETY INSTRUCTIONS
Carefully read this manual before using this appliance. Make sure that you know how the appliance
functions and how to operate it. Maintain the appliance in accordance with the instructions to ensure that it
functions properly. Keep this manual with the appliance. If the appliance is to be used by a third party, this
instruction manual must be supplied with it. The safety instructions, by themselves, do not eliminate
danger completely, and proper accident prevention measures must always be used.
For any customer query or in the unlikely event of a product failure, please
phone or email the helpline contact details below for assistance.
DO NOT RETURN THE PRODUCT TO THE RETAILER.
Toll Free Help line: 1300 366 144
1
BEFORE INITIAL USE
Remove all packaging. Carefully wipe the outer case with a soft damp cloth and dry it afterwards with a
dry towel. Do not immerse the appliance in water or any other liquid. Check for any damage that may have
occurred during transit. Do not use if the appliance is damaged in any way or if the supply cord is
damaged. Immediately return to supplier for replacement or repair.
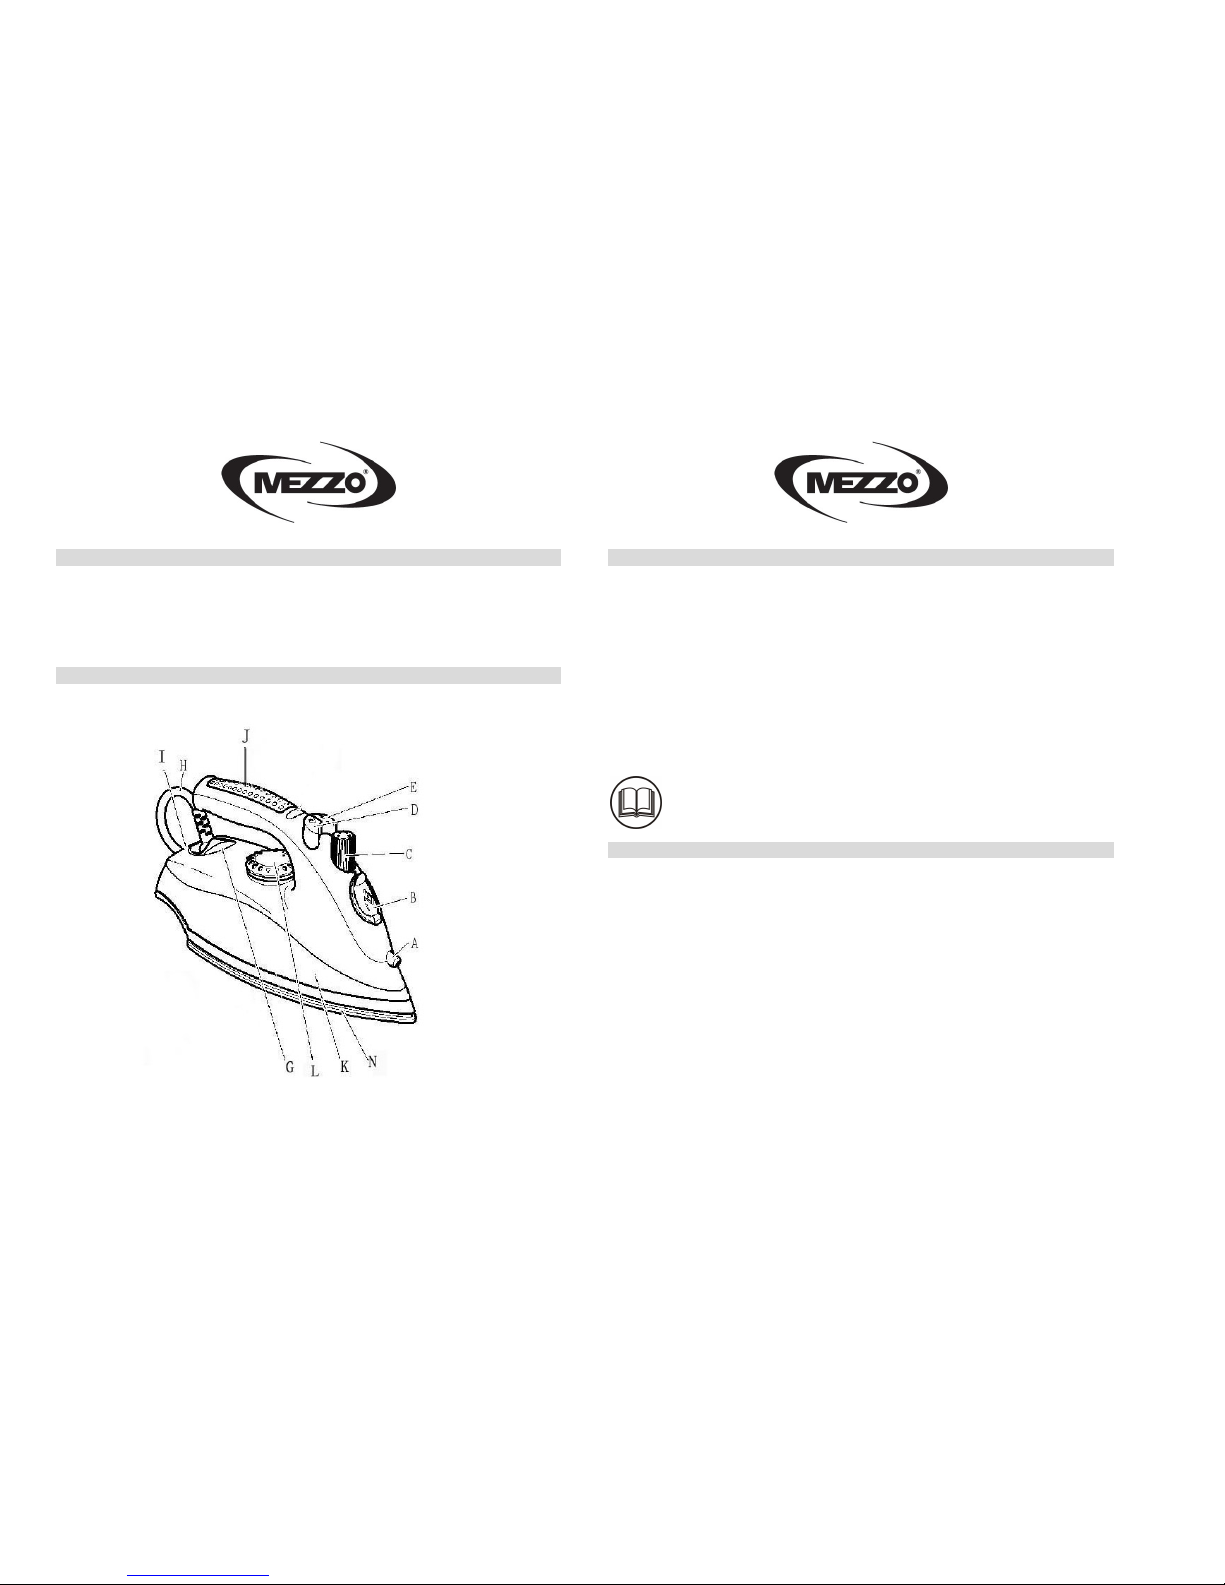
LOCATION OF CONTROLS
2
LIST OF CONTROLS AND PARTS
A. Spray Nozzle
B. Water Filling Inlet
C. Variable Steam Control
D. Steam Shot Button
E. Spray Button
G. Power Indicator Light
H. Power Cord
I. Swivelling Power Cord Protector
J. Soft Grip Handle
K. Transparent Water Tank
L. Variable Temperature Control Dial
N. Stainless Steel Soleplate
OPERATION GUIDE
This appliance has been designed for general indoor household use only. Always place iron on its heel rest
when hot or on a heat resistant surface. Disconnect from the power supply when not in use.
Features.
•
••
•Auto shut off.
If the iron has not been moved for a period of approximately 30 seconds in a horizontal position or 8
minutes in an upright position, the power will be shut off and a small warning beep sounded. An indicator
lamp is located in the soft grip handle that shows auto shut-off has activated.
•
••
•Variable steam selector switch.
The iron has the following selection options located on the variable steam control knob.
OFF (use as a dry iron) - Low Steam - Full Steam - Self Clean.
•
••
•Shot of Steam / Spray
Press ‘Spray’ button for a fine mist of water spray. Press ‘shot’ button for a burst of steam.
3
•
••
•Anti-Calcium
This iron is fitted with an anti-calcium device in the water reservoir. This helps to break down any calcium
build up from hard water. There is no user-action required for this function.
IRON USE
Before using for the first time, check if the voltage rating on the base plate corresponds to the mains
voltage in your home. Mains supply: 240V ~ 50 Hz – AC only. Unwrap the cord fully.
Remove any labels or stickers on the iron soleplate.
Sort the articles to be ironed according to the fabric. Ironing instructions are usually stitched onto an inside
seam of the garment and these should be followed at all times. Start your ironing with the fabrics requiring
the lowest heat setting. When using the iron for the first time, test on an old piece of fabric to ensure the
soleplate and water tank are completely clean.
Stand the iron on the Heel Rest, set the temperature dial to MIN and then plug in the iron to the mains
outlet. Turn your temperature control dial to the position you desire according to the following suggested
fabric indications:
Synthetics / Nylon Silk / wool Linen / cotton
Synthetic fabric should be ironed at a low temperature, while wool, cotton and linen can be ironed at a
higher temperature.
If you are unsure of the fibre content of a garment, test a small area (a seam or inside hem) before ironing.
When in doubt, start with low heat. If wrinkles remain, gradually increase heat to find the best setting for
good results without damaging the fabric.
If the article is made of a mixture of different fibres, you must select the lowest ironing temperature of the
composition of those fibres. (e.g. an article consisting of 60% polyester and 40% cotton should be ironed at
the temperature indicated for polyester.)
Some parts of the iron have been slightly greased and as a result the iron may smoke slightly when
switched on for the first time. After a short while, however, this will cease.
Allow iron to heat for 2 minutes on heel rest before ironing.
The pilot lamp glows when the iron is switched on, and goes off when the iron reaches the temperature
selected on the fabric dial. As the iron cools, the thermostat will switch back on and the iron will re-heat to
the selected temperature. The pilot lamp will glow while the iron re-heats.
The iron heats up more quickly than it cools. Allow time for the iron to heat up when changing from a low
temperature to a high temperature. Conversely, wait for a while when changing to a cooler setting.
When ironing, always keep the iron moving.
Iron with a straight back. Adjust the height of the ironing board so that the handle of the iron is on the same
level as your elbow.
Pressing down on the iron should not be necessary provided that the temperature is set correctly. Ironing is
most effective if the laundry is slightly damp.
4
Steam Ironing.
The variable steam button can be set to Off, Low Steam or Full Steam. Steaming will stop when the iron is
placed on the heel rest. Note: Water may leak from the soleplate if too low a temperature has been
selected.
Filling Water Reservoir.
Warning! The plug must be removed from the socket-outlet before the water reservoir is filled with water.
The filling aperture must not be opened during use.
Set the steam control button to the “no steam” position.
Open water inlet cover, hold the iron on an angle of approximately 45º and carefully pour water into water
inlet, periodically stopping to check the level of water in the water tank. Close the water inlet cover.
Be careful never to overfill past the “MAX” line on the water tank. Do not fill directly from a water tap.
Use the measuring cup provided or another suitable filling utensil.
Normal tap water can usually be used for ironing. However, if you live in a hard water area we
recommend using distilled water to insure optimum performance of your iron.
Self-Cleaning.
Periodically clean the iron of impurities. Fill water reservoir with clean water. Heat iron fully and set
variable steam knob to continuos setting. Water will flow thought the iron, removing any impurities left.
5
ELECTRICAL SAFETY
When using electric appliances always observe safety regulations where applicable to reduce the risk of
fire, electric shock and personal injury.
Always check that the power supply corresponds to the voltage on the rating plate.
Supply cord and plug.
Always fully unwind any cord to avoid overheating. Never allow the supply cord to come in contact with
hot objects. Do not carry the appliance by the cord or yank the cord to disconnect it from the mains supply.
Disconnect by first switching off the outlet, grasping the plug and pulling it out gently. Do not let the
supply cord hang over the edge of a table or counter.
If the supply cord is damaged, it must be replaced by the manufacturer, its service agent or a similarly
qualified person in order to avoid a hazard.
Children.
Caution. Keep out of reach of children.
This appliance is not intended for use by young children or infirm persons. Young children must be
supervised to ensure that they do not play with the appliance.
Water.
Do not immerse..
Do not immerse any part of this appliance or supply cord in water or other liquid.. Do not use with wet
hands or use in damp situations.
Handling.
Do not drop the appliance. Do not use this appliance if it has been damaged in any way, immersed in
water, the supply cord is damaged or the operation is faulty. Contact with any damaged appliance could
result in electric shock.
Unattended.
Do not leave the appliance unattended while in use. Disconnect from the power supply.
Hot surfaces.
Do not touch hot surfaces. Allow to cool completely before cleaning.
6
GENERAL SAFETY
When using electric appliances basic safety precautions should always be followed to reduce the risk of
fire, electric shock and personal injury. Read all these instructions before attempting to use the machine.
Consider the environment.
Do not use in damp or wet conditions. Do not use without adequate light. Do not use near flammable or
hazardous materials. Do not use outdoors. Do not leave unattended while connected to the power supply.
Keep children away
.
This appliance is not intended for use by young children or infirm persons without supervision. Young
children must be supervised to ensure that they do not play with it.
Damaged or dropped.
Always inspect your appliance before use. Do not use this appliance if it has been damaged, dropped, left
outdoors or dropped in water. Return it to an authorised service dealer for examination and repair. Do not
attempt to service this appliance yourself. Refer servicing to qualified service personnel.
Store in a safe place
When not in use store your appliance and all its accessories and instruction manual in a safe and dry place.
Liability.
No liability can be accepted for any damage or personal injury caused by non-compliance with these
instructions or any other improper use or mishandling. This appliance is intended for household use only.
CARE AND CLEANING
Before cleaning.
When not in use or before cleaning, always disconnect the appliance from the mains supply.
Cleaning guide.
Regularly clean the outside of the appliance with a soft damp cloth and dry it with a dry towel. Do not
immerse in water. Do not use harsh solvents to clean the plastic components.
Storage
When not in use store the appliance, accessories and these instructions in a dry place.
7

TECHNICAL SPECIFICATIONS
8
WARRANTY CARD
This product is guaranteed against faulty materials and workmanship for a period of twelve months from
the date of purchase. This warranty becomes void if the product has been tampered with, damaged by
accident, damaged in any other way by improper use or has been purchased second hand. All production
orders have quality inspections.
For any customer query or in the unlikely event of a product failure, please
phone or email the helpline contact details below for assistance.
DO NOT RETURN THE PRODUCT TO THE RETAILER.
WARRANTY FOR APPLIANCES USED COMMERCIALLY LIMITED TO 90 DAYS
Product: ____________________________________________________________________________
Toll Free Help line: 1300 366 144
Supply Voltage
Power
240V ~ AC 50 Hz
2
2
00 Watts
Table of contents
Other Mezzo Iron manuals

Popular Iron manuals by other brands

POLTI
POLTI VAPORELLA FOREVER 440 Usage instructions

Vitek
Vitek VT-1239 B Manual instruction

Philips
Philips powerlife plus GC2980 series user manual

Philips
Philips GC3920 user manual

Philips
Philips GC2860 Service manual

Black & Decker
Black & Decker First Impressions AvantSteam Pro A S3000... Use and care book


