Micca M702Z User manual
Thank you for purchasing the Micca
M702Z digital photo frame! For
questions and general support, please
email [email protected]
Main Features
Photo Slideshow Display
MP3 Music Playback
Movie/Video Playback
Calendar and clock display with alarm clock
Specifications
7-inch TFT LCD widescreen display (480×234)
Supports numerous media formats including JPG, MP3, AVI.
Play media files from SD/SDHC, MS, and MMC memory cards.
Play media files from USB drives
Convenient calendar, clock, and alarm clock functions.
Video output to TV for viewing on a bigger screen.
Button Function Description
Enter Confirmation key
Exit Return to the main menu
Stop Stop playback
Right Move cursor right or rotate photo clockwise
Left Move cursor left or rotate photo counterclockwise
Down Move cursor down or flip photo horizontally
Up Move cursor up or flip photo vertically
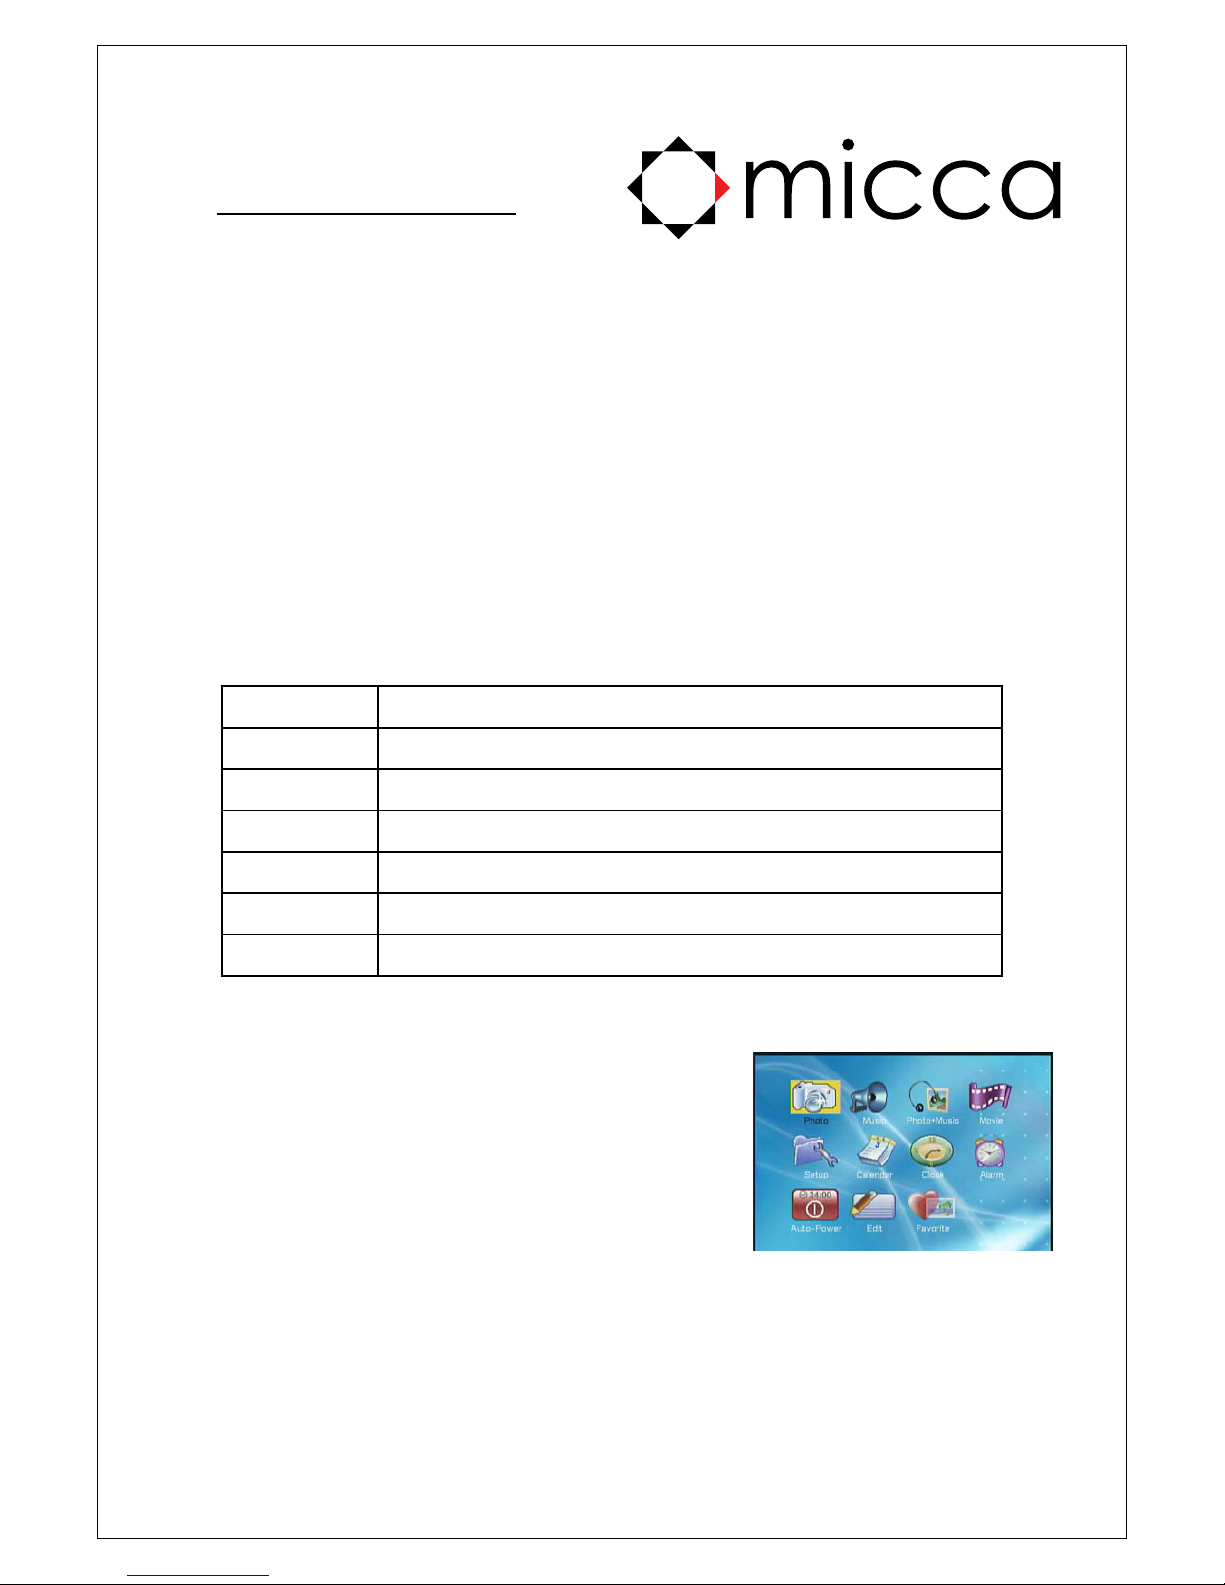
1. Powering On
1.1. The photo frame powers on automatically when
then AC power adapter is connected. After turning
on, the main menu will display. The main menu
contains icons for accessing various functions of the
photo frame. The user can use the remote or
buttons on the back of the frame to move the cursor
and press ENTER key to confirm selection.
1.2. The frame supports media playback from USB
drives or flash memory cards. When both storage types are detected, the USB drive
will be used first.
2. Settings
Highlight (Setup) in the main menu and press ENTER to access the setup menu. Pressing the
(Setup) key on the remote will also enter the setup menu.
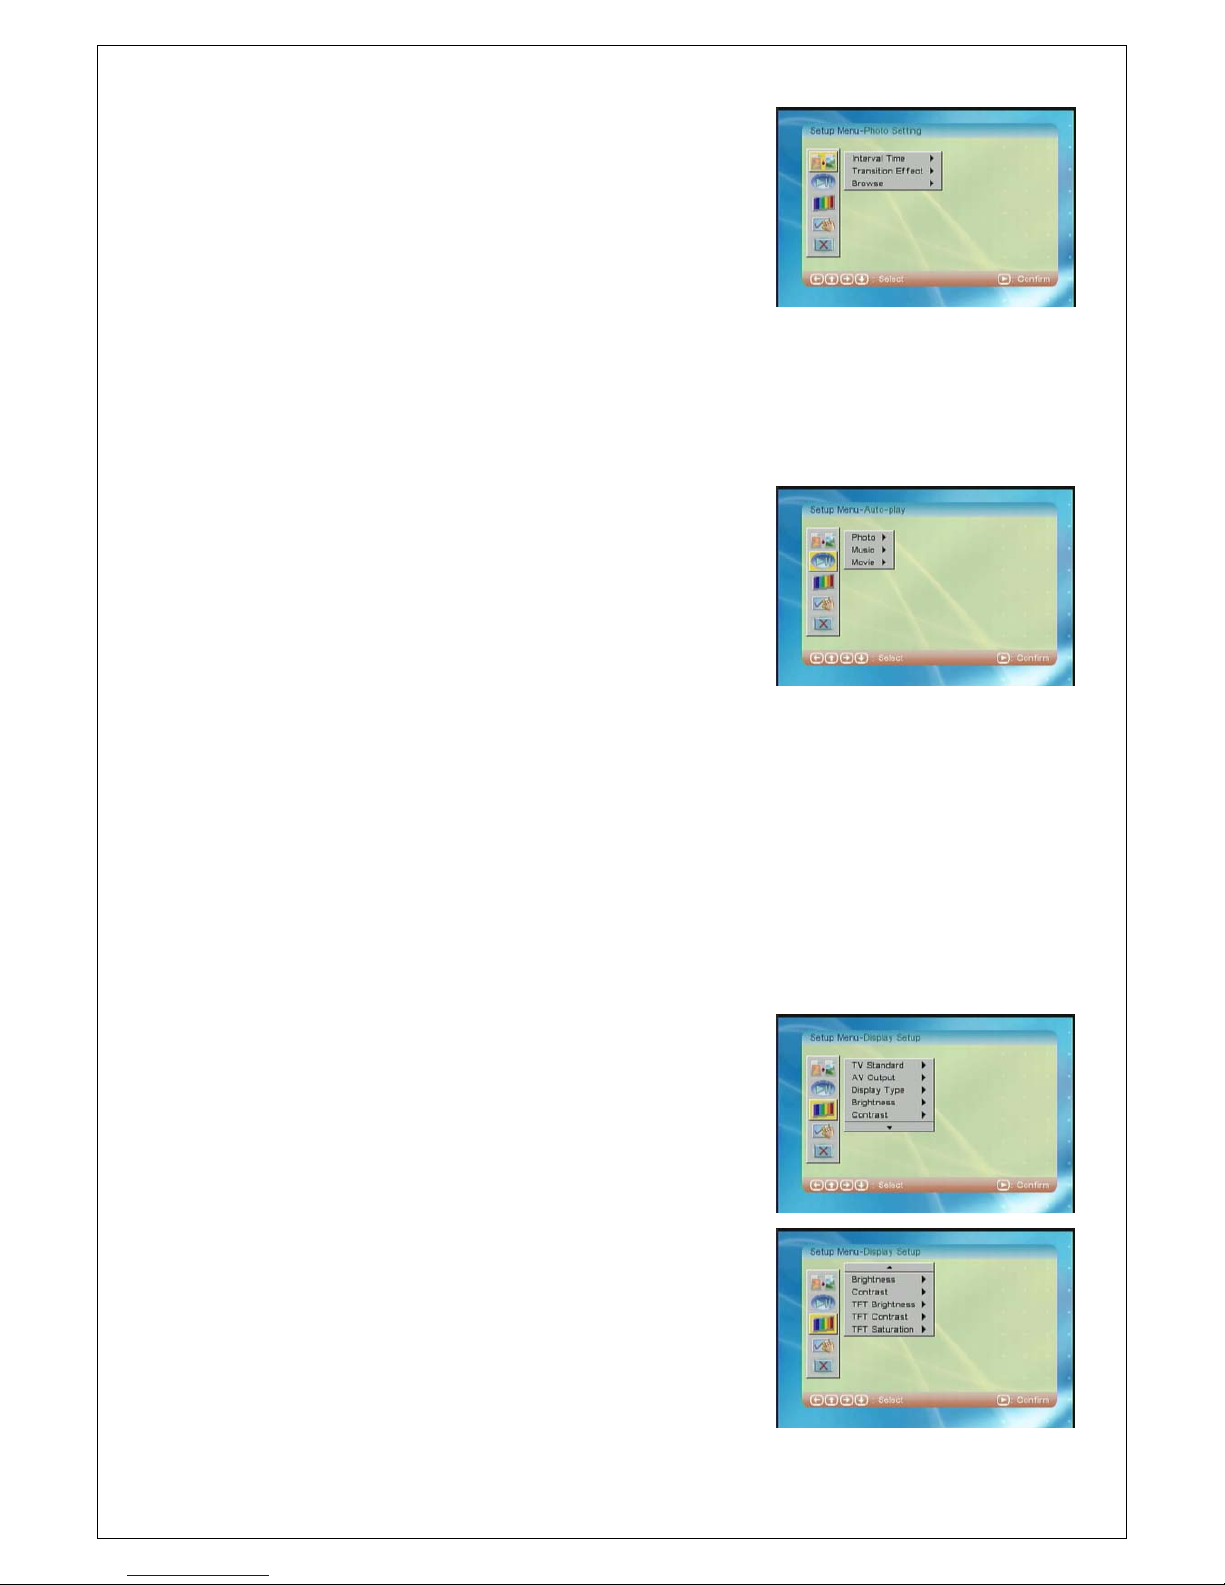
2.1. Photo Setting – Controls how photos are displayed
by the photo frame.
2.1.1. Interval Time – Sets the time delay between
photos during a slideshow. Available options are
5/10/15/30 seconds, 1/3 minutes, and OFF.
2.1.2. Transition Effect – Sets the transition effect from
one photo to the next during a slideshow. There
are approximately 30 different types of effects
and can also be turned off or set to random.
2.1.3. Browse - This setting affects how the photo is displayed when Auto-Play has
been turned off and the user selects Photo from the main menu. The two
available options are Gallery or File Manager. When set to Gallery, photos will be
displayed in a gallery format. When set to File Manager, photos will be presented
as a list of files and folders.
2.2. Auto-Play Setting – Controls automatic playback
behavior of the photo frame when the user selects
Photo, Music, or Photo from the main menu.
2.2.1. Photo – When set to On, photos found on the
storage device will automatically display as a
slideshow when user selects Photo from the
main menu. When set to Off, photos will be
displayed as a gallery or in a file manager
screen as determined by the Browse photo setting.
2.2.2. Music – When set to On, music found on the storage device will automatically
start to play when user selects Music from the main menu. When set to Off,
music will be displayed in a file manager screen but will not play.
2.2.3. Movie – When set to On, movies found on the storage device will automatically
start to play when user selects Movie from the main menu. When set to Off,
movies will be displayed in a file manager screen but will not play.
2.2.4. IMPORTANT – To enable automatic playback of photos when a USB drive or
flash card is inserted, or when the frame is turned on, set both the Photo and
Movie auto-play settings to On. To disable, set both the Photo and Movie
auto-play settings to Off.
2.3. Display Setup – Sets the display parameter for the
digital photo frame’s LCD screen or video output.
2.3.1. TV Standard – Sets the video output standard.
The available options are NTSC, PAL, or AUTO.
Choose the one that matches the external TV.
2.3.2. AV Output – When set to TV, the image will be
sent to the AV Out video connection. When set
to LCD, the image will be displayed on the photo
frame’s own screen.
2.3.3. Display Type - Sets the aspect ratio of the
display in use. When AV Out is set to LCD, the
display type should always be set to 16:9.
When AV Out is set to TV, choose a setting that
matches the external TV.
2.3.4. Brightness – Sets the brightness of the video
output signal. This affects the image quality on
both the external TV and the photo frame’s own
screen.

2.3.5. Contrast - Sets the contrast of the video output signal. This affects the image
quality on both the external TV and the photo frame’s own screen. The available
values are from -4 to 4 in 9 steps. Higher values indicate higher contrast.
2.3.6. TFT Brightness - Sets the brightness of the digital photo frame’s own LCD
screen. This does not affect the image quality on the external TV.
2.3.7. TFT Contrast - Sets the contrast of the digital photo frame’s own LCD screen.
This does not affect the image quality on the external TV.
2.3.8. TFT Saturation - Sets the saturation of the digital photo frame’s own LCD screen.
This does not affect the image quality on the external TV.
2.4. System Setting – Sets basic digital photo frame system parameters.
2.4.1. OSD Language – Sets the language for operating the digital photo frame. The
available settings include English, French, Spanish, German, Italian, Dutch,
Portuguese, and Polish.
2.4.2. Style – Sets the color scheme used by the digital
photo frame’s system menus and fonts. There
are four styles to choose from.
2.4.3. Repeat Mode - Sets the repeat mode for media
files during playback. The available options are:
Off: No repeat
One: Repeat one file only
Folder: Repeat all files in a folder
All: Repeat all files on a USB drive or flash card
2.4.4. Default – Restores all settings to their firmware default values.
2.5. Exit setting - Select the third icon in the setup menu by highlighting it with the cursor.
Press ENTER or OK return to the main menu.
3. Photo Playing
3.1. If photo auto-play has been turned on in settings,
the photo frame will automatically display photos
found on a USB drive or flash card when:
The USB drive or flash card is inserted
The photo frame turns on
User selects Photo from the main menu
3.2. If auto-play has been turned off, the photo frame will
display photos found on a USB drive or flash card in
a file manager screen. The user can then select a photo and press enter to begin
slideshow.
4. Music Playing
4.1. If music auto-play has been turned on in settings,
the photo frame will automatically display and play
music found on a USB drive or flash card when the
user selects Music from the main menu. Only MP3
files are supported for playback.
4.2. If music auto-play has not been turned on, the photo
frame will display music found, and the user can
select a file to start playing.
4.3. During playback, the following controls are available:
V+, V- to increase/decrease volume

Audio to switch between stereo, right mono, and left mono
Mute to completely mute the sound output
Playback controls to pause, stop, fast forward, rewind, and skip
4.4. Use the V+ and V- buttons to control playback volume.
5. Photo with Background Music
5.1. After choosing (Photo + Music) in the main menu, the photo frame will automatically
start displaying photo in a slideshow and play music found on a USB drive or flash
card. This behavior is fully automatic and is independent of the Auto-Play settings.
6. Movie Playing
6.1. If movie auto-play has been turned on in settings,
the photo frame will automatically display and play
movies found on a USB drive or flash card when the
user selects Movie from the main menu. Only
MPEG1/2/4 encoded AVI files files are supported for
playback.
6.2. If movie auto-play has not been turned on, the photo
frame will display movies found, and the user can
select a file to start playing.
6.3. During playback, the following controls are available:
V+, V- to increase/decrease volume
Audio to switch between stereo, right mono, and left mono
Mute to completely mute the sound output
Playback controls to pause, stop, fast forward,
rewind, and skip
7. Calendar
7.1. Selecting (Calendar) from the main menu brings up
the Calendar menu. When used for the first time,
select Set Date to set the correct date. Use the
arrow keys to set the current date and select OK to
finish.
7.2. After the date has been set, select Display to show
the calendar. While viewing the calendar display,
the following controls are available via the remote:
Left/Right – Change the year
Up/Down – Change the month
Menu – return to main menu
8. Clock
8.1. Selecting (Clock) from the main menu brings up the
Clock menu. When used for the first time, select Set
Time to set the correct time. Use the arrow keys to
set the current time and select OK to finish.
8.2. After the time has been set, select Display to show
the clock or clock and calendar. While viewing the
clock or clock and calendar display, the following
controls are available via the remote:
Menu – return to main menu
.
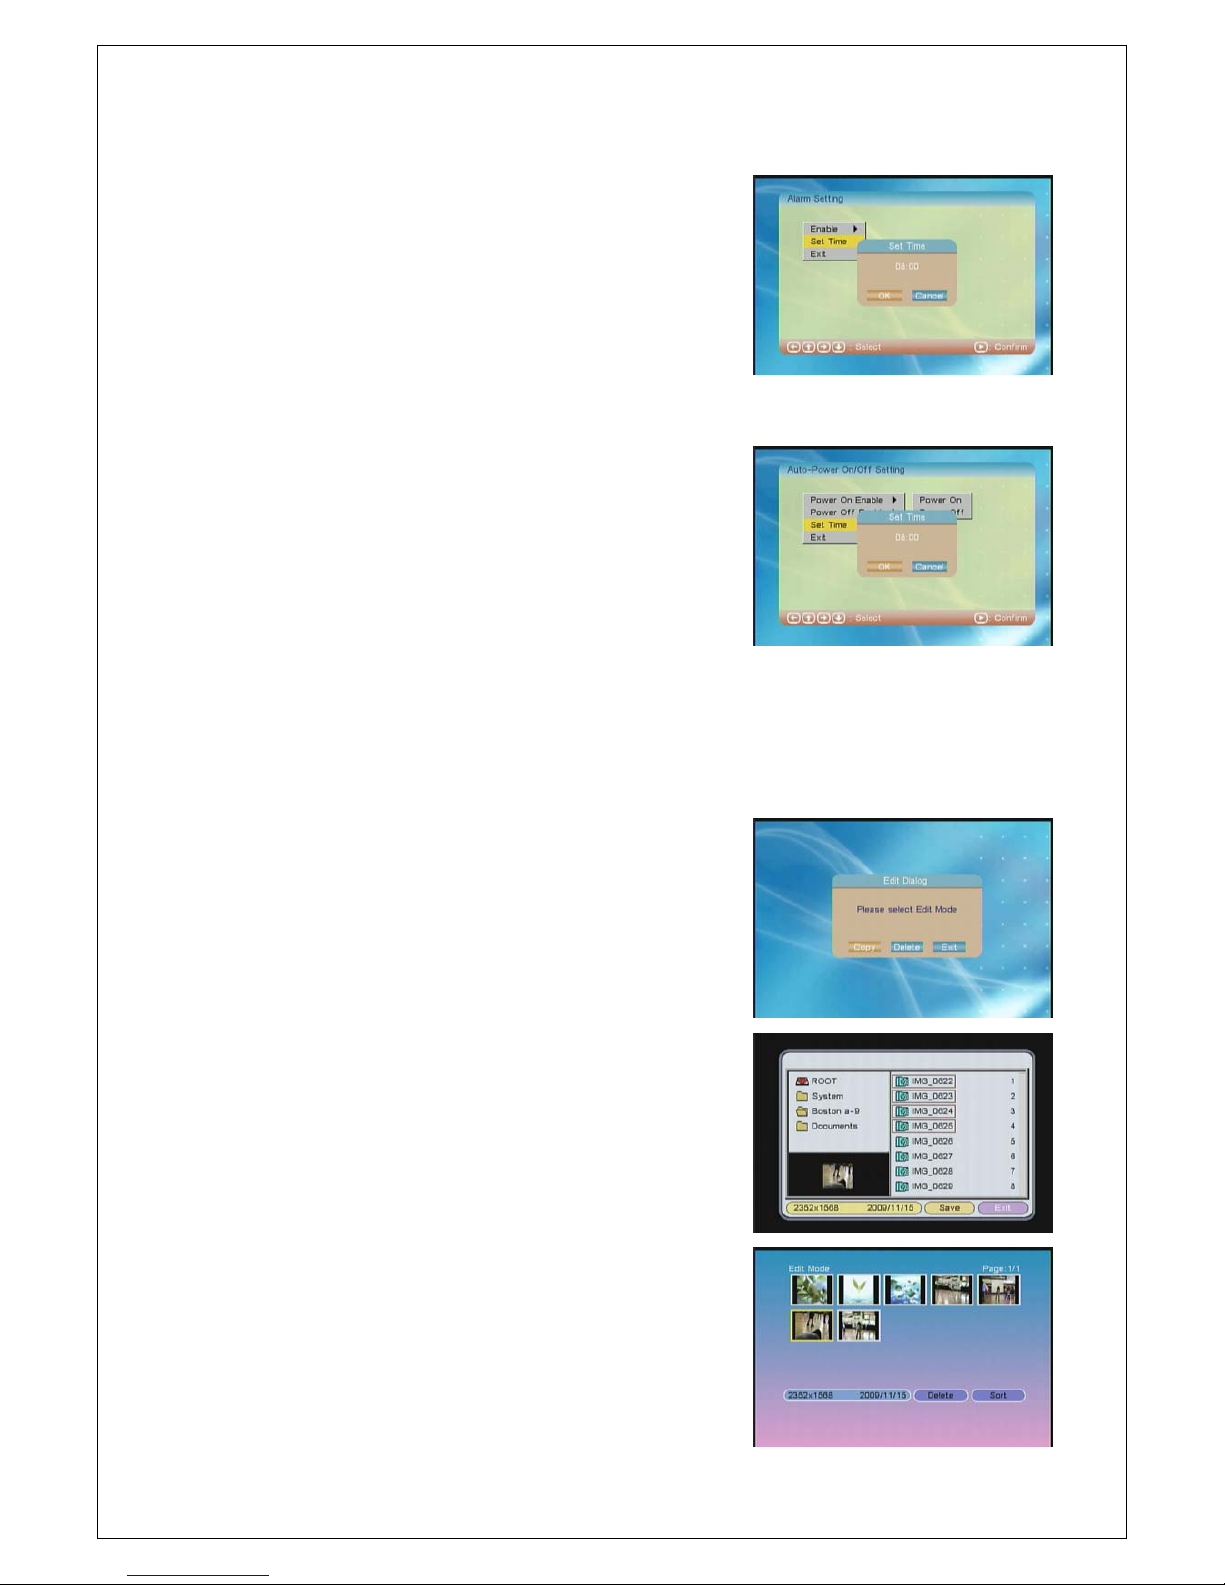
9. Alarm Clock
9.1. Select (Alarm) from the main menu to bring up the
Alarm Setting menu. When used for the first time,
select Set Time to set the desired alarm time. Use
the arrow keys to set the current time and select
OK to finish.
9.2. After the alarm time has been set, set Enable to On
or Off to enable or disable the alarm. The alarm will
function whether the frame is on or off.
10. Auto Power On/Off
10.1. Select (Auto-Power) from the main menu to bring
up the Auto-Power On/Off Setting menu. When
used for the first time, select Set Time to set the
desired Power On and Power Off time. Use the
arrow keys to set the current time and select OK
to finish.
10.2. After the alarm time has been set, set Enable for
Power On and Power Off to On or Off to enable or
disable the auto power feature.
10.3. Auto Power can be set independently for on or off to tailor to the needs of the user.
For example, only the auto power off feature can be enabled to make sure that the
frame gets turned off each day but not to automatically turn on when not needed.
11. Edit
11.1. The photo has internal memory for storing up to
15 photos internally as favorites. Select (Edit)
from the main menu to copy or delete photos
to/from the internal memory.
11.2. Copy Photo – In this function, the user can copy
photos from a USB drive or flash card into the
photo frame’s internal storage. To select a photo
for copying, highlight it and then press ENTER on
the remote; the selected photo will show a red
outline border. To deselect a photo, highlight it
and press ENTER on the remote. After selecting
files to be copied, highlight (Save) and press
ENTER on the remote to initiate copying.
11.3. Delete Photo - In this function, the user can
delete photos from the photo frame’s internal
storage. Photos are always deleted from the end
of the gallery, where each press of the ENTER
button on the remote with (Delete) highlighted
deletes the last photo in the gallery. To control
which photos get deleted, use the sort function to
rearrange the order of the photos in the internal
storage so that the photos to be deleted are at the
end of the gallery.
Troubleshooting
The digital frame
will not turn on
The power adapter isn’t plugged in correctly, please plug in the
power adapter, and make sure the connection of the power adapter
is secure.
The Main Menu
displays but nothing
else happens
Check for the following faults:
The USB drive or flash card isn’t inserted in correctly.
There are no compatible files found
For flash cards, the contacts should be towards the front
Make sure there is at least one photo, music or video file in
the USB drive or flash card
Compatible photo format: JPG
Compatible music format: MP3
Compatible video format: MPEG1/2/4 encoded AVI files.
The photo frame
does not display
photos when
“Photo” is selected
from the main menu
Check for the following faults:
There are no photos on the USB drive or flash card
Make sure there is at least one photo in storage card.
Compatible format of photo: JPG
Notice: the photo frame only supports JPG format, it does
not support TIFF, BMP, GIF.
There is no video on
television output or
the video is
abnormal
Make sure the connection of “AV OUT” video output cable is
correct.
Make sure the photo frame’s AV Output setting has been set
to TV and not LCD. The user can also press the AV button
on the remote.
Make sure the TV Standard setting (NTSC/PAL) is
compatible with the TV.
Small video or
photo size on
screen
The photo frame does not upscale photos or videos that are smaller
than its native resolution. When a photo or video shows up smaller
than the frame’s screen, it’s typically because its resolution is too
low.
Dark border on the
side or above/below
the photo
This is normal because different digital cameras use different
aspect ratio or pixels when taking photos, and not all of them will fit
neatly into the photo frame’s 16:9 aspect ratio. When this happens,
a black boarder on the sides or above/below the photo will be
visible.
Table of contents
Other Micca Digital Photo Frame manuals


