Micca Slim User manual
Copyright © 2009-2010 Micca, LLC. All rights reserved.
Micca Slim User’s Manual
V1.1 – Firmware v2009-08-11
Copyright © 2009-2010 Micca, LLC. All rights reserved.
This manual may not be reproduced in whole or in part
without permission for any purpose other than personal use.

Copyright © 2009-2010 Micca, LLC. All rights reserved.
IMPORTANT! – PLEASE READ!
Cooling
The Micca Slim is a passively cooled device, please read the following
recommendations to ensure optimal performance and reliability.
Use the Micca Slim on an open smooth surface with good ventilation such as:
Home: Desks, tables, counters, open shelves
Car: Console surface, uncovered trays or bins
DO NOT use the Micca Slim in enclosed spaces or on fibrous surfaces
such as:
Home: Enclosed shelves, drawers, boxes, carpet, towel, bedding
Car: Glove compartments, covered trays or bins, pockets, bags
Improper cooling during use can lead to overheat conditions and may cause poor
playback performance such as freezing or skipping. Prolonged overheating of the
player may also shorten the life of the Micca Slim and the internal hard disk drive.
Hard Disk Drive Selection
Newer generation 5400RPM SATA hard disk drives are strongly recommended
over older drives or 7200RPM drives. Modern 5400RPM SATA drives use far
less power and thus generate less heat and offer more than enough performance
for use with the Micca Slim.

Copyright © 2009-2010 Micca, LLC. All rights reserved.
IMPORTANT!
For your personal safety, please read the following instructions carefully.
To reduce the risk of fire, electrical shock or damage to the player, do not
expose this device to humidity, rain, sand or excessive heat (caused by
heating equipment or direct sunlight).
Use the player in a well ventilated environment to ensure proper cooling.
Do not open the player beyond which is required to install the internal hard
disk drive, as there is risk of electric shock. Contact a professional for repair.
Please follow the instructions enclosed with the player for key operation and
maintenance.
Usage Notice
Before plugging in this device, make sure your power supply voltage matches
the product. The working voltage of this player is marked on the AC power
adapter. Only use the AC power adapter that is supplied with this device.
Do not touch the socket with a wet hand.
Turn off the power when the device will not be used.
Do not place heavy objects on top of the player.
Do not use strong solvents to clean the surface of the player such as alcohol,
benzene, or thinner.

Copyright © 2009-2010 Micca, LLC. All rights reserved.
I. General Introduction
Thank you for purchasing a Micca product.
The Micca Slim is a standalone portable HDD media player. It is capable of
playing digital videos, music and pictures stored on the internal hard drive. It is
also capable of playing digital videos, music, and pictures stored on
SD/SDHC/MMS flash cards, as well as USB 2.0 compliant storage devices such
as USB drives, or portable hard disk drives. The Micca Slim supports a wide
range of media file formats, allowing its users to enjoy digital contents on the go
or in the comfort of his or her living room.
One Device to Store All Your Media Files
The Micca Slim is ideal as the central storage for your media files. With playback
quality as good as that of a computer, you will never need to spend time copying
large files back and forth between computers. Just take the Micca Slim to
wherever you may have a TV or monitor and enjoy!
Perfect For Travel
The Micca Slim is your perfect travel companion. Take your media files with you
on a business trip and playback wherever you can find a TV or computer monitor,
from showing customers a product showcase video, to catching up on missed
shows the comfort of your hotel room. Take the Slim along on a road trip and
you’ll never run out of videos to play back to the kids.
Maximum Versatility
The Micca Slim is also a portable hard disk drive enclosure. Simply install any
SATA 2.5-inch HDD and connect it to your computer’s USB port and read/write to
it as you please. Choose your own storage space, whether it’s a 40GB drive left
over from an upgrade, or a new 500GB drive. The Slim is only slightly larger
than a regular portable hard drive – so if you are going to carry a portable hard
drive, why not carry one that can also play back the media files stored on it.
Copyright © 2009-2010 Micca, LLC. All rights reserved.
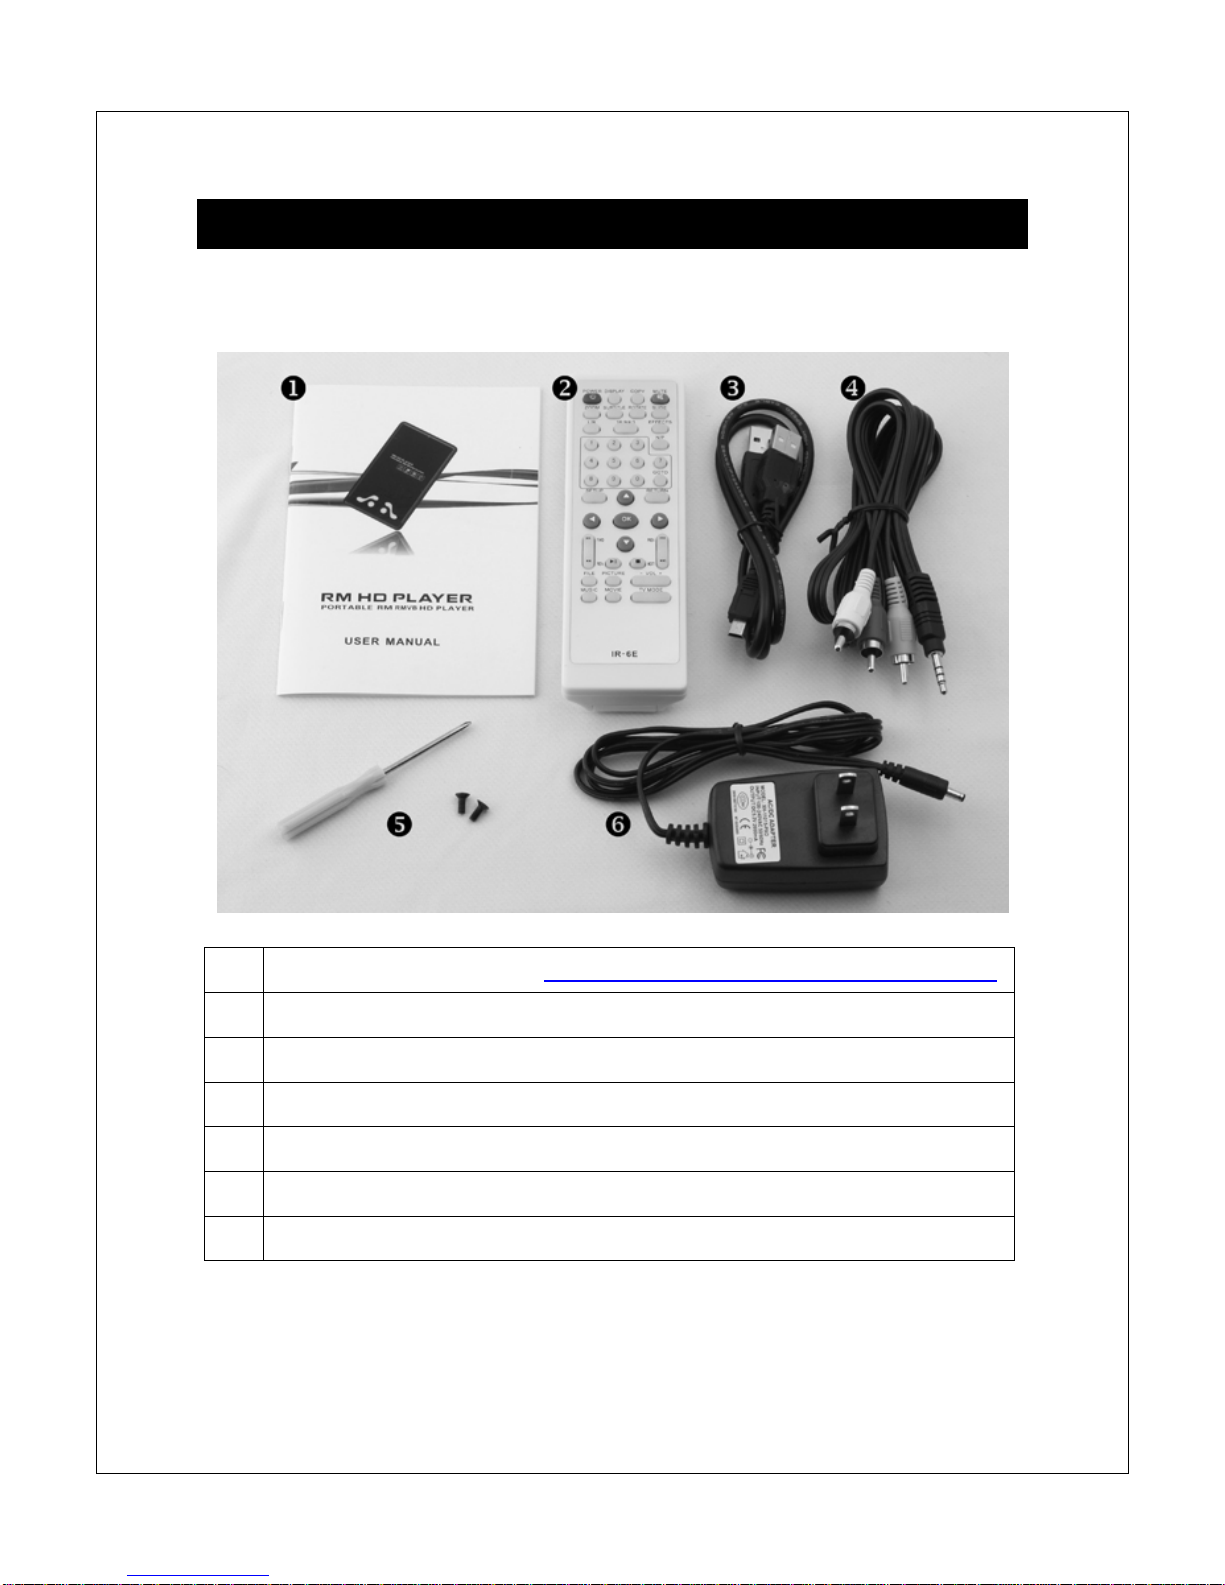
II. Item Check List
Before starting, check that the following items have been included with your
Micca Slim. If anything is missing, contact your retailer.
1 User’s Manual (Optional) – Download the latest User’s Manual from Micca
2 IR Remote Control
3 USB Data Cable
4 3.5mm to 3 RCA AV Output Cable
5 Installation Screws and Mini Screw Driver
6 5.0VDC AC Wall Adapter
7 HDMI Cable (Optional, not pictured)
Copyright © 2009-2010 Micca, LLC. All rights reserved.
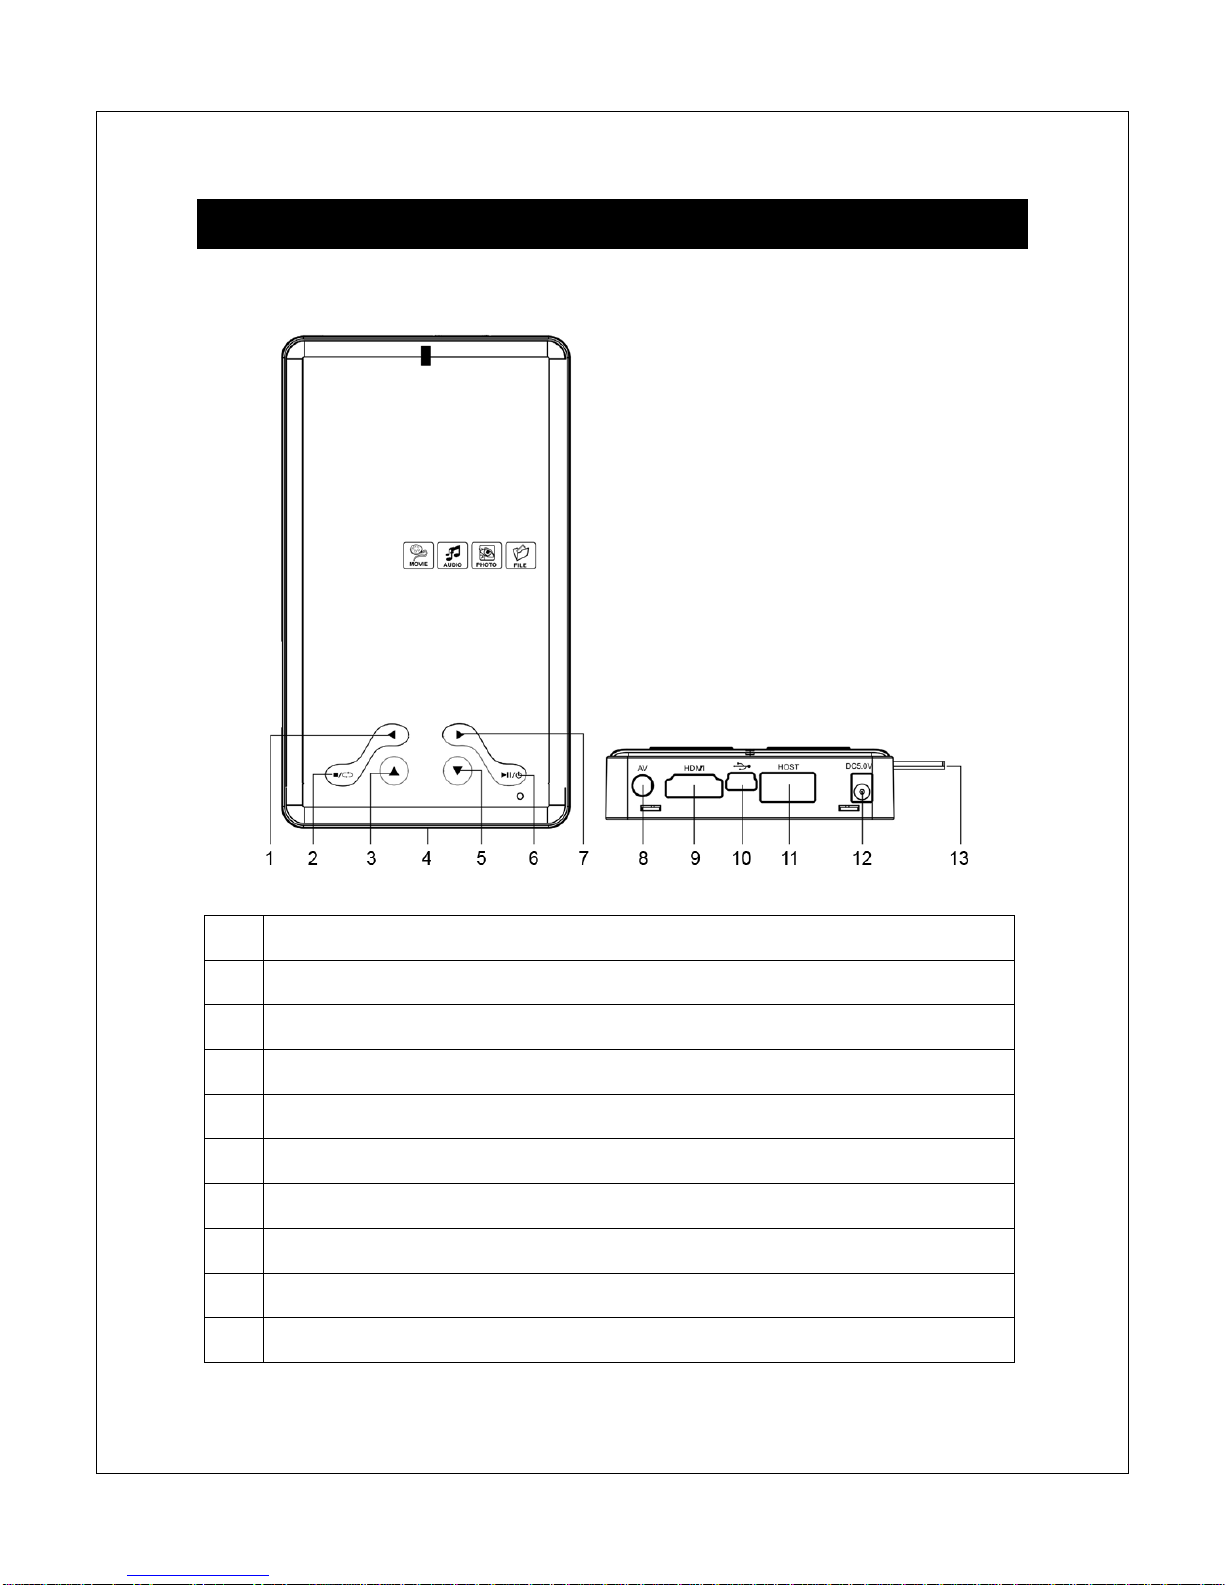
III. Physical Layout
A. The Micca Slim Player
1 Left Button
2 Stop/Return Button
3 Up Button
4 IR Remote Receiver
5 Down Button
6 Right Button
7 Play/Pause and Power On/Off Button
8 AV Out: Analog Audio and Video Output
9 HDMI: Digital Audio and Video Output
10 USB 2.0 Connector (to computer)
Copyright © 2009-2010 Micca, LLC. All rights reserved.
11 USB 2.0 Host Connector (for attaching USB storage devices)
12 5V DC Power Jack
13 SD/SDHC/MMS Card Reader
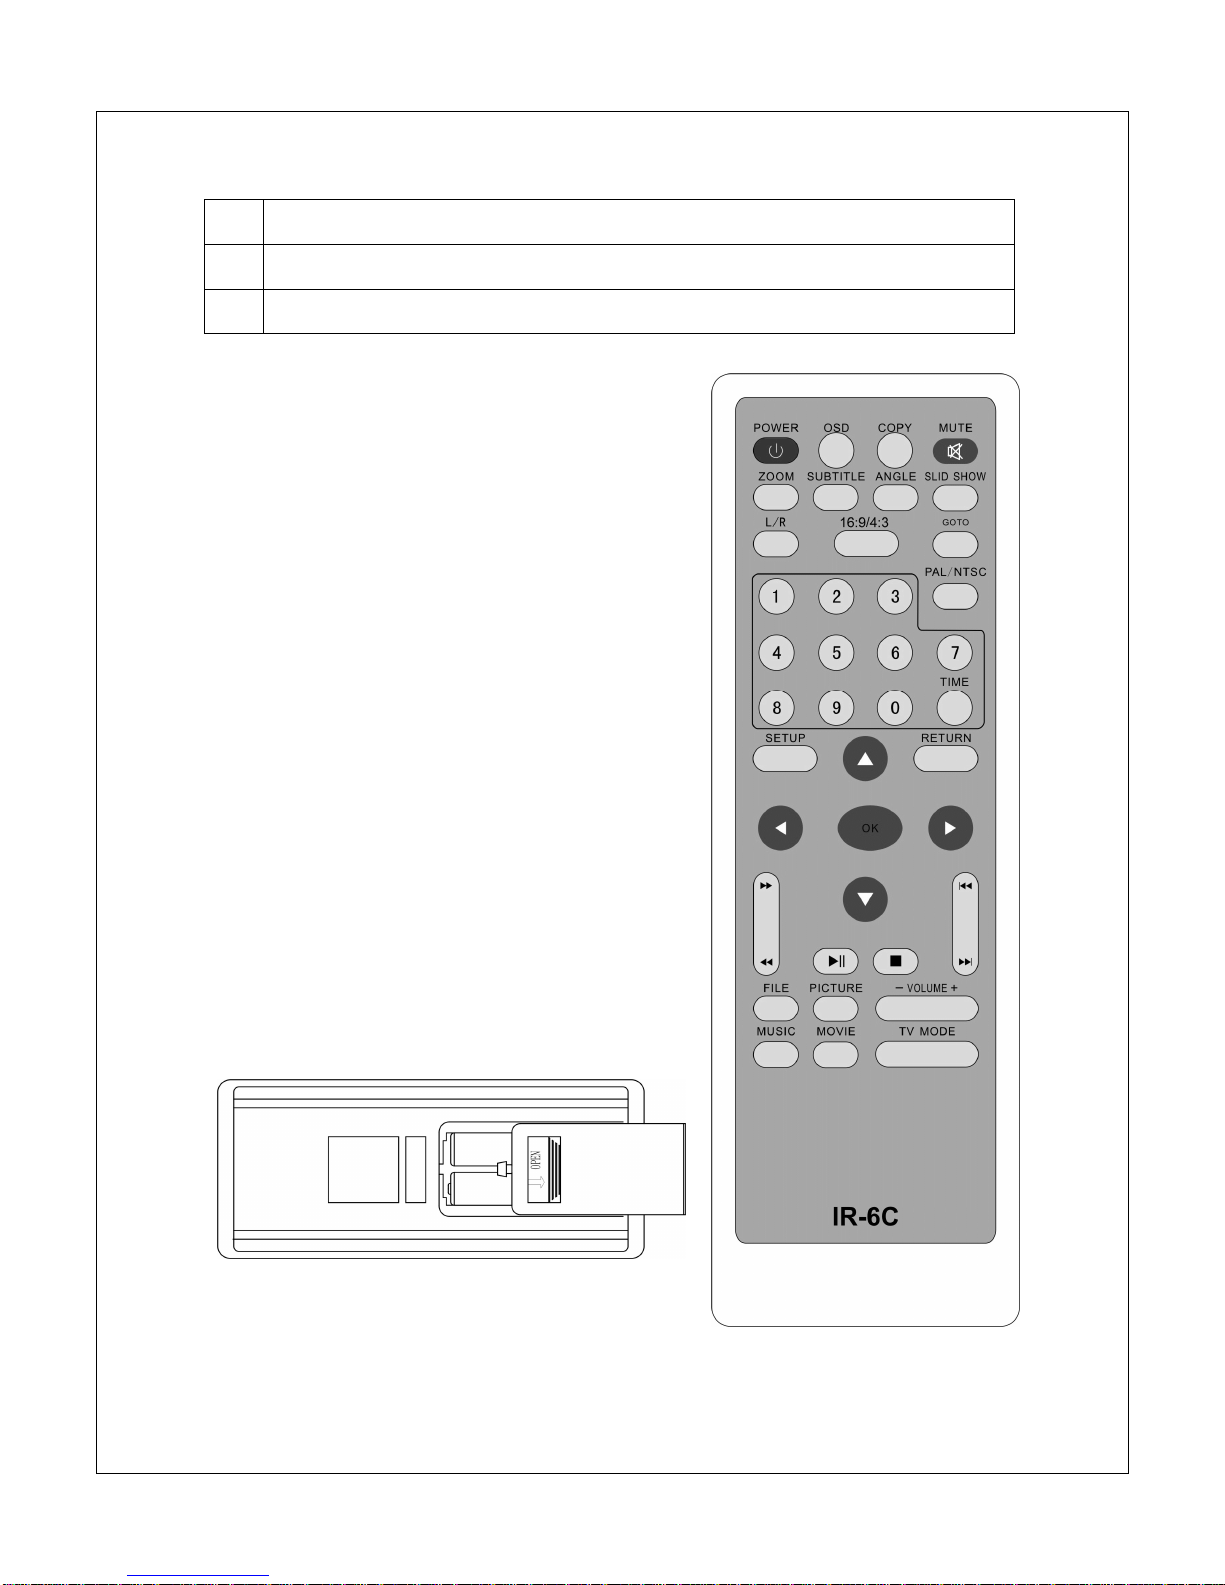
B. IR Remote Control
The Micca Slim is equipped with an IR remote
control. While the player’s built-in buttons can
be used to navigate and select files for playback,
the remote control is designed to provide more
comprehensive access to all of the player’s
features and functions.
Buttons on the remote control are laid out in a
logical and familiar manner. The specific
function of each button will be described in the
relevant sections in which they are used.
The remote control requires two AAA (LR03,
24A) sized batteries for operation. To install
batteries, slide open the battery compartment
cover on the back of the remote. Ensure that
batteries are inserted in the correct polarity as
indicated in the battery compartment.
When not planning to use the remote for a long
Copyright © 2009-2010 Micca, LLC. All rights reserved.
period, remove the batteries from the remote to prevent damage from potential
battery leakage.
Do not mix batteries of different types as this may lead to
damage to the batteries and remote, and injury to the user.
The remote is most effective when used within 20ft of the Micca Slim player, and
within a 60-degree angle with respect to the IR remote sensor on the player.
Strong ambient lighting may degrade the effective range and angle of the remote.
Batteries typically last for 1 year with normal use. If the batteries become too
weak, the remote’s effective range will be decreased dramatically and its
operation may become intermittent. When this happens, replace the batteries.

Copyright © 2009-2010 Micca, LLC. All rights reserved.
IV. Hard Disk Drive Installation
The Micca Slim has an integrated Serial ATA hard disk drive interface that is
compatible with all SATA 1.5/3/I/II 2.5-inch internal hard disk drives. Proper hard
disk drive installation is critical the player’s proper and reliable function.
Without a hard disk drive installed, the Micca Slim can still be
used to play media files from the card reader or USB devices.
Step 1: Remove the two side screws if present and
carefully pry open the bottom cover.
Step 2: Insert a 2.5-inch SATA hard disk drive into
the drive bay. Lay the drive down flat but do not yet
engage the SATA connector.
Step 3: With the hard disk drive laying flat in the
drive bay, slide the hard drive towards the SATA
connector to make the connection.
Step 4: Replace the bottom cover and make sure
that it is completely seated. Install the two side
screws as the final step of assembly.

Copyright © 2009-2010 Micca, LLC. All rights reserved.
V.Connecting the Micca Slim
A. Power
Only use the supplied AC power adapter to provide 5.0VDC power to the Micca
Slim. Using a different power adapter may damage the player. Do not cut off
power to the device while the unit is turned on as this may cause serious damage
to the hard drive and result in data loss. Make sure that the player is in standby
mode before disconnecting power. The player consumes a small amount of
power in standby mode and should be disconnected from power to conserve
energy if not planned to use for a while.
B. USB to Computer
The supplied USB cable can be used to connect the Micca Slim to a computer
and function as an external hard disk drive. No additional software or drivers are
needed for the Micca Slim to be recognized by the computer. Once connected,
files can be copied to and from the Micca Slim as desired using the standard file
management functions of the computer’s operating system.
The Micca Slim will draw power through the USB cable when
connected to the computer and does not need 5.0VDC power.
If the hard disk drive is new, it will need to be partitioned and formatted before it
can be recognized and used by the computer. For directions on how to partition
and format a new hard disk drive within Windows XP/2000, please refer to the
following Microsoft tutorial: http://support.microsoft.com/kb/309000
The process is very similar for Windows Vista/7. The Micca Slim is able to
recognize up to 4 FAT32/NTFS partitions on the hard drive. NTFS partitions are
strongly recommended for maximum efficiency, performance, and compatibility
with large media files.
To prevent data loss and potential hard disk drive damage, do not disconnect the
Micca Slim from the computer until all file copy/move/delete activities have
completed and the blue status light is solid and not blinking.

Copyright © 2009-2010 Micca, LLC. All rights reserved.
C. Analog AV Output
The Micca Slim can be connected to analog TVs and display devices through its
AV Out connector. Only use the supplied 3.5mm-to-RCA cable to ensure correct
signal polarity and avoid damage to the player and TV/display.
The RCA cable connectors are color coded to match the AV input on TVs and
display devices as follows:
Red Right Audio Channel
White Left Audio Channel
Yellow Composite Video
The Micca Slim must be set to NTSC or PAL Composite mode for the analog AV
output to function. If there is no picture displayed after connecting the AV Output
and turning on the Micca Slim, press the <Setup> button on the remote and then
press the <TV Mode> button to switch between output modes until the correct
mode has been selected. There will be a short delay when switching output
modes so please wait a few seconds between presses of the <TV Mode> button.
Copyright © 2009-2010 Micca, LLC. All rights reserved.
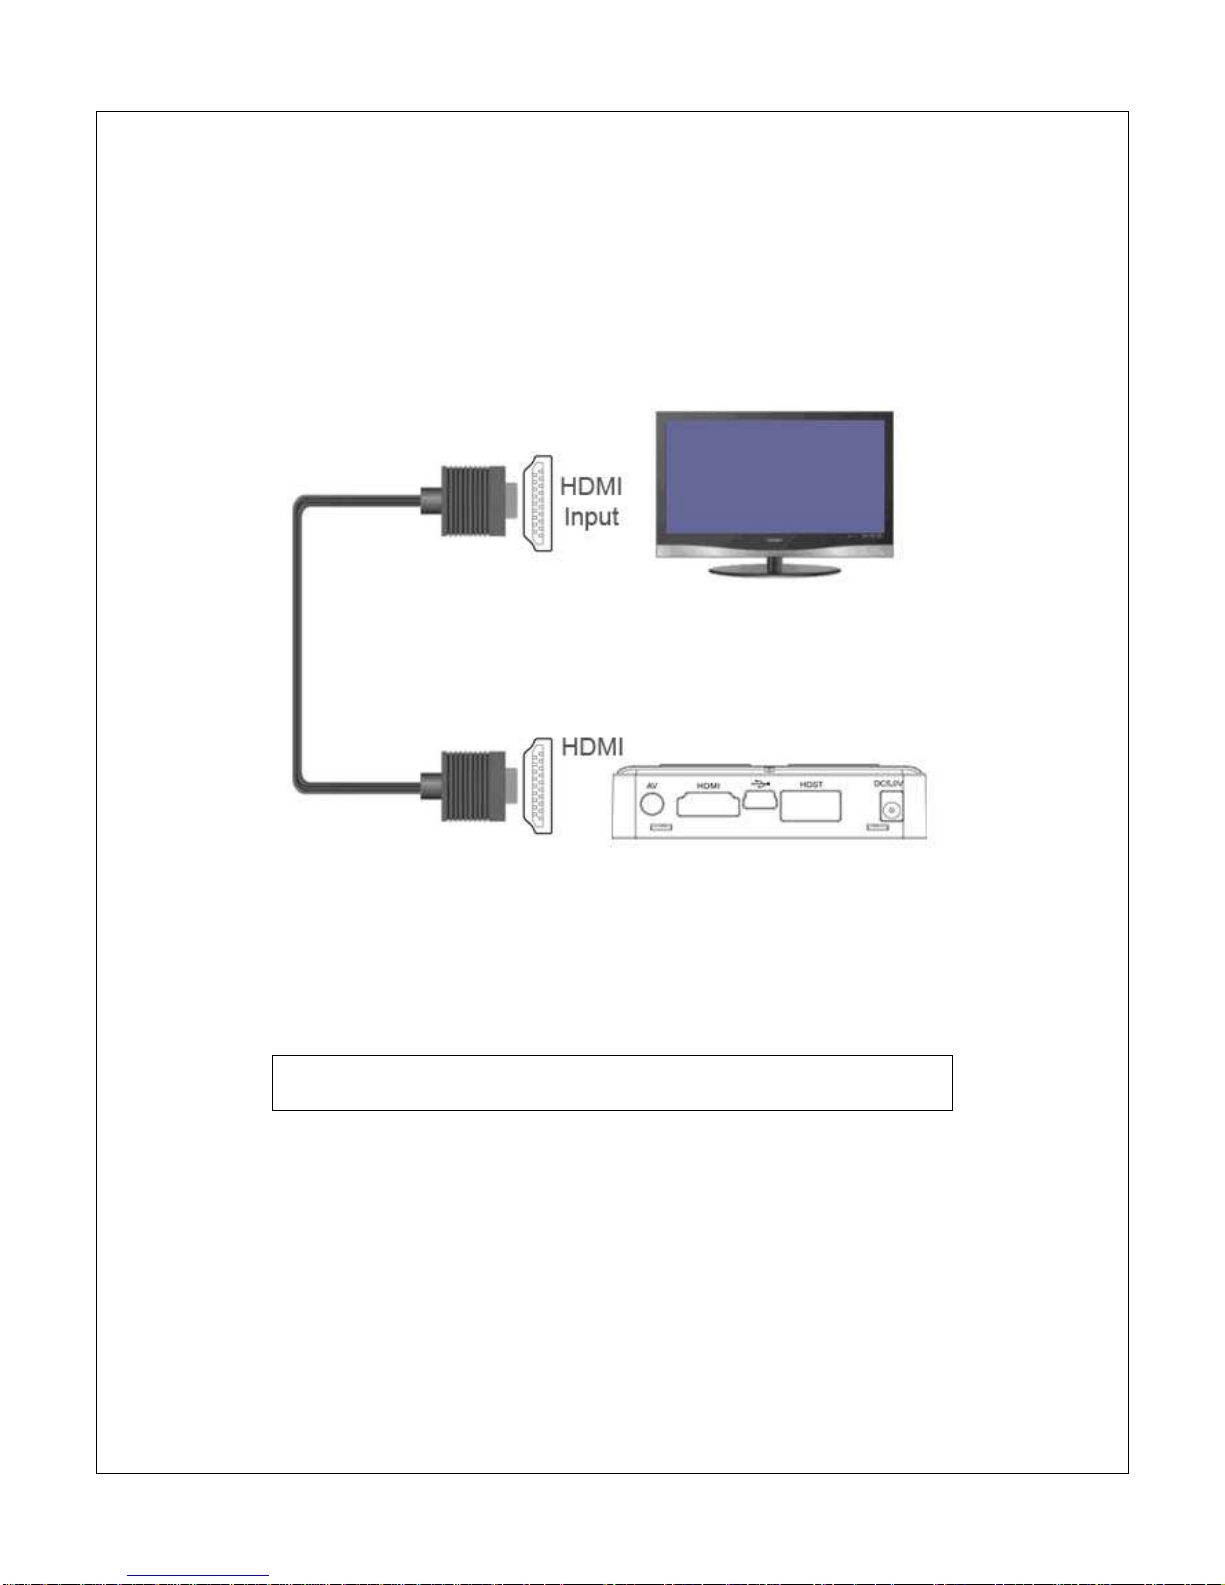
D. HDMI Output
The Micca Slim can be connected to digital HDTVs and display devices such as
computer monitors through its HDMI connector. Only use HDMI cables that have
been certified to be v1.3a or higher to ensure signal quality. The Micca Slim’s
HDMI output resolution is fixed at 1280x720p.
The HDMI connection carries both audio and video signals on the same cable so
no separate audio connection is needed when the TV or display device supports
receiving audio signals over its HDMI input. If the display device does not
support audio over HDMI, audio output from the AV Out connection can be used.
Use a HDMI-to-DVI adapter (not included) when connecting the
Micca Slim to a computer monitor without HDMI input.
The Micca Slim must be set to HD Mode for the HDMI connection to output a
correct signal. If the picture looks distorted after connecting the HDMI and turning
on the Micca Slim, press the <Setup> button on the remote and then press the
<TV Mode> button to switch between output modes until the correct mode has
been selected. There will be a short delay when switching output modes so
please wait a few seconds between presses of the <TV Mode> button.
Copyright © 2009-2010 Micca, LLC. All rights reserved.
VI. Micca Slim Startup
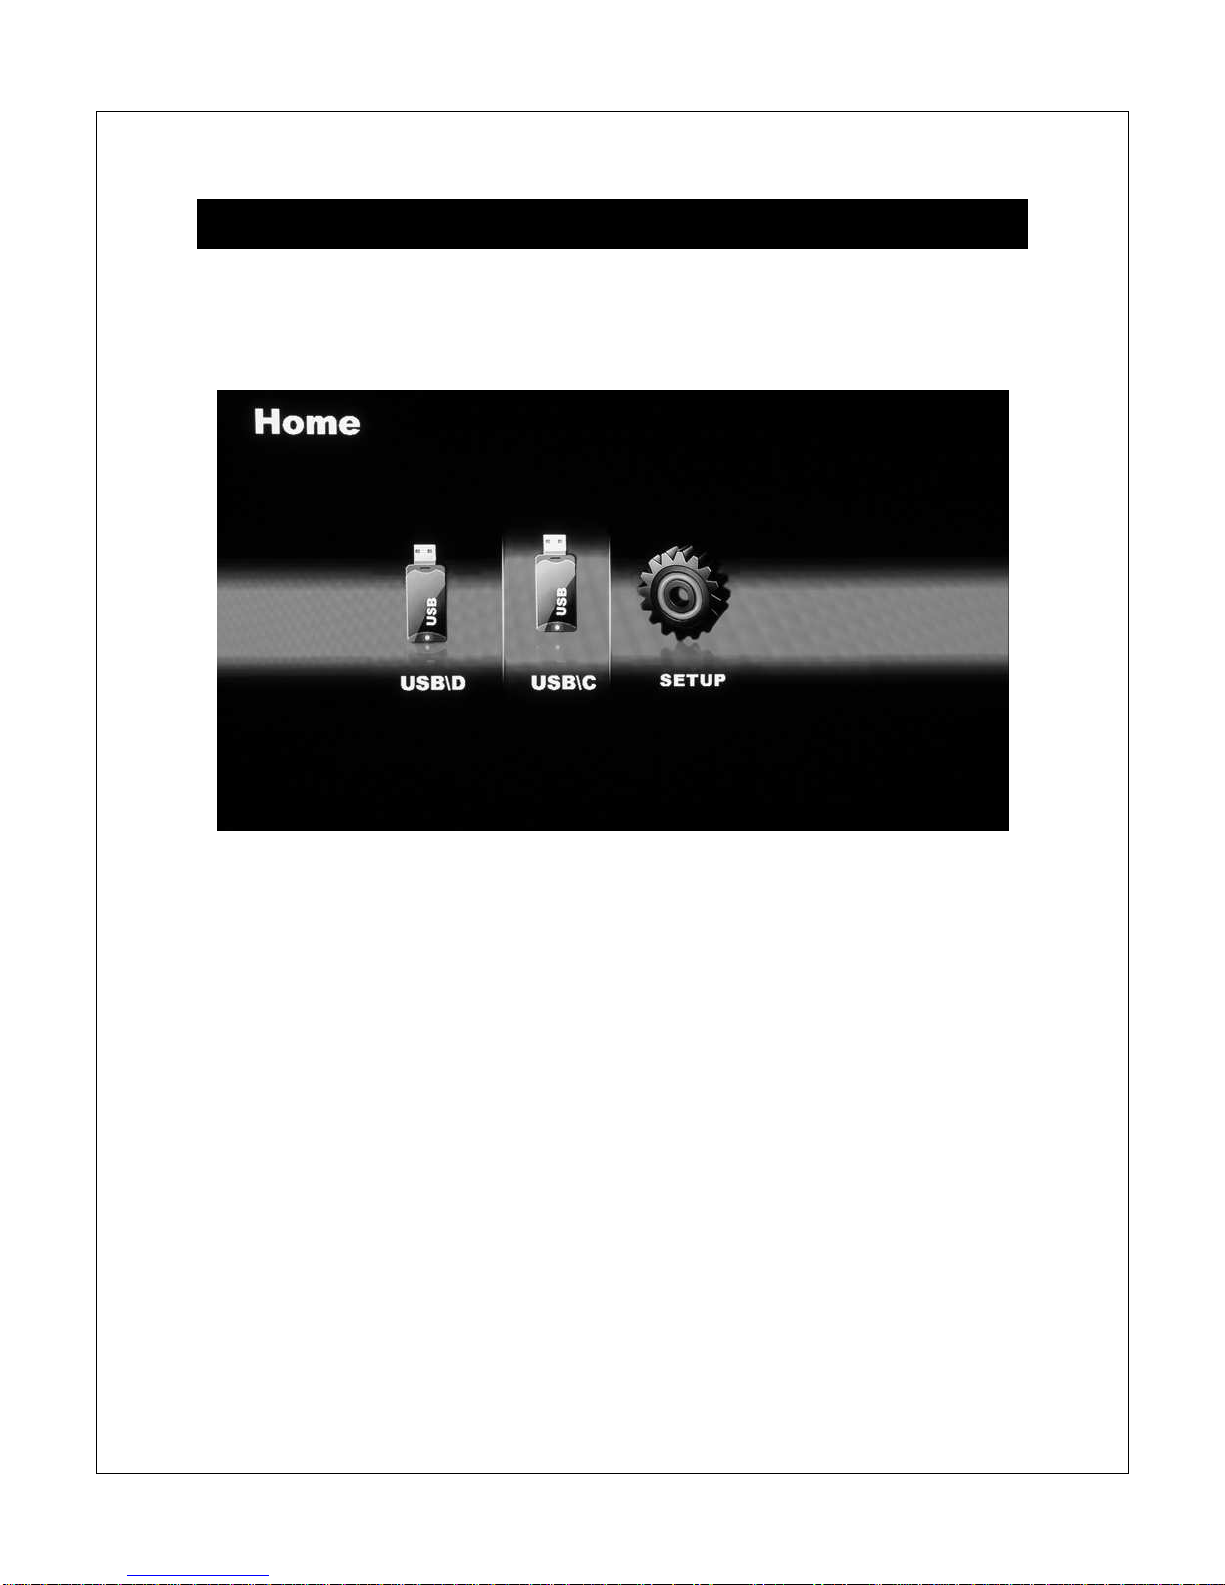
When powered on, the Micca Slim displays a brief loading screen and then the
[Home] screen. By default the [Home] screen will have the [Setup] icon plus
icons representing compatible storage devices found during start up.
During start up the Micca Slim configures attached storage devices in the
following order: external USB drive, SD card, internal hard disk drive. The
storage device icons on the [Home] screen are arranged in this same order. The
internal hard disk drive, if installed and properly partitioned and formatted, will be
represented by a [USB] icon.
It is possible to remove and insert external USB devices or SD cards with the
Micca Slim powered on. Displayed storage device icons will adjust automatically.
Use the <
>and <
>buttons on the remote to highlight a storage device and
press the <OK> button to select it and bring up the [Select Media] screen.
Copyright © 2009-2010 Micca, LLC. All rights reserved.
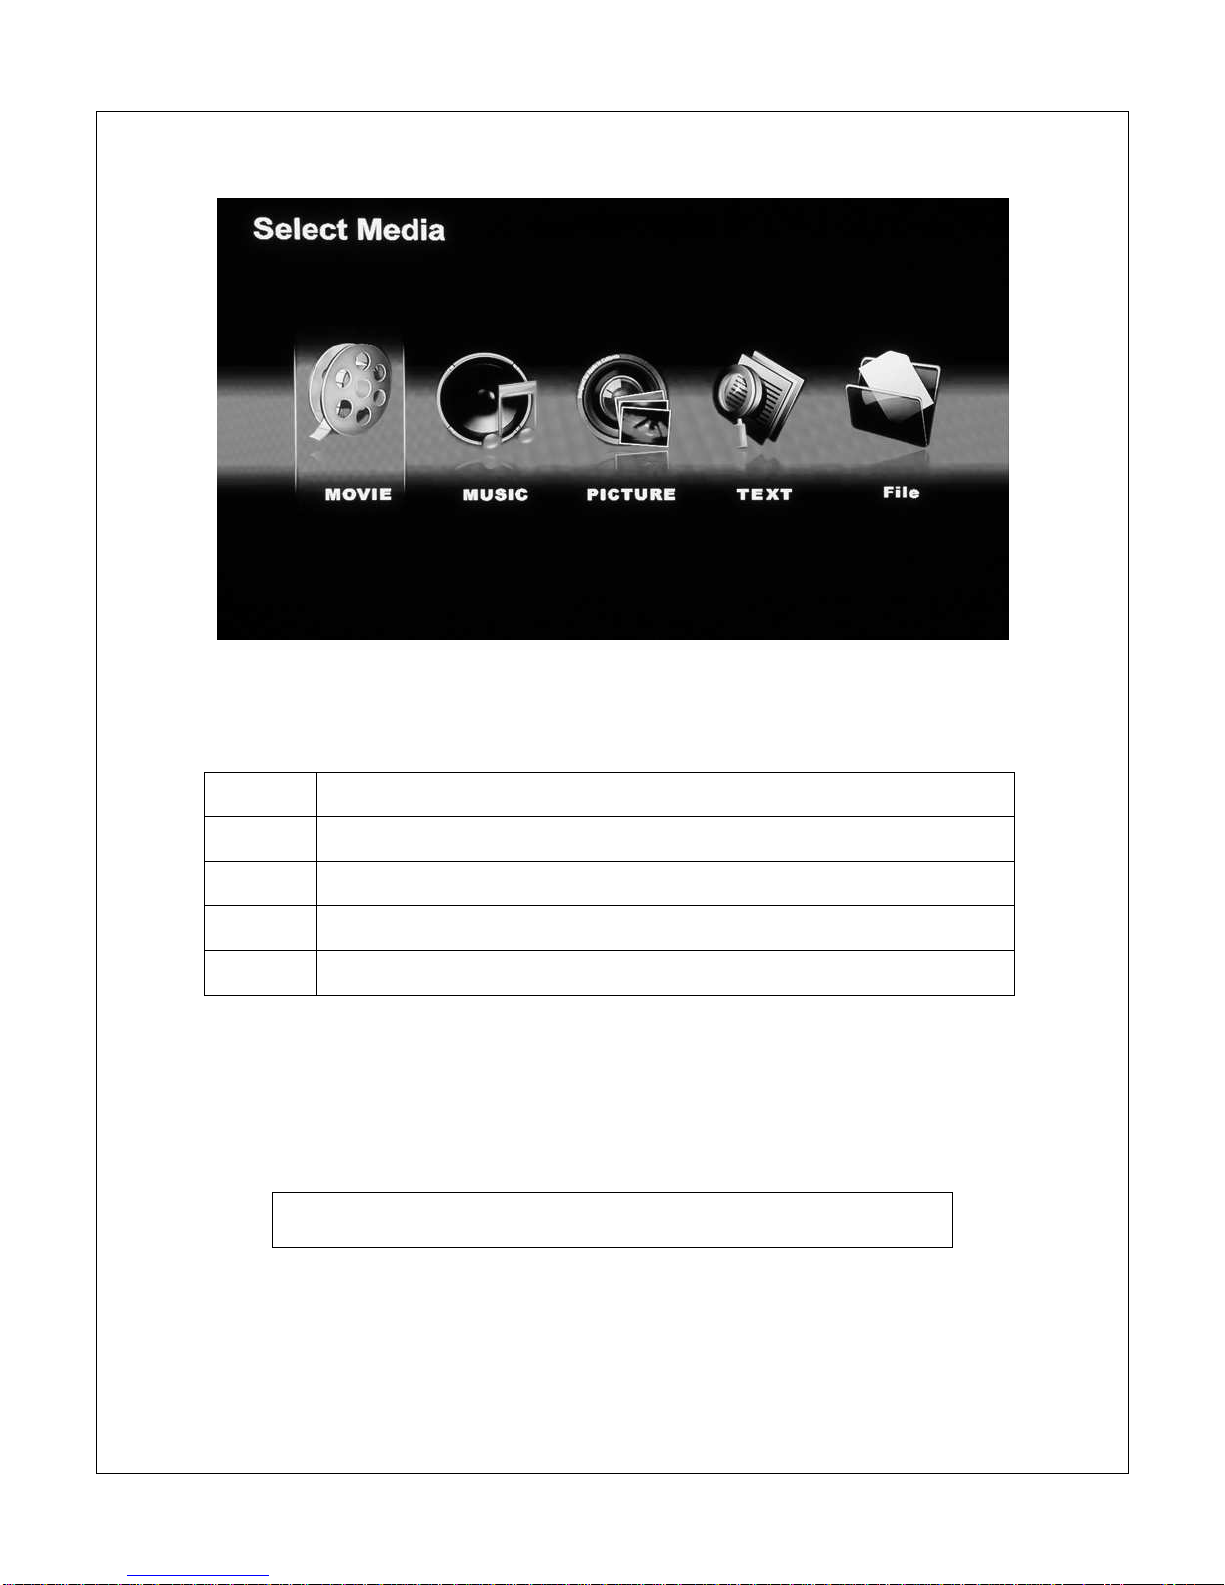
The [Select Media] screen presents five icons for access to different types of
media files on the selected storage device:
Movie Navigate and playback compatible video files
Music Navigate and playback compatible audio files
Picture Navigate and display compatible picture files.
Text Navigate and display .TXT files
File Navigate and playback all compatible files
Use the <
>and <
>buttons on the remote to highlight the desired media
type and press the <OK> button to select it. Refer to sections for individual
media types for additional information.
Use the <File>, <Picture>, <Music>, and <Movie> buttons on
the remote to quickly switch between media playback modes.
Copyright © 2009-2010 Micca, LLC. All rights reserved.
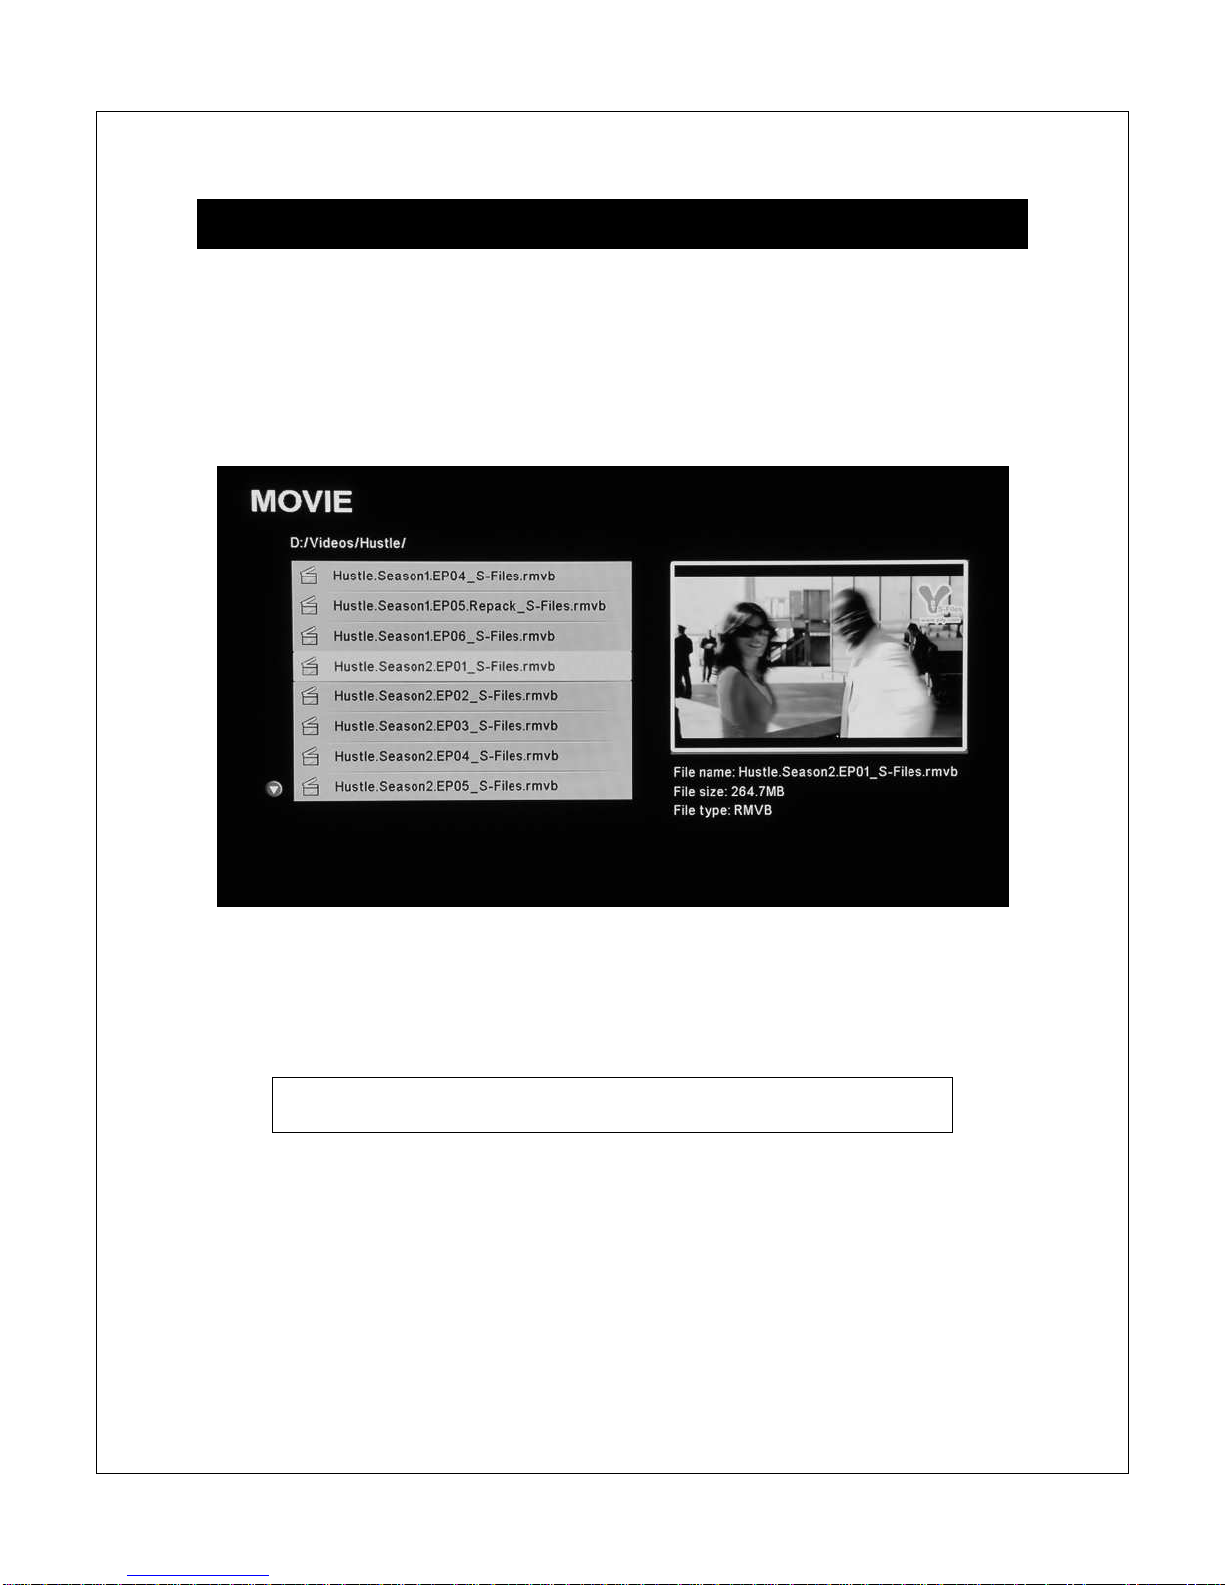
VII. Movie Mode
In Movie mode, the Micca Slim displays a file/folder directory on the left side of
the screen, and a preview box on the right. Navigate the files and folders to
locate video files you wish to play. Use the <
>and <
>buttons to highlight a
compatible video file and it will automatically start to play in the preview box
without sound after a short delay.
To play a video file full screen, press the <OK> button on the remote control after
highlighting it. By default, the Micca Slim will continuously and repeatedly play all
video files in a folder in alphabetical order until stopped or turned off.
Quickly jump to movie mode by pressing the <Movie> button on
the remote control.
NOTE: Only files with compatible video file extensions AVI, MPG, MP4, MOV,
VOB, MPG, DAT, RM, RMVB, and 3GP are visible in the file/folder directory.
Video files with incompatible file extensions, such as MKV or WMV will are not
visible. Video files with compatible file extensions but incompatible codec such
as H.264 will not play in the preview box and will generate an error when full
screen playback is attempted.
Copyright © 2009-2010 Micca, LLC. All rights reserved.
In movie mode, the following navigation controls are available while browsing the
file/folder directory:
Go up one folder level, currently preview video stops
Enter the highlighted folder, no effect if a file is highlighted
Highlight the previous file or folder, currently preview video stops
Highlight the next file or folder, currently preview video stops
OK
Play the highlighted file full screen
In movie mode, the following playback controls are available while playing a
video file full screen:
Rewind the current playing video file in 2X, 3X, or 4X speeds
Fast forward the current playing video file in 2X, 3X, or 4X speeds
Skip back to the previous video file
Skip forward to the next video file
Pause or play the current video file
Stop playing the current file and return to file/folder directory
VOL+
Increase playback volume
VOL-
Decrease playback volume
Mute
Mute playback volume
Display
Toggle the on screen display menu
Zoom
Zoom in on the current video in at 2X, 4X, or 8X magnification. During
zoom, the <
>, <
>, <
>and <
>buttons can be used to scroll.

Copyright © 2009-2010 Micca, LLC. All rights reserved.
Subtitle
Displays available subtitles, toggles subtitle text size between normal
or 2X. Subtitle files in the .SRT or .SUB file format are supported and
should be placed in the same folder as the video file.
L/R
Toggle between Stereo, Left-Only, and Right-Only audio output
16:9/4:3
Toggles between various playback aspect ratios
GOTO
Enter a time mark in the video to jump to
OK
Display the on screen display menu
The on screen display menu presents a selection of playback control icons on
screen. The menu contains navigation icons for Rewind, Skip Back, Skip
Forward, Fast Forward, Play/Pause, Stop, Zoom, and jump-to time mark. With
the on screen display visible, the following controls are available:
Highlight icon to the left
Copyright © 2009-2010 Micca, LLC. All rights reserved.
Highlight icon to the right
OK
Execute the highlighted playback control command
To jump to a time mark in the current video, press the <GOTO> button to bring
up the on screen display menu. Use the <
>and <
>buttons on the remote
control to highlight the hour, minute, or second section. Use the numeric keys on
the remote to enter the desired time mark. When finished, press the <OK> key
on the remote to jump to the entered time mark.

Copyright © 2009-2010 Micca, LLC. All rights reserved.
VIII. Music Mode
In Music mode, the Micca Slim displays a file/folder directory on the left side of
the screen, and a playback box on the right. Navigate the folders to locate music
files you wish to play. Highlight a compatible audio file and it will automatically
start to play after a short delay. By default, the Micca Slim will continuously and
repeatedly play all music files in a folder in alphabetical order until stopped or
turned off.
Quickly jump to music mode by pressing the <Music> button on
the remote control.
NOTE: Only files with compatible music file extensions MP3, WMA, and OGG
are visible in the file/folder directory.
In music mode, the following navigation and playback controls are available while
browsing the file/folder directory:
Go up one folder level, currently playing music stops
Enter the highlighted folder, no effect if a file is highlighted
Copyright © 2009-2010 Micca, LLC. All rights reserved.
Highlight the previous file or folder, currently playing music stops
Highlight the next file or folder, currently playing music stops
Rewind the current playing music file in 2X, 4X, or 8X speeds
Fast forward the current playing music file in 2X, 4X, or 8X speeds
Skip back to the previous music file
Skip forward to the next music file
Pause or play the currently highlighted music file
Stop playing the current music file
VOL+
Increase playback volume
VOL-
Decrease playback volume
Mute
Mute playback volume
Other manuals for Slim
1
Table of contents
Other Micca Portable Multimedia Player manuals


