Micro Direct Spiro User manual

SpiroLung Monitor
Operating Manual
Federal (USA) law restricts this device to sale by or on the
order of a physician or licensed practitioner.
Micro Direct, Inc.
803 Webster Street
Lewiston, ME 04240
1-800-588-3381
www.mdspiro.com

CONTENTS
Introduction page 1
Package Contents page 2
Setting Personal Best (Reference) Values page 3
Setting Management Zones page 3
3 Zones page 4
4 Zones page 4
Performing a Test page 5
Review Previous Results page 6
Deleting All Results History page 6
Creating a PDF Report page 7
Customer Contact Information page 8

1
Introduction
The Micro Direct spiroLung Monitor was specifically
designed for situations where low cost, easy to use, accurate
spirometry with a report is required.
The spiroLung Monitor accurately measures, displays and
stores the actual FEV1, FEV6 , FEV1/FEV6, FEF25-75 and the percent
of Personal Best FEV1. The personal best FEV1can be set by the
clinician with future patient efforts compared to their personal best.
The three color action zones are preset but can be customized by
the clinician.
With the Spirometry Reports Software, the results can be
uploaded to a computer to generate a report that can be sent to
the physician.

2
Package Contents
The SpiroLung Monitor is packaged with the following items:
1SpiroSpirometer
2 Plastic reusable mouthpiece
3Two AAA batteries
4 Reports Writer CD-Rom
5 Model 4000 User Manual
6 Computer Cable
3
Setting Personal Best (Reference) Values
Personal Best (reference) values can be set for forced expiratory
volume after 1 second (FEV1). To set the Personal Best
(reference) FEV1, follow these steps:
1. Turn the device on.
2. When the device is ready for a test, press the and
buttons together for 3 seconds.
3. The reference FEV1 value is set by pressing the button and
releasing when the value is reached. Press the to roll back.
The values will increase/decrease in values of 0.10. If the button is
kept depressed, the values will scroll faster.
4. Press ENTER to keep this reference FEV1 value. The device
will return to the test screen.
Note: to de-activate zones, set the FEV1 reference value to 0.00.
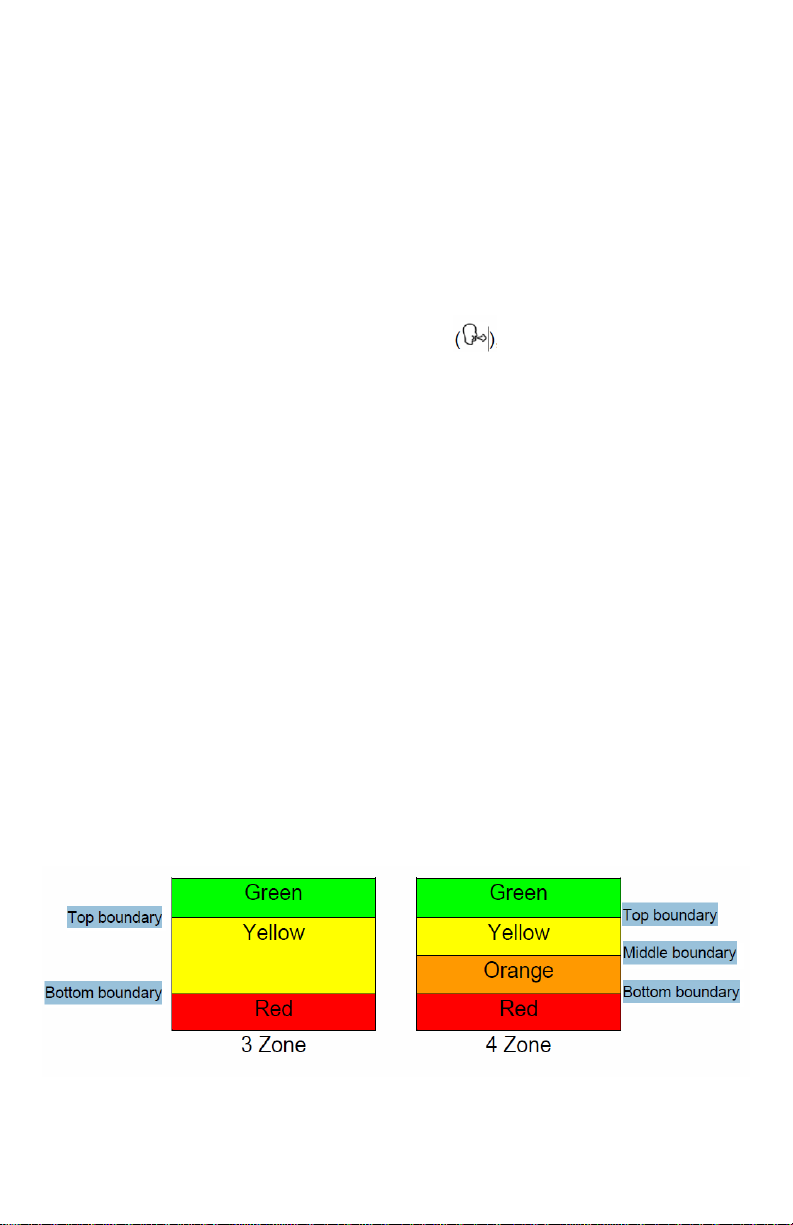
Setting Management Zones
The Spirolung monitor can be set for use with 3 or 4 zone
management plans. The zone percentages are factory set to 2
boundaries, 95% & 90%, i.e. 3 Zones (95-100%, 90-95%, 0-90%).
For 4 zones the middle boundary is set last. The color systems for
each zone type are as follows:
Setting Management Zones (3 Zones)

4
1. Turn the device on.
2. When the device is ready for a test , press the and
“Enter” buttons together for approximately 10 seconds.
3. The top (Green/Yellow) boundary can now be set. This is done
by pressing the or button and releasing when the value is
reached.
4. Press “Enter” to set the top (Green/Yellow) boundary value.
5. The bottom (Yellow/Red) boundary can now be set. This is
done by pressing the or button and releasing when the value
is reached. Press “Enter” to set the bottom (Yellow/Red) boundary
value.
6. Only 2 boundaries are required for the 3 zone system, so the
next value should be selected as 0% (default). Press “Enter”. The
device will return to the test screen.
Setting Management Zones (4 Zones)
1. First set the top and bottom boundaries –see above procedure
(steps 1 - 6).
2. The middle (Yellow/Orange) boundary can now be set. This is
done by pressing the button and releasing when the middle
boundary value is reached. The values will increase/decrease in
values of 1% after an initial jump to the lower boundary value. If
the button is kept depressed, the values will scroll faster. This
boundary value cannot be set at a value that is greater than the
top boundary value or less than the bottom boundary value.
3. Press “Enter” to set the middle (Yellow/Orange) boundary
value. The device will return to the test screen.
Performing the Test

5
1. Sit down when blowing into the device (unless the physician
advises otherwise).
2. Turn the device on and insert the mouthpiece.
3. When the device is ready for a test , breathe in as deeply as
possible, hold the Spirolung monitor ready in front of the mouth.
4. Holding the breath, place the mouthpiece into the mouth, biting
the mouthpiece lightly, and with the lips firmly sealed around it.
5. Blow out as HARD, as FAST and as LONG as possible (the
device will stop taking readings after 6 seconds). Be careful not to
block the mouthpiece with the tongue or teeth. A ‘spitting’ action
will give false readings.
6. Following each blow and at the end of the test session, the
FEV1 value will be displayed and below that, FEV1 % Personal
Best results for that blow.
7. Pressing the button will show the FEV6 result.
8. Pressing the button again will show the FEV1/FEV6 result.
9. Pressing the button again will show the FEF25-75 result.
10. With the blow icon showing, blow again . Usually 3 blows
are required.
11. To view the best test in the session (best FEV1 and best
FEV6), press the “Enter” button. This is the value that is recorded
for the session in the device history.
Note: if an exclamation mark ! appears, this means it was not a
good quality blow and the subject should blow again. ! appears
when: The Vext (extrapolated volume) is > 5% or 150mL of FEV6
or a cough is detected in the 1st second
If the subject experiences dizziness or fatigue during the test
session, wait until this passes before blowing again or terminate
the session.

6
Reviewing Previous Results
The Spirolung monitor can store up to 200 test sessions. In
order to view previously performed test sessions, follow these
steps:
1. Turn the device on.
2. When the device is ready for a test , press the “Enter”
button for approximately 3 seconds.
3. The most recent test session will now be displayed. The best
FEV1 result will be displayed for approximately 3 seconds,
followed by the best FEV6 result. The session number ‘1’ is also
displayed, this is the latest session.
4. Earlier test sessions can also be viewed. Pressing the button
once will show ‘2’ the previous test, and so on.
5. Press “Enter” button. The device will return to the test screen.
Deleting All Results History
Caution: Once the history has been deleted it cannot be
recovered.
To delete the history entirely, i.e. all previously stored session
results, follow these steps:
1. Turn the device on.
2. When the device is ready for a test , press the and
“Enter” buttons simultaneously for approximately 10 seconds.
3. A long beep will indicate success and the device will return to
the test screen.
Creating a PDF Report
The test session may be transmitted to the Reports Utility on your
PC where it can be stored as a PDF file and viewed or printed.
Before you can transmit you must first have the Reports Utility
installed and running on your PC.
7
1. Connect the Spirolung monitor USB device to the PC using
the USB cable supplied.
2. On the Reports Utility ensure ‘Spirolung monitor’ is selected
as the device.
3. There are two ways to print the test results from the lung
monitor;
a. When the device is ready for a test press the button for
3 seconds on the device will show the Report icon .
b. After completing the test session, press the or button until
the print screen is displayed. Press the “Enter” button.
4. On the Utility Reports enter the Subject Demographic details
and Comments. Select ‘Continue’ on the Utility Reports when you
are finished entering the information.
5. Select a location for the test report on your PC as requested by
the Utility Reports. A PDF of the test results will appear and will
also be stored to the PC.
Customer Contact Information
For all sales order processing, training and spare parts, service
and technical support inquiries, please contact the following:
Micro Direct, Inc.
803 Webster Street

8
Lewiston, ME 04240
Telephone: 207-786-7808
Toll Free: 800-588-3381
Fax: 207-786-7280
Website: www.mdspiro.com
Table of contents


