manuals.online logo
Brands
  1. Home
  2. •
  3. Brands
  4. •
  5. MICROclimate International
  6. •
  7. Thermostat
  8. •
  9. MICROclimate International B1 User manual

MICROclimate International B1 User manual

Other MICROclimate International Thermostat manuals

MICROclimate International B1ME User manual

MICROclimate International

MICROclimate International B1ME User manual

MICROclimate International Ministat User manual

MICROclimate International

MICROclimate International Ministat User manual

MICROclimate International B2 Magic Eye User manual

MICROclimate International

MICROclimate International B2 Magic Eye User manual

MICROclimate International HH 6 User manual

MICROclimate International

MICROclimate International HH 6 User manual

MICROclimate International B2/HT User manual

MICROclimate International

MICROclimate International B2/HT User manual

MICROclimate International B2 User manual

MICROclimate International

MICROclimate International B2 User manual

MICROclimate International DL2 User manual

MICROclimate International

MICROclimate International DL2 User manual

Popular Thermostat manuals by other brands

EWELLY EW-181 manual

EWELLY

EWELLY EW-181 manual

Prolon T1100 Hardware guide

Prolon

Prolon T1100 Hardware guide

Computherm Q20 operating instructions

Computherm

Computherm Q20 operating instructions

Heatmiser neoStat user manual

Heatmiser

Heatmiser neoStat user manual

Mars HEAT CONTROLLER IR Wireless Thermostat user manual

Mars

Mars HEAT CONTROLLER IR Wireless Thermostat user manual

Saswell SAS920XWHB-7-S-RF User manual and warranty card

Saswell

Saswell SAS920XWHB-7-S-RF User manual and warranty card

Aircalo TFP1-ET85P2 operating manual

Aircalo

Aircalo TFP1-ET85P2 operating manual

Honeywell CM721 user manual

Honeywell

Honeywell CM721 user manual

Carrier DEBONAIR 33CS Installation and operating instructions

Carrier

Carrier DEBONAIR 33CS Installation and operating instructions

Lennox iHarmony Zone Thermostat Installation and setup guide

Lennox

Lennox iHarmony Zone Thermostat Installation and setup guide

Gemtech GT7000 Operation

Gemtech

Gemtech GT7000 Operation

Rollei Smartes 45000 manual

Rollei

Rollei Smartes 45000 manual

Sinope TH1300RF user guide

Sinope

Sinope TH1300RF user guide

Honeywell RLV4305 owner's guide

Honeywell

Honeywell RLV4305 owner's guide

Honeywell Prestige 2.0 THX9421 manual

Honeywell

Honeywell Prestige 2.0 THX9421 manual

NuTone NTBZ48 Installation & operation guide

NuTone

NuTone NTBZ48 Installation & operation guide

Stelpro MAESTRO ASMT402AD user guide

Stelpro

Stelpro MAESTRO ASMT402AD user guide

Honeywell T6811 quick guide

Honeywell

Honeywell T6811 quick guide

manuals.online logo
manuals.online logoBrands
  • About & Mission
  • Contact us
  • Privacy Policy
  • Terms and Conditions

Copyright 2025 Manuals.Online. All Rights Reserved.

IMPORTANT))*)TO)ENSURE)CORRECT)OPERATION)OF)YOUR)B1)THERMOSTAT)
PLEASE)READ)THE)GUIDE)BEFORE)COMMENCING)INSTALLATION
B1 Thermostat
User Guide
Correct'temperature'reading
The'temperature'sensor'encased'in'the'black'sheath'is'very'accurate.'
Having'set'the'desired'temperature'on'the'thermostat'and'positioned'
the'sensor'in'its'required'location'the'temperature'of'the'air'will'be'
controlled'accurately'at'the'position'of'the'temperature'sensor.
The'temperature'nearer'the'heater''(from'the'sensor'position)'will'be'
hotter'and'further'away'from'the'heater'it'will'be'cooler.''
Please'note'that'when'using'a'thermometer'to'check'the'temperature'
that'unless'it'is'in'exactly'the'same'position'as'the'thermostat'sensor'
there'will'be'a'discrepancy'due'to'the'positioning'of'the'thermometer.
Warranty
Used'in'accordance'with'these'instructions'this'thermostat'will'give'
many'years'of'trouble'free'service.
The'thermostat'is'guaranteed'for'five'years'from'the'date'of'purchase'
against'faulty'parts'and'workmanship.''In'the'unlikely'event'of'a'failure,'
return'it'to'Microclimate'International'Ltd'together'with'a'receipt'or'
proof'of'purchase'and'brief'description'of'the'fault.''If'returned'within'
one'year'there'will'be'no'charge,'after'this'time'a'charge'of'£5'will'be'
made'for'administration'and'postage.''Please'enclose'a'cheque'or'
postal'order'made'payable'to'Microclimate'International.''Cash'is'also'
accepted.
No'liability'is'accepted'other'than'for'the'repair'or'replacement'of'a'
faulty'product.
This'does'not'affect'your'statutory'rights.
Microclimate'International
Unit'3'Heath'Mill'Enterprise'Park
Heath'Mill'Road
Wombourne
England
United'Kingdom
WV5'8AP
Tel':'01902'895351
Fax':'01902'897613
[email protected]
www.microclimate.co.uk
B1'Thermostat
The'B1'Thermostat'is'designed'to'give'precise'microprocessor'
controlled'temperature'of'heat'sources'up'to'600'watts.''This'may'
include'heatmats,'ceramics,'bulbs'and'other'heat'sources.''The'heat'
source'must'be'a'minimum'of'5'watts.
The B1'is'a'dimming'thermostat'which'will'control'the'heat'source'
precisely'by'varying'the'power'to'the'heater.''The'use'of'a'
microprocessor,'using'up'to'the'minute'software'greatly'enhances'the'
reliability'and'performance'of'the'thermostat.
WARNING DO NOT OVERLOAD YOUR THERMOSTAT BY CONNECTING
HEAT SOURCES WITH OUTPUTS GREATER THAN 600 WATTS.
DAMAGE CAUSED BY MISUSE IS NOT COVERED BY THE WARRANTY.
PF0076A
Mains'Supply
Heat'Source
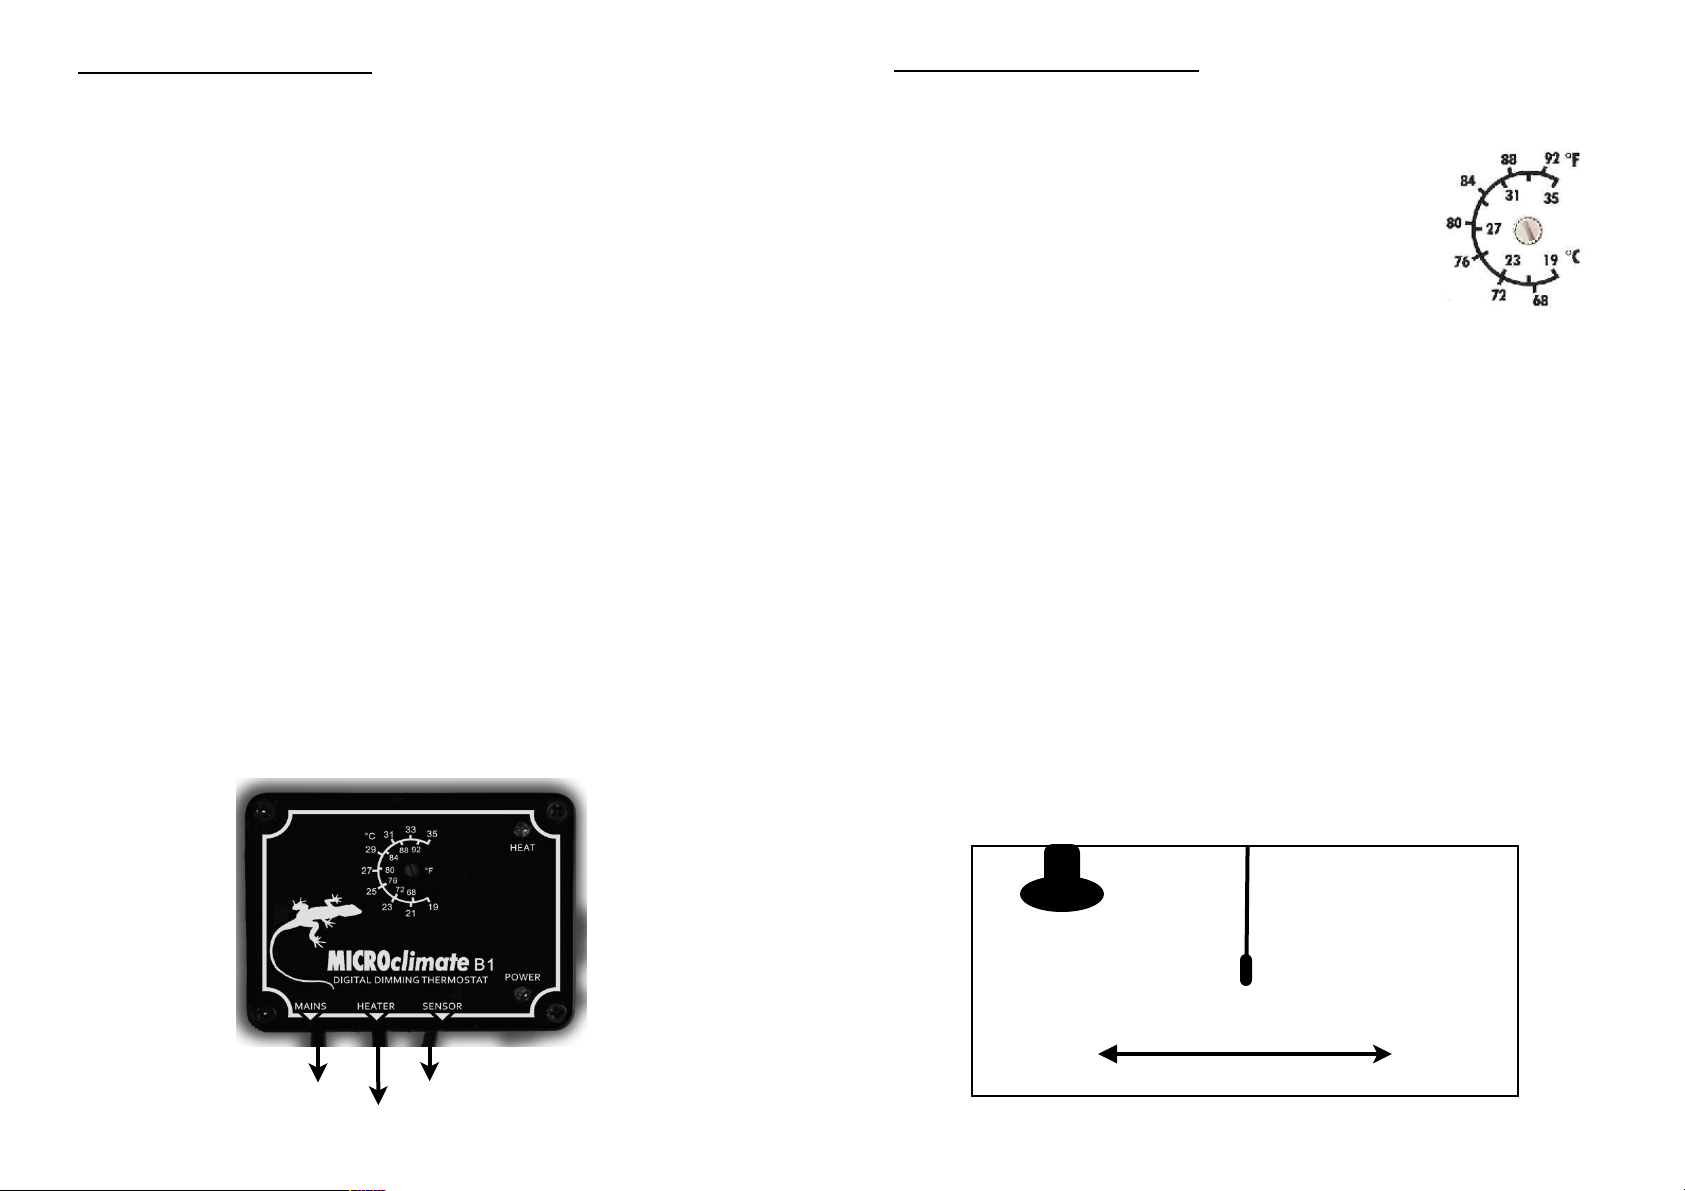
Sensor'mounted'in'Vivarium
Heater
Sensor
Hotter
Controlled
Cooler
Installing'your'B1'Thermostat
Find'a'suitable'location'for'the'thermostat'to'be'located'on'the'outside'
of'the'vivarium'ensuring'sufficient'cable'is'available'for'the'sensor.
The'sensor'should'be'installed'inside'the'vivarium'at'least'225mm'(9'
inches)'away'from'the'heat'source.''This'is'to'ensure'that'the'sensor'is'
measuring'the'air'temperature.''The'sensor'should'be'in'free'air'and'not'
fixed'to'the'wall'of'the'vivarium'as'this'will'not'give'a'correct'reading'to'
the'thermostat.'Ensure'the'sensor'is'at'least'10cm'from'the'side'walls'of'
the'vivarium.''
However'if'you'are'controlling'a'heatmat'installed'underneath'a'layer'of'
substrate'inside'the'vivarium'then'we'recommend'that'the'sensor'be'
placed'under'the'substrate'directly'on'top'of'the'heatmat.'This'allows'
direct'control'of'the'heatmat.
Connect'the'mains'cable'from'your'heat'source'to'the'heater'socket'on'
the'thermostat'using'a'suitable'mains'plug'fitted'with'a'3'amp'fuse.
Connect'the'mains'cable'from'the'thermostat'to'your'mains'supply.''
Please'note'the'mains'plug'is'fitted'with'a'3'amp'fuse.
The'mains'cable'fitted'to'the'thermostat'is'colour'coded'as'follows
BROWN'`'LIVE''''''''''''BLUE'`'NEUTRAL'''''''''''''GREEN/YELLOW'`'EARTH
Operating'your'B1'Thermostat
The'thermostat'temperature'is'factory'set'to'19'degrees'Celsius,'this'is'
fully'anti`clockwise'on'the'temperature'dial.
To'adjust'the'temperature'use'a'small'flat'bladed'
screwdriver'and'rotate'the'temperature'adjuster'
clockwise'until'the'slot'is'aligned'with'the'required'
temperature'on'the'scale.
A'thermometer'should'ALWAYS'be'used'to'check'the'
temperature'within'the'vivarium'and'the'thermostat'then'
adjusted'to'give'the'required'temperature'for'your'pets'environment.
The'green'LED'is'a'power'on'indicator'and'will'be'lit'when'the'
thermostat'is'connected'to'the'mains'supply.
The'yellow'LED'on'the'thermostat'indicates'power'being'sent'to'the'
heater.''If'the'temperature'that'has'been'set'requires'full'power'from'the'
heater'then'the'LED'will'be'on'full'brightness.'If'the'power'required'is'
only'half'power'then'the'LED'will'be'on'half'brightness.''If'no'power'at'all'
is'required'the'LED'will'be'off.''The'thermostat'will'control'the'power'
from'off'to'full'on'resulting'in'extremely'accurate'and'stable'
temperature'control.
If'the'yellow'LED'remains'on'full'brightness'for'prolonged'periods'this'
would'indicate'that'a'higher'wattage'heater'may'be'required'to'achieve'
the'temperature'that'has'been'set.
A'vivarium'should'be'set'up'to'allow'a'temperature'gradient.''The'heater'
should'be'at'one'end'with'the'sensor'in'the'centre'of'the'vivarium.'This'
will'allow'a'Hot'area,'Controlled'area'and'a'Cooler'area.