Micromark 90533 User manual

#90533 WET / DRY VACUUM
INSTRUCTION MANUAL
Please read the instruction manual carefully before use

-
1
-
CONTENTS
1. Parts Identification Drawing--------------------- 2
2. Accessories and Vacuum Specifications-------3
3. Safety Notices ---------------------------------------4
4. Warnings--------------------------------------------5-9
5. Installation and Assembly-------------------------9
6. Application Dry and Wet---------------------10-14
7. Electrical Circuit & Maintenance---------------15
8. Trouble Shooting and Warranty------------16-17

-
2
-
Parts Identification
Fig. 1.

-
3
-
Includes:
Standard Accessories
Φ32*1.2M hose 1pc Dust Bag 1pc
2 in 1 nozzle 1pc Floor Brush 1pc
Plastic Pipe 2pcs Wheels 4pcs
Silencer/Dampener 1pc
Specifications
Product name: VACUUM
CLEANER
Model No.: 90533
Rate Voltage: 110V/ 50~60HZ Rate Power: 1000W
Max Suction: 17KPA Tank
Capacity:
3 Gallon
Noise: 80dB(A) Weight: 7 Lbs.
Package Size: 320*320*400/420/485mm

-
4
-
Production
Standard:
Safety Notice

-
5
-
Warnings:
WARNING! IMPORTANT READ CAREFULLY all safety warnings and all
instructions BEFORE USE.
Failure to follow the warnings and instructions may result in electric
shock, fire and/or serious injury
1. Before use, make sure that this cleaner must be used by people who
have been adequately instructed on the use of this cleaner.
2. Only use the socket outlet on the cleaner for purposes specified in the
instructions.
3. If liquid escapes from the cleaner, switch off immediately.
4. Clean the water level limiting device regularly and examine it for signs
of damage.
5. For Dry Use….Do not use the cleaner without the filter. Replace a
damaged filter immediately.
6. USE OF EXTENSION CORD. If an extension cord is required, make sure
that use an adequate one of size and length for the purpose. Using a gauge
of cord to small or too long will cause the motor to receive insufficient
electrical current and cause the motor to overheat or otherwise be
damaged.

-
6
-
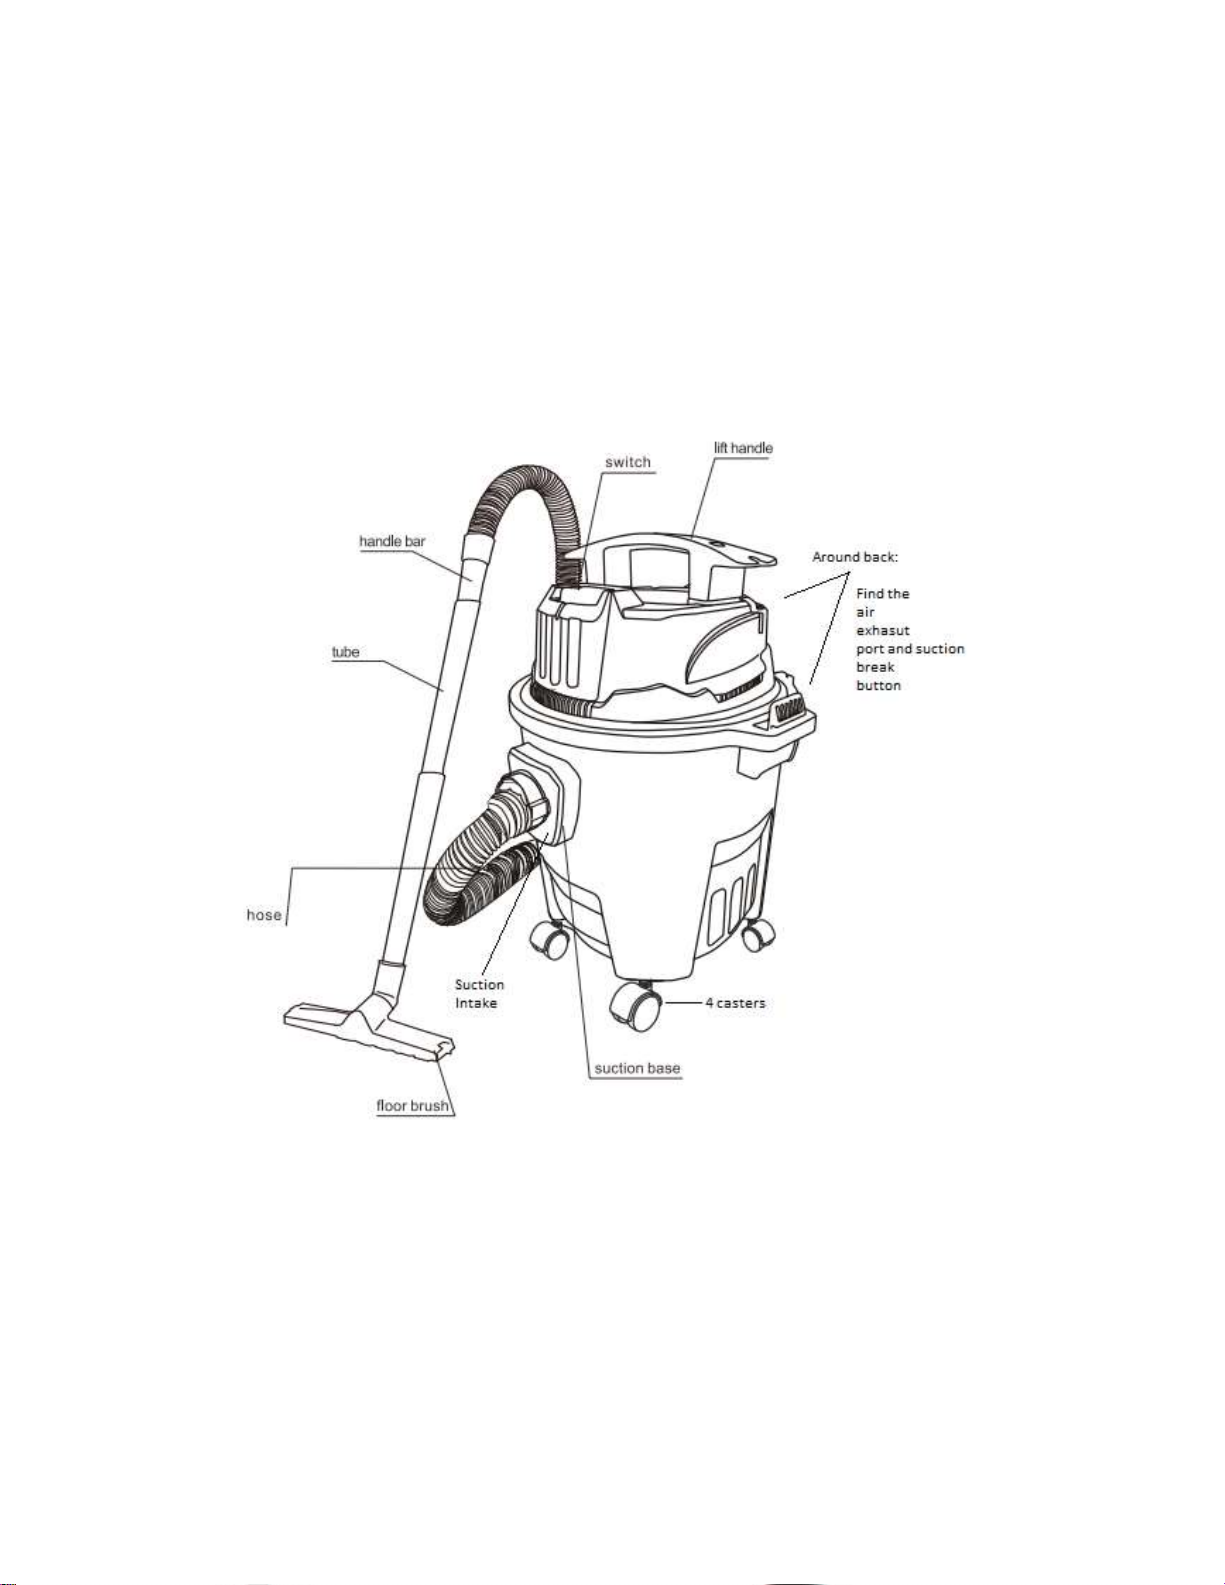
7. VOLTAGE WARNING: Before connecting the cleaner to a power source
(receptacle, outlet, etc.) be sure the voltage supplied is the same as that
specified on the nameplate of the cleaner. A power source with voltage
greater than that specified for the cleaner can result in SERIOUS INJURY
to the operator as well as damage to the cleaner. If in doubt, DO NOT
PLUG IN THE CLEANER. Using a power source with voltage less than the
nameplate rating is harmful to the motor.
8. AVOID UNINTENTIONAL STARTING. Be sure switch is OFF when
plugging in.
9. Do not attempt to pick up flammable materials, fire works, lighted
cigarettes, hot ashes, hot metal chips, sharp materials such as razors,
needles, broken glass or the like.
10. NEVER USE THE CLEANER IN THE VICINITY OF GASOLINE, GAS, PAINT,
ADHESIVES OR OTHER HIGHLY EXPLOSIVE SUBSTANCES. The switch
emits sparks when turned ON and OFF. And so does the motor
commutator during operation. A dangerous explosion may result.
11. Never vacuum up toxic, carcinogenic, combustible or other
hazardous materials such as asbestos, arsenic, barium, beryllium, lead,
pesticides, or other health endangering materials.
12. Never use the cleaner outdoors in the rain.
13. Do not use close to heat sources (stoves, etc.).

-
7
-
14. GUARD AGAINST ELECTRIC SHOCK. Prevent body contact with
grounded surfaces. For example: pipes, radiators, ranges, refrigerator
enclosures.
15. Do not block cooling vents. These vents permit cooling of the motor.
Blockage should be carefully avoided otherwise the motor will burn out
from lack of ventilation.
16. Always keep proper footing and balance.
17. DO NOT ABUSE CORD. Never carry the cleaner by cord or yank it to
disconnect from receptacle. Keep cord away from heat, oil, and sharp
edges.
18. Do not fold, tug, or step on the hose.
19. Stop the cleaner immediately if you notice poor performance or
anything abnormal during operation.
20. DISCONNECT THE CLEANER. When not in use, before servicing, and
when changing accessories.
21. Clean and service the cleaner immediately after each use to keep it
in tiptop operating condition.
22. MAINTAIN THE CLEANER WITH CARE. Keep the cleaner clean for
better and safer performance. Follow instructions for changing
accessories. Inspect cleaner cords periodically and if damaged, have
repaired by authorized service facility. Inspect extension cords

-
8
-
periodically and replace if damaged. Keep handles dry, clean, and free
from oil and grease.
23. CHECK DAMAGED PARTS. Before further use of the cleaner, a guard
or other part that is damaged should be carefully checked to determine
that it will operate properly and perform its intended function. Check for
alignment of moving parts, binding of moving parts, breakage of parts,
mounting, and any other conditions that may affect its operation. A
guard or other part that is damaged should be properly repaired or
replaced by an authorized service center unless otherwise indicated
elsewhere in this instruction manual. Have defective switches replaced
by authorized service center. Don’t use the cleaner if switch does not
turn it on and off.
24. REPLACEMENT PARTS. When servicing, use only identical
replacement parts.
25. STORE IDLE CLEANER. When not in use, the cleaner should be stored
indoors.
26. Be kind to your cleaner. Rough handling can cause breakage of even
the most sturdily built cleaner.
27. Do not attempt to clean the exterior or interior with benzine, thinner
or cleaning chemicals. Cracks and discoloration may be caused.
28. Do not use cleaner in an enclosed space where flammable, explosive
or toxic vapors are given off by oil-base paint, paint-thinner, gasoline,

-
9
-
some mothproofing substances, etc., or in areas where flammable dust
is present.
29. Do not leave the cleaner cord lying on the floor after you have
finished a cleaning job. It can become a tripping hazard or may cause
damage to the cleaner.
30. Do not operate this or any tool while under the influence of drugs or
alcohol.
31. As a basic rule of safety, use safety goggles or safety glasses with side
shields.
32. Use a dust mask in dusty work conditions.
33. The cleaner is not intended for use by young children or inform
persons without supervision.
34. Young children should be supervised to ensure that they do not play
with the cleaner.
35. Never handle plug cord or cleaner with wet hands.
36. Use extreme caution when cleaning on stairs.
Assembly
CAUTION: Always be sure that the cleaner is switched off and
unplugged before carrying out any work on the cleaner.
1. Insert the hose into suction hole and lock by clockwise rotation.
2. Assemble the required tubes and brush onto the handle.
3. Remove the hose with anti-clockwise rotation and pull out after use.

-
10
Application: Dry Cleaning
1, To start the cleaner, rotate the switch lever to the "I" side.
To stop it, rotate the switch lever to the "0" side.
2,Use handle to pick up the cleaner assembly easily.

-
11
CAUTION:
Never use gasoline, benzine, thinner, alcohol or the like. Discoloration,
deformation or cracks may result.
Cleaning dry waste from the Vacuum
When the tank is full you will notice less suction power than normal, or
you might hear the unit struggling or sounds of it being clogged. This is a
sign that it needs dumped and cleaned out.
How to clean
1) The 2 blue clips on either side of the motor head need to be pushed
inward to allow the head to be pulled straight off. You will find the filter
that needs to be pulled upward to see the waste it is covering. Dump the
waste into your receptacle.

-
12
Fig. 2.
2) Clean the filter as required.
3) Replace if worn severely.
4) Then assembly it with reverse steps.
5) Take care when inserting the
filter onto the can so that the
rubber gasket seals when the
lid is place back onto it.
A silencer / reducer has been provided that attaches to the exhaust port
on the opposite side of the air intake side. Its job is to reduce the sound
slightly but more importantly shed the exhaust of the vacuum in a
sideways direction thru a foam filter. This way the force of the exhaust

-
13
does not blow dust and items around. Insert with the tabs at 12 and 6
o’clock and rotate clockwise to install. Removal is reverse direction.
Note: There is a suction-break button near the exhaust port. This can be
pressed when the wand picks up something by mistake that is not
intended to be suctioned. Hold it down, momentarily until the
unintended item drops off of the wand head. Sometimes, depending on
what is stuck in the wand may not fall off in which case you will need
shut off the motor and / or remove it by hand with care.
Application: Wet Cleaning
During wet clean-up, special care must be taken by the user to avoid
electric shock, motor damage and spillage of what is being suctioned.
1- Make sure that the electric cord is in good condition and the
outlet to be used is in good operation condition and is properly
grounded.
2- Do not place the unit into standing water greater than 1 inch.
3- User must remove the filter from within the tank and re-attach
the head onto the tank. The filter is only used for dry clean-up.
4- The used should not be standing in the liquid that is to be
suctioned.

-
14
5- Turn on the vacuum and using the tubes and wand head desired
begin to suction up the wet spill.
6- The tank hold approximately 3 gallons of liquid. Note: see Fig 2.
There is a ball cock located inside the lower frame of the head
assembly. As water is suctioned and fills the tank, it will rise
with the water level inside the tank. As it approaches “full”, it
will cut off suction to the motor and the motor will be begin to
struggle and not suck up any more liquid. Move the switch to
“off” immediately.
7- Remove the head from the tank and set it aside out of harms
way.
8- Dump the contents of the tank in an appropriate place.
9- Re-attach the head assembly onto the now empty tank and
continue until clean up is complete.
10- After use, allow the tank to dry without the head assembly on
it. Once dry, re-install the filter and place the head back onto
the tank.

-
15
Circuit Diagram
Cleaning and Maintenance
From time-to-time and depending on long use of your vacuum it will
become necessary to clean the main tank filter. You can use a blower to
dislodge particles trapped in the filter, or you can also tap the filter on
an outside table to help dislodge particles. You can also rinse the filter
with water and dry thoroughly in the shade before use. Never wash
filters in a washing machine.
NOTE:
• Do not rub and scratch the filter, the prefilter or the damper with hard
objects such as a brush and a paddle.

-
16
• The filters are consumable and are recommended to have some spares
on hand. If the filter cannot be shaken clear of particles in may be time
to order a replacement filter from Micro-Mark.
Troubleshooting:
Vacuum Cleaner
does not work
1, Not plugged in?
2, Switch not in ‘ON’ position.
3, No electric power from
socket.
4, Motor is overheated and the
protective internal thermo
switch is active.
1, Plug into receptacle.
2, Turn switch to ‘ON’.
3. Check the electric
situation.
4. Let the motor cool down
for 2 hours and then try it
again.
Loss of suction
1, Dust tank is full?
2, Hose broken?
3, Suction hole blocked?
4, Filter not fixed well?
5, Hose connectors not fixed
Well?
1, Clean the dust tank.
2, Replace the hose.
3, Check all connection part.
4, Re-fix the filter.
5, Reassemble the hose.
Brush/nozzle
difficult to move
1, Strong suction power makes
it hard move?
1, Adjust the angle between
brush/nozzle and floor
LIMITED WARRANTY
Micro-Mark guarantees this product to be free of manufacturing defects for a period of 90
days from date of shipment, regardless of the amount of time the product has been used
and/or stored. The product, or parts thereof, will be repaired or replaced (at our option) and
shipped back to you free of charge if the following conditions have been met:
• the product is shipped back to us within the warranty period, • incoming transportation
charges have been pre-paid, • proof of purchase has been provided, and • our Service
Department determines that the problem was caused by a defect in material and/or
workmanship.

-
17
Please return to Micro-Mark Product Service Dept. at the address below with a note
explaining the problem.
Micro-Mark Repair Dept.
340 Snyder Ave.
Berkeley Heights, NJ 07922
For products returned after the warranty period, our regular repair charges shall apply.
Please include your telephone number so we may advise you of the repair estimate. Any
product returned to the purchaser without repair work being performed shall be shipped
C.O.D. for the return transportation charges.
This warranty does not cover damages resulting from improper assembly, adjustment or
maintenance, accident, alterations, normal wear, abuse or misuse, and does not apply
where products are used commercially. The warranty shall also not apply when the product
has been used for purposes beyond those for which it was designed or unreasonable for its
size.
Micro-Mark makes no other warranty of any kind whatever, expressed or implied, and all
implied warranties of merchantability and fitness for a particular purpose which exceed the
above mentioned obligation are hereby disclaimed by Micro-Mark and excluded from this
warranty.
This warranty gives you specific legal rights and you may also have other rights which vary
from state to state. The obligation of the warrantor is solely to repair or replace the
products. The warrantor is not liable for any incidental or consequential damages due to
such defect. Some states do not allow the exclusion or limitations of incidental or
consequential damages, so the above limitations or exclusion may not apply to you.
If you have any questions, please contact our Product Service Department by email:

-
18
Table of contents