midimori MDMR-9819 User manual

MULTI-FUNCTION KITCHEN MACHINE
MDMR-9819
Instruction Manual
Keep this manual for future reference and pass it on
with the equipment to any future users.
Joint Stock Company
No. 87 Trung Van Street, Trung Van Ward, Nam Tu Liem District, Hanoi.
Tell: 024 3993 1800

Technical Data
Model: MDMR-9819
Rated voltage: 220-240V~ 50-60Hz
Power consumption: 1800W
Protection class: I
General Safety Instructions
Read the operating instructions carefully before putting the appliance into operation and keep the instructions including the
warranty, the receipt and, if possible, the box with the internal packing. If you give this device to other people, please also pass
on the operating instructions.
l The appliance is designed exclusively for private use and for the envisaged purpose. This appliance is not fit for commercial
use. Do not use it outdoors (except if it is designed to be used outdoors). Keep it away from sources of heat, direct sunlight,
humidity (never dip it into any liquid) and sharp edges. Do not use the appliance with wet hands. If the appliance is humid or
wet, unplug it immediately.
l When cleaning or putting it away, switch off the appliance and always pull out the plug from the socket (pull on the plug, not
the cable) if the appliance is not being used and remove the attached accessories.
l Do not operate the machine without supervision. If you should leave the workplace, always switch the machine off or
remove the plug from the socket (pull the plug itself, not the lead).
l Check the appliance and the cable for damage on a regular basis. Do not use the appliance if it is damaged.Do not try to
repair the appliance on your own. Always contact an authorized technician. To avoid the exposure to danger, always have a
faulty cable be replaced only by the manufacturer, by our customer service or by a qualified person and with a cable of the
same type.
l Use only original spare parts.
l Pay careful attention to the following “Special Safety Instructions”.
Children and Frail Individuals
l In order to ensure your children‘s safety, please keep all packaging (plastic bags, boxes, polystyrene etc.) out of their
reach.
Caution! Do not allow small children to play with the foil as there is a danger of suffocation!
l This appliance shall not be used by children. Keep the appliance and its cord out of reach of children.
l This device is not a toy. Children shall not play with the appliance.
l Appliances can be used by persons with reduced physical, sensory or mental capabilities or lack of experience
and knowledge if they have been given supervision or instruction concerning use of the appliance in a safe way
and if they understand the hazards involved.
Special safety Instructions for this Machine
l Always disconnect the appliance from the supply if it is left unattended and before assembling, disassembling
or cleaning.
l Switch off the appliance and disconnect from supply before changing accessories or approaching parts that
move in use.
l Do not use appliance for other than intended purpose.
l CAUTION: In order to avoid a hazard due to inadvertent resetting of the thermal cut-out, this appliance must
not be supplied through an external switching device, such as a timer, or connected to a circuit that is regularly
switched on and off by the utility.
l Only operate this machine under supervision.
l Do not interfere with any safety switches.
l Do not insert anything into the rotating hooks while the machine is working.
l Place the machine on a smooth, flat and stable working surface.
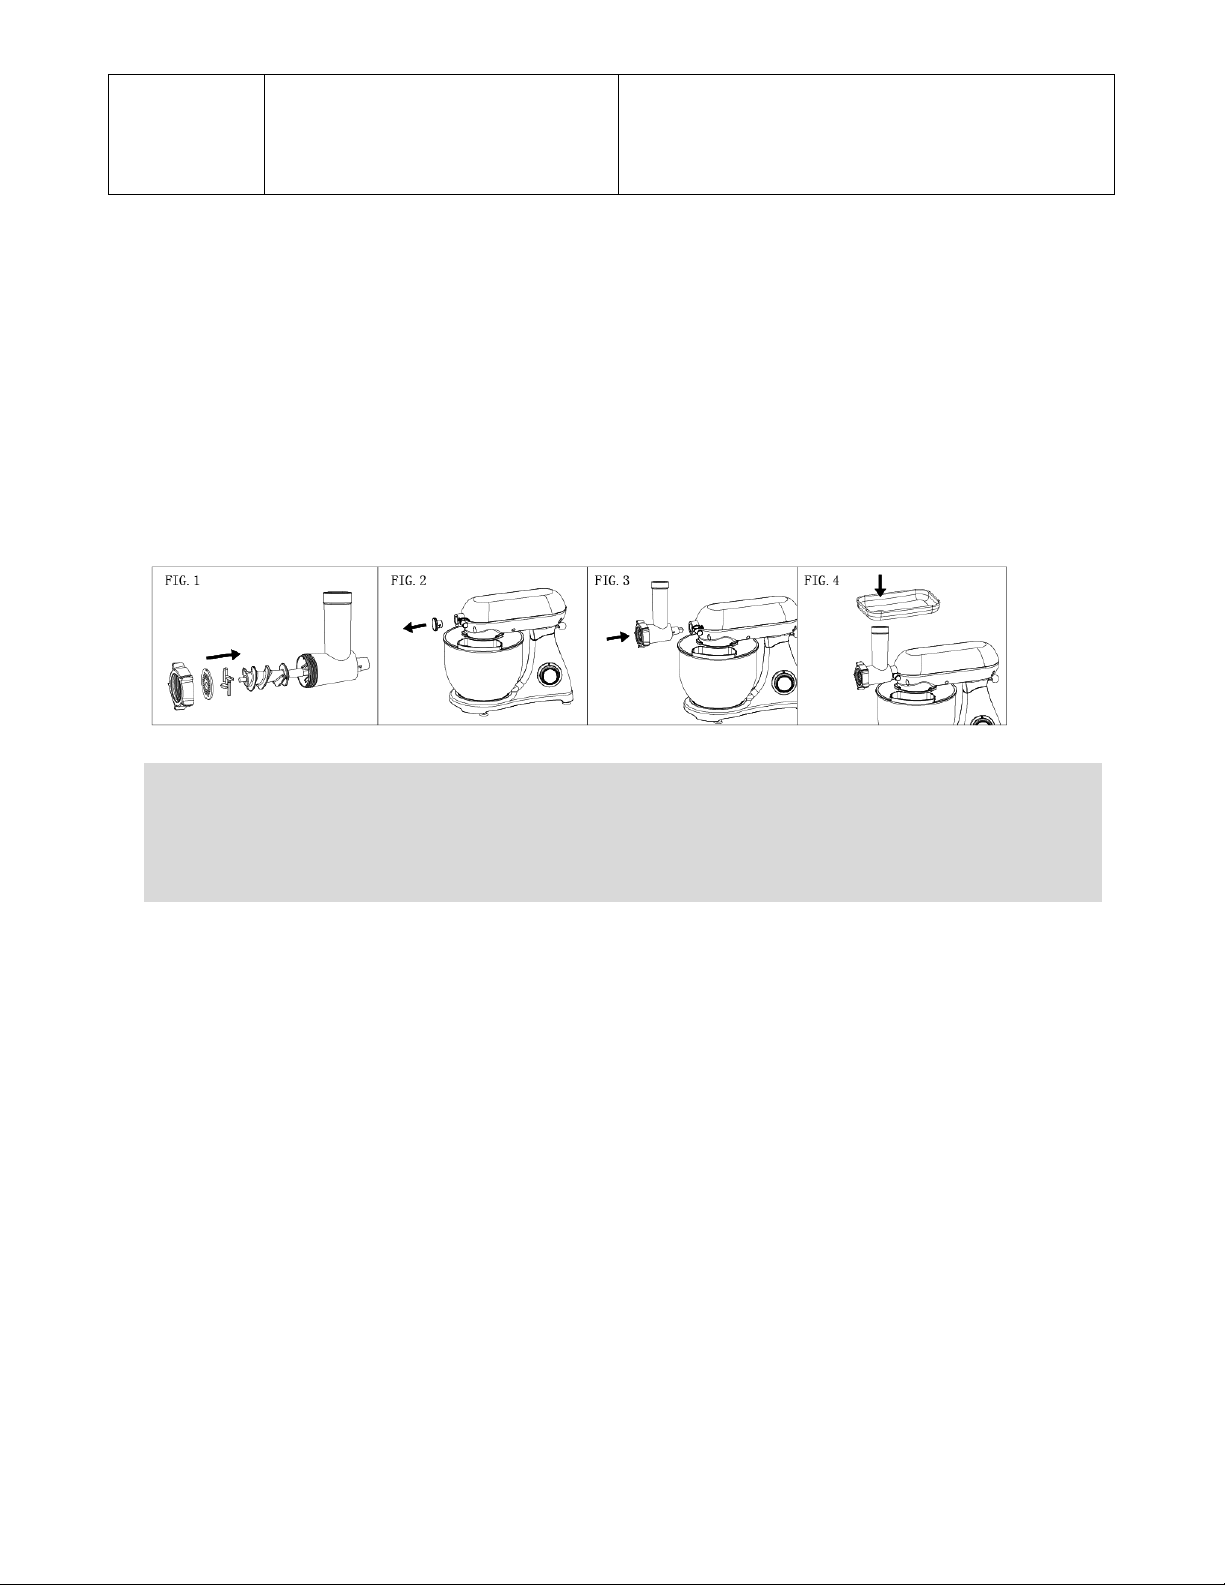
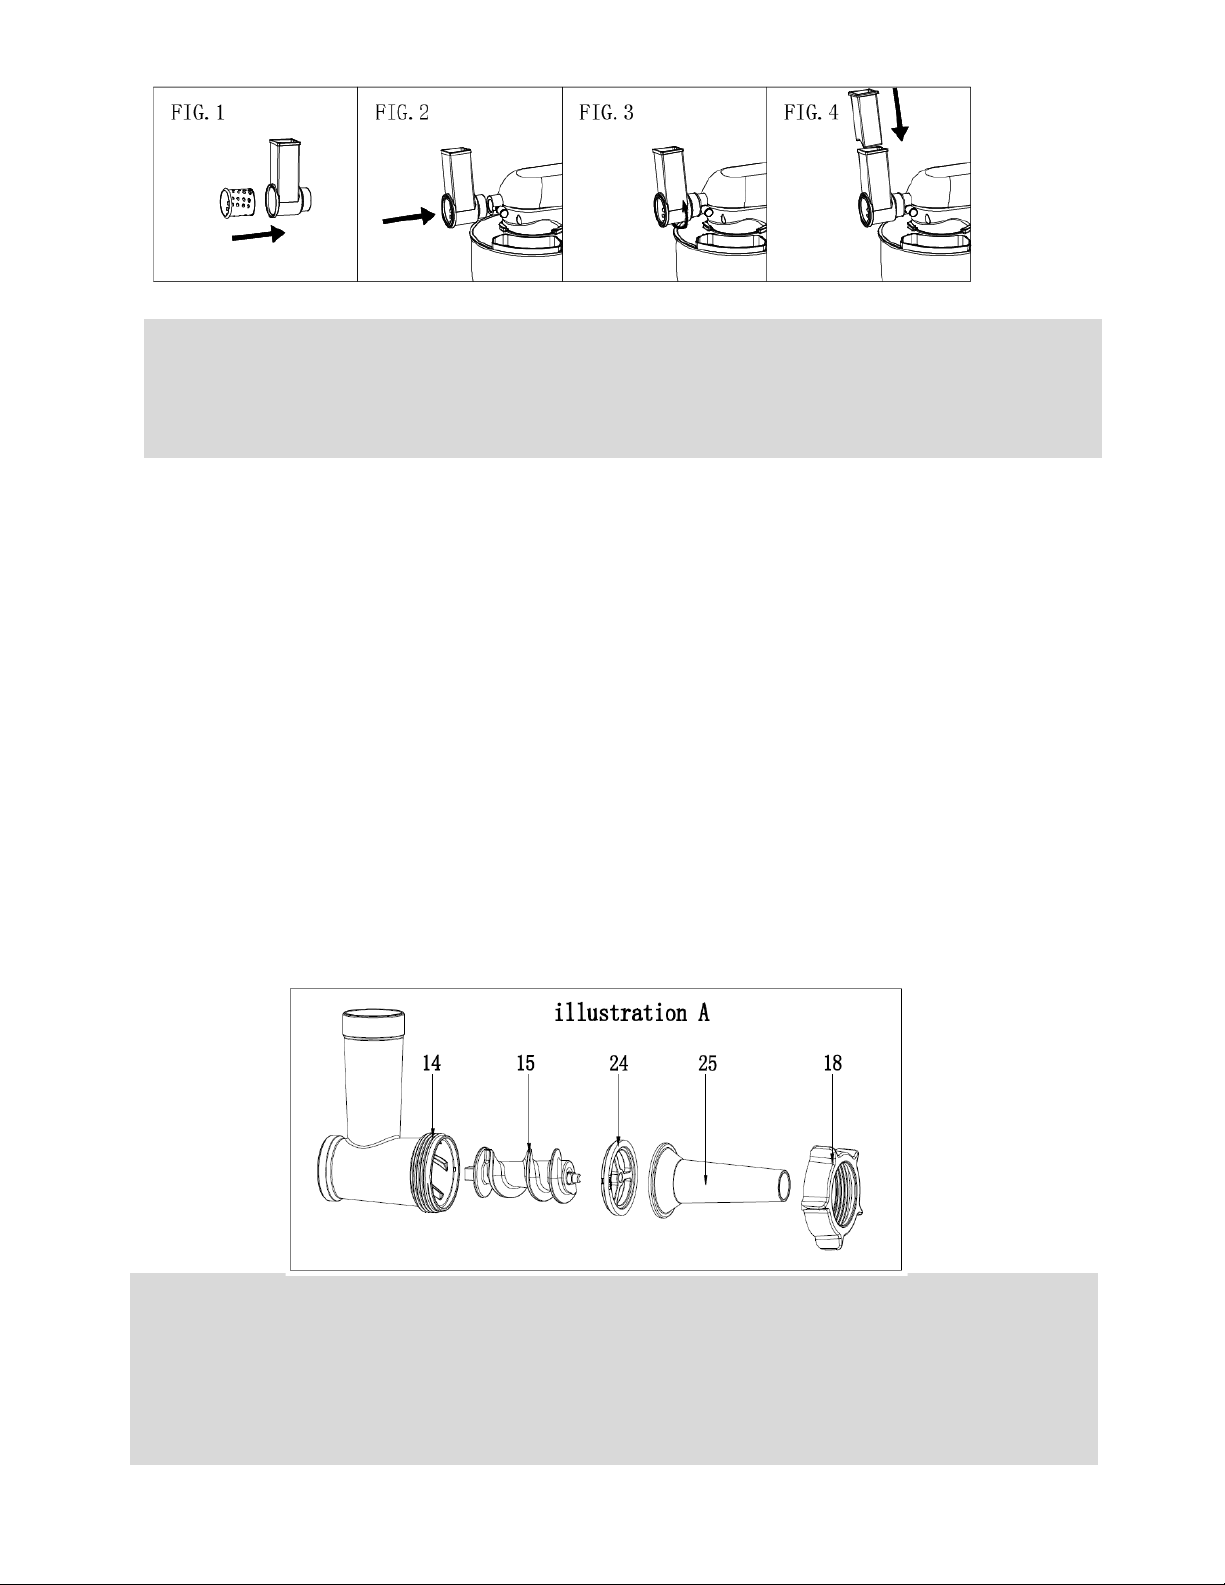
l Do not insert the mains plug of the machine into the power socket without having installed all the necessary accessories.
l CAUTION: Ensure that the blender is switched off before removing it from the stand.
l Care shall be taken when handling the sharp cutting blades, emptying the bowl and during cleaning.

Overview of the Components
Main Components and Standard Accessories:
1
Output shaft
12
Helix
2
handle metal ball
13
Blade
3
Speed knob
14
Sieve
4
Power Cord
15
Lock
5
Mixing bowl
16
Meat mincer presser
6
Dough hook
17
Filling tray
7
Beater
18
Pusher
8
Whisk
19
Cutter housing
9
Pot cover
20a
Coarse shredder
10
Front cover
20b
Slicer
11
Helix housing
20c
Fine shredder

Using the Mixing Bowl
1. In order to lift the arm, clockwise rotation the Rise knob (2) . The arm will now move upwards.(FIG1)
2. Place the pot cover into its body. (FIG2)
3. Place the mixing bowl into its holding device(Step①) and turn the bowl clockwise until it locks into place(Step
②). (FIG3)
4. Mount the required utensil(Dough hook or Beater or Whisk)by inserting the top into the output shaft,
and turn anti-clockwise until it locks into place. (FIG4&FIG5)
5. Now fill in your ingredients.
Do not overfill the machine - the maximum quantity of ingredients is 1.5kg.
6. Lower the arm using the rise knob (2). (FIG6)
7. Insert the mains plug into a properly installed 220-240V 50-60 Hz safety power socket.
8. Switch the machine using the speed knob to a speed between 1 and 6 (corresponding to the mixture).
9. For pulse operation (kneading at short intervals), turn the switch to the “PULSE” position. The switch has to be
held in this position according to the desired interval length. When the switch is released it returns automatically
to the “0” position.
10. After kneading/stirring turn the speed knob (3) back to the “0” position as soon as the mixture has formed a ball.
Then remove the mains plug.
11. Push the rise knob (2) downwards and the arm will be raised.
12. The mixture can now be released with the help of a spatula and removed from the mixing bowl.
13. The mixing bowl can now be removed.
14. Clean the parts as described under “Cleaning” .

Adjusting the Levels and Using the Dough Hook for not more than 1.5kg of Mixture
Use
Picture
Levels
Time(Min)
Maximum
Operation method
Dough hook
1-3
3-5
1000g flour and
538g water
1 speed run for 30s,
the 2 speed run for
30s, and then the 3
speed run for 2 min to
3 min to form a cluster.
Beater
2-4
3-10
660g flour and
840g water
2 speed run for20s, the
4 speed run for more
than 2min40s
Whisk
5-6
3-10
3 egg whites
(Minimum)
Open 6 speed to run
3min above.
Troubleshooting
NO.
Troubles
Solution
1
The machine doesn't work
·Check if the plug is in good contact with the socket.
·Check if the rise button spring back in place.
·Check if the machine works continuously more than
6 minutes, and wait until the motor cool down.
2
Noise in the mixing bowl when
working (the accessory scraped the
bowl)
·Check if the mixing bowl is properly installed.
·Check if the accessory installed properly on
machine.
3
The pot cover doesn’t fit the mixing
bowl properly
·Check if the pot cover placed on the machine
properly.
·Check if the mixing bowl installed properly on
machine and locked correctly.
4
The machine doesn’t work on certain
speed
·Check if the mark on speed knob correspond to the
speed silkscreen on housing.
·Rotate speed knob to 0 ,and re-check if the machine
works .
5
Movements when the machine
working
·Check if the anti-slip feet fall off.
·Check if the machine is placed on a smooth and flat
tabletop.

6
The rise button didn’t springback in
place after installing the mixing bowl
and pot cover
·Check if the pot cover placed on the machine
properly.
·Check if the mixing bowl is properly installed.
Meat mincer Function:
How to use the mincer
1) To mount the mincer parts, first place the blade(13) on the end of the helix(12) and then a sieve(14) of your choice. Please
pay attention to the sieve and the recesses on the helix housing(11). Screw the lock (15) on until it is “hand tight”.(FIG.1)
2) Remove the front cover (FIG.2) from the machine.
3) Press the fixed button then place the helix housing into the machine and turn anticlockwise to lock (FIG.3)
4) Place the filling tray(FIG.4) on the filler neck
5) Place a vessel under the exit.
6) Put the plug in the socket then set the speed control to position 3.Put the pieces of meat on to the filling tray (17) and into
the filler neck. If necessary push the meat with the presser (16). Do not use your fingers to push the meat!
7) After use, Switch off the appliance and unplug it .
Recommended formulation:
Remove the bones from the meat and cut the pieces into 2.5cm blocks. Put the plug in the socket then set
the speed control to position 1-3, put meat into Filling tray, one-time continuous meat can be 3 kilograms,
after continuous operation of 5min, please stop working, do not work continuously for more than 15 minutes.
Lest the performance of the machine be affected.
Vegetable cutter Function:
How to use the Vegetable cutter
1) Remove the front cover (10) from the machine.
2) Insert the selected cutter [ coarse shredder(20a),slicer(20b),or fine shredder(20c) ] into the cutter
housing(19).(FIG.1&2)
3) Press the fixed button then attach the cutter housing into the machine and turn anticlockwise to lock (FIG.3)
4) Now the appliance is ready for slicing/shredding.
5) Place a vessel under the exit.
6) Put the plug in the socket then set the speed control to position 3-5. Cut the potato or other vegetable to pieces,
which size is suitable for the cutter housing. Choose the different kind of cutter as required. Put the vegetable
pieces into the cutter housing and press slightly by pusher(18). (FIG.4) (Note: Never press by finger)
7) After use, switch off the appliance and unplug it .

Recommended formulation:
Cut solid food into long strips and pass through the cutout.Put the plug in the socket then set the speed
control to position 3-5.Then apply the appropriate force above the pressure block to press the food. after
continuous operation of 5min, please stop working, do not work continuously for more than 15 minutes. Lest
the performance of the machine be affected.
Sausage Function:
How to use the Sausage accessories
1) According to the illustration A, which in turn will 14.15.24.25.18 components installed, install the whole
machine of ground meat output, and back-up wrench will lock nut and tighten.
2) Minced pork clean, with drum attachment twisted into mince (filaments winch) can be used.
3) Minced meat in a mixing bowl.
4) To j oi n a ll ki nds o f s pi ces
5) In the blender mixing slurry to meat good word, viscosity, particles as small as possible
6) Prepare for casing, salt with blisters. Before using, casing in water, and check whether there is a big hole, if
there is a big hole need to truncate the knot, etc. Casing set on the funnel of enema accessories, dip in the
water jacket is easier, knot the end or fasten with a string.
7) The ground put into gradually with the hand gently pull the casing and the sausage filling well. Intervals, with
the rope tight, split sausage. The whole irrigation, sort out again.
8) The sausage is just need to hang up, dry skin. No need to dry completely. Feel the skin is dry that all.
Recommended formulation:
Streaky pork 1kg, salt16g,sugar70g、maple syrup 85g、white pepper 2g、Garlic powder 7g、Five-spice powder
5g、Cayenne pepper 7g、black pepper15g、potato starch 50g、Yellow rice wine 90g Developed for 1 hour, then
cut into blocks. Put the plug in the socket then set the speed control to position 3-6.Then apply the
appropriate force above the pressure block to press the food. after continuous operation of 5min, please stop
working, do not work continuously for more than 15 minutes. Lest the performance of the machine be
affected.

Hollow sausage Function:
How to use the Hollow sausage accessories
1) According to the illustration B, which in turn will 14.15.26.27.18 components installed, install the whole
machine of ground meat output, and back-up wrench will lock nut and tighten.
2) Method of use is the same as the sausage accessories.
Cookie Function:
How to use the Cookie accessories
1) According to the illustration C, which in turn will 14.15.24.28a.18.28b components installed. Then install the
whole attachment into the meat mincer output of the unit, and tighten the lock nut with a wrench.
2) Please pay attention to align the notch of sausage segmentation plate with the fixing pin of the helix housing as
shown in the upper left part of above figure.
3) Move part 28b, and select the shape of cookies you like.
4) After properly installed the cookie attachment, please cut the kneaded dough into strips, then put them into the
filler neck of helix housing one after another, start the machine and set the speed, the cookies will be extruded
from the output part.
5) When the dough sticks to the inner wall of the helix housing, you can use meat mincer presser to push the
dough into the helix housing.
Recommended formulation:
Streaky pork 1kg, salt16g,sugar70g、maple syrup 85g、white pepper 2g、Garlic powder 7g、Five-spice powder
5g、Cayenne pepper 7g、black pepper15g、potato starch 50g、Yellow rice wine 90g Developed for 1 hour, then
cut into blocks. Put the plug in the socket then set the speed control to position 3-6.Then apply the appropriate
force above the pressure block to press the food. after continuous operation of 5min, please stop working, do not
work continuously for more than 15 minutes. Lest the performance of the machine be affected.

Pasta maker Function:
How to use the Pasta maker accessories
1) Align the slot of the pasta maker with the helix housing.
2) According to the illustration D , which in turn will follow 14.15.29.18 components installed ,screw tight the lock
nut.
3) After correctly installed the accessory of pasta maker, cut the dough to bars, and put into the helix housing, set
up the speed, noodles will squeeze out from the output end slowly.
4) When dough adhesive onto the inner wall of the spiral housing, push the dough by using the presser.
Pasta roller function:
Recommended formulation:
Cut the mixture of flour 1Kg and water 500g dough into strips, and can pass through the feed mouth.Put the plug
in the socket then set the speed control to position 3-6.Then apply the appropriate force above the pressure
block to press the food. after continuous operation of 10min, please stop working, do not work continuously for
more than 30 minutes. Lest the performance of the machine be affected.
Recommended formulation:
Cut the mixture of flour 1Kg and water 500g dough into strips, and can pass through the feed mouth.Put the
plug in the socket then set the speed control to position 3-6.Then apply the appropriate force above the
pressure block to press the food. after continuous operation of 10min, please stop working, do not work
continuously for more than 30 minutes. Lest the performance of the machine be affected.

How to use the Pasta roller
PARTS AND FEATURES
Pasta Roller
Fettuccine Cutter (optional)
Spaghetti Cutter (otional)
FUNCTION
Attachment
Speed
Noodle width
Suggested Uses
PASTA ROLLER
2
Up to 140mm
See roller settings chart
FETTUCCINE CUTTER
4
6.5mm
Egg noddles Fettuccine
SPAGHETTI CUTTER
6
2mm
Spaghetti
Thin fettuccine
Linguine fini
Roller settings chart
Attachment
Roller setting
Suggested use
Pasta roller
1-2
Kneading and tiinning dough
3-4
Egg noddles
4-5
Spaghetti,Fettuccine,ravioli,lasagna noddles
6-7
Thin fettuccine,Tortellini,linguini fini
BEFORE FIRST USE
To a voi d da ma ge , do n ot w as h or i mm ers e th e at ta chmen t in w at er o r o the r li qu id. Do n ot w ash in d ish washer. Note:
These attachment are designed for making pasta dough only. Do not cut or roll anything other than pasta to avoid
damaging your pasta roller.
1. Assembling
ATTENTION! Before assembling, turn the stand mixer off and umplug first.
1. Insert the attachment shaft housing into the
hub,making certain the power shaft fits into the square
of hub socket. If necessary, make the pin on
attachment housing fits into the notch of the hub rim
when in proper position.
2.Tighten the attachment hub knob until the attachment
is completely secured to the mixer.
2.Using

WARNING! When using the pasta roller and the cutters, Do not wear ties, scarves, loose clothing or long
necklaces; gather long hair with a clasp.
1. Cut dough into sections that fit in the pasta roller
2. Pull the pasta roller adjustment knob straight out and turn to setting 1. Release the knob, making certain the
pin on the pasta roller housing engages the opening on the back of the adjustment knob, allowing the knob to
fit flush against the roller housing.
3. Turn to speed 2. Feed flattened dough into rollers to knead. Fold dough in half and roll again. Repeat until
dough is smooth and pliable and covers the width of the roller. Lightly dust pasta with flour while rolling and
cutting to aid in drying and separation.
4. Feed dough through rollers to further flatten the sheet of dough. Charge the roller to setting 3, and repeat the
rolling process. Continue to increase roller setting until desired thickness is reached. Do not fold the dough
during this step.
5. To ma ke no od les , exc ha nge t he pa sta r oll er fo r t he cu tt er of yo ur ch oi ce. F eed t he fl att en ed sh eet s of do ugh
through the cutter. See the "Function chart" to determine the correct thickness for each type of pasta.
Cleaning
l Before cleaning remove the mains lead from the socket.
l Never immerse the housing with motor in water!
l Do not use any sharp or abrasive detergents.
Motor Housing
l Only a damp rinsing cloth should be used to clean the outside of the housing.
Mixing Bowl, Mixing Equipment
CAUTION:
l The components are not suitable for cleaning in a dishwasher. If exposed to heat or caustic
cleaners they might become misshapen or discolored.
l Components that have come into contact with food can be cleaned in soapy water.
l Allow the parts to dry thoroughly before reassembling the device.
l Please apply a small quantity of vegetable oil likely to the screens after they have dried.
Disposal
Do not dispose of the device in normal domestic waste.
Dispose of the device over a registered waste disposal firm or through your communal waste disposal facility.
Observe the currently valid regulations. In case of doubt, consult your waste disposal facility.
Table of contents
Popular Kitchen Appliance manuals by other brands

First Choice
First Choice Lincat Opus 800 Installation, operating, servicing and conversion instructions

Bosch
Bosch TCA 52 SERIES operating instructions

Ninja
Ninja Foodi AD150 owner's guide

Morphy Richards
Morphy Richards 43970 TEA MAKER instructions

Sansaire
Sansaire Sous Vide instruction manual

Kalamera
Kalamera KRC-85SZF instruction manual