MIDORI MIDORI-36 User manual

User’s Manual
-Models-
MIDORI-36, MIDORI-42, MIDORI-48, MIDORI-60, MIDORI-72
108 Pico St, Pomona, CA 91766 USA
Tel. (909) 865-7111 Fax. (909) 865-9222
www.YOSHIMASA.usa.com, info@yoshimasausa.com

Thank you for purchasing a MIDORI Air Curtain.
Before use please carefully read this user’s manual and have installed by a specialist.
Be sure to completely read these instructions before any attempts are made to install this
product. It is for your own personal safety and if you fail to observe them, the results can
be potential injury and or damage to yourself and to the property itself. Only use this
product for its intended use. Save this manual so you may refer to it in the future.
WARNING!
1. If the supply cord is damaged, it must be replaced by the manufacturer, its agent or similarly qualified
persons in order to avoid a hazard.
2. This appliance is not intended for use by persons (including children) with reduced physical, sensory or
mental capabilities, or lack of experience and knowledge, unless they have been given supervision or
instruction concerning use of the appliance by a person responsible for their safety.
3. Children should be supervised to ensure that they do not play with the appliance.
4. The method of fixing is not to depend on the use of adhesives since they are not considered to be a
reliable fixing means.
5. Ensure that the fan is switched off from the supply mains before removing the guard.
1. Product Overview
Our company produces the MIDORI air curtain, which can be used to ventilate domains with many
years of accumulations of the core technologies. We have absorbed domestic and foreign advanced
experiences fully in the foundation, and developed a new generation sequence product. This product’s air
volume is suitable, the noise is low, suitable for installing in guesthouse, meeting room, theater, office,
freezer storage, operating room and so on. Widely applies electron, measuring appliance, drugs
manufacture, food, precision sizing, and medical service. (For example entrance) forms the curtain wall in
the specific region, cuts off the inside and outside air from mixing, the reduced heat change,
moisture-proof, provides against pollution, and against fly screen.
2. Type/Style
Air curtain details in the following table:
Type/Style
Air Curtain Machine
Non Heating Air Curtain
Installation Direction
Horizontal Installment
Series
Centrifugal Series

3. Select Model
Select the model mainly on the basis of the width and height of the door, the length of air curtain and
the wind wheel diameter of air curtain. Generally speaking, the width of the door should be shorter than
the length of the air curtain. Please use two or more assemblies. If the door is higher, please select the
bigger diameter of wheel air curtain. Otherwise, then select the smaller diameter of wheel air curtain.
When the environment is quiet, please select the smaller diameter of wheel air curtain.
4. The Use Environment
Project
Specification
Working conditions temperature, °F
14~104
Fixed supply voltage deviation, %
±10
5. Installment
The external dimensions and installation size (Inches):
The air curtain has already designated that for the best installment is a hole on the bottom for the user.
Please loosen the binding screw. This separates the bottom from the box body and has been equipped
with the installment hole on the bottom (Picture 1). When it is installed, the position must be accurate and
be reliable, the method of installation is as follows:
Model
A
B
C
D
E
F
G
Minimum Height
Above Doorway
MIDORI-36
35 ½
4 ¹⁄₁₆
-
7
13 ¾
8 ½
9 ¼
1 ⅜
MIDORI-42
39 ⅜
6 ⅜
-
7
13 ¾
8 ½
9 ¼
1 ⅜
MIDORI-48
47 ¼
3 ⅛
12 ⅞
7
12 ⅞
8 ½
9 ¼
1 ⅜
MIDORI-60
59 ¹⁄₁₆
2 ³⁄₁₆
12 ⅞
7
12 ⅞
8 ½
9 ¼
1 ⅜
MIDORI-72
70 ⅞
2 ⅞
12 ⅞
7
12 ⅞
8 ½
9 ¼
1 ⅜
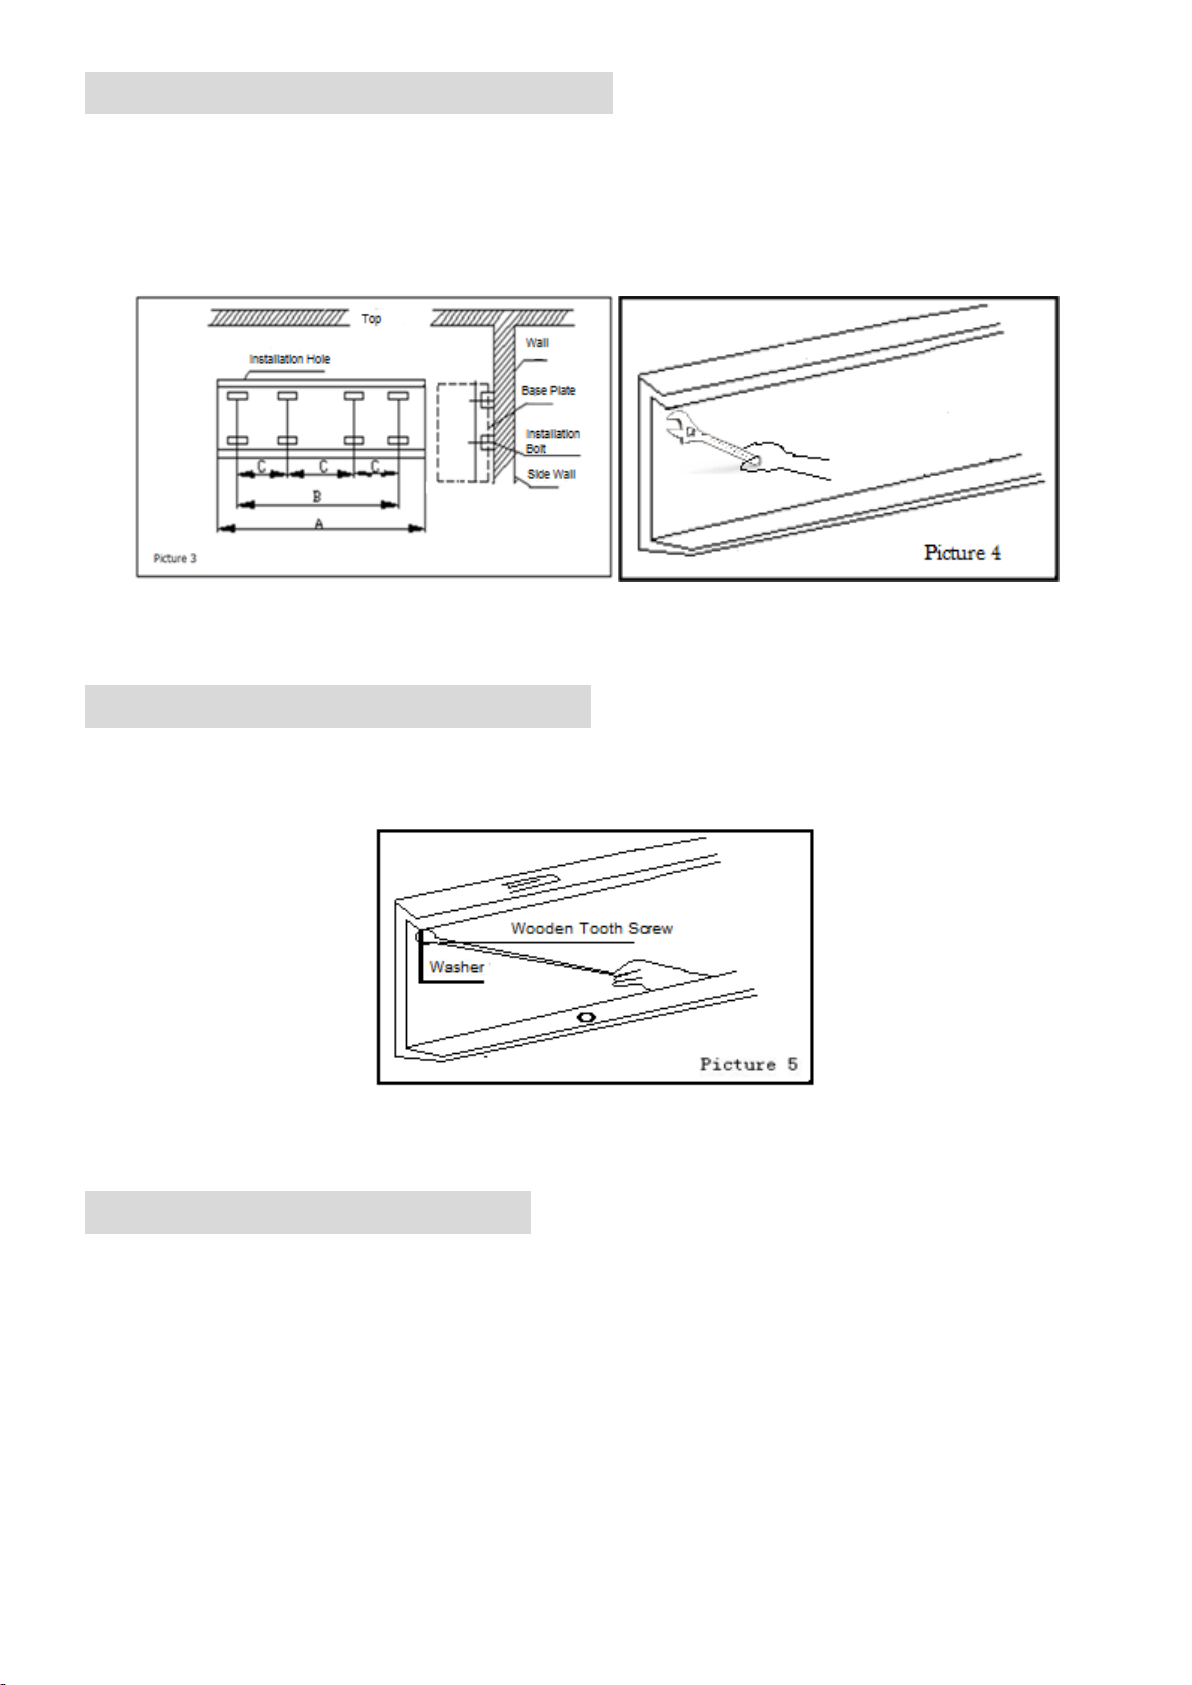
6. Installing On Concrete Walls
(1) According to the different specifications, choose the position (Picture 2)
(2) Splits out explodes bolt's hole which matches M8 to pull on the position, will pull explodes the bolt to fix
on the concretes wall, simultaneously should protect bolt's swinging radius is 19/32 in. (Picture 3)
(3) With the gasket, the nut fastens the bottom; install the complete machine (Picture 4)
7. Installing on Wooden Walls
With the wooden tooth screw fixed firmly on the bottom in a good position (Picture 5), then install the
complete machine again.
8. Installation Precautions
When customer installs the air curtain, please note the following, can increase the efficiency of air curtain.
1. Please install on a solid location, which prevents the work from vibration, and prevents noise which
vibration produces.
2. Please install the air curtain on the inside of the room. (If this product is installed outdoors, please make
sure to protect it from all weather conditions.)
3. Please install to be suitable to the model; if the installation position is too high, will be unable to display
its scheduled function.
4. When installing the air curtain, make sure the air outlet is right at the bottom of fitting surface.
5. If the width of the door is wider than the length of the air curtain, please use two or more assemblies. In
this situation, please make sure the distance is about 25/32 in~1 ft. 37/64 in.
6. When installing the air curtain, please make sure the air curtain is hung on the wall plate and the wall
cannot leave space.
7. The distance between the air curtain and the doorway should not be smaller than 1⅜ in.
8. Please make sure of the level to install.
9. When installing, please make sure the distance between air outlet and the ground is more than
7 ft 6½ in.
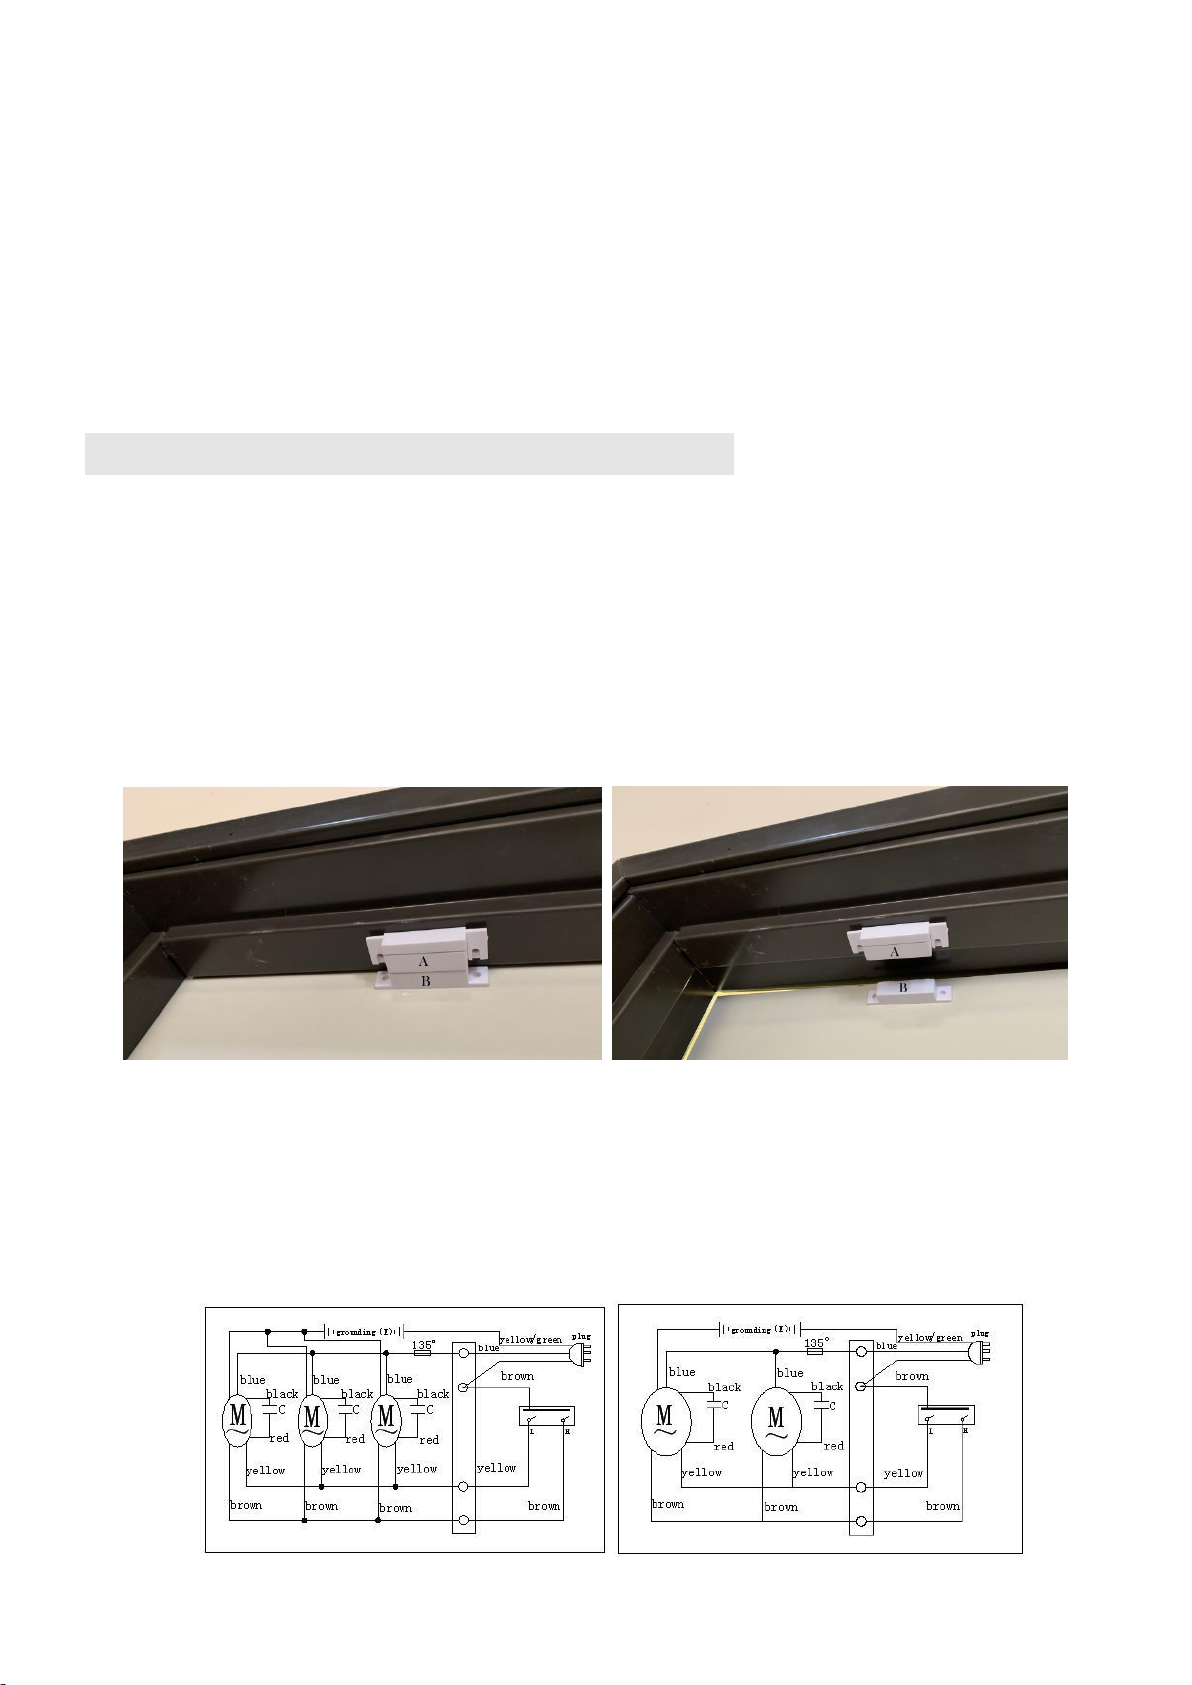
9. The Control and Use of Air Curtain
1. Installation of the magnetic door switch (Picture 6-1, 6-2). The air curtain can be controlled by this
switch.
Part A goes on the door frame and Part B goes onto the door itself. As long as the magnets in both parts
work when close to each other when the door is closed, the magnetic door switch has been properly
installed. When the door is closed and both parts are close to each other, the air curtain will not be active
and will be off. (Picture 6-1) Once the door is open and both parts are no longer near each other, the air
curtain gets activated and will turn on. (Picture 6-2)
Picture 6-1 Picture 6-2
2. With the buttons on the air curtain itself you can switch between two speeds on the air curtain control
circuit (Picture 7-1, 7-2); once you have pressed the ON button please press LO or HI, then after
obtaining the appropriate air speed, press the OFF button to stop.
Picture 7-1 Picture 7-2
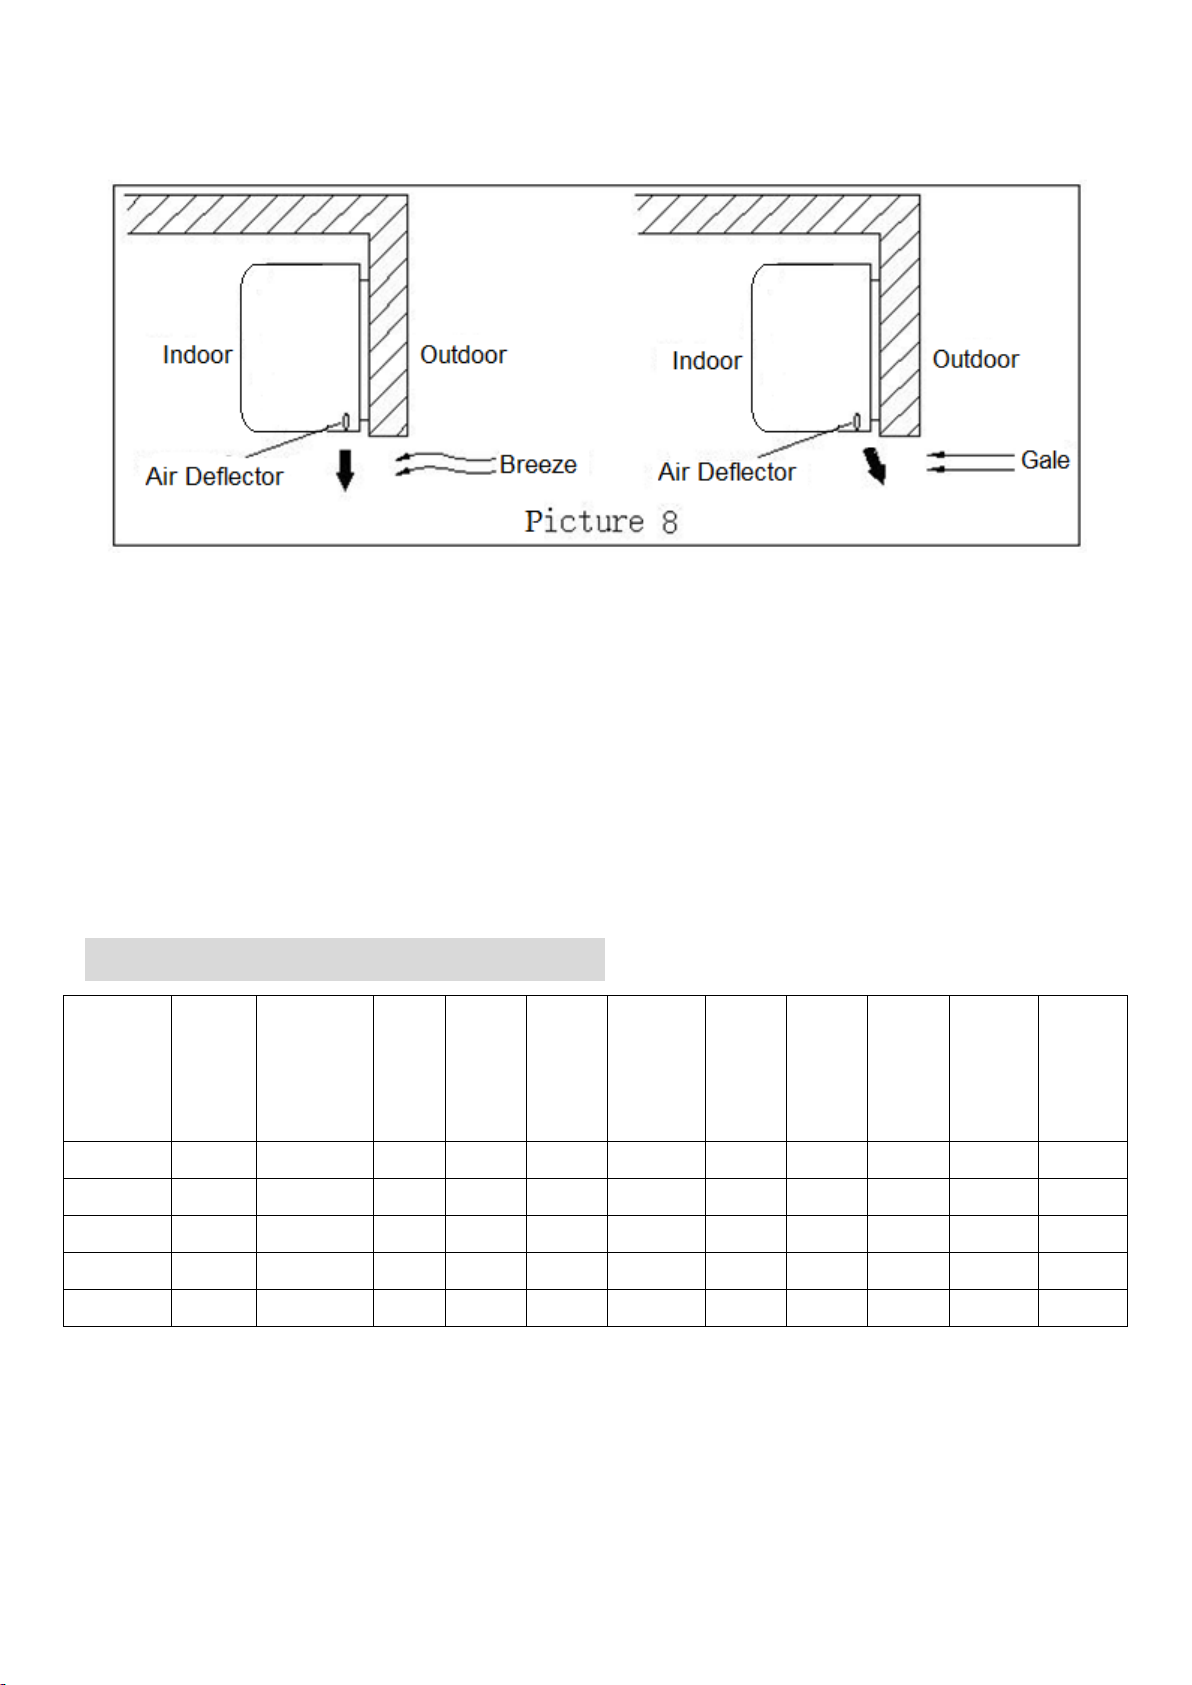
3. The air deflector of air curtain is adjustable. The air direction changed depends on the air deflector.
(Picture 8)
4. The air curtain can be controlled by either the remote or automatically via the magnetic door switch. As
mentioned above, the door switch allows the air curtain to turn on whenever the door opens which is
convenient for when the door is normally kept closed. The remote can only turn the air curtain on when
the door is open and Part A and B of the magnetic door switch are no longer touching. Once the door is
open, and the air curtain is off, you can click the ON button on the remote and the air curtain will be
activated to the setting of either HI or LO. If you wish to go back to having the air curtain controlled by the
magnetic door switch, just go ahead and turn it off using the remote and turn it back on using the buttons
directly on the air curtain itself as mentioned in #2 of section 9.
10. The Technology Parameter
Model
Rated
Voltage
(V)
Rated
Frequency
(Hz)
Max
Input
Power
(w)
Max
Input
Flow
(m³/h)
Max
Wind
Speed
(m/s)
Noise
(dBA)
N.W
(lbs)
HP
# of
Motors
Air
Volume
(CFM)
Amps
MIDORI-36
110
60
510
1450
20
≤48
36
⅓
2
1450
4
MIDORI-42
110
60
510
1450
20
≤48
39
⅓
2
1450
4
MIDORI-48
110
60
660
1930
20
≤49
50
⅜
2
1930
5.5
MIDORI-60
110
60
840
2420
20
≤52
61
⅓
3
2420
6.8
MIDORI-72
110
60
980
2900
20
≤54
72
⅓
3
2900
8

11. Service and Maintenance
1. The power should be cut off before inspection and maintenance.
2. Motors, electrical components should be moisture-proof to prevent a short circuit.
3. Every six months, carry out normal periodic repairs and maintenance to remove the dirt from air curtain.
Please use cleaning detergents to clean, and then wipe with a clean, soft cloth.
Do not use gasoline, thinner, kerosene, fungicides or a metal brush to clean the machine.
4. Damaged supply cords to be replaced by the manufacturer, service agent or similarly qualified person
to avoid hazard.
12. Product Warranty (1 Year Labor & Parts)
1. This appliance is not intended for use by persons (including children) with reduced physical, sensory or
mental capabilities, or lack of experience and knowledge, unless they have been given supervision or
instruction concerning use of the appliance by a person responsible for their safety.
2. Children should be supervised to ensure that they do not play with the appliance.
3. If the product’s quality is indeed the problem, the product’s return, replacement or repair is free of
charge. (Warranty excludes the magnetic door switch and remote control.)
4. Our products are tested to ensure they are functioning properly before shipping out to customers.
5. The product must have been purchased within one year, under normal use and maintenance of
machines for the products to be in the free repair period.
6. Repair products up to one year, but will be charged for one of the following repairs:
(1) The damage of use, maintenance or custody caused by improper use; (2) Damage due to the
demolition or moving of the company maintenance department to repair damage; (3) Without a valid
invoice or the purchase certificate; (4) Inconsistent maintenance of products; (5) Damage due to major
force
Hold Onto For Your Records
Air Curtain Model Name: _______________________
Date of Purchase: ___________________
Purchased From: ____________________
This manual suits for next models
4
Table of contents
Popular Heater manuals by other brands

Everdure
Everdure BRIGADIER Operating and maintenance instructions

Bestron
Bestron WINTER WARM ACV3000T instruction manual

Voohek
Voohek HB-301 instructions

Timken
Timken VHIN-G2-10 user manual

Protemp
Protemp PT-16-TTC User's manual & operating instructions

VeriSmart
VeriSmart EcoHeat C3 Installation and user manual


