Midwest RDH Freedom Manual

ENGLISH • 1
ENGLISH • 1
Directions For Use
Mode d’emploi
Instrucciones de uso
Gebrauchsanweisung
Istruzioni per l’uso
Указания по применению
Le système de prophylaxie sans l
El Sistema de Prolaxis Inalámbrico
Kabellose Prophylaxe-System
Il sistema di prolassi senza li
Беспроводной профилактической системы
Cordless Prophy System
®
Please read carefully and completely before operating unit.
Prière de lire attentivement et complètement avant la première
utilisation de l’appareil.
Por favor lea cuidadosamente y en su totalidad antes de operar la unidad.
Bitte vor Inbetriebnahme der Einheit sorgfältig und vollständig durchlesen.
Si prega di leggere attentamente e completamente prima di utilizzare
l’apparecchio.
Пожалуйста, внимательно и полностью прочтите перед использованием
устройства.

ENGLISH • 2
ENGLISH • 2
TABLE OF CONTENTS
OVERVIEW . . . . . . . . . . . . . . . . . . . . 3
1. INDICATIONS FOR USE. . . . . . . . 3
2. CONTRAINDICATIONS . . . . . . . . 3
3. WARNINGS . . . . . . . . . . . . . . . . 3
4. PRECAUTIONS . . . . . . . . . . . . . . 4
5. ADVERSE REACTIONS . . . . . . . . 4
6. MIDWEST®RDH FREEDOM®
CORDLESS PROPHY SYSTEM
DESCRIPTION . . . . . . . . . . . . . . 5
7. UNPACKING THE SYSTEM . . . . . 6
8. INFECTION CONTROL
PROCEDURES . . . . . . . . . . . . . 6
9. SYSTEM SETUP . . . . . . . . . . . . . 9
10. CHARGING THE HANDPIECE
AND FOOT PEDAL . . . . . . . . . . . 9
11. SYNCHRONIZING THE
HANDPIECE AND FOOT
PEDAL . . . . . . . . . . . . . . . . . . . 10
12. PREPARATION FOR USE. . . . . . 11
13. OPERATION . . . . . . . . . . . . . . . 12
14. HANDPIECE INDICATOR
LIGHTS (WHEN IN USE) . . . . . . 12
15. SPECIFICATIONS . . . . . . . . . . . 13
16. CLASSIFICATIONS . . . . . . . . . . 13
17. SYMBOL IDENTIFICATION. . . . . 14
18. DISPOSAL OF UNIT. . . . . . . . . . 15
19. TROUBLESHOOTING. . . . . . . . . 15
20. ACCESSORIES . . . . . . . . . . . . . 17
21. LIMITED WARRANTY . . . . . . . . 18

ENGLISH • 3
1. Indications for Use
The Midwest RDH Freedom is a high-performance
cordless prophylaxis handpiece with a wireless foot
pedal for use with Nupro Freedom® disposable
prophylaxis angles in a hygiene operatory to perform
cleaning and polishing procedures on teeth.
WARNING Use care to prevent personal and / or patient injury
PRECAUTION Use care to prevent product damage and ensure safe and effective product use
Safety Conventions in This Document
3. Warnings
• To prevent damage, charge the handpiece using
only the Midwest RDH Freedom charging base
and power supply.
• Sterilizing the inner module will cause component
damage to the handpiece and the sterilizing equip-
ment, and may cause personal bodily injury.
• The outer sheath must be steam sterilized before
first use and between patients to prevent cross
contamination. See Section 8 for the Infection
Control Procedures.
• The Disposable Prophy Angles are designed for
single-patient use only and should never be used
more than once. Disposable Prophy Angles are not
autoclavable or designed to withstand disinfection
solutions. The risk of reuse of a Disposable Prophy
Angle are damage to equipment and cross-con-
tamination. Install a new Prophy Angle before each
use.
• It is the responsibility of the Dental Healthcare
Professional to determine the appropriate uses of
this product and to understand:
• the health of each patient
• the dental procedures being undertaken
• applicable industry and governmental agency
recommendations for infection control in dental
healthcare settings
• requirements and regulations for safe practice
of dentistry
• these Directions for Use in their entirety
• Per FCC Part 15.21, changes or modifications not
expressly approved by the party responsible for
compliance could void the user’s authority to oper-
ate this equipment.
• Failure to follow recommendations for environ-
mental operating conditions (see Section 15 for
Specifications) could result in injury to patients or
users.
• Inspect the handpiece system before each use for
worn, loose or damaged parts. Do not attempt to
operate unless the Disposable Prophy Angle (DPA)
is properly installed. A loose DPA could eject from
the handpiece causing bodily injury. Reinstall the
DPA or replace any damaged parts as necessary.
• To prevent bodily injury and damage to the device,
do not sterilize the disposable prophy angle, inner
module, charging base, foot pedal or power supply.
Disinfect the inner module, charging base, foot
pedal and power supply using only the tested and
approved disinfectants listed in Section 8, Infection
Control Procedures.
• Operating the Disposable Prophy Angle at an
excessive speed or with excessive force may
cause heating of the tooth and temporary discom-
fort to the patient.
• The inner module, foot pedal, charging base and
power supply are not waterproof. To prevent dam-
age to the equipment, contamination or bodily
injury, do not immerse any of these components in
water or a chemical solution.
• Use only components and accessories listed in
Section 7 of this manual. Failure to do so will void
the warranty, may decrease system performance
and may lead to unsafe operation.
Overview
The MIDWEST®RDH Freedom®Cordless Prophy System offers a cordless design that eliminates cord drag and
allows clinicians easy access and comfort during prophylaxis procedures. Quieter than traditional hygiene and low
speed handpieces, the system offers all-day battery life while delivering the same performance you would expect
from a corded handpiece. The system includes an autoclavable outer sheath for infection control.
2. Contraindications
None Known.

ENGLISH • 4
• Never mount a Disposable Prophy Angle to the
handpiece body while it is operating.
• Dispose of Nupro Freedom® Disposable Prophy
Angles after each patient according to CDC
Guidlines for Infectious Waste and Federal, State
and Local regulations.
• There are no user-serviceable items in the inner
module, power supply, outer sheath, foot pedal or
charging base. Opening any of these units may
result in unsafe operation and will void the war-
ranty.
• According to IEC 60601-1/UL60601-1, this device
must not be used in the presence of a flammable
anesthetic gas mixed with air, oxygen, or nitrous
oxide. (Note: nitrous oxide by itself is not a flam-
mable anesthetic gas.).
4. Precautions
• Before using this product, carefully read and follow
all instructions and save them for future reference.
Observe all precautions and warnings.
• The handpiece system can only be used with
Nupro Freedom® Disposable Prophy Angles.
• As with all dental procedures, use universal pre-
cautions (i.e., wear face mask, eyewear, or face
shield, gloves and protective gown).
• The inner module motor is designed to be lube-
free. Lubrication may cause damage to the inner
module.
• Oil and/or dirt may damage the motor, electron-
ics and battery located inside the handpiece inner
module.
• The batteries are not user replaceable. When
needed, the units should be returned to the listed
repair center for replacement.
• Do not place the system on or next to a radiator
or other heat source. Excessive heat may damage
the system’s electronics.
•Inadvertent system shutdown may occur in the
presence of strong non-compliant radio frequency-
generating components.
• This device complies with part 15 of the FCC
Rules and with Industry Canada license-exempt
RSS standard(s). Operation is subject to the fol-
lowing two conditions: (1) This device may not
cause harmful interference, and (2) This device
must accept any interference received, including
interference that may cause undesired operation.
Changes or modifications not expressly approved
by the party responsible for compliance (i.e. the
manufacturer) could void the user’s authority to
operate the equipment.
This Class B digital apparatus complies with
Canadian ICES-003.
• Under Industry Canada regulations, this radio
transmitter may only operate using an antenna of
a type and maximum (or lesser) gain approved
for the transmitter by Industry Canada. To reduce
potential radio interference to other users, the
antenna type and its gain should be so chosen that
the equivalent isotropically radiated power (e.i.r.p.)
is not more than that necessary for successful
communication.
• This equipment has been tested and found to
comply with the limits for a Class B digital device,
pursuant to Part 15 of the FCC Rules. These lim-
its are designed to provide reasonable protection
against harmful interference in a residential instal-
lation. This equipment generates, uses and can
radiate radio frequency energy and, if not installed
and used in accordance with the instructions, may
cause harmful interference to radio communica-
tions. However, there is no guarantee that interfer-
ence will not occur in a particular installation. If
this equipment does cause harmful interference to
radio or television reception, which can be deter-
mined by turning the equipment off and on, the
user is encouraged to try to correct the interfer-
ence by one or more of the following measures:
• Reorient or relocate the receiving antenna.
• Increase the separation between the equip-
ment and receiver.
• Connect the equipment into an outlet on a
circuit different from that to which the receiver
is connected.
5. Adverse Reactions
There are no known adverse reactions.
ENGLISH • 5
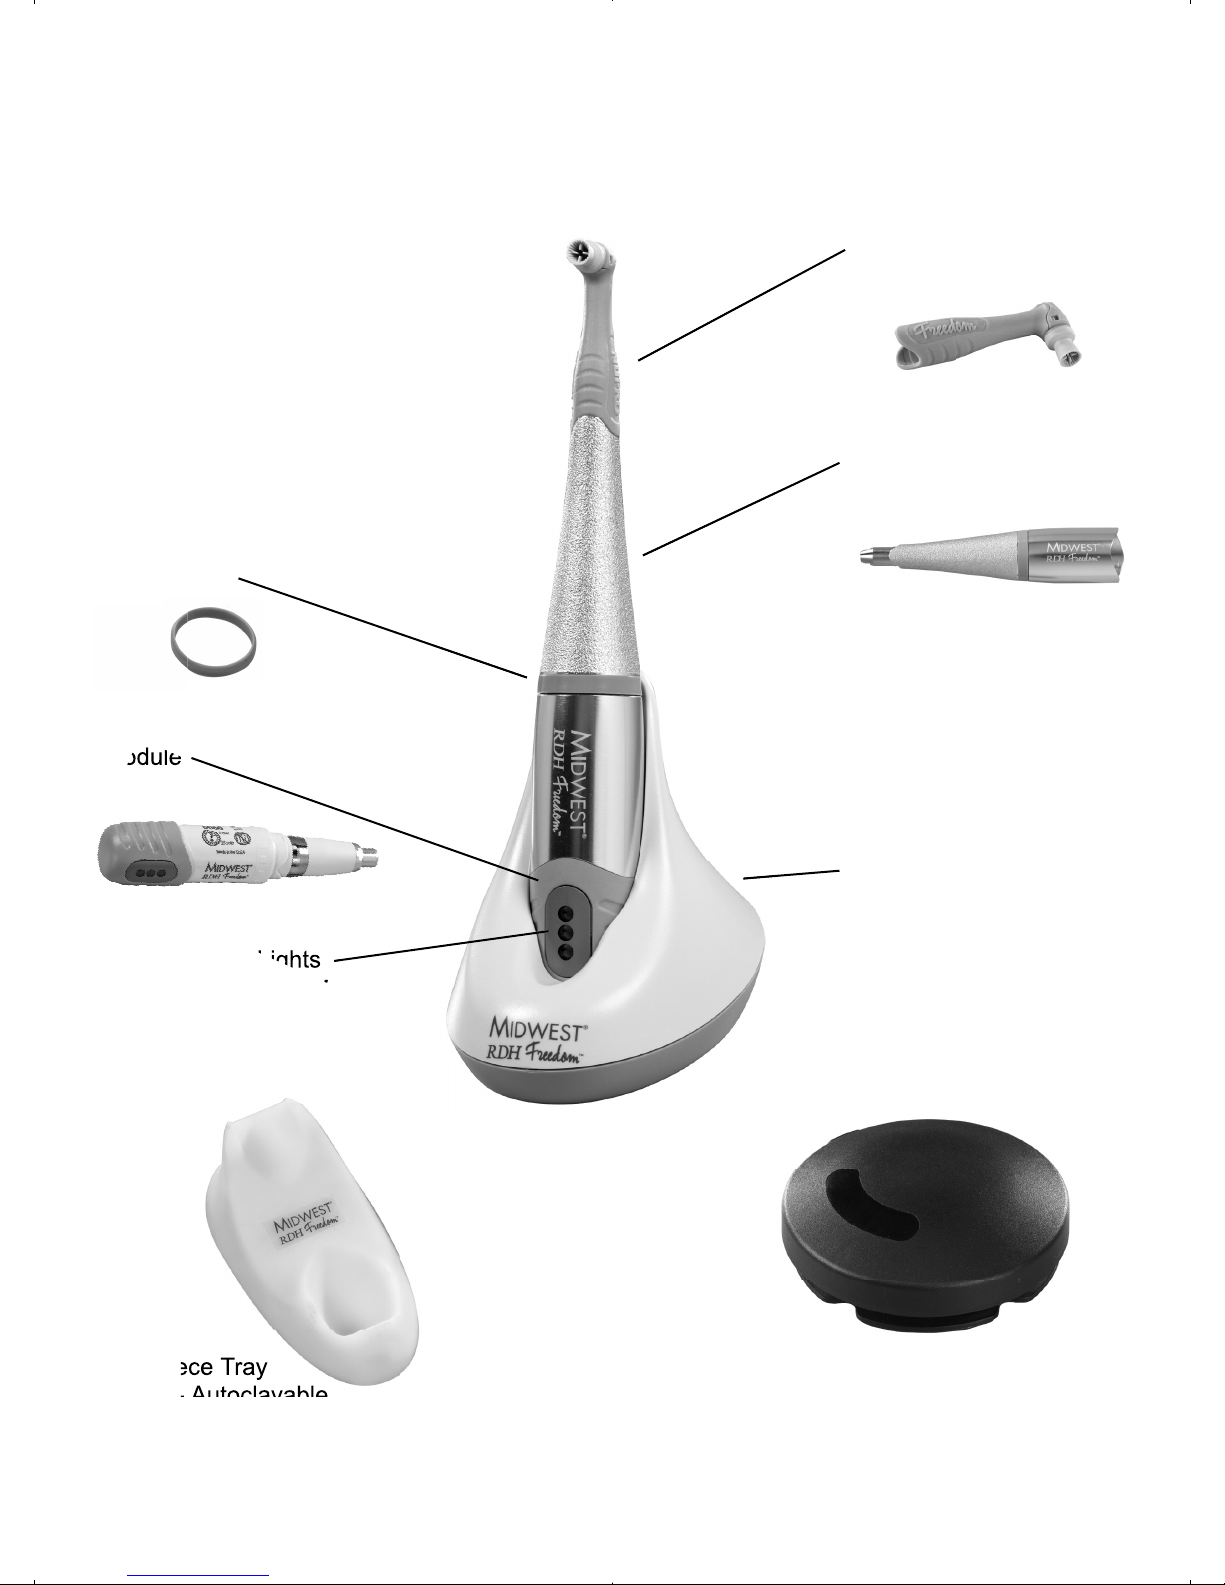
6. MIDWEST®RDH Freedom® Cordless Prophy System Description
Nupro Freedom®
Disposable Prophy Angle
Removable, Autoclavable
Outer Sheath
Charging Base
(See Section 10)
Removable, Replaceable
Color Ring
Inner
Module
LED Indicator Lights
(Charging - See Section 10)
(Operation - See Section 14)
Wireless Rechargable Foot Pedal
(Charging - See Section 10)
(Syncronization - See Section 10)
Handpiece Tray
Cradle - Autoclavable
Handpiece Tray
Cradle - Autoclavable
Module
LED Indicator Lights
(Charging - See Section 10)

ENGLISH • 6
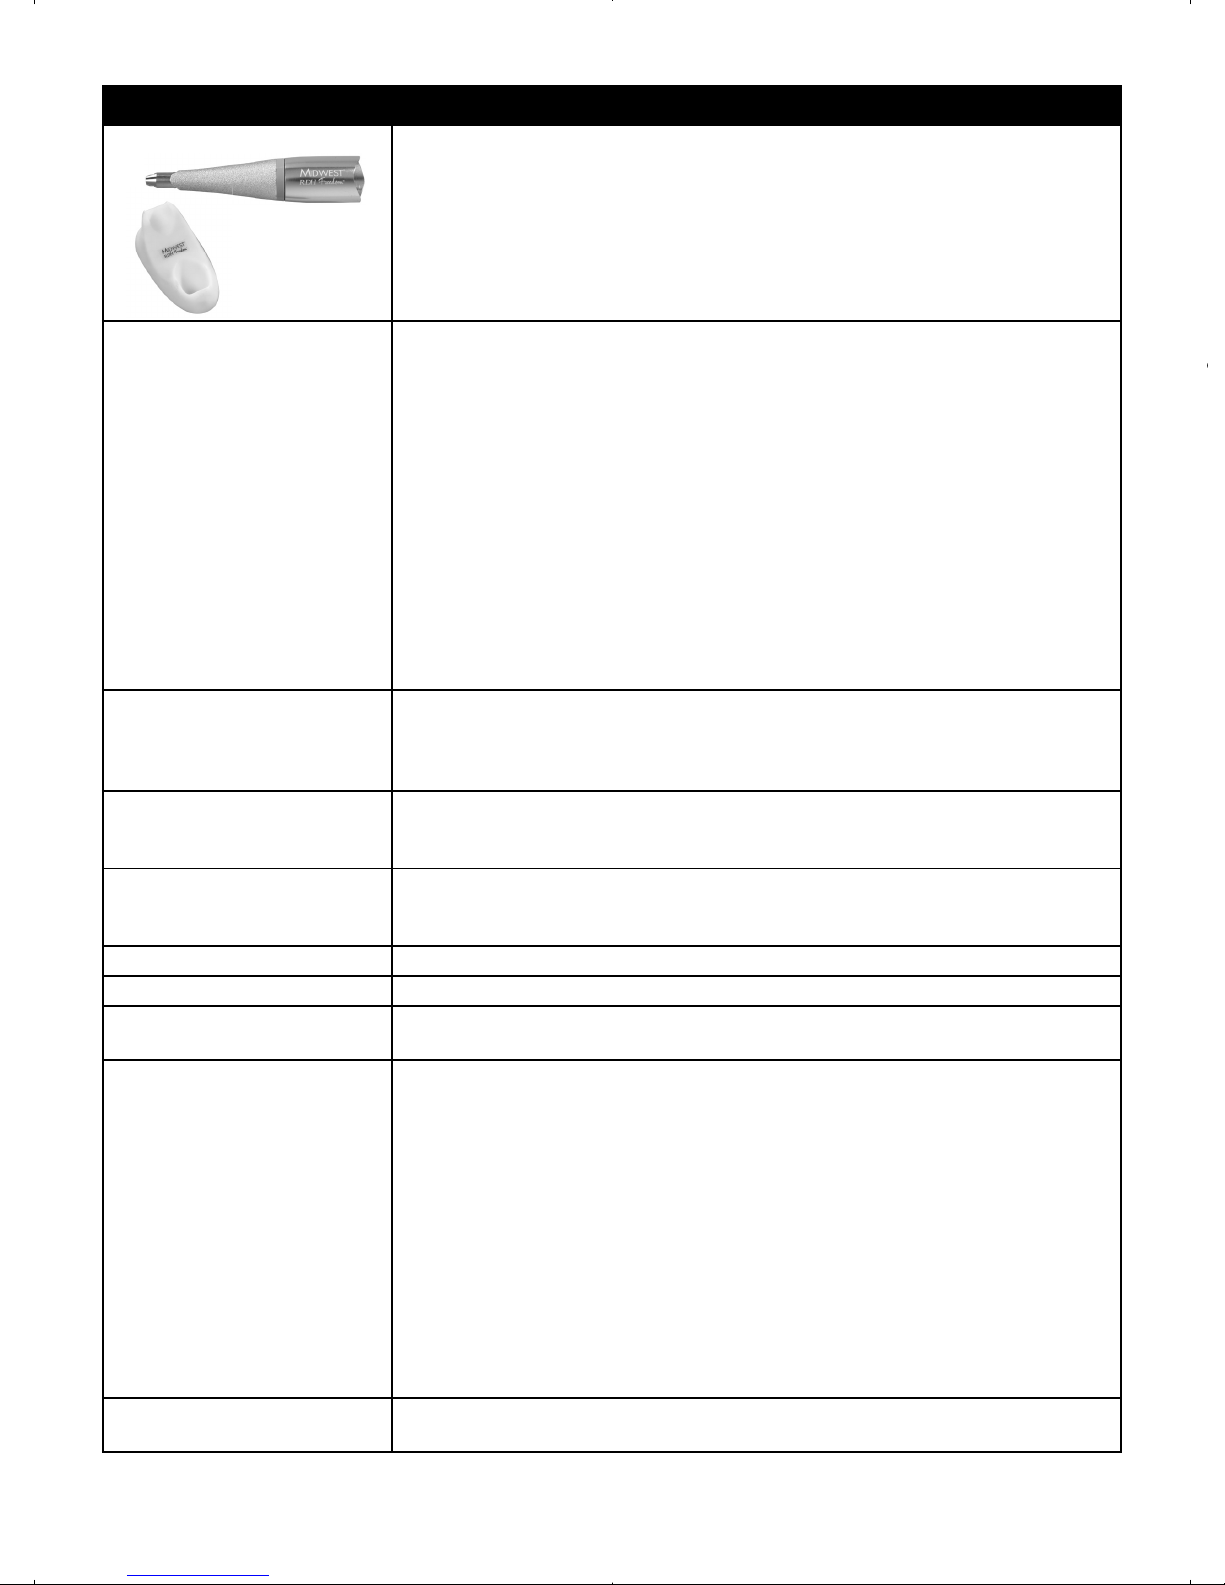
7. Unpacking the System
As you unpack your MIDWEST®RDH Freedom® Cordless Prophy System, verify that the following compo-
nents and accessories are included:
8. Infection Control Procedures
The objective of the information provided in this section is to reduce the potential for cross contamination when
using a MIDWEST®RDH Freedom® Cordless Prophy System during routine dental care. In the event any
regulatory agency disagrees with this information, the agency requirements take precedence.
NOTE: Outer sheaths and handpiece cradle must be steam-autoclave sterilized prior to each use.
Additional outer sheaths and handpiece cradles are available for purchase.
Basic System:
1- Handpiece Inner Module
1- Handpiece Outer Sheath
1- Charging Base
1- Wireless Foot Pedal
1- Power Supply
1- Double-ended extension cable (not shown)
20- NUPRO Freedom Disposable Prophy
Angles (DPAs)
1- Disposa-Shield Trial Pack (25)
1- Handpiece Cradle
Premium System:
1- Handpiece Inner Module
3- Handpiece Outer Sheaths
1- Charging Base
1- Wireless Foot Pedal
1- Power Supply
1- Double-ended extension cable (not shown)
20- NUPRO Freedom Disposable Prophy
Angles (DPAs)
1- Disposa-Shield Trial Pack (25)
1- Handpiece Cradle
1- Carrying case
ENGLISH • 7
WARNINGS These instructions are for use ONLY on the outer sheath and handpiece cradle. All
other parts of the system should be disinfected according to the procedures in the
“Disinfection” section.
The outer sheath and handpiece cradle for the MIDWEST®RDH Freedom® Cordless
Prophy System are not sterile upon receipt and must be sterilized prior to use in
accordance with the following instructions.
LIMITATIONS ON
REPROCESSING The Handpiece Cradle may only be sterilized following the pre-vacuum sterilization
procedures. The Gravity Steam sterilization procedures have not been validated for the
Handpiece Cradle.
Do not use an automatic washer/disinfector for the sheath. Discoloration of material
will occur.
Repeated cleaning and sterilization cycles have minimum effect on these instruments.
End of life is normally determined by wear and damage due to use.
Do not use chemical disinfectants prior to sterilization or rapid deterioration of the
material may occur.
Cold liquid disinfection/sterilization, chemical vapor sterilization, and dry heat
sterilization methods have not been tested or validated for efficacy and are not
recommended for use.
Do not immerse the outer sheath or handpiece cradle in an ultrasonic bath.
POINT OF USE Remove excess soil with disposable cloth or paper wipe.
It is recommended that instruments are reprocessed as soon as is reasonably practical
following use.
CONTAINMENT AND
TRANSPORTATION Protect the outer sheath and handpiece cradle from contact with other dental
instruments that may cause damage.
PREPARATION FOR
DECONTAMINATION Remove the outer sheath from the inner module of the handpiece. Only the outer
sheath, color ring of the handpiece, and handpiece cradle may be steam-autoclave
sterilized.
CLEANING: MANUAL Rinse the instruments with running water to remove any gross debris.
DISINFECTION Disinfection of the instruments is not necessary prior to steam - autoclave sterilization.
PACKAGING Place each instrument in a separate paper or paper/plastic steam-sterilization pouch.
If using a sterilizing cassette, ensure that the sterilizer’s maximum load is not exceeded.
STERILIZATION Use a steam autoclave. Place bagged instruments into the steam autoclave, paper
side up when using a paper/plastic pouch.
Gravity Steam Sterilization
Full Cycle:135°C (275°F) for 3.5 minutes
Pre-vacuum Steam Sterilization
Full Cycle:132°C (270°F) for 3 minutes
Alternate Method: Place non-bagged instruments into the steam autoclave and run at
the listed cycles.
NOTE: Instruments sterilized unbagged should be used immediately.
DRYING To dry, use the drying cycle of the autoclave. Set cycle for 20 to 30 minutes. Do not
exceed 137°C.
Instructions for Sterilizing The Outer Sheath And Handpiece Cradle
The Handpiece Cradle may only be sterilized following the pre-vacuum
sterilization procedures. The Gravity Steam sterilization procedures have
not been validated for the Handpiece Cradle.
ENGLISH • 8
WARNINGS The charging base, inner module, foot pedal, power supply and double-ended
extension cable (not shown) are not sterilizable by autoclave, but can be disinfected
following the procedures listed below.
Only use water based non-immersion type disinfectant solutions.
Per the Centers for Disease Control and Prevention (CDC), chemical germicide
registered with the EPA as a “hospital disinfectant” and labeled for “tuberculocidal”
(i.e., mycobactericidal) activity is recommended for disinfecting surfaces that have
been soiled with patient material. These intermediate-level disinfectants include
phenolics, and chlorine-containing compounds.
The following tuberculocidal disinfectants are safe for use on the components listed
above: • Phenolics (Dual Water-Based) such as Birex SE Concentrate or Disinfectant
Wipes (Manufactured by Biotrol)
• Phenolics (Dual Alcohol-Based) such as Cavicide Spray or Wipes
(Manufactured by TotalCare)
• Quarternaries (Dual or Synergized Plus Alcohol) such as Lysol IC
Disinfectant Spray (Manufactured by Sultan Heathcare)
• Sodium Hypochlorite such as Clorox Germicidal Spray or Wipes
(Manufactured by Harry J. Bosworth Company)
• Sodium Bromide & Chlorine (Microstat Tablets) 2 tablets/quart of water
LIMITATIONS ON
REPROCESSING Repeated cleaning has minimum effect on these instruments. End of life is normally
determined by wear and damage due to use.
Do not use disinfectant solution on sterilizable outer sheaths. Refer to sterilization
procedures for sterilizable outer sheaths.
POINT OF USE Remove excess soil with disposable cloth or paper wipe. Discard wipe after use.
CONTAINMENT AND
TRANSPORTATION Handle with care.
CLEANING Generously spray disinfectant solution on a clean cloth. Wipe the outer surfaces of
the charging base, inner module, foot pedal, power supply and cords. Discard used
cloth. Wipe dry with a clean cloth.
DISINFECTION Generously spray disinfectant solution on a clean cloth. Wipe the outer surfaces of the
charging base, inner module, foot pedal, and the power supply and its cord.
Discard used cloth.
Allow disinfectant to air dry.
Instructions For Disinfecting All Other Parts (Charging Base, Inner Module, Foot Pedal and Power Supply)
MAINTENANCE Visually inspect to ensure that all contamination has been removed.
Check for distortion, damage or wear. Discard damaged, worn or corroded
instruments.
STORAGE To maintain sterility, instruments should remain bagged until ready for use.
MANUFACTURER CONTACT In the United States, contact DENTSPLY Professional Customer Service Technical
Support at 800-989-8826. For areas outside the United States, contact your local
DENTSPLY Division.
Instructions For Sterilizing The Outer Sheath And Tray Cradle, Cont.
Only use water based non-immersion type disinfectant solutions.
Per the Centers for Disease Control and Prevention (CDC), chemical germicide
registered with the EPA as a “hospital disinfectant” and labeled for “tuberculocidal”

ENGLISH • 9
DRYING When cleaning, wipe surfaces dry with a clean cloth. To achieve disinfection, allow
surfaces to air dry.
MAINTENANCE Visually inspect to ensure that all contamination has been removed.
Visually inspect power supply and cords for damage.
STORAGE Ambient temperature range: -20˚C to 50˚C
Relative humidity range: 45 - 95% (non-condensing)
MANUFACTURER CONTACT In the United States, contact DENTSPLY Professional Customer Service Technical
Support at 800-989-8826. For areas outside the United States, contact your local
DENTSPLY Division.
Instructions For Disinfecting All Other Parts (Charging Base, Inner Module, Foot Pedal and Power Supply), Cont.
The instructions provided above have been validated by DENTSPLY as being capable of preparing a medical device for
re-use. It remains the responsibility of the processor to ensure that the processing is actually performed using equipment,
materials and personnel in the processing facility to achieve the desired result. This requires validation and routine
monitoring of the process. Likewise, any deviation by the processor from the instructions provided should be properly
evaluated for effectiveness and potential adverse consequences.
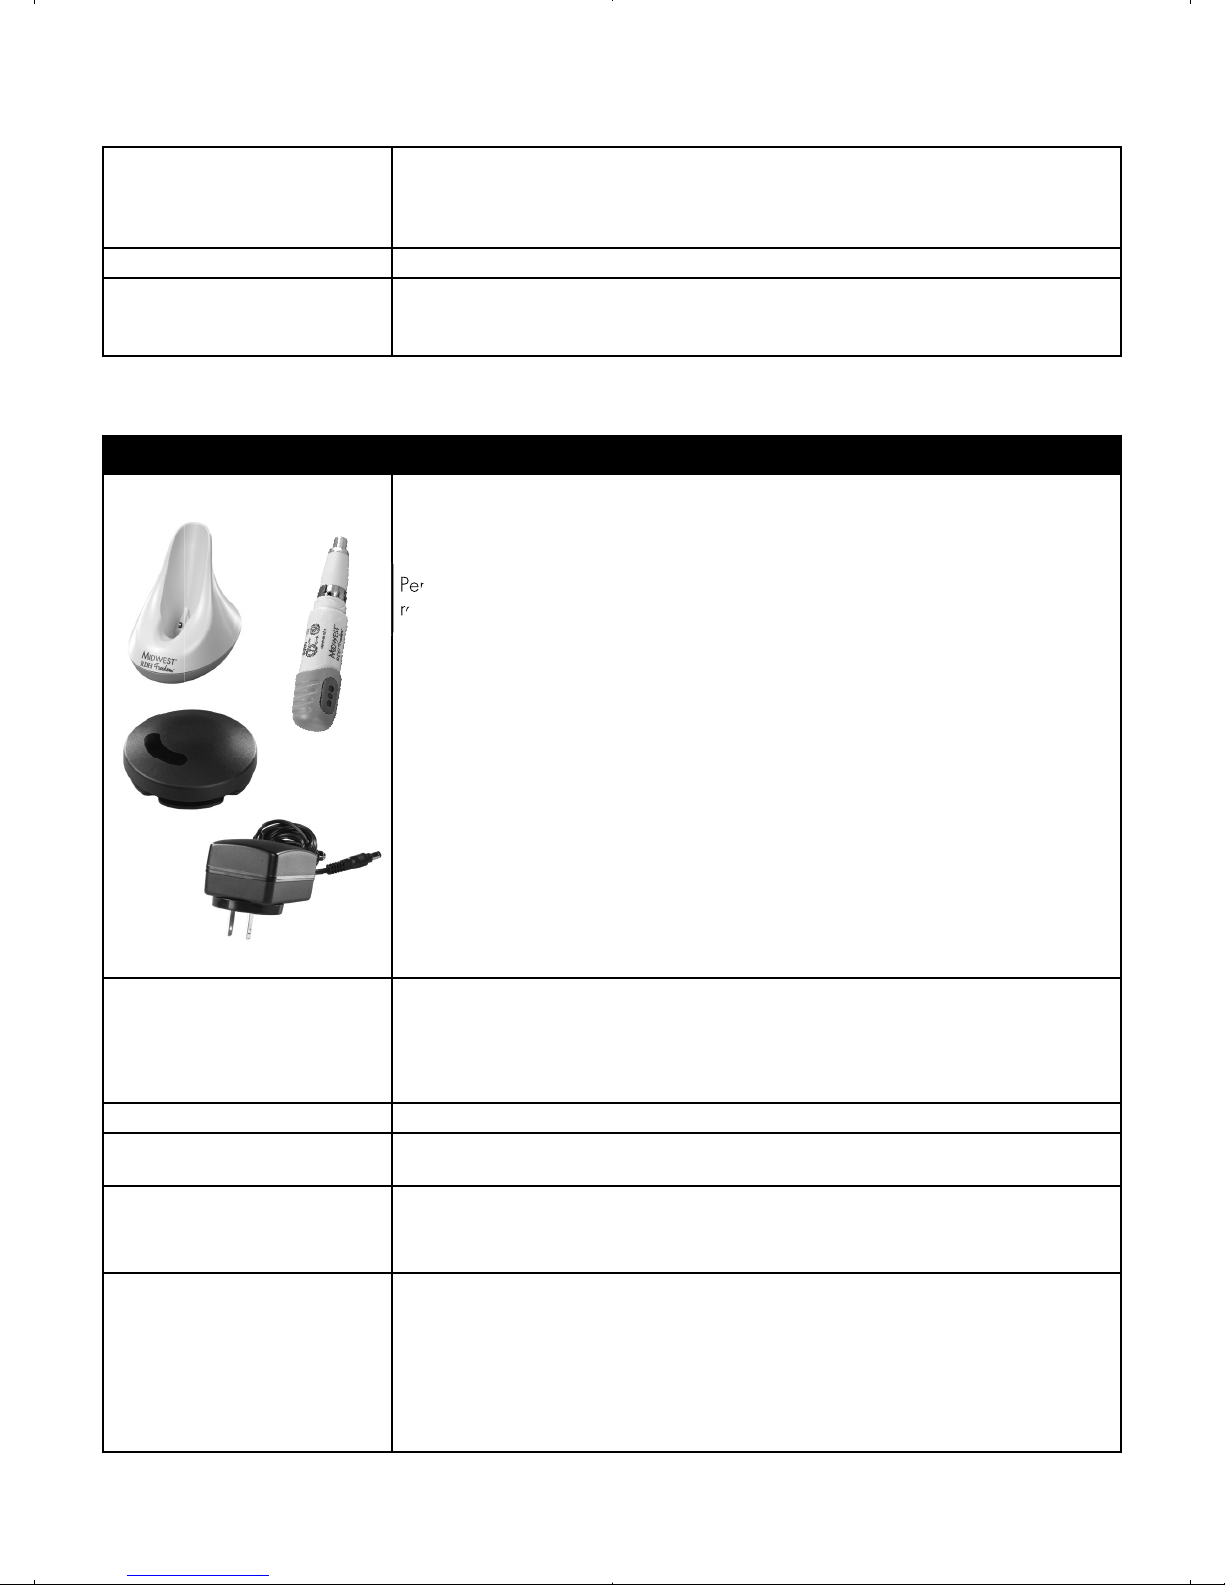
9. System Setup
Both the handpiece and foot pedal must be
charged prior to first use. Only use the Midwest
RDH Freedom power supply. Failure to do so
could cause your system to malfunction and
void your warranty. Charge the handpiece and
foot pedal for at least 90 minutes. (See Section 10,
Charging the Handpiece and Foot Pedal).
10. Charging the Handpiece and Foot
Pedal
When the corresponding indicator light is orange,
the handpiece and/or foot pedal must be charged.
10.1 A double-ended extension cable has been sup-
plied that allows you to charge both the inner
module and the foot pedal at the same time. Plug
the female onto the Power Supply Cable plug and
plug the male ends into the charging base and foot
pedal.
You can also charge the inner module and the foot
pedal individually using the power supply cable
alone.
10.2 Plug the power supply into a wall outlet.
NOTE: The green power-on indicator on the back of the
charging base illuminates when the charging base is
successfully connected.
NOTE: Unplug the power supply from the wall outlet
(power mains) to remove all power to the charging base.
PRECAUTION: Connect to single phase AC power 100-
240V power only. Otherwise, malfunction will occur.
Do not unplug the power supply by pulling on the cord.
Handpiece charge
indicator
Foot-pedal charge
indicator
Power supply
connector
Power supply
connector
connector
Power Indicator
Power Indicator
ENGLISH • 10
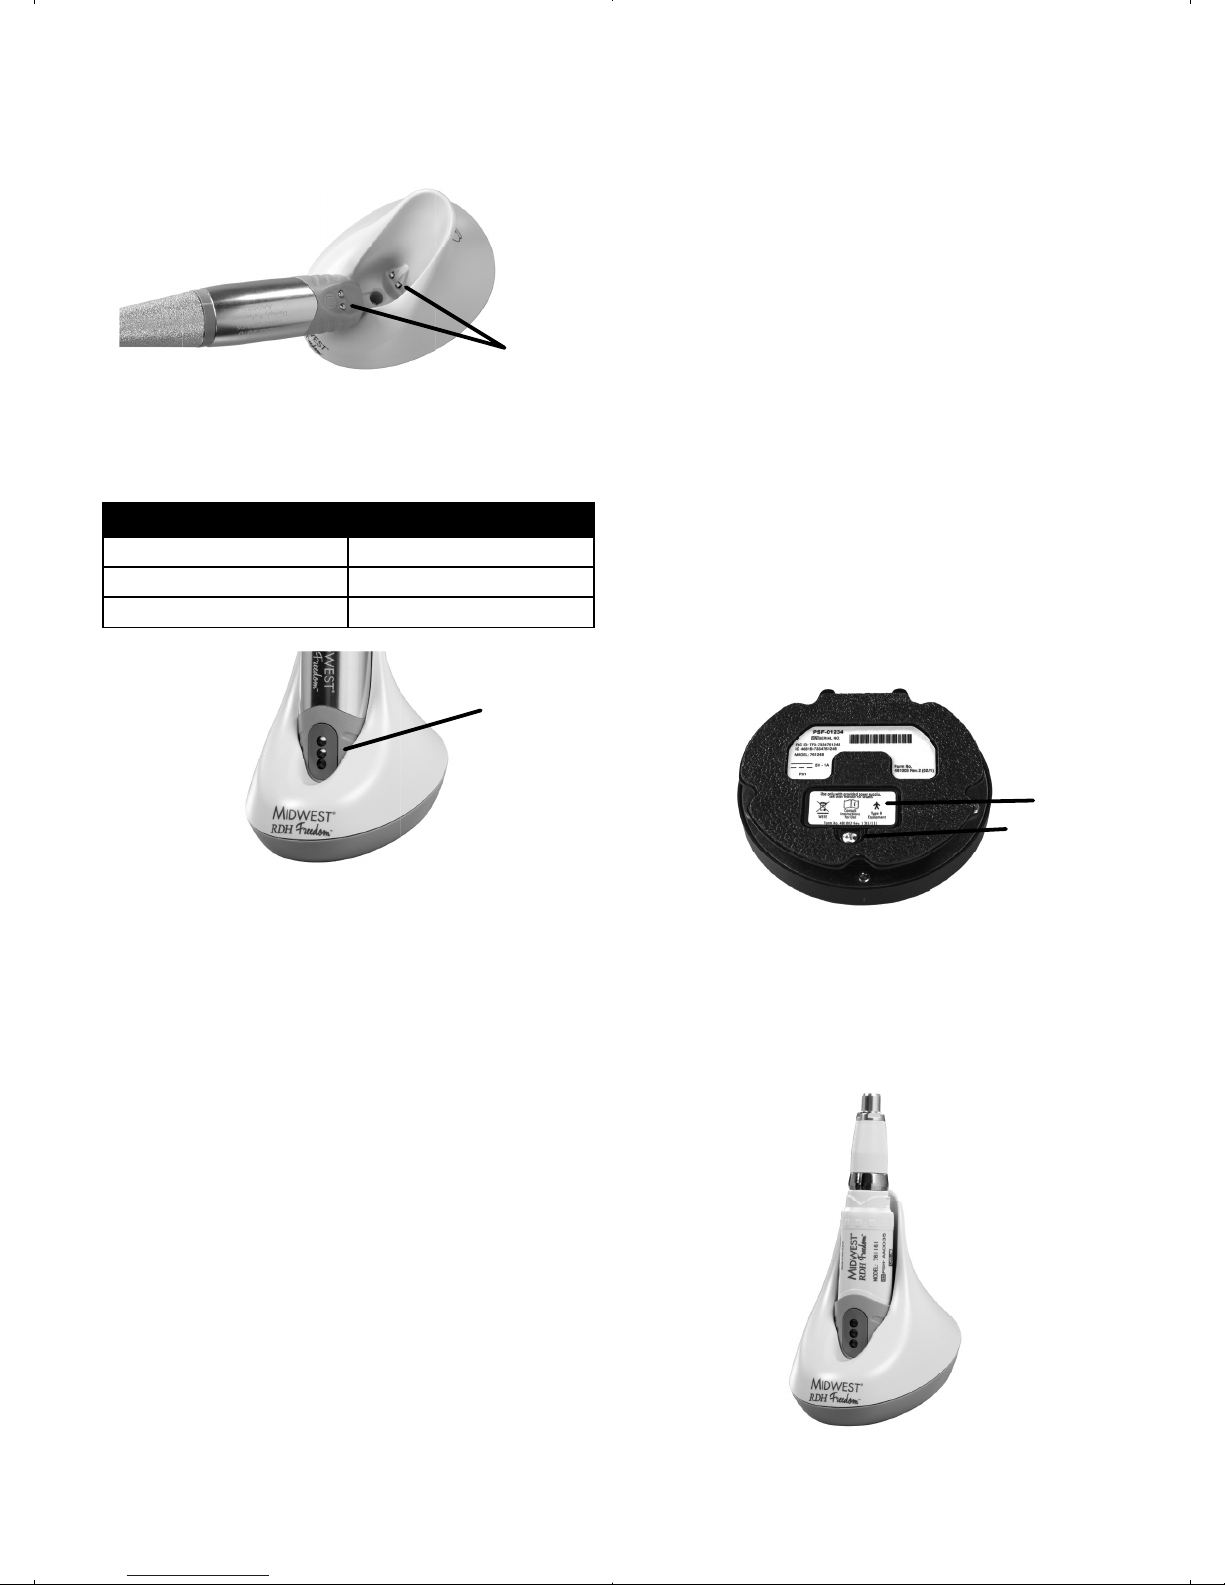
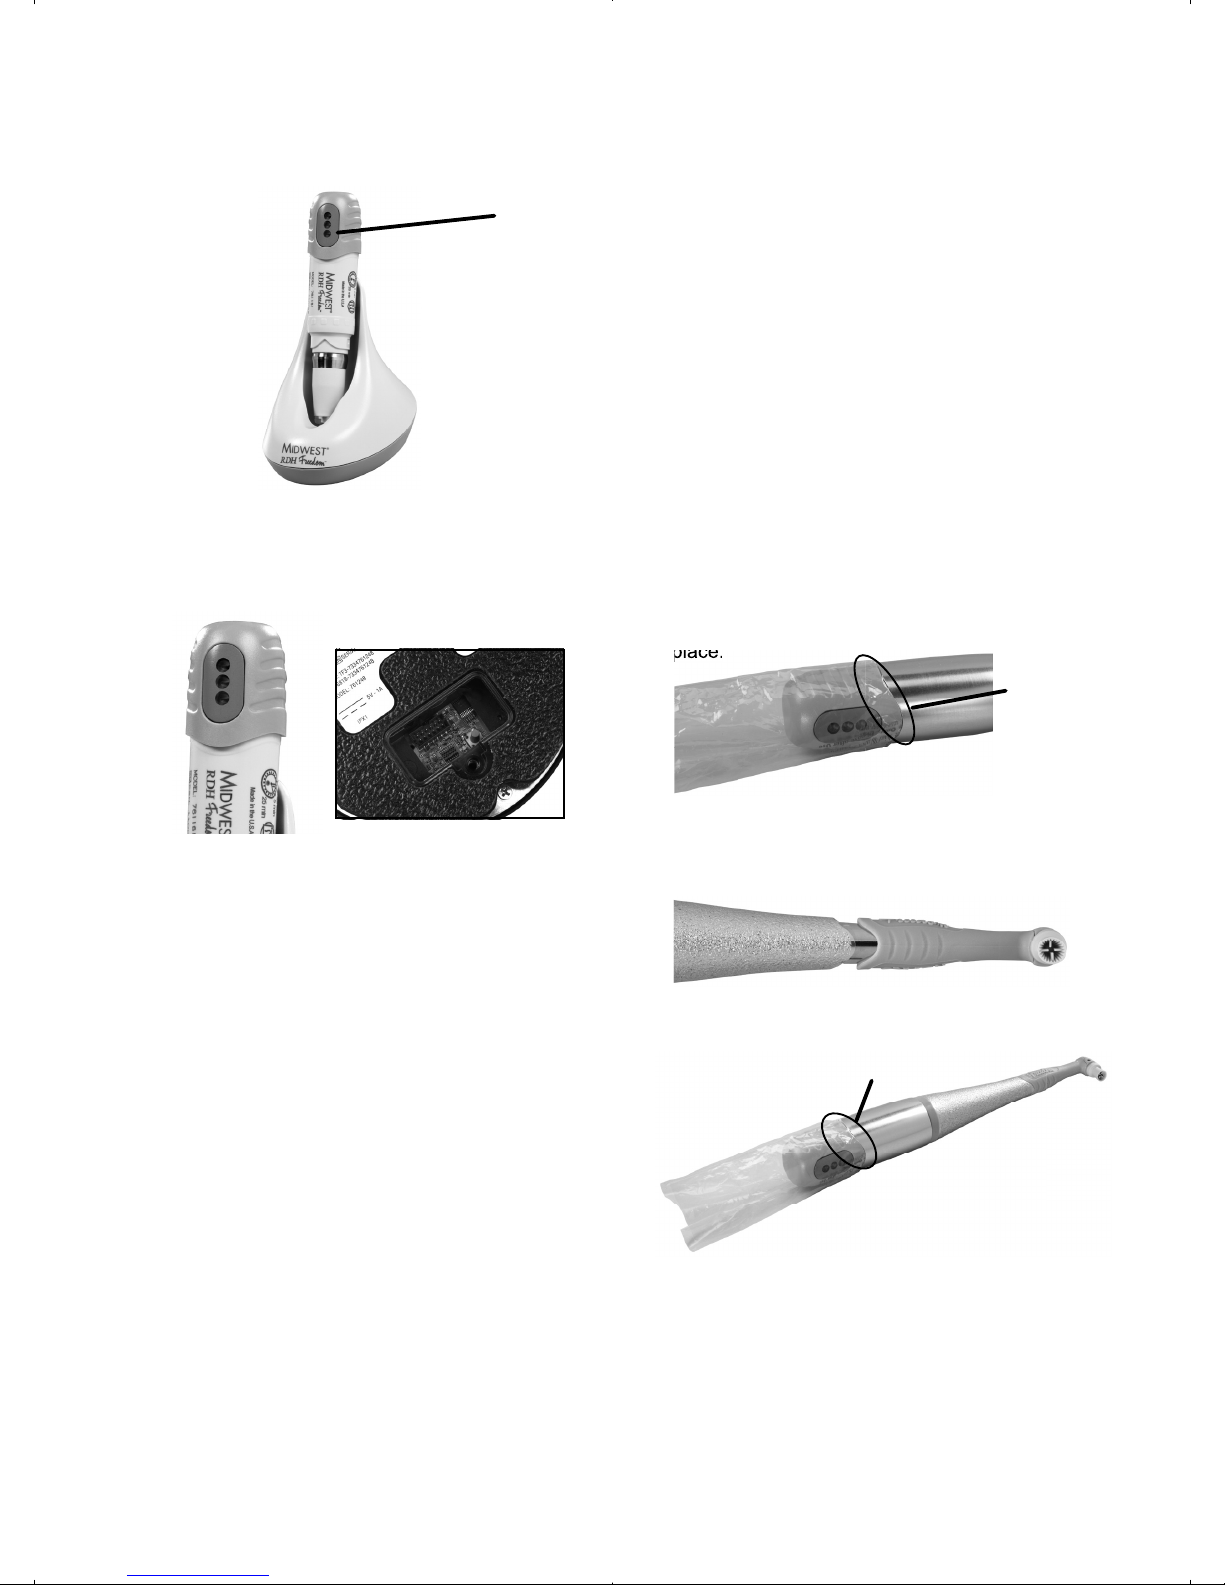
10.3 Place the inner module or handpiece on the
charging base, aligning the charging contacts on
each.
10.4 Refer to the figure and table below to determine
the charging progress for the inner module.
NOTE:
• The handpiece should be recharged after each full day’s
use.
• If necessary, the handpiece may be “quick charged” for
a single use in 15 minutes.
10.5 The foot pedal should be recharged monthly. A
fully discharged foot pedal will need approximately
90 minutes to fully recharge. The foot pedal may
be operated while charging.
NOTE:
• The middle LED light on the inner module denotes the
degree of the charge in the foot pedal battery. A solid
green light means greater than 30%. A solid orange
light means less than 30%.
Indicator Lights Degree of Charge
Scrolling orange Less than 50%
Scrolling green 50-90%
Solid green Greater than 95%
NOTE:
• After one week of non-use, both the handpiece and the
foot pedal enter an enhanced battery-saving mode.
• Place the handpiece inner module into an
energized charging base for 5 seconds to
restore normal functions.
• Connect the foot pedal to the power supply for 5
seconds to restore normal functions.
11. Synchronizing the Handpiece and
Foot Pedal
NOTE:
Follow this procedure when:
• the foot pedal or handpiece inner module is replaced
for any reason
• the handpiece and foot pedal do not seem to be
communicating properly
11.1 Place the foot pedal within 10 feet of the charging
base.
11.2 Invert the foot pedal and remove the screw and the
access door.
11.3 Remove the inner module from the outer sheath of
the handpiece.
11.4 Place the inner module on the charging base,
ensuring that the three indicator lights are scrolling
or all are solid green.
Charging Contacts
Indicator lights
Screw
Access Door
ENGLISH • 11
12. Preparation for Use
12.1 Position the foot pedal for use, ensuring that the
floor is level.
12.2 Ensure that the outer sheath has been sterilized
according to the Infection Control Procedures (sec-
tion 8).
12.3 When it is sufficiently charged, insert the inner
module into a Disposa-Shield®sleeve. Ensure that
the nose of the inner module completely clears the
opening of the Disposa-Shield sleeve.
PRECAUTION: Do not install the covered inner module
into the outer sheath without ensuring the Disposa-
Shield sleeve is clear of the inner module nose. The
Disposa-Shield protects the inner module from debris
and splatter. Do NOT apply the Disposa-Shield to the
outer sheath, which must be sterilized before each use.
12.4 Install the inner module into the outer sheath by
aligning the swoops on each and snapping in
place.
12.5 Attach a NUPRO Freedom Disposable Prophy
Angle to the handpiece by aligning the swoops on
each and snapping in place.
12.6 Verify that all parts of the handpiece are securely
attached before use.
Aligned correctly
Fully-Assembled Handpiece
11.5 Invert the inner module and place it on the charg-
ing base as shown. The LED shown below will
blink green if the position is correct for synchroni-
zation.
11.6 When the indicator lights display a scrolling green
and orange pattern, press the red button in the
bottom compartment of the foot pedal within 15
seconds.
NOTE:
• The LED beside the synchronization switch of the foot
pedal flashes orange to indicate that the foot pedal is in
synchronization mode.
11.7 If the synchronization was successful, the three
indicator lights on the handpiece and the LED in
the foot pedal will flash green several times.
11.8 If all three handpiece indicator lights, and the foot
pedal LED flash orange, the syncing was unsuc-
cessful. Return the inner module to an upright
position in the charging base and repeat the proce-
dure.
Access Door
LED
place.
Aligned correctly
ENGLISH • 12
13. Operation
13.1 The handpiece powers up when it detects motion, i.e. when the user picks it up. If not in use, it will shut
down again after a minute.
13.2 Load the DPA with prophy paste and depress the foot pedal slowly to avoid splatter. The DPA (motor) will
only rotate in one direction.
13.3 Adjust pressure on the foot pedal to control the rotation speed of the DPA throughout the procedure.
13.4 Follow standard prophylaxis procedures as you would with any corded prophy device.
13.5 You only need to apply a light pressure during polishings. Applying excessive force to the polishing surface
may slow or stop the rotation of the DPA and result in ineffective polishing.
13.6 The Handpiece Cradle should be placed on the instrument tray so that the Handpiece may be placed in it to
avoid the handpiece possibly rolling and falling off the tray during a prophylaxis procedure.
NOTES:
• If the handpiece seems to be losing power, recharge as
soon as possible.
• If the handpiece battery is completely discharged, the
three LEDs will blink and the unit will shut down. The
handpiece must be put in the charging base before it’s
able to operate again.
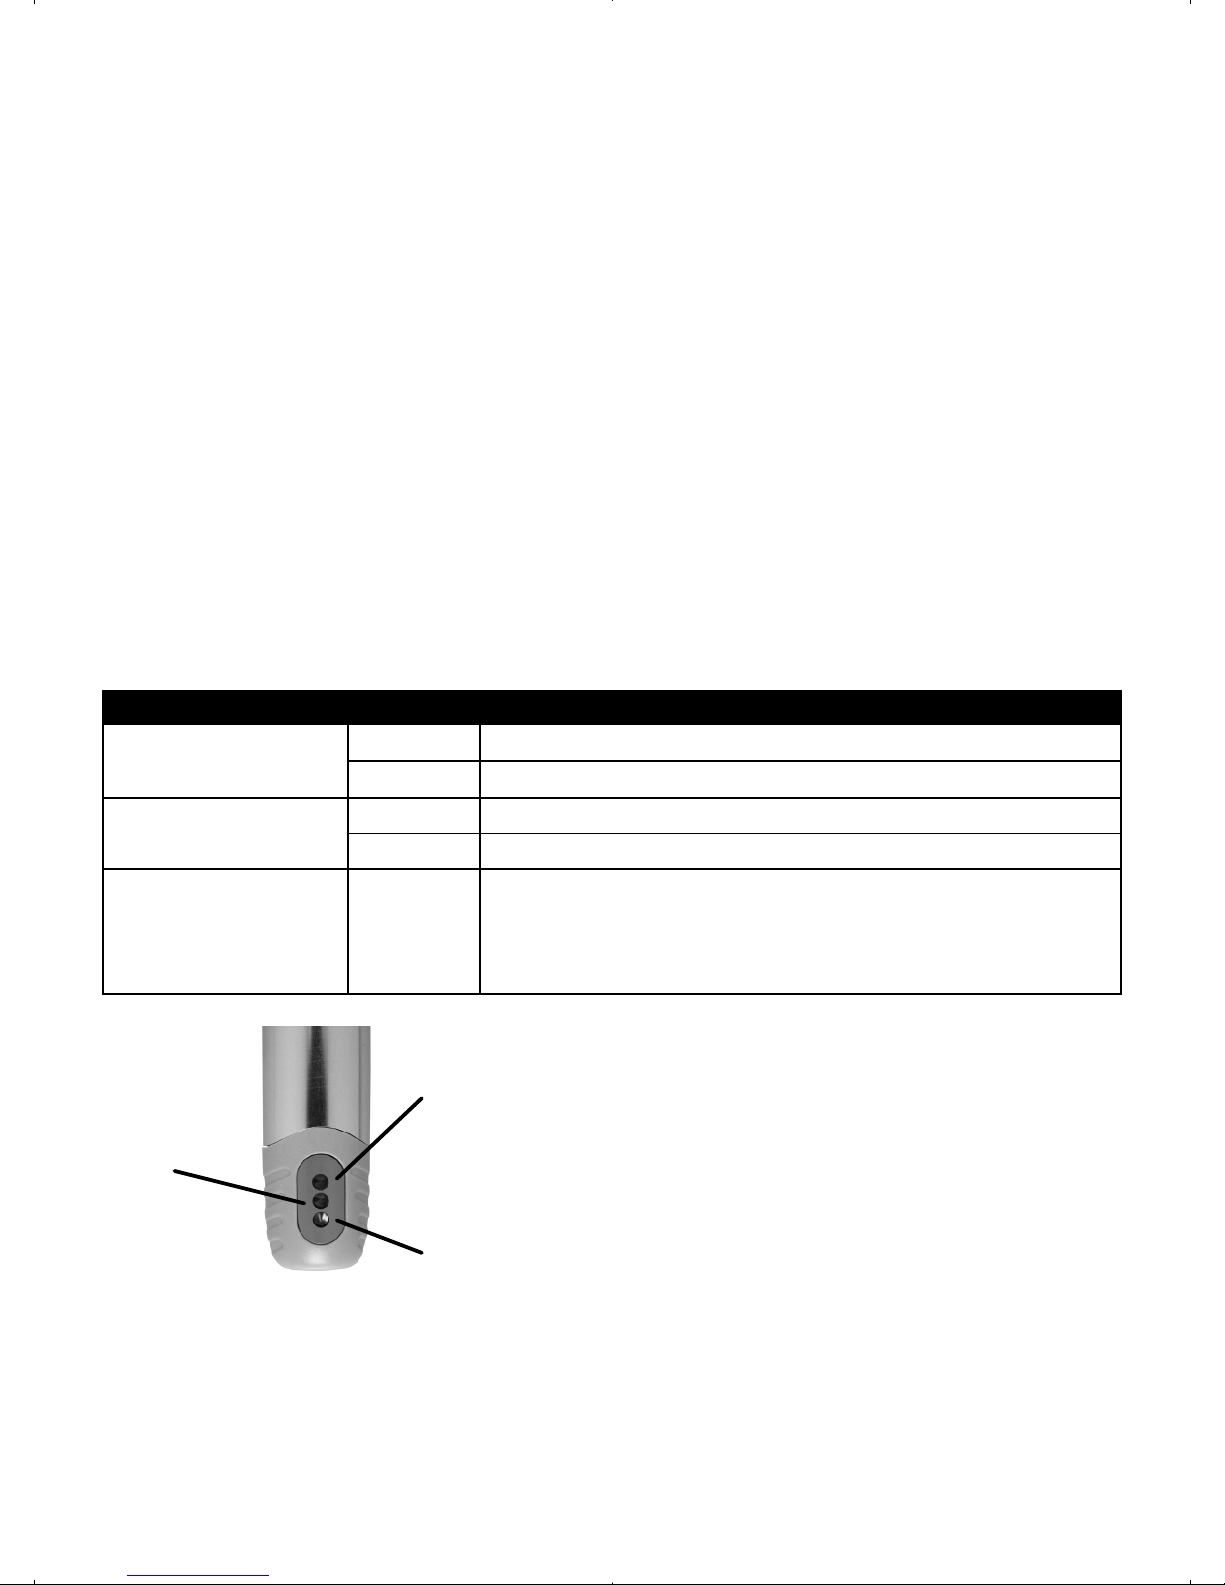
14. Handpiece Indicator Lights (when in use)
The MIDWEST®RDH Freedom® Cordless Prophy System handpiece has three LEDs. Whenever the handpiece
is in normal operational mode (i.e., not being charged or synchronized) the handpiece indicator lights display
information about the system according to the table below:
Handpiece charge
indicator
Temperature
indicator light
Foot-pedal charge
indicator
Degree of Charge Color Light Functional Description
Handpiece charge
indicator Orange Handpiece charge less than 50%
Green Handpiece charge greater than 50%
Foot-pedal charge indicator Orange Foot pedal charge less than 30%
Green Foot pedal charge greater than 30%
Temperature indicator light Orange Illuminates when the internal temperature of the handpiece is higher than
normal. The light will turn off when the temperature returns to normal.
Operator should refrain from using the handpiece for several minutes until
the indicator light goes out. If the temperature indicator light persists, call
technical support.

ENGLISH • 13
15. Specifications
16. Classifications
Power Supply manufacturer:
Power Supply model number:
AC Input
Ault (SL Power)
MW170KB0502B03
Continuous (100-240 VAC)
AC Input Current Less than 0.7A
AC Input Phases Single
AC Input Frequency 50-60 Hz
DC Output Power 8W
DC Output Voltage and Current +5VDC at 1.6A
Output Regulation +/- 10%
Weight Handpiece with metal sheath = 120 g
Foot pedal = 200 g
Dimensions Handpiece with sheath & disposable angle
L = 190 mm, W = 30 mm
Foot pedal W = 118 mm H = 40 mm
Foot Pedal Protection Class IPX1. Not for operating theatres.
Remote Communication Frequency:
Power:
Channels:
2405-2480 MHz
1mW
16
Operating Environment Ambient temperature:
Relative Humidity:
Atmospheric Pressure:
Altitude:
10°C-40°C
45-95% (non-condensing)
80-106 kPa
< 2,000 meters
Transport and Storage Conditions Ambient temperature:
Relative Humidity:
Atmospheric Pressure:
Altitude:
-20°C to 50°C
45-95% (non-condensing)
54-106 kPa
< 5,000 meters
Handpiece Performance Protection Class IPX3.
Max Cup Speed
Max Torque 3000 rpm
10 mNm
Type of protection against electric shock: Class II
Degree of protection against electric shock: Type B Applied Part
Mode of operation for handpiece:
Mode of operation for foot pedal:
Non-continuous: 5 minutes ON, 25 minutes OFF
Continuous
Degree of safety of application in the presence of a
flammable anesthetic mixture with air or with oxygen or
nitrous oxide:
Equipment not suitable for use in the presence of flammable
mixtures
According to medical device directive: IIA (Rule 9) (ISO/IEC 60601)
Pollution Degree Classification Pollution Degree 2
Overvoltage Category Category II (connected to wall outlet)
ENGLISH • 14
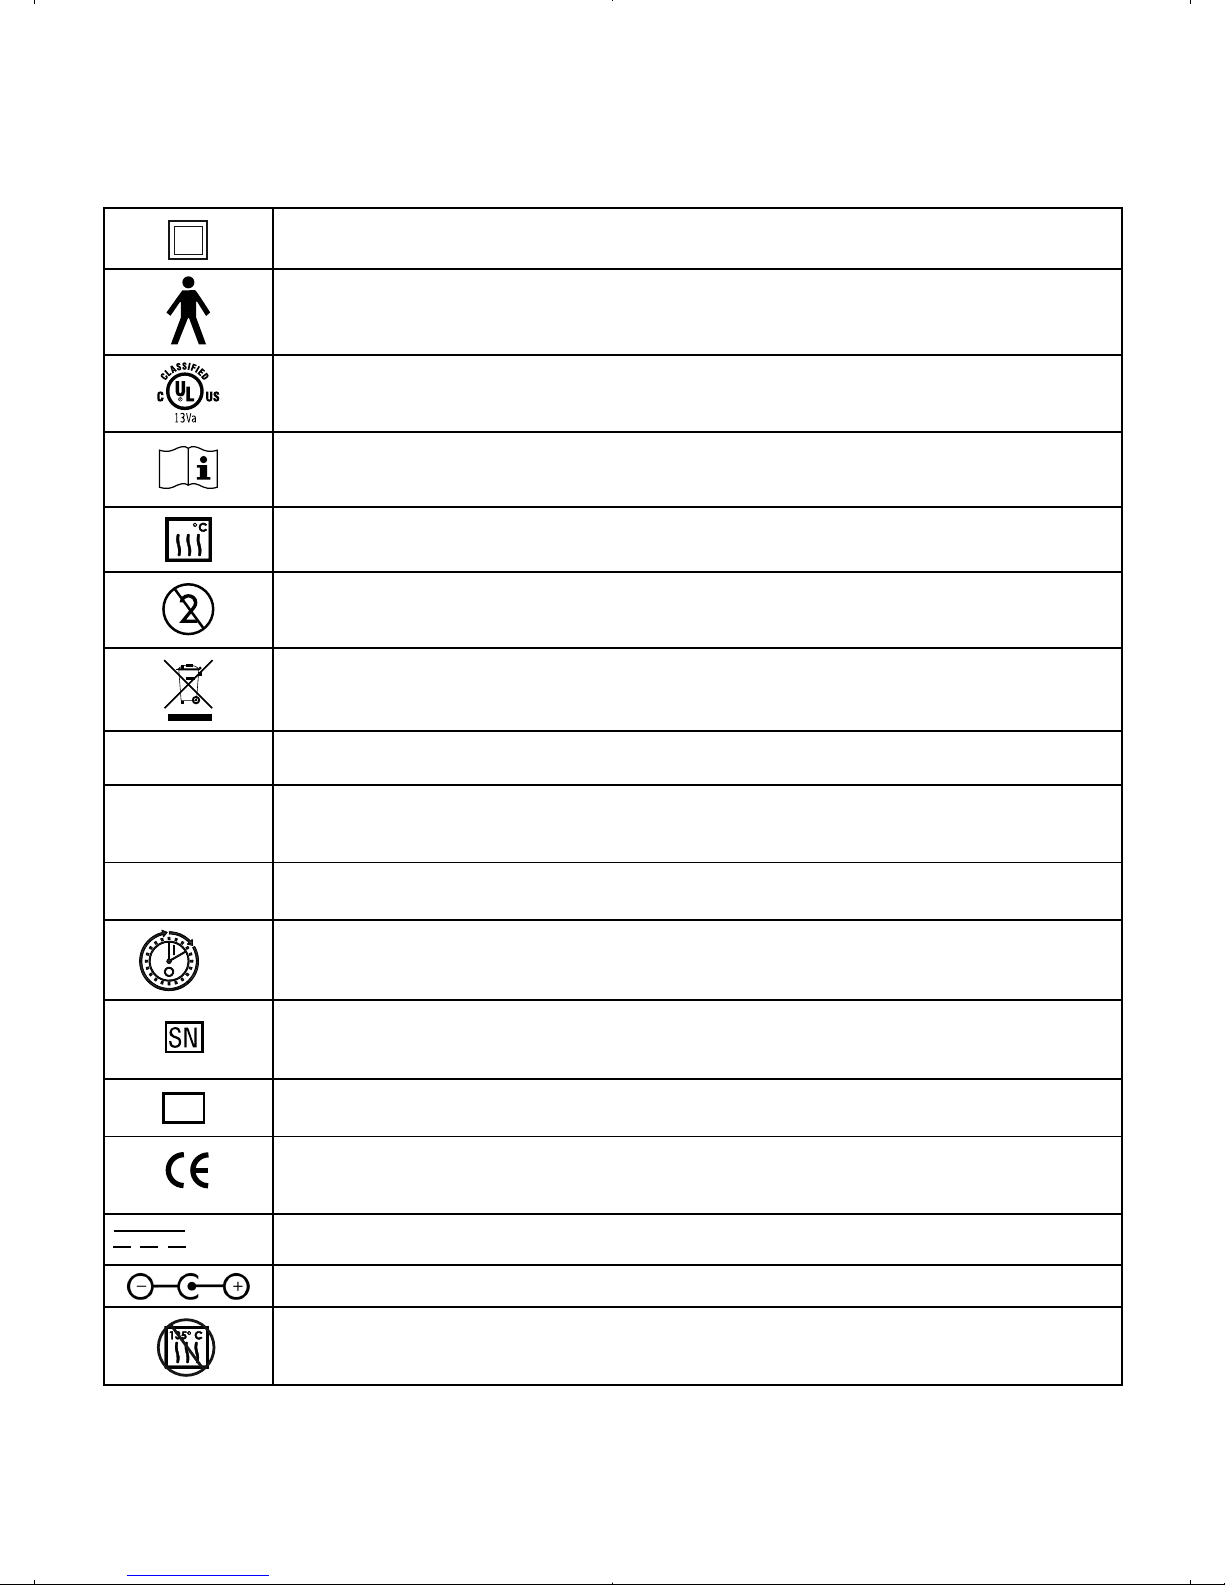
17. Symbol Identification
The following standard symbols appear on the device label.
Class II
Equipment
Class II Equipment
Type B applied part
MEDICAL EQUIPMENT
WITH RESPECT TO ELECTRIC SHOCK, FIRE AND MECHANICAL HAZARDS ONLY IN
ACCORDANCE WITH UL-2601-1/60601-1, CAN/CSA C22.2 NO.601.1
Consult instructions for use
135 Sterilizable up to the temperature specified
Do not re-use
Do not re-use (For DPAs)
Dispose of in accordance with the Waste Electrical and Electronic Equipment Directive 2002/96/
EC of the European Parliament and the Council of the European Union
IPX0 Protection Class IPX0
IPX0 Classification of ingress of water for Charger – not protected
IPX1 Footswitch not for operating theatres
Protection Class IPX1
IPX1 Classification of ingress of water
IPX3 Protection Class IPX3
IPX3 Classification of ingress of water for Inner Module - Protected against falling spray.
5 min
25 min
Duty Cycle for handpiece:
5 minutes ON
25 minutes OFF
Serial Number
LOT Batch Code/Lot Number
This symbol is a mandatory marking for devices entering the European market to indicate conformity
with the essential health and safety requirements set out in European Directives. The symbol may be
accompanied by a four-digit identification number of the notified body.
5V-1A Direct Current (DC) supply. 5 Volts, 1 Amp
Polarity of power (DC). Positive counter.
Do Not Autoclave (Inner Module)

ENGLISH • 15
18.Disposal of Unit
U.S. - Dispose of the system components in accordance with state and local laws.
EU - Dispose of in accordance with the Waste Electrical and Electronic Equipment Directive 2002/96/EC of the
European Parliment and the Council of the European Union.
19. Troubleshooting
Problem Solution
DPA is not revolving. 1. Ensure the outer sheath and the DPA are snapped
together securely.
2. Ensure that the Inner Module and the Outer Sheath are
snapped together securely.
3. Verify the handpiece is powered up and properly
charged. If the handpiece lights do not illuminate,
place the handpiece in the charging base for a
minimum of 5 seconds, and then remove it to use.
4. Verify the foot pedal is not in battery saving mode or
discharged. This is done by connecting the power
supply to the foot pedal. The foot pedal will operate
while charging.
5. Ensure the DPA is not damaged by removing the DPA
and spinning the cup between your fingers. The cup
should spin freely.
6. Ensure that the sheath is not damaged by removing
the inner module from the sheath, leaving the DPA
connected, and spinning the DPA cup between your
fingers. The cup should spin freely. If the cup does not
spin freely, place 1-2 drops of MIDWEST Lubricant into
the sheath nose and try to spin again. If the cup still
does not spin freely, call Technical Support.
7. If DPA still does not spin freely, remove the sheath
from the inner module and verify the inner module
motor spins when the foot pedal is depressed. If the
inner module motor does not spin, resynchronize the
foot pedal with the inner module as per instructions
contained in this manual.
8. Resynchronize the units. See Section 11 Synchronizing
the Handpiece and Foot Pedal.
9. If the synchronization is not successful and/or the
handpiece still does not spin, call Technical Support.
Excessive noise or vibration during operation. 1. Ensure that the outer sheath is aligned correctly with the
inner module.
2. Check the components for gross debris or
contamination and adhere to all infection control
procedures.
3. Check for damaged, worn or broken components.
4. Call Technical Support if necessary.
Foot pedal does not charge. 1. Ensure that the power cord is securely attached to the
wall outlet and the foot pedal.
2. Remove the foot pedal access door and look in
the compartment; ensure that the LED in the bottom
compartment is illuminated. If not, return the foot
pedal to Technical Support for professional battery
replacement.

ENGLISH • 16
Difficulty removing outer sheath from inner module. 1. Check the components for gross debris
2. Hold the handpiece outer sheath securely and twist the
inner module
3. Inspect parts for wear
4. Call Technical Support if necessary
Charging base does not drain liquids. Clear any debris from the hole at the bottom of the
charging base.
Handpiece does not charge. 1. Clean the charge contacts on the handpiece and
charging base, using one of the approved cleaning
solutions described in section 8.
2. Verify that the power supply is properly connected to
the charging base and that the green LED on back
lights up.
3. Verify that the handpiece is able to properly sit inside
the charging base, and that there are no foreign
obstructions.
4. If still not charging, return the handpiece to Technical
Support for professional battery replacement.
Handpiece does not hold charge. 1. Verify that the handpiece properly charges (LEDs scroll
when in the charger).
2. Return the handpiece to Technical Support for
professional battery replacement.
Orange Service Light in handpiece illuminates. 1. Handpiece is heating up due to excess ON time or
load. Do not use handpiece for several minutes and
allow it to cool down.
2. If LED still illuminates even after allowing handpiece to
cool down, set aside and call Technical Support.
Power supply overheating. Immediately unplug the unit and call Technical Support.
Power cords are frayed or damaged in any way. Do not use. Call Technical Support.
NOTE:
For current Technical Support contact information, see “Manufacturer contact“ in the infection control procedures
(section 8).

ENGLISH • 17
20. Accessories
MIDWEST RDH FREEDOM
Item Description DENTSPLY Part Number
Outer Sheath 9070301
Inner Module, Lavender 9070402
Inner Module, Pink 9070404
Charging Base, Lavender 9070502
Charging Base, Pink 9070504
Wireless Foot Pedal 9070601
Power Supply-Domestic 9070701
Double-ended Extension Cable 90730
Power Supply, with Adapter Plugs - International 9070702
Handpiece Cradle 9070801
Carrying Case 9070901
Color Rings, Sheath-Multi Colored Package 9071001
Disposa-Shield Surface Barrier A88018D5
Item Description DENTSPLY Part Number
NUPRO Freedom DPA, Lavender Soft Cup – Box/100 96570001
NUPRO Freedom DPA, Lavender Firm Cup – Box/100 96570101
NUPRO Freedom DPA, Lavender Brush Cup – Box/100 96570201
NUPRO Freedom DPA, Pink Soft Cup – Box/100 96570601
NUPRO Freedom DPA, Pink Firm Cup – Box/100 96570701
Item Description DENTSPLY Part Number
NUPRO Freedom Prophy Pack – Box/100
• NUPRO Prophy Paste Mint Flavor, Medium Grit
• NUPRO Freedom DPA with Soft Cup
96571001
NUPRO Freedom Prophy Pack – Box/100
• NUPRO Prophy Paste Mint Flavor, Coarse Grit
• NUPRO Freedom DPA with Soft Cup
96571101
NUPRO Freedom Prophy Pack – Box/100
• NUPRO Prophy Paste Razzberry Flavor, Medium Grit
• NUPRO Freedom DPA with Soft Cup
96571201
NUPRO Freedom Prophy Pack – Box/100
• NUPRO Prophy Paste Razzberry Flavor, Coarse Grit
• NUPRO Freedom DPA with Soft Cup
96571301
NUPRO Freedom Prophy Pack – Box/100
• NUPRO Prophy Paste BubbleExtreme Flavor, Medium Grit
• NUPRO Freedom DPA with Soft Cup
96571401
NUPRO Freedom Prophy Pack – Box/100
• NUPRO Prophy Paste BubbleExtreme Flavor, Coarse Grit
• NUPRO Freedom DPA with Soft Cup
96571501
NUPRO FREEDOM PROPHY PACKS (only available with lavender soft cup DPA)
NUPRO FREEDOM DISPOSABLE PROPHY ANGLES

ENGLISH • 18
21. Limited Warranty
The DENTSPLY Professional MIDWEST®RDH Freedom® Cordless Prophy System is designed exclusively for
dental use and this warranty is not applicable to other uses. This warranty extends to Midwest RDH Freedom
system purchased from an authorized DENTSPLY distributor, and only to the original purchaser. The system is
made up of four significant assemblies, the Inner Module, Metal Outer Sheath, Charging Base and Wireless Foot
Pedal. All are warranted against defects arising from faulty materials and workmanship.
All components of the Midwest RDH Freedom Cordless Prophy System, except the Disposable Prophy Angle, which
is a single use only item, are warranted for (1) year from the date of purchase with (1) free battery replacement for
the inner module within the first three years.
Parts will be repaired or replaced at the discretion of DENTSPLY Professional provided that the system has been
operated and maintained as prescribed in these instructions and has not been subjected to apparent misuse,
abuse or accident. Claims covered by this warranty will be honored when presented through your DENTSPLY
Professional distributor within thirty (30) days from discovery of defect within the applicable warranty period.
THERE ARE NO WARRANTIES, EXPRESS OR IMPLIED, WHICH EXTEND BEYOND THE DESCRIPTION
ON THE FACE HEREOF. DENTSPLY neither assumes, nor authorizes any person to assume for it, any other
liability in connection with the sale or use of its products. DAMAGES ARE LIMITED STRICTLY TO REPAIR
OR REPLACEMENT OF PARTS. DENTSPLY EXPRESSLY DISCLAIMS LIABILITY FOR INCIDENTAL AND
CONSEQUENTIAL DAMAGES RESULTING FROM THE USE OF THE PRODUCTS.

FRANÇAIS • 19
FRANÇAIS • 19
TABLE DES MATIÈRES
VUE D’ENSEMBLE . . . . . . . . . . . . . 20
1. INDICATIONS D’UTILIZATION . . 20
2. CONTRE-INDICATIONS . . . . . . . 20
3. AVERTISSEMENTS . . . . . . . . . . 20
4. MISES EN GARDE. . . . . . . . . . . 21
5. EFFETS INDÉSIRABLES . . . . . . 21
6. DESCRIPTION DU SYSTÈME
DE PROPHYLAXIE SANS FIL
MIDWEST®RDH FREEDOM® . . . 22
7. DÉBALLAGE DU SYSTÈME . . . . 23
8. PROCÉDURES DE CONTRÔLE
DES INFECTIONS . . . . . . . . . . . 23
9. INSTALLATION DU SYSTÈME . . 26
10. REMPLACEMENT DE LA
PIÈCE À MAIN ET DE
LA PÉDALE . . . . . . . . . . . . . . . 26
11. SYNCHRONISATION DE
LA PIÈCE À MAIN ET DE
LA PÉDALE . . . . . . . . . . . . . . . 27
12. PRÉPARATION AVANT
L’EMPLOI. . . . . . . . . . . . . . . . . 28
13. UTILISATION . . . . . . . . . . . . . . 29
14. VOYANTS LUMINEUX DE
LA PIÈCE À MAIN
(DURANT L’UTILISATION) . . . . . 29
15. SPÉCIFICATIONS . . . . . . . . . . . 30
16. CLASSEMENTS . . . . . . . . . . . . 30
17. IDENTIFICATION DES
SYMBOLES . . . . . . . . . . . . . . . 31
18. MISE AUX REBUTS . . . . . . . . . . 32
19. DÉPANNAGE . . . . . . . . . . . . . . 32
20. ACCESSOIRES . . . . . . . . . . . . . 34
21. GARANTIE LIMITÉE. . . . . . . . . . 35

FRANÇAIS • 20
1. Indications d’utilization
La pièce à main de prophylaxie sans fil Midwest
RDH Freedom haute performance avec pédale sans
fil est conçue pour une utilisation avec des angles
prophylactiques jetables Nupro Freedom® dans un
cadre hygiénique pour nettoyer et polir des dents.
AVERTISSEMENT Veillez à ne pas vous blesser ni à blesser le patient.
MISE EN GARDE Veillez à ne pas endommager le produit afin de pouvoir l’utiliser efficacement et en
toute sécurité.
Conventions de sécurité utilisées dans le document
3. Avertissements
• Pour éviter tout problème, ne branchez la pièce
à main qu’à une base de charge et à une source
d’alimentation Midwest RDH Freedom.
• La stérilisation du module intérieur peut endomma-
ger la pièce à main et l’équipement de stérilisation,
et causer des blessures.
• La gaine extérieure doit être stérilisée à la vapeur
avant la première utilisation et après chaque uti-
lisation sur un patient, afin d’éviter tout risque de
contamination. Voir les procédures de contrôle des
infections dans la section 8.
• Les angles prophylactiques jetables sont conçus
pour une utilisation sur un seul patient et ne doi-
vent jamais être réutilisés. Les angles prophylac-
tiques jetables ne peuvent être désinfectés en
autoclave et ne sont pas conçus pour résister aux
solutions de produits désinfectants. Les risques
d’une réutilisation d’un angle prophylactique jetable
sont des dommages à l’équipement et une conta-
mination du patient. Installer un angle prophylacti-
que neuf avant chaque utilisation.
• Il est de la responsabilité du praticien dentaire de
déterminer les cas dans lesquels ce produit peut
être utilisé, et d’être au fait de :
•la santé de chaque patient ;
• des procédures dentaires entreprises ;
• des recommandations des autorités gouverne-
mentales et professionnelles pour le contrôle
des infections dans un cabinet dentaire ;
• des réglementations relatives à la sécurité
dans l’exercice de la profession ;
• de ce mode d’emploi en entier
• Conformément aux exigences de la partie 15.21
des règles de la FCC, les changements ou modifi-
cations qui ne sont pas expressément approuvés
par la partie responsable de la conformité peuvent
annuler l’autorisation d’utiliser cet équipement.
• Le non-respect des recommandations relatives aux
conditions environnementales d’utilisation (voir les
spécifications dans la section 15) pourrait causer
des blessures aux patients ou aux utilisateurs.
• Inspecter le système de la pièce à main avant cha-
que utilisation pour vérifier si des composants sont
usés, desserrés ou endommagés. Ne pas tenter
d’utiliser sans avoir bien fixé l’angle prophylactique
jetable (APJ). Dans le cas contraire, l’APJ risque
de s’éjecter de la pièce à main et de provoquer
des blessures. Réinstaller l’APJ ou remplacer les
pièces endommagées au besoin.
• Pour éviter les blessures et les dommages à l’équi-
pement, ne pas stériliser l’APJ, le module intérieur,
la base de recharge, la pédale et le bloc d’alimen-
tation. Désinfecter la base de recharge, le module
intérieur, la pédale et le bloc d’alimentation unique-
ment avec un désinfectant recommandé dans la
section 8 sur les procédures de contrôle des infec-
tions.
• L’utilisation de l’APJ à une vitesse excessive ou
avec une force excessive peut faire chauffer la
dent et causer une douleur temporaire.
• Le module intérieur, la pédale, la base de recharge
et le bloc d’alimentation ne sont pas à l’épreuve
des infiltrations d’eau. Pour éviter de causer des
dommages matériels, une contamination ou des
Aperçu général
Le système de prophylaxie sans fil MIDWEST®RDH Freedom® offre une conception sans fil qui élimine tout cor-
don encombrant et procure aux cliniciens un accès facile et confortable durant les procédures de prophylaxie. Moins
bruyant que les systèmes d’hygiène dentaire classiques et les pièces à main à faible vitesse, ce système est doté
d’une pile pouvant durer une journée entière et procure les mêmes performances qu’un système avec cordon. Le
système comprend une gaine extérieure pouvant être désinfectée en autoclave et permettant d’éviter les infections.
2. Contre-indications
Aucune connue.
Other manuals for RDH Freedom
1
Table of contents
Languages:
Other Midwest Dental Equipment manuals


