Miicstar MS-62 User manual

1
© Copyright 2018 Karaoke Home Entertainment www.khe.com.au / www.khe.co.nz / www.picknmix.com.au
Miic Star MS-62 Karaoke System
Contents
How to Connect Your System ....................................................................................................................................... 2
Song Book Creation.......................................................................................................................................................3
Use YouTube Videos .....................................................................................................................................................4
Use a Powered Speaker ................................................................................................................................................5
MP3+G Karaoke Files ....................................................................................................................................................6
MP4 Karaoke Files.........................................................................................................................................................8
Troubleshooting: Wireless Microphone Pairing .........................................................................................................10
Meet Your Remote Control.........................................................................................................................................11
Navigate The Menu.....................................................................................................................................................12
Recording Your Performance......................................................................................................................................13
Export Your Performance............................................................................................................................................13
Settings & Setup..........................................................................................................................................................14
Thank you and Enjoy!..................................................................................................................................................15

2
© Copyright 2018 Karaoke Home Entertainment www.khe.com.au / www.khe.co.nz / www.picknmix.com.au
How to Connect Your System
Your new Miic Star MS-62 Karaoke System comes with two ways to connect (all cables included).
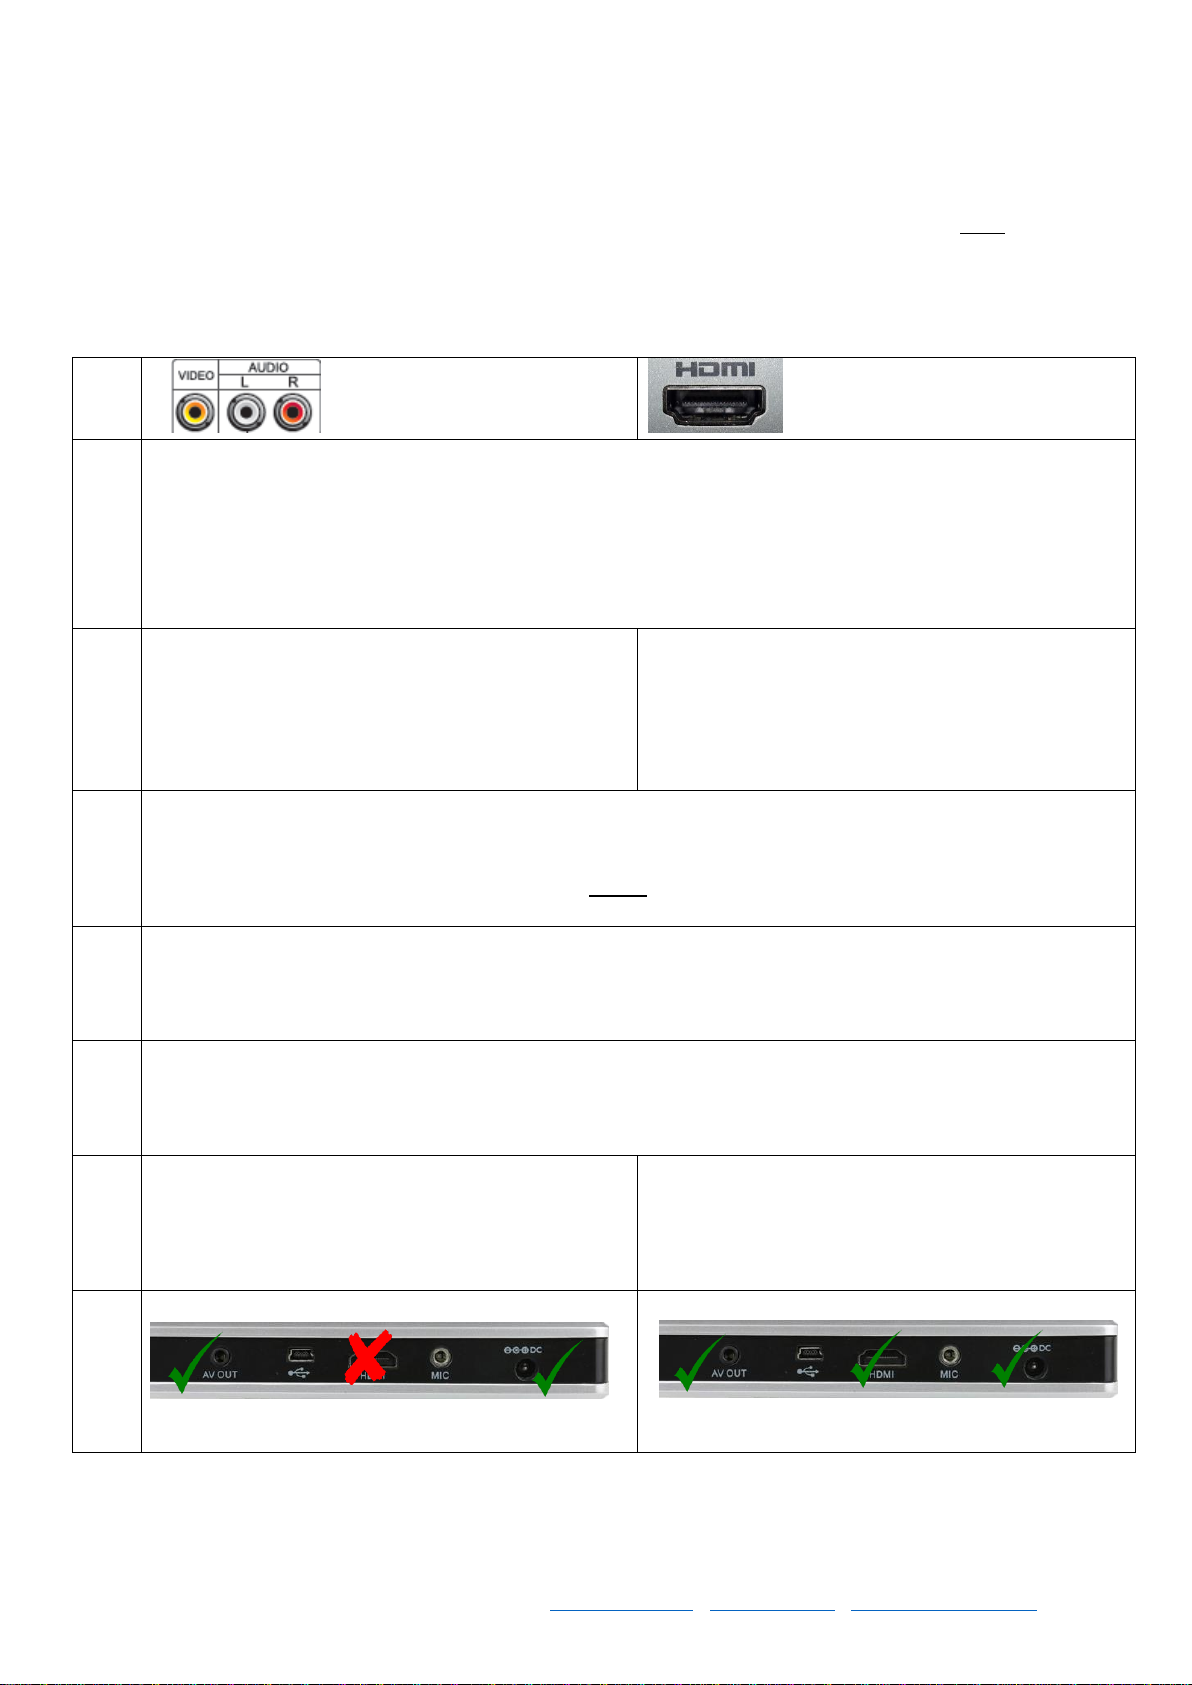
You have a standard AV / RCA connection cable which uses the red, white and yellow. This can be used in 2 ways.
For both options the single cable end, which has one black connection gets plugged into AV OUT, it must be pushed
in all the way so it makes full connection.
You also get the HDMI Connection cable which is one single thicker cable which carries video and audio through the
one connection, it needs to be plugged into the port marked HDMI.
Standard AV / RCA Connection
HDMI Connection
CONNECT TO TV
You can plug all three colours (red, white, yellow) into your TV for the sound and picture.
Or you can plug just the HDMI into your TV for the sound and picture.
However, bare in mind that your TV has small speakers and is not designed for singing karaoke. You may
notice a delay or distortion of the music and your voice through the microphones. This is a limitation of your
TVs functionality. We always recommend that you use a separate sound system for karaoke and we only
ever use TVs for the picture.
CONNECT TO
SOUND SYSTEM
You can plug the yellow only into your TV, for the
picture. And the red and white directly into an
amplifier or powered speaker.
Note: if you are using all three red, white and yellow
AV connections do NOT plug in the HDMI Cable.
You can use HDMI for the TV for the picture only.
And the red and white directly into an amplifier or
powered speaker.
USE HOME
THEATRE
Home Theatre Amplifier: Change the settings on your amplifier to 2-Channel Stereo, this will use only your
main two speakers and eradicate any delay you may have (delay caused by using 5.1 Surround Sound). Note:
If all your speakers are very small satellite speakers you may still need to turn the volume up considerably
and you might damage your speakers. Note: We do not recommend the use of sound bars for karaoke
whatsoever.
KARAOKE
AMP
Karaoke Mixing Amplifier: Our amplifiers all have the red and white inputs on the back, so you simply plug it
in, and ensure your speakers are connected properly.
POWERED
SPEAKER
Powered Speaker: If your powered speaker has the red and white audio inputs on it then you can just plug
them in directly. If your powered speaker has only got a line-in / AUX connection / headphone jack then you
will need a small adaptor that converts the plug from red and white to one single headphone jack.
HDMI
SETTING
When using HDMI (video) and AV red, white (sound)
together, you must change the Miic Star Setup.
Menu > Setup > Audio Output > Analog
This will send the sound through AV ports and
picture only through HDMI.
IMAGE

3
© Copyright 2018 Karaoke Home Entertainment www.khe.com.au / www.khe.co.nz / www.picknmix.com.au
Song Book Creation
Your new Miic Star MS-62 Karaoke System has a very handy feature of creating a songbook for all your MP3+G and
MP4 Karaoke Files that are formatted correctly in the MYSONGS folder.
Step 1
Have all your songs loaded into the MYSONGS folder of the SD card and formatted correctly.
Step 2
Press SETUP button on the remote
Step 3
Select EXPORT ENGLISH SONGBOOK
Step 4
Press OKAY and wait a few minutes, it will tell you when its done.
Step 5
Once completed, you can insert the SD Card into your computer, and in the root directory you will see a MYSONGS
SONGBOOK.csv file. You can simply open and print this.
Step 6
When using the unit, simply type in the number of the song you want to using the remote

4
© Copyright 2018 Karaoke Home Entertainment www.khe.com.au / www.khe.co.nz / www.picknmix.com.au
Use YouTube Videos
The Miic Star MS-62 Karaoke System is extremely versatile and lets you add and sing along with most video files,
specifically AVI/MP4 which you can download from your favourite YouTube videos.
How to download a video from YouTube: https://www.onlinevideoconverter.com/video-converter
Once the file is downloaded, copy and paste it into the DOWNLOAD folder on the SD Card, put it back in the machine
once copying is done and play!

5
© Copyright 2018 Karaoke Home Entertainment www.khe.com.au / www.khe.co.nz / www.picknmix.com.au
Use a Powered Speaker
The Miic Star MS-62 Karaoke System is a compact karaoke multi-media device with 2 wireless microphones. You load
all your music onto the SD Card (See New SD Card Formatting Guide), plug it into your TV and sound system and start
singing.
A Powered Speaker means that the amplifier is built into the same box as the speaker, an all-in-one style unit, with
great sound projection, some include party lights and all include additional wireless microphones so more people
can sing! If you don’t have a Powered Speaker see www.portablekaraoke.com.au for more details.
In this guide, we’ll explain how to use a Powered Speaker with your Miic Star.
For the best sound results…
We recommend that you use your TV for the lyric video component and run the sound directly from the Miic Star
into a Powered Speaker, Amplifier and Speakers, or Home Theatre System. Though if using a Home Theatre, we
don’t recommend sound bars and you should change the settings on the amplifier to 2-Channel Stereo only
providing that you have two main speakers which have both a woofer and a tweeter in each to avoid damaging your
home theatre speakers.
If using HDMI, for both picture and audio directly through a TV you may find you get a digital delay when singing, this
is a limitation of the television and we recommend only using HDMI for the picture component and using the
analogue stereo RCA cable into a Powered Speaker, Amplifier and Speakers, or Home Theatre System, as you will not
experience any delays with the audio and vocals.
Speaker Connection
Picture Connection
Sound Connection
Connection
Must →
Plug the single end of the AV Cable included into the AV OUT on the back of the Miic Star, this
must be pushed in all the way to ensure complete connection.
Your
speaker has
Red & White
AV Inputs
Option 1 –Yellow plug from the AV cable plugs
into your TVs matching Yellow video (to show
lyrics) input connection.
The red and white
connectors from the
AV cable go directly
into your Audio Red
and White AV Inputs
on your speaker.
Option 2 –Use HDMI from the Miic Star HDMI
connection on the back direct to a HDMI input on
your TV. You must then change the Miic Star Setup.
Menu > Setup > Audio Output > Analog
This will send the sound through AV ports and
picture only through HDMI.
Your
speaker has
an AUX jack
Input
Option 1 –Yellow plug from the AV cable plugs
into your TVs matching Yellow video (to show
lyrics) input connection.
You will need a RCA (red and white) to AUX
jack plug in order to connect your Miic Star
to the Powered Speaker via the AUX input.
Option 2 –Use HDMI from the Miic Star HDMI
connection on the back direct to a HDMI input on
your TV. You must then change the Miic Star Setup.
Menu > Setup > Audio Output > Analog
This will send the sound through AV ports and
picture only through HDMI.

6
© Copyright 2018 Karaoke Home Entertainment www.khe.com.au / www.khe.co.nz / www.picknmix.com.au
MP3+G Karaoke Files
The Miic Star MS-62 Karaoke System runs purely off an SD Card. Your unit will come with an SD Card with all your
songs purchased at the same time loaded onto it, if you didn’t purchase music you will get a blank SD Card however
we will format it for you. If you want to use your own SD Card, you will need to format it by inserting it in the
machine for 30 seconds until the screen resets prior to loading it up with your songs.
This is what an MP3+G Karaoke File looks like…
These files are mostly standard karaoke versions with cover guide vocals in the chorus line and wherever the original
artist had backing singers. No original artist performances are used. You can choose to purchase the MPX version
when choosing your songs to download. These are Multiplex (MPX) and have full guide cover vocals that you can
switch on and off. If you have MPX version files use the TVSYS button on the Miic Star MS-62 remote to turn vocals
on and off.
Get Your Songs Ready
Step 1 –Purchase your songs from www.karaokemp3g.com.au
Step 2 –Save these files to your computer in a safe place (keep a backup in case you ever need to restore your files
at a later date, if your files are lost and not backed up you will need to repurchase)
Step 3 –Unzip the files on your computer (right click and extract all) there will be 2 files per song, named the same
except for the .cdg and .mp3 extensions.
Step 4 –Rename the files so the Miic Star can recognise them and is able to make a songbook for you.
Your very FIRST song will be numbered: 100001, the rest will follow in sequential order.
Formatted like so: Song Number-Artist Name-Song Title
Note: Dashes are hard up against the names, no spaces between. No commas at all, use words like feat or and
instead.
Example:
100001-Kylie Minogue-Better The Devil You Know.cdg
100001-Kylie Minogue-Better The Devil You Know.mp3
Repeat for each song increasing the number sequentially as you go.
Tip! If you’re using your own SD Card make sure its 100% empty and formatted to FAT32 in a computer prior to
formatting in the Miic Star, even if its brand new.
Tip! The best way to rename a song is to do one file first then highlight and copy the text and paste into the next
file. Just be sure to not change either of the extensions at the end, the .cdg and .mp3

7
© Copyright 2018 Karaoke Home Entertainment www.khe.com.au / www.khe.co.nz / www.picknmix.com.au
Step 5 –Now you can copy the songs to your SD Card. All your formatted MP3+G songs (2 files per song) into the SD
Card, open the KARAOKE folder > then put the songs into the MYSONGS folder on the SD Card. If you can’t see this
folder, you need to format the SD Card first, see the top of this document.
Note: Do not change, rename or delete any of the files or folders that the Miic Star has created otherwise functions
may not work and you may need to start again. You also cannot create folders within the MYSONGS folder, you must
copy all the files into this folder, only songs in the MYSONGS root directory will be seen and played on the Miic Star.
Step 6 - Now you can put the SD Card into your Miic Star, wait for it to update the database and once its complete,
sing!
Important Information and Key Tips
•The MYSONGS folder is the only place you can put your MP3+G songs.
•Do not create any additional folders on the SD Card at any point or functions may be lost, or your songs may
not be seen.
•Your songs must be unzipped prior to copying onto the SD Card or else they will not be seen. If you need
help unzipping, please see the www.picknmix.com.au/support
•Every MP3+G song must have two files per song, one is .cdg and the other is .mp3, if only one is present
then the song will not work/play.
•When renaming the songs, they need to be 100% the same, except for the file extension.
•The file extension is never to be altered or the song will not work/play.

8
© Copyright 2018 Karaoke Home Entertainment www.khe.com.au / www.khe.co.nz / www.picknmix.com.au
MP4 Karaoke Files
The Miic Star MS-62 Karaoke System runs purely off an SD Card. Your unit will come with an SD Card with all your
songs purchased at the same time loaded onto it, if you didn’t purchase music you will get a blank SD Card however
we will format it for you. If you want to use your own SD Card, you will need to format it by inserting it in the
machine for 30 seconds until the screen resets prior to loading it up with your songs.
This is what an MP4 Karaoke File looks like…
These files are very crisp and clean and all include full on/off vocals that you can switch on and off using the TVSYS
button on the Miic Star MS-62 remote.
Get Your Songs Ready
Step 1 –Purchase your songs from www.karaokemp4.com.au
Step 2 –Save these files to your computer in a safe place (keep a backup in case you ever need to restore your files
at a later date, if your files are lost and not backed up you will need to repurchase)
Step 3 –Unzip the files on your computer (right click and extract all).
Step 4 –Rename* the file so the Miic Star can recognise them and is able to make a songbook for you.
Your very FIRST song will be numbered: 100001, the rest will follow in sequential order.
Formatted like so: Song Number-Artist Name-Song Title
Note: Dashes are hard up against the names, no spaces between. No commas at all, use words like feat or and
instead.
Example: 100001-Taylor Swift-Shake It Off.mp4
Repeat for each song increasing the number sequentially as you go.
*Note: If you do NOT want a songbook created then you can simply skip the renaming process and put the songs
once unzipped into the DOWNLOADS folder on the SD Card. They will then appear under DOWNLOADS from the
Miic Star menu.
Step 5 –Now you can copy the songs to your SD Card. All your formatted (must be formatted to create a songbook)
MP4 songs into the SD Card, open the KARAOKE folder > then put the songs into the MYSONGS folder on the SD
Card. If you can’t see this folder, you need to format the SD Card first, see the top of this document.
Tip! If you’re using your own SD Card make sure its 100% empty and formatted to FAT32 in a computer prior to
formatting in the Miic Star, even if its brand new.

9
© Copyright 2018 Karaoke Home Entertainment www.khe.com.au / www.khe.co.nz / www.picknmix.com.au
Note: Do not change, rename or delete any of the files or folders that the Miic Star has created otherwise functions
may not work and you may need to start again. You also cannot create folders within the MYSONGS folder, you must
copy all the files into this folder, only songs in the MYSONGS root directory will be seen and played on the Miic Star.
Step 6 - Now you can put the SD Card into your Miic Star, wait for it to update the database and once its complete,
sing!
Important Information and Key Tips
•The MYSONGS folder is the only place you can put your MP4 songs if you want to make a songbook, and
they must be formatted as in Step 2 above.
•If you do NOT want a songbook you can put your downloaded MP4 files straight into the DOWNLOADS
folder (must be unzipped).
•Do not create any additional folders on the SD Card at any point or functions may be lost, or your songs may
not be seen.
•Your songs must be unzipped prior to copying onto the SD Card or else they will not be seen. If you need
help unzipping, please see the www.picknmix.com.au/support
•The file extension is never to be altered or the song will not work/play.
Unformatted, no songbook creator
function
Formatted as in Step 2, can
generate a songbook

10
© Copyright 2018 Karaoke Home Entertainment www.khe.com.au / www.khe.co.nz / www.picknmix.com.au
Troubleshooting: Wireless Microphone Pairing
If you find one or both of your Miic Star MS-62 Karaoke System are not working properly, buttons functioning and/or
the microphone sound component, firstly we’d recommend you try brand new batteries. And if one microphone is
working try the batteries from the working microphone in the one that’s not working. If this doesn’t help, the
microphones may need to be recalibrated and re-paired to the base unit. We’ve found in majority of cases this
recalibration / re-pairing of the microphones have fixed any issues.
Follow these steps to pair the microphones to the base unit…
Step 1 –Plug in the base unit to the TV and put two AA batteries in each microphone.
Step 2 –Make sure the base unit is off (light is red) and the two microphones are off (no lights).
Step 3 –Hold down the power button on the base unit until you see a box appear on the screen which says “pairing
mics” then you can let go
Step 4 –Now rather quickly, grab both microphones and hold down both the on switches on the microphones until
they are both flashing.
Step 5 –It will take a few minutes from here to recalibrate the microphones and pair them to the base unit. The
screen will reset in approx. 3 minutes and you’ll be able to use both microphones.
Note –If at first, immediately after recalibrating you try and use the microphones they don’t work it means they’re
not finished re-pairing, give it a few more minutes and they will both work.
Try Again –If the microphone recalibration / re-pairing doesn’t work the first time you can try it again, if your timing
is off with the recalibration steps above it may not work. Be sure to follow the steps closely.

11
© Copyright 2018 Karaoke Home Entertainment www.khe.com.au / www.khe.co.nz / www.picknmix.com.au
Meet Your Remote Control
Power On/Off
Record Button –use this button
before/during a song to record your
performance
Setup Button –use this button to
export a song list, edit TV and audio
settings.
TVSYS Button –switch full vocals on
and off on supported files
These buttons are for the
controlling the higher (+) and lower
(-) functions of Key Control, Tempo,
Music Volume and Microphone
Volume.
Use the arrows to navigate up,
down and across the main screen
and menus. Use “enter” to select.
Favourite a song, keep it in a list
with all your favs!
Stop playback
Use these numbers to enter a song
number or type in the name of a
song/artist

12
© Copyright 2018 Karaoke Home Entertainment www.khe.com.au / www.khe.co.nz / www.picknmix.com.au
Navigate The Menu
This feature allows you to see your formatted MP3+G, MP4 and foreign language packs in
folders by artist (only for mentioned formats, formatted correctly and within MYSONGS)
All of your songs are inside here, foreign language and any songs you have formatted correctly
and loaded into the MYSONGS folder on the SD Card.
Find your recorded performances in here, see page 13 for more information.
Here is where your other files, not formatted will appear, you must load them into the
DOWNLOADS folder on the SD Card.
Go here to change settings, see page 14 for details.
As you favourite songs along the way they will accumulate a list in here

13
© Copyright 2018 Karaoke Home Entertainment www.khe.com.au / www.khe.co.nz / www.picknmix.com.au
Recording Your Performance
Step 1 Select a song from the main menu to sing
Step 2 On remote, press the “REC” button, it will appear on the screen as “record on”
Step 3 Sing your song!
Step 4 When you’re done, either hit “REC” again to stop or when the song has ended. You can either replay your
recording, delete or save it.
Step 5 If you’ve saved your recording it will appear in the RECORD section from the main menu. You can playback
the recording from here at anytime.
Export Your Performance
Yes you can export your performance and share it with all your friends!
Step 1 From the main menu, select RECORD
Step 2 Select “Export” on the remote
Step 3 Choose to export the one file you’ve selected or the whole list. Allow
some time as it will get to 100% and show you the recorded page again once
done
Step 4 Now, switch off the unit and take out the SD Card, put the SD Card into
your computer
Step 5 In your computer, open the SD Card file
Step 6 Then select the “KARAOKE” folder and then the “rec_wave” folder and your recorded song will be in there.
Step 7 Play and share the recording as you wish!

14
© Copyright 2018 Karaoke Home Entertainment www.khe.com.au / www.khe.co.nz / www.picknmix.com.au
Settings & Setup
When you choose SETUP from the main menu screen, this is the Setup Menu that you will see and what each button
will do for you.
Export a printable song list of all your MP3+G
and MP4 songs which are formatted
correctly and loaded into the MYSONGS
folder. Any unformatted in the DOWNLOADS
folder will not be included.
You can also change/edit the background
images and language
Audio Output –when using HDMI (to TV for
lyrics) and AV (for sound through dedicated
speaker) change the Audio Output to
Analog.
TV system –settings relevant to your TV and the
connection you are using. (Maximum Resolution
1280 x 720)
The best setting is AUTO which will allow you to
switch between TVs and the unit will
accommodate to the different cable. If you’ve
changed it to HDMI and are going back to AV,
you will need to use the unit with HDMI still in it
to change the settings here to Auto or else it
won’t see the AV cables and you won’t see any
visual.

15
© Copyright 2018 Karaoke Home Entertainment www.khe.com.au / www.khe.co.nz / www.picknmix.com.au
Thank you and Enjoy!
We thoroughly hope you enjoy your Miic Star MS-62 Karaoke System!
Here are some quick links you can use for downloading and purchasing extra
music packs:
karaokemp3g.com.au
karaokemp4.com.au
miicstar.com.au (Australia)
www.khe.co.nz/miicstar (New Zealand)
If you are still experiencing difficulties connecting or using your Miic Star MS-62,
please make contact with us.
1300 550 630 (Australia) / 00 613 9557 5110 (New Zealand)
Or visit us in store
(See khe.com.au/stores for open hours)
Melbourne: 553 Centre Rd, Bentleigh
Perth: Suite 2, 434 Lord St, Mt Lawley
Table of contents
Other Miicstar Karaoke System manuals