Mikomi ET880 User manual

Instruction Manual - Please keep for future reference
Mikomi Digital Dictation 64MB Machine
ET880
03-05
REC
VOL +
VOL
UP
MODE
DOWN
STOP
PLAY/PAUSE
HOLD
USB

1
IMPORTANT SAFETY INSTRUCTIONS
PRECAUTIONS
To Maintain Optimum Performance
Do not use the unit in places which are extremely hot, cold, dusty or humid. Do not use
or keep the unit in following places.
•In a high humidity area such as a bathroom or near a heater.
•In an area exposed to direct sunlight (where it can become extremely hot).
•Near sources of strong magnetism, such as televisions, speakers, or magnets.
•Where there is a lot of movement, vibration or an unstable shelf.
For Safety
•Do not attempt to disassemble this unit.
•Make sure that pins or other foreign objects do not get inside the unit.
•Take care not to drop the unit or subject it to strong shocks.
Children
•Children do not understand the dangers associated with operating electronic devices.
Never allow children to use this device.
Note on listening with the earphones
•Listen at moderate volumes to avoid hearing damage.
•Do not wear the earphones while driving or cycling. It may create a traffic hazard.
•You should use extreme caution or temporarily discontinue use in potentially hazardous
situations, such as walking, jogging, etc.
•If you hear no sound when playing a file, DO NOT turn the volume up high because
the music could suddenly begin at high volume. To avoid hurting your ears or damaging
the headphones, turn the volume control to the lowest level before starting playback
and slowly turn it up to the desired level.
Read all instructions before use and keep for future reference.

32
MIC
KNOW YOUR MACHINE
CONTENTS
Know Your Machine.........................................................................................3
Using with Batteries.........................................................................................4
Basic Operation (Power on/off)........................................................................6
Basic Operation (Record)..................................................................................7
Basic Operation (Record play ing)...................................................................9
Basic Operation (PlayMP3)...............................................................................11
Basic Operation (HOLD keylock)......................................................................13
Drive Installation................................................................................................14
Format memory..................................................................................................15
Features..............................................................................................................16
Specifications...................................................................................................17
FHeadset Socket
BExternal
Microphone
Socket
EMIC (Build in Microphone)
CRecord
Indicator GREC (Record)
HVOL+ (Volume Up)
IUP (Next Song/Skip)
KMODE (Switching Button)
JVOL- (Volume Down)
LDOWN(Previous Song/Skip)
MHOLD (Key Lock)
NSTOP (Stop/Power Off)
OPLAY/PAUSE
(Power On/Play/Pause)
PUSB Interface
DLCD Display
T1 x Ear Phone
Q1 x Mic
R1 x USB Cable
S1 x CD
A1 x Digital Dictation Machine
U1 x Audio Cable

4
fig. 1
5
fig. 2
fig. 4
fig. 3
NOTES:
- Please read the important safety
instructions before use.
USING WITH BATTERIESUSING WITH BATTERIES
Full Battery Low Battery Empty
Full Battery
Low Battery
DVR MP3
1
Install Batteries
Note on batteries:
• Do not mix different types of
batteries or an old battery with a
new one.
• To prevent the risk of leakage or
explosions, never recharge the
batteries, apply heat or take them
apart.
• When not using batteries, remove
them to prevent battery drain.
• If liquid leaks from the batteries,
throw them away. Thoroughly
clean the battery compartment
with a dry cloth.
1. Slide the cover to the right and
insert 2 x AAA batteries into the
unit. Ensure the polarity on the
batteries and unit are correctly
aligned.
See fig. 1 and 2.
2. After you insert the batteries the
unit will "power on" and scroll
through the LCD screen. The unit
is now ready for use, if you do not
use the product for 2 minutes the
unit will auto shutdown and you
will need to press the Power On
Oto start again.
See fig. 3.
Low Battery
1. In the event of installing low
batteries or when the unit starts to
run on low power please note the
following.
• LCD screen will indicate "Lo" for 2
seconds and during MP3 play
mode the unit will reduce the output
volume and then flash for 10
seconds until it automatically
powers off.
• If you are recording the unit will
automatically save the current file
and then power off. If the LCD
indicates "Lo" while recording the
unit will not function under low
battery conditions.
• If the unit shows low battery, we
suggest turning the volume down
or use the earphones to conserve
power
See fig. 4.
NOTE:
• If the unit is not used for long
periods you must remove the
batteries to prevent leakage and
damage to the unit.
• If the LCD does not display check
the polarity installation and battery
type before contacting the service
centre.
WARNING:
• Never remove batteries or unplug
the USB cable when in use or
during operation or in PC mode
as this can result in damage to the
unit and possible loss of program
files.
O

76
fig. 5
fig. 6
fig. 7
fig. 8
OPERATION (POWER ON/OFF) OPERATION (RECORDING)
DVR
DVR
REC
DVR
DVR MP3
REC
1. Press O for 2 seconds to turn on,
the unit will scroll through the LCD
screen to display memory space
and then go into idle mode.
See fig. 5.
NOTE: If the unit is not used for 2
minutes the unit will
automatically power off.
2. Turn off the unit by pressing STOP
Nfor 2 seconds.
See fig. 5.
HOLD KEY:
- Sliding the HOLD M up locks the
key pad to prevent accidental
activation of the keys. If the keys
are activated in Hold mode the
LCD will display HOLD. Slide the
key down to re-activate the unit.
- Please note you can not turn the
unit on or off if the Hold key is
active.
See fig. 5.
3. When the unit is turned on the
LCD will display the current track
selection 00-07 and F-10
depending on the total number of
tracks recorded.
See fig. 6.
NOTE: Each time you stop
recording a new file is created.
If you want to record a long
message on the same file use
the "Pause" feature to keep the
message to a single track if you
need to stop recording for any
reason.
RECORD
Select record mode
1. Turn on the unit and wait 2 seconds
to allow the unit to check the status,
the unit will automatically default
to DVR mode.
G
H
K
J
M
N
O
2. Press VOL + H or VOL- J to
toggle the recording mode. LP is
used to extend the recording time
space available and SP is used for
shorter recordings.
See fig. 5.
3. Press REC G to start recording
your message and the red LED C
will illuminate and REC will display
in the LCD.
See fig. 5.
4. Press REC G again to pause
recording.
See fig. 5.
5. Press STOP N to stop recording.
See fig. 5.
Message Length
- Please note the maximum
message length is 4 hours for SP
or 18 hours for LP and the
maximum number of tracks
available is up to 99 tracks.
C

98
fig. 9
fig. 10
OPERATION (PLAY FEATURES) OPERATION (PLAY FEATURES)
- The feature available are Play,
Pause, Stop, Skip, Forward, Skip
Backward, Select, Volume, Loop
and A-B repeat, Delete.
PLAY
1. Press PLAY O to play back your
selected track.
See fig. 9.
PAUSE
1. Press PLAY O to pause the
selected track at any time.
See fig. 9.
STOP
1. Press STOP N to stop playing or
recording at any time. Press and
hold this key to turn the unit off.
See fig. 9.
Skip Forward & Backward
1. Press and hold DOWN L and UP
Ito skip forward & or backward
to the next section of a track as
required.
See fig. 9.
SELECT
1. Press UP I or DOWN L to select
the next track. The unit will
automatically scroll from track 1
and then to the highest track and
then start again.
See fig. 9.
DVR MP3
REC
ALL
1
fig. 11
DVR
fig. 12
REC
ALL
1
DVR
PLAY FEATURES
VOLUME ADJUST
1. During play back Press VOL+ H
or VOL- J to increase or decrease
the volume from 00 to max 15.
Playing on high volume reduces
the battery life.
See fig. 9 and 11.
LOOP
1. During play back press MODE K
to enter the loop mode. After LED
is displayed in the LCD press UP
I or DOWN L to select (ALL) to
loop all record files or (1) to loop
a single record file and note the
displayed icons. If you press a third
time no icons will be displayed and
to loop function will be turned off.
If no key activation takes place the
unit will save the current settings
and default the play menu.
See fig. 9 and 12.
H
I
K
J
L
N
O

1110
fig. 13
fig. 15
fig. 14
OPERATION (PLAY FEATURES) OPERATION (PLAYING MP3 FILES)
MP3
ALL
1
MP3
2. Press and hold MODE K to
display the del icon. Press PLAY
O to delete the selected file and
"ERASE" will show briefly in the
display to indicated the file has
been deleted.
See fig. 13.
DELETE
DELETE ALL
1. Press and hold MODE K to
display the del icon.
See fig. 13.
2. Press and hold MODE K again
and the word "ALL" will display.
Press PLAY O to Delete ALL
selected files.
See fig. 13.
1. Press UP I or DOWN L to select
the required file.
See fig. 13.
PLAY
- Press PLAY O to play the
selected track, the display will also
show the elapsed play time.
See fig. 13 and 15.
PAUSE
- Press PLAY O to pause the track,
the MP3 icon will flash in the
display.
See fig. 13.
STOP
- Press STOP N to stop the track
playing.
See fig. 13.
Skip Forward/Backward
- Press UP I or DOWN L during
playback to skip within the playing
track.
See fig. 13.
1. Turn on the unit and press MODE
Kto switch to the MP3 mode. The
display will indicate between F00-
F05 depending on the number of
tracks recorded.
See fig. 13 and 14.
A-B Repeat
- Use this function to repeat a certain
part of recorded message. For
example a message could be 30
seconds long but you just wish to
repeat the section from 15-20
seconds.
1. During play back press MODE K
press once to enter REP mode
then press a second time to select
message repeat. At the same time
the "A" icon will flash of A-B. Then
"B" will flash.
Press UP I to indicate the start
point and the "B" will flash, press
again to indicate the finish point.
The unit will then automatically play
that part of the selected message.
Press MODE K again or STOP N
to cancel the settings.
See fig. 13.
I
K
L
N
O

1312
fig. 16
fig. 17 fig. 18
fig. 19
fig. 20
OPERATION (PLAYING MP3 FILES) OPERATION (HOLD KEY LOCK)
KEY LOCK
- When enabling the HOLD M
the system will indicate "Hold"
and restore to original display.
No key operation will be respond
until disabling the HOLD M.
When the HOLD M is enabled
under shut down status, the
system will indicate HOLD when
trying to boot up by long pressing
the PLAY O.
See fig. 16 and 17.
REMOVABLE DISK
(UPLOAD/DOWNLOAD)
1. Under any circumstance except
system upgrading ,when insert a
removable disk into the USB
interface of PC, the system will
immediately interrupt current
operation, trying to connect with
PC. Disk operation is ready when
the disk icon emerges in the PC
operation system.
See fig. 18 and 19.
2. Upload/download: When
removable disk is detected , you
may upload/ download ( in the
manner of copy ) Mp3/WMA files
or other files.
3. When the USB is in idle
status,shortly press the MODE
key to switch to MP3 operation
mode. The system will indicate
"busy" during data transmittin
between the disk and PC. Never
disconnect at this time, or a data
loss may be caused.
See fig. 20.
MP3
EQ Mode
1. During play back press MODE K
to enter the EQ options. Press UP
Ior DOWN L to make your
selection.
00 : NATURAL
01 : ROCK
02 : POP
03 : CLASSIC
04 : SOFT
05 : JAZZ
06 : DBB (Dynamic Bass Boost)
If no selection is made within 8
seconds the system will save
current settings and return to play
mode.
See fig. 16.
A-B Repeat
- See page 10.
VOLUME
- See page 9.
LOOP
- See page 9.
DELETE FILES
- See page 10.
R
PC
I
K
J
M
O
P

1514
fig. 23
DRIVE INSTALLATION FORMAT MEMORY
FORMAT MEMORY
- To format the memory, you
should insert the MP3 into the
computer's USB interface and
enter USB connecting mode to
format the MP3 memory. Under
any operation system, the
method of format is the same as
that for computer hard disks and
floppy disk (namely select the
"movable disk" to format).
ADDING THE SOFTWARE
1. Install software before make the
connection. (auto run / click the
file name, it normally should be
setup.exe)
2. Connect to the computer by the
provided USB Cable R.
See fig. 23.
3. List out all the function in simple
way.
fig. 21
CD ROM Drive
S
PC
fig. 22
Other Music Device
DRIVE INSTALLATION
- When the Digital voice recorder is
used as movable disk, you can use
the drivers built in the operation
systems such as Windows
Me/2000/XP, Mac OS 9.x/Mac OS
and Linux 2.4.x, etc., and you don't
need to install the driver. Under
Windows 98, you need to install
the driver. AII the driver files are
included in the CD S enclosed.
You can install the driver of the
Digital voice recorder to Windows
98 from CD. The installations
procedures are described as below:
• Start up your Windows 98 system
• Insert the CD driver S Into the
CD-ROM Drive.
See fig. 21.
• Install the driver;
• Restart the operation system;
• Insert the music U-disk into the
computer's USB interface. The
system will automatically find the
U-disk, which displayed as
movable disk.
WARNING:
• Never remove batteries, unplug
the USB cable when in use or
during operation or in PC mode
as this can result in damage to the
unit and possible loss of program
files.
RECORD FROM OTHER DEVICE
1. Plug one end of Audio Cable U
into the External Micophone Socket
B.
See fig. 22.
2. Plug the other end of Audio Cable
Uinto the other music device.
3. Start record.
U
R
PC
P
16 17
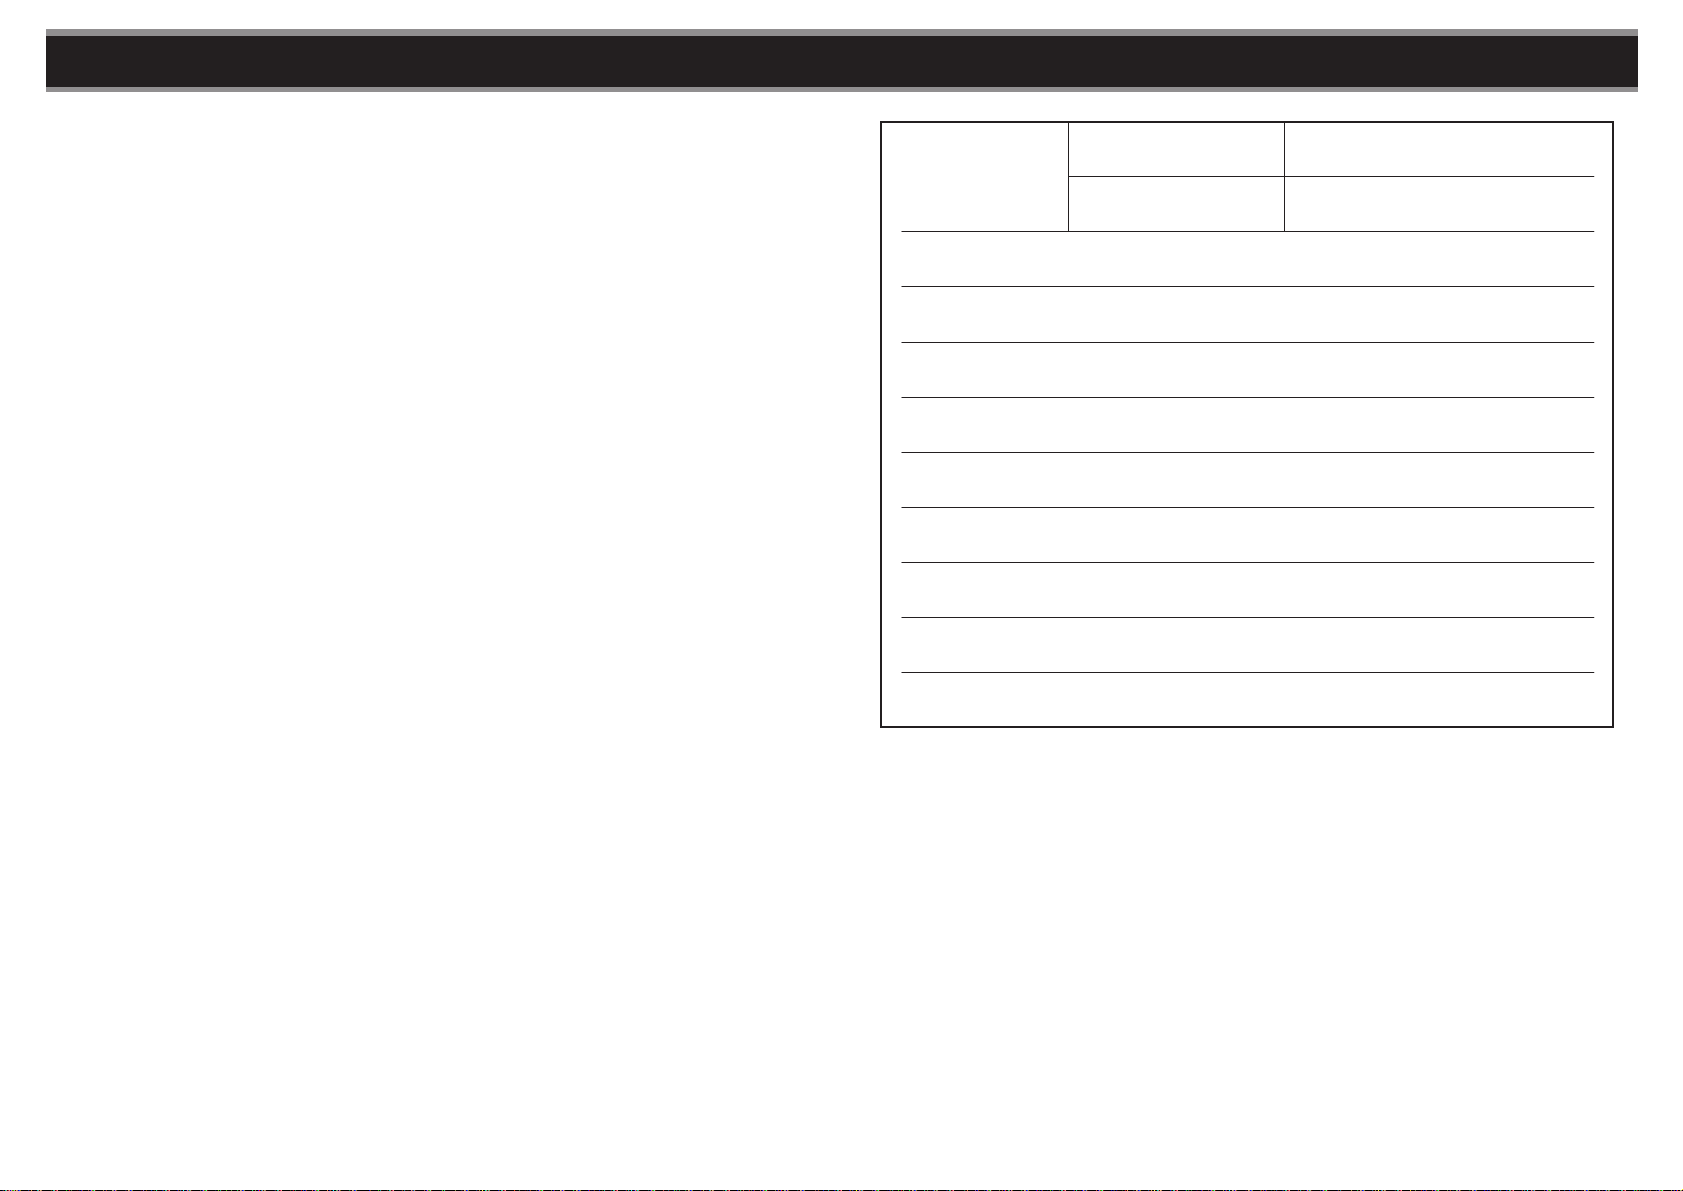
Recording Time
High Quality Playing
Mode SP
Low Quality Playing
Mode LP
About 240 minutes
About 1080 minutes
Dimension 105(L)x30(W)x16(T) mm
Weight About 36g (excluding batteries)
Battery 2 x alkaline DC3V "AAA"
The highest serial number
of recorded messages 127
Output power (max) 80Mw (Distortion<10%, 32ohm)
Frequency range of
Recording/replaying 500Hz-3500Hz
Input Built-in microphone or single-track
microphone socket, about 2k ohm
Output Stereo earphone, about 32 ohm
Operating 0-40
1. Large memory space 64M.
2. Record up to 99 voice messages.
3. MP3, WMA and ADPCN format.
4. Blue backlight.
5. Record indication.
6. Music playing function.
7. SP and LP record format available.
SP 240m LP 1080m
8. Loop mode.
9. 7 play modes:
NATURAL, ROCK, POP, CLASSIC,
SOFT, JAZZ, DBB (dynamic bass
boost).
NOTE: If you find that "OFF" shutdown picture arises after booting up, this may
be caused by program loss due to incorrect operation, in which case carry out
troubleshooting according to the following steps:
1 Connect the USB line and enter Digital Voice recorder after 2 seconds. Fully
format the Digital Voice recorder (in Windows 2000 and Windows XP, please
select FAT other than FAT32 as file format)
2 Insert the enclosed CD into the CD-ROM and copy the file named '*nanfla$.ugr"
from the CD into the Digital voice recorder.
3 Upon completion, right-click the Digital voice recorder icon to display the pull-
down menu. Click "eject" to exit USB mode (or press the MODE key to exit) and
a "Unplug" picture will emerge on the display (It is recommended to use the
"eject" function on the pull-down menu to perform Firmware Update).
A arrow icon has been display when the unit connected to the computer. Right
click on the arrow and select the "Unplug an deject..". Then follow the instructions
from the computer manual to eject the unit.
4 The update process will take 5-8seconds. A "ON" is displayed to indicate update
succeeded and enter the USB mode again 8 seconds later with a update
description (including update version and date) under the root directory of
removable disk.
5 You can copy MP3 or other files into the Digital voice recorder only when the
"PC USB" is displayed (Note: Never pull out the USB line or press the MODE
key or use the eject function when the "busy" picture still on the display).
FUNCTION DESCRIPTION
ALTERNATIVE TO EJECT THE UNIT
1 An arrow icon is displayed when connected to your PC. Right click on the arrow
and select "Unplug and eject".
2. Then follow the instructions from the PC user manual to eject the unit.
10. Repeat mode (A-B): Repeat certain
segments of a song.
11. Delete: delete existing MP3 music
files and voice files, individually or
all.
12. Volume adjustment to 15 levels.
13. USB connectable for uploading and
downloading
Voice files (including music and
MP3 files).
14. Built-in speaker.
15. Low battery indication.
16. HOLD key lock.
SPECIFICATIONS
CONNECTION TO YOUR PC TROUBLE SHOOTING


