Tascam DR-40 User manual

DR-40
Linear PCM Recorder
D01157920A
OWNER’S MANUAL
This device has a serial number
located on the bottom panel. Please
record it and retain it for your
records.
Serial number:
__________________

2TASCAM DR-40
Declaration of Conformity
Model Number: DR-40
Trade Name: TASCAM
Responsible party: TEAC AMERICA, INC.
Address: 7733 Telegraph Road, Montebello,
California, U.S. A.
Telephone number: 1-323-726-0303
This device complies with Part 15 of the FCC Rules. Operation is
subject to the following two conditions: (1) this device may not
cause harmful interference, and (2) this device must accept any
interference received, including interference that may cause
undesired operation.
THIS CLASS B DIGITAL APPARATUS COMPLIES WITH CANADIAN ICES-003.
CET APPAREIL NUMÉRIQUE DE LA CLASSE B EST CONFORME À LA NORME
NMB-003 DU CANADA.
FOR U.S.A.
TO THE USER
This equipment has been tested and found to comply with the limits for a
Class B digital device, pursuant to Part 15 of the FCC Rules. These limits are
designed to provide reasonable protection against harmful interference
in a residential installation. This equipment generates, uses, and can
radiate radio frequency energy and, if not installed and used in accordance
with the instruction manual, may cause harmful interference to radio
communications. However, there is no guarantee that interference will
not occur in a particular installation. If this equipment does cause harmful
interference to radio or television reception, which can be determined by
turning the equipment off and on, the user is encouraged to try to correct
the interference by one or more of the following measures.
a) Reorient or relocate the receiving antenna.
b) Increase the separation between the equipment and receiver.
c) Connect the equipment into an outlet on a circuit different from that to
which the receiver is connected.
d) Consult the dealer or an experienced radio/TV technician for help.
CAUTION
Changes or modifications to this equipment not expressly approved by
TEAC CORPORATION for compliance could void the user's authority to
operate this equipment.
IMPORTANT SAFETY PRECAUTIONS

TASCAM DR-40 3
IMPORTANT SAFETY INSTRUCTIONS
1 Read these instructions.
2 Keep these instructions.
3 Heed all warnings.
4 Follow all instructions.
5 Do not use this apparatus near water.
6 Clean only with dry cloth.
7 Do not block any ventilation openings. Install in accordance with the
manufacturer's instructions.
8 Do not install near any heat sources such as radiators, heat registers, stoves,
or other apparatus (including ampliers) that produce heat.
9 Do not defeat the safety purpose of the polarized or grounding-type plug. A
polarized plug has two blades with one wider than the other. A grounding
type plug has two blades and a third grounding prong. The wide blade or
the third prong are provided for your safety. If the provided plug does not
t into your outlet, consult an electrician for replacement of the obsolete
outlet.
10 Protect the power cord from being walked on or pinched particularly at
plugs, convenience receptacles, and the point where they exit from the
apparatus.
11 Only use attachments/accessories specied by the manufacturer.
12 Use only with the cart, stand, tripod, bracket, or table specified by the
manufacturer, or sold with the apparatus. When a cart is used, use caution
when moving the cart/apparatus combination to avoid injury from tip-over.
13 Unplug this apparatus during lightning storms or when unused for long
periods of time.
14 Refer all servicing to qualified service personnel. Servicing is required when
the apparatus has been damaged in any way, such as power-supply cord
or plug is damaged, liquid has been spilled or objects have fallen into the
apparatus, the apparatus has been exposed to rain or moisture, does not
operate normally, or has been dropped.
Do not expose this apparatus to drips or splashes.
•
Do not place any objects lled with liquids, such as vases, on the apparatus.
•
Do not install this apparatus in a conned space such as a book case or
•
similar unit.
The apparatus draws nominal non-operating power from the AC outlet with
•
its POWER or STANDBY/ON switch not in the ON position.
The apparatus should be located close enough to the AC outlet so that you
•
can easily grasp the power cord plug at any time.
The mains plug is used as the disconnect device, the disconnect device shall
•
remain readily operable.
If the product uses batteries (including a battery pack or installed batteries),
•
they should not be exposed to sunshine, re or excessive heat.
CAUTION for products that use replaceable lithium batteries: there is danger
•
of explosion if a battery is replaced with an incorrect type of battery. Replace
only with the same or equivalent type.
Caution should be taken when using earphones or headphones with the
•
product because excessive sound pressure (volume) from earphones or
headphones can cause hearing loss.

4TASCAM DR-40
Cautions about Batteries
8
This product uses batteries. Misuse of batteries could cause a leak, rupture or
other trouble. Always abide by the following precautions when using batteries.
Never recharge non-rechargeable batteries. The batteries could rupture or
•
leak, causing re or injury.
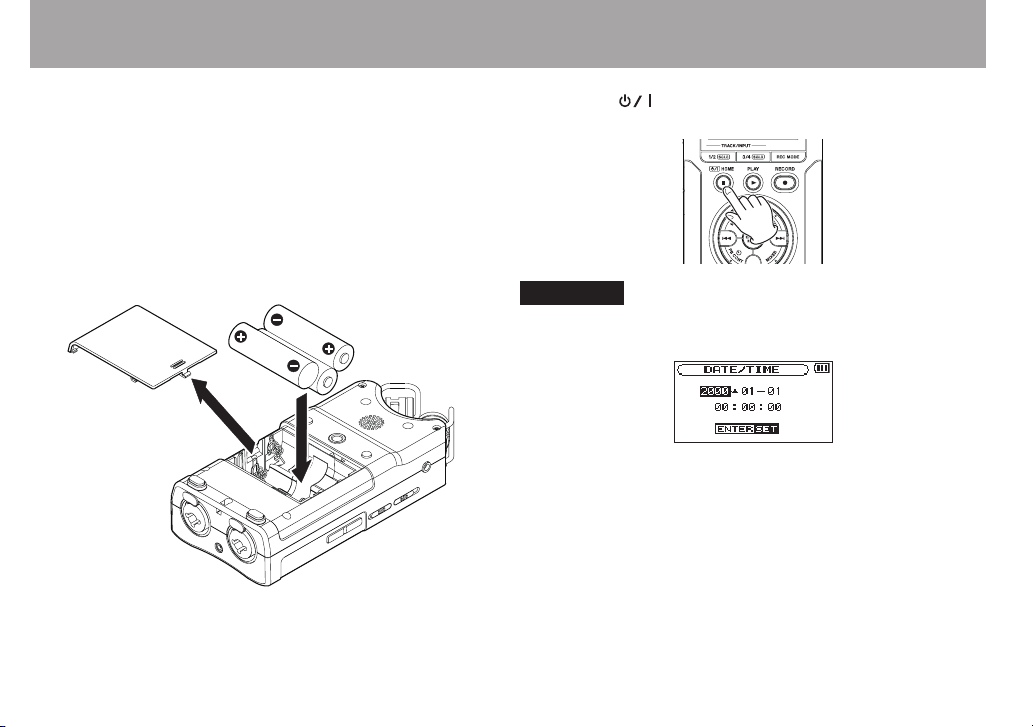
When installing batteries, pay attention to the polarity indications
•
(plus/minus (+/–) orientation), and install them correctly in the battery
compartment as indicated. Putting them in backward could make the
batteries rupture or leak, causing re, injury or stains around them.
When you store or dispose of batteries, isolate their terminals with insulation
•
tape or something like that to prevent them from contacting other batteries
or metallic objects.
When throwing used batteries away, follow the disposal instructions
•
indicated on the batteries and the local disposal laws.
Do not use batteries other than those specied. Do not mix and use new
•
and old batteries or dierent types of batteries together. The batteries could
rupture or leak, causing re, injury or stains around them.
Do not carry or store batteries together with small metal objects. The
•
batteries could short, causing leak, rupture or other trouble.
Do not heat or disassemble batteries. Do not put them in re or water.
•
Batteries could rupture or leak, causing re, injury or stains around them.
If the battery uid leaks, wipe away any uid on the battery case before
•
inserting new batteries. If the battery uid gets in an eye, it could cause loss
of eyesight. If uid does enter an eye, wash it out thoroughly with clean
water without rubbing the eye and then consult a doctor immediately. If the
uid gets on a person’s body or clothing, it could cause skin injuries or burns.
If this should happen, wash it o with clean water and then consult a doctor
immediately.
The unit power should be o when you install and replace batteries.
•
Remove the batteries if you do not plan to use the unit for a long time.
•
Batteries could rupture or leak, causing re, injury or stains around them.
If the battery uid leaks, wipe away any uid on the battery compartment
before inserting new batteries.
For European Customers
8
Disposal of electrical and electronic equipment
(a) All electrical and electronic equipment should be disposed of separately
from the municipal waste stream via designated collection facilities
appointed by the government or the local authorities.
(b) By disposing of the electrical and electronic equipment correctly, you will
help save valuable resources and prevent any potential negative eects on
human health and the environment.
(c) Improper disposal of waste equipment can have serious eects on the
environment and human health as a result of the presence of hazardous
substances in electrical and electronic equipment.
(d) The crossed out wheeled dust bin symbol indicates that electrical and
electronic equipment must be collected and disposed of separately from
household waste.
(e) The return and collection systems are available to the end users. For
more detailed information about disposal of old electrical and electronic
equipment, please contact your city oce, waste disposal service or the
shop where you purchased the equipment.
Safety Information

TASCAM DR-40 5
Safety Information
Disposal of batteries and/or accumulators
(a) Waste batteries and/or accumulators should be disposed of separately from
the municipal waste stream via designated collection facilities appointed by
the government or the local authorities.
(b) By disposing of waste batteries and/or accumulators correctly, you will
help save valuable resources and prevent any potential negative eects on
human health and the environment.
(c) Improper disposal of waste batteries and/or accumulators can have serious
eects on the environment and human health as a result of the presence of
hazardous substances in batteries and/or accumulators.
(d) The crossed out wheeled dust bin symbol indicates that batteries and/or
accumulators must be collected and disposed of separately from household
waste.
Pb, Hg, Cd
If the battery or accumulator contains more than the specied values of lead
(Pb), mercury (Hg), and/or cadmium (Cd) dened in the Battery Directive
(2006/66/EC), then the chemical symbols for lead (Pb), mercury (Hg) and/or
cadmium (Cd) will be indicated beneath the crossed out wheeled dust bin
symbol.
(e) The return and collection systems are available to the end users. For more
detailed information about disposal of waste batteries and/or accumulators,
please contact your city oce, waste disposal service or the shop where you
purchased them.

6TASCAM DR-40
IMPORTANT SAFETY PRECAUTIONS ..........................2
IMPORTANT SAFETY INSTRUCTIONS .........................3
Safety Information ......................................................4
Quick Start Guide ......................................................10
1 – Introduction .........................................................12
Features.............................................................................................. 12
Items included with the product .............................................. 14
Conventions used in this manual ............................................. 14
Intellectual property rights......................................................... 15
About SD cards................................................................................ 16
Precautions for use.................................................................... 16
Precautions for placement and use ......................................... 17
Beware of condensation .............................................................. 17
Cleaning the unit ............................................................................ 17
User registration.............................................................................. 17
2 – Names and Functions of Parts ............................18
Top panel ........................................................................................... 18
Front panel........................................................................................ 22
Left side panel.................................................................................. 23
Right side panel............................................................................... 23
Bottom Panel.................................................................................... 24
Home Screen.................................................................................... 25
Recording Screen............................................................................ 27
Playback Control screen............................................................... 29
Menu item list .................................................................................. 30
Using menus..................................................................................... 31
Basic operation................................................................................ 32
3 – Preparation...........................................................34
Powering the unit........................................................................... 34
Using AA batteries..................................................................... 34
Using an AC adaptor (sold separately) ............................... 35
Using USB bus power ............................................................... 35
Start-up & shutdown..................................................................... 36
Starting up the unit................................................................... 36
Shutting down ............................................................................ 37
Resume function ........................................................................ 37
Setting the date and time............................................................ 37
Inserting and removing SD cards ............................................. 38
Inserting the SD card................................................................ 38
Removing the card .................................................................... 39
Card write protection ............................................................... 39
Preparing an SD card for use ...................................................... 40
Using the built-in speaker ........................................................... 40
Connecting monitors and headphones................................. 41
Using the built-in microphone .................................................. 41
Setting the mics to record a wide stereo sound
(A-B position)............................................................................... 41
Setting the mics to record a clear stereo sound
(X-Y position)................................................................................ 42
Table of Contents

TASCAM DR-40 7
Table of Contents
Swapping the left-right channels of the built-in
microphone pair ............................................................................. 42
Microphone position detection............................................ 43
Attaching the tilt foot ................................................................... 44
4 – Recording .............................................................45
Selecting file format, sampling frequency, and maximum
file size ................................................................................................ 45
Preparing the recording inputs ................................................. 46
Recording with the built-in mics ......................................... 46
Recording with external mics (EXT MIC IN) ...................... 46
Recording an external device (LINE IN).............................. 47
Setting the external input type............................................. 48
Using phantom power ............................................................ 48
Adjusting the input level ............................................................. 49
Manually adjusting the input level...................................... 49
Using the Level Control Function......................................... 50
Overview of recording modes ................................................... 51
Recording (MONO/STEREO recording)................................... 52
Make recording settings.......................................................... 52
Set where to save the file ........................................................ 53
Starting the recording.............................................................. 53
File names when recording in MONO/STEREO ............... 54
Simultaneously recording two files at different
input levels (DUAL REC)................................................................ 54
Enabling dual recording ......................................................... 54
Starting dual recording ........................................................... 56
Dual recording file names....................................................... 56
Recording 4 channels.................................................................... 57
Making 4-channel recording settings................................. 57
Starting 4-channel recording ................................................ 58
File names when recording in 4-channel.......................... 58
Recording playback and input sounds together
(overdubbing).................................................................................. 58
Setting the overdubbing mode............................................ 59
Select the file you want to overdub .................................... 60
Start the overdubbing.............................................................. 60
File names when recording in overdubbing.................... 61
Recording automatically (AUTO REC)...................................... 62
Creating and changeover to a new file during continued
recording (Track increment) ....................................................... 63
Manual track increment during recording ....................... 64
Automatic track increment by file size............................... 64
Mark function................................................................................... 65
Adding marks manually to a recording.............................. 65
Adding marks automatically to a recording..................... 65
Moving to a mark position...................................................... 65
Setting the low cut filter............................................................... 66
Recording the moment before pushing RECORD
(PRE REC)............................................................................................ 66
Self-timer function ......................................................................... 67
Solo function.................................................................................... 67
Recording duration........................................................................ 68

8TASCAM DR-40
Table of Contents
5 – Working with Files and Folders
(BROWSE screen)..................................................69
Screen navigation........................................................................... 69
Icons on the BROWSE screen...................................................... 70
File operations ................................................................................. 70
Folder operations............................................................................ 72
Creating a new folder.................................................................... 73
6 – Playback................................................................74
Adjusting playback volume ........................................................ 74
Setting the playback area (AREA) ............................................. 74
Selecting a folder for the playback area (1)........................... 75
Selecting a folder for the playback area (2)........................... 76
Playlist................................................................................................. 77
Adding files to the playlist...................................................... 77
Editing the playlist..................................................................... 77
Selecting files for playback (skip).............................................. 79
Playback............................................................................................. 79
Pausing........................................................................................... 80
Stopping........................................................................................ 80
Rewinding and fast-forwarding (search)........................... 80
Repeat playback (REPEAT)........................................................... 80
Special Playback Control Functions......................................... 81
Playback Control Screen.......................................................... 81
Repeated Playback of Selection (Loop Playback)........... 82
Changing the playback speed (VSA)................................... 83
Using the playback equalizer (PLAY EQ)................................. 83
Moving back a few seconds for replay (jump-back
playback) ........................................................................................... 84
Playback of files recorded using dual recording ................ 84
OVERDUB INPUT MUTE function (during playback) .......... 85
Solo function ................................................................................... 85
7 – Quick Operations .................................................86
Features of the QUICK button.................................................... 86
Quick menu screen ........................................................................ 87
Closing the Quick menu screen............................................ 88
Deleting the selected file (Quick Delete) ............................... 88
Dividing the selected file (DIVIDE)............................................ 89
Increasing the perceived overall sound pressure to
enhance listenability (Level Alignment)................................. 90
Mixdown ........................................................................................... 91
8 – Using the Effects ..................................................92
Setting the effect ............................................................................ 92
Effects Preset List............................................................................ 93
9 – Mixer .....................................................................94
Making mixer settings................................................................... 94
Using the MS decoder .................................................................. 95
Decoding the input sound as you record ......................... 95
Decoding the playback sound ............................................. 95
MS decoder settings...................................................................... 95
10 – Tuning a Musical Instrument (Tuner) ...............97
Using the tuner................................................................................ 97

TASCAM DR-40 9
Setting the tuner........................................................................ 97
Tuning a musical instrument ................................................. 97
11 – Connecting with a computer ............................98
Transferring files to a computer ................................................ 99
Transferring files from a computer........................................... 99
Disconnecting from a computer............................................... 99
12 – Settings and Information................................100
Viewing File Information............................................................100
File information page .............................................................100
Card information page...........................................................101
System information page......................................................101
System Settings and Formatting.............................................101
Turning the unit power OFF automatically.....................102
Setting the backlight ..............................................................102
Adjusting the display contrast ............................................102
Setting the type of AA batteries .........................................102
Setting the phantom power voltage ................................102
Restoring the factory settings.............................................103
Using QUICK FORMAT.............................................................103
Using FULL FORMAT................................................................103
Setting the format of file names..............................................104
File name format .....................................................................104
Setting the WORD item..........................................................105
Resetting the number (COUNT) .........................................105
13 – Using the REMOTE jack....................................106
Footswitch (TASCAM RC-3F).....................................................106
Setting footswitch operation...............................................106
Using the footswitch...............................................................107
Mode functions.........................................................................107
Remote control (TASCAM RC-10)............................................107
Setting the wired remote control ......................................107
Using the wired remote control .........................................108
Overview of mode functions ...............................................108
14 – Messages ..........................................................109
15 – Troubleshooting ..............................................112
16 – Specifications...................................................114
Ratings..............................................................................................114
Input/output ratings....................................................................114
Analog audio input/output ratings...................................114
Control input/output ratings...............................................115
Audio performance......................................................................115
Computer compatibility.............................................................115
Other specifications.....................................................................116
Dimensional drawings................................................................117
Table of Contents

10 TASCAM DR-40
Quick Start Guide
Try recording and playback with TASCAM DR-40.
The unit contains a factory-installed SD card, and will by
default produce 44.1 kHz, 16-bit WAV les.
Higher-quality or longer les can be produced using other
recording settings. See“Selecting file format, sampling
frequency, and maximum file size” for details on page 45.
1 Install batteries in the battery compartment on the
back of the unit. Fit them to the + and – marks shown in
the compartment.
2 Turn on, and various setting information will be
displayed.
Press the (HOME) [8] button until the unit is
turned on, and then release it.
CAUTION
The rst time you use the unit, a built-in clock setting screen
will appear.
Press the .or /button to move the cursor
(highlighted portion), and adjust the date and time
using the + or – button. Then press the ENTER/MARK
button to set.

TASCAM DR-40 11
3 Press the RECORD [0] button to switch to recording
standby. The indicator will flash.
RECORD button/indicator
NOTE
If the or icon appears in the upper right of the Home
Screen, the adjustment for the angle and the left-right
channels of the microphone do not suit the recording setting.
Change the settings. (See“Using the built-in microphone”on
page 41.)
4 Use the INPUT LEVEL + or – button on the left side
panel to adjust the input level. See “Adjusting the input
level”on page 49 for details.
5 Press the RECORD [0] button to start recording. The
indicator will light during recording.
6 Press the (HOME) [8] button to finish recording.
NOTE
To pause recording, press the RECORD [0]button. Press the
RECORD [0]button again to restart recording in the same
le.
7 Press the PLAY [7] button for playback. If you use a
headphone or amplifier/speaker set, connect it to the
/LINE OUT socket on the left side panel.
For playback over the built-in speaker, enable it on
the speaker settings screen (See“Using the built-in
speaker” on page 40.)
Powered monitor speakers or
amplifer and speakers
Headphones
8 Use the + or – button to control the playback volume.
9 Press the (HOME) [8] button to stop playback.
NOTE
If you have made several recordings, use the .or /
button to select the le to play when playing back or stopped
and the Home Screen is displayed.
Quick Start Guide

12 TASCAM DR-40
1 – Introduction
Thank you very much for purchasing the TASCAM DR-40 Linear
PCM Recorder. Please read this Owner’s Manual carefully in
order to maximize your use of all the unit’s features. We hope
that you will enjoy using this recorder for many years to come.
After you have nished reading this manual, please keep it in
a safe place for future reference.
You can also download the Owner’s Manual from the TASCAM
web site (http://tascam.com/).
Features
Compact audio recorder that uses SD/SDHC cards as
•
recording media
High-performance directional stereo mics can be adjusted,
•
enabling both A-B and X-Y recording
Can record with dierent types of stereo sound depending
•
on the angle of the microphones
Close: Clear Stereo Sound with less phase difference
Open: Wide Stereo Sound
Mid-side decoding function can be used with MS mics
•
Recording of up to four channels simultaneously possible
•
44.1/48/96 kHz, 16/24-bit, linear PCM (WAV format)
•
recording possible
Compatible with BWF format
•
32–320 kbps MP3 format recording possible (compatible
•
with ID3 tag v2.4)
Dual recording allows two les to be recorded
•
simultaneously at dierent levels
Overdubbing in mix mode allows the playback signal and
•
the input signal to be mixed and recorded as a new le
Overdubbing in separate mode allows the playback signal
•
and the input signal to be mixed and recorded as a new le,
while saving the original le
Built-in 0.3 W monaural monitor speaker
•
Built-in eect (reverb) can be used during recording and
•
playback
Auto-record function starts recording automatically when a
•
set sound input level is detected
Can start recording a new le automatically when a
•
maximum le size set in advance is reached without
interrupting recording
A QUICK button is available for easy access to various
•
functions
Track incrementing function allows a recording to be split
•
by creating a new le when desired
Pre-recording (PRE REC) function allows the unit to record
•
the 2 seconds of sound before recording is activated
Peak reduction function is available to reduce the level
•
automatically in case of excessively large input.

TASCAM DR-40 13
Automatic level control is available to increase or decrease
•
the recording volume when the input sound is too low or
too high, respectively.
Limiter function automatically reduces the level suitably in
•
particular portions where the input level is too high
Low cut lter conveniently reduces low-frequency noise
•
VSA function can change the playback speed in the range
•
from 0.5 to 1.5 times (in 0.1 increments) the normal speed
without changing pitch
Repeat playback and IN-OUT loop playback functions
•
PB CONTROL button is available to show settings screens
•
for playback speed control and IN-OUT loop
Tuner function to tune musical instruments
•
Self-timer function to start recording after a set period of
•
time.
Jump back and play function allows the last several seconds
•
of the currently played le to be replayed again by simply
pressing a button
Delay compensation function that eliminates time lags
•
caused by dierences in the distances of two sets of inputs
from the sound source
Playlist function
•
DIVIDE function allows les to be split where desired (only
•
for WAV les)
MARK function convenient for moving to specic locations
•
Equalizers function for playback, and level alignment
•
function to enhance the perceived overall sound pressure
File name format can be set to use a user-dened word or
•
the date
Resume function to memorize the playback position before
•
the unit is turned o.
3.5 mm (1/8”) line/headphones output jack
•
128 x 64 pixel LCD with backlight
•
Mini-B type USB 2.0 port
•
Operates on 3 AA batteries, an AC adaptor (sold separately:
•
TASCAM PS- P515U), or USB bus power
Tripod attachment screw-hole built into unit
•
USB cable included
•
Mic inputs can provide +24V/+48V phantom power
•
Two balanced mic/line inputs (XLR/TRS combo jacks)
•
1 – Introduction

14 TASCAM DR-40
Items included with the product
The DR-40 package contains the following items.
Take care when opening the package not to damage the
items. Keep the package materials for transportation in the
future.
Please contact the retailer where you purchased this unit if
any of these items are missing or have been damaged during
transportation.
Main unit
•................................................................................................1
SD memory card (in the unit)
•..........................................................1
AA alkaline batteries
•..........................................................................3
USB cable (80 cm)
•................................................................................1
Tilt foot
•....................................................................................................1
Warranty card
•.......................................................................................1
Owner’s Manual (this document)
•..................................................1
Conventions used in this manual
The following conventions are used in this manual.
When we refer to a button or connector or control on the
•
DR-40, the typeface looks like this: MENU.
When we show messages, for example, that appears on the
•
unit’s display, the typeface looks like this:
REPEAT
.
When we show messages, for example, that appear on the
•
computer’s screen, we show them like this: DR-40.
“SD memory card” is sometimes abbreviated as“SD card.”
•
Additional information is introduced in the styles below
•
when needed:
TIP
We give hints and tips on using the DR-40 when you see this
icon.
NOTE
A note provides additional explanations for special situations.
CAUTION
A caution shows that you may lose data (recordings) if you do
not follow the instructions.
1 – Introduction

TASCAM DR-40 15
Intellectual property rights
TASCAM is a trademark of TEAC Corporation, registered in
•
the U.S. and other countries.
SDHC Logo is a trademark of SD-3C, LLC.
•
Supply of this product does not convey a license nor imply
•
any right to distribute MPEG Layer-3 compliant content
created with this product in revenue-generating broadcast
systems (terrestrial, satellite, cable and/or other distribution
channels), streaming applications (via Internet, intranets
and/or other networks), other content distribution systems
(pay-audio or audio-on-demand applications and the like)
or on physical media (compact discs, digital versatile discs,
semiconductor chips, hard drives, memory cards and the
like). An independent license for such use is required. For
details, please visit http://mp3licensing.com.
MPEG Layer-3 audio coding technology licensed from
•
Fraunhofer IIS and Thomson.
Microsoft, Windows, Windows XP, Windows Vista, and
•
Windows 7 are either registered trademarks or trademarks
of Microsoft Corporation in the United States and/or other
countries.
Apple, Macintosh, iMac, Mac OS and Mac OS X are
•
trademarks of Apple Inc.
Other company names, product names and logos in this
•
document are the trademarks or registered trademarks of
their respective owners.
Any data, including, but not limited to information,
described herein are intended only as illustrations of such
data and/or information and not as the specications for
such data and/or information. TEAC Corporation disclaims
any warranty that any use of such data and/or information
shall be free from infringement of any third party’s
intellectual property rights or other proprietary rights,
and further, assumes no liability of whatsoever nature
in the event of any such infringement, or arising from or
connected with or related to the use of such data and/or
information.
1 – Introduction

16 TASCAM DR-40
This product is designed to help you record and reproduce
sound works to which you own the copyright, or where
you have obtained permission from the copyright holder
or the rightful licensor. Unless you own the copyright,
or have obtained the appropriate permission from the
copyright holder or the rightful licensor, your unauthorized
recording, reproduction or distribution thereof may
result in severe criminal penalties under copyright laws
and international copyright treaties. If you are uncertain
about your rights, contact your legal advisor. Under no
circumstances will TEAC Corporation be responsible for
the consequences of any illegal copying performed using
the recorder.
About SD cards
This unit uses SD cards for recording and playback.
You can use 64 MB–2 GB SD cards and 4 GB–32 GB SDHC cards
with this unit.
A list of SD cards that have been tested with this unit can be
found on the TASCAM web site (http://tascam.com/).
Use of cards that have not been veried for use with this unit
could result in the unit not functioning properly.
Precautions for use
SD cards are delicate media. In order to avoid damaging a card
or the card slot, please take the following precautions when
handling them.
Do not leave in extremely hot or cold places.
•
Do not leave them in extremely humid places.
•
Do not let them get wet.
•
Do not put things on top of them or twist them.
•
Do not hit them.
•
1 – Introduction

TASCAM DR-40 17
Precautions for placement and use
The operating temperature should be between 0°C and
•
40°C (32°F and 104°F).
Do not install in the following types of places. Doing so
•
could degrade the sound quality and/or cause malfunctions.
Places with signicant vibrations or that are otherwise
•
unstable
Near windows or other places exposed to direct sunlight
•
Near heaters or other extremely hot places
•
Extremely cold places
•
Places with bad ventilation or high humidity
•
Very dusty locations
•
Places that could be directly exposed to rain or other
•
water
Avoid installing this unit on top of any heat-generating
•
electrical device such as a power amplier.
Beware of condensation
If the unit is moved from a cold to a warm place, or used
after a sudden temperature change, there is a danger of
condensation; vapor in the air could condense on the internal
mechanism, making correct operation impossible. To prevent
this, or if this occurs, let the unit sit for one or two hours at the
new room temperature before using.
Cleaning the unit
Use a dry soft cloth to wipe the unit clean. Do not clean the
unit with a chemically treated cloth or substances such as
benzene, thinner and alcohol because they might cause
damage to the surface of the unit.
User registration
See the end of this manual for details about user registration.
1 – Introduction

18 TASCAM DR-40
2 – Names and Functions of Parts
Top panel 1Built-in stereo microphone
Cardioid stereo electret condenser microphone. You can
set the microphone angles to open (A-B), or close (X-Y).
2DUAL indicator
This lights orange when recording in dual recording mode.
34CH indicator
This lights orange when recording in 4-channel recording
mode.
4OVER DUB indicator
This lights orange when recording in overdubbing mode.
53/4 [SOLO] button
When in 4-channel recording mode, press this to open
a display pull-up that shows meters with the input level
settings for 3/4.
Press when the 1/2 input level meter pull-up is displayed
to switch to the 3/4 input level meter pull-up.
Press and hold when recording or playing back in DUAL
or 4CH mode to use the solo function, which switches the
monitored sound to sources other than channels 1 and 2.
Press and hold to solo channels 3 and 4.
61/2 [SOLO] button
Press this to open a display pull-up that shows meters with
the input level settings for 1/2.

TASCAM DR-40 19
Press when the 3/4 input level meter pull-up is displayed
to switch to the 1/2 input level meter pull-up.
Press and hold when recording or playing back in DUAL
or 4CH mode to use the solo function, which switches the
monitored sound from other sources to channels 1 and 2.
Press and hold to solo channels 1 and 2.
7(HOME) [8] button
Press this button during playback to cause the playback
to pause at the current position. Press this button during
pause time to return to the beginning of the playback le.
Press this button during recording or recording standby to
cause the recording to stop.
When any other screen is open, press this button to return
to the Home Screen. Use this button to answer“NO”to a
conrmation message.
Press and hold this button to turn the unit’s power ON or
OFF.
8+ button
When the Home Screen is displayed, press this button to
increase the output level from the built-in speaker or
/LINE OUT jack. During adjustment, a volume indicator
will be displayed in a pull-up window.
When the Playback Control screen is displayed, press this
button to increase the playback speed.
When a setting screen is open, use the button to change
the setting of the selected item.
9MENU button
When the Home Screen is displayed, press this button to
open the
MENU
Screen.
Press this button to return to the
MENU
Screen from the
various setting screens.
When the
MENU
Screen is displayed, press this button to
return to the Home Screen.
When the IN and OUT points are set in the le and the
Playback Control screen is displayed, press this button to
turn on or o loop playback.
0.button
Press this button to return to the beginning of a playback
le that is playing or stopped in the middle. When the IN
and OUT points are set between the current position and
the beginning of the playback le, pressing this button
skips to those points.
If you press this button when a le is stopped at its
beginning, the unit will skip to the beginning of the
previous le.
Press and hold this button to search backwards.
Press this button while pressing and holding the ENTER/
MARK button to return to the previous mark.
2 – Names and Functions of Parts

20 TASCAM DR-40
2 – Names and Functions of Parts
On the setting screens, use this button to move the cursor
left. On the
BROWSE
Screen, press this button to move up a
level.
qPB CONT button
This button activates the Playback Control screen. When
the Playback Control screen is displayed, press this button
to return to the Home Screen.
Press this button during recording standby to turn o the
self-timer function or change the time period.
w– button
When the Home Screen is displayed, press this button to
decrease the output level from the built-in speaker or
/LINE OUT jack. During adjustment, a volume indicator
will be displayed in a pull-up window.
When the Playback Control screen is open, press this
button to decrease the playback speed.
When a setting screen is open, use the button to change
the setting of the selected item.
eDisplay
Shows a variety of information.
rPEAK indicator
Lights when the input volume is too high.
tREC MODE button
Press this button to open the
REC MODE
screen.
When the
REC MODE
screen is open, press this button to
return to the Home Screen.
yRECORD [0] button/indicator
Press this button when stopped to start recording standby.
The recording indicator will blink when in standby.
Press this button when in recording standby to start
recording. The recording indicator will light when
recording.
Press this button when recording to pause recording.
uQUICK button
When playing back, stopped, paused or in recording
standby in the Home Screen or when the Playback Control
screen is displayed, press this button to display the Quick
Menu screen. The function to be shown depends on the
state of the unit when the button is pressed.
Stopped: delete, division, level alignment, or mixdown
•
for the current playback le
Playback/Playback Control screen: level alignment
•
Recording standby: level control, swap left and right
•
built-in mics
MIXER
•screen: MS DECODER setting
When the
BROWSE
screen or
PLAYLIST
screen is displayed,
press this button to show or cancel the popup menu for
le/folder operations.
Other manuals for DR-40
5
Table of contents
Other Tascam Voice Recorder manuals

Tascam
Tascam DR-40 Instruction Manual

Tascam
Tascam AUDIO RECORDER User manual

Tascam
Tascam HS-P82 User manual

Tascam
Tascam DR-07 Manual

Tascam
Tascam DA-98 User manual

Tascam
Tascam DR-701D User manual

Tascam
Tascam MMR-8 User manual

Tascam
Tascam DR-40 Instruction Manual

Tascam
Tascam DA-60MKII Assembly instructions

Tascam
Tascam DR-100 MKIII User manual

Tascam
Tascam HS-P82 User manual

Tascam
Tascam DA-6400 User manual

Tascam
Tascam HS-P82 Operation and maintenance manual

Tascam
Tascam DR-05 User manual

Tascam
Tascam DA-6400 User manual

Tascam
Tascam DR-680 How to use

Tascam
Tascam Mixcast 4 User manual

Tascam
Tascam DR-701D User manual

Tascam
Tascam DR-1 User manual

Tascam
Tascam DR-05 Guide