Mila EasyChef MLA-66AG User manual


3
CONTENTS
1. INTRODUCTION ........................................................................................ 4
2. GETTING TO KNOW YOUR AIR FRYER ....................................................... 4
3. IMPORTANT SAFEGUARDS........................................................................ 5
4. TOUCH SCREEN CONTROL PANEL ............................................................7
5. FUNCTIONS .............................................................................................. 8
6. HOW TO STAY SAFE WHILE COOKING ...................................................... 8
7. COOKING AND OPERATING ..................................................................... 9
8. A NOTE ON AIR FRYING PRE-PACKAGED FROZEN FOODS........................10
9. BEFORE USING FOR THE FIRST TIME ........................................................10
PREHEATING....................................................................................................... 10
QUICK START GUIDE........................................................................................... 11
10. FUNCTION BUTTONS ...............................................................................11
AIR GRILL ............................................................................................................. 11
11. AIR GRILL INSTRUCTIONS........................................................................ 12
AIR FRYER FUNCTION ........................................................................................12
DEHYDRATE FUNCTION .....................................................................................12
CAKE FUNCTION ................................................................................................13
BBQ FUNCTION ..................................................................................................13
GRIDDLE ............................................................................................................. 14
12. AIR GRILL MAINTENANCE........................................................................ 14
13. CARE AND CLEANING INSTRUCTIONS..................................................... 14
14. STORING INSTRUCTIONS......................................................................... 15
15. TROUBLESHOOTING ................................................................................ 15
16. WARRANTY TERMS AND CONDITIONS .................................................... 16
17. INDEMNITY.............................................................................................. 16
18. WARRANTY AND DISCLAIMER................................................................. 17
19. LIMITATIONS AND LIABILITY ................................................................... 17
4
1. INTRODUCTION
Welcome to Mila. We hope you enjoy your Mila EasyChef Air Grill.
To get more out of your product, please see our website for more information about
Mila, your Easy Chef Air Grill, accessories and other products, or Air Grill recipes.
We recommend you read this manual throughly to ensure your safety and best use of
your new Air Grill. In this manual, we will refer to the EasyChef Air Grill as either the
Unit, Easy Chef Air Grill or the Air Grill.
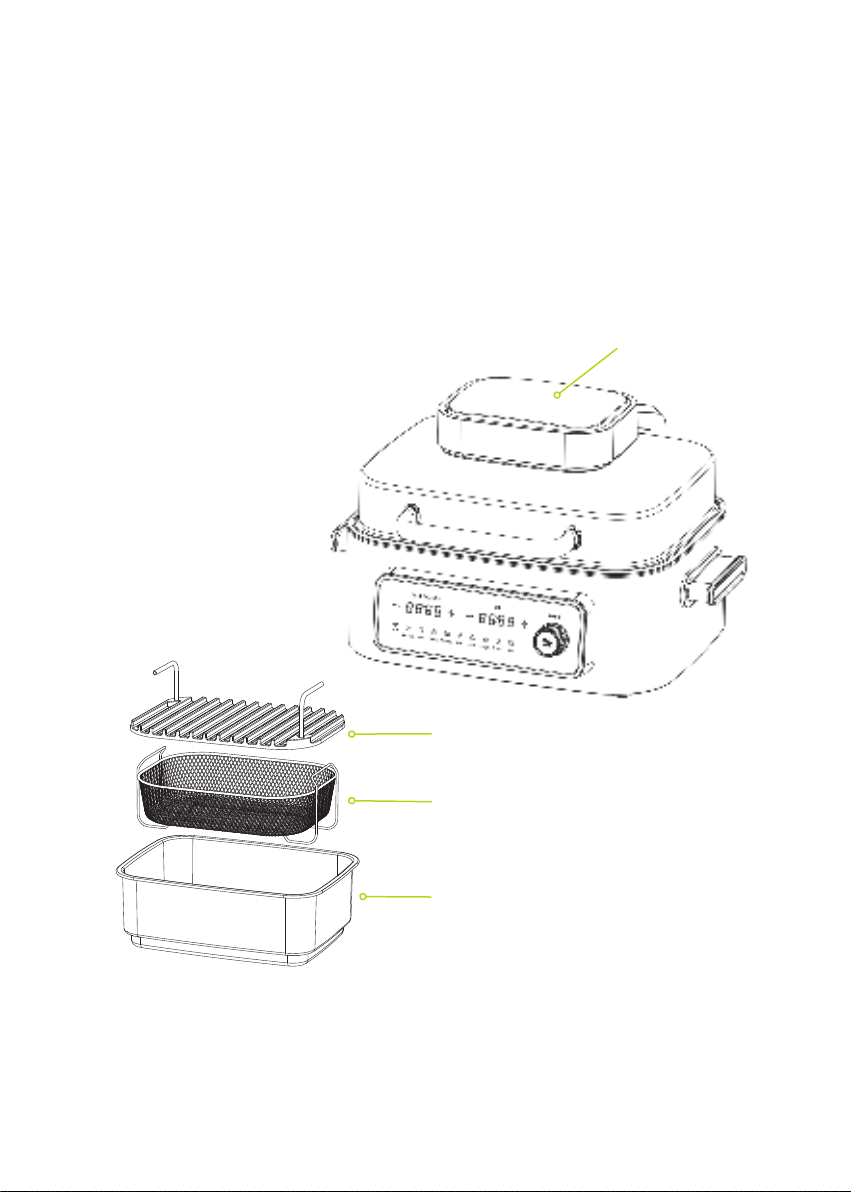
2. GETTING TO KNOW YOUR AIR FRYER
1. What’s in the box:
• Air Grill
• Lid
• Crisper Basket
• Cooking Basket
• Grill Grate
Product may vary slightly from illustration
Grill Grate
Crisper Basket
Cooking Basket
Lid

5
3. IMPORTANT SAFEGUARDS
When using electrical appliances, basic safety precautions should always be followed,
including the following:
1. DO NOT touch hot surfaces. Use handles, oven mitts or potholders.
2. To protect against electric shock DO NOT immerse the cord, plugs, or appliance in
water or other liquid.
3. All users of this appliance should read and understand this instruction manual before
operating or cleaning this appliance.
4. Unplug the appliance from the power outlet when not in use and before cleaning.
5. Allow to cool before putting on or taking o parts, and before cleaning the appliance.
6. DO NOT operate the appliance if it has malfunctioned or has been damaged,
including the power cord or plug. If the power cord is damaged, it must be replaced
by the manufacturer, its service agent or qualied technician in order to avoid a
hazard.
7. The use of accessory attachments is not recommended by the appliance
manufacturer. They can cause injuries and void the product warranty.
8. DO NOT use outdoors.
9. DO NOT let the cord hang over the edge of tables or counters, or touch hot surfaces.
10. DO NOT place on or near a hot gas or electric burner, or in a heated oven.
11. DO NOT move the appliance while containing hot oil or other hot liquids.
12. DO NOT use the appliance for other than intended use.
13. Make sure the removable airow tray is in place before adding food to be air fried.
14. Make sure the frying basket is securely in the Air rill cavity, while in operation.
15. This appliance is not intended for use by persons (including children) with reduced
physical, sensory or mental capabilities, or lack of experience and knowledge, unless
they are being supervised or given instruction concerning use of the appliance, by the
person responsible for their safety.
16. Children should be supervised to ensure that they DO NOT play with the appliance.
1 7. Close supervision is necessary when your appliance is being used near children or
infants.
18. This appliance is intended for household use only. It is not warranted for use in a
commercial or business application.
19. After air frying, extreme caution must be used when handling the cooking basket,
removable airow tray, and cooked foods.
20. DO NOT use on acrylic or stone surfaces as heat may cause cracks or surface
damage. Do not place directly in front of glass splash-backs. Leave a minimum of
10cm from the rear of the unit.
21. This appliance generates heat and escaping steam during use. Proper precautions
must be taken to prevent the risk of burns, res, or other injury to people or damage

6
to property. Keep your face and hands away from heat or steam outlets.
22. This appliance will become hot during operation and retain heat after turning o.
23. Always use oven mitts when handling hot materials and allow metal parts to cool
before cleaning.
24.DO NOT place anything on top of the appliance while it is operating or while it is
hot.
25. The cord to this appliance should be plugged into a 220- 240V AC electrical outlet
only.
26. If this appliance begins to malfunction during use, remove the frying basket and
disconnect the plug from the wall outlet. DO NOT use or attempt to repair the
malfunctioning appliance.
27. DO NOT leave this appliance unattended during use.
28. DO NOT immerse the power cord in any liquid. If the power cord to this appliance is
damaged, it must be replaced.
29. Keep the cord out of reach of children and infants to avoid the risk of electric shock
and choking.
30. Place the Air rill on a at, heat-resistant work area.
31. DO NOT obstruct the air outlet or air inlets on the back and sides of the Air rill
with any objects. Avoid escaping steam from the air outlet during air frying.
32. Keep the appliance at least 15cm away from walls or other objects during operation.
33. After air frying, make sure to place the frying basket on a at, heat-resistant surface.
34.
Hot oil can collect at the base of the basket. To avoid risk of burns or
personal injury, or to avoid oil from contaminating air fried foods, always unlock
and remove the frying basket from the cooking basket before emptying. NEVER
turn the basket upside down with the frying basket attached.
35. Over-lling the frying basket may damage the Air rill and could result in serious
personal injury.
36. NEVER move the EasyChef Air rill while it is on, or containing hot food.
3 7. DO NOT clean with metal scouring pads. Pieces can break o the pad and touch
electrical parts, creating a risk of electric shock.
38. This Air rill should not be used to boil water or to deep fry food.
39. The maximum food weight capacity recommended for this air frying basket is 2kg.
The basket can also accommodate a cake or pie at up to 22cm x 7cm.
40.During rst use, the Air rill may emit a slight odour. This is normal and will not
aect the avour or air convection frying.
7
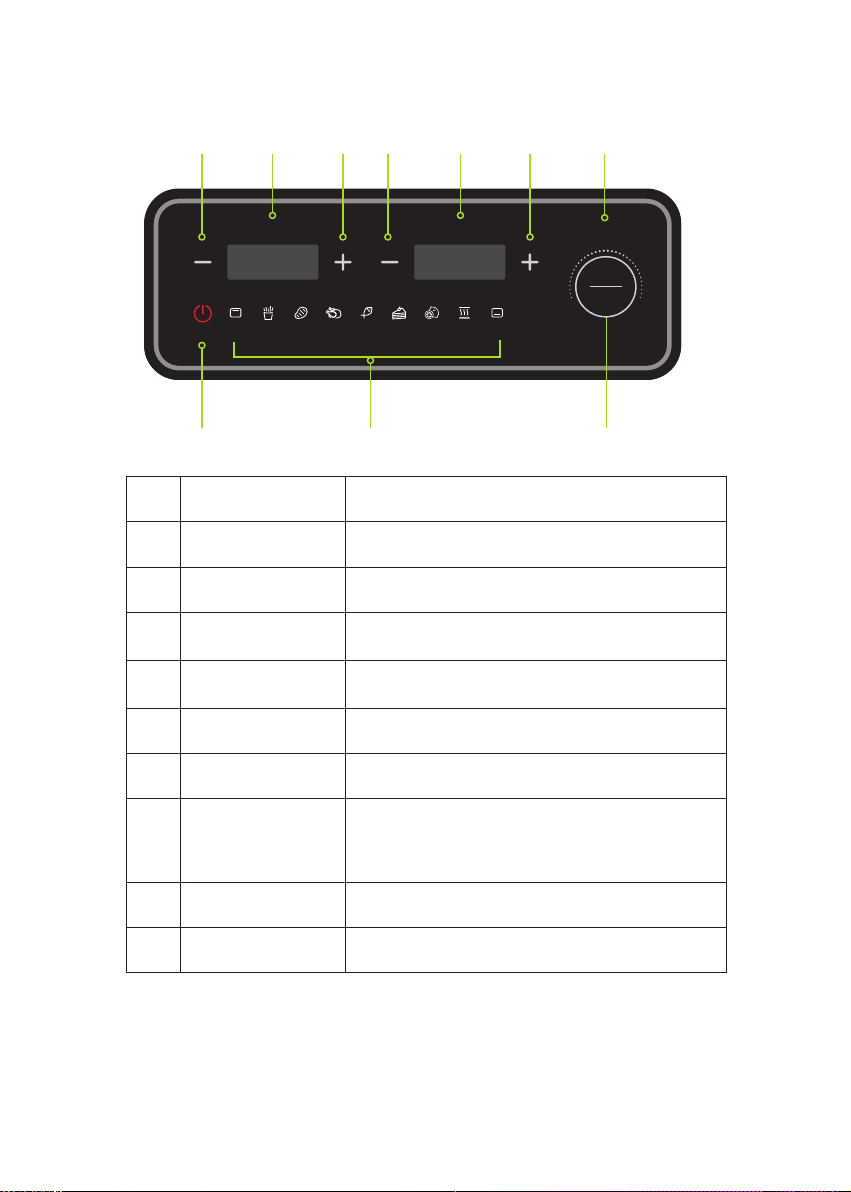
4. TOUCH SCREEN CONTROL PANEL
1 2 3 4 5 6 7
8910
Air Grill Fries Steak Chicken Fish Cake Dehyd. Griddle BBQ
TEMPERATURE TIME MENU
START
PAUSE
1Lower Temperature
Button Lowers the temperature.
2Temperature Displays the current temperature.
3 Increase Temperature
Button Increases the temperature.
4Reduce Time Button Reduces cooking time.
5Time Display Cooking duration indicator.
6Add Time Button Increases cooking time.
7Function Turn the knob clockwise to select a function.
8Start/Pause
1. When you are selecting a function, temperature or time
- conrm changes by pressing START/PAUSE.
2. To pause a cooking cycle, press the
START/PAUSE button.
9Function Display Area Displays the available (and selected) functions.
10 Standby When the Air Fryer Grill is on standby mode, press the
redSTANDBY button to activate.

8
5. FUNCTIONS
NOTE:
The BBQ Function can only be selected and used when the top cover of the EasyChef
Air Grill is open.
6. HOW TO STAY SAFE WHILE COOKING
• Unplug the
EasyChef Air Grill
when not in use.
• Always use oven mitts when handling the hot Air Fryer Basket/ Grill/ Cook Pot.
• Hot oil can pool at the base of the cooking basket. . To avoid risk of burns or
personal injury and to avoid oil from contaminating air fried foods, always make
sure you remove any leftover oil from the unit.
CAUTION - HOT SURFACES
• This appliance operates at high temperatures. Do not touch external
surfaces of the appliance as they can be hot. Do not touch inside the
appliance while it is in operation.
• Duringoperation,hotairisreleasedthroughthehotairoutlets.Pleasekeepyour
hands and face away from the steam and air outlets.
FUNCTION
HEATING
ELEMENT TIME (Min) TEMP (°C) PRE
HEAT
TOP BOTTOM DEFAULT RANGE DEFAULT RANGE
FRIES ON 16min 1 - 120min 200°C 60-230°C Yes
CAKE ON 25min 1 - 120min 230°C 60-230°C Yes
STEAK ON ON 10min 1 - 120min 245°C 200-245°C Yes
CHICKEN ON 35min 1 - 120min 175°C 60-230°C Yes
FISH ON ON 20min 1 - 120min 245°C 200-245°C Yes
DEHYDRATE ON 6H 60 - 720min 60°C 60-230°C No
AIR GRILL ON 10min 1 - 120min 260°C 60-260°C Yes
BBQ ON 20min 1 - 120min 200°C 60-245°C No
BBQ
GRIDDLE ON ON 10min 1 - 120min 245°C 60-245°C No

9
7. COOKING AND OPERATING
We encourage you to ensure the lid is closed and locked in during use to ensure
cooking quality and to protect your safety.
Please note the following before you start cooking:
1. Please refer to the Air Frying Chart and/or follow the package directions for the
suggested cooking TIME and TEMP.
2. Always pat food dry before cooking to encourage browning and avoid excess
smoke.
3. To ensure even cooking and browning, ALWAYS open the lid halfway through the
cook time and check, turn or shake foods in the frying basket. Some recipes may
need you to brush or spray oil halfway through cooking. Adjust the TIME or TEMP
if needed.
4. Allow cooked food to rest for 5 to 10 minutes. Remove the cook pot from the
machine and place on a at, heat-resistant surface. Then remove the air ow tray
from the basket.
5. Shake air fried foods out onto serving area. Continue air frying subsequent
batches, if any.
6. To avoid excess smoke, when cooking naturally high fat foods, such as bacon,
chicken wings or sausages, it may be necessary to empty fat from the cook pot
between batches.
7. For crispier results, air fry small batches of freshly crumbed food. Create more
surface area by cutting food into smaller pieces. Bathe pieces of meat in egg and
milk and then press bread crumbs onto the meat.
8. Spray oils work best because oil is distributed evenly and less oil is needed.
Canola, olive, avocado, coconut, grape-seed, peanut, or vegetable oil all work
well.

10
8. A NOTE ON AIR FRYING PRE-PACKAGED FROZEN FOODS
1. Where microwave ovens often produce hot, mushy results, air frying assures
reasonably fast, crispy, delicious results!
2. As a rule, (depending on the food and amount to be cooked), the suggested
cooking TIMES may have to be reduced slightly. Always check food halfway
through cooking time to determine nal cook TIME and TEMP.
3. Always check cooking progress after TIME has expired
9. BEFORE USING FOR THE FIRST TIME
• Remove all packing material and labels from inside and outside of the Air Grill.
Check that there is no packaging underneath and around the frying basket.
• Remove all accessories from the package and read this manual carefully. Please
pay particular attention to operational instructions, warnings, and important
safeguards to avoid any injury or property damage
• Wash the grill grate, at top BBQ griddle, crisper basket, and cooking basket in
warm, soapy water, then rinse and dry thoroughly. All accessories, are dishwasher
safe.
• DO NOT use abrasive brushes or sponges on the cooking surfaces, as it will cause
damage to the coating.
PREHEATING
The EasyChef Air Grill has a default PREHEAT function. This is to warm up the unit so
your food can be cooked at an optimum. If for whatever reason you want to override
or cancel this, press the START/PAUSE dial to cancel.
The selected COOKING function timer and settings will automatically begin. If
you choose to PREHEAT, after the preheat temperature has reached a three-beep
notication will sound.
This means the unit has nished pre-heating it will say ADD FOOD. After the food is
added, press the START/PAUSE button. The selected cooking function (i.e. steak,
chicken ) will start cycling through and cooking with the preset temperature and time.
Once the food has cooked, you will hear the beep 3 times.
You can change the temperature and the time during cooking by pressing +and -to
cook as per your preference.
Note: The timer, on the display panel will blink while food is cooking.

11
QUICK START GUIDE
To start cooking please follow the below steps:
1. Press the red STANDBY button.
2. Select the Menu using the START/PAUSE dial.
3. Press the START/PAUSE button to begin cooking.
4. Add your food after ADD FOOD is displayed or press START/PAUSE to
cancel Preheat, close the lid once you are nished adding food.
5. A beep will sound 3 times when the food is cooked.
6. Users can open the lid to check progress.
NOTE: YOU CAN CHANGE THE COOKING PRESET ONCE COOKING HAS
BEGUN, BY PRESSING START/PAUSE AND CHOOSING ANOTHER OPTION.
10. FUNCTION BUTTONS
AIR GRILL
Benets of the Air Grill Function:
• Grilling uses high heat, and cooks food from the underside. It seals in all
juices so your food stays tender and moist without needing to add high-
calorie oil, butter or other sauces.
• Grills naturally encourage the cooking of fresh meats, sh, and vegetables.
They also preserve nutrients found in meat (such as thiamine and riboavin).
• By grilling your food you can elevate your cooking to add complex avours
via caramelisation, and smoking.
• Suitable foods: Lean meats, including steaks and meat patties, chicken,
vegetables, sh and pizzas.

12
11. AIR GRILL INSTRUCTIONS
Users will need to manually select the temperature of the plate. These are the
recommended temperature levels for common foods, using the Mila EasyChef Air
Grill.
The Air Fryer may produce smoke when cooking ingredients on a setting hotter than
recommended. Please follow the table below as a guide.
TEMPERATURE GUIDE
AIR FRYER FUNCTION
The Air Fryer function allows you to air fry your favourite foods quickly, while locking
in taste and avour.
By choosing the FRIES, WINGS, STEAK, CHICKEN or FISH function, the Air Fryer
will cook your food. Easily adjust the temperature or time on these settings to cook
similar food.
HOW TO OPERATE THE AIR FRYER FUNCTION:
1. Press the red STANDBY button
2. Select the preset cooking function using the START/PAUSE dial.
3. Once selected, press the START/PAUSE button to start cooking.
4. Add your food after ADD FOOD is displayed. You can override the pre-heat
function by pressing START/PAUSE. Close the lid once your have added your
food.
DEHYDRATE FUNCTION
Dehydrating food is the process of having water removed from a type of food, by
drying using a heat source such as the sun (i.e. radiant energy) or heated air (e.g. by
electrical energy).
SUITABLE FOODS: Fruits like bananas, apples, strawberries, vegetables like
mushrooms, peas and corn, legumes like beans and lentils, low fat meats.
LOW MID HIGH MAX
• Bacon
• Sausages
• When using thick
BBQ Sauce
• Frozen Meats
• Marinated/sauced
meats
• Burgers
• Steaks
• Chicken
• Hot Dogs
• Meat Kebabs
• Veggies
• Fruit
• Pizzas
• Fresh/Frozen
Seafood
• Veggie Kebabs

13
HOW TO OPERATE THE DEHYDRATE FUNCTION:
1. Press the red STANDBY button
2. Select the Dehydrate Menu using the START/PAUSE dial.
3. Press the START/PAUSE button to start cooking.
During dehydration, you can open the lid to check on your food. The timer will pause
when the lid is opened and then automatically resume after it is closed. When the
dehydration cycle is complete, the unit will beep and the word END will appear on the
display screen. Remove your food and close the lid.
CAKE FUNCTION
The Cake Function creates your favourite cakes with minimal fuss. You will need a
separate cake pan containing the cake mix, to place inside the EasyChef Air Grill.
HOW TO OPERATE:
1. Press the red STANDBY button
2. Select the Cake Menu using the START/PAUSE dial.
3. Press the START/PAUSE button to start cooking.
4. Add your food after ADD FOOD is displayed or press START/PAUSE to cancel
Preheat. Close the lid once your have added your food.
BBQ FUNCTION
The BBQ Function creates your favourite outdoor foods inside, all year round. This
function allows you to create steaks, juicy burgers, sausages, corn on the cob and
more.
Benets of the BBQ Function:
• Bottom heating element is active only.
• Default time is 12 minutes, at 200°C.
• Does not require the preheat function.
SUITABLE FOODS: Lean meats, including steaks and meat patties, chicken,
vegetables, sh.
HOW TO OPERATE:
1. Press the red STANDBY Button
2. To select the BBQ function turn the START/PAUSE dial until you choose the
desired function.
3. Add your food after ADD FOOD is displayed or press START/PAUSE to cancel the
preheat function.

14
RECOMMENDED COOKING TIMES
The default cooking time on the BBQ setting is 12 minutes at 200°C. You will need
to manually adjust this time to customise the heat and time temperature to suit your
taste preferences and achieve your level of ‘done-ness.’
You can open the EasyChef Air Grill lid and check your food as it progresses.
GRIDDLE
The Griddle Function cooks at a higher temperature and for a shorter amount of time.
It cooks from both heating plates (above and below your food). The lid will need to be
closed for this function to work.
This setting is best for juicy pieces of meat, like lamb, beef, sh, chicken, pork.
Please note, this setting will only work with the lid on, and we recommend you pre-
heat the Grill plate rst for best results.
Benets of the GRIDDLE FUNCTION: :
• Both heating elements are active.
• Default cooking time is 4 minutes, at 265°C.
• Does not require the preheat function.
SUITABLE FOODS: Lean meats, including steaks and meat patties, chicken,
vegetables, sh.
HOW TO OPERATE:
1. Press the red STANDBY button
2. Press the START/PAUSE button to start cooking.
3. Add your food after ADD FOOD is displayed or press START/PAUSE to cancel
preheat.
4. Close the lid once your have added your food.
12. AIR GRILL MAINTENANCE
This appliance requires little maintenance. It contains no user-serviceable parts. Any
servicing requiring disassembly other than cleaning must be performed by a qualied
appliance repair technician.
13. CARE AND CLEANING INSTRUCTIONS
WARNING: Allow the EasyChef Air Grill to cool fully before cleaning.
1. Unplug the EasyChef Air Grill. Remove the cooking basket. Make sure the cooking
basket has cooled completely before cleaning.
2. Wash the accessories airow tray in hot soapy water. Do not use metal kitchen
utensils or abrasive cleansers or cleaning products as this may damage the non-
stick coating.
15
3. For best results, place them both on the rack of your dishwasher to clean.
4. Wipe the EasyChef Air Grill body with a soft, non-abrasive damp cloth to clean.
14. STORING INSTRUCTIONS
1. Make sure the EasyChef Air Grill is unplugged and all of its parts are clean and dry
before storing.
2. NEVER store the Easy Chef Air Grill while it is hot or wet.
3. Store the Easy Chef Air Grill in its box or in a clean, dry place.
15. TROUBLESHOOTING
PROBLEM POSSIBLE CAUSE SOLUTION
The EasyChef Air
Grill does not work
• The Air Grill is not plugged
in.
• The Air Grill has turned
itself o.
• Plug the cord into the wall outlet.
To begin, press the button.
• Make sure the frying lid is assembled
correctly and fully closed.
Food is
undercooked/not
cooked
• The cook pot is
overloaded.
• Air fry smaller batches of food.
• Shake food 2 OR 3 TIMES during
the cooking process.
• Increase TEMPERATURE.
• Increase AIR FRY TIME.
Food is not fried
evenly
• The cook pot is
overloaded.
• Air fry smaller batches of food.
• Apply a light even coat of spray oil to
food before frying.
• Shake foods 2 OR 3 TIMES during
the cooking process.
White smoke
coming from the
unit
• The Air Grill is overloaded
with oil.
• The cook pot have not
been cleaned.
• When frying oily foods, such as bacon,
you may need to clean out the frying
basket cooking basket.
• Clean the frying basket and cooking
basket after each use.
Fresh potato fries
are not fried evenly
• The cook pot is
overloaded.
• Soak, rinse and fully dry potatoes
before frying.
• Use fresh, rm potatoes.
Fries are not crispy • Raw fries have too much
water.
• Use a clean kitchen towel to wrap and
dry cut potato fries thoroughly before
adding oil.
• Cut potato fries into smaller slices.
• Shake and spray oil on potato fries
frequently.

16
16. WARRANTY TERMS AND CONDITIONS
Our goods come with guarantees that cannot be excluded under the Australian
Consumer Law. You are entitled to a replacement or refund for a major failure and
for compensation for any other reasonably foreseeable loss or damage. You are also
entitled to have the goods repaired or replaced if the goods fail to be of acceptable
quality and the failure does not amount to a major failure.
This warranty is provided in addition to your rights under the Australian Consumer
Law. Directed Electronics Australia Pty Ltd (Directed Electronics) warrants that this
product is free from defects in material and workmanship for a period of 12 months
from the date of purchase or for the period stated on the packaging. This warranty is
only valid where you have used the product in accordance with any recommendations
or instructions provided by Directed Electronics.
This warranty excludes defects resulting from alterations of the product, accident,
misuse, abuse or neglect. In order to claim the warranty, you must return the product
to the retailer from which it was purchased or if that retailer is part of a National
network, a store within that chain, along with satisfactory proof of purchase. The
retailer will then return the goods to Directed Electronics.
Directed Electronics will repair, replace or refurbish the product at its discretion. The
retailer will contact you when the product is ready for collection. All costs involved
in claiming this warranty, including the cost of the retailer sending the product to
Directed Electronics, will be borne by you.
Email: info@milahome.com.au
Phone: +61 3 8331 4800
1 7. INDEMNITY
You agree to defend, indemnify and hold harmless Mila from and against any and
all claims, proceedings, injuries, liabilities, losses, costs and expenses (including
reasonable legal fees), including but not limited to, claims alleging negligence,
invasion of privacy, copyright infringement and/or trademark infringement against
Mila products and services, relating to or arising out of your breach of any provision
of these terms, your misuse of the Mila products and services, or your unauthorized
modication or alteration of products or software.

17
18. WARRANTY AND DISCLAIMER
Mila has a limited warranty whereby Mila warrants to you and only to you that Mila
products will be free from defects in materials and workmanship for one (1) year from
the date of your purchase of the Mila products (unless a longer warranty period is
required by law).
The specics of this Mila limited warranty are at https://www.milahome.com.au/
warranty
Mila also assumes no responsibility for and shall not be liable for any damages caused
by misuse of the product or failure to follow the instructions provided.
Other than the above product warranty for the Mila products, Mila and its suppliers
disclaim all warranties of any kind, whether express, implied, or statutory, regarding
the Mila equipment. Including any implied warranty of title, merchantability, tness
for a particular purpose, or noninfringement of third party rights. Because some
jurisdictions do not permit the exclusion of implied warranties, the last sentence of
this section may not apply to you. Mila hereby further expressly disclaims all liability
for any claims for service failures that are due to normal product wear, product
misuse, abuse, product modication, improper product selection or your non-
compliance with any and all applicable federal, state or local laws. This warranty
and warranty disclaimer give you specic legal rights, and you may have other rights
that vary by state, province, or country. Other than as permitted by law, Mila does
not exclude, limit or suspend other rights you have, including those that may arise
from the nonconformity of a sales contract. For a full understanding of your rights
you should consult the laws of your state, province, or country. For our Australian
customers: please note that this warranty is in addition to any statutory rights in
Australia in relation to your goods which, pursuant to the Australian Consumer Law,
cannot be excluded.
19. LIMITATIONS AND LIABILITY
Mila liability for damages, especially for breach of duty or obligation, delay in
performance, non-performance, or malperformance shall be precluded, except when
these are due to negligent breaches of any signicant contractual duty or obligation
on the part of Mila. Any liability for negligence is limited to direct losses usually and
typically foreseeable in such case. Should the claim for damages be based on willful
or grossly negligent breach of contractual duty or obligation on the part of Mila, the
preclusion and limitation of liability mentioned in the preceding sentences will not
apply. The preceding preclusion and limitation of liability will also not apply to claims
for damages arising out of loss of life, bodily injury or health impacts for which Mila
may be liable, or for non-contractual liability.
Some states and countries do not allow the exclusion or limitation of incidental or
consequential damages, so the above limitation or exclusion may not apply to you.
Additionally, this provision is not intended to limit Mila’s liability in the event of Mila’s
willful or intentional misconduct.


All Images, Information and Content are Copyright © 2022
Directed Electronics Australia Pty Ltd. All Rights Reserved.
www.directed.com.au | www.directed.co.nz
ANOTHER
DIRECTED
BRAND
www.milahome.com.au
www.milahome.co.nz
Table of contents


