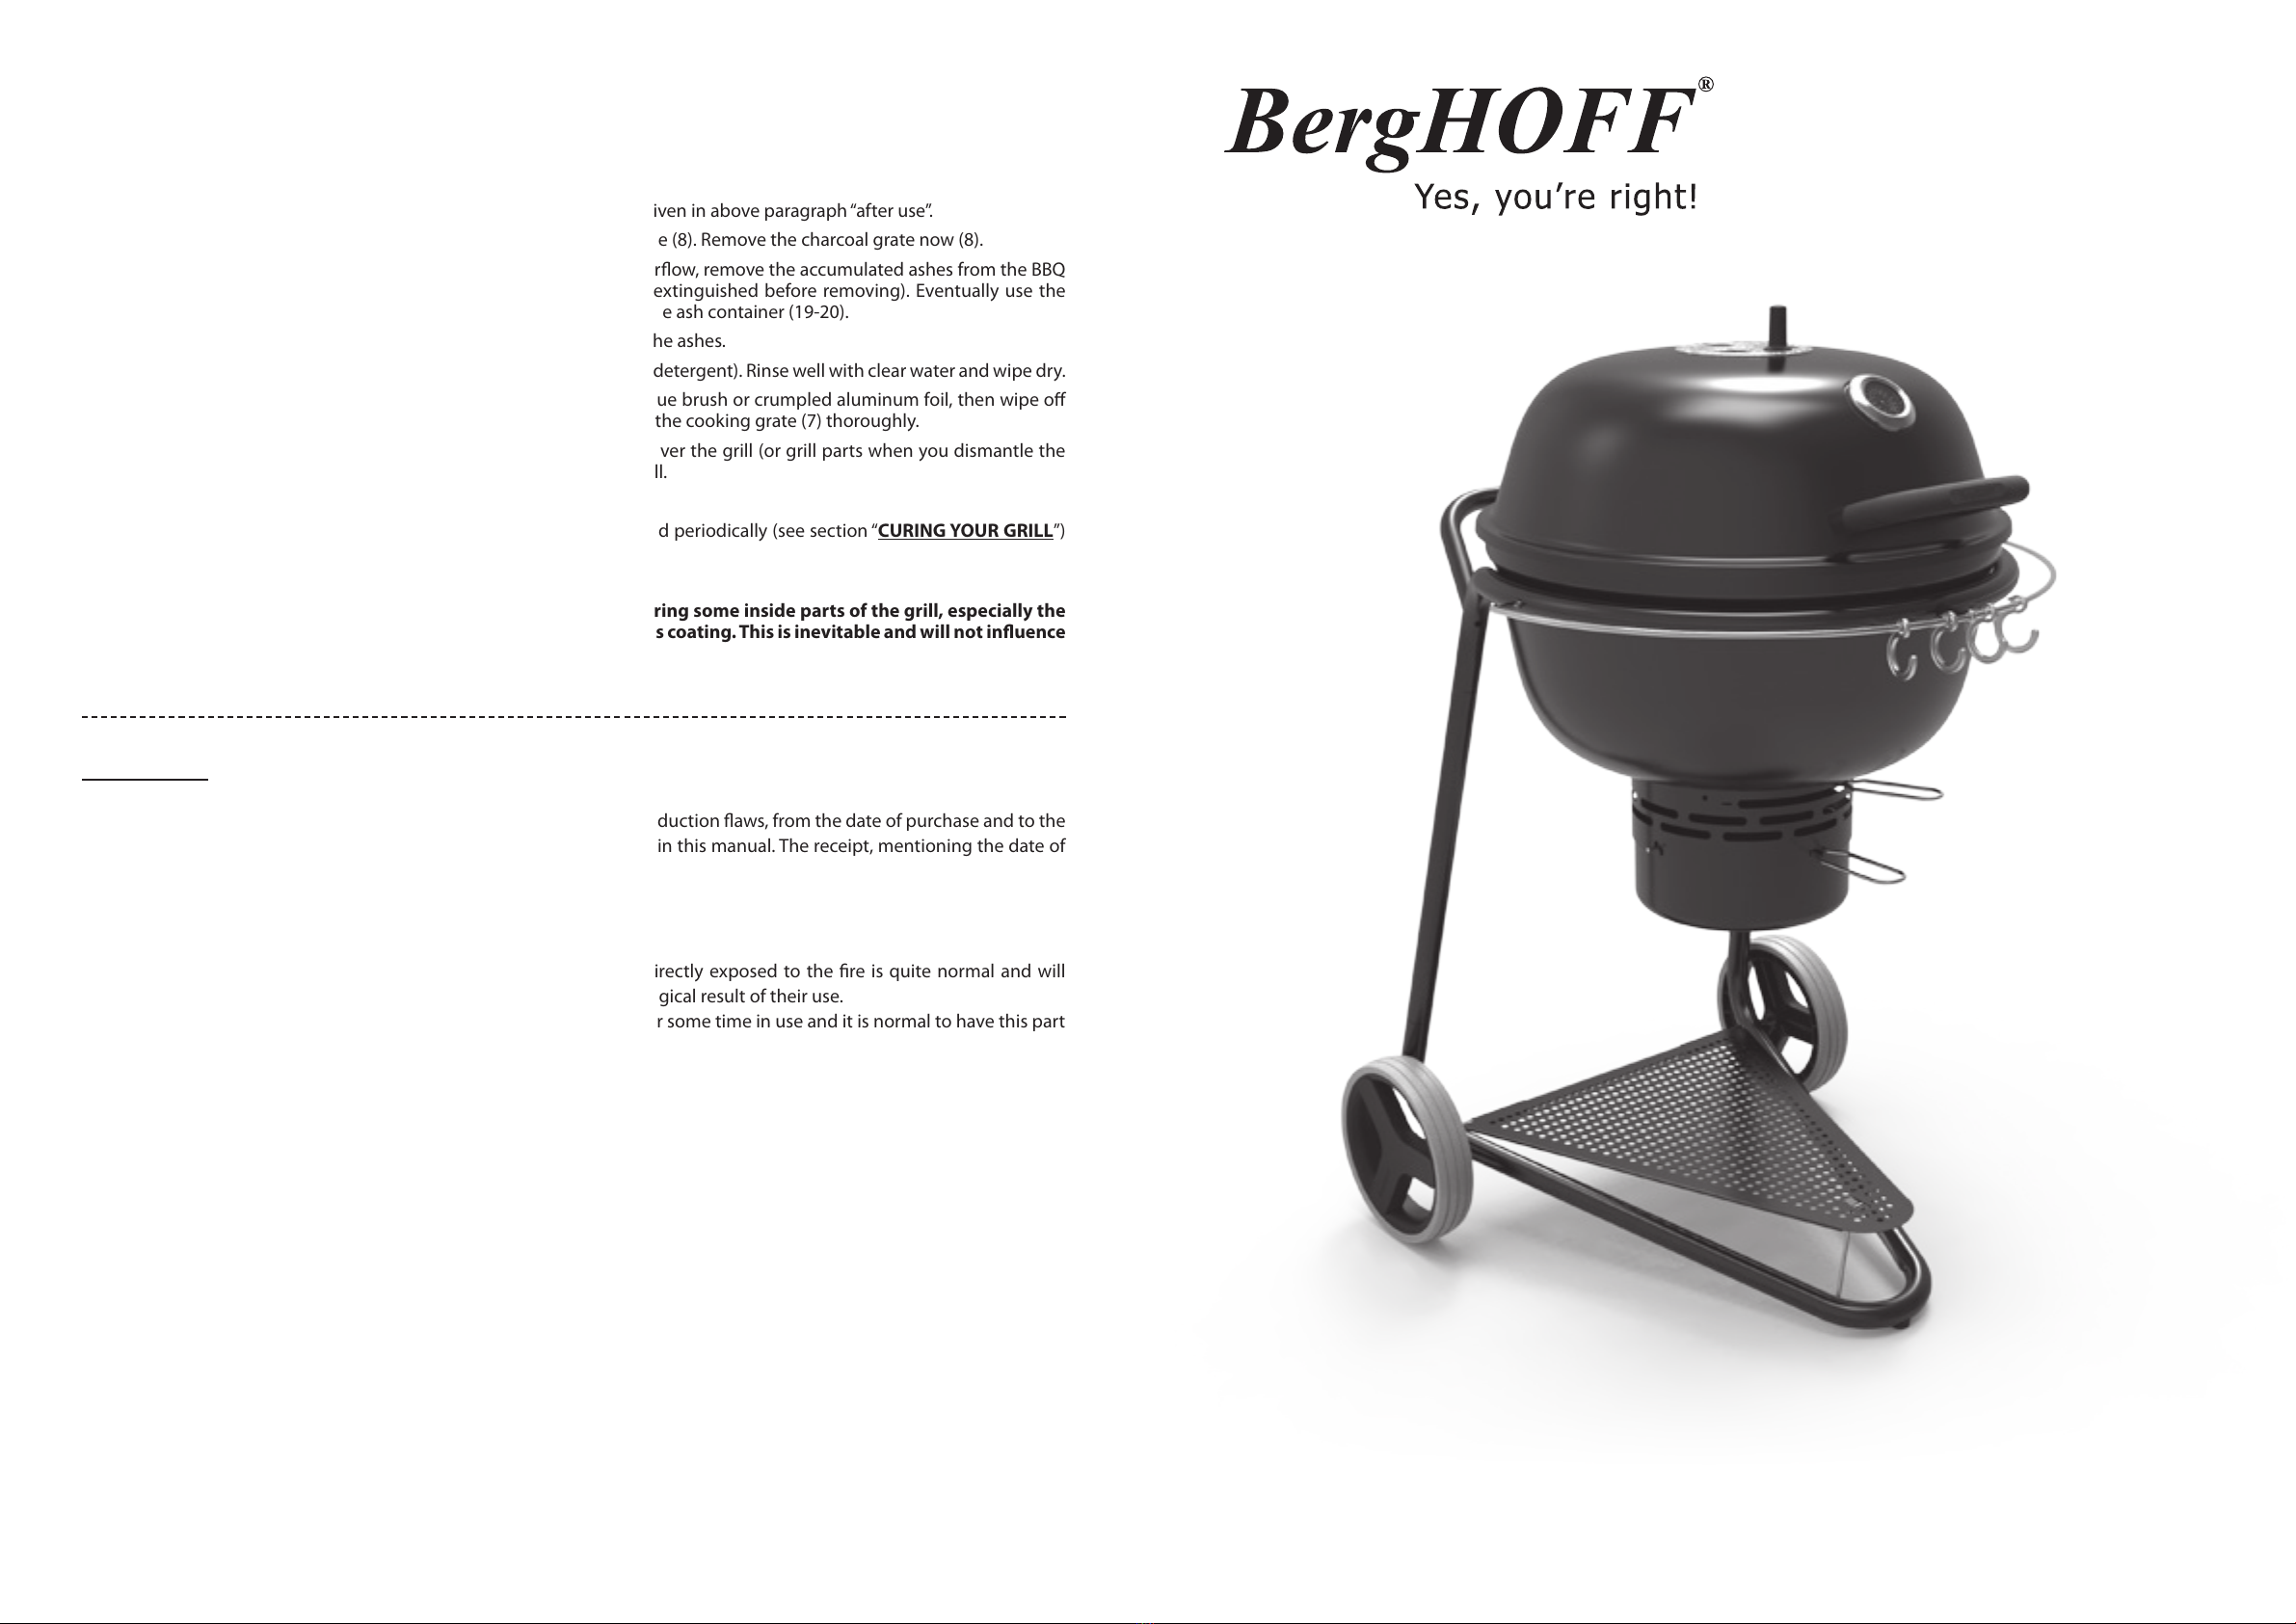
Berghoff 2415610 User manual

2415610
KETTLE GRILL
KETTLE BARBECUE
AU CHARBON DE BOIS AVEC DÔME
HOUTSKOOLBARBECUE
2 3
• Never add charcoal lighting uid to hot or even warm coals as ashback causing severe burns may occur.
• When adding charcoal and / or wood, use extreme caution.
• Open the lid (3) from the BBQ while lighting and getting the charcoal started.
• The BBQ is hot when in use. To avoid burns:
• DO NOT attempt to move the grill (when not strictly necessary).
• Wear protective gloves or oven mitts.
• DO NOT touch any hot grill surfaces.
• DO NOT wear loose clothing or allow hair to come in contact with the grill.
• When grilling, grease from meat may drip into the charcoal and cause a grease re. If this should happen, take o the
meat from the cooking grate, until the grease res has extinguished by itself. For fatty food, we recommend to use a
“re-safe”grill pan. Do not use water to extinguish grease res.
• Use caution since ames can are-up when fresh air suddenly comes in contact with re. Keep hands, face and body at
safe distance from hot steam and ame are-ups.
• Do not allow charcoal and/or wood to pile against the walls of the bowl (9). Doing so will greatly reduce the life of the
metal and nish of your grill.
• Use caution when assembling and operating your grill to avoid scrapes or cuts from sharp edges of metal parts. Use
caution when reaching into or under the grill.
• In windy weather, place the grill in an outdoor area that is protected from the wind.
• Never leave coals and ashes in the grill unattended. Before the grill can be left unattended, remaining coals and ashes
must be removed from the grill. Use caution to protect yourself and property. Carefully place remaining coals and ashes
in a non-combustible metal container and saturate completely with water. Allow coals and water to remain in metal
container 1 hour prior to disposing.
• Do not use water to control are-ups or to extinguish charcoal after you nished cooking. Slightly close bottom and lid
air ow regulators (12-1) and place lid (3) on the bowl (9).
• Barbecue mitts should always be worn while cooking, adjusting air-ow regulators (1-12), adding charcoal and handling
the lid (3) or other hot surfaces.
• Use proper barbecue tools, with long, heat-resistant handles.
• Never touch the cooking or charcoal grates (7-8), ashes, charcoal or the bowl itself (3-9) to see if they are hot.
• Extinguished coals and ashes should be placed at a safe distance from all structure and combustible materials.
• Completely wet the surface beneath and around the grill with a garden hose to extinghuish any ashes, coals or embers
which may have fallen during the cooking or cleaning process.
• After each use, clean the grill thoroughly and apply a light coat of vegetable oil to prevent rusting.
• Cover the grill to protect it from excessive rusting.
• Use caution when lifting or moving the grill to prevent strains and back injuries.
• We advise that a re extinguisher is always on hand. Refer to your local authority to determine the proper size and type
of re extinguisher.
• Store the grill out of reach of children and in a dry location when not in use.
• Properly dispose of all packaging material.
• Failure to adhere to safety warning and guidelines in this manual could result in bodily injury or property damage.
Save this manual for future reference.
WARNING
IMPORTANT SAFETY WARNINGS
WE WANT YOU TO ASSEMBLE AND USE YOUR GRILL AS SAFELY AS POSSIBLE.
READ ALL SAFETY WARNINGS AND INSTRUCTIONS CAREFULLY BEFORE
ASSEMBLING AND OPERATING YOUR GRILL.
WARNING
• Only use this grill on a hard, non-combustible, stable surface (concrete, ground) capable of supporting the weight of the
grill. Never use on wooden or other surfaces that could burn.
• DO NOT use the grill without the ash container (19-20) in place. DO NOT attempt to remove the ash container (19-20)
while the BBQ contains hot coal.
• Maintain proper clearance of 3 meter (10 feet) between the grill and combustible material (bushes, trees, wooden decks,
fences, buildings, etc.). Construction should be maintained at all times when the grill is in use. Do not place the grill
under a roof overhang or other enclosed area.
• For outdoor use only. Do not operate the grill indoors or in an enclosed area.
• For household use only. Do not use this grill and relating tools for other than its intended purpose.
• Do not use on recreational (moving) vehicles and/or boats.
• Don’t use the barbecue as a heater.
• Improper assembly can be dangerous. Follow the assembly instructions of this manual.
• Do not attempt to service the grill other than normal maintenance as explained in this manual.
• Use caution and common sense when operating your grill.
• The use of alcohol, prescription or non-prescription drugs may impair the customer’s ability to properly assembling or
safely operating the barbecue.
• Do not leave the grill or relating tools unattended when in use.
• Place the grill in an area where children and pets cannot come into contact with the unit. Close supervision is necessary
when the grill or relating tools are in use.
• Always put the charcoal on the enameled steel charcoal grate (8). Don’t put charcoal directly on the bottom of the bowl
(9).
• We recommend the use of a charcoal chimney starter to avoid the dangers associated with charcoal lighting uid. If you
choose to use charcoal lighting uid, only use lighting uid approved for lighting charcoal. Carefully read manufacturer’s
warnings and instructions on the charcoal lighting uid and charcoal prior to the use of their product. Store charcoal
lighting uid safely away from the grill.
• Do not use gasoline, kerosene or alcohol for lighting charcoal. CAUTION! Do not use spirit or petrol for lighting or
relighting! Use only firelighters complying to EN 18603. The use of any of these or similar products could cause an
explosion possibly leading to severe body injuries.
• Do not store lighter uid or other ammable liquids or materials under the grill.
• When using charcoal lighting uid, allow charcoal to burn until covered with a light ash (approximately 20 to 30 minutes).
This will allow charcoal lighting uid to burn o. If you fail to do this, the fumes from charcoal lighting could trap the
uid in the grill and may result in a ash re or explosion.
• Never use charcoal that has been pre-treated with lighting uid. Use only a high-grade plain charcoal or charcoal/wood
mixture.
• Do not use gasoline, kerosene or alcohol for lighting charcoal. The use of any of these or similar products could cause an
explosion possibly leading to severe injuries.
ENGLISH
ENGLISH

4 5
5
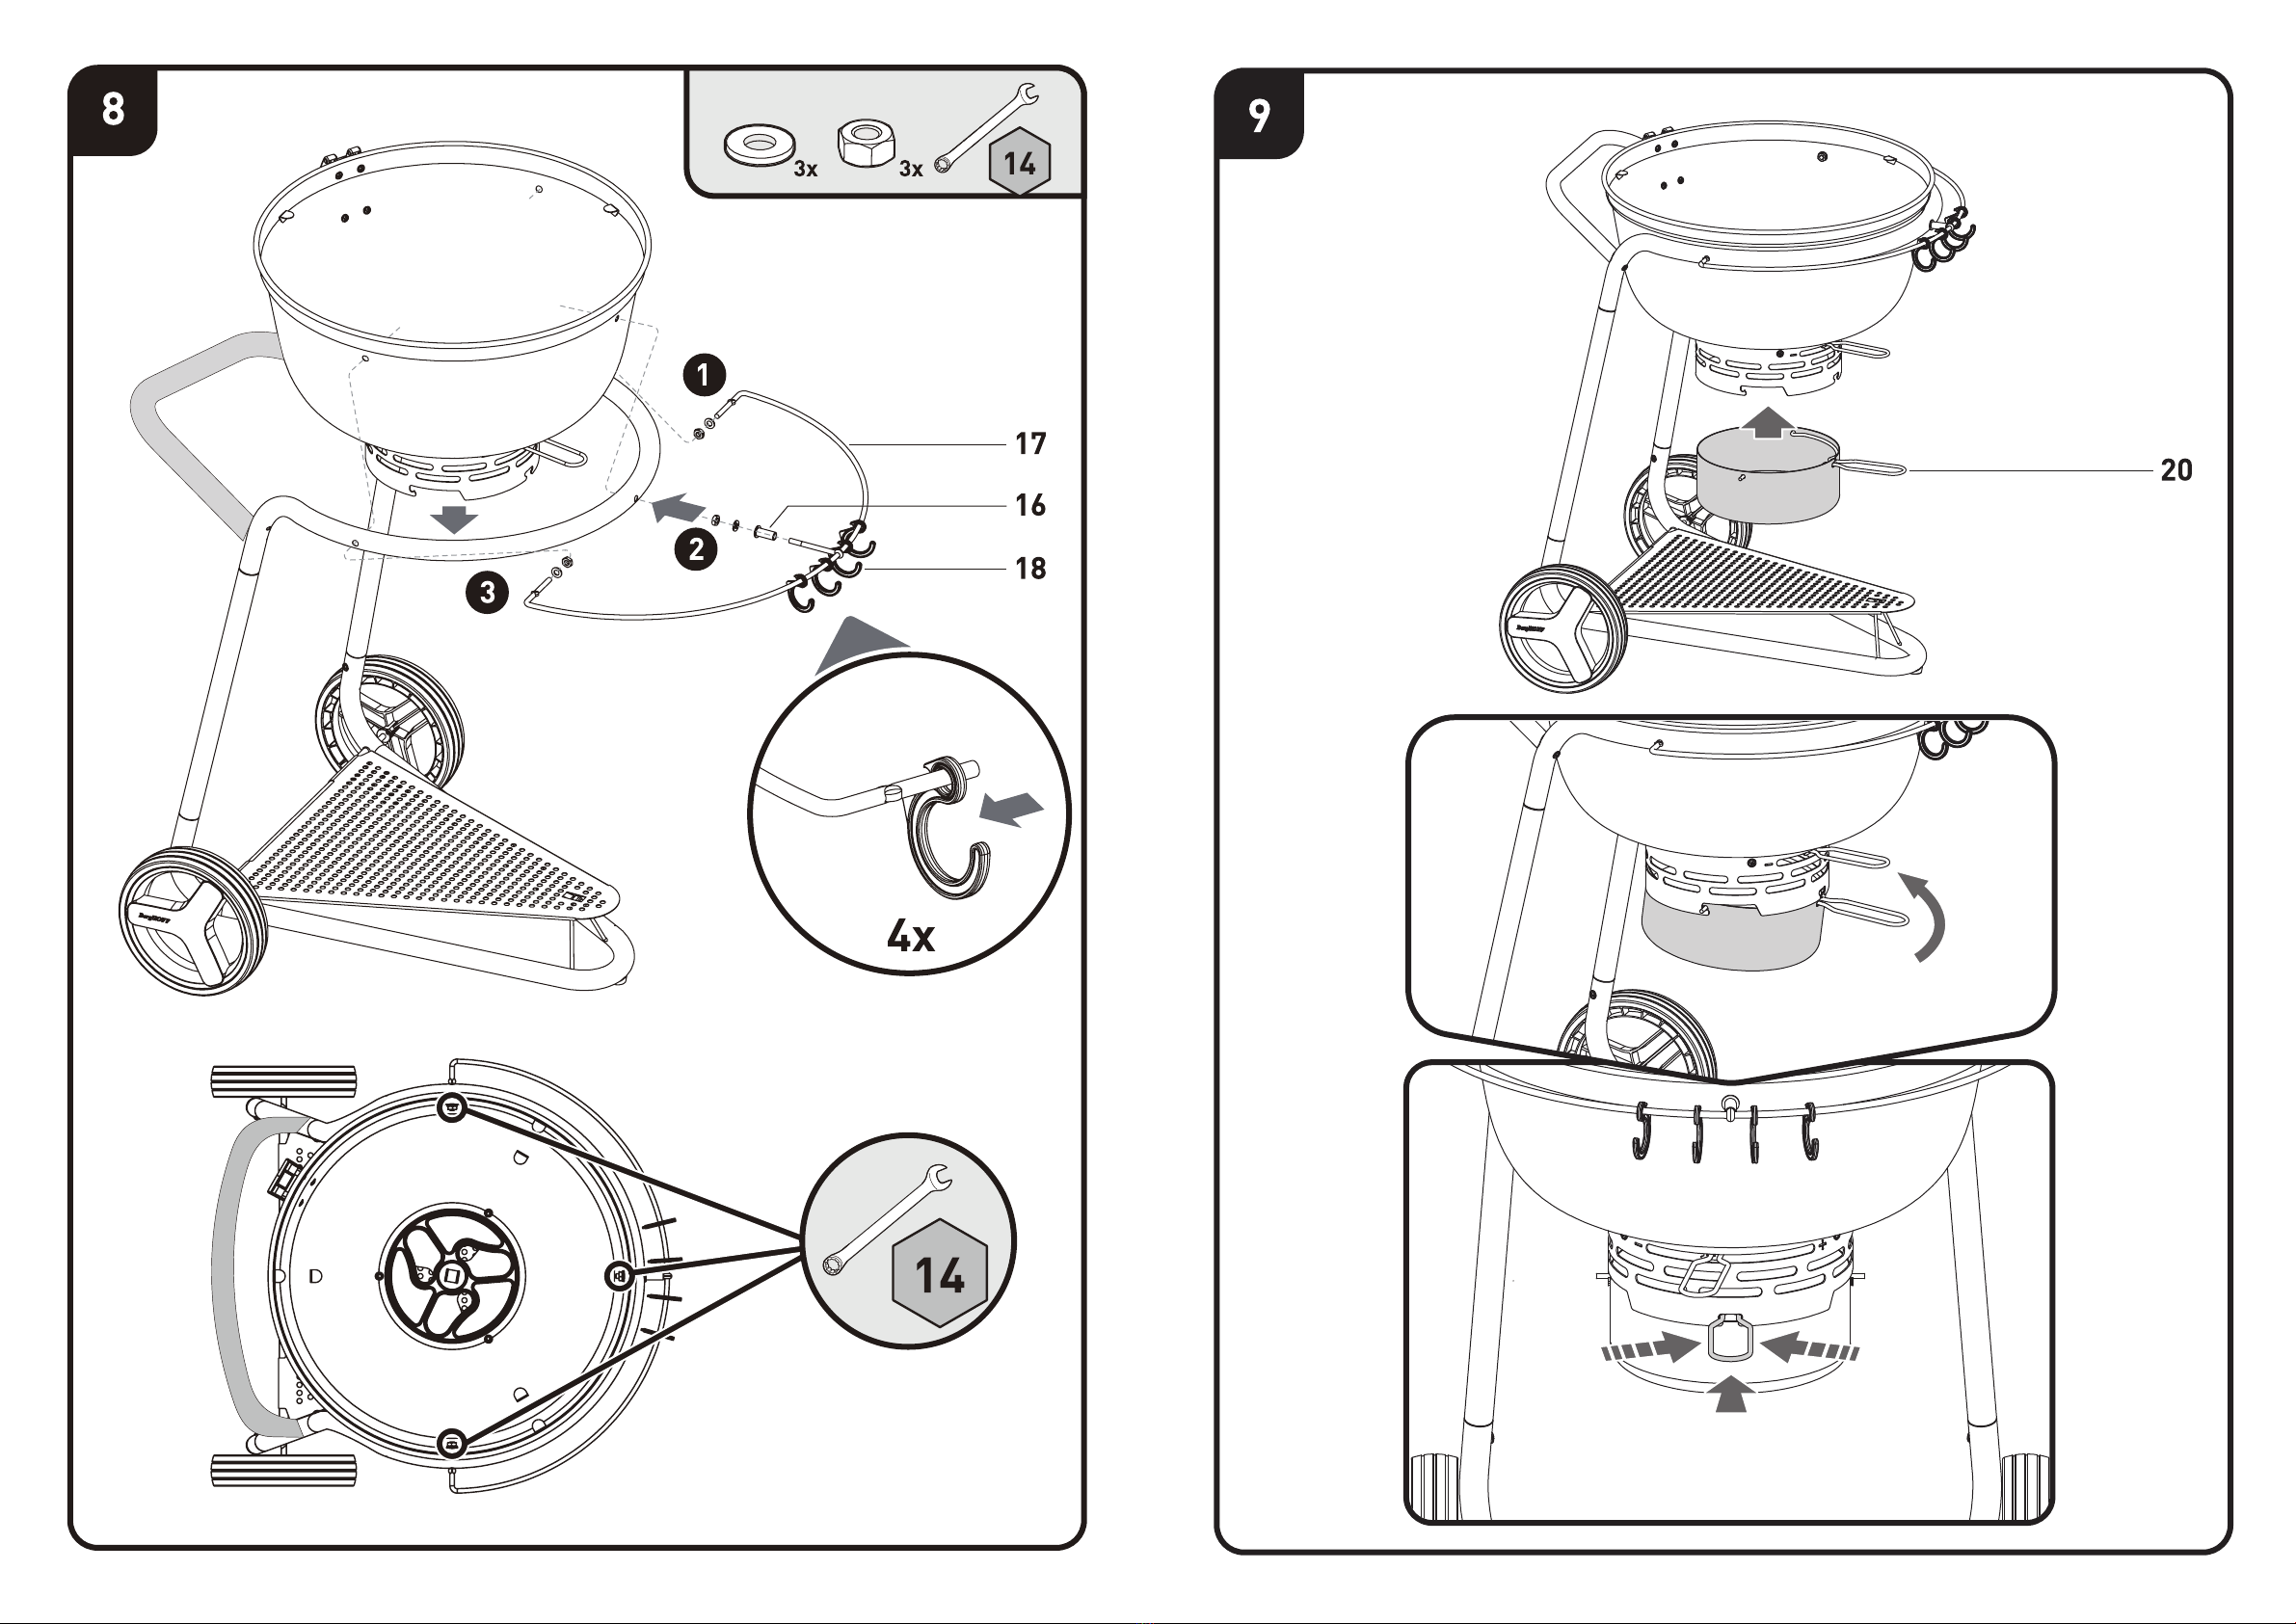
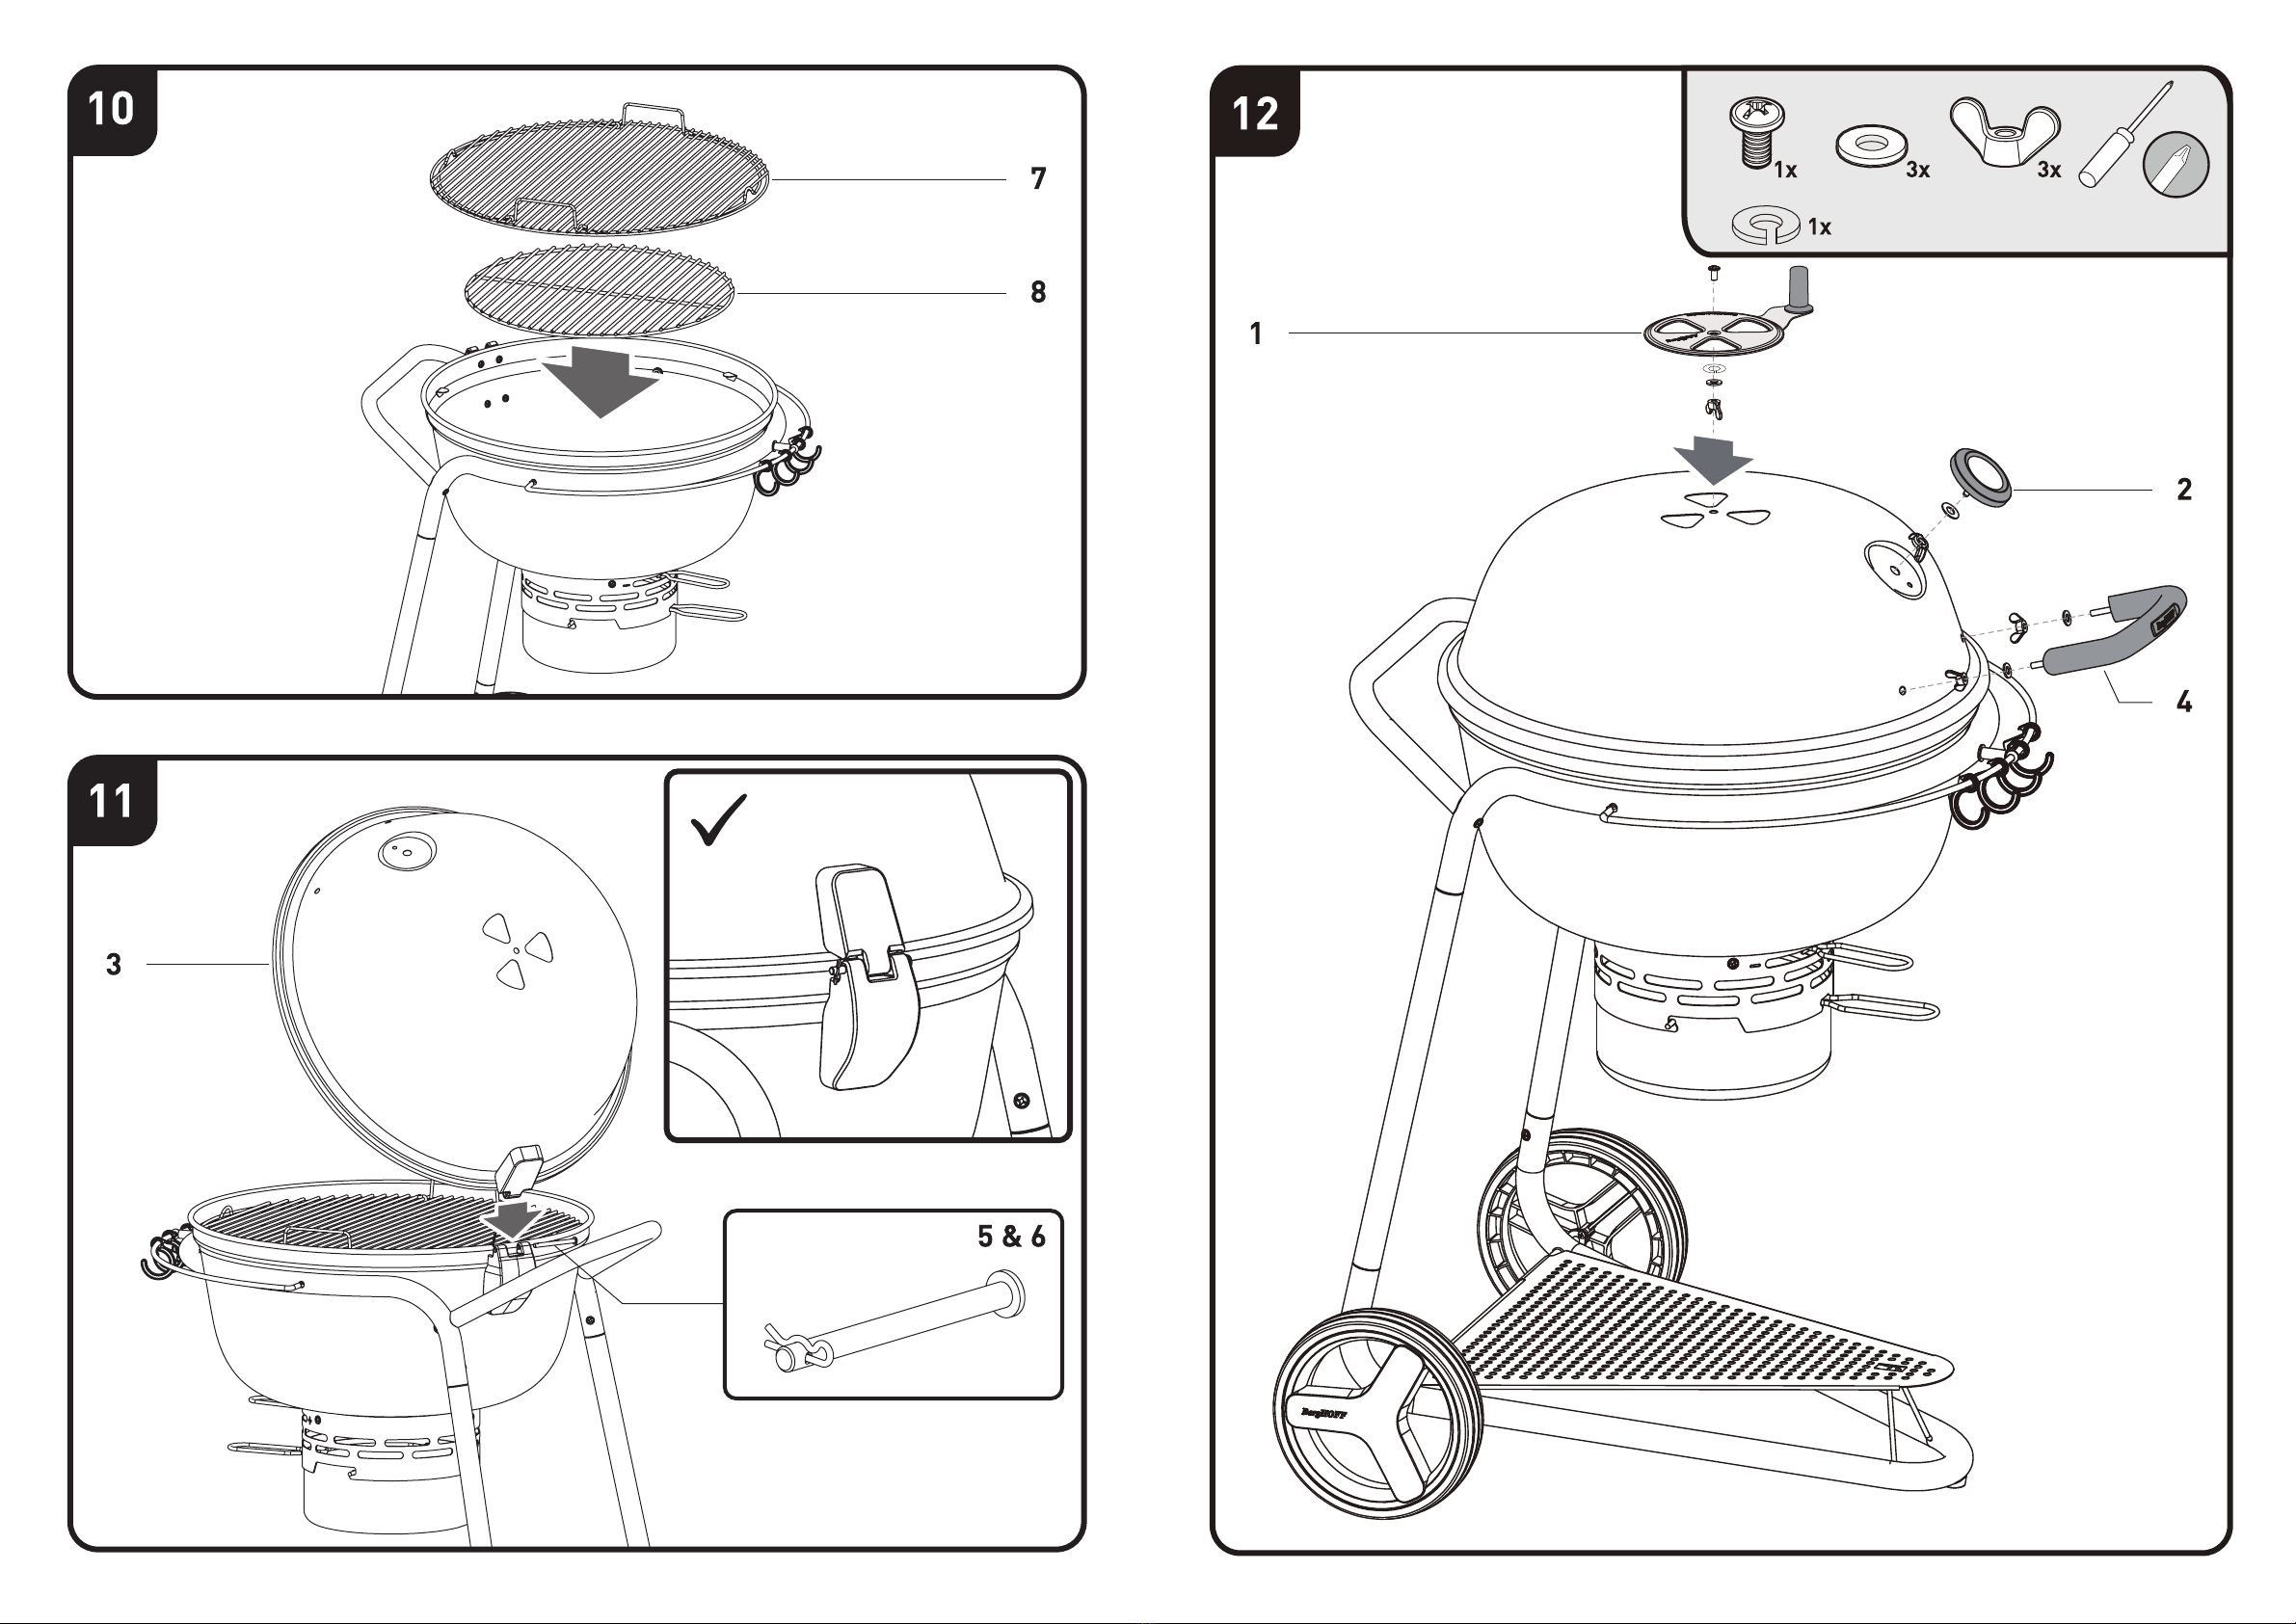
ASSEMBLY INSTRUCTION
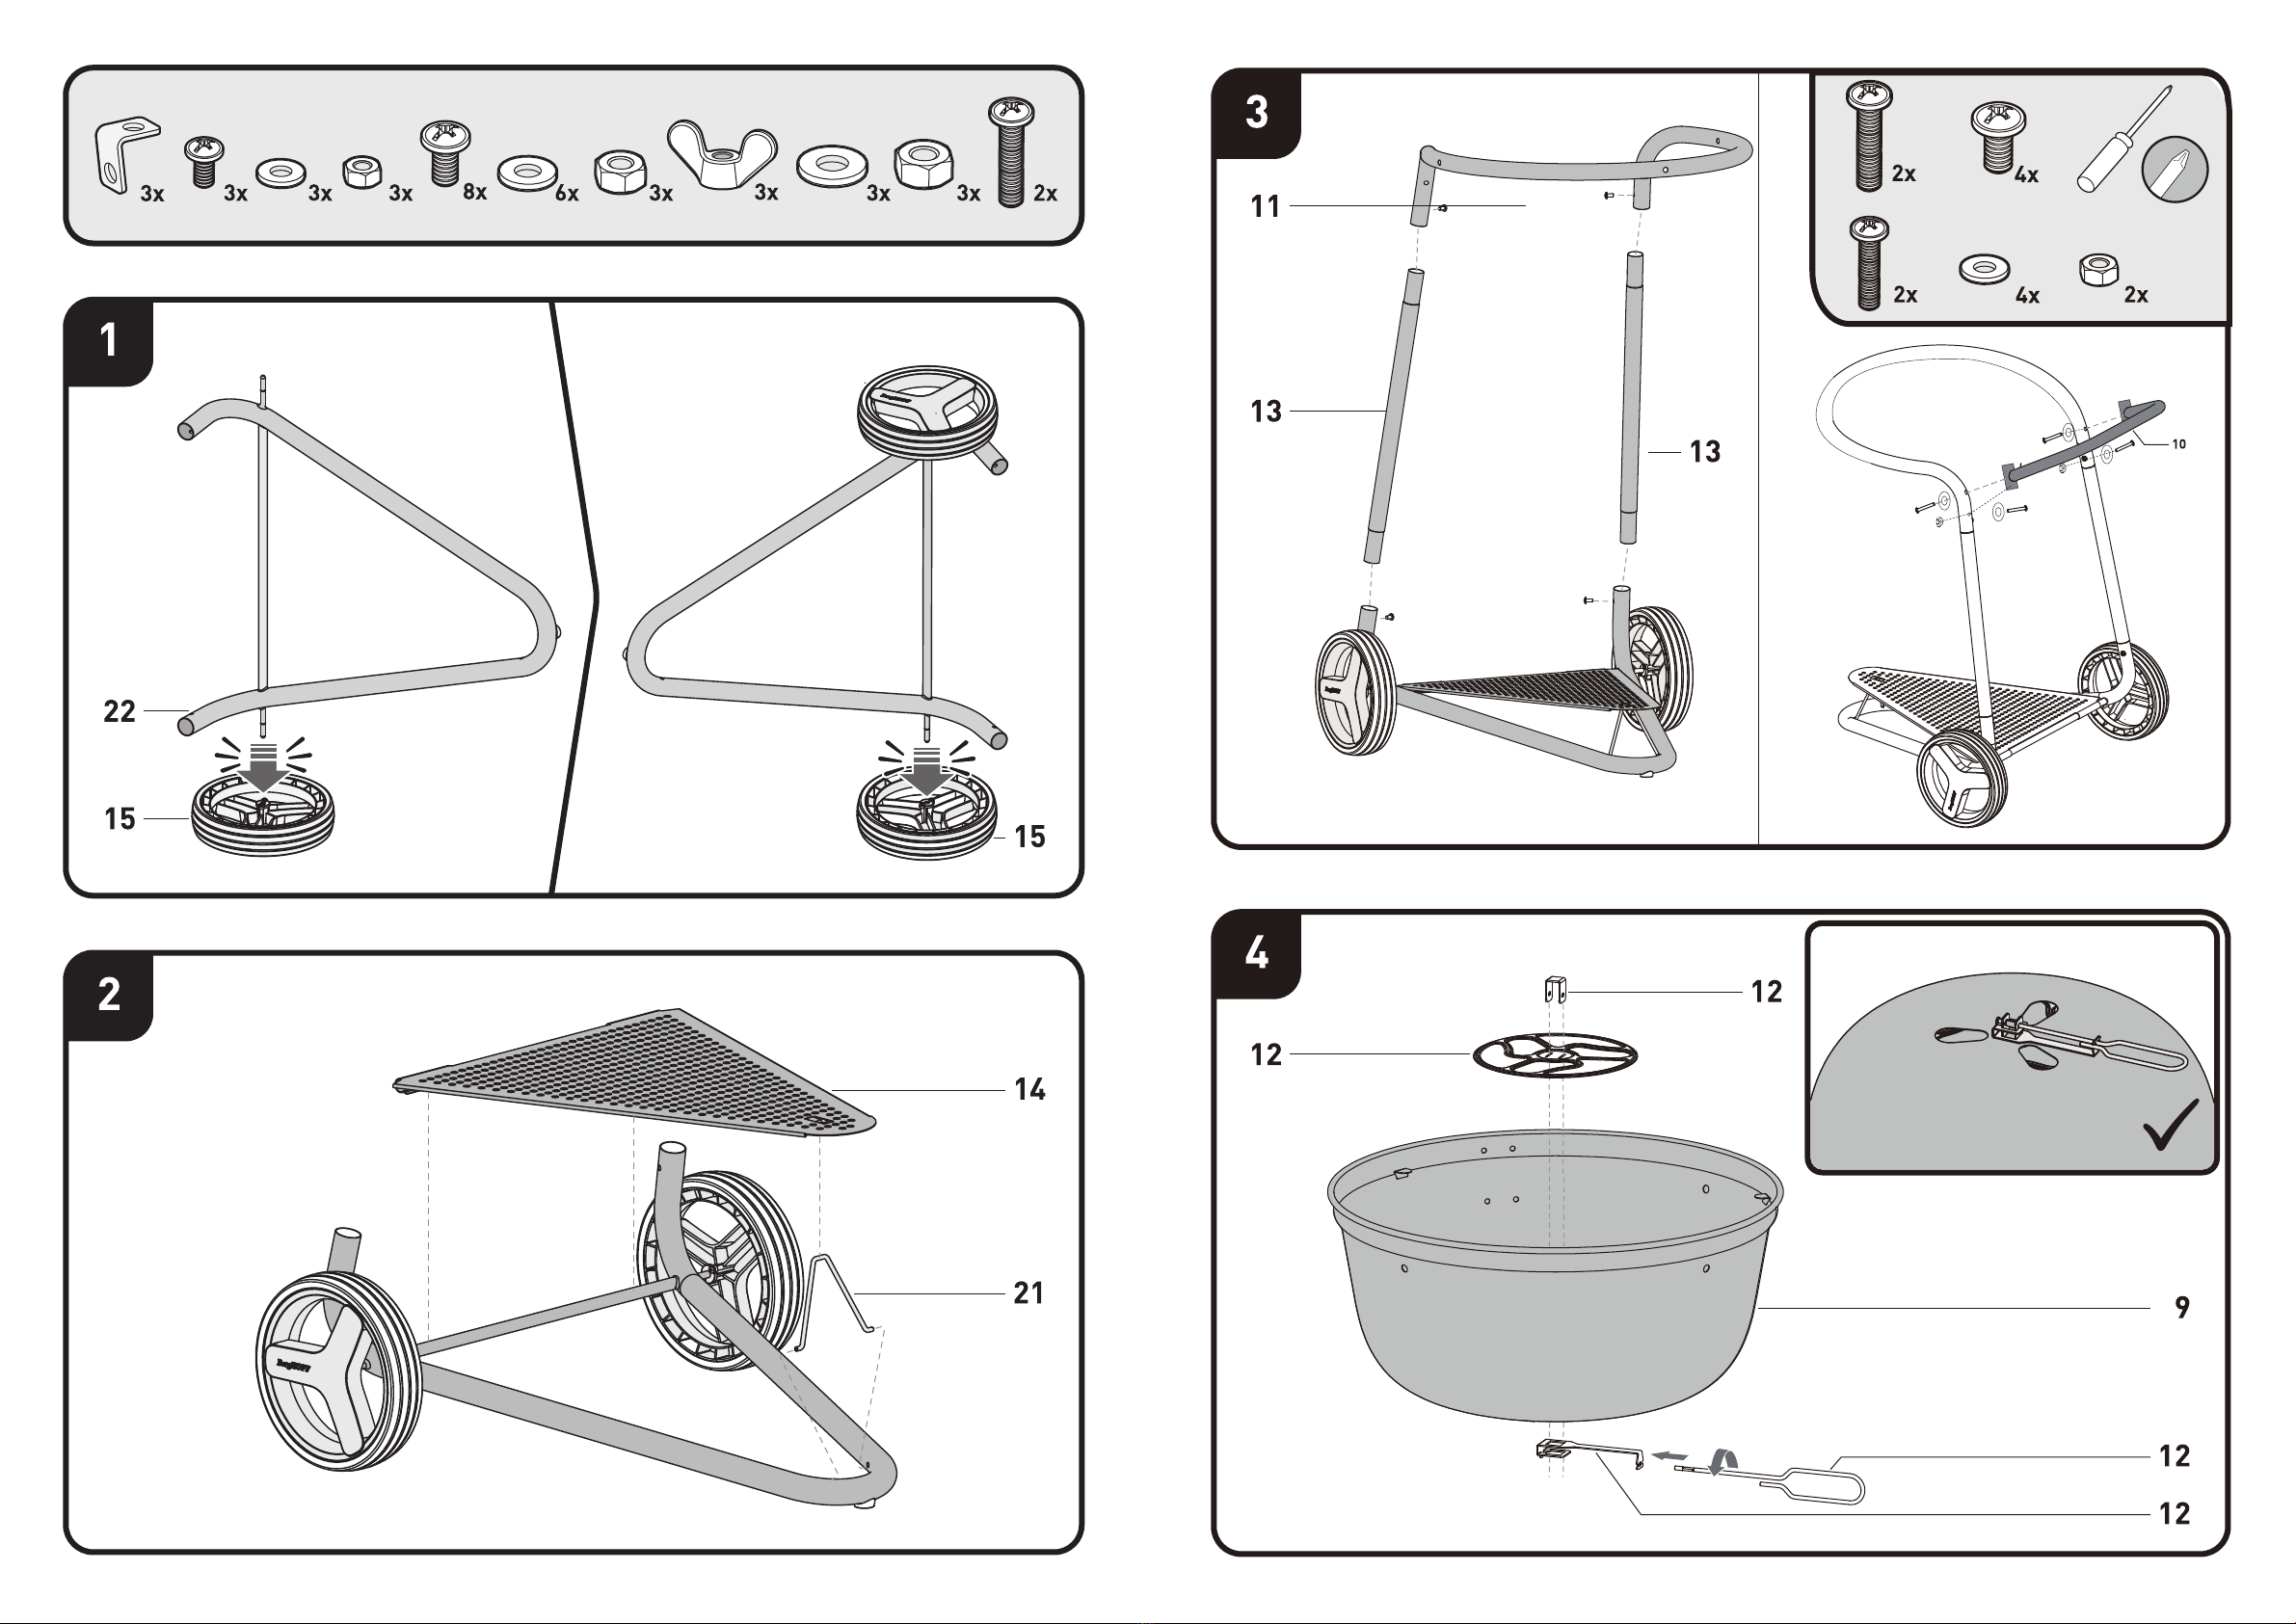
1. PARTS LIST
1AIR FLOW REGULATOR DAMPER 1x
2THERMOMETER 1x
3LID 1x
4HANDLE LID 1x
5-6 HINGE LOCKING PIN 1x
7COOKING GRATE 1x
8CHARCOAL GRATE 1x
9BOWL 1x
10 HANDLE CHARIOT 1x
11-13-22 CHARIOT FRAME 4x
12 BOTTOM AIRFLOW REGULATOR 1x
14 PERFORATED SHELF 1x
15 CHARIOT WHEEL 2x
16 TOOL HOLDER FILTING 1x
17 TOOL HOLDER 1x
18 TOOL HOOKS 4x
19 ASH CONTAINER MOUNTING COLLAR 1x
20 ASH CONTAINER 1x
21 SHELF BRACKET 1x
23 MOULDED FOOTPAD 1x
ENGLISH
ENGLISH

6 7
COMPONENTS LIST ASSEMBLY BAG
ENGLISH
ENGLISH

8 9
ENGLISH
ENGLISH

10 11
ENGLISH
ENGLISH
11

12 13
ENGLISH
ENGLISH
12
13

14 15
PLACE THE GRILL OUTDOORS ON A HARD, NONCOMBUSTIBLE SURFACE AWAY
FROM ROOF OVERHANG OR ANY COMBUSTIBLE MATERIAL. NEVER USE ON
WOODEN OR OTHER SURFACES THAT COULD BURN. PLACE THE GRILL AWAY
FROM OPEN WINDOWS OR DOORS TO PREVENT SMOKE FROM ENTERING YOUR
HOUSE. IN WINDY WEATHER, PLACE THE GRILL IN AN OUTDOOR AREA THAT IS
PROTECTED FROM THE WIND.
WARNING
ENGLISH
ENGLISH

16 17
READ ALL SAFETY WARNINGS AND INSTRUCTIONS CAREFULLY BEFORE
OPERATING YOUR GRILL.
Never use charcoal that has been pre-treated with lighter uid. Use only a high grade plain charcoal or
charcoal /wood mixture. DO NOT use the grill without the charcoal ash container (19-20) in place. DO NOT
attempt to remove the charcoal ash container (19-20) while the BBQ or container contains hot coals.
WARNING
WARNING
PREPARATION FOR USE & LIGHTING INSTRUCTIONS
➔ Before rst use: CURING YOUR GRILL
Prior to your rst use of the grill, follow the instructions below carefully to cure your grill. Curing your grill will minimize
damage to the exterior nish and get rid of the grill paint odor that can cause unnatural avors to the rst meal
prepared on the grill.
Step 1: after having carefully chosen the position of your BBQ area:
Open the lid (3) from the BBQ and use it in an open position while lighting and getting the charcoal started.
Lightly coat all interior surfaces of the grill with vegetable oil or vegetable oil spray. Do not coat the cooking grate
(7) & enameled charcoal grate (8). It’s preferable to do the light oiling before positioning the cooking grate (7)
and enameled charcoal grate (8) inside the BBQ.
Step 2
Charcoal grate (8) must be in place at all time, before starting the lighting. Be sure the air–ow regulators (1-12)
are not obstructed.
Step 3
Follow the instructions below carefully to build a re. You may use charcoal (or charcoal briquettes) and/or
wood as fuel in the grill.
NOTE: To extend the life of your grill, make sure that hot coals and wood do not pile against the walls of
the bowl.
NOTE: It is important that the exterior of the grill is not scraped or rubbed during the curing process.
IMPORTANT: to protect your grill from excessive rust, the unit must be cured periodically and covered at
all times when not in use.
For lighting the charcoal, we advise to use dry crumpled paper or lighter cubes
(both are non-toxic, odorless and tasteless).
IF USING A CHARCOAL CHIMNEY STARTER, PROCEED TO STEP 6.
IF YOU STILL CHOOSE TO USE CHARCOAL LIGHTING FLUID, ONLY use charcoal lighting uid approved
for lighting the charcoal.
Do not use gasoline, kerosene, alcohol or other ammable material for lighting charcoal. CAUTION! Do not use spirit or
petrol for lighting or relighting! Use only relighters complying to EN 18603. Start with 2.2 pounds (1.0kg) of charcoal. This
should be enough charcoal to cook with, once the curing process has been completed. Place the charcoal in the center of
the charcoal grate.
Step 4
Saturate charcoal with lighting uid. Wait 2 to 3 minutes to allow lighting uid to soak into charcoal. Store lighting
uid at a safe distance from the grill.
Step 5
With coals burning strong, close the lid (3) and allow the temperature to reach ± 100°C (± 225°F). Maintain this
temperature for 1 hour.
Step 6
Increase the temperature to ± 300°C (± 570°F). This can be achieved by adding more charcoal and/or wood.
Maintain this temperature for ½ hour then allow unit to cool completely.
WHEN USING A CHARCOAL CHIMNEY STARTER:
Follow all manufacturer’s warnings and instructions regarding the use of their product. Start with max. 2.2 pounds (1.0
kg) of charcoal. This should be enough charcoal to start cooking with, once the curing process has been completed. When
charcoal is burning strong inside the chimney starter, carefully place hot coals in the center of the barbecue’s charcoal grate
(8), eventually add extra charcoal and close the lid (3).
THE CURING PROCESS IS FINISHED NOW, AND YOUR GRILL CAN NOW BE USED FOR COOKING FOOD AS SOON AS:
- all charcoal burns equally
- ames are no longer noticeable
- all coals are covered with a grey ash
TO START THE CHARCOAL GRILL
Note: For rst use see instructions above“Before rst use: CURING YOUR GRILL.”
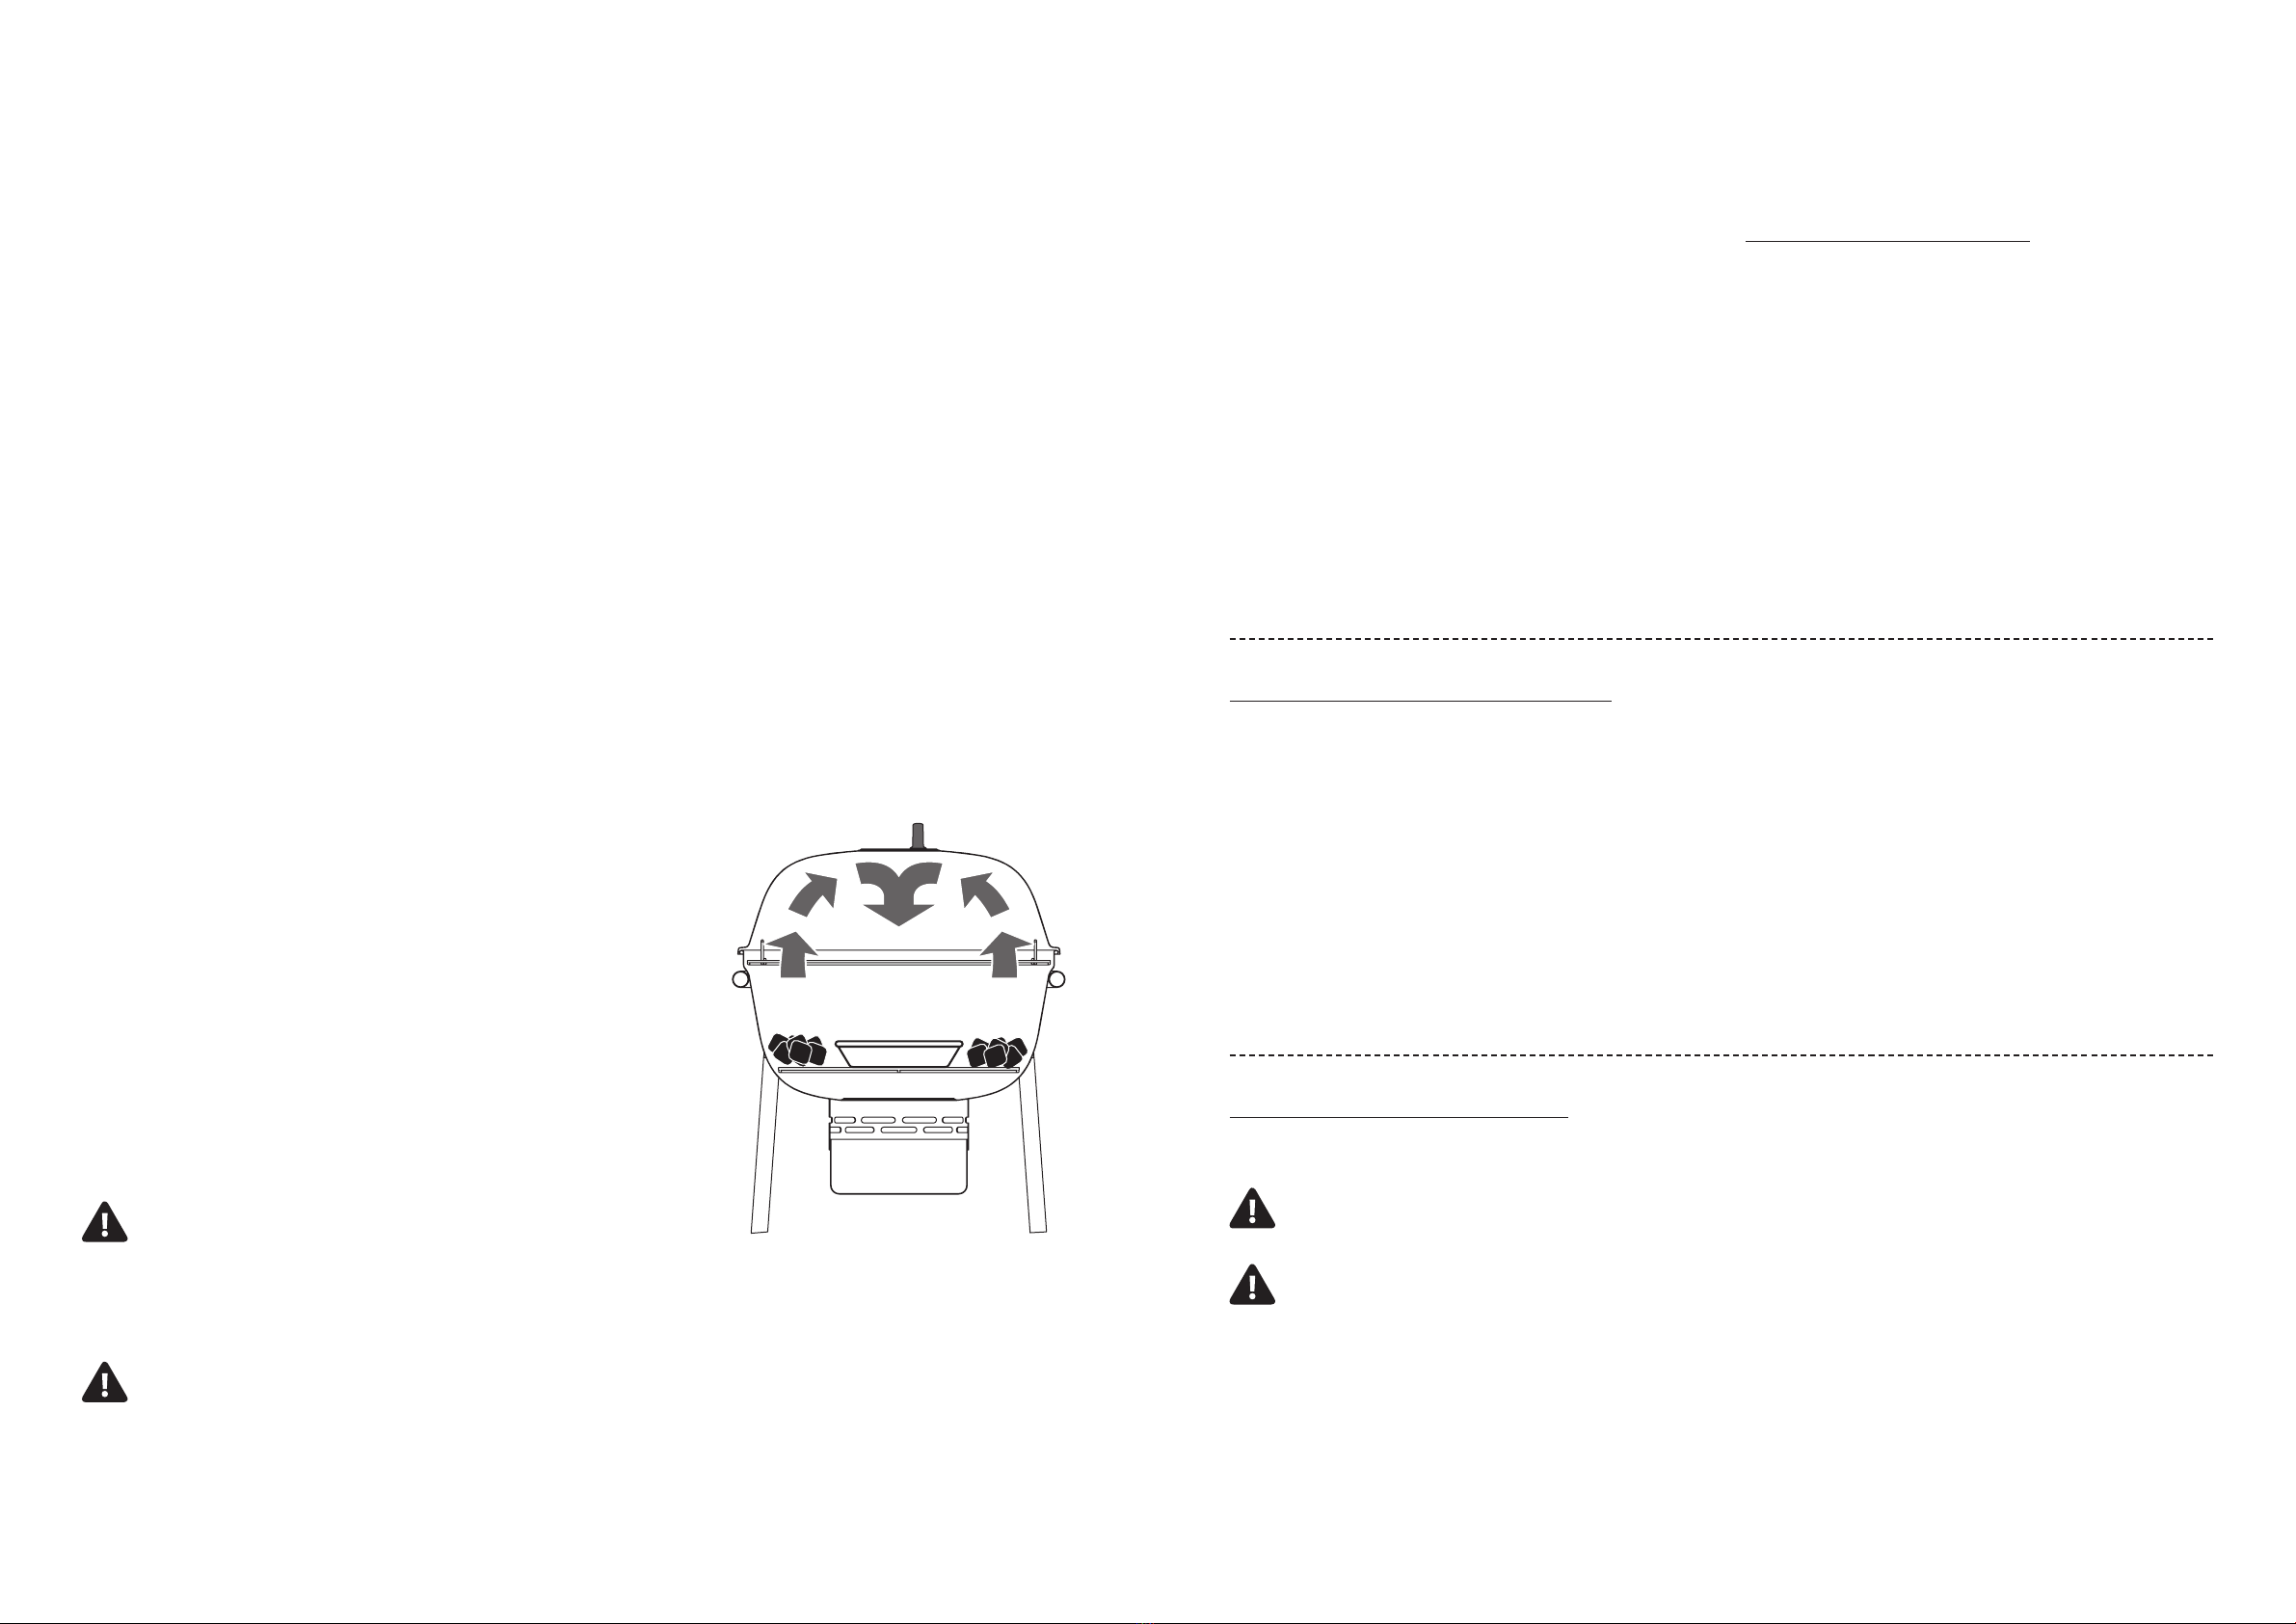
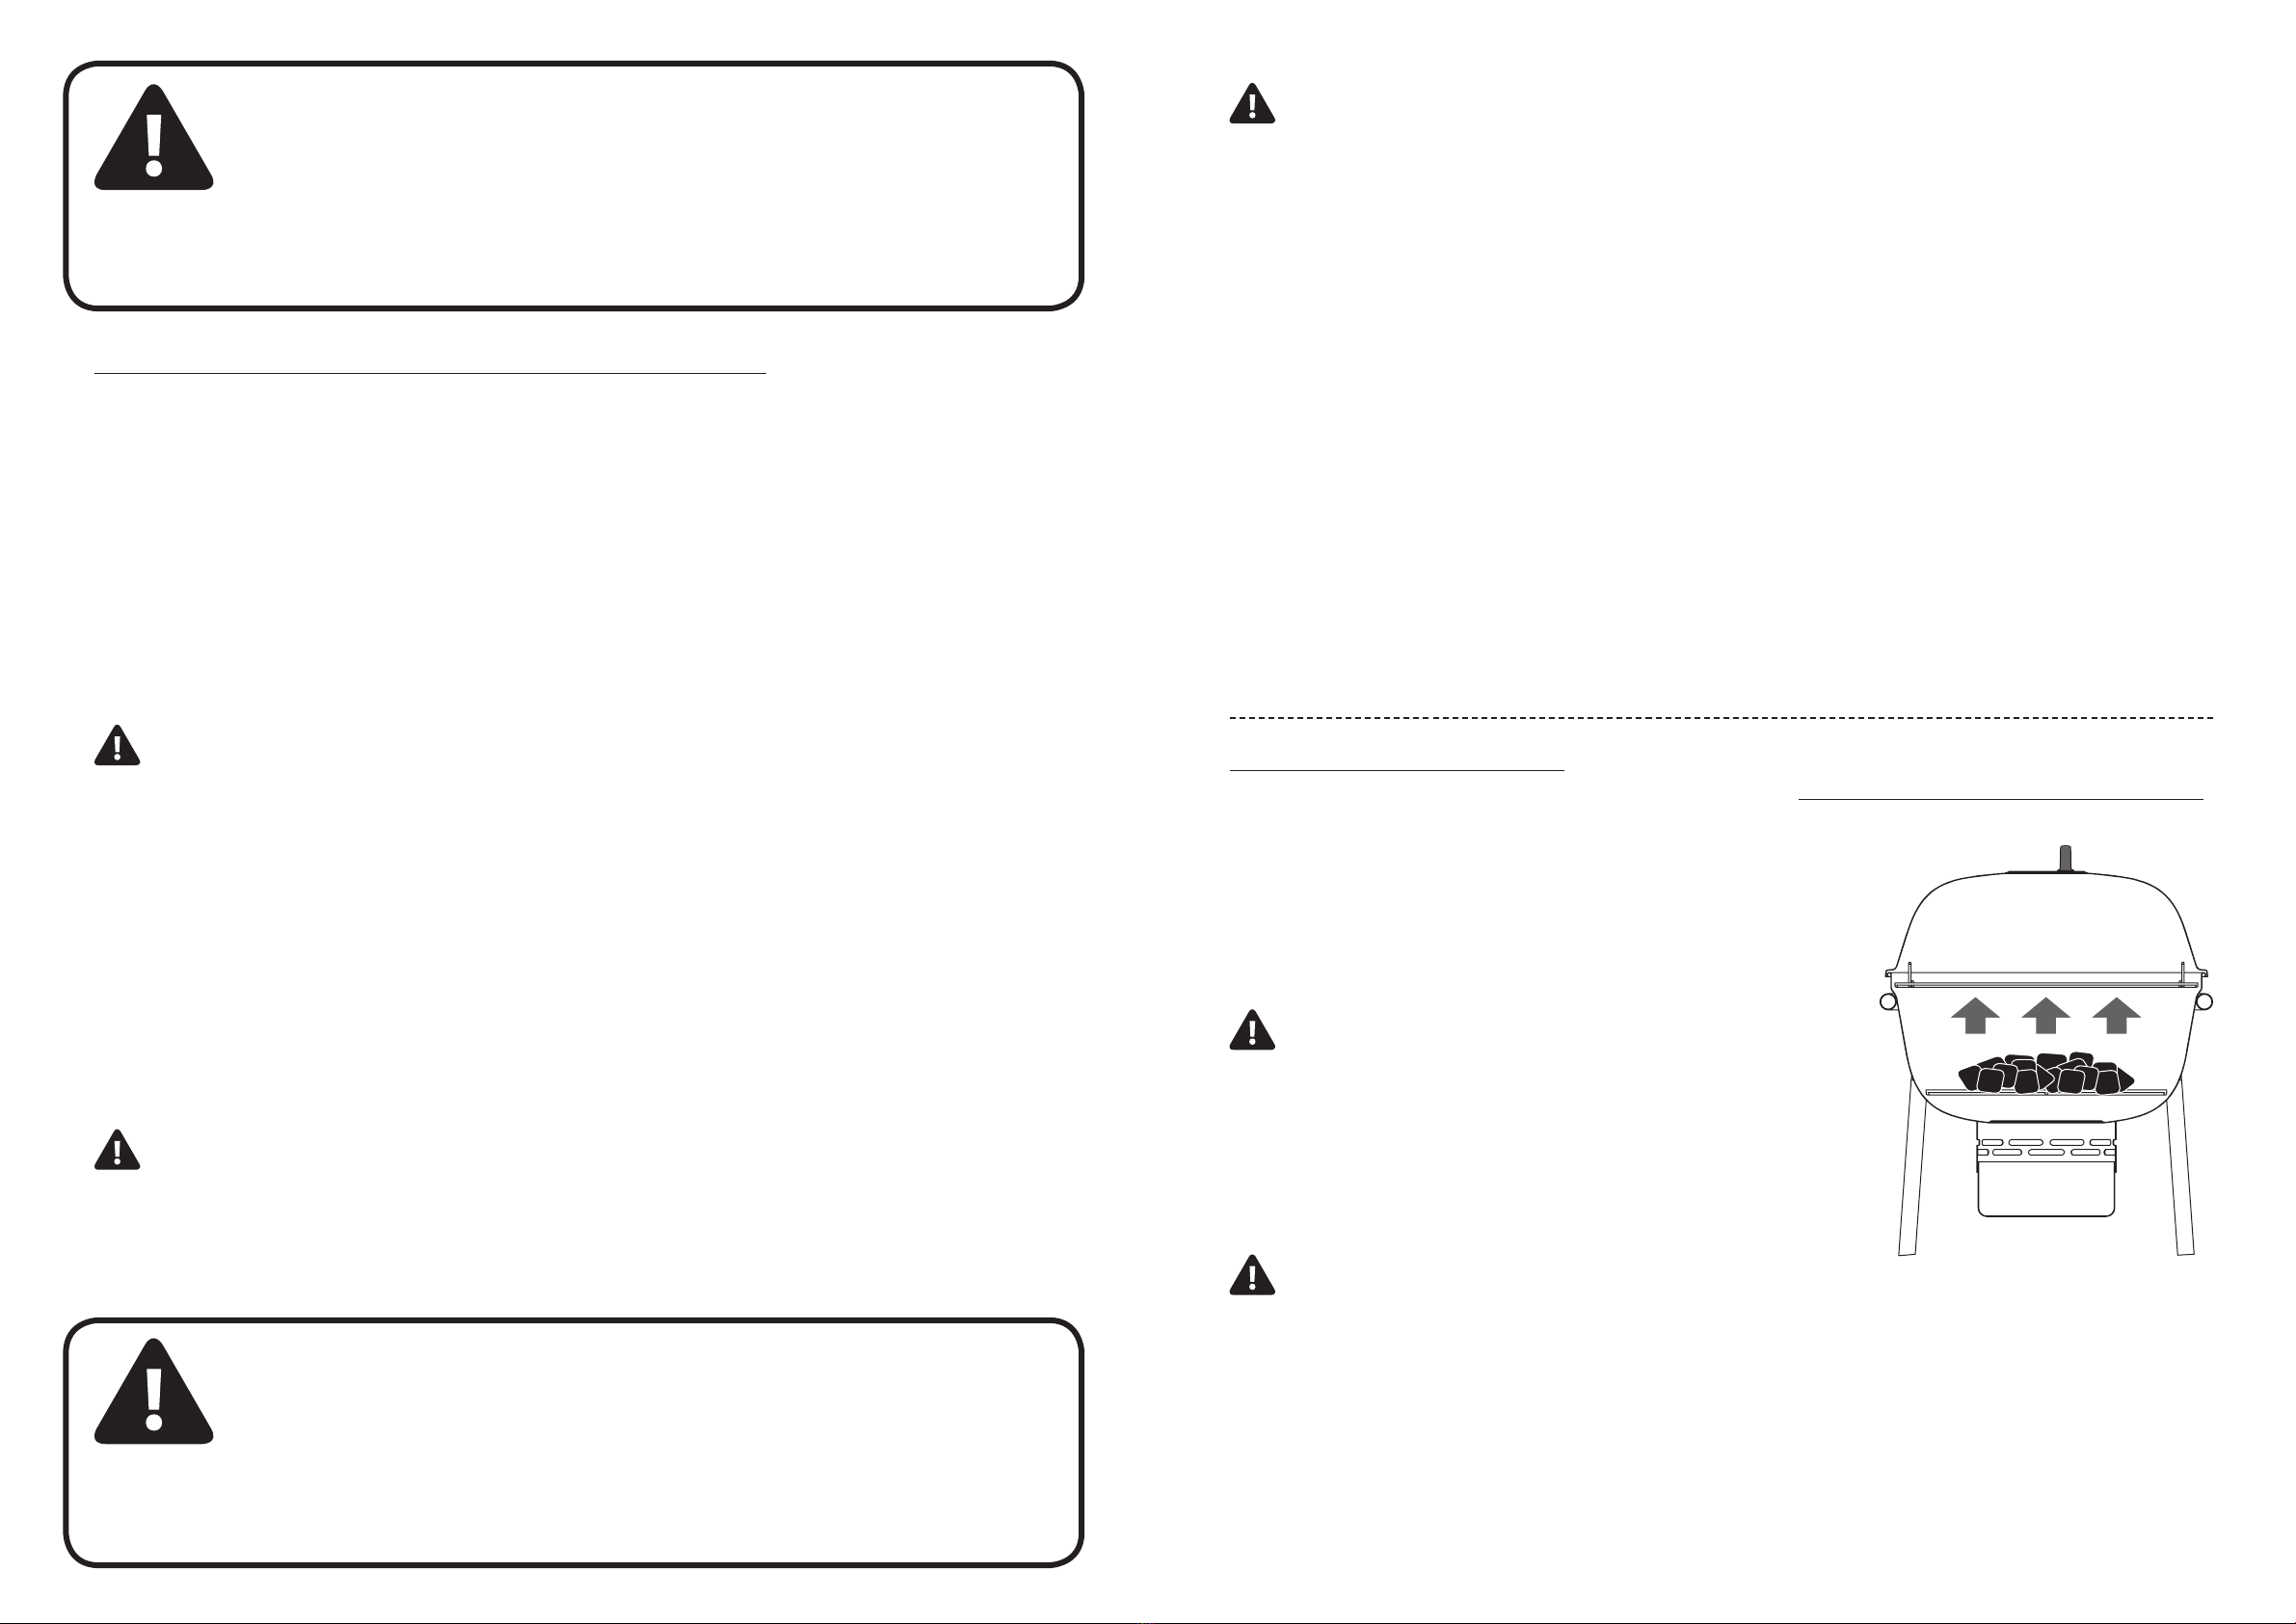
DIRECT GRILL COOKING METHOD
The direct grill cooking is a method where the food is cooked on the
cooking grate (7) directly above the glowing embers and with a closed lid
(3). For even cooking, food should be turned once, halfway through the
grilling time. This cooking method is ideal for food that needs less than
20 min. to cook: steaks, chops, kebaps, vegetables,…
Step 1
Make sure that the BBQ is correctly positioned as described above:
Place the grill outdoors on a hard, non-combustible surface away
from roof overhang or any combustible material. Never use on
wooden or other surfaces that could burn. Place the grill away from
open windows or doors to prevent smoke from entering your house.
In windy weather, place the grill in an outdoor area that is protected
from the wind.
Step 2
Open the lid (3) from the BBQ and use it in an open position while lighting and getting the charcoal started.
Be sure all air-ow regulators (1-12) are open and free. For proper airow, remove accumulated ashes from previous BBQ
sessions on the BBQ bottom if present (coals should be fully extinguished before removing). Charcoal requires oxygen
to burn, so be sure of a good airow and that nothing will obstruct the vents.
Step 3
Mound the charcoal or briquettes into a pyramid-shaped pile, or pile the charcoal into a charcoal chimney starter. Start
with 2.2 pounds (± 1.0kg) of charcoal. This should be enough charcoal to start cooking with. Ignite the charcoal.
ENGLISH
ENGLISH
18 19
➔ WHEN USING LIGHTER CUBES OR PAPER:
Spread lighter cubes (non-toxic, odorless and tasteless) or dry crumpled paper under the charcoal and light. Be sure
that the paper or lighter cubes are well spread and also mixed under the charcoal, so all charcoal starts burning equally.
Eventually replace charcoal carefully with long-handled tongs to obtain an equal burning.
➔ WHEN USING A CHARCOAL CHIMNEY STARTER:
Follow all manufacturer’s warnings and instructions regarding the use of their product. Start with max. 2.2 pounds
(1.0kg) of charcoal. This should be enough charcoal to cook with. When charcoal is burning strong inside the chimney
starter, carefully place hot coals in the center of the charcoal grate (8) of the BBQ.
WE DO NOT RECOMMEND - BUT IF YOU STILL CHOOSE TO USE CHARCOAL LIGHTING FLUID:
ONLY use charcoal lighting uid approved for lighting the charcoal.
Do not use gasoline, kerosene, alcohol or other ammable material for lighting charcoal. CAUTION! Do not use spirit or
petrol for lighting or relighting! Use only relighters complying to EN 18603.
Saturate charcoal with lighting uid. Wait 2 to 3 minutes to allow lighting uid to soak into charcoal. Store lighting uid at a
safe distance from the grill.
Step 5
When there are no longer ames noticeable and all coals are covered with a grey ash (usually after 20 to 30 minutes).
Rearrange the charcoal, briquettes or wood by placing the hot coals carefully in the center on the charcoal grate (8) of
the BBQ. Make sure that the hot coals and wood do not pile against the walls of the bowl (9). It will extend the life of your
grill.
Step 6
Position the cooking grate (7) over the coals. Place food on the cooking
grate (7) and close the lid now (3).
INDIRECT GRILL COOKING METHOD
Indirect cooking needs a set up where charcoal is put on each side of the
food. There’s no charcoal directly under the food, so the heat rises, reects o
the lid and inside surfaces of the grill, and circulates to slowly cook the food
evenly on all sides. There’s no need to turn the food over.
This indirect cooking method is ideal for food that needs more than 20-
25min. to cook (for example: roasts, bone-in poultry,…) , and for delicate
foods which would dry out or scorch when exposed to direct heat (whole
sh, sh llets,…).
For food that needs more than 1 hour to cook, extra charcoal must be added
to each side.
Step 1
Make sure that the BBQ is correctly positioned as described above:
Place the grill outdoors on a hard, non-combustible surface away from roof overhang or any combustible material.
Never use on wooden or other surfaces that could burn. Place the grill away from open windows or doors to prevent
smoke from entering your house. In windy weather, place the grill in an outdoor area that is protected from the wind.
Step 2
Open the lid (3) from the BBQ and use it in an open position while lighting and getting the charcoal started.
Make sure that all air–ow regulators (1-12) are open and free. For proper airow, remove the accumulated ashes from
previous BBQ sessions on the BBQ bottom if present (coals should be fully extinguished before removing). Charcoal
requires oxygen to burn, so be sure of a good airow and that nothing will obstruct the vents.
Step 3
Place the charcoal on each side of the charcoal grate (8) (see picture). Make sure you leave enough room for a drip pan
between the charcoal. Ignite the charcoal.
Step 4
Ignite the charcoal as prescribed in step 4 above in chapter“DIRECT GRILL COOKING METHOD“.
Step 5
Leave o the lid (3) until the coals are covered with a grey ash (usually after 20 to 30 minutes).
Make sure that the hot coals and wood do not pile against the walls of the bowl (9). It will extend the life of your grill.
Place a“re safe” drip pan between the coals in the center of the charcoal grate (8).
Step 6
Position the cooking grate (7) over the coals.
Place food on the cooking grate (7), directly above the drip pan and close the lid now (3).
NOTE: For additional smoke avor, consider adding hardwood chips or chunks (soaked in water for at least 30 min. and
drained) or moistened fresh herbs such as rosemary, thyme, or bay leaves. Place the wet wood or herbs directly on the
coals just before you start cooking. This can be used in combination with both cooking methods: direct or indirect.
TIPS FOR GRILLING & FOOD SAFETY
• Don’t try to save time by placing food on a grill that’s not yet ready. Let charcoal burn until it’s coated with light-grey ash.
• Always start with a well-cleaned cooking grate (7). Food rests from previous sessions should be removed by a bristle
barbeque brush or crumpled aluminum.
• Unless otherwise stated in the recipe, turn your food only once - halfway the cooking time.
• A light coating of oil will help brown your food evenly and keep it from sticking to the cooking grate (7). Always brush
or spray oil on your food, not on the cooking grate (7).
• Do not defrost meat, sh or poultry at room temperature. Defrost in the refrigerator or microwave oven.
• Never place cooked food on the same plate the raw food was placed on.
• Wash all plates and cooking utensils which have come into contact with raw meats or sh with hot, soapy water and
rinse.
PROPER CARE & MAINTENANCE
➔ After use:
DO NOT remove the ash container (19-20), while the ash container and/or BBQ contains HOT coals. Wait until the
coals has cooled down.
Never leave the coals and ashes unattented in the grill.
Before the grill can be left unattended, remaining coals and ashes must be removed from the grill. Use caution
to protect yourself and your property. Carefully place the remaining coals and ashes in a non-combustible metal
container and saturate completely with water. Allow the coals and water to remain in the metal container 1 hour
prior to disposing.
The extinguished coals and ashes should be placed on a safe distance from all structure and combustible materials.
Completely wet the surface beneath and around the grill to extinguish any ashes, coals or embers which may have
fallen during the cooking or cleaning process.
ENGLISH
ENGLISH
20 21
➔ After each use - clean the grill as follows:
1. Make sure that the grill is cool and coals are cooled o or totally extinguished.
2. Remove the cooking grate (7).
NOTE: step 3 & 4 should be done according the instructions given in above paragraph “after use”.
3. Remove the cooled charcoal or briquettes on the charcoal grate (8). Remove the charcoal grate now (8).
4. Be sure the bottom air-ow regulator (12) is free. For proper airow, remove the accumulated ashes from the BBQ
session on the BBQ bottom if present (coals should be fully extinguished before removing). Eventually use the
bottom air-ow regulator (12) to help guiding the ashes into the ash container (19-20).
5. Remove the steel ash container (19-20) carefully and remove the ashes.
6. Eventually wash your grill with warm soapy water (with a mild detergent). Rinse well with clear water and wipe dry.
7. Cooking grate (7): Simply loosen residue with a bristle barbeque brush or crumpled aluminum foil, then wipe o
with paper towels. After multiple BBQ sessions regularly wash the cooking grate (7) thoroughly.
8. Apply a light coat of vegetable oil to prevent from rusting. Cover the grill (or grill parts when you dismantle the
grill), to protect it from excessive rusting before storing the grill.
General: to protect your grill from excessive rust, the unit must be cured periodically (see section “CURING YOUR GRILL”)
and covered at all times when not in use.
NOTE: While using the grill, high temperatures can result in discoloring some inside parts of the grill, especially the
parts in direct contact with the hot charcoal can discolor or release its coating.This is inevitable and will not inuence
the performance of your grill.
WARRANTY
This BergHOFF BBQ grill comes with a limited two-years warranty on production aws, from the date of purchase and to the
extent the use corresponds with the present instructions for use & care in this manual. The receipt, mentioning the date of
purchase counts as guarantee card.
This BBQ grill is not suited for professional use.
Wear, corrosion, deformation and discoloration of the parts that are directly exposed to the re is quite normal and will
therefore in no event ever be considered as a production aw: it is the logical result of their use.
Hence, the charcoal grate & BBQ grill grid can be strongly deformed after some time in use and it is normal to have this part
replaced by the customer without any warranty.
ENGLISH
2415610
KETTLE BARBECUE
AU CHARBON DE BOIS AVEC DÔME
FRANÇAIS

22 23
• N’utilisez pas d’essence, de kérosène ou d’alcool pour allumer le charbon. L’utilisation de ces produits ou de produits
similaires pourrait provoquer une explosion pouvant entraîner des blessures graves.
• Ne jamais ajouter du liquide d’allumage au charbon chauds ou même tiède, car une inammation soudaine risque
d’entraîner des brûlures graves.
• Lorsque vous ajoutez du charbon et / ou du bois, faites preuve d’une extrême prudence.
• Ouvrez le couvercle (3) du barbecue en allumant le charbon de bois.
• Le barbecue est chaud lorsqu’il est utilisé. Pour éviter les brûlures:
• N’essayez PAS de déplacer le BBQ (lorsque cela n’est pas strictement nécessaire).
• Portez des gants de protection ou des gants de cuisine.
• NE PAS toucher les surfaces chaudes du BBQ.
• NE PAS porter de vêtements qui volent au vent ou permettre aux cheveux de venir en contact avec le BBQ
• Lors de l’utilisation, la graisse de viande peut tomber dans le charbon et provoquer un feu de graisse. Si cela se produisait,
enlever la viande de la grille de cuisson jusqu’à ce que les feux de graisse s’éteignent. Pour les aliments gras, nous
recommandons d’utiliser un plat de BBQ «coupe-feu». Ne pas utiliser l’eau pour éteindre les graisses.
• Soyez prudent car les ammes peuvent faire éruption lorsque l’air frais entre en contact avec le feu. Gardez les mains, le
visage et le corps à une distance sûre de la vapeur chaude et des ammes.
• Ne laissez pas le charbon de bois et / ou le bois s’empiler contre les parois de la cuvette (9). Cela réduira considérablement
la durée de vie du métal et la nition de votre grill.
• Soyez prudent lors de l’assemblage et de l’utilisation de votre BBQ pour éviter les éraures ou les coupures des bords
tranchants des pièces métalliques. Soyez prudent lorsque vous mettez vos mains dans ou sous la grille.
• Par temps venteux, placez le BBQ dans une zone extérieure protégée contre le vent.
• Ne laissez jamais les charbons et les cendres dans la grille sans surveillance. Avant que la grille ne soit laissée sans
surveillance, les charbons et les cendres restants doivent être retirés du BBQ. Soyez prudent pour protéger vous et vos
biens. Placez soigneusement les charbons et les cendres restants dans un récipient métallique incombustible et saturé
complètement avec de l’eau. Laisser les charbons et l’eau dans un conteneur métallique minimum jusqu’à l’élimination
de la consommation.
• Ne pas utiliser d’eau pour éteindre le charbon. Fermer légèrement les régulateurs de débit d’air du fond et du couvercle
(12-1) et placer le couvercle (3) sur la cuve(9).
• es gants de protection spéciale barbecue doivent toujours être utilisés pendant la cuisson, pour régler les régulateurs
de débit d’air (1-12), pour ajouter du charbon et ou manipuler le couvercle (3) ou d’autres surfaces chaudes.
• Utilisez des outils de barbecue appropriés, avec de longues poignées résistantes à la chaleur.
• Ne touchez jamais les grilles de cuisson ou de charbon (7-8), les cendres, le charbon de bois ou la cuve elle-même (3-9)
pour contrôler s’ils sont chauds.
• Les charbons et les cendres éteints doivent être placés à une distance sûre de toute structure et matériaux combustibles.
• Humidier complètement la surface sous et autour de la grille avec un tuyau d’arrosage pour éteindre les cendres, les
charbons ou les braises qui peuvent être tombés pendant le processus de cuisson ou de nettoyage.
• Après chaque utilisation, nettoyer soigneusement le BBQ et appliquer une légère couche d’huile végétale pour éviter la
rouille.
• Couvrir le BBQ pour le protéger contre la rouille excessive.
• Faites attention lorsque vous soulevez ou déplacez le BBQ pour éviter les égratignures et les blessures au dos.
• Nous conseillons qu’un extincteur soit toujours à portée de main. Reportez-vous à votre autorité locale pour déterminer
la taille et le type d’extincteur.
• Rangez le BBQ hors de portée des enfants et dans un endroit sec lorsqu’il n’est pas utilisé.
• Eliminer correctement tous les matériaux d’emballage.
• Le non-respect des consignes de sécurité et les consignes de ce manuel peuvent entraîner des dommages corporels ou
matériels.
Gardez ce manuel pour référence future.
AVERTISSEMENTS IMPORTANTS DE SÉCURITÉ
NOUS VOUS DEMANDONS À ASSEMBLER ET À UTILISER VOTRE BBQ
AUSSI SÛREMENT QUE POSSIBLE. LISEZ ATTENTIVEMENT TOUTES LES
AVERTISSEMENTS ET INSTRUCTIONS DE SÉCURITÉ AVANT
L’ASSEMBLAGE ET DE FAIRE FONCTIONNER DE VOTRE BBQ.
ATTENTION
• Utilisez uniquement ce BBQ sur une surface dure, non combustible et stable (béton, carrelage) capable de supporter le
poids du BBQ. Ne jamais utiliser sur du bois ou d’autres surfaces susceptibles de brûler.
• N’utilisez PAS le BBQ sans le récipient à cendres (19-20) en place. N’essayez PAS d’enlever le récipient de cendres (19-20)
alors que le barbecue contient du charbon en combustion.
• Maintenir un dégagement approprié de 3 mètres (10 pieds) entre le BBQ et les matériaux combustibles (buvards, arbres,
ponts en bois, clôtures, bâtiments, etc.). La construction doit être maintenue en tout temps lorsque la grille est utilisée.
Ne placez pas le BBQ sous un surplomb de toit ou dans une autre zone fermée.
• Pour usage extérieur seulement. N’utilisez pas le BBQ à l’intérieur ou dans un endroit ouvert.
• Pour usage domestique seulement. N’utilisez pas ce BBQ et les outils connexes pour un autre but que celui prévu.
• Ne pas utiliser sur les véhicules récréatifs ou en mouvement et / ou les bateaux.
• N’utilisez pas le barbecue comme chaue-eau, chauage etc.
• Un montage incorrect peut être dangereux. Suivez les instructions de montage de ce manuel.
• N’essayez pas de réparer le BBQ autrement que par une maintenance normale, comme expliqué dans ce manuel.
• Faites preuve de prudence lorsque vous utilisez votre BBQ.l.
• L’utilisation d’alcool, de médicaments sur ordonnance ou de médicaments sans ordonnance peut nuire à la capacité de
l’utilisateur à bien assembler ou à utiliser en toute sécurité le barbecue.
• Ne laissez pas le BBQ ou les outils connexes sans surveillance lors de l’utilisation.
• Placez le BBQ dans une zone où les enfants et les animaux domestiques ne peuvent pas entrer en contact avec le
produit. Une surveillance étroite est nécessaire lorsque le BBQ ou les outils connexes sont utilisés.
• Toujours mettre le charbon sur la grille de charbon d’acier émaillé (8). Ne placez pas de charbon directement au fond du
récipient (9).
• Nous recommandons l’utilisation d’une cheminée d’allumage à charbon pour éviter les dangers associés aux liquides
inammables pour le charbon de bois. Si vous choisissez d’utiliser un liquide d’inammable pour le charbon de bois,
utilisez uniquement un liquide approuvé pour l’allumage de charbon. Lisez attentivement les avertissements et les
instructions du fabricant sur du produit avant l’utilisation. Rangez le liquide d’allumage du charbon de bois en toute
sécurité loin du BBQ.
• N’utilisez pas d’essence, de kérosène ou d’alcool pour allumer le charbon. MISE EN GARDE! N’utilisez pas l’alcool ou
l’essence pour l’allumage! N’utiliser que des produits d’allumage conformes à la norme EN 18603. L’utilisation de ces
produits ou de produits similaires pourrait provoquer une explosion/incendie pouvant entraîner des lésions corporelles
graves.
• Ne rangez pas le liquide d’allumage ou d’autres liquides ou matériaux inammables sous ou proche du BBQ.
• Lorsque vous utilisez un liquide d’allumage de charbon, laissez le charbon brûler jusqu’à ce qu’il soit recouvert de cendres
légères (environ 20 à 30 minutes). Cela permettra au liquide d’allumage de charbon de brûler. Si vous ne parvenez pas
à le faire, les fumées provenant de l’allumage du charbon pourraient piéger le liquide dans le BBQ et provoquer une
amme importante ou une explosion.
• Ne jamais utiliser le charbon qui a été prétraité avec un liquide d’allumage. Utilisez uniquement un mélange de charbon
de bois ou de charbon de bois et bois de haute qualité.
FRANÇAIS
FRANÇAIS
ATTENTION

24 25
INSTRUCTIONS DE MONTAGE
1. LISTE DES PIÈCES
1REGULATEUR DE FLUX D’AIR DAMPER 1x
2THERMOMETRE 1x
3COUVERCLE 1x
4POIGNEE DU COUVERCLE 1x
5-6 RIVET DE VERROUILLAGE DE LA CHARNIERE 1x
7GRILLE DE CUISSON 1x
8GRILLE DE CHARBON 1x
9RECIPIENT 1x
10 POIGNEE DU CHARIOT 1x
11-13-22 CADRE DU CHARIOT 4x
12 REGULATEUR DE FLUX D’AIR DU BAS 1x
14 ÉTAGÈRE PERFORÉ 1x
15 ROUE DU CHARIOT 2x
16 RACCORDS DE PORTEURS D’OUTILS 1x
17 PORTE OUTILS 1x
18 OUTILS 4x
19 COLLIER DE MONTAGE DE CONTENANT
DE CENDRE 1x
20 CONTENANT DE CENDRE 1x
21 SUPPORT D’ETAGERE 1x
23 PIED 1x
FRANÇAIS
FRANÇAIS
5
5
5
L’OUTILLAGE
NON INCLUS
26 27
LISTE DES COMPOSANTS SAC D’ASSEMBLAGE
FRANÇAIS
FRANÇAIS

28 29
FRANÇAIS
FRANÇAIS
FERME OUVERT
30 31
FRANÇAIS
FRANÇAIS
11
32 33
FRANÇAIS
FRANÇAIS
12
13

34 35
PLACER LE BBQ À L’EXTÉRIEUR SUR UNE SURFACE DUR, NON COMBUSTIBLE ET NE
PAS SOUS UN TOIT OU D’UN MATÉRIAU COMBUSTIBLE. NE JAMAIS UTILISER SUR
DES SURFACES À BOIS OU AUTRES QUI PEUVENT ETRE INFLAMMABLE. PLACEZ
LE BBQ LOIN DES FENÊTRES OU DES PORTES OUVERTES POUR ÉVITER LA FUMÉ
Y ENTRER. EN TEMPS DE VENT, PLACEZ LE BBQ DANS UNE ZONE EXTERIEURE
PROTÉGÉE DU VENT.
ATTENTION
FRANÇAIS
FRANÇAIS
36 37
LISEZ TOUTES LES AVERTISSEMENTS ET INSTRUCTIONS DE SÉCURITÉ AVANT DE
FAIRE FONCTIONNER VOTRE BBQ.
N’utilisez jamais de charbon qui a été prétraité avec un liquide d’allumage. Utiliser uniquement un mélange
de charbon de bois ou bois de haute qualité. N’utilisez PAS le BBQ sans le récipient de cendres au charbon
(19-20) en place. N’essayez PAS d’enlever le récipient de cendres (19-20) alors que le barbecue ou le
contenant contient des charbons chauds.
ATTENTION
ATTENTION
INSTRUCTIONS D’UTILISATION ET INSTRUCTIONS D’ALLUMAGE
➔ Avant la première utilisation: CURER VOTRE BBQ
Avant votre première utilisation du BBQ, suivez attentivement les instructions ci-dessous pour curer votre BBQ. La
curation de votre BBQ réduira au minimum les dommages de la nition extérieure et éliminera l’odeur de la peinture
du BBQ qui peut provoquer des arômes non naturels au premier repas préparé sur le BBQ.
Étape 1: après avoir soigneusement choisi l’emplacement de votre BBQ:
Ouvrez le couvercle (3) du barbecue et utilisez-le dans une position ouverte tout en allumant le charbon de bois.
Revêtir légèrement toutes les surfaces intérieures de la grille avec de l’huile végétale. Ne pas enduire la grille
de cuisson et (7) la grille de charbon émaillé (8). Il est préférable d’huiler légèrement avant de placer la grille de
cuisson (7) et la grille de charbon émaillé (8) à l’intérieur du barbecue.
Étape 2
La grille de charbon (8) doit être en place à tout moment, avant de démarrer l’allumage. Assurez-vous que les
régulateurs de débit d’air (1-12) ne sont pas obstrués.
Étape 3
Suivez attentivement les instructions ci-dessous pour créer un feu. Vous pouvez utiliser du charbon (ou des
briquettes de charbon de bois) et / ou du bois comme moyen dans le BBQ.
REMARQUE: Pour prolonger la durée de vie de votre BBQ, assurez-vous que les charbons chauds et le
bois ne s’accumulent pas contre les parois du bol.
REMARQUE: Il est important que l’extérieur de la grille ne soit pas raclé ou frotté pendant le processus
de curage.
IMPORTANT: pour protéger votre BBQ contre la rouille excessive, l’unité doit être curé périodiquement
et recouverte en tout temps lorsqu’il n’est pas utilisé.
Pour allumer le charbon, nous conseillons d’utiliser du papier froissé sec ou des cubes d’allumages
(les deux sont non toxiques, inodores et sans saveur).
EN CAS D’UTILISATION D’UN ALLUMAGE AVEC UN CHEMINÉE DE CHARBON, PROCÉDER À L’ÉTAPE 6.
SI VOUS CHOISISSEZ TOUJOURS D’UTILISER UN LIQUIDE D’ALLUMAGE DE CHARBON, N’UTILISEZ
QUE le liquide d’allumage de charbon approuvé pour allumer le charbon.
Ne pas utiliser d’essence, de kérosène, d’alcool ou d’autres matériaux inammables pour allumer du charbon. MISE EN
GARDE! N’utilisez pas l’alcool ou l’essence pour l’allumer ou ré-allumer! N’utiliser que les moyens d’allumages conformes à
la norme EN 18603. Commencez avec 2,2 livres (1,0 kg) de charbon de bois. Ce devrait être susamment de charbon pour
cuisiner, une fois le processus de curage terminé. Placez le charbon au centre de la grille de charbon de bois.
Étape 4
Aspergez le charbon avec un liquide d’allumage. Attendez 2 à 3 minutes pour permettre au liquide d’inltrer le
charbon de bois. Stocker le liquide d’allumage à une distance sûre du BBQ.
Étape 5
Lorsque les charbons brûlent trop fort, fermez le couvercle (3) et laissez la température atteindre ± 100 ° C (± 225 ° F).
Maintenir cette température pendant 1 heure.
Étape 6
Augmenter la température à ± 300 ° C (± 570 ° F). Cela peut être obtenu en ajoutant plus de charbon ou de bois.
Maintenez cette température pendant ½ heure, puis laissez refroidir complètement l’appareil.
SI VOUS UTILISEZ UN CHEMINEE D’ALLUMAGE DE CHARBON:
Suivez tous les avertissements et instructions du fabricant concernant l’utilisation de leur produit. Commencez avec max. 2,2
kg (1,0 kg) de charbon de bois. Ce devrait être susamment de charbon pour commencer à cuisiner, une fois le processus de
curage terminé. Lorsque le charbon de bois brûle fortement à l’intérieur du cheminée, placez soigneusement les charbons
au centre de la grille de charbon du barbecue (8), ajoutez éventuellement du charbon et fermez le couvercle (3).
LE PROCESSUS DE CURAGE EST TERMINÉ MAINTENANT, ET VOTRE GRILLE PEUT ÊTRE UTILISÉ POUR CUISINER LES
ALIMENTS SI:
- tout le charbon brûle d’une manière égale
- les ammes ne sont plus perceptibles
- tous les charbons sont recouverts d’une cendre grise
COMMENCER AVEC VOTRE BBQ
Remarque: Pour une première utilisation, voir les instructions ci-dessus“Avant la première utilisation: CURER VOTRE BBQ.”
MÉTHODE DE CUISSON DIRECTE
La cuisson directe avec le BBQ est une méthode où les aliments sont cuits
sur la grille de cuisson (7) directement au-dessus des braises et avec un
couvercle fermé (3). Pour une cuisson uniforme, les aliments doivent être
tournés une fois, à mi-chemin du temps de cuisson. Cette méthode de
cuisson est idéale pour les aliments qui nécessitent moins de 20 min. Faire
cuire: steaks, côtelettes, kebaps, légumes, ...
Étape 1
Assurez-vous que le barbecue est correctement positionné comme
décrit ci-dessus:
Placez le BBQ à l’extérieur sur une surface dure et non combustible
à l’écart du surplomb du toit ou de tout matériau combustible. Ne
jamais utiliser sur du bois ou d’autres surfaces susceptibles de brûler.
Placez le BBQ loin des fenêtres ouvertes ou des portes pour empêcher
la fumée d’entrer dans votre maison. Par temps venteux, placez le
BBQ dans une zone extérieure protégée contre le vent
Étape 2
Ouvrez le couvercle (3) du barbecue et utilisez-le dans une position ouvert tout en allumant commençant le charbon
de bois. Assurez-vous que tous les régulateurs de débit d’air (1-12) sont ouverts et libres. Pour un débit d’air approprié,
retirez les cendres accumulées des séances de barbecue précédentes sur le fond du barbecue si présent (les charbons
doivent être complètement éteints avant de les enlever). Le charbon de bois nécessite de l’oxygène pour brûler, alors
assurez-vous d’un bon ux d’air et que rien ne gênera ce ux.
Étape 3
Monter le charbon ou les briquettes dans une pile en forme de pyramide, ou empiler le charbon de bois dans une
cheminée à charbon de bois. Commencez avec 2,2 livres (± 1,0kg) de charbon . Ce devrait être assez de charbon pour
commencer à cuisiner. Allumez le charbon de bois.
FRANÇAIS
FRANÇAIS

38 39
➔ EN UTILISANT DES CUBES OU DE PAPIER POUR L’ALLUMAGE:
Répartir des cubes d’allumage (non toxique, inodore et sans saveur) ou du papier froissé sec sous le charbon et l’allumez.
Assurez-vous que le papier ou les cubes sont bien répartis et également mélangés sous le charbon de bois, de sorte que
tout le charbon de bois commence à brûler également. Déplacez nalement le charbon de bois soigneusement avec les
outils longues pour obtenir une diusion homogène.
➔ EN UTILISANT UNE CHEMINEE D’ALLUMAGE :
Suivez tous les avertissements et instructions du fabricant concernant l’utilisation de leur produit. Commencez avec
max. 2,2 livres (1,0 kg) de charbon de bois. Ce devrait être susamment de charbon pour cuisiner. Lorsque le charbon
brûle fortement à l’intérieur du cheminée, placez soigneusement le charbon au centre de la grille de charbon (8) du BBQ.
NOUS NE RECOMMANDONS PAS - MAIS DANS LE CAS OU VOUS UTILISEZ UN LIQUID D’ALLUMAGE:
UTILISEZ UNIQUEMENT un liquide au charbon approuvé pour allumer le charbon.
Ne pas utiliser d’essence, de kérosène, d’alcool ou d’autres matériaux inammables pour allumer du charbon. MISE EN
GARDE! N’utilisez pas alcool ou l’essence pour l’allumage ou le ré-allumage. N’utiliser que des moyens d’allumage conformes
à la norme EN 18603.
Aspergez le charbon avec un liquide d’allumage. Attendez 2 à 3 minutes pour permettre au liquide d’inltrer le charbon de
bois. Stocker le liquide d’allumage à une distance sûre du BBQ.
Étape 5
Lorsqu’il n’y a plus de ammes remarquables et que tous les charbons sont recouverts d’une cendre grise (habituellement
après 20 à 30 minutes). Réorganiser le charbon de bois, les briquettes ou le bois en plaçant soigneusement les charbons
au centre sur la grille de charbon de bois (8) du barbecue. Assurez-vous que les charbons et le bois ne s’accumulent pas
contre les parois du bol (9). Cela prolongera la vie de votre BBQ.
Étape 6
Placez la grille de cuisson (7) sur les charbons. Placez les aliments sur la
grille de cuisson (7) et fermez le couvercle maintenant (3).
MÉTHODE DE CUISSON INDIRECTE
La cuisine indirecte nécessite une mise en place où le charbon de bois est
placé de chaque côté de la nourriture. Il n’y a pas de charbon directement
sous la nourriture, de sorte que la chaleur augmente, reète par le couvercle
et les surfaces intérieures de la grille, et circule pour faire cuire la nourriture
uniformément de tous les côtés. Il n’est pas nécessaire de tourner la nourriture.
Cette méthode de cuisson indirecte est idéale pour les aliments qui
nécessitent plus de 20 à 25 min. Pour cuisiner (par exemple: rôtis, volailles
à l’os, ...), et pour les aliments délicats qui sécheront ou brûleront lorsqu’ils
seront exposés à la chaleur directe (poissons entiers, lets de poisson, ...).
Pour les aliments qui nécessitent plus d’une heure de cuisson, du charbon
supplémentaire doit être ajouté de chaque côté.
Étape 1
Placez le BBQ à l’extérieur sur une surface dure et non combustible à l’écart du surplomb du toit ou de tout matériau
combustible. Ne jamais utiliser sur du bois ou d’autres surfaces susceptibles de brûler. Placez le BBQ loin des fenêtres
ouvertes ou des portes pour empêcher la fumée d’entrer dans votre maison. Par temps venteux, placez le BBQ dans une
zone extérieure protégée contre le vent.
Étape 2
Ouvrez le couvercle (3) du barbecue et utilisez-le dans une position ouvert tout en allumant commençant le charbon de
bois.
Assurez-vous que tous les régulateurs de débit d’air (1-12) sont ouverts et libres. Pour un débit d’air approprié, retirez les
cendres accumulées des séances de barbecue précédentes sur le fond du barbecue si présent (les charbons doivent être
complètement éteints avant de les enlever). Le charbon de bois nécessite de l’oxygène pour brûler, alors assurez-vous
d’un bon ux d’air et que rien ne gênera ce ux.
Étape 3
Placez le charbon de chaque côté de la grille de charbon de bois (8) (voir photo). Assurez-vous de laisser susamment
de place pour une casserole entre le charbon de bois. Allumez le charbon de bois.
Étape 4
Allumez le charbon comme indiqué à l’étape 4 ci-dessus au chapitre“MÉTHODE DE CUISSON DIRECTE “.
Étape 5
Retirez le couvercle (3) jusqu’à ce que les charbons soient recouverts d’une cendre grise (généralement après 20 à 30
minutes). Assurez-vous que les charbons et le bois ne s’accumulent pas contre les parois du bol (9). Cela prolongera la
vie de votre BBQ. Placez un bac d’égouttement «résistant au feu» entre les charbons au centre de la grille de charbon
de bois (8).
Étape 6
Placez la grille de cuisson (7) sur les charbons. Placez la nourriture sur la grille de cuisson (7), directement au-dessus de
l’égouttoir et fermez le couvercle maintenant (3).
REMARQUE: Pour une saveur de fumée supplémentaire, envisagez d’ajouter la silure ou des morceaux de feuillus
(trempés dans de l’eau pendant au moins 30 minutes et égouttés) ou des herbes fraîches humectées comme le romarin,
le thym ou les feuilles de laurier. Placez le bois humide ou les herbes directement sur les charbons, juste avant de
commencer à cuisiner. Cela peut être utilisé en combinaison avec les deux méthodes de cuisson: direct ou indirect.
CONSEILS POUR LA SÉCURITÉ ALIMENTAIRE ET L’UTILISATION DU BBQ
• N’essayez pas de gagner du temps en plaçant des aliments sur un BBQ qui n’est pas encore prêt. Laisser brûler du
charbon de bois jusqu’à ce qu’il soit enduit de cendres gris clair.
• Commencez toujours avec une grille de cuisson bien nettoyée (7). Les aliments reposant sur les séances précédentes
devraient être éliminés par une brosse de fer ou un aluminium froissé.
• Sauf indication contraire dans la recette, ne tournez vos aliments qu’une fois, à mi-chemin du temps de cuisson.
• Un léger revêtement d’huile aidera à cuire vos aliments uniformément et à l’empêcher de coller à la grille de cuisson (7).
Toujours brosser ou pulvériser de l’huile sur vos aliments, pas sur la grille de cuisson (7).
• Ne pas décongeler la viande, le poisson ou la volaille à température ambiante. Décongeler dans le réfrigérateur ou le
four à micro-ondes.
• Ne placez jamais de nourriture sur la même assiette sur laquelle les aliments crus ont été placés.
• Lavez toutes les plats et les ustensiles de cuisine qui ont été mis en contact avec des viandes crues ou des poissons avec
de l’eau chaude et savonneuse puis rincer.
SOINS ET MAINTENANCE
➔ Après l’utilisation:
NE PAS retirer le récipient à cendres (19-20), pendant que le récipient à cendres et / ou le barbecue contiennent des
charbons CHAUDS. Patientez jusqu’à ce que les charbons aient refroidi.
Ne laissez jamais les charbons et les cendres sans surveillance dans le BBQ.
Avant que le BBQ ne soit laissée sans surveillance, les charbons et les cendres restants doivent être retirés du gril.
Soyez prudent pour vous protéger. Placez soigneusement les charbons et les cendres restants dans un récipient
métallique incombustible et saturé complètement avec de l’eau. Laisser les charbons et l’eau rester dans le récipient
métallique 1 heure avant l’élimination.
Les charbons et les cendres éteints devraient être placés à une distance de sécurité de toute structure et matériaux
combustibles.
Humidiez complètement la surface sous et autour du BBQ pour éteindre toutes les cendres, les charbons ou les
braises qui peuvent être tombées pendant la cuisson ou le nettoyage.
FRANÇAIS
FRANÇAIS
Table of contents
Languages:
Other Berghoff Grill manuals


