Milestone MHT-L1081 User manual

Thermal Label Printer
Quick Installation Guide
www.milestoneiot.com

Front View Rear View
Inside View
1
3.Paper Exit
1.Upper Cover
2.FEED Button
4.Cover Opening Key
1.Paper Guide
2.Power Interface
3.USB Interface
4.Power Switch
5.Heat Dissipation Port
1.Thermal Head Piece
2.Rubber Roller
3.Paper Guide
1
1
2
3
4
1
2
3
4
5
2
3
Note: The interface is optional or customized, and the specific interface is subject to
the actual object.
Appearance and Componrnts

2
(1) Facing the back of the machine, hold the paper guide with both hands, and adjust
the distance between the left and right guides according to the folded paper size.
(2) Insert the folded paper into the paper guide.
(3) Confirm that the printer has detected paper feeding, automatically feeds paper
and delivers paper normally.
Loading Paper

Label printer: 1 set
Printer Unpacking
Before use, make sure the accessories are included in the package(the following
picture is an example). If any thing is missing, contact the supplier or manufacturer.
Power cord: 1 pcs
Quick installation guide: 1 pcs
The pictures are for reference only, please subject to practicality.
3
Power adapter Power cord
USB cable: 1 pcs
Quick Installation Guide
Main machine
Power adapter: 1 pcs
USB cable
Printer Unpacking

4
(1) Confirm that the power switch is in off (0) state.
(2) Connect the power adapter to the printer.
(3) Connect the power line to the power adapter.
Use the special power adapter for the printer.
The connection diagram is as follows:
Connect the power line
(4) Connect the other end of the power line to a nearby socket.
(1) Connect the USB cable to the printer.
(2) Connect the USB cable to the PC host.
(3) Turn the power switch to on (I) state.
Connect the USB cable
Switch onSwitch off
Connect to the PC host
Printer UnpackingConnecting the Printer

5
Connect the printer and the computer, and turn on the printer power.
Open the printer driver
Printer UnpackingWindows Driver Installation

5Open computer settings --> Devices --> Devices and printers.
5
6
The driver has been successfully installed,piease click Finish to close the page.

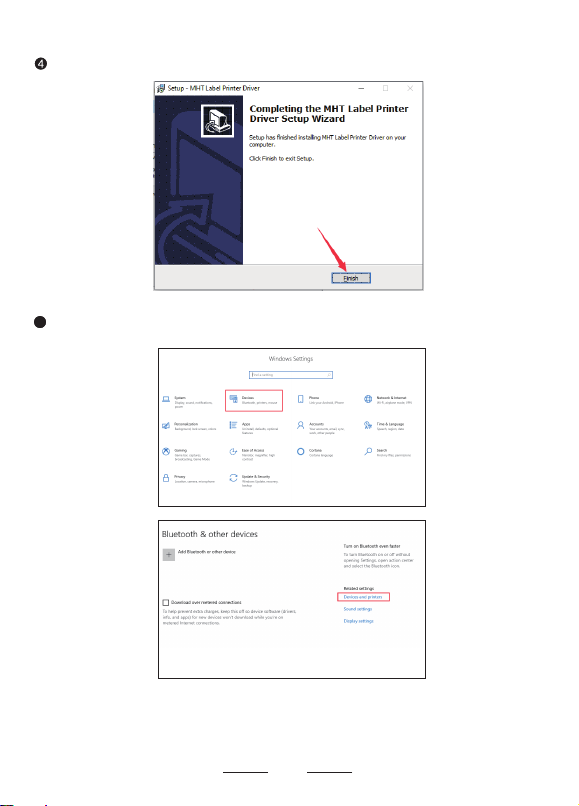
6Find the MHT-L1081 printer and set it as the default printer. And change the
properties of the printer, such as paper size. But we recommend
using 4x6" or 100*150mm paper size for better printing results.
At this step, you have fully installed the printer, then please open the document and
try to print a test. Please use 4x6 labels and open the test document "USPS Test1.
pdf" attached to the USB flash drive. Please select 4x6" or 100*150mm for the
print preview paper size. (Attention, if you encounter unable to print, please turn
off the printer power and restart the printer).
7
7

Open The Pinter Driver.
If the computer prompts that the document cannot be verified, please open "Security
and Privacy", agree to open the driver document, and continue the installation.
8
Printer UnpackingMac OS Driver Installation
1

9
Open System Preferences
Click Security&Privacy
3
2

10
Click Open Anyway
Click Open
5
4

Back to the installation step, this step will verify the account security, enter the
computer password or fingerprint to continue the installation.
11
Click Contine
Enter computer password
3
2
1

At this step, the driver has been installed correctly, then we add the printer to
the computer. Open “printers & scanners”, Add a Milestone MHT-L1081 Thermal
Label Printer.
12
The driver has been installed
please close the interface.
successfully,
Click Printer & Scanners.
Click"+" to add a Printer.
4
1
2

13
Select the Printer
Model MHT-L1081.
OK, the printer has been
installed successfully.
3
4
At this step, you have fully installed the printer, then please open the document
and try to print a test. Please use 4x6 labels and open the test document
"USPS Test1.pdf" attached to the USB flash drive. Please select 4x6" or 100*150mm
for the print preview paper size. (Attention, if you encounter unable to print, please
turn off the printer power and restart the printer)
5

14
Printer UnpackingFrequently Asked Questions

15

16
USB
DC 24V 2.5A
Power adapter
Working environment
Storage environment Storage temperature:-10 ~ 60°C,
Storage humidity: 10 ~ 90%
Printing paper width
Effective resolution
Thickness of printing paper
Effective printing width
Character size
Printing method
Printing speed
Interface type
Paper loading method
Paper type
Operating temperature: 0 ~ 45°C,
Operating humidity: 20 ~ 90%
Thermal line printer
Easy paper loading/auto paper feeding
Actual speed detection:150mm/s
104mm
203 dpi (300 dpi optional)
Continuous paper, label paper, black label paper
Min 38mm Max 112mm
ASCII Font A: 12x24 ASCII
Font B: 9x17 Chinese character 24x24
0.06-0.18mm
Printer UnpackingProduct Specification List

17
2 Sounds
Scenarios
Power Off
Standby
Open the cover
Standby
Continuous printing process
Pause printing
Button operation
Press and hold + turn on the printer
Press and hold 3s
Press and hold 10s
Press
Press
Press
Corresponding functions
Print self-test page
Enter label specification learning mode
Restore factory settings
Automatically feed one blank label sheet
Pause printing
Continue printing
Indicator status
Indicator always lights up
Indicator flashes
Buzzer alarm (common)
Status description
Normal standby
Buzzer alarm
Printer mechanism error
Paper shortage error
Overheating error
Cover opening error
Seam label error
3 Sounds
5 Sounds
6 Sounds
7 Sounds
Function description of buttons
Indicator description
Printer UnpackingKeys and Indicators

18
(1) Confirm that the printer is connected to power supply and the paper roll
is loaded correctly.
(2) Confirm that the printer is turned off and the top cover is closed in place.
(3) Press and hold the FEED button, then press the POWER button to turn
on the printer; release the button after the printer is turned on.
The self-test method is as follows:
When the printer is initially installed or there are any problems with the printer,
you can run self-test program to confirm the following status firmware version,
printer parameter setting status, print quality, and related setting information of
external devices, etc. After confirming that there is no problem with the printer
after the self-test, please check other devices or software. This function runs
ndependently of other devices or software.
(1) To install Windows driver, please refer to "Driver Installation Instruction".
(2) Set the "port" of the Windows driver as the appropriate interface to use.
Print the test page with the "Print test page" function of Windows driver.
Printer UnpackingPrinter UnpackingPrint Self-Test PagePrint Self-Test Page
Printer UnpackingPrinter UnpackingPrint with the Window Driver

1
The table below shows common problems and solutions for operators.
If you have followed the simple troubleshooting methods but the printer is still not
functioning properly, please contact the customer service department of your dealer
for assistance.
Incorrect positioning
Fault Phenomenon Cause Solution
POWER indicator is off
a. The AC plug and the power supply
plug are not properly connected to
the printer socket.
a. Check the power connection and confirm
that the AC plug and the power supply plug
are properly connected to the printer socket.
b. Turn on the printer.
Unable to print a. The communication cable is not properly
connected to the printer and PC host.
b. Communication interface setting error.
c. Print status error.
a. Reconnect the communication cable.
Incomplete print content a. The paper is not centered. a. Adjust the paper position.
b. Set the correct label size.
a. Label learning is not performed.
b. Seam label detection photocoupler
is offset.
c. Wrong mode selected.
a. Label learning is performed.
b. Open the cover to confirm whether the seam
label detection component is offset.
For black label paper, move the seam label
detection component according to the black
label position so that the detection
photocoupler can detect the black label.
Label paper/continuous paper: The detection
photocoupler must be in the paper range.
c. Use the setting tool to open the printer
information and confirm whether the paper
type is the same as the paper loaded
in the printer, which can be changed by using
the setting tool.
Poor print result
a. Paper loading error.
b. Print density/speed setting error.
c. Print head/rubber roller has dust
or adhesive accumulation.
d.The print head is damaged.
a. Reload the paper.
b. Readjust the print density/speed of printer
by using the setting tool or the software.
Printing density can be coarsely tuned with
the setting tool and finely tuned with the driver.
c. Clean the print head/rubber roller.
(refer to 8.1 "Cleaning Print Head"/8.2 "
Cleaning Sensor"/8.3 "Cleaning Printing
Rubber Roller" of the Manual.)
d. Use the setting tool to detect bad point
of head piece. If the print head is damaged,
please contact the customer service
department of your dealer for repairs.
b.The printer power switch is not on.
b. Label size setting is incorrect.
9
Troubleshooting
Table of contents