Milli Pure Twin Rail User manual
Page 1 of 2
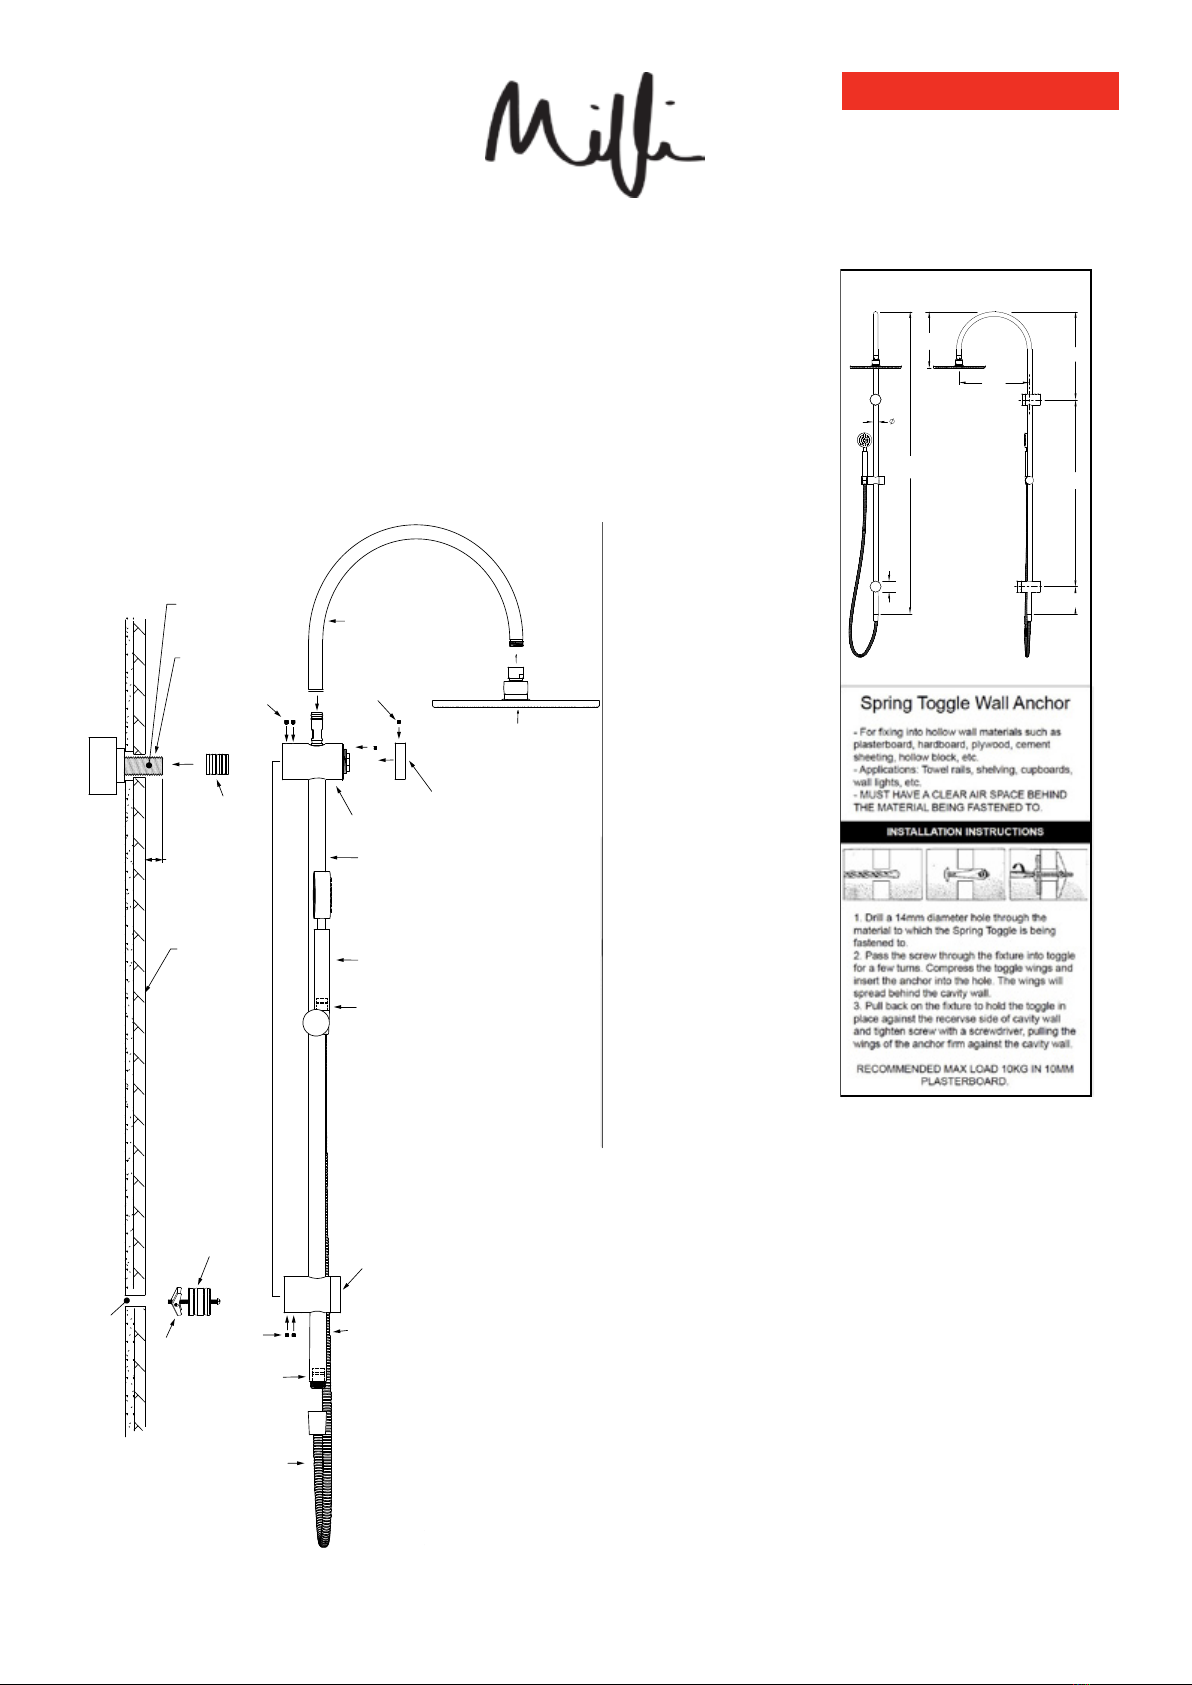
Shower
Hose
Shower
Hose
Extension
Check Valve
1/2" BSP
Lugged Elbow
Water Feed
FINISHED WALL
Apply Sealant
Inlet
Fitting
15-20mm
Diverter Body
x2 Set
Screws
To Suit
Toggle
Wall
Anchor
Fixing Body
Shower Arm
Slide Rail
Noggin
Hand Shower
Shower Head
Twin Shower
Check Valve
PRE-ASSEMBLED
Toggle
Anchor
Wall Fixing
Use 10mm Allen
Key To Fit
FIT OFF
- The Rail is supplied part preassembled to suit a Top Water
Inlet installation.
- FOR BOTTOM WATER INLET INSTALLATION SEE PAGE 2.
- Remove Inlet Fitting and Wall Fixing by loosening the Set
Screws.
- Accurately mark out and drill for the Wall Fixing 900mm from
centre of Water Feed (see Spring Toggle Wall Anchor guide).
- Ensure the wall penetration is sealed prior to connecting any
fittings.
- Apply thread tape or appropriate sealant to Water Feed
Thread and attach Inlet Fitting using 10mm Allen key.
- Using the provided Spring Toggle Anchor attach the Wall
Fixing.
- Fit the Rail Shower as assembled onto the Wall Fixing and Inlet
Fixing, secure by tightening the Set Screws.
- Remove the Diverter Body Cover Plate by loosening top Set
Screw.
- Align and fit the Shower Arm.
- Secure Shower Arm by tightening Set Screws.
- Attach Shower Head.
- Test function and water flow on both Shower Head and Hand
Shower.
- Check for water leaks.
Diverter Body
Coverplate
Set
Screws
x2 Set
Screws
22
54
1455
270
340
425
900
130
Shower
Hose
Shower
Hose
Extension
Check Valve
1/2" BSP
Lugged Elbow
Water Feed
FINISHED WALL
Apply Sealant
Inlet
Fitting
15-20mm
Diverter Body
x2 Set
Screws
To Suit
Toggle
Wall
Anchor
Fixing Body
Shower Arm
Slide Rail
Noggin
Hand Shower
Shower Head
Twin Shower
Check Valve
PRE-ASSEMBLED
Toggle
Anchor
Wall Fixing
Use 10mm Allen
Key To Fit
FIT OFF
- The Rail is supplied part preassembled to suit a Top Water
Inlet installation.
- FOR BOTTOM WATER INLET INSTALLATION SEE PAGE 2.
- Remove Inlet Fitting and Wall Fixing by loosening the Set
Screws.
- Accurately mark out and drill for the Wall Fixing 900mm from
centre of Water Feed (see Spring Toggle Wall Anchor guide).
- Ensure the wall penetration is sealed prior to connecting any
fittings.
- Apply thread tape or appropriate sealant to Water Feed
Thread and attach Inlet Fitting using 10mm Allen key.
- Using the provided Spring Toggle Anchor attach the Wall
Fixing.
- Fit the Rail Shower as assembled onto the Wall Fixing and Inlet
Fixing, secure by tightening the Set Screws.
- Remove the Diverter Body Cover Plate by loosening top Set
Screw.
- Align and fit the Shower Arm.
- Secure Shower Arm by tightening Set Screws.
- Attach Shower Head.
- Test function and water flow on both Shower Head and Hand
Shower.
- Check for water leaks.
Diverter Body
Coverplate
Set
Screws
x2 Set
Screws
22
54
1455
270
340
425
900
130
Installation Instructions
Milli Pure Twin Rail Shower (top inlet)
INSTALLATION GUIDE
Tapware is to be installed by a Licenced Plumber in
accordance with AS/NZS 3500:2003
Recommended working water pressure 300-500kpa.
Maximum water temperature is 65 deg.C.
Plumbers, please ensure a copy of the Installation
Instructions are left with the end user for future reference
Fit Off
- The Rail is supplied part preassembled to suit a Top Water Inlet installation.
- FOR BOTTOM WATER INLET INSTALLATION SEE PAGE 2.
- Remove Inlet Fitting and Wall Fixing by loosening the Set Screws.
- Accurately mark out and drill for the Wall Fixing 900mm from centre of
Water Feed (see Spring Toggle Wall Anchor guide).
-Ensurethewallpenetrationissealedpriortoconnectinganyttings.
- Apply thread tape or appropriate sealant to Water Feed Thread and attach
Inlet Fitting using 10mm Allen key.- Using the provided Spring Toggle
Anchor attach the Wall Fixing.
- Fit the Rail Shower as assembled onto the Wall Fixing and Inlet Fixing,
secure by tightening the Set Screws.
- Remove the Diverter Body Cover Plate by loosening top Set Screw.
-AlignandttheShowerArm.
- Secure Shower Arm by tightening Set Screws.
- Attach Shower Head.
-TestfunctionandwaterowonbothShowerHeadandHandShower.
- Check for water leaks.

Page 2 of 2
Shower Hose
Extension
Diverter
Body
Slide Rail
Hand Shower
Diverter Body
Coverplate
Set
Screws
Fixing Body
Coverplate
Set
Screws
Fixing
Body
Shower Hose
Extension
Slide Rail
Hand Shower
Diverter Body
Coverplate
Set
Screws
Fixing Body
Coverplate
Set
Screws
- Swap the Diverter Body and Fixing Body positions.
- Diverter body will now be located at the bottom.
- Fixing body will now be located at the top.
-The Diverter Body will now
be located at the bottom.
-Rotate the Diverter Body
180 degrees to fit the
mating parts.
Shower Hose
Extension
Diverter
Body
Slide Rail
Hand Shower
Diverter Body
Coverplate
Set
Screws
Fixing Body
Coverplate
Set
Screws
Shower Arm
Shower Head
Shower Hose
Extension
Slide Rail
Hand Shower
Diverter Body
Shower Arm
Shower Head
1/2" BSP
Lugged Elbow
Water Feed
FINISHED WALL
Apply Sealant
Inlet
Fitting
15-20mm
To Suit Toggle
Wall Anchor
Noggin
Toggle
Anchor
Wall Fixing
Use 10mm Allen
Key To Fit
- Proceed with installation fit off (see page 1)
1. 2.
3. 4.
- Remove Diverter and Fixing Body coverplates by
loosening Set Screws.
- Loosen Set Screws and detach Diverter Body and Fixing
Body from slide rail.
-The Fixing Body will now
be located at the top.
-Rotate the Fixing Body
180 degrees to fit the
mating parts.
- Re-attach the Fixing Body and the Diverter Body to
Slide rail. Tighten Set Screws.
- Re-attach Shower Hose Extension. Tighten Set Screws.
- Attach Shower Arm and Head. Align Shower Arm and
Tighten Set Screws
- Re-attach Coverplates.
Fixing Body
x2 Set
Screws
x2 Set
Screws
Installation Instructions
Milli Pure Twin Rail Shower (bottom inlet)
Plumbers, please ensure a copy of the Installation
Instructions are left with the end user for future reference
Other Milli Bathroom Fixture manuals


Popular Bathroom Fixture manuals by other brands

Laufen
Laufen ILBAGNOALESSI ONE 8.1897.1 Mounting instructions

PALAZZANI
PALAZZANI SOFFIONI 9926H4 Assembly and maintenance instructions

Gessi
Gessi VIA MANZONI 39300 manual

Black & Decker
Black & Decker Pfister Treviso 48 Series manual

PEERLESS
PEERLESS PTT188733 Series manual

Anzzi
Anzzi EDAN SP-AZ024 install guide


Porcelanosa
Porcelanosa noken BEND 100223953 N720000154 installation instructions

Gainsborough
Gainsborough GSME installation guide

Fantini Rubinetti
Fantini Rubinetti Icona Classic R504WU instructions

Helpmation
Helpmation GFS-302 manual

Hans Grohe
Hans Grohe Finoris 230 76060 Series Instructions for use/assembly instructions

Sanifun
Sanifun JACOPO Assembly and maintenance instructions