Milltronics ACCUMASS BW500 User manual

ACCUMASS BW500
Instruction Manual PL-565 January 2001
ACCUMASS BW500
33455650
Rev. 1.2

© Siemens Milltronics Process Instruments Inc. 2001
Safety Guidelines
Warning notices must be observed to ensure personal safety as well as that of others, and to protect the product and the connected equipment.
These warning notices are accompanied by a clarification of the level of caution to be observed.
Qualified Personnel
This device/system may only be set up and operated in conjunction with this manual. Qualified personnel are only authorized to install and
operate this equipment in accordance with established safety practices and standards.
Warning:This product can only function properly and safely if it is correctly transported, stored, installed, set up, operated, and maintained.
Note: Always use product in accordance with specifications.
Copyright Siemens Milltronics Process
Instruments Inc. 2000. All Rights Reserved
Disclaimer of Liability
This document is available in bound version and in
electronic version. We encourage users to purchase
authorized bound manuals, or to view electronic versions as
designed and authored by Siemens Milltronics Process
Instruments Inc. Siemens Milltronics Process Instruments
Inc. will not be responsible for the contents of partial or
whole reproductions of either bound or electronic versions.
While we have verified the contents of this
manual for agreement with the instrumentation
described, variations remain possible. Thus we
cannot guarantee full agreement. The contents of
this manual are regularly reviewed and
corrections are included in subsequent editions.
We welcome all suggestions for improvement.
Technical data subject to change.
MILLTRONICS®is a registered trademark of Siemens Milltronics Process Instruments Inc.
Contact SMPI Technical Publications at the following address:
Technical Publications
Siemens Milltronics Process Instruments Inc.
1954 Technology Drive, P.O. Box 4225
Peterborough, Ontario, Canada, K9J 7B1
Email: techpubs@milltronics.com
For the library of SMPI instruction manuals, visit our Web site: www.milltronics.com

PL-565 Accumass BW500 Page 3
Table of Contents
About this….................................................................................................................7
About This Manual ...........................................................................................7
About the Accumass BW500 ...........................................................................8
Accumass BW500 features: ......................................................................8
Specifications..............................................................................................................9
Installation .................................................................................................................13
Dimensions ....................................................................................................13
Optional Plug-ins............................................................................................14
SmartLinx®Module ..................................................................................14
mA I/O board ...........................................................................................15
Layout ............................................................................................................16
Interconnection ..............................................................................................17
System Diagram......................................................................................17
Scale – One Load Cell ............................................................................18
Scale – Two Load Cell ............................................................................19
Scale – Four Load Cell............................................................................20
Scale – LVDT ..........................................................................................21
Speed.............................................................................................................22
Constant Speed (No Sensor) ..................................................................22
Speed Sensor..........................................................................................22
Auxiliary Inputs...............................................................................................23
Auto Zero .......................................................................................................23
RS-232 Port 1 ................................................................................................23
Printers ....................................................................................................23
Computers and Modems .........................................................................24
Remote Totalizer............................................................................................24
mA Output 1...................................................................................................24
Relay Output ..................................................................................................25
RS-485 Port 2 ................................................................................................25
Daisy Chain .............................................................................................25
Terminal Device ......................................................................................25
RS-232 Port 3 ................................................................................................26
Power Connections........................................................................................26
mA I/O Board .................................................................................................27
Installing/Replacing the Memory Back-up Battery.........................................27
Start Up ......................................................................................................................29
Orientation .....................................................................................................29
Display and Keypad ................................................................................29
Program Mode ...............................................................................................30
General....................................................................................................30
Run Mode ................................................................................................31
Initial Start Up ................................................................................................32
Power Up.................................................................................................32
Programming...........................................................................................32
Load Cell Balancing .......................................................................................35
Typical two load cell belt scale................................................................35
Zero Calibration.......................................................................................38
Span Calibration......................................................................................39
Run Mode ................................................................................................40

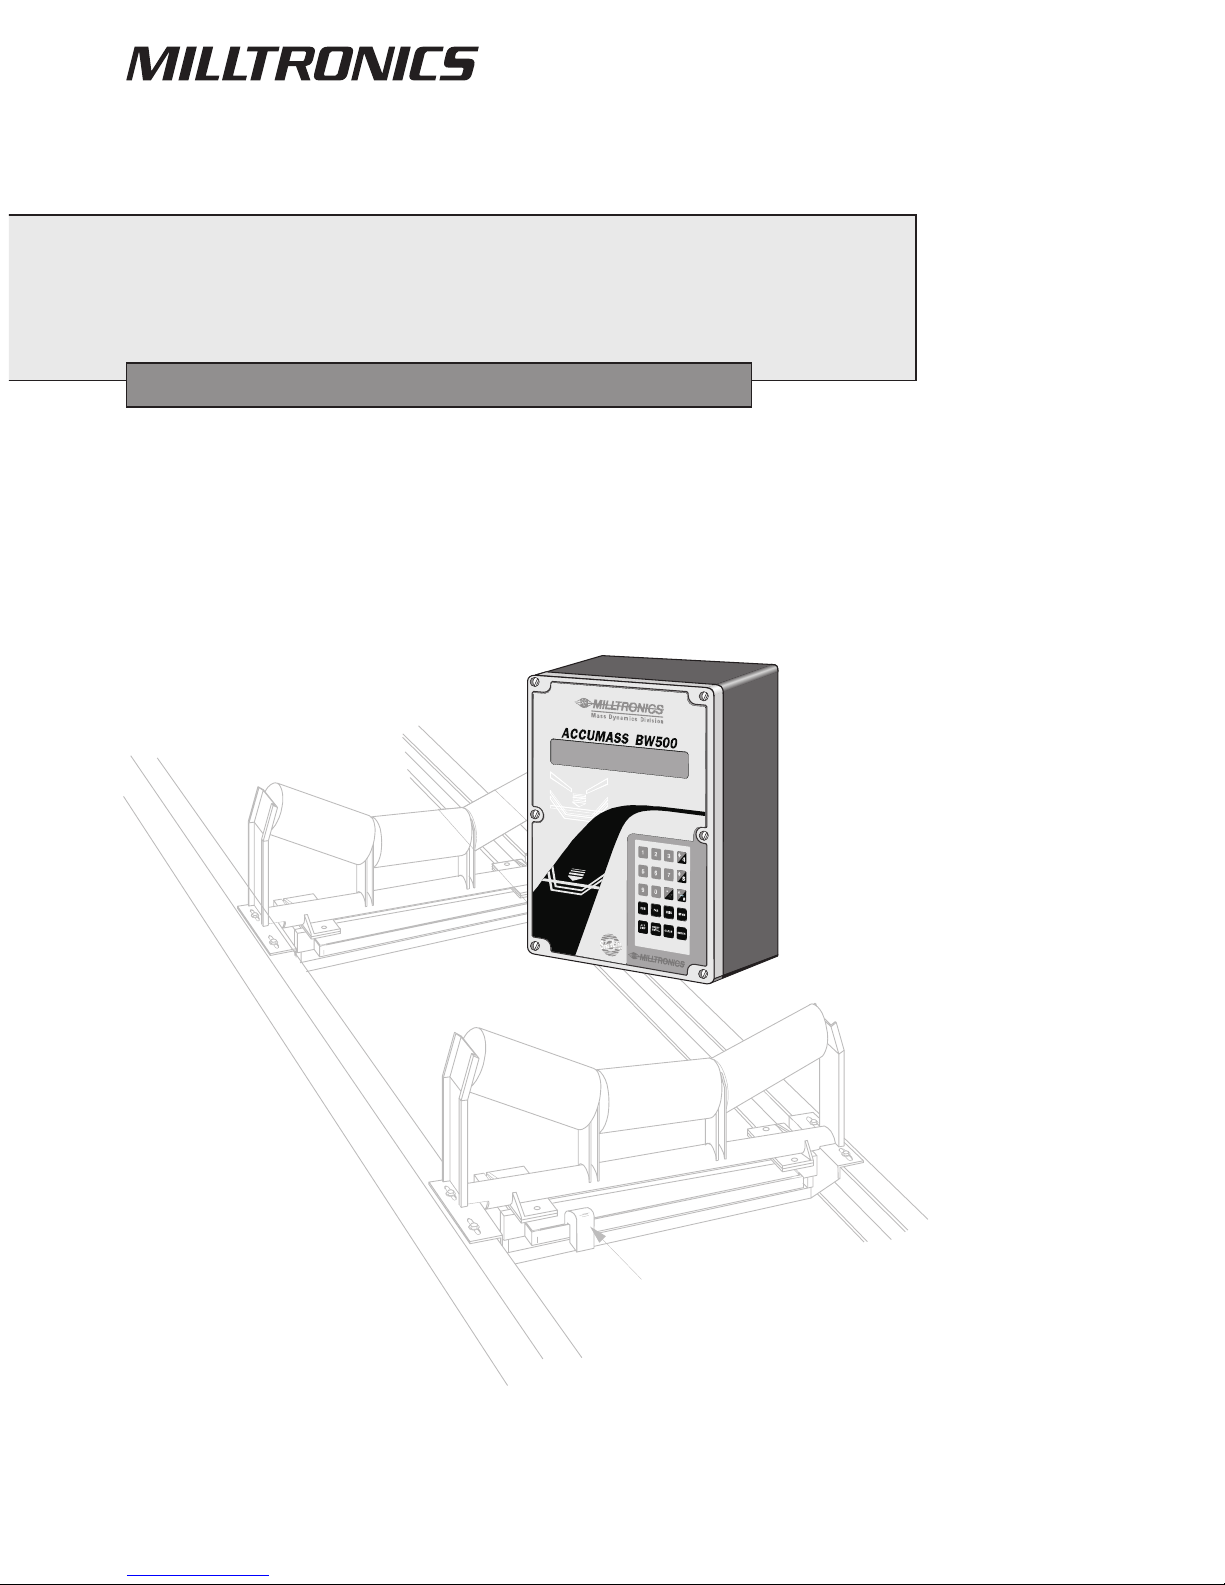
Page 4 Accumass BW500 PL-565
Recalibration .............................................................................................................41
Belt Speed Compensation .............................................................................41
Material Tests ................................................................................................42
% Change................................................................................................42
Material Test............................................................................................44
Design Changes ............................................................................................44
Recalibration ..................................................................................................45
Routine Zero............................................................................................45
Initial Zero................................................................................................46
Direct Zero...............................................................................................46
Auto Zero.................................................................................................47
Routine Span...........................................................................................47
Initial Span...............................................................................................49
Direct Span..............................................................................................50
Multispan .................................................................................................50
Factoring ........................................................................................................53
Linearization...................................................................................................54
Parameter Description..............................................................................................57
Start Up (P001 to P017) ................................................................................58
Relay/Alarm Function (P100 - P117) .............................................................62
mA I/O Parameters (P200 - P220).................................................................65
Calibration Parameters (P295 –360) ............................................................69
Linearization Parameters (P390 - P392) .......................................................72
Proportional Integral Derivative (PID) Control Parameters, (P400 –P418) .......73
Batch Control (P560 –P568).........................................................................76
Totalization (P619 - P648) .............................................................................78
ECal Parameters (P693 –P698) ...................................................................81
Communication (P750 - P792) ......................................................................84
P750 –P769 SmartLinx®Module Specific Parameters...........................84
P770 –P789 Local Port Parameters.......................................................84
Test and Diagnostic (P900 - P951)................................................................85
Operation ...................................................................................................................89
Load Sensing .................................................................................................89
Speed Sensing...............................................................................................89
Modes of Operation .......................................................................................89
Damping.........................................................................................................90
mA I/O (0/4-20 mA)........................................................................................91
Output......................................................................................................91
Input.........................................................................................................91
Relay Output ..................................................................................................91
Totalization.....................................................................................................92
PID Control ................................................................................................................95
Hardware .......................................................................................................95
Connections ...................................................................................................95
Setpoint Controller –Rate Control ..........................................................96
Setpoint Controller –Load Control..........................................................96
Setpoint Controller –Master/Slave Control.............................................97
Setpoint Controller –Rate and Load Control ..........................................98
Setup and Tuning...........................................................................................98
Proportional Control (Gain), P.................................................................98
Integral Control (Automatic Reset), I.......................................................99

PL-565 Accumass BW500 Page 5
Derivative Control (Pre-Act or Rate), D...................................................99
Feed Forward Control, F.......................................................................100
PID Setup and Tuning..................................................................................100
Initial Start-Up........................................................................................100
Programming ...............................................................................................103
Batching...................................................................................................................107
Connections .................................................................................................107
Typical Ladder Logic .............................................................................107
Programming ...............................................................................................108
Operation .....................................................................................................109
Pre-act Function ....................................................................................109
Certification .............................................................................................................111
Communications.....................................................................................................113
BW500 and SmartLinx®...............................................................................114
Connection...................................................................................................114
Wiring Guidelines ..................................................................................114
Configuring Communication Ports ...............................................................115
P770 serial protocols.............................................................................115
P771 protocol address ..........................................................................116
P772 Baud Rate ....................................................................................116
P773 Parity ............................................................................................116
P774 data bits .......................................................................................117
P775 stop bits........................................................................................117
P778 modem attached ..........................................................................117
P779 modem idle time...........................................................................117
P780 RS-232 transmission interval.......................................................118
P781 data message ..............................................................................118
Dolphin Protocol...........................................................................................120
Dolphin Plus Screen Shot .....................................................................120
Modbus RTU/ASCII Protocol .......................................................................121
How Modbus Works ..............................................................................121
Modbus RTU vs. ASCII .........................................................................122
Modbus Format .....................................................................................122
Modbus Register Map ...........................................................................123
Modbus Register Map (cont’d) ..............................................................125
Modems.................................................................................................133
Error Handling .......................................................................................135
Troubleshooting......................................................................................................137
Generally ...............................................................................................137
Specifically.............................................................................................137
Error Codes..................................................................................................138
Appendices..............................................................................................................139
Memory Backup ...........................................................................................139
Software Updates ........................................................................................139
Calibration Criteria .......................................................................................139
Zero: ......................................................................................................139
Span: .....................................................................................................139
PID Systems:.........................................................................................139

Page 6 Accumass BW500 PL-565

PL-565 Accumass BW500 Page 7
About this…
About this…
About This Manual
It is essential that this manual be referred to for proper installation and operation of
your BW500 belt scale integrator. As BW500 must be connected to a belt scale, and
optionally a speed sensor, refer to their manuals as well.
Installation gives you step by step instructions for the installation
and interconnection of your BW500.
Start Up instructs you on how to operate the keypad, read the
display, do an initial Start Up for a successful entry into
the run mode.
Recalibration emphasizes how to optimize and maintain accurate
operation of your weighing system through material tests
and routine recalibrations.
Operation offers an overview of the BW500 features and functions
that allow you to take full advantage of your weighing
system.
Parameters lists the parameters available to you, with a description
of their function and use. You are urged to read this
section; to familiarize yourself with the parameters
available to you and optimizes BW500 to maximum
performance.
Appendices this manual has an alphabetical cross reference of the
parameters to their numbers, a diagnostic help with the
list of error messages, a maintenance reminder, and a
record sheet for jotting down parameter values.

Page 8 Accumass BW500 PL-565
About this…
About the Accumass BW500
Note:
The ACCUMASS BW500 is to be used only in the manner outlined in this
instruction manual.
The ACCUMASS BW500 is a microprocessor based integrator designed for use with
Milltronics, or equivalent belt scales and weigh feeders. The speed and load signals
from the conveyor and scale, respectively, are processed to derive rate of material
flow, and totalization. The primary values of speed and load, and the derived values
of rate and total are available for display on the local LCD, or as output in the form of
analog mA, alarm relay and remote totalization.
BW500 supports Milltronics Dolphin Plus software and Modbus protocol on the two
RS-232 ports and the RS-485 port for communication to customer PLC or computer.
BW500 also supports Milltronics SmartLinx®for communication with popular
industrial communication systems.
Accumass BW500 features:
•Reliable and robust user interface
✔multi-field LCD display
✔local keypad
•Instrumentation I/O
✔two remote totalizer contacts
✔five programmable relays
✔five programmable discrete inputs
✔two programmable isolated mA input, for PID* control
✔three programmable isolated mA output for rate, load, speed or PID* control
•popular Windows®and Industrial communications
✔two RS-232 ports
✔one RS-485 port
•individual port configuration for:
✔Dolphin
✔Modbus ASCII
✔Modbus RTU
✔Printer
✔SmartLinx®compatible
•Controls and operation functions
✔load linearization
✔auto zero
✔PID* control
✔batch control
✔multispan operation
*PID control requires the optional mA I/O board.

PL-565 Accumass BW500 Page 9
Specifications
Specifications
Power:100/115/200/230 V ac ±15%, 50/60 Hz, 31 VA
fuse, FU1: 2AG, Slo Blo, 2 A, 250 V or equivalent
Application:compatible with Mass Dynamics belt scales or equivalent 1, 2 or 4 load cell
scales.
compatible with LVDT equipped scales, with use of optional interface board
Accuracy:0.1% of full scale
Resolution:0.02% of full scale
Environmental:location: indoor / outdoor
altitude: 2000 m max
ambient temperature: -20 to 50 °C (-5 to 122 °F)
relative humidity: suitable for outdoor (Type 4X / NEMA 4X /IP 65
enclosure)
Installation category: II
pollution degree: 4
Enclosure:Type 4X / NEMA 4X / IP 65
285 mm W x 209 mm H x 92 mm D (11.2”W x 8.2”H x 3.6”D)
polycarbonate
Programming:via local keypad and/or Dolphin Plus interface
Display:illuminated 5 x 7 dot matrix liquid crystal display with 2 lines of 40
characters each
Memory:program stored in non-volatile FLASH ROM, upgradable via Dolphin Plus
interface
parameters stored in battery backed RAM,
battery P/N 20200035 or use Rayovac #BR2335, 3V, Lithium or equivalent,
5 year life
Inputs:load cell: 0 - 45 mV dc per load cell
speed sensor: pulse train: 0 V low, 5-15 V high, 1 to 2000 Hz,
or
open collector switch,
or
relay dry contact
auto zero: dry contact from external device
mA see optional mA I/O board
auxiliary 5 discrete inputs for external contacts, each
programmable for either: display scrolling,
totalizer 1 reset, zero, span, multispan, print,
batch reset, or PID function.

Page 10 Accumass BW500 PL-565
Specifications
Outputs:mA: 1 programmable 0/4 - 20 mA, for rate, load and
speed output
optically isolated
0.1% of 20 mA resolution
750 Ωload max
see optional mA I/O board
load cell: 10 V dc compensated excitation for strain gauge
type, 4 cells max, 150 mA max
speed sensor: 12 V dc, 150 mA max excitation
remote totalizer 1: contact closure 10 - 300 ms duration
open collector switch rated 30 V dc, 100 mA max
remote totalizer 2: contact closure 10 - 300 ms duration
open collector switch rated 240 V ac/dc, 100 mA
max
relay output: 5 alarm/control relays, 1 form 'A' SPST relay
contact per relay, rated 5 A at 250 V ac, non-
inductive
Communications:two RS-232 ports
one RS-485 port
SmartLinx®compatible (see options)
Cable:one load cell:
non-sensing: Belden 8404, 4 wire shielded, 20 AWG or
equivalent, 150 m (500 ft) max
sensing: Belden 9260, 6 wire shielded, 20 AWG or
equivalent, 300 m (1000 ft) max
two / four* load cells:
non-sensing: Belden 9260, 6 wire shielded, 20 AWG or
equivalent, 150 m (500 ft) max
sensing: Belden 8418, 8 wire shielded, 20 AWG or
equivalent, 300 m (1000 ft) max
*for four load cell scale, run two separate cables of two load cell configuration
speed sensor: Belden 8770, 3 wire shielded, 18 AWG or
equivalent, 300 m (1000 ft)
auto zero: Belden 8760, 1 pair, twisted/shielded, 18 AWG,
300 m (1000 ft) max
remote total Belden 8760, 1 pair, twisted/shielded, 18 AWG,
300 m (1000 ft) max
Options:Speed Sensor: Mass Dynamics MD-36 / 36A / 256 or 2000A, or
RBSS, or compatible
Dolphin Plus: Milltronics Windows based software interface.
Refer to associated product documentation
SmartLinx®Modules: protocol specific modules for interface with
popular industrial communications systems.
Refer to associated product documentation.

PL-565 Accumass BW500 Page 11
Specifications
Mass Dynamics Incline Compensator:
for load cell excitation compensation on variable
incline conveyors
mA I/O board:
inputs: 2 programmable 0/4 –20 mA for PID, control
optically isolated
0.1% of 20 mA resolution
200 Sinput impedance
outputs: 2 programmable 0/4 –20 mA for PID control,
rate, load and speed output
optically isolated
0.1% of 20 mA resolution
750 Sload max
output supply isolated 24 V dc at 50 mA, short circuit protected
LVDT interface card: for interface with LVDT based scales
Weight 2.6 kg (5.7 lb.)
Approvals:CE*, CSA NRTL/C
*EMC performance available upon request

Page 12 Accumass BW500 PL-565
Specifications

PL-565 Accumass BW500 Page 13
Installation
Installation
Notes:
1. Installation shall only be performed by qualified personnel, and in accordance
with local governing regulations.
2. This product is susceptible to electrostatic shock. Follow proper grounding
procedures.
Dimensions
3. Non metallic enclosure does not provide grounding between connections.
Use grounding type bushings and jumpers.
Conduit entry area.
Recommend drilling the enclosure with
a hole saw and the use of suitable
cable glands to maintain ingress rating.
209 mm
(8.2”)
172 mm
(6.8”)
92 mm
(3.6”)
285 mm
(11.2”)
267 mm
(10.5”)
lid screws
(6 places)
16 mm
(0.6”)
lid
enclosure
customer
mounting screw
mounting hole
(4 places)

Page 14 Accumass BW500 PL-565
Installation
Optional Plug-ins
SmartLinx®Module
The BW500 is software/hardware ready to accept the optional Milltronics SmartLinx®
communications module that provides an interface to one of several popular
industrial communications systems.
Your BW500 may be shipped to you without a SmartLinx®module, for installation at a
later date.
If you are ready to install your SmartLinx®module, or want to change it, please follow
the instructions as outlined.
Installation
1. Isolate power and voltages applied to the BW500
2. Open the lid
3. Install the module by mating the connectors and secure in place using the two screws
provided.
4. Route communication cable to SmartLinx®module along the right side of the
enclosure wall. This route will reduce communication.
Note:
Refer to the SmartLinx®module documentation for any required hardware settings
prior to closing the lid.
5. Close the lid
6. Apply power and voltage to the BW500.
Refer to:
•SmartLinx®Module in the Specifications section on page 14,
•P750 –P769 SmartLinx®Module Specific Parameters on page 84 in this manual,
•the SmartLinx®manual for wiring.

PL-565 Accumass BW500 Page 15
Installation
mA I/O board
The BW500 is software/hardware ready to accept the optional mA I/O board. The
mA I/O board provides 2 programmable 0/4-20 mA outputs, 2 programmable 0/4-20
mA inputs and a nominal 24V dc supply for loop powered devices.
Your BW500 may be shipped to you without an mA I/O board, for installation at a
later date.
If you are ready to install your mA I/O board, please follow the instructions as
outlined.
Installation
1. Isolate power and voltages applies to the BW500
2. Open the lid
3. Install the board by mating the connectors and secure the card in place using the 3
screws provided.
4. Close the lid
5. Apply power and voltage to the BW500.
Refer to:
•Specifications on page 9
•mA I/O board on page 15
•mA I/O Parameters (P200 - P220) on page 65
•mA I/O (0/4-20 mA) in the Operation section on page 91
SmartLinx®
mA I/O board
route SmartLinx®cable
along right hand wall

Page 16 Accumass BW500 PL-565
Installation
Layout
*To reduce communication interference, route SmartLinx®cable along right side of
enclosure wall.
•All field wiring must have insulation suitable for at least 250 V.
•dc terminals shall be supplied from SELV source in accordance with IEC
10101-1 Annex H.
•Relay contact terminals are for use with equipment having no accessible live
parts and wiring having insulation suitable for at least 250 V
•The maximum allowable working voltage between adjacent relay contact shall
be 250 V.
certification
switch
optional
Analog I/O
board
battery,
memory
back up
optional SmartLinx®module*
display
board
power
switch
port 3
(RJ-11)
fuse
FU1

PL-565 Accumass BW500 Page 17
Installation
Interconnection
Note:
Wiring may be run via common conduit. However these may not be run in the
same conduit as high voltage contact or power wiring. Ground shield at one point
only. Insulate at junctions to prevent inadvertant grounding.
System Diagram
Note:
Typical system capability. Not all components or their maximum quantity may be
required.
belt scale,
see Specifications
speed sensor,
optional,
see Specifications
customer remote
totalizer
mA input from
customer device
relay output, to
customer device
ACCUMASS
BW500
optional SmartLinx ®
optional analog I/O
mA output to
customer device
mA output to
customer device
optional fieldbus
connection
communication
ports can be
configured for
Milltronics
Dolphin, print
data, or Modbus
ASCII or RTU
protocol
auxiliary inputs

Page 18 Accumass BW500 PL-565
Installation
Scale –One Load Cell
*Where separation between the BW500 and belt scale exceeds 150 m (500 ft), or legal for trade
certification:
•remove the jumpers BW500 terminal 11/12 and 13/14
•run additional conductors from :
BW500 terminal 12 to scale `red'
BW500 terminal 13 to scale `blk'
•If load cell wiring colours vary from those shown, or if extra wires are provided,
consult Milltronics.
customer
junction box
*
Milltronics
Belt Scale
load cell
r
e
d
b
l
k
w
h
t
s
h
l
d
g
r
n

PL-565 Accumass BW500 Page 19
Installation
Scale –Two Load Cell
*Where separation between the BW500 and belt scale exceeds 150 m (500 ft) ), or legal for trade
certification:
•remove the jumpers BW500 terminal 11/12 and 13/14
•run additional conductors from :
BW500 terminal 12 to scale `red'
BW500 terminal 13 to scale `blk'
•If load cell wiring colours vary from those shown, or if extra wires are provided,
consult Milltronics.
customer
junction box
*
Milltronics
Belt Scale
load cell
A
load cell
B
r
e
d
b
l
k
g
r
n
w
h
t
s
h
l
d
g
r
n
w
h
t

Page 20 Accumass BW500 PL-565
Installation
Scale –Four Load Cell
*Where separation between the BW500 and belt scale exceeds 150 m (500 ft), or legal for trade
certification:
•remove the jumpers BW500 terminal 11/12 and 13/14
•run additional conductors from :
BW500 terminal 12 to scale `red'
BW500 terminal 13 to scale `blk'
•If load cell wiring colours vary from those shown, or if extra wires are provided,
consult Milltronics.
*
customer
junction box
Milltronics
Belt Scale
load cell
A
load cell
B
r
e
d
b
l
k
g
r
n
w
h
t
s
h
l
d
g
r
n
w
h
t
load cell
C
load cell
D
integrator
r
e
d
b
l
k
g
r
n
w
h
t
s
h
l
d
g
r
n
w
h
t
Table of contents
Popular Industrial Electrical manuals by other brands

Ravas
Ravas SAFECHECK Installation and user manual

Murata
Murata GRM1885C1E821JA01 Series Reference sheet

Murata
Murata GRM155F50J104ZA01 Series Reference sheet

Murata
Murata GRM0335C1E1R1BA01 Series Reference sheet

Softing
Softing FG-200 HSE/FF user manual

Marechal Electric
Marechal Electric SPeX instruction sheet

Murata
Murata GRM188R71H823KA93 Series Reference sheet

Murata
Murata GRM319R71C564KA01 Series Reference sheet

Wiremold
Wiremold Legrand Omnibox installation instructions

Murata
Murata GRM219R61C226ME15 Series Reference sheet

Murata
Murata GRM319R71H334KA01 Series Reference sheet

OEZ
OEZ NP65 Series Instructions for use