Mini Gadgets BBWiFiAlarmClock User manual

1 Version 1.0
Bush Baby Alarm
Clock with Wi-Fi
Hidden Camera
SKU: BBWiFiAlarmClock

2 Version 1.0
THANK YOU FOR PURCHASING THE
BBWIFIALARMCLOCK
Please read this manual before operating the
BBWiFiAlarmClock and keep it handy.
Cheating spouse and running out of plug room?
No need to worry, this all-in-one unit is what
you need! With this BBWIFI camera, you can
stream in 1080P resolution, record to external
memory, or via phone all through your
smartphone app! Use the 2 functional USB
ports to plug and charge any devices, increasing
plug space for other surrounding items.
Your purchase should include:
1 x BBWiFiAlarmClock
1 x Manual
1 x 128GB Micro SD Card
1 x Micro SD Card Reader

3 Version 1.0
GET FAMILIAR WITH YOUR BBWIFIALARMCLOCK

4 Version 1.0

5 Version 1.0
OPERATING THE BBWIFIALARMCLOCK
BEFORE YOU START
1. First you must download the TinyCam
app from the Google Play Store or the
iPhone App Store.
oAndroid:
https://play.google.com/store/a
pps/details?id=com.rtp2p.tinyca
m
oiPhone:
https://apps.apple.com/us/app/
tinycam/id1444285114
2. If you ever need to move your device
from one network connection to a
different one, you will need to reset the
device before moving to the new
network. Otherwise, the device will not
connect to the new network.

6 Version 1.0
Note: If you are not located in the US, or if you
intend to use this product anywhere other than
the US, you will need to purchase a converter in
order to use the AC wall plug in and avoid
damaging the product. Because different
countries use different voltages in their
electrical wiring, you will need a converter that
adapts to the current in your particular country.
IMPORTANT WARRANY INFORMATION: If the
warranty sticker on your device has been
removed or tampered with, your lifetime
warranty will be voided. You may be charged
fees or denied a return should this happen.
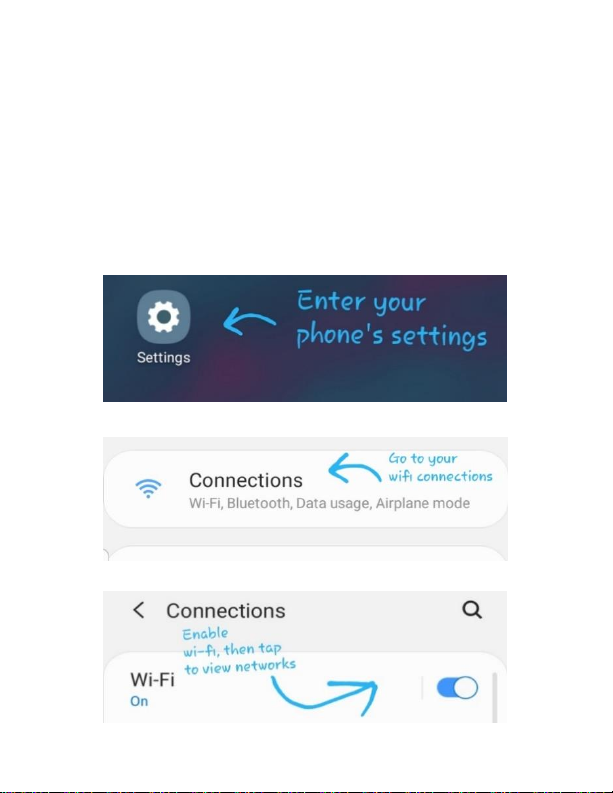
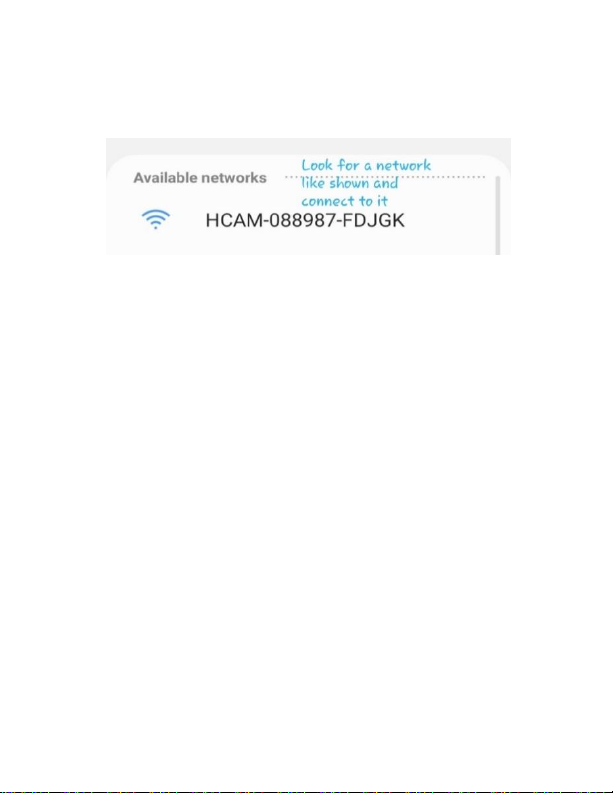
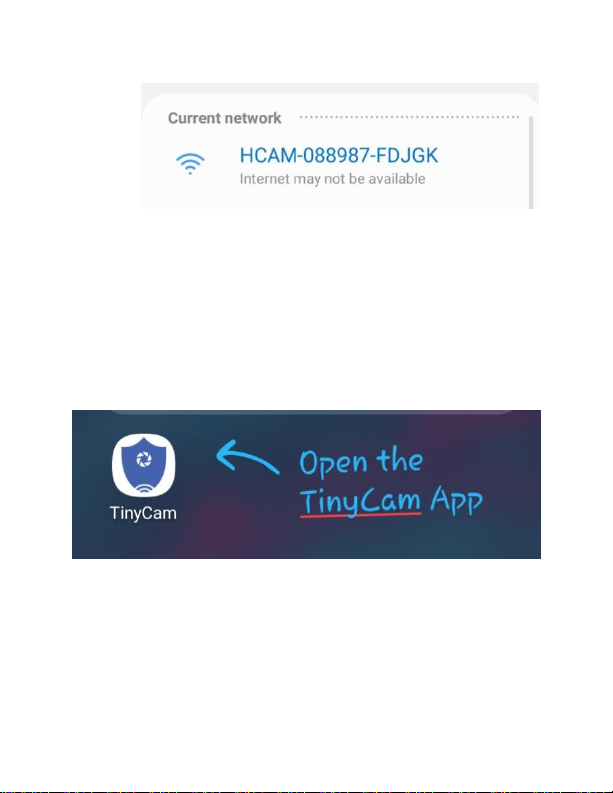
CONNECTING TO YOUR DEVICE DIRECTLY &
ADDING IT TO WIFI
In order to view your device remotely, you
must complete the following two-part
sequence of steps.

7 Version 1.0
1. Plug the device’s power cord into a wall
outlet.
2. Turn on your phone’s Wi-Fi.
oGo to your phone’s settings (see
pictures on the next page, follow
them from the top –down)

8 Version 1.0
3. After connecting to the device’s Wi-Fi
signal, it should display as ‘Connected’
or the ‘Current Network’ (see below
picture)
oSome devices may produce a
warning that the network has no
internet access. If you see this,
choose to connect to the
network anyway.
oFor iOS devices, you must wait
until the Wi-Fi signal appears
next to your Phone Carrier Name
at the top of your phone screen.

9 Version 1.0
4. Now that we are connected to the unit’s
Wi-Fi signal, go ahead and open the
TinyCam App on your phone.
5. When you open the app, it will
automatically detect that you are
connected to the unit’s Wi-Fi signal and

10 Version 1.0
ask if you would like to add the device
to the TinyCam App. Press “OK”.
6. After pressing “OK”, this will add the
device to the TinyCam App and take you
to the home screen.
oWe still need to add the camera
to a Wi-Fi network where it is
staying in order to livestream it!
7. You should now see your device listed
on the home screen. Let’s continue and
add the camera to a nearby Wi-Fi
network. Tap the wrench icon on the
bottom right of the device listing.

11 Version 1.0
8. After tapping the wrench, a new menu
will appear with a bunch of different
‘Config’ or ‘Setting’ selections. For now,
we want to focus on Wi-Fi Config. Go
ahead and select ‘Wi-Fi Config’ and a
new menu should open.

12 Version 1.0
9. After selecting Wi-Fi Config, we are
taken to a page where you can choose a
network for the unit to connect to, and
then type in the password for that wi-fi
network. Press ‘Confirm’ when done to
pair the unit with the router. You should
see something that says “Set Success”.

13 Version 1.0
10. Close the TinyCam App and proceed to
step 11.
11. If the unit pairs with your router, it will
stop broadcasting its own Wi-Fi signal,
and your phone should connect back to
the normal network for the area.

14 Version 1.0
oTo verify if the camera added
successfully to your router, turn
off your phones Wi-Fi, and then
open the ‘TinyCam’ app. Using
your cellular data, you should be
able to stream the device (if you
have cellular data enabled).
oIf your device is still broadcasting
its Wi-Fi signal, the unit has
failed to pair with your Wi-Fi.
Please attempt repeating the
listed steps, starting with
connecting to the unit’s Wi-Fi
(from step 1)
12. Your device is now connected to Wi-Fi
and can be remotely viewed/managed!
oNOTE: The first time you access
the livestream, the unit will
request that you change the
password. DO NOT FORGET THIS
PASSWORD!

15 Version 1.0
oThe default password is 888888.
HOW TO ADJUST THE VIDEO QUALITY OF THE
STREAM
1. Open the TinyCam App.
2. Open the livestream for your unit.
3. After opening the livestream, in the top
center of the screen, you should see
three different options.
a. 1080P –Stream in 1920x1080P
b. 720P –Stream in 1280x720
c. 640P –Stream in 1152x640

16 Version 1.0
HOW TO SET UP MOTION DETECTION
RECORDING
1. Open the TinyCam app.
2. Tap the wrench icon on your device
listing.
3. Navigate to ‘Alarm Config’.

17 Version 1.0
4. Turn Motion detection to any option
besides ‘Close’.
5. Hit the back button on your phone
so you can see all the other
Config/Setting options again.
6. Choose ‘Micro SD Card Setting’.

18 Version 1.0
7. Tap the ‘Alarm recording’ box and
ensure that it is checked.
8. Your device is now set up for motion
detection recording!
a. By turning the ‘Alarms’
motion detection levels on,
the unit sends an ‘Alarm’
once motion is detected. This
alarm triggers the unit to
begin recording.
9. For further information regarding
the settings inside the ‘Micro SD
Card Setting’, please refer to the
next section.

19 Version 1.0
Micro SD Card Setting –A Further Look

20 Version 1.0
a) Micro SD Card Capacity –This displays
what size MicroSD card you have inside
the unit, and the total space left.
a. The number on the left is the
total space left.
b. The number on the right is what
size MicroSD card you have
inside the unit.
b) Uninstall SD Card –This allows you to
‘safely eject’ the MicroSD card for the
unit. Press this prior to removing the
MicroSD card.
c) Format SD Card –This will format the
MicroSD card and erase all data on it.
Only use this option if told to do so by
Technical Support.
d) Stop Recording –If this box is checked,
the unit will not record at all.
e) Full Time Recording –If this box is
checked, the unit will record 24/7.
Table of contents