Mistral MIF1350TCL-RE User manual

127cm Flame Effect Inbuilt
or Wall-mountable Electric
Fireplace
Model: MIF1350TCL-RE
Instruction Manual

2
Important Safeguards
When using electrical appliances, in
order to reduce the risk of re, electric
shock, and/or injury to persons, basic
safety precautions should always be
followed, including:
For Your Safety
When using this appliance, below safety
precautions should always be followed.
• To prevent re or shock hazard, DO NOT
expose this appliance to rain or moisture.
• Dangerous high voltages are present inside
this enclosure. To avoid electric shock, DO
NOT open the cabinet, refer servicing to
qualied personnel only.
• To protect against re, electrical shock and
injury to persons, do not immerse the unit,
plug or cord in water or spray with liquids.
• The apparatus shall not be exposed to
dripping or splashing and no objects lled
with liquids, such as vases, shall be placed
near the product. Dry location use only.
• No naked ames sources, such as candles,
should be placed on the product.
• Any ventilation holes should not be impeded
by covering with items, such as newspaper,
table paper, tablecloths, curtains etc. Slots
and opening are provided for ventilation to
ensure reliable operation of the product and
to protect it from overheating. Never obstruct
the air inlet and outlet. Do not use any object
to cover this appliance.
• Only connect to a suitable AC 240V~50Hz
mains wall outlet. Do not overload the wall
outlet.
• This appliance is not intended to be operated
by means of an external timer or separate
remote-control system. Other use not
recommended may cause re, electric shock
or injury.
• This appliance is not intended for use by
persons(including children) with reduced
physical, sensory or mental capabilities,
or lack of experience and knowledge,
unless they have been given supervision or
instruction concerning use of the appliance
by a person responsible for their safety.
• Keep out of reach of children. Children
should be supervised to ensure that they do
not play with the appliance.
• To disconnect, grip the plug and pull it from
the wall outlet. Never pull by the cord. Do not
use with wet hands or in damp environments.
• Do not attempt to repair, disassemble or
modify the appliance. There are no user-
serviceable parts inside. Repairs should only
be performed by qualied personnel.
• If the supply cord is damaged, it must be
replaced by the manufacturer, its service
agent or similarly qualied persons in order to
avoid a hazard.
• Do not use this appliance outdoors. This
appliance is for household use only and not
for commercial or industrial use.
• Do not use if there are visible signs of damage
to the heater
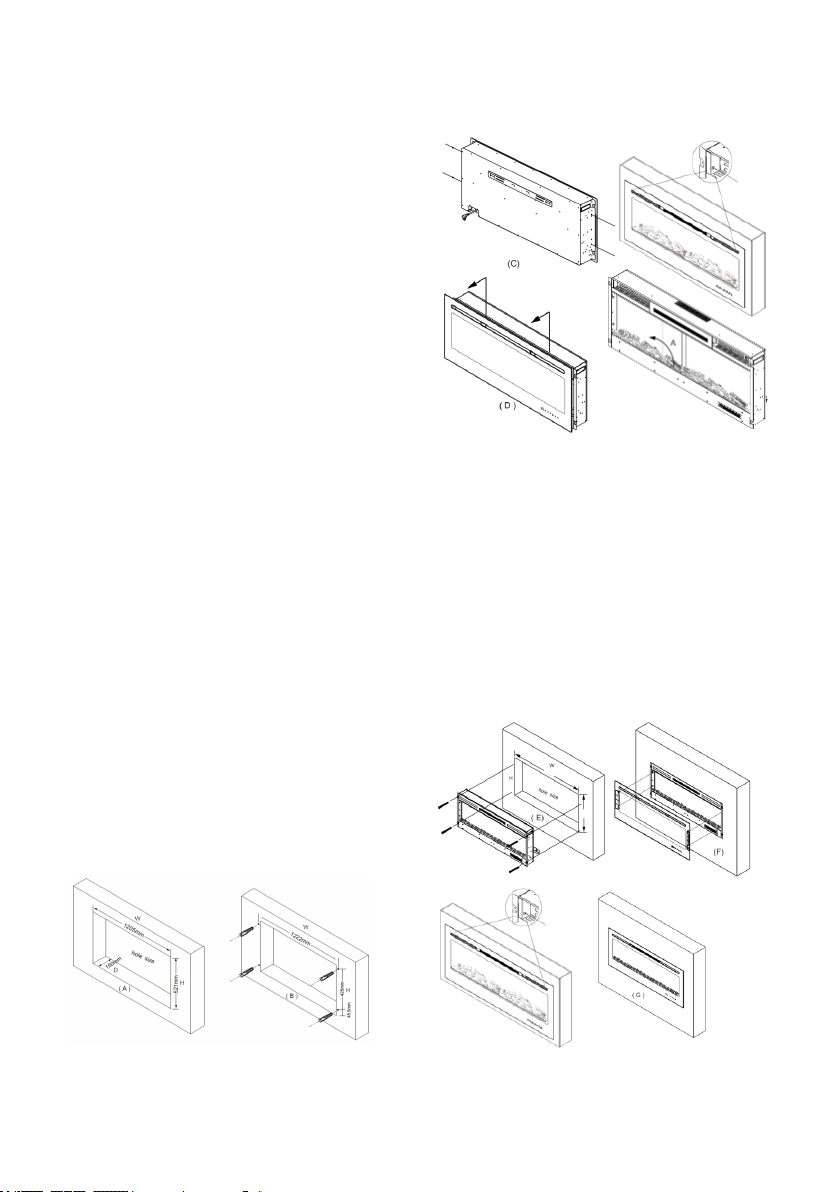
• Operate this heater only when wall mount or
insert installation is completed.
• Do not use this heater with a programmer,
timer, separate remote-control system or
any other device that switches the heater
on automatically, since a re risk exists if the
heater is covered or positioned incorrectly.
• Do not use this heater if it has been dropped.
WARNING: Do not use this heater in small
rooms when they are occupied by persons
not capable of leaving the room on
their own, unless constant supervision is
provided.
Warning: In order to avoid overheating, DO
NOT COVER the appliance.
WARNING: To reduce the risk of re, keep
textiles, curtains, or any other ammable
material a minimum distance of 1 m from
the air outlet.
WARNING: FIRE RISK EXISTS IF THE HEATER
IS COVERED BY OR POSITIONED CLOSE
TO CURTAINS OR OTHER COMBUSTIBLE
MATERIALS.

3
Always
1. Always position/install the heater in
accordance with the instructions.
2. Always make sure the electrical socket is
accessible and located adjacent to, but not
above the heater.
3. Always use a re guard when children,
animals and inrm persons can come into
contact with the heater. Pay attention! The
air outlet gets hot during operation.
4. Always turn the appliance OFF and unplug
it from the mains wall outlet when it is not in
use, when moving the appliance from one
location to another and before cleaning.
Never
1. Never leave the appliance unattended when
it is in use. Never leave children unsupervised
in a room where the heater is ON and
unguarded.
2. Never obstruct or cover the air outlet or force
items into the heater openings, this could
cause overheating and consequent risk of
re. Never insert or allow foreign objects
to enter the air outlet as this may cause
damage to the appliance.
3. Never position or use the heater in the
immediate vicinity of water, such as bathtub,
shower, washbowls, swimming pool etc.
4. Never use aerosols or steam cleaners on or
around the heater.
5. Never use the heater in rooms with explosive
gas or while using ammable solvents, varnish
or glue.
6. Never route the power supply cord under
carpet etc.
7. Never use the heater to dry clothes, etc.
8. Never operate the appliance with a
damaged cord or plug, after a malfunction
or if it is not working normally, dropped or
damaged in any way.
9. Never let the power cord hang over the edge
of a table or counter or let it touch any hot
surfaces.
10. Never move the appliance by pulling the
cord.
11. Never immerse the product in water or any
other liquid for any reasons.
12. Never use accessories that are not
recommended or supplied by the
manufacturer.
Positioning Instructions
When wall mounting or inserting the heater,
please keep the following points in mind:
• This heater must not be located immediately
below an electrical outlet.
• The heater MUST only directly be plugged in
to a xed Domestic Power outlet , DO NOT
use in conjunction with Extension cords ,
Power Boards or Double Adaptors , as these
can overheat when overloaded.
• install and use the appliance in rooms no
smaller than 4m2.
• Keep the air inlet and outlet free from objects
at least 100cm in front of the heater. Do not
hang anything on or in front of the heater.
• Never position the heater close to curtains
or combustible materials such as furniture,
cushions, bedding, paper, clothes, curtains
etc. Keep the the appliance at least 100cm
(1m) away from any combustible materials.
• Never position or use the heater in the
immediate vicinity of water, such as bathtub,
washbowls, swimming pool etc. where the
likelihood of immersion or splashing could
occur.
• Keep hearthrugs and other soft furnishings
away from the front of the heater. They could
obstruct the free ow of hot air and damage
both soft furnishings and heater.

4
Cautions:
Do not operate the appliance on an inclined
surface. Do not move the appliance while the
appliance is switched on.
In order to avoid a hazard due to inadvertent
resetting of the thermal cutout, this appliance
must not be supplied through an external
switching device, such as a timer, or connected
to a circuit that is regularly switched on and off
by the utility.
This heater is hot when in use or directly after use.
To avoid burns, do not let bare skin touch hot
surfaces. Keep combustible materials such as
furniture, pillows, bedding, papers, clothes and
curtains well away from the heater. Do not drape
laundry or any other items over the heater.
At the end of the product’s serviceable life it
should be disposed of carefully and safely in
accordance with local authority regulations.
Handling & Transit
• Unpack the heater from the carton it is
supplied in.
• Prepare the heater for installation onto the
wall or insertion.
Remove the tempered glass panel from
the front of the heater, by undoing 2 panel
retention screws from each side of the heater
and with the help of another person, slide
glass panel upwards and pulling forward to
unlock.
Set glass panel aside in a safe place until
installation process is completed.
• Only when installation process is completed.
Reposition the tempered glass panel and
secure back into place with one screw on
each side of the heater.
• Do not carry or lift the heater by positioning
hands underneath the glass panel , this will
unlock the glass panel from heater enclosure
Only place hands underneath the heater
enclosure when lifting.
• The heater is heavy, requires assistance of
another person to position and secure the
heater into place.

5
Features of Your 127cm Flame Effect Inbuilt or
Wall-mountable Electric Fireplace
Air Outlet
Control panel
LED display
Wall xing
bracket
ST4 X 40mm 9pcs
screws for wall xing
bracket
ST4x8mm screws for
bottom bracket 2pcs
8 hour timer
select button
Heating select
button
The temperature
select button Flame dimmer
button
ON/OFF button
Remote control
Color change button
Master ON/OFF
power switch
Drywall anchors
9pcs

6
Your Electric Flame
Effect Heater
Congratulations on the purchase of your
new Heater. Before using your new heater,
it is important that you read and follow the
instructions in this Use and Care booklet, even
if you feel that you are quite familiar with this
appliance. Find a place to keep this booklet
handy for future reference. Attention is drawn to
section dealing with ‘IMPORTANT SAFEGUARDS.’
This appliance has been designed to operate
from a standard domestic power outlet. It is not
intended for industrial or commercial use.
Wall-mount Instructions
This Electric Flame Effect Heater also comes with
a wall mounting kit if the preferred option is to
wall mount the heater.
The following installation instructions must be
adhered to in order to ensure that it is installed
and secured safely:
1. Only mount heater horizontally, For installation
of the heater, care must be taken not to
damage concealed cables.
2. Minimum of 300mm in height from the oor
and minimum 1000mm from the ceiling.
3. Domestic power outlet positioned adjacent
, to the right hand-side of the heater (In situ)
and within heater power cord length(Do not
use extension leads to reach power outlet).
4. Wall mount bracket(s) must be secured in
to solid substrate ( Brick , concrete etc.)
or aligned with timber or metal wall studs,
DO NOT secure onto just plaster or similar
materials that cannot support the weight of
the heater. Mounting brackets, screws and
wall plugs are included.
5. Ensure that heater is mounted away from any
surrounding combustible materials.
6. Ensure to fully read the installation instructions
to familiarize yourself with the installation
requirements.
Do not start the heater until it is securely xed
to the wall and minimum distances stated are
strictly adhered to.
7. Take care when using tools to drill holes to
ensure mounting bracket can be securely
tted and support the weight of the heater(
Oversize holes and loose wall plugs may result
in appliance becoming detached and cause
damage to the appliance or injury).
Wall-mount steps:
1. Although a minimum distance of 300mm from
the oor is to be adhered to, for optimum
viewing of the fuel bed, 600mm height is
recommended. Select a location that is not
prone to moisture and is located at least 1m
away from combustible materials such as
curtain drapes, furniture, bedding, paper, etc.
Have two people hold the appliance against
the wall to determine the nal location.
2. Place unit face down on a soft, non abrasive
surface. Remove the bracket from the back
of the unit by removing the screws,
3. Mark the top four screws holes (Applicable
to solid substrate of Brick concrete etc.) and
ensure it is level. Use 8.0mm Masonry drill bit,
drill 40 mm deep holes, insert wall plugs and
secure bracket with the 4 x 40mm screws
provided. For plaster walls with Timber or Steel
wall studs ensure to secure bracket to at least
2 wall studs (Additional pilot hole may need
to be drilled into bracket to obtain alignment
with a minimum of 2 studs). In this instance
there is no need to drill holes to insert wall
plugs, but can secure bracket with screws
directly into studs.
NOTE: Ensure that the screws that hold the
mounting bracket are securely screwed
into timber or metal wall studs, secured
with plugs just into plaster will not be safe
to support the weight of the mounted
heater.
Note: Ensure the bracket is level by using
a spirit level whilst marking out the hole
positions.

7
4. Fist Take off four screws in both sides and
remove two screws at both front corner of
replace. Figure (C)
Remove the at glass panel from the front of the
enclosure. To remove, have rm grip on the glass
panel with both hands, slide upwarders to unlock
and then pull forward to remove. Figure (D)
Take the foam(A) out off appliance.Place the
heater upside down on a soft cloth or carpet.
Secure the bottom bracket onto the base of the
heater enclosure with the2pcs of 4x8mm screws
provided.
With the help of another person (to avoid injury,
damage to property or appliance), lift the heater
into place and engage the heater with the
top wall bracket (See Fig. A) and is positioned
centrally. Now mark the position of the 2holes
that secures the bottom bracket. Lift heater
away from the wall and drill the holes (Solid walls,
brick/ concrete). For plaster wall, use plaster wall
anchors (Not Supplied).
Fig A
5. Fix the heater to the wall bracket
Again with the help of another person
(to avoid injury,damage to property or
appliance), lift the heater into place
and engage the heater with the top wall
bracket(Fig A), ensure it is positioned centrally
then gently angle heater down against the
wall and secure bottom bracket with 2 screws
(30mm) against the wall.
6. The at glass panel can now be placed back
into position. Align metal hooks on the glass
panel with the correponding slots of the
heater enclosure, push into slots and slide
down to secure in place. Ret the 2 screws
on each side and 2 screws at the front of the
heater to secure glass panel into place.
Note: Positioning the glass panel in place
should ideally be done with assistance
(Person on each side holding glass) to
safely align and secure in place.

8
Recess the heater into a wall
Instructions & steps
Note: This heater can be inserted into a
wall, to do so your require a minimum of
150 mm depth.
This may require a custom build structure,
as standard internal plaster/stud wall
cannot facilitate the insertion depth
required.
So consult with qualied trades person if
you are not technically inclined to conduct
such construction work yourself.
Illustrated below are the cavity sizes
required and instructions to t the heater.
Ensure that there is sufcient structural
support surrounding the heater to safely
and securely insert mount the heater.
Electrical works maybe required to make
heater connection directly to a Domestic
Power outlet, if that is needed consult a
licensed electrician to conduct such work.
Figure (A)
1. Select and mark the section of plaster wall
that needs to be removed or construct a
frame work aligned with plasterboard as per
hole dimensions detailed in illustration below
Figure (A).
Note: If cutting holes in existing plaster
wall (Please check and conrm that area
directly above the proposed placement
is not Load bearing as some support studs
may need to be trimmed to t the heater).
Fit supporting timber around the parameter
of the opening where needed to act as
supported structure to mount the heater to.
2. Drill 2 Pilot holes(Smaller than screw diameter)
on each side of the opening as per
dimensions detailed in Illustration below Figure
(B)
3. Prepare the heater for installation by
removing the glass panel, undo the panel
retention screws, 2 screws on each side of the
heater and 2 screws at the front as shown in
Figure (C)
4. Have two person to take the glass panel out
of the replace box., Take the foam(A) out off
appliance.Place it to a soft and clean place.
Figure(D)
5. Have two person to move the replace box
to the wall hole.
When the appliance is fully recessed into the
wall:
• Use the 4 screws(provided) to secure the
heater to wall, through the holes in the side
rims of the heater. see Figure(E)
6. Reposition the Glass panel and lock into
place. See Figure (F)
7. Secure the glass panel into place with a
screw on either side of the heater. Figure (G)

9
Operation
When operated for the rst time, the unit may
emit an unpleasant burning type smell. This is
normal, and will disappear after a short period
of use.Always choose a safe location for the
heater, keeping in mind the safety precautions
outlined.
Ensure that all packaging has been removed
from the unit before use.
The appliance can be operated either by the
switches located on the bottom control panel
of the replace heater or by supplied remote
control.
• Plug the power cord into a suitable 230 -
240V~50Hz wall outlet.
• Set master ON/OFF switch to position “I”.
• Press on the Power On/Off switch , or press
on the remote control,the re illumination
effect will be activated.

10
Control Panel
• Select the desired function:
Touch panel/Remote control Operation
BUTTON FUNCTION ACTION&INDICATION
POWER
ON: Enables control panel functions and
remote control. Turns on ame effect.
OFF: Disables control panel functions and
remote control.
1. Press once. Indicator light turns on.
Power turns on. All functions enabled.
2. Press again Turn off ame effect.
COLOR
COLOR button: Controls the color change
of the ame effect.
1. Press once. Flame color effect starts
changing.
2. Press again until desired setting is
reached.
FLAME
FLAME button: Controls the dimming
or brightening of the ame effect
illumination.
NOTE: Flame effect stays on until power
button is turned off. Flame effect must be
on for heater to turn on.
1. Press once. Flame brightness effect
starts changing.
2. Press again. Until desired setting is
reached.
HEATER
HEATER button:Turn heater on and off.
NOTE: To prevent overheating, the heater
fan will blow out cool air for 20 seconds
after the heater turn off.
1. Press once. Indicator lights up. 900W
heater turns on and blows warm air.
2. Press again. Indicator lights up. 1800W
heaters turns on and blows hot air.
3. Press again. Heaters turn off.
The fan blows cool air for 20 seconds to
allow heater to cool down, then turns
off.
TEMP
TEMPERATURE button: Control temperature
settings to choose temperature as desired.
Setting range from 16C to 30C
1. Press once. Indicator light turns on.
Temperature is set to 16C
2. Press again until desired setting is
reached. LED display shows setting.
TIMER
TIMER button: Control timer settings to turn
off replace at selected time.
Settings range from 1 hours to 8 hours.
3. Press once. Indicator light turn on.
Temperature is set to hours.
Press again until desired setting is
reached. LED display shows setting.
Warning: The heating element box and fan air intake / outlet is positioned on top the heater. This area
gets hot during operation and should not be operated under , near or on top of ammable materials
such as curtains drapes. Do not insert or allow foreign objects to enter any grille opening as this may
cause an electric shock , re or damage the heater, contact with the elements inside the heater could
result in electric shock.
LED Display
8 hour timer
select button
Heating select
button
The temperature
select button Flame dimmer
button
ON/OFF button
Color change button

11
Infrared Remote control
Battery Replacing (For Remote Control)
1. The remote control requires one “CR2025”
type 3-volt lithium battery (included). If the
operation of the remote control becomes
unsatisfactory, replace with a new 3-volt
lithium battery.
2. Place the remote control with the control
buttons facing downward.
3. Loosen the cover screw, Press the locking arm
of the battery cover and pull out the tray.
(Push tab “A” towards the middle rst. See the
Fig.1).
4. Place one new 3V CR2025 battery into the
battery tray with the positive “+” side facing
up, observing the polarity markings. If the
battery is placed incorrectly, the remote
control will not work. CAUTION: There is
danger of malfunction if the battery is
replaced incorrectly. Replace only with the
same or equivalent type of battery.
5. Insert the battery holder into the battery
compartment and ensure it is secured.
tighten the cover screw.
6. Tell others about the risk associated with
button batteries and how to keep their
children safe.
Thermal Safety Cut-out
This appliance is tted with a safety cut out,
which will operate if the heater overheats (eg,
due to blocked air outlet). For safety reasons,
the heater will NOT automatically reset. To reset
the heater, disconnect the heater from the
power outlet. Let the heater cool down before
reconnecting the heater to the power outlet and
switching it back on.
WARNING: In order to avoid a hazard due
to inadvertently resetting the thermal cut-
out, this appliance must not be supplied
through an external switching device, such
as a timer, or connected to a circuit that is
regularly switched on and off by the utility.
Technical Specications
Power Supply: AC 220-240V ~ 50Hz
Power Consumption: 1800W
NOTE: As a result of continual
improvements, the design and
specications of the product within may
differ slightly to the unit illustrated on the
packaging.

12
Cat. No. MIF1350TCL-RE
December 2020
Warranty Conditions for
purchase in Australia &
New Zealand
Any claim under this warranty must be made
within 2 years of the date of purchase of the
product. To make a claim under the warranty
in Australia, take the product (with proof of
purchase) to any Bunnings store (see www.
bunnings.com.au in Australia or www.bunnings.
co.nz in New Zealand for store locations).
GSM Retail Group bears reasonable, direct,
expenses of claiming under the warranty in
Australia. You may submit details and proof to a
Bunnings store for consideration or contact our
service agent below.
This warranty is provided in addition to other
rights and remedies you may have under law:
our goods come with guarantees which cannot
be excluded under the Australian Consumer
Law (if purchased in Australia) or the Consumer
Guarantees Act 1993 (if purchased in New
Zealand). You are entitled to replacement or
refund for a major failure and to compensation
for other reasonably foreseeable loss or damage.
You are also entitled to have the goods repaired
or replaced if the goods fail to be of acceptable
quality and the failure does not amount to a
major failure.
The warranty excludes damage resulting from
product misuse or product neglect. The warranty
covers domestic use only and does not apply to
commercial applications.
This warranty is given by GSM Retail Group
ABN: 53007682475
For Warranty and technical queries: 1300 373 199
Aus Or 0800 200 037 NZ
Warranty Exclusions
Damage to the base or diffuser or any part
through accident, misuse or negligence.
Care and Cleaning
• Before cleaning, ensure that the heater is
switched in the off position and is unplugged
from the socket.
• Clean the exterior surfaces of the heater with
a dry, soft cloth.
• Never use any form of detergents or solvents
to clean the heater.
• Never spray with liquids or submerge in liquids
or water.
• DO NOT attempt to clean the interior of the
heater.
• DO NOT ATTEMPT TO OPEN THE CASE OF THIS
HEATER at any time. There are no consumer
serviceable parts inside this unit.
• When the heater is stored during the off
season, neatly wind the cord around the
base of the heater to prevent any damage
to the cord.
Disposal
Do not dispose of packaging or the product
through your household waste!
The product and packaging are made from
recyclable materials (plastics, metals, paper).
If the product is no longer suitable for use dispose
of it in an environmentally friendly manner in
accordance with your local council.
Table of contents
Other Mistral Indoor Fireplace manuals
Popular Indoor Fireplace manuals by other brands

Desa
Desa VK42P SERIES OWNER'S OPERATION AND INSTALLATION MANUAL

Magiglo
Magiglo Ekos 20 User, installation & servicing instructions

Valor
Valor 1500INO (NG) Installation & owners guide

European Home
European Home VISION GAS FIREPLACE Installation, operation and owner's manual

Harman Home Heating
Harman Home Heating Harman Accentra Insert Installation & operating manual

Charlton & Jenrick
Charlton & Jenrick INFINITY 800HD BF UBL Instruction for user, Installation & Servicing