Mitek MO Series User manual

Operation and maintenance manual
OUTBOARD MOTORS “MO” SERIES
Mitek s.r.l
Addr: Via Paolo Frisi, 70 48124 Ravenna –Italy
VAT - IT02621720396
Phone: +39 0544 264459
Site: www.mitekitaly.com
E-mail: [email protected]

1
Dear customer,
we would like to thank you for your trust in Mitek electric outboard motors.
Each motor has been designed and manufactured for maximum comfort, ease of use and safety, and has
been extensively tested before delivery.
We strive to improve our products on a daily basis. If you have any comments on the design and use of our
products, we would be pleased to hear from you. Our customer service is always available to answer any
questions you may have. Contact details can be found at the back of this manual.
Please read this manual carefully so that you can get the most out of your Mitek outboard motor and enjoy
it for a long time.
Enjoy the sea,
Team Mitek, 100% electric motors
Table of contents
1. Use and safety ..........................................................................................................................................................3
1.1. Important information for safe motor operation.................................................................................................3
1.2. General Warnings .................................................................................................................................................3
1.3. Technical data.......................................................................................................................................................4
1.4. Equipment and controls........................................................................................................................................4
1.4.1. The package comes with...................................................................................................................................4
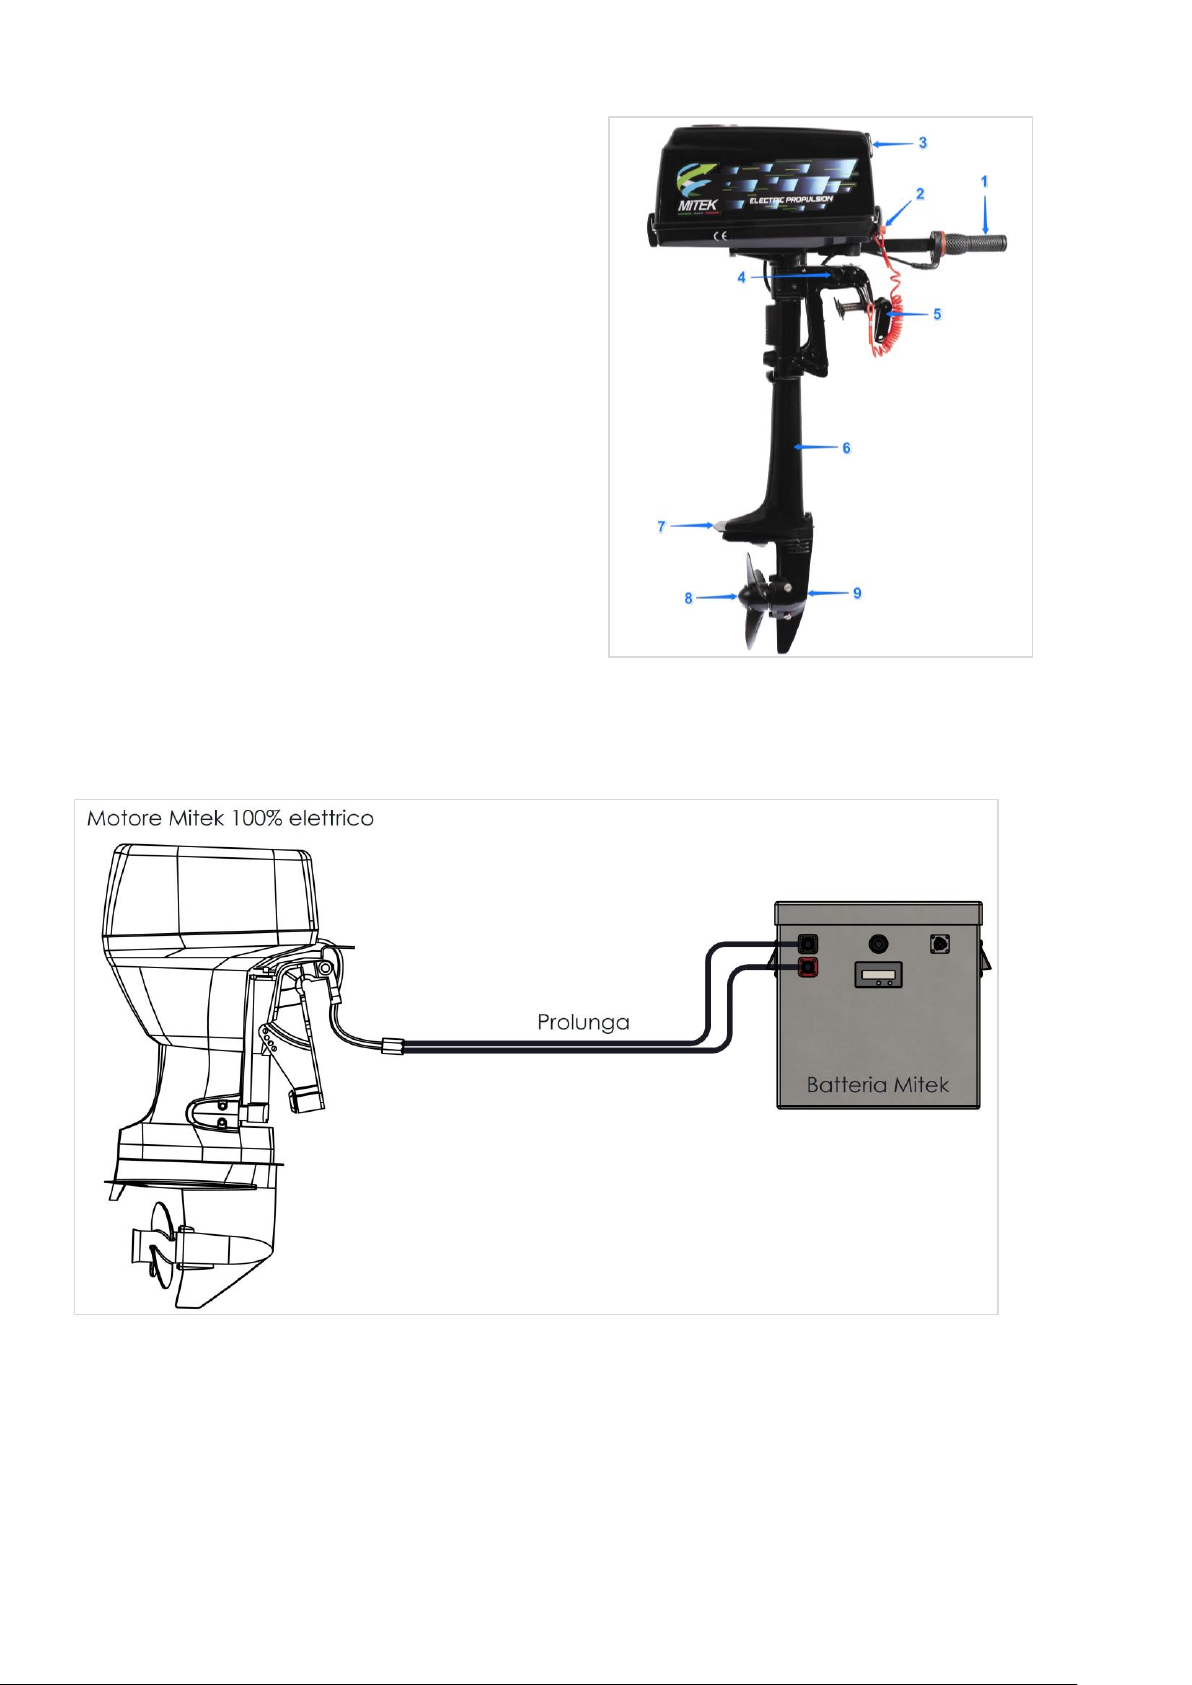
1.4.2. Main components.............................................................................................................................................5
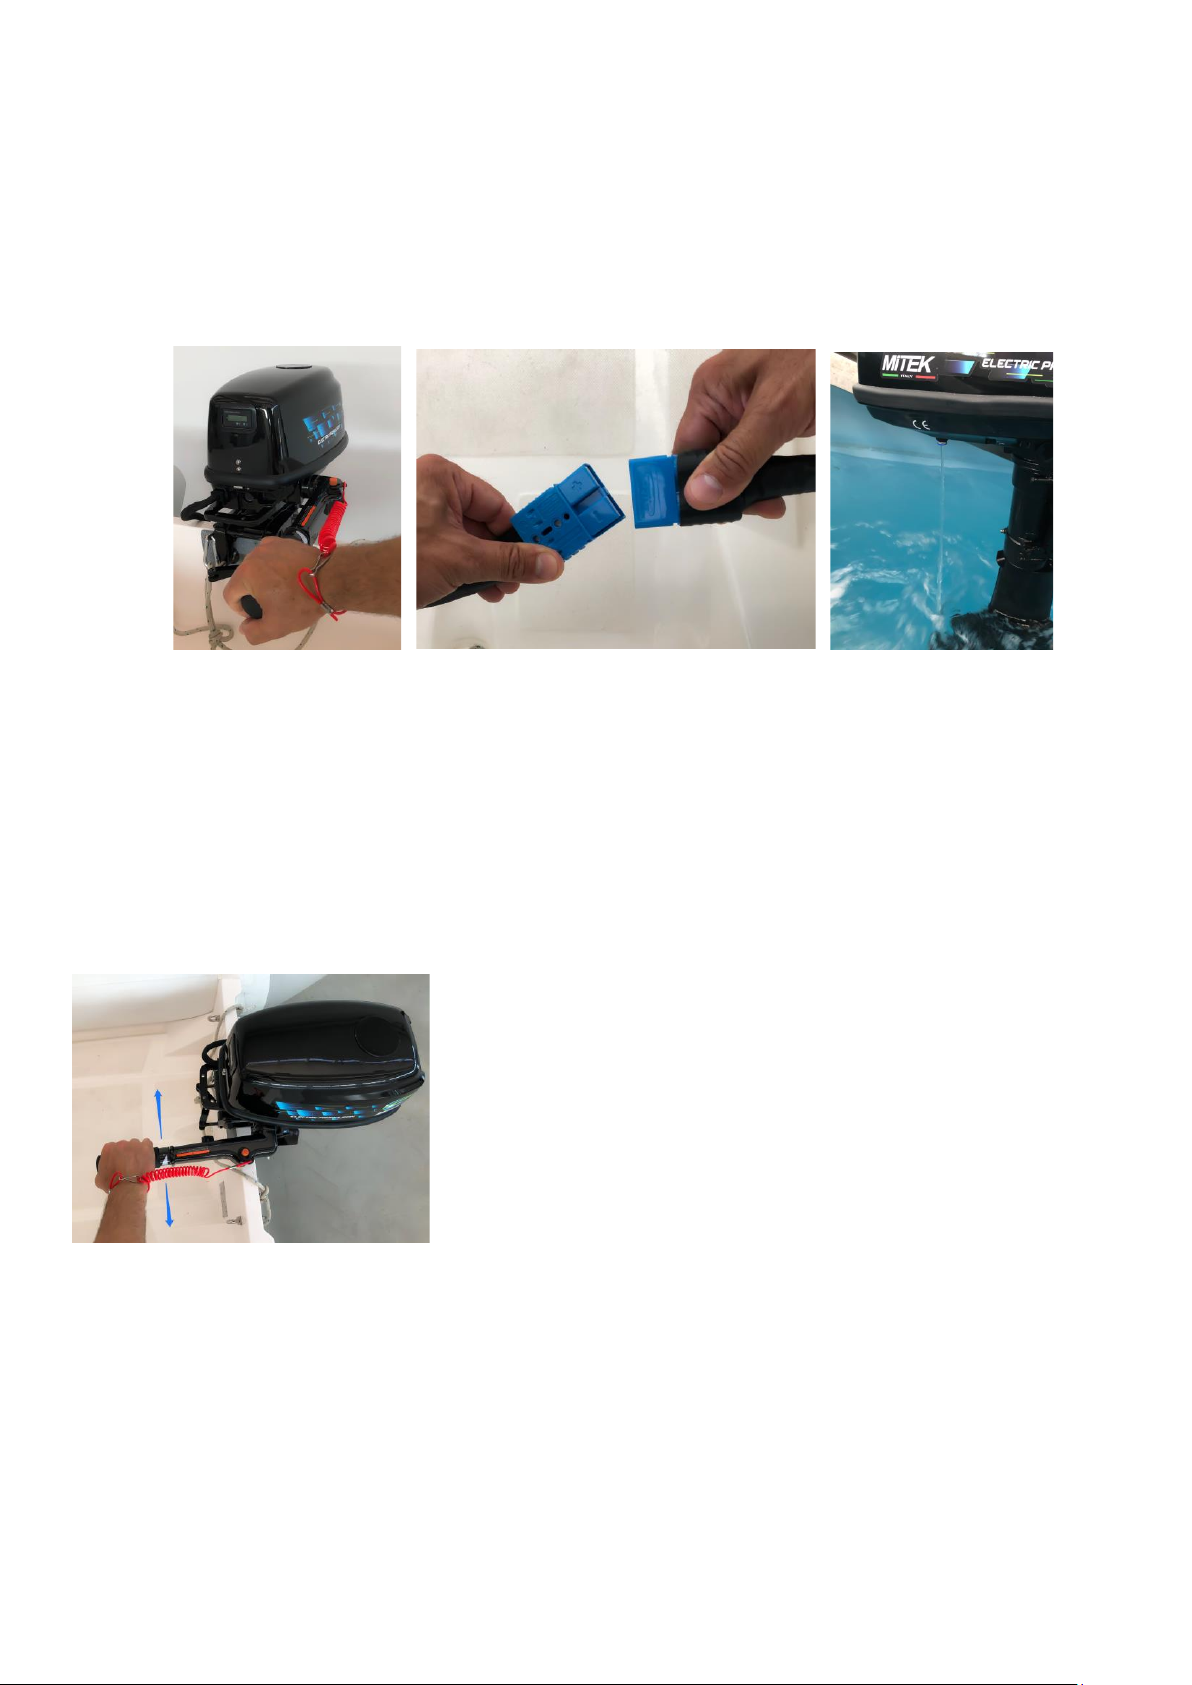
1.5. Electrical connections ...........................................................................................................................................5
2. Operating manual.....................................................................................................................................................6
2.1. Outboard Installation............................................................................................................................................6
2.2. Batteries................................................................................................................................................................6
2.3. Emergency situations............................................................................................................................................7
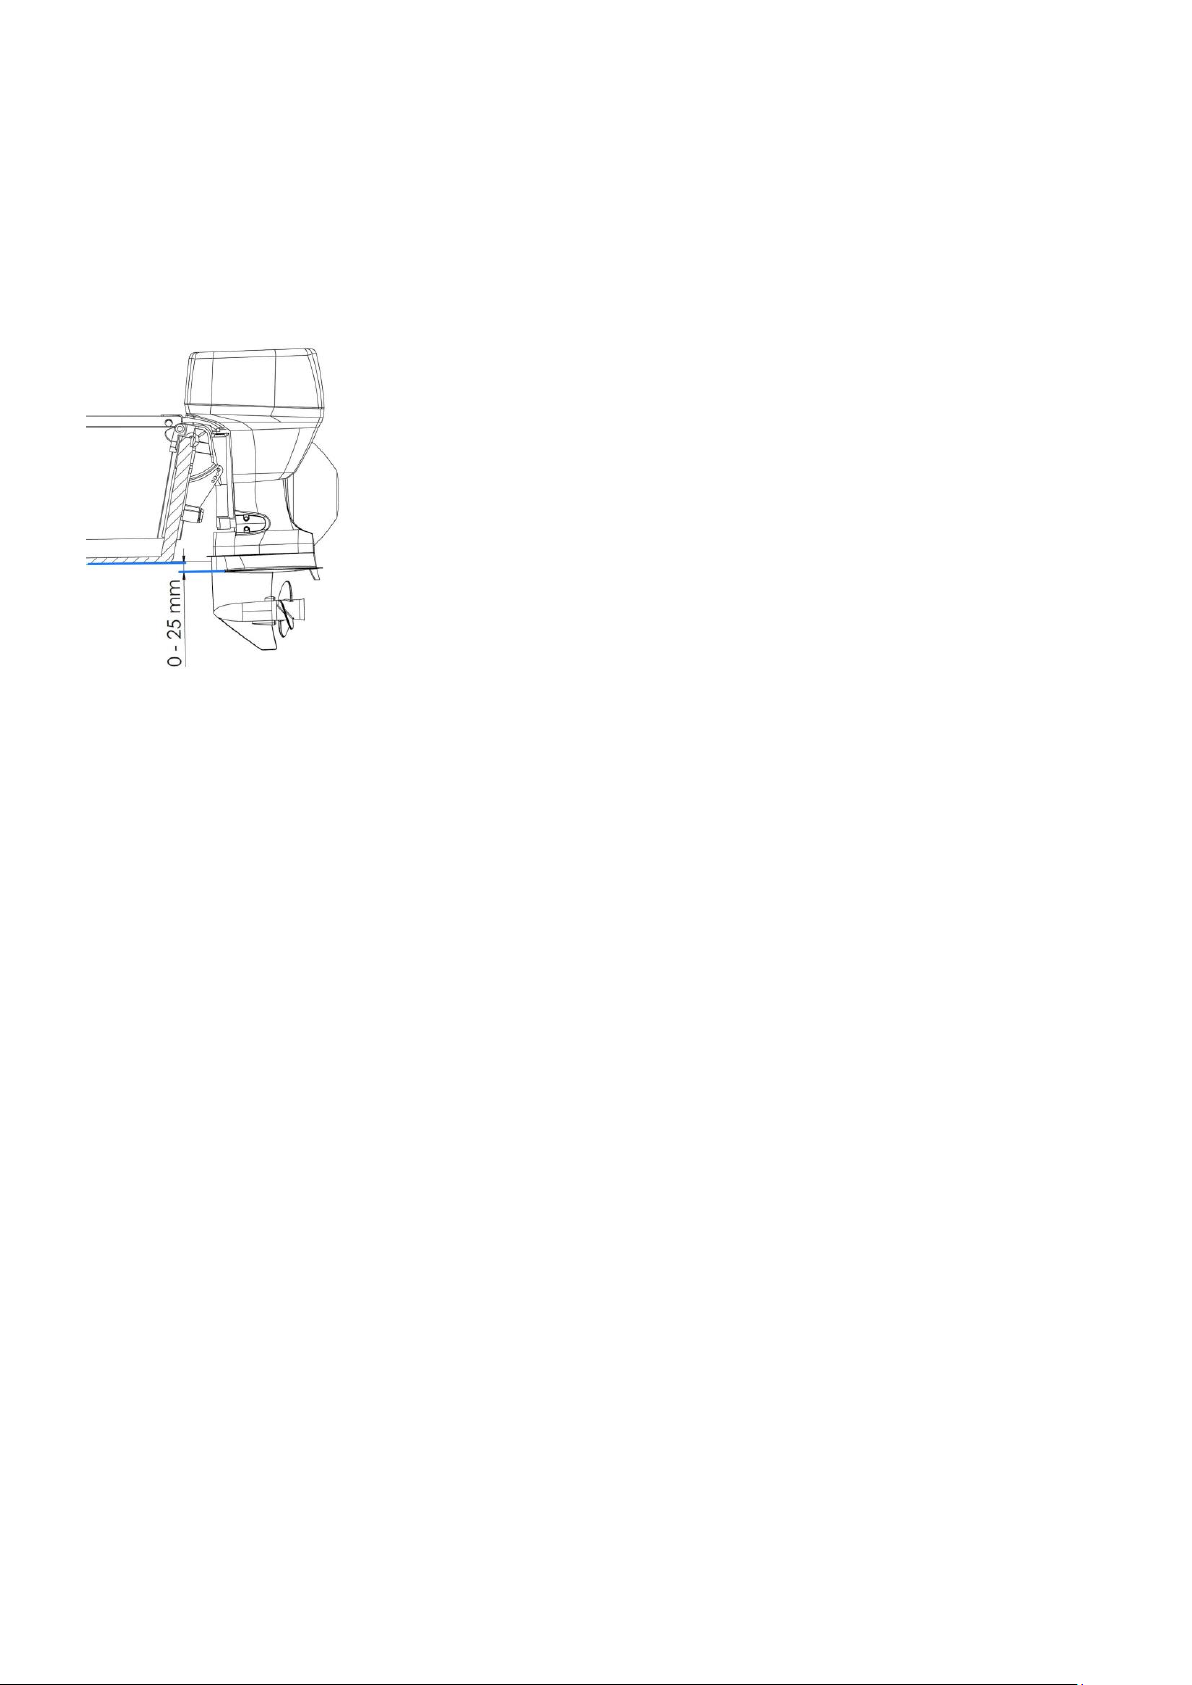
2.4. Setting outboard motor mounting height ............................................................................................................7
2.5. Pre-operation checks ............................................................................................................................................7
2.6. Starting the motor.................................................................................................................................................8
2.7. Tiller handle ..........................................................................................................................................................8
2.8. Adjusting the speed ..............................................................................................................................................9
2.9. Stopping the motor...............................................................................................................................................9
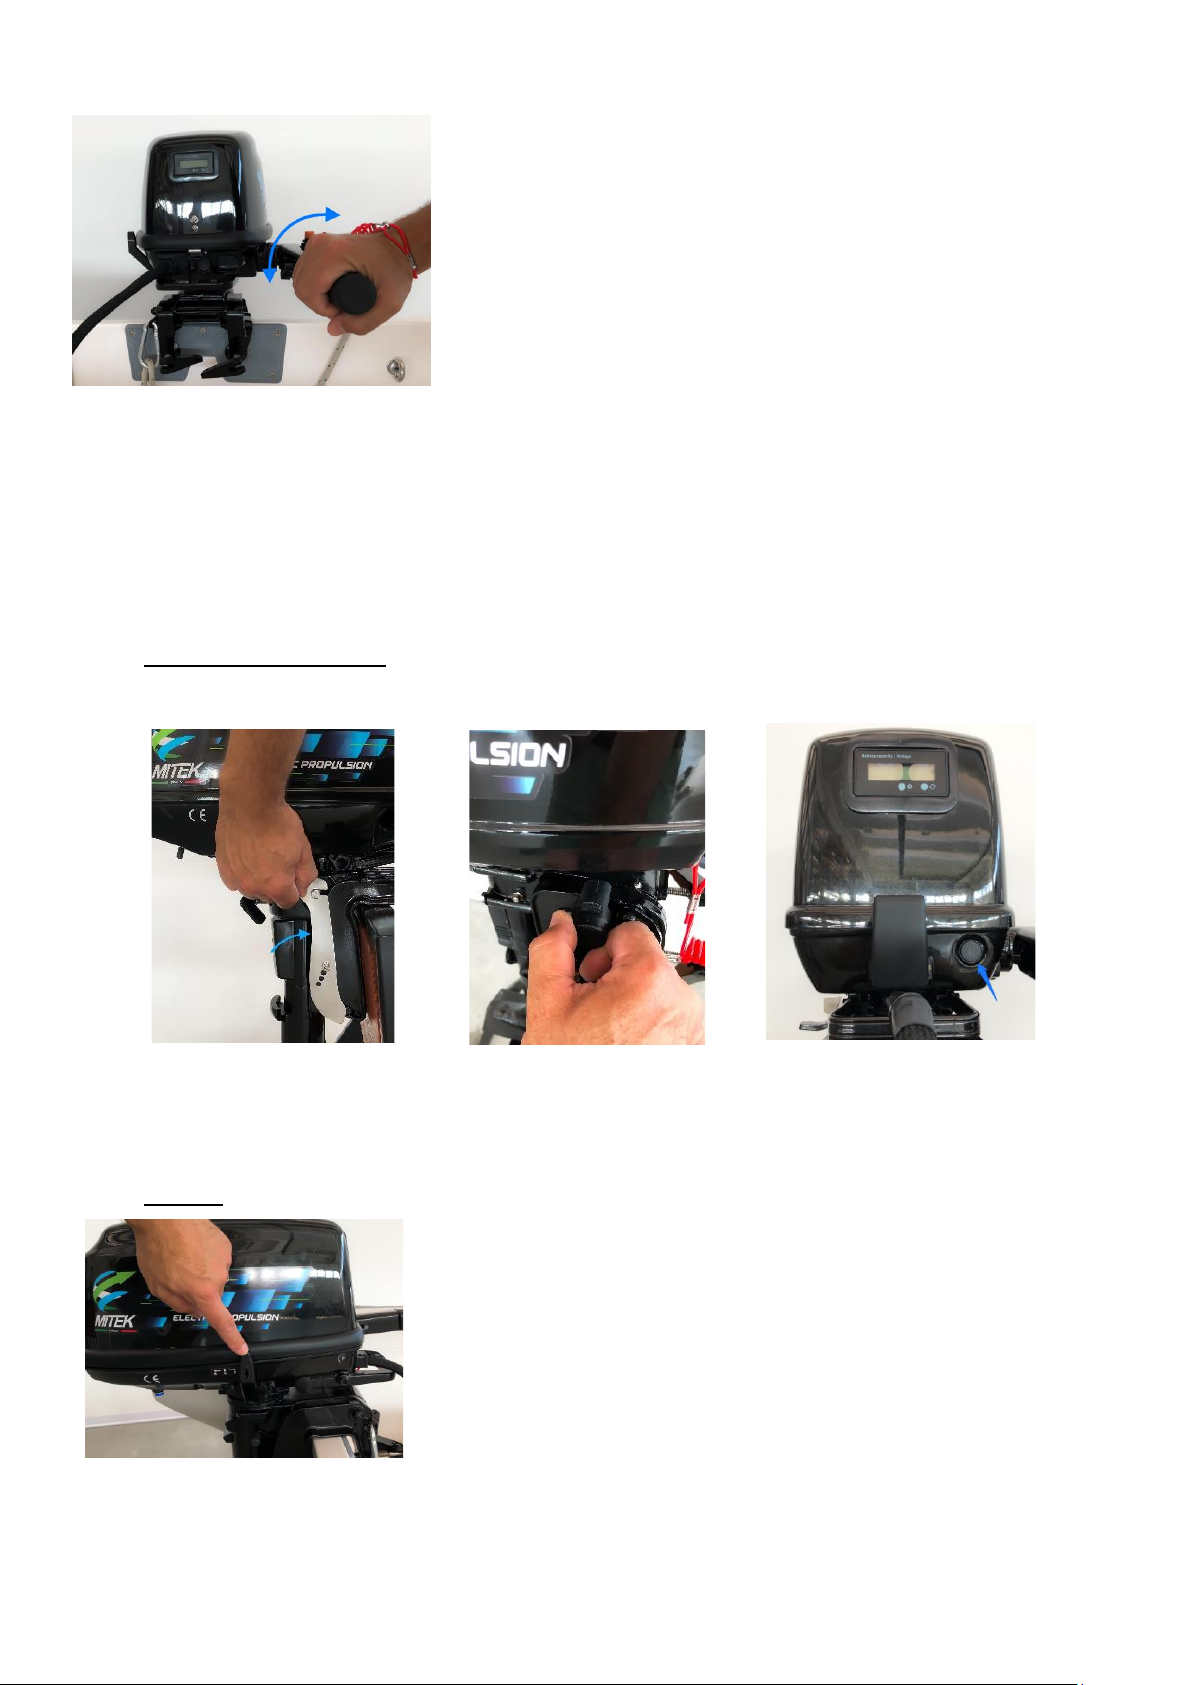
2.10. Gear shift lever..................................................................................................................................................9
2.11. Trimming the motor........................................................................................................................................10
2.12. Locking the tiller..............................................................................................................................................11
2.13. Tilting up and down ........................................................................................................................................12
2.14. Operating in shallow water.............................................................................................................................14

2
2.15. Operating in salt water ...................................................................................................................................14
3. Maintenance...........................................................................................................................................................14
3.1. Greasing ..............................................................................................................................................................14
3.2. Checking wiring and connectors.........................................................................................................................14
3.3. Checking for leakage...........................................................................................................................................15
3.4. Checking the propeller........................................................................................................................................15
3.4.1. Removing the propeller ..................................................................................................................................15
3.4.2. Installing the propeller....................................................................................................................................16
3.5. Changing lower unit oil .......................................................................................................................................17
3.6. Checking and replacing anodes...........................................................................................................................17
3.7. Checking top cowling ..........................................................................................................................................17
3.8. Maintenance table..............................................................................................................................................18
3.9. Trailering .............................................................................................................................................................18
3.10. Storing.............................................................................................................................................................18
4. Actions in emergency.............................................................................................................................................19
4.1. Impact damage ...................................................................................................................................................19
4.2. Not working motor..............................................................................................................................................19
4.3. Submerged motor...............................................................................................................................................19
5. Remote control connection scheme......................................................................................................................20
6. Warranty.................................................................................................................................................................21
7. Dimensions .............................................................................................................................................................23
8. Voltmeter settings..................................................................................................................................................24

3
1. Use and safety
Mitek motors are designed for safe and reliable operation.
Please read this manual carefully before operating your motor.
Failure to comply with the following instructions may cause personal injury or material damage.
Mitek srl declines responsibility due to negligence and non-observance of the rules and instructions
contained in this manual. We also decline responsibility for damage caused by improper use of the
product.
1.1. Important information for safe motor operation
•Before starting a trip, check the status and operation of the motor (including the safety switch which
will act as an emergency stop if necessary).
•Familiarise yourself with all the motor control elements.
•The motor should be only operated by adults who have been instructed to do so.
•Comply with the boat manufacturer's instructions regarding the permitted motorisation of your boat.
Do not exceed the stated loading and power limits.
•In the event of a person going overboard, stop the motor immediately.
•Do not start the motor if there are swimmers nearby.
•Solar panels or generators can be connected only in parallel with the battery bank
Mitek can refuse warranty claims if the purchased item was in any way modified or equipped with parts or
accessory items which are not expressly authorized by Mitek.
Warning: In addition to this information, please pay attention to everything in this manual.
1.2. General Warnings
In addition to the following warnings, please take into account all the information in this manual to prevent
damage to your outboard:
•Protect the connectors and the main switches from moisture.
•The motor unit must be lifted or taken out of the water if the boat is driven by other means (e.g. sailing,
using other motors) to prevent damage to the electronics.
•Operate the propeller only when it is underwater to avoid damage to the cooling system.
•After use in salt water, rinse the outboard with fresh water and be careful not to get the electronic
components wet.
•Before leaving the boat, remove the safety key and disconnect the power connector to prevent
accidental starting of the motor and battery discharge when not in use.
•Disconnect the power connector with safety insulated gloves and do not operate the motor if exposed
to flood waters.
•Check the sacrificial anode periodically, every 6 months at the latest, and replace it if necessary.
•Always use chargers with galvanic isolation when charging batteries. Your dealer will be able to advise
you accordingly.

4
1.3. Technical data
MODEL
SHAFT
VOLTAGE
STATIC THRUST
WEIGHT
2,6 HP
S (short)
24 V
30 KG
16,5 KG
L (long)
24 V
33 KG
20 KG
4,5 HP
S (short)
48 V
51 KG
17,5 KG
L (long)
48 V
54 KG
20 KG
6 HP
S (short)
48 V
65 KG
23,5 KG
L (long)
48 V
65 KG
24,5 KG
9,9 HP
S (short)
48 V
80 KG
27 KG
L (long)
48 V
80 KG
28 KG
15 HP
L (long)
48 V
126 KG
49 KG
20 HP
L (long)
48 V
156 KG
56 KG
NOTE: The sizes of the motors can be found on the last pages of the manual.
1.4. Equipment and controls
1.4.1. The package comes with
•A Mitek electric outboard motor
•Battery connector
•Operating manual

5
1.4.2. Main components
1. Tiller handle
2. Safety switch
3. Display (optional)
4. Tilt leverer
5. Transom brackets
6. Shaft
7. Anti-cavitation plate
8. Propeller
9. Drive/lower unit
1.5. Electrical connections

6
2. Operating manual
2.1. Outboard Installation
Warning: installation should be done by experienced personnel. Please make sure that the installation is
carried out on steady footing and that the battery connector is not connected to the motor.
Place the outboard on the transom or
outboard mount on the centreline of the
boat and tighten the two clamps securely.
Warning: to avoid damage or loss of the
motor, check the tightness of the two
clamps frequently.
Attach a strop or retaining chain to the eyelet of the outboard if the boat has one.
Check that the motor axis is perpendicular to the water and
if necessary move the pin to achieve the correct inclination
(trim).
Please note that this function is not available for models
MO 2.6HP S and MO 4.5HP S.
To lock the steering function of the engine (e.g. on boats
equipped with a rudder) tighten the side screw.
Warning: once the engine has been installed and the boat has reached its maximum load capacity, make
sure that there is no danger of water entering the boat from the transom when water rises due to waves;
this could cause loss of stability and be very dangerous.
2.2. Batteries
The best choice for your electric outboard motor is to install batteries sold or recommended by Mitek.
However, the full range of Mitek MO outboards can be powered with different types of batteries like lead
acid, AGM, Gel, and lithium batteries, as long as they achieve the desired capacity according to the needs
and autonomy required. It is advisable to contact the service centre for all necessary information.

7
2.3. Emergency situations
There are two ways to stop the motor rapidly in an emergency:
•Move the throttle lever to 0: the electronics are set to stop the propeller within 1 second
•Remove the safety key.
2.4. Setting outboard motor mounting height
For correct installation, check the installation height in relation to the boat's
keel.
If the outboard is mounted too high on the transom, cavitation tends to
occur and this may result in loss of efficiency, increased noise and damage to
the propeller; if the mounting height is too low, the water resistance will
increase and thereby reduce engine efficiency. There is also a risk that the
outboard goes underwater.
The correct height of the anti-cavitation plate is 25mm below the bottom of
the boat.
The ideal height is influenced by the type of use and the geometry of the hull.
Please consult your dealer or boat manufacturer for more information.
The optimum mounting height of the outboard motor is affected by the
shape of the hull and the desired use.
Please consult your dealer or boat manufacturer for more information.
2.5. Pre-operation checks
•Check the integrity of the cables and electrical connections.
•Check that the batteries are charged and securely fastened in the correct position.
•Check that there is no water on the electrical connections and batteries.
•Check the gearbox and steering, they should be smooth.
•Check that there are no loose or damaged fasteners.
•Check the integrity of the propeller.
Warning: if any item in the pre-operation checks is not working properly, please contact our customer
service and have it inspected and repaired in order to avoid incidents.

8
2.6. Starting the motor
Warning: do not operate the motor out of the water, it could get damaged. Handle all electrical equipment
with dry hands .
•Attach the engine stop switch lanyard cord to a secure place (e.g. your wrist). Do not attach to
clothing that could tear loose.
•Set throttle to 0.
•Connect the battery power connector.
•Accelerate gently and check that there is a steady flow of water from the exhaust.
Warning: A continuous flow of water from the cooling water pilot hole shows that the water pump is
pumping water through the cooling passages. If water is not flowing out of the hole at all times while the
engine is running, over heating and serious damage could occur. Stop the engine and check whether the
cooling water inlet on the lower unit or the cooling water pilot hole is blocked. Consult your dealer if the
problem cannot be located and corrected. NB: On MO 2.6HP and 4.5HP models, there will be no water
flow when operating in reverse.
2.7. Tiller handle
To change direction wile operating your boat, move the tiller handle
to the left or right.

9
2.8. Adjusting the speed
To increase or decrease speed, turn the throttle grip.
2.9. Stopping the motor
To stop the motor, turn the throttle grip to zero (turn it clockwise completely).
2.10. Gear shift lever
The gear shift changes from motor to motor.
•MO 2.6hp and MO 4.5hp: to reverse, lock the engine tilt with the lever and press the "R" button.
Warning: to avoid damages in case of collision with the seabed, turn the throttle grip to zero and unlock
the motor tilt before moving the gear shift to forward.
•MO 6hp: to reverse, move the gear shift lever:
F = Forward
N = Neutral
R = Reverse

10
•MO 9.9hp: to select the desired direction of travel, move the selector lever towards the direction in
which you want to travel (image), as indicated by the FORWARD or REVERSE arrows.
Warning: keep the gear shift lever in DRIVE for forward or reverse and set it to TILT to raise the
engine (image).
•MO 15hp and MO 20hp: to select the desired direction of travel, move the selector lever towards
the direction in which you want to travel (image), as indicated by the FORWARD or REVERSE
arrows.
2.11. Trimming the motor
Warning: this procedure cannot be carried out on the 2.6HP S and 4.5HP S
models.
•To adjust the trim, remove the pin from the clamp bracket and reinsert it
in the correct position so that the motor axis is perpendicular to the
water.
Warning: Once the trim has been adjusted, gradually test the boat's stability.
An incorrect adjustment of the trim can cause stability problems.

11
2.12. Locking the tiller
If the boat already has a rudder (e.g. sailboat), you can lock the
motor in place with the side screw.

12
2.13. Tilting up and down
Warning: Be sure all people are clear of the outboard motor when tilting up and down. Be careful not to
pinch any body parts between the drive unit and motor bracket.
When the boat is not in use for long periods, or when it is moored in shallow water, or even when it is
driven by other means like a sailboat (e.g. sailboat, other engines), the outboard motor should be tilted up
in order to avoid damage by collision and reduce strain on the motor.
When the boat is moored in the water, always tilt the motor up so that the lower case remains completely
out of the water when the motor is not in use
•2.6hp model: switch off the engine, remove the safety key IMAGE 1, set the tilt lock lever to "F" by
pulling it out about 10mm, rotate it, tilt the motor up and set the tilt lock lever to "R" to keep it in
place. IMAGE 2 To tilt it down again, lift the motor slightly, set the lever to "F" and lower the motor.
(1) (2)
•6hp and 9.9hp model: switch off the motor, remove the safety key, set the tilt lock lever to “N",
raise the motor, making sure that the tilt lock is engaged properly before lowering the outboard. To
lower again, lift the motor slightly, operate the tilt lever and lower the motor.

13
•15hp and 20hp models: switch off the motor, remove the safety key, set the tilt lock lever to “N" on
models with tiller control, unlock the tilt by pushing down the "tilt block" lever (Figure 1), lift the engine
until the tilt block is engaged by means of the appropriate lever (Figure 2). Make sure that the tilt lock
is fully engaged before releasing the motor. To lower again, lift the motor slightly, operate the tilt lever
and lower the motor.

14
2.14. Operating in shallow water
To navigate in shallow water, unlock the tilt lever and raise the foot of the motor partially, so that it does
not hit the bottom.
Warning: do not use the reverse gear when operating in this mode. This could result into damage to things
or injuries to people.
Warning: please note that in this mode the motor is free to tilt. You must navigate at the lowest possible
speed and accelerate very slowly.
Warning: motor cooling is not guaranteed in this mode. Return the engine to the normal running position
as soon as possible.
2.15. Operating in salt water
After operating in salt water, rinse the exterior of the outboard motor and flush the cooling system with
fresh water.
3. Maintenance
To ensure safe operation and long life of the motor, we recommend that you perform some minor periodic
maintenance.
Warning: before carrying out any maintenance operation, set the throttle to 0 and disconnect the power
connector with dry hands.
3.1. Greasing
Use a grease gun to apply marine grease to the following components:
3.2. Checking wiring and connectors
Check the integrity of wires and connectors, and search for any pinched wire or damaged cable sheath and
connector.
Use an electrical contact cleaner spray to preserve the efficiency of the connectors.
Warning: if damage is found, disconnect the power connector using insulated gloves and contact the
nearest customer service.

15
3.3. Checking for leakage
Check that there are no leaks around the motor and from the cooling pipes.
Warning: in the event of a leak, switch off the motor, disconnect the power connector and contact the
nearest customer service.
3.4. Checking the propeller
Warning: before carrying out this check, switch off the motor and disconnect the power connector.
Check the propeller blades for wear.
Check the propeller shaft for damage.
Check the splines/shear pin (in models MO 2.6 and 4.5) for wear or damage. If necessary replace it.
Check that there are no objects entangled around the propeller (e.g. fish lines).
Check the propeller shaft oil seal for damage. If necessary contact the nearest customer centre.
3.4.1. Removing the propeller
MO 2.6/4.5 HP:
Straighten the cotter pin and pull it out using a pair of pliers.
Remove the propeller.

16
MO 6/9.9 HP:
Straighten the cotter pin and pull it out using a pair of pliers.
Unscrew the retaining bolt and remove the washer.
Remove propeller and reinforcing washer.
3.4.2. Installing the propeller
MO 2.6/4.5 HP:
•Apply marine grease to the propeller shaft.
•Install the shear pin.
•Align the propeller with the propeller shaft hole.
•Insert a new cotter pin in the hole and bend the cotter ends securely.
MO 6/9.9 HP:
•Install the thrust washer.
•Apply marine grease.
•Install the propeller on the shaft.
•Insert the washer and propeller nut, insert the cotter pin and bend the longest ends so that it
does not come out.

17
3.5. Changing lower unit oil
Warning: The lower unit oil should be changed in a dry place. Be sure that the outboard motor is securely
fastened to a transom in vertical position. You could be severely injured if the outboard motor falls on you.
Warning: Waste oil is a hazardous waste. It must be collected and disposed of accordingly.
Place a container underneath the motor foot and collect the used oil.
Unscrew and remove the upper plug.
Unscrew and remove the lower plug and allow the oil to drain into the
container.
Warning: Inspect the used oil after it has been drained. If the oil is
milky, water may have seeped into the gear case, which can cause gear
damage. Have your outboard motor checked and repaired.
Screw the lower plug back in and replace the seal with a new one.
Slowly fill the gear oil drain screw hole with oil from the upper plug until
it flows out.
Screw the upper plug back in and replace the seal with a new one.
Warning: change the gear oil after the first 10 hours of operation, and
every 100 hours or at 6 months intervals thereafter.
3.6. Checking and replacing anodes
Inspect the external anodes periodically and remove scales from the surfaces
of the anodes.
Warning: do not paint the anodes, as this would render them ineffective and
can cause rapid corrosion damage.
3.7. Checking top cowling
Check the fitting of the top cowling by pushing it sideways
in both directions. If it is loose, have it repaired by the
nearest service centre.

18
3.8. Maintenance table
When used under normal conditions, maintained and repaired properly as illustrated in this manual, we
are sure that you will enjoy using Mitek motors for many years. Frequency and maintenance operations
may be adjusted according to the operating conditions. The following table gives general guidelines.
A = indicates the check-ups that you can carry out yourself
D =indicates work to be carried out by a service centre
ITEM
ACTIONS
INITIAL
EVERY
10 hours
(1 month)
50 hours
(3 months)
100 hours
(6 months)
200 hours
(1 year)
Greasing points
Greasing
A
Wiring and
connectors
Check
A
A
Cooling water
passages
Cleaning
A
A
Propeller and cotter
pin
Check / Replacement
A
A
Lower unit oil
Replacement
A
A
Anodes
Check / Replacement
A/D
A/D
Cowling clamps
Check
A
Top Cowling
Check
A
A
Warning: When operating in turbid water, the engine should be flushed with fresh water after every use.
3.9. Trailering
When trailering the boat, lift or remove the outboard.
Warning: when you remove the outboard, always place it on a protective towel to avoid damage to the
motor and surface.
3.10. Storing
Warning: When the outboard motor will not be used for a long period of time (two months or more), it is
advisable to place it in a dry, ventilated place away from direct sunlight after performing the following
procedures:
•Secure the outboard motor to a rigid structure and insert the shaft
into a container of clean fresh water. Make sure that the anti-
cavitation plate is completely covered with water.
•Connect the battery using dry hands or insulated gloves.
•Run the motor for at least 2 minutes to flush the cooling system.
•Disconnect the batteries.
•Wash the exterior of the outboard motor with fresh water, dry it and
spray it with a protective product.
•Grease clamps and throttle cable under the tiller (except for MO
2.6S and MO 4.5S).

19
If you do not have the right equipment and are not familiar with these procedures, we recommend that
you visit a s service centre.
4. Actions in emergency
In case of emergency, please follow the instructions below
4.1. Impact damage
If the outboard hits an object in the water:
•Stop the motor immediately by moving the throttle lever to 0 or removing the safety key.
•Inspect the motor for any damage.
•In the event of damage, do not continue to run the motor and contact the nearest service centre.
If no damage is found after a collision with an object, we still recommend that you have the motor checked
at your nearest service centre
4.2. Not working motor
If for some reason you cannot start the motor, please follow the steps below until the problem is solved:
1. Move the throttle lever to 0 and try to accelerate gently.
2. Move the throttle lever to 0, remove the safety key, wait 10 seconds, reinsert it and try to
accelerate gently.
3. Move the throttle lever to 0, disconnect the power connector, wait 10 seconds, reconnect it
again and try to accelerate gently.
4. Contact a service centre.
4.3. Submerged motor
If for some reason the motor is submerged:
a) Remove the safety key.
b) Immediately disconnect the power connector using insulated gloves and take it to the nearest
service centre as soon as possible.
Warning: do not try to operate the motor unless it has been checked by a service centre.
This manual suits for next models
6
Table of contents