MTL-300AN
Thank you for purchasing the Mitel Wireless LAN Adapter
(hereinafter, " MTL-300AN ").
The MTL-300AN is a wireless bridge that can be used to add wireless connectivity features to the
Mitel IP phones (e.g. Mitel MiVoice 6900 Series IP phones or the Mitel 6800 Series SIP phones).
With 2.4GHz/5GHz band support, the Mitel IP phones can easily be connected to a wireless network.
Enterprise security features will ensure safe and secure use of wireless communication at an oce,
factory, or any other environment where high security is required.
This Setup Guide explains how to setup and use the MTL-300AN in a wireless network.
Mitel Wireless LAN Adapter
Setup Guide
Following items are bundled with the Mitel Wireless LAN Adapter.
Package Contents
Connect the AC adapter to the MTL-300AN, and the AC adapter's plug
to an electrical outlet.
Step2 Setup
Start a Web browser (Internet Explorer, Safari, etc) on the PC you are using
for the setup. The Web page of the MTL-300AN is displayed.
* If the destination network is not displayed in the Wireless Network List,
click Detailed Conguration at the top of the page. In the page displayed,
enter the wireless settings of the network that you wish to connect
MTL-300AN to, and click the Submit button. Refer to the HELP for details
on each setting.
Turn o the IP phone that you wish to use wirelessly and connect it to MTL-300AN using the network cable. Connect the AC adapter to the MTL-300AN and the AC adapter's plug to
the electrical outlet.
Turn on the IP phone connected to MTL-300AN.
If the phone uses Power over Ethernet (PoE) the phone will turn on
automatically when the AC adapter is connected to the MTL-300AN.
Step3 Connect the MTL-300AN to the IP phone you wish to use wirelessly
Parts and Functions
Mitel Wireless LAN Adapter
AC adapter
Network cable
Safety Information and Regulatory Compliance Insert * If a password is set on the MTL-300AN, a password entry screen is
displayed. Enter the password and click Login.
* This screen is not displayed at the initial setup. Go on to then.
* If the Web page is not displayed, enter "http://mitel.ca" in the address
bar of the Web browser and press the Enter key.
* The MTL-300AN is set to Multi-Client Mode by default. It is
recommended to keep Multi-Client Mode enabled when using the
MTL-300AN with the IP phones.
FRONT
TOP BOTTOM
POWER LED (Green/Red)
WLAN LED (Green/Red)
STATUS LED (Green/Red)
MAC Address
Push switch
Status LED (Green/Orange)
LAN port
Link LED (Green)
Power connector
Starts the MTL-300AN in Conguration Mode:
Press and hold the push switch for 5 sec while the MTL-300AN is active.
Congures the MTL-300AN using Smart Wireless Setup:
Press and hold the push switch for 10 sec while the MTL-300AN is active.
Resets the MTL-300AN to factory default settings:
Press and hold the push switch while turning on the MTL-300AN.
Release the switch when the WLAN LED turns from Green to Red.
BLINK (Orange) : Waiting for connection when Link LED is OFF.
Transferring data when Link LED is ON.
Connect the network cable.
ON : Connected to a wired LAN
Connect the AC adapter.
ON (Green): Powered on
ON (Red): Powered on and ready
BLINK (Red): Connected device IP changed. Disconnected due to
security issue.
ON (Green): Running in Infrastructure mode.
BLINK(Green): Processing setup using the Smart Wireless Setup.
* Blinks together with STATUS LED when running in Conguration Mode.
* Turns from Green to Red during the initialization.
ON (Green): A network connection is established.
BLINK (Green): Transferring data.
* Blinks together with WLAN LED when running in Conguration Mode.
MAC Address of the MTL-300AN
2
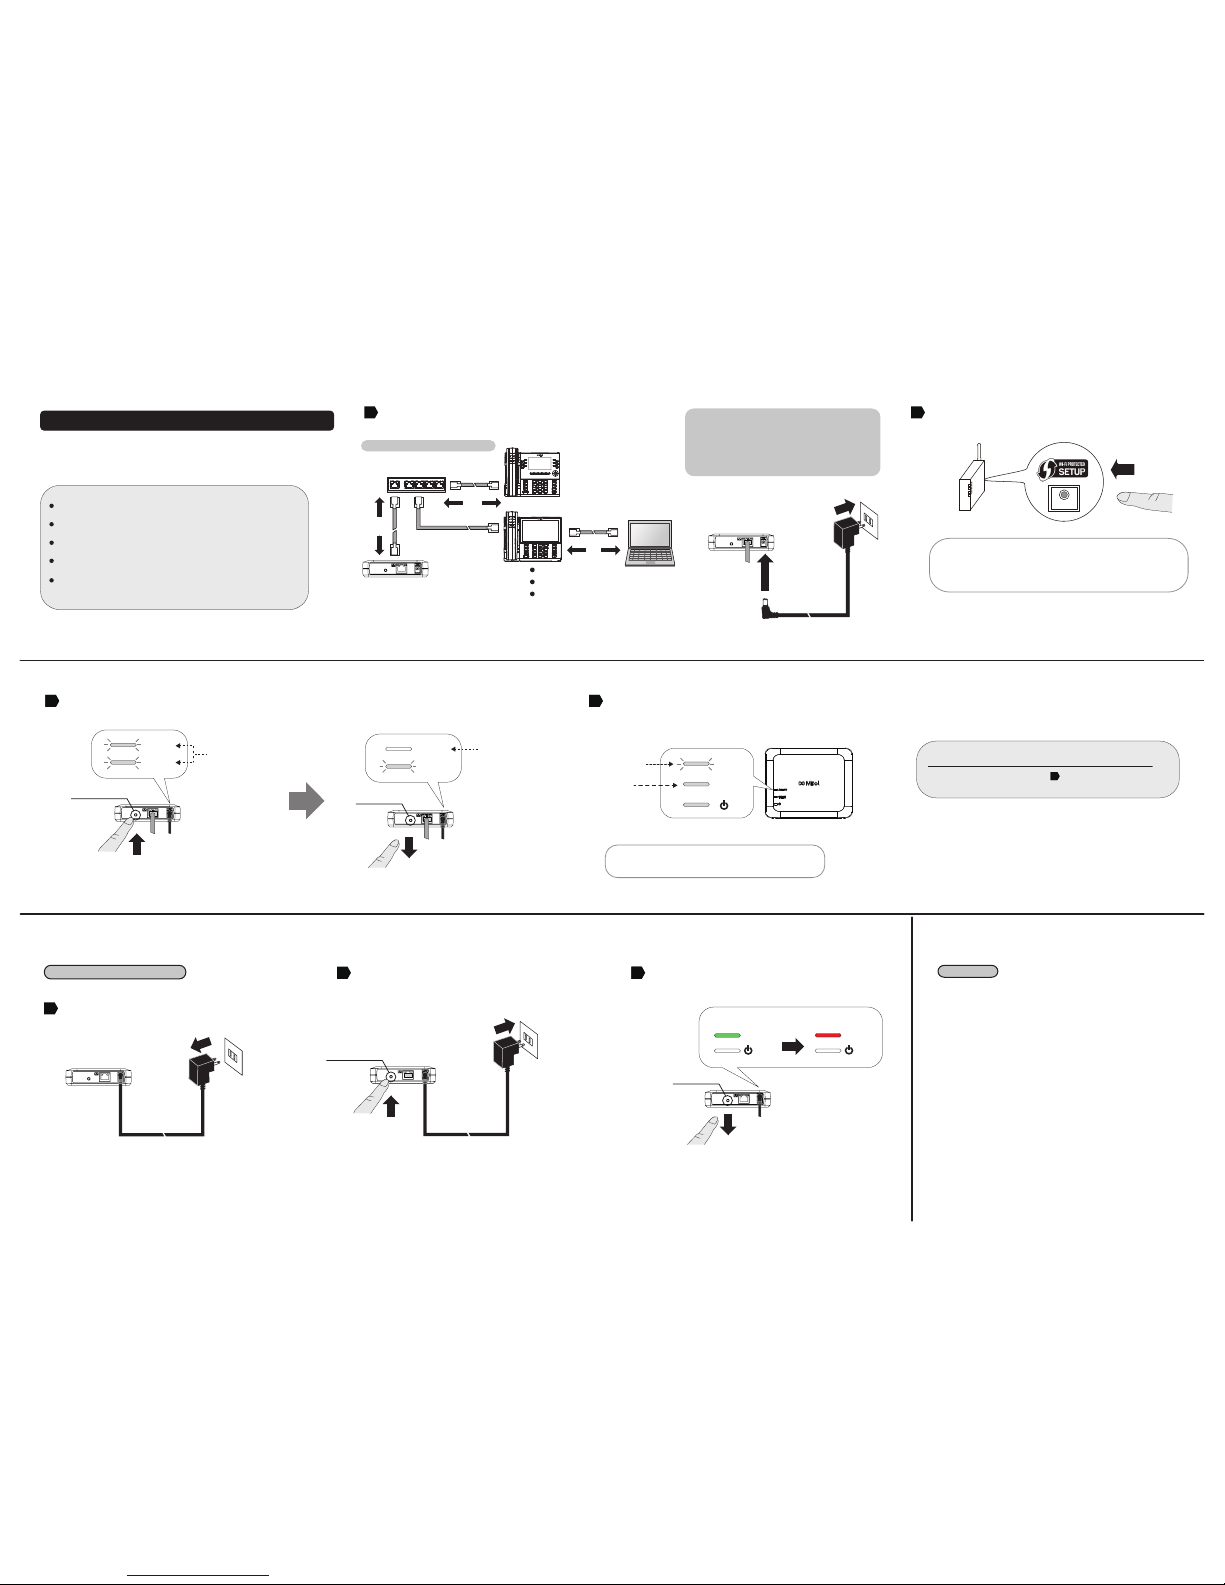
Step1 Start MTL-300AN in Conguration Mode
Connect the MTL-300AN to the PC using the network cable that came
with the MTL-300AN.
1
PC
Network Cable
In the Web page, select the destination network from the Wireless
Network List and enter the WEP Key or Shared Key for the Network Key.
Click Submit when nished.
* It is recommended to use a router/access point that supports the 5 GHz
band. Due to interference and congestion, using the 2.4 GHz band may
cause issues with real time voice communications.
2
Once a message appears indicating that the conguration has been
completed, close the Web browser.
3
The conguration has now been completed.
4
1
23
1
* If wireless LAN is enabled on your PC, please disable it.
When the POWER LED on top of the MTL-300AN turns Red, press and hold the push switch.
Release the push switch when WLAN LED and STATUS LED start to blink Green together (it may take 20sec until blinking). The MTL-300AN will start running in
Conguration Mode and will be ready to congure from the PC that has been connected to the MTL-300AN via a network cable.
3
Release the push switch
Push Switch
Conrm
LEDs are
blinking
Push Switch
②
①
Keep holding
WLAN
STATUS
③
Sample connection in Multi-Client Mode
* Some IP phones may require additional network settings.
In such cases, refer to the manual that came with the IP phone.
* When turning on the MTL-300AN and the IP phones, be sure to
turn on the MTL-300AN rst. Do not press the push switch
when turning on the MTL-300AN.
Multi-Client Mode
Conguration Method 1 - Setup Using Conguration Mode
If you are using a wireless router supporting WPS (Wi-Fi Protected Setup), please start from Conguration Method 2 - Easy Conguration Using Smart Wireless Setup on the back.
October 2016
58015145
* If the Web page is still not displayed after entering “http://mitel.ca”,
you need to check the IP address of the PC connected to the
MTL-300AN.
If a static IP address is congured to the PC, enter the PC’s address
with 1 being added to its last digit and press Enter key.
②
①
AC adaptor
Electrical Outlet
④
②
①
MTL-300AN
Network Cable
Ethernet Switch
IP Phone
MTL-300AN
Electrical Outlet
Conrm
LED turns
to Red
MTL-300AN MTL-300AN
①
E/A:84253FXXXXXX
IP Phone
http://mitel.ca
MTL-300AN
PC
②
Optional