Mobius M108S User manual

M108S TRIMMER
USER GUIDE
v1.3

TABLE OF CONTENTS
INTRODUCTION...............................................................................................................................................................................3
SERVICES & REPAIRS...................................................................................................................................................................4
WARRANTY.........................................................................................................................................................................................5
SAFETY INSTRUCTIONS............................................................................................................................................................. 6
GENERAL SAFETY PRECAUTIONS.............................................................................................................................. 6
GET TO KNOW YOUR
MOBIUS M108S TRIMMER........................................................................................................................................................8
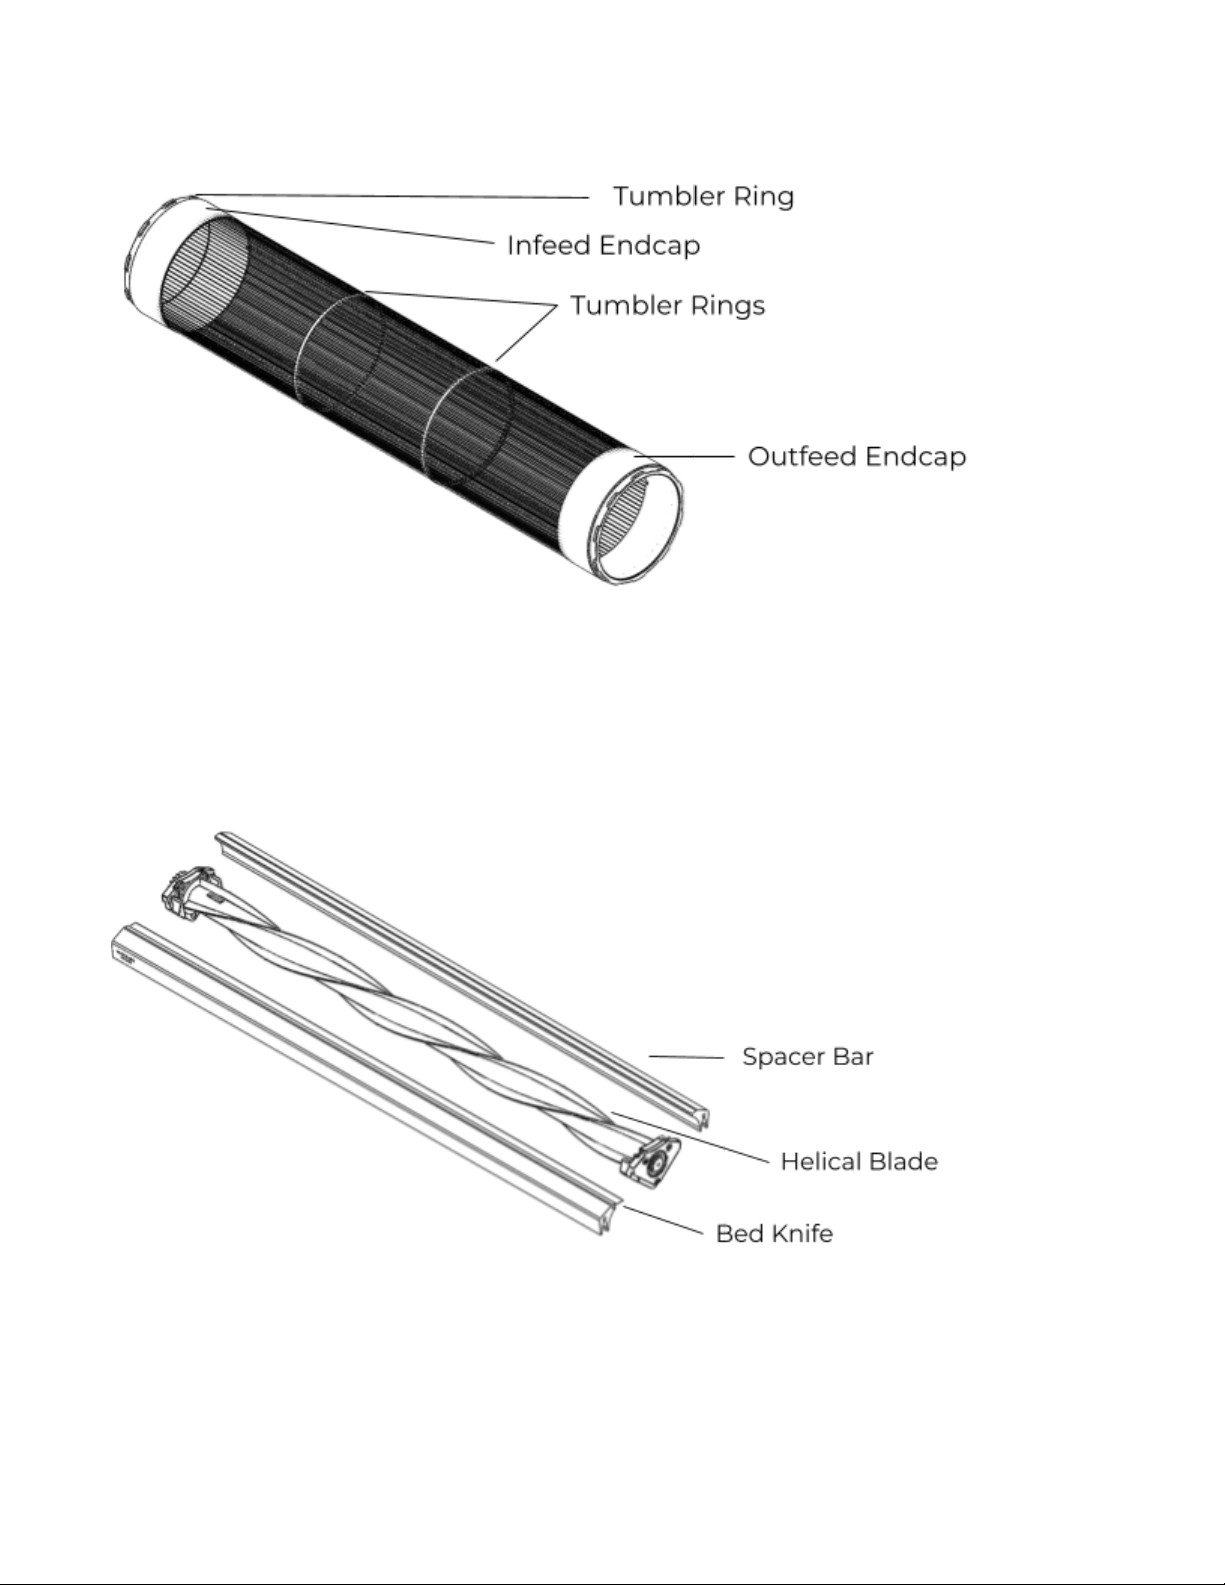
AIRTHREAD TENSION TUMBLER.................................................................................................................................9
TRIFLEX BLADE SYSTEM................................................................................................................................................... 9
VARIABLE FUNCTION SYSTEM....................................................................................................................................10
WHAT’S IN THE CRATE?...................................................................................................................................................10
INITIAL UNCRATING & INSPECTION................................................................................................................................. 11
CRATE INSPECTION..............................................................................................................................................................11
UNPACKING & INSPECTION OF EQUIPMENT.................................................................................................... 11
MACHINE ASSEMBLY & DISASSEMBLY......................................................................................................................... 12
SEPARATOR INSTALLATION...................................................................................................................................12
BLADE CARTRIDGE REMOVAL & INSTALLATION....................................................................................12
LID REMOVAL & INSTALLATION..........................................................................................................................12
TUMBLER INSTALLATION & REMOVAL.......................................................................................................... 12
ELECTRICAL BOX (E-BOX) FILTER REMOVAL & INSTALLATION....................................................12
SETTING UP TO OPERATE.......................................................................................................................................................13
PAIRING THE M108S TRIMMER WITH MOBIUS CONVEYORS................................................................ 13
TANDEM SET-UP....................................................................................................................................................................15
PAIRING THE M108S TRIMMER WITH THE MOBIUS M9 SORTER........................................................15
MOBIUS AUTOMATION SUITE CONFIGURATION EXAMPLES................................................................16
OPERATION...................................................................................................................................................................................... 17
MATERIAL PREPARATION...............................................................................................................................................17
TRIMMER SET-UP..................................................................................................................................................................17
GENERAL OPERATION......................................................................................................................................................18
GETTING READY TO TRIM....................................................................................................................................... 18
MACHINE START-UP SEQUENCE.......................................................................................................................19
TRIMMING – GENERAL.............................................................................................................................................20
TUMBLER EMPTY SEQUENCE.............................................................................................................................22
TRIM TOTE CHANGES................................................................................................................................................22
HOT SWAPS............................................................................................................................................................................. 23
DRY TRIMMING: SINGLE M108S UNIT....................................................................................................................24
VFDs...................................................................................................................................................................................... 24
TUMBLER FILL................................................................................................................................................................24
TILT ANGLE........................................................................................................................................................................25
MOBIUS M108S USER GUIDE 1

FEED RATE........................................................................................................................................................................25
DRY TRIMMING: TANDEM M108S SET-UP...........................................................................................................25
VFDs.......................................................................................................................................................................................25
TUMBLER FILL................................................................................................................................................................25
TILT ANGLE....................................................................................................................................................................... 26
FEED RATE........................................................................................................................................................................26
WET TRIMMING: SINGLE M108S UNIT................................................................................................................... 26
VFDs...................................................................................................................................................................................... 26
TUMBLER FILL................................................................................................................................................................26
TILT ANGLE....................................................................................................................................................................... 26
FEED RATE........................................................................................................................................................................27
WET TRIMMING: TANDEM M108S SET-UP..........................................................................................................27
VFDs...................................................................................................................................................................................... 27
TUMBLER FILL................................................................................................................................................................27
TILT ANGLE........................................................................................................................................................................27
FEED RATE........................................................................................................................................................................27
TIPS & TRICKS......................................................................................................................................................................... 28
CLEANING & MAINTENANCE.............................................................................................................................................. 30
CLEANING.................................................................................................................................................................................30
PREVENTATIVE MAINTENANCE................................................................................................................................ 30
EXPECTED SERVICE LIFE OF STANDARD WEAR PARTS...........................................................................31
Need to order parts?................................................................................................................................................... 31
OTHER INSTRUCTIONS & SUPPORT RESOURCES................................................................................................32
INSTRUCTIONAL VIDEOS & GUIDES....................................................................................................................... 32
MOBIUS OFFICE HOURS................................................................................................................................................ 32
GMP GUIDE..............................................................................................................................................................................32
SUPPORT................................................................................................................................................................................... 32
PARTS ORDERS..................................................................................................................................................................... 32
TROUBLESHOOTING.................................................................................................................................................................33
SPECIFICATIONS..........................................................................................................................................................................34
TECHNICAL SPECIFICATIONS..................................................................................................................................... 34
MATERIAL SPECIFICATIONS........................................................................................................................................ 34
MOBIUS M108S USER GUIDE 2

INTRODUCTION
This User Guide is a comprehensive manual covering the operation and maintenance of the
Mobius M108S Trimmer as of the date of publication. Eteros Technologies reserves the right
to make updates to the machine from time to time. In the event of an update, this User
Guide will remain applicable for the safe operation and maintenance of your unit. This User
Guide, as well as any documentation supplied by component manufacturers, are to be
considered the information package associated with this device. Every operator must read
and understand the User Guide. The Guide should be located within easy access for
periodic review.
MOBIUS M108S USER GUIDE 3

SERVICES & REPAIRS
Repairs may only be carried out by Eteros Technologies or a designated authorized agent
(service technician). Should the need arise, please notify us:
ETEROS TECHNOLOGIES
26 Industrial Ave.
Carleton Place, Ontario, Canada K7C 3T2
www.eteros.com
1.866.874.6244
Improper interfacing, improper repair, or unauthorized modification could result in void
warranty claims.
MOBIUS M108S USER GUIDE 4

WARRANTY
Thank you for purchasing Mobius Trimmer equipment from Eteros Technologies Inc.
The Mobius M108S Trimmer, MBX Bucker, M210 Mill, and Mobius Automatic Tumbler and
Brush Washer are covered by our manufacturer’s warranty as follows:
●No warranty on consumable parts, including blades/blade bars, tumbler, fan housing
filter bag, brush-bar, filters, trim tote gasket, die plates, rolls, and screens;
●Warranty coverage for one (1) year or 1,000 operating hours, whichever occurs first, on
motors, electrical components, and remainder of machine components.
The warranty period begins on the date the equipment is received by the customer. Any
damage that occurs during shipping will be the responsibility of Eteros Technologies.
The above terms are valid if Mobius equipment is used and maintained as directed. If the
equipment is modified in any way, all terms of this warranty are void. This warranty does not
apply to cosmetic damage, such as scratches or general wear and tear.
Should you experience a technical problem with your equipment, please contact Eteros
Technologies at the email or phone number outlined in the Services & Repairs section.
MOBIUS M108S USER GUIDE 5

SAFETY INSTRUCTIONS
To ensure operator safety while in use, this device includes decals, guarding, and other
safety features. Operators are encouraged to use caution and best judgment when using
equipment. Equipment should be serviced when required.
To avoid possible damage to the machine and risk of injury to the operator, consult with an
Eteros Technologies representative to answer any questions.
All operators must read and understand this User Guide and be trained in safe operation
and use of the machine. We recommend the owner of this equipment develop a standard
operating procedure (SOP) specific to each worksite to address any local hazards or other
conditions not outlined in this User Guide. The machine must be inspected regularly for
damage, component failure, and wear. Results of inspection activity should be
documented.
Eteros Technologies makes every effort to ensure the machine is compliant with all current
safety standards. It is the responsibility of the owner to ensure all municipal, provincial,
state, county, territorial, and federal codes, regulations, and standards have been met in
each working location.
Do not lend or rent your machine without providing the User Guide. A first-time operator
should receive practical instruction before using the machine.
This machine is not to be used for any purpose other than those expressly stated in the
User Guide, advertising literature, or other Eteros Technologies written material pertaining
to the machine.
GENERAL SAFETY PRECAUTIONS
1. READ and become familiar with the entire User Guide. Learn the equipment
applications, limitations, and possible hazards.
2. IDENTIFY AND FOLLOW WARNING LABELS on the machine.
3. DO NOT USE THE MACHINE IN A DANGEROUS ENVIRONMENT or damp or wet
locations. Never expose the control panel directly to rain or water. Keep the work area
well illuminated.
4. DO NOT use the device in the presence of flammable liquids or gasses.
5. KEEP WORK AREA CLEAN. Cluttered areas and workspaces invite accidents.
MOBIUS M108S USER GUIDE 6

6. WEAR PROPER APPAREL. Do not wear loose clothing, gloves, neckties, rings,
bracelets, or other jewelry which may get caught in moving parts. Non-slip footwear
is recommended. Wear protective hair covering to contain long hair.
7. POWER DOWN AND DISCONNECT EQUIPMENT before washing or servicing and
when changing accessories.
8. CHECK FOR DAMAGED PARTS PRIOR TO OPERATION. The equipment should be
inspected prior to use to ensure proper operation when performing its intended
function. Check for alignment of moving parts, binding of moving parts, breakage of
parts, mounting, and any other conditions that may affect its operation. Any
damaged part including guards should be properly repaired or replaced.
9. ALWAYS WEAR EYE PROTECTION.
MOBIUS M108S USER GUIDE 7

GET TO KNOW YOUR
MOBIUS M108S TRIMMER
MOBIUS M108S USER GUIDE 8

AIRTHREAD TENSION TUMBLER
TRIFLEX BLADE SYSTEM
MOBIUS M108S USER GUIDE 9

VARIABLE FUNCTION SYSTEM
WHAT’S IN THE CRATE?
Your M108S Trimmer arrives with the following components:
INSTALLED ON MACHINE
PACKED SEPARATE FROM MACHINE
3
Helical Blade
1
15' Power Cord
3
Bed Knife
2
Tumbler
3
Spacer Bar
2
Trim Tote with Gasket
2
Sensor Override Pucks
2
E-box Filter
2
Tandem Locks
2
Dry Trim Exhaust Filter
1
Brush
1
Wet Trim Exhaust Filter
1
E-Box Filter
1
Filter Bag Wire
1
Spare Drive Belt
1
Spring Jack
1
Infeed Hopper
1
Outfeed Chute
2
Tumbler Retaining Ring
1
Instructional Poster Package
MOBIUS M108S USER GUIDE 10

INITIAL UNCRATING & INSPECTION
CRATE INSPECTION
Inspect the exterior of the crate for any damage that may have been caused during
shipping. If there is visible damage that may be indicative of damage to the contents, take
photos of the damage and contact Eteros Technologies for further instructions.
UNPACKING & INSPECTION OF EQUIPMENT
Inside the machine crate is the fully-assembled Mobius M108S Trimmer, fastened to the
crate base, and separately packaged accessory items.
A detailed instructional video for unpacking the crate is available at
mobiustrimmer.com/uncrate-m108s/
Once the trimmer and all of the accessories are unpacked, ensure that all items are
accounted for and in good condition. (See ‘WHAT’S IN THE CRATE?’ on the previous page)
MOBIUS M108S USER GUIDE 11

MACHINE ASSEMBLY & DISASSEMBLY
Assembly and disassembly of the trimmer will be required to clean the equipment and to
carry out periodic maintenance activities.
The following videos provide detailed instructions on how to install and remove key
components on the M108S Trimmer. (Find all instructional videos at
mobiustrimmer.com/instructions/)
SEPARATOR INSTALLATION
BLADE CARTRIDGE REMOVAL & INSTALLATION
LID REMOVAL & INSTALLATION
TUMBLER INSTALLATION & REMOVAL
ELECTRICAL BOX (E-BOX) FILTER REMOVAL & INSTALLATION
MOBIUS M108S USER GUIDE 12

SETTING UP TO OPERATE
The M108S Trimmer can be operated as a single unit, manually feed using the infeed
hopper that comes included with the machine, or it can be operated as part of a larger
automation line for high-volume trimming and sorting. The following sections describe
how to pair other equipment with the Mobius Trimmer.
PAIRING THE M108S TRIMMER WITH MOBIUS CONVEYORS
To get the most out of your Mobius Trimmer, consider pairing it with an Infeed Conveyor
and an Outfeed Conveyor.
Pairing the M108S with an Infeed Conveyor instead of manually feeding it using a hopper
offers the following benefits:
●Higher throughputs;
●More consistent trimming results;
●Opportunity to remove foreign objects (i.e. pieces of lattice, zip ties, gloves, etc.)
before they run through the trimmer with your product; and
●Ability to pull out excess water leaves, which boosts both throughputs and trim
potency.
Adding an Outfeed Conveyor instead of having your trimmed flower simply fall into a
collection bin offers the following benefits:
●Real-time quality control (QC) of trimmed product;
●Ability to monitor and, if necessary, adjust trimmer settings to dial in finished
product; and
●Ability to easily weigh and batch product as it comes out of the trimmer.
Mobius Conveyors have been designed specifically to integrate with the M108S Trimmer. To
pair the Mobius Infeed Conveyor to the M108S Trimmer, install the infeed guide plate on the
trimmer and then hook the belt tensioning stubs on the conveyor frame into the hooks on
the guide plate. As the trimmer is raised and lowered during operation, the guide plate will
ensure that the Infeed Conveyor stays connected to the trimmer and moves up and down
with it.
MOBIUS M108S USER GUIDE 13

To pair the Mobius Outfeed Conveyor to the M108S Trimmer, simply roll the conveyor into
place, either inline with the trimmer or at a right angle, in either direction.
MOBIUS M108S USER GUIDE 14

TANDEM SET-UP
If your operation is looking to process larger volumes or simply wants to increase its hourly
trimming throughput, connecting two Mobius M108S Trimmers in tandem is the answer.
A how-to video for connecting two M108S units in tandem is available at:
mobiustrimmer.com/instructions/m108s-trimmer-tandem-setup/
PAIRING THE M108S TRIMMER WITH THE MOBIUS M9
SORTER
Mobius equipment is designed to be modular and one of the options that really helps drive
automated processing operations is the Mobius M9 Sorter. When set up as an automated
trimming and sorting line, the Mobius M9 Autofeed Conveyor connects the two machines
so that product can flow continuously and seamlessly from the M108S Trimmer to the M9
Sorter.
Note: The line can be configured with or without the Mobius Outfeed Conveyor and each
piece can be set up either inline or at right angles. Below are some of the configuration
options.
MOBIUS M108S USER GUIDE 15

MOBIUS AUTOMATION SUITE CONFIGURATION EXAMPLES
MOBIUS M108S USER GUIDE 16

OPERATION
MATERIAL PREPARATION
The M180S Trimmer can be used to trim wet (fresh) or dry material. If trimming dry, it is
recommended that the material have a moisture content in the range of 11% - 15%. When
the moisture content is below 11%, the material tends to become very brittle and fragile and
the flower-to-trim ratio suffers as a result.
TRIMMER SET-UP
Take the following steps to set up the trimmer for operation:
1. Ensure there is sufficient space in the operating area to accommodate the
following:
●Allow for enough space behind the machine to comfortably install and
remove the trim tote.
●Allow for enough space at the front of the machine to allow the operator to
easily access the control panel and, in particular, the emergency stop button.
●Allow for enough space on the infeed of the trimmer to accommodate either
the infeed hopper or an Infeed Conveyor.
●Allow for enough space around the infeed to have multiple totes of material
staged and ergonomically positioned to feed into the trimmer.
●Allow for enough space on the outfeed to accommodate collection totes, an
outfeed conveyor, sorting equipment, scales, or any other equipment
necessary to maintain a consistent processing workflow.
●If using an Outfeed Conveyor to perform quality control functions, allow for
enough space to position personnel safely and comfortably on one or both
sides of the conveyor.
●Consider the proximity of the trimmer to the power source. The standard
power cord supplied with the M108S Trimmer is 15’ (4.5m). For custom cord
lengths, please contact Eteros Technologies.
2. Check that the electrical box filter is in place and clean. It is recommended that the
electrical box filter is replaced after every trim session.
3. Check that the correct exhaust filter (wet trimming filter versus dry trimming filter)
is in place and clean. It is particularly important that the dry trimming exhaust filter
MOBIUS M108S USER GUIDE 17

is not clogged. If air cannot easily flow through the filter, the strength of the
vacuum created by the machine is diminished and trim quality will suffer.
4. Confirm that the power cord is in good condition and that the twist lock plug ends
are locked into the machine power receptacle and the power source.
5. Ensure all guarding is properly installed on the trimmer and on any other
accessories and/or machines being used in conjunction with the trimmer.
6. Ensure that the tumbler and all blade components are in good condition and
properly installed in the machine. Carry out the 6-Point Blade Inspection before
starting the machine.
7. Ensure that the separator is properly assembled and installed and that the trim
tote(s) and gasket(s) that will be going into operation are in good condition and
properly installed.
8. Address any errors that are flagged on the control panel.
GENERAL OPERATION
PRIOR TO DEVICE OPERATION, ENSURE ALL GUARDS ARE IN PLACE AND PROPERLY
SECURED. PRESS THE E-STOP BUTTON AT ANY TIME TO STOP ALL MOVING PARTS AND
TURN OFF THE MACHINE.
GETTING READY TO TRIM
1. Identify a Trim Team Lead. This person is responsible for:
●Ensuring that the trimmer is set up correctly and all pre-start inspections have
taken place;
●Ensuring that appropriate PPE is available and utilized by all team members in
the room;
●Assigning trim team roles, as per item 2 below;
●Operating the trimmer and dialing in the key variables (feed rate, tilt angle,
tumbler speed, vacuum, and blades) until the desired level of trim is reached
on the outfeed.
Note: There is a delay between making a change to one or more of these
variables and seeing the impact of that change on the buds coming out of the
trimmer. Be patient when dialing in the trimmer settings so as not to
over-correct.
MOBIUS M108S USER GUIDE 18

2. Identify roles for each of the trim team members. Typical roles could include:
●Feeding the trimmer via the Infeed Conveyor or infeed hopper;
●Performing QC and polishing of material on the Outfeed Conveyor or outfeed
collection tote;
●Acting as a runner, which includes bringing totes of untrimmed material to
the infeed line, changing out full totes for empty totes on the outfeed line,
keeping an eye on and swapping out the trim tote when full, weighing
material, as required, etc.
Note: For a more comprehensive description of these and related roles check
out our blog article, How to Staff a Mobius Cannabis Processing Line.
mobiustrimmer.com/how-to-staff-a-mobius-trim-line/
3. Put the infeed and outfeed equipment into place. If using conveyors, ensure they
are adjusted to the correct height. For the Outfeed Conveyor, this means setting it
at a height below the outfeed of the trimmer. For the Infeed Conveyor, this means
setting it at a height that has the belt just touching the Infeed Conveyor guide
when the tilt angle is at the lowest level you will be operating at. It is ok if the lead
legs on the Infeed Conveyor lift off the floor when the tilt angle is increased.
4. Ensure the trim tote is properly installed.
5. Ensure there is an adequate amount of bucked material available at the infeed end
of the trim line and that is within easy reach of the operator who will be feeding the
machine.
6. Ensure there is an empty tote on the outfeed end of the trim line to collect the
material.
7. Fill the Infeed Conveyor belt or hopper with material in preparation for beginning
trimming operations.
MACHINE START-UP SEQUENCE
1. Disengage the e-stop button.
2. Press the blue button to turn on the machine. The lights will turn from blue to
white indicating the machine is ready to begin trimming.
MOBIUS M108S USER GUIDE 19
Table of contents
Other Mobius Trimmer manuals