Modd i360Move User manual

i360Move Robotic Vacuum Cleaner
INSTRUCTIONS MANUAL
Please keep this instruction Manual carefully,
and read it before operating
MV303

1. It is not allowed to dismantle the product by non-technicians
without permit.
2. The product only applies the original power adapter, other-
wise, it may bring damage to the product.
3. Please do not touch electric wire, socket or power adapter
with wet hands.
4. Please pay attention to the cloth curtains, substances that
are easy to entangle, or the user's body to ensure that not to be
rolled into the driven wheel.
5. Please do not get the product close to cigarette butt, lighter
or other types of flames.
6. The product is for indoor use only.
7. It is not allowed to put weight of 10kg or more or stand on
the product.
8. Please do not use the product in the damp environment
such as bathroom and do not use it to absorb liquid.
9. Before using the product, please remove all vulnerable goods
and fragile items such as glass cup and lamp as well as the
things which may entangle the side brush or block the air inlet,
for example, electric wire,paper,curtain,etc.
10. Please switch it off when the product is not going to be
used for a long time or transported.
11. Please check if the adapter is well connected with the
socket betofre charging.
12. The working temperature for this product is 0℃-40℃.
13. Please remove the battery before scrap of the product.
14. Users should recover the old battery when you change
the battery.
15. It is forbidden to let children,mentally retarded person
or person who do not have common knowledge or
experience about the domestic households without sur-
veillance.
16. Please do not dismantle the battery by yourself. Please
contact the after-sales service if you want to change the
battery.
This appliance is not intended to be used by children and
person with reduced physical, sensory or mental capabili-
ties, or lack of experience and knowledge on the domestic
household, unless they have been given supervision or
instruction concerning use of the appliance by a person
responsible for their safety.
Children should be supervised to ensure that they do not
play with the appliance.
Switch off before cleaning or maintaining the appliance
‒ The battery in appliance must be removed from the
appliance before it is scrapped;
‒ The appliance must be disconnected from the supply
mains when removing the battery;
‒ The battery must be removed and discarded according
to local laws and regulations before disposal of the appli-
ance.
This appliance batteries that are only replaceable by
skilled person.
WARNING: For the purposes of recharging the battery, only
use the detachable supply unit GQ12-240060 provided
with this appliance
Safety instructions
Product introduction
Operation introduction
Product maintenance
Troubles shooting
1
5
9
15
19
12

34
Before using the product on a rug with tasseled edges, please fold the
rug edges under.
WARNING:
Do not use your i360Move on wet surfaces or surfaces
with standing water.
It may be necessary to place a physical barrier at the edge of a drop to
stop the unit from falling over the edge.
Notes Before Cleaning
could be obstructed by, and tidy up the area to be cleaned by putting
furniture, such as chairs, in their proper place.
1
2
3

7
7
56
Manual
Instruction
Main Unit
Charging Dock
Power Adapter
Side Brush
Remote Control
High-Efficiency Filter
Manual Instruction
x 2

78
Charging Dock

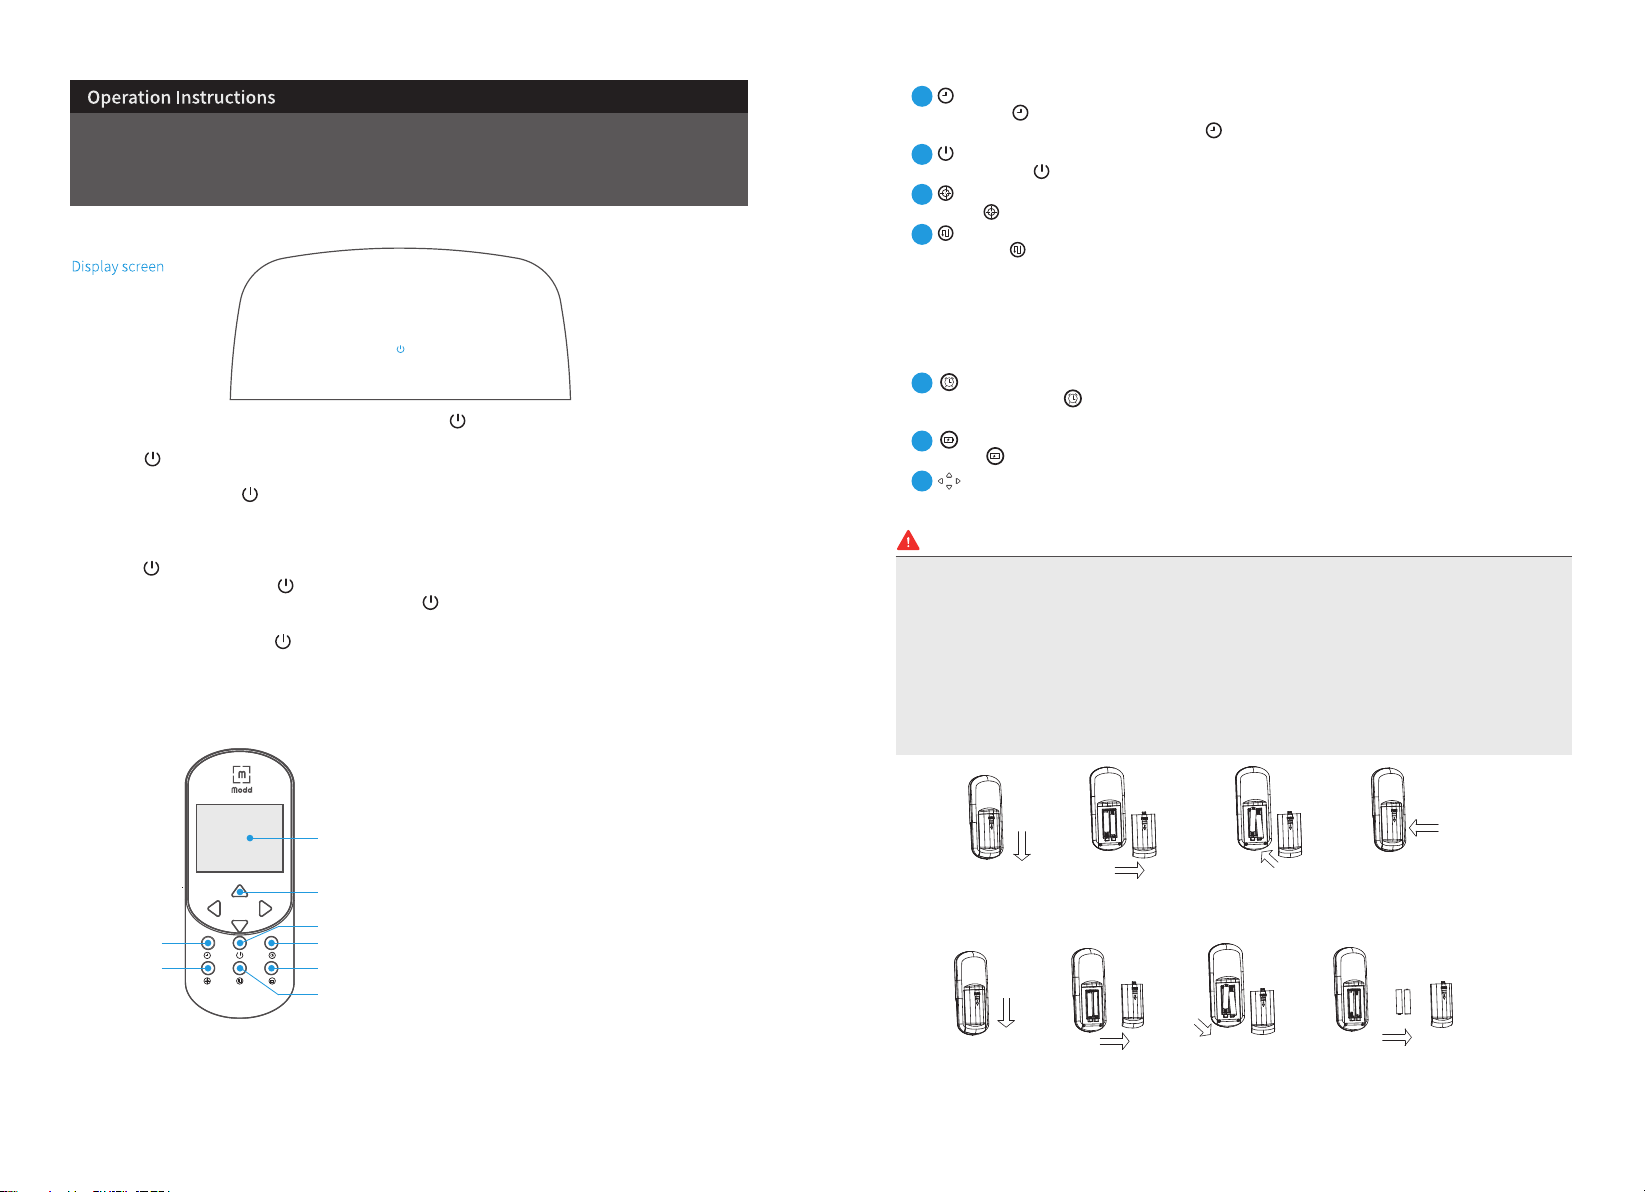
Install the battery to remote conrtol before operations, or take the battery out of remote if long time
no usage of remote.
Remote control
The operation of remote control is similar as operation on TV remote, press the buttons and control
your i3 cleaner directly. Firstly switch the On/Off button on your i3 robot’s body and robot is ready for
cleaning:
1
Press the “ ” button and hold for a while to start the setting of time. Press the direction
arrows to set times and finally press the “ ” button to save setting.
2
Shortly press ” ” button to start or pause the cleaning of your i3 robotic cleaner.
3
Press “ ” , to start spot deep cleaning for specific area.
4
5
Shortly press the “ ” button to check the scheduled cleaning, and long press the button
for setting of scheduling, more details, please see page 11 of this manual instruction.
6
Press “ ” button to order your i3 robot back to charging dock.
7
Press the direction arrow keys to control the cleaning path of your i3 robotic cleaning.
7
8
6
5
4
3
1
2
Illustration of the Main Unit and Remote Control
Cautions
Firstly switch the “On/Off” button on unit body, indicator ” ” light on cover flash blue and your i3
robot is ready for cleaning.
Press the “ ” light on machine middle cover, to start the operation of cleaning or stop the operation of
cleaning.
The signal information of “ ” indicator light as below.
Switch the “On/Off” button, your i3 robot is ready for cleaning and indicator light shows blue color, and
the light will shut off if no operation in 30 min.
Robot system reset, the light will quick-flash blue for 7 seconds.
Press the “ ”, the light flash blue for 3 times , then start to cleaning and the light keeps in blue color.
When in low battery level, the “ ” light will flash red color slowly.
When back to charging dock and start charging, the “ ” light will keep flash blue color slowly, the light
will keep in blue color once full-charged.
Once meet any problems, the “ ” indicator light will flash red color quickly.
Assemble the battery to remote control body
Push and take out the battery cover under remote body, fit 2pcs battery (AAA 1.5V battery) into the
battery container in right direction, cover the remote control body with battery cover.
Discharge the battery from remote control body
Push and take out the battery cover under remote control body, discharge the 2 pcs AAA battery from
the battery container, cover the remote control body with battery cover.
Press the ” ” button to change the cleaning mode,
MODE1 :Edge cleaning ;
MODE2 :Zone cleaning;
MODE3: Auto cleaning;
MODE4:Zigzag cleaning
Kindly note that there will have a pause if you change MODE4 to MODE1; more details,please see the
page 12 of the manual instruction.
- The types of batteries that may be used;
– See following procedures to remove and insert the batteries(AAA 1.5V )
– Non-rechargeable batteries are not to be recharged;
– Different types of batteries or new and used batteries are not to be mixed;
– Batteries are to be inserted with the correct polarity;
– Exhausted batteries are to be removed from the appliance and safely disposed of;
– If the appliance is to be stored unused for a long period, the batteries should be removed;
– The supply terminals are not to be short-circuited.
910
1. LCD Display
2. Direction Control Buttons
3. Start / Stop Button
4. Time Schedule Button
5. Return To Charge Mode Button
6. Mode Settings Button
7. Current Time Setting Button
8. Spot Cleaning Mode Button

Caution and Room Preparation before Operating Your i3 Robot.
03
.
a.When your i3 robotic cleaner is in charging, the “ ” indicator light will flash blue color slowly
b.When the charging is completed, the “ ” indicator light will keep in blue color.
c.When the power is not enough in standby mode, your i3 robotic cleaning will send out a voice
message ”please charge” and “ ” indicator light will become red color.
d.When the power is not enough in the working model, your i3 robotic cleaning will stop cleaning
and look for charging dock automatically and “ ” indicator light flash red color.
Methods for extending the lifetime of the battery:
a.Please charge your i3 robotic cleaner for 12 hours for the first use.
b.When the power is not enough, please charge it immediately.
c.When the cleaning is finished or the power is too low, your i3 robotic cleaner will start to return
the charging dock automatically.
d.If your i3 robotic cleaner will not be used for a long time, please charge it fully, take the battery
out and keep it in the dry and ventilated place.
e.If your i3 robotic cleaner is not used for 3 months, please charge it for 12 hours at one time.
11 12
Put the charging dock on the ground against the wall and remove all the obstacles 2-3 meters
in front of the dock as shown in the figure below.
If your i3 robot is in the power-off state,please switch it on.
You can charge your i3 robotic cleaner by the following two ways.
a. Plug the power adapter directly on your i3 robotic cleaner with the other end connected with
power as shown in the pic.a.
b.Please press “ ”remote control to make your i3 robotic cleaner back to charging dock by itself
as shown in the pic.b.

Reservation Schedule Cleaning Settings
The current setting is 8:00 AM. The remote control setting value is 01:00. After the setting is
successful, your i3 robotic cleaner will start working after 1 hour. Your i3 robotic cleaner starts to work
at 9 o'clock and will start working at 9 o'clock everyday.
Note
Note
Cancel the schedule cleaning settings
1
Make sure your i3 robotic cleaner is in Standby or Charge state, and then long press the
“ " button on the remote control, the remote control to enter the schedule setting
mode;
2
At this point the remote control display appears flashing numbers, change the flashing number by
press up and down button, set a number by left and right buttons to move to the next number to
be set.
3
After setting the remote control at your i3 robotic cleaner, press the remote control “ " key,
the success of the reservation machine will display the corresponding appointment time.
Make sure your i3 robotic cleaner is in Standby or Charge state, and then long press the
“ ” button on the remote control, the remote control to enter the schedule setting
mode;press the “ ” button again.(If the wiring harness is 00:00, the reservation is canceled,
otherwise please press “ ” key once)
When press “ ”,the remote control displays “ 1 ”, your i3 robotic cleaner will enter to the edge cleaning,
ceaning along with the obsacle.
Start
End
Introduction Of The Cleaning Modes
When press “ ” the remote displays “ 2 ”, your i3 robotic cleaner will enter the zone cleaning, and start
cleaning in a specific areas within a scope of 2*2m.
When press “ ” the remote control display “ 3 ”, your i3 robotic cleaner will enter auto cleaning; robot
starts 2 meters cleaning and then turn a auto direction.
13 14
When press “ ” the remote control display “ 4 ”, your i3 robotic cleaner will enter Zigzag mode, in this
mode ,robot will clean in “ z ” way.
d.
Setting time, please long press " "button to set the time, press the left& right direction button to
switch the hours/minutes; and up/down direction button to change the hours/minutes; press " ”
to exit the time setting

15 16
below.
objects
Side Brush Cleaning of the Dust Bin and Filter

17 18
day once. lifetime
Cleaning Of The Dust Bin And Filter Cleaning Of The Sensor And Wheels

PRODUCT PARAMETER
Parameter
350 mm
97 mm
4.5 kg
14.4 V
Ni-MH 2000 mAh
0.35 L
Items
Diameter
Height
Net weight
Voltage
Battery
Dust bin
Manual / Auto
4-6 hours
70 minutes
Touch button
Auto, Edge,Spot,Zigzag
ParameterItem
Charging type
Cleaning mode
Charging time
Cleaning time
Button type
TROUBLES SHOOTING
Voice Notice/Problems Possible reasons Solution
Please turn on the power switch
Please put the machine in a safe place
Wheel overload
Please install dustbin
Side brush fault
Signal-short
Front bumper fault
Please Charge
Power switch is not power on when
charging
Machine is not on floor,or its wheel
falls down. Sensors covered by dusts
Left and right wheel jammed by
cables or ropes
Machine trapped by obstacles
No dustbin in machine,
Dustbin is incorrect installed
Left side brush or right side brush
ammed by dusts, or obstacles
Hair or other debris jammed the
roller and cause Overload on roll
Front bumper does not reset to
position.
Front bumper jammed by obstacles
Battery in unit machine is in low level
power
Switch on the power button
Put the machine in a safe floor
Check the sensors hole,
and remove all the dusts.
Remove the obstacles winded on
wheels
Take out the machine from obstacles
Check and fit the dustbin into
machine.
Take out and reinstall the dustbin into
machine
Remove the dusts or obstacles
jammed on brush
Remove the hairs or other debris on
roller brush
Check out the bumper
function if it can trigger back, and
reset to position
Machine trapped in obstacles, take it
out of obstacles.
Press the charging to charge the
machine.Machine will get back to
station for charging automatically
WARNINGS ABOUT BATTERY INSIDE UNIT BODY
REMOVAL OF BATTERY INSIDE UNIT BOY
You must not remove (or attempt to remove) the battery incorporated in this product on your own.
To replace the battery, you must contact your service provider or an independent qualified
professional. These instructions have been prepared for the exclusive use of your service
provider or independent qualified professional.
FOR YOUR OWN SAFETY, DO NOT ATTEMPT TO REMOVE THE BATTERY ON YOUR OWN OR DISPOSE
OF IT IN FIRE. DO NOT DISASSEMBLE, CRUSH OR PUNCTURE THE BATTERY.
1.Remove the screws on battery cover with a screw driver.
2.Remove the battery cover.
3.Grasp the insulating tape at two sides of the battery and lift the battery.
4.Unplug the wire connector that links the battery and robot.
Correct disposal of batteries in this product
(Applicable in countries with separate battery return systems.)
The marking on the battery, manual or packaging indicates that the battery in this product
should not be disposed of with other household waste. Where marked, the chemical
symbols Hg, Cd or Pb indicate that the battery contains mercury,
cadmium or lead above the reference levels in EC Directive 2006/66.
The battery incorporated in this product is not user replaceable. For information on its
replacement, please contact your service provider. Do not attempt to remove the battery or
dispose it in a fire. Do not disassemble, crush, or puncture the battery. If you intend to
discard the product, the waste collection site will take the appropriate measures for the
recycling and treatment of the product, including the battery
19 20
Zone

21
Warranty Agreement
Covered Product:
Modd Vacuum Cleaners:
Model Number: MV101, Serial Number: CUV117
Model Number: MV202, Serial Number: CUV118
Model Number: MV303, Serial Number: CUV119
Buyer:
Name: _________________
Address: _________________, _________________, _________________________________
Limitation of Damages
In no event shall Cecibon Inc be liable for consequential damages for breach of this warranty.
Some States do not allow the exclusion or limitation of incidental or consequential damages, so
the above limitation or exclusion may not apply to the buyer.
Warranty Coverage
Cecibon Inc warrants the Covered Product to be free of all defects in material and workmanship
for 1 year from date of purchase. This warranty extends to the original buyer (only or and each
successive buyer within the warranty period).
Within the period of this warranty, Cecibon Inc will repair or replace, free of charge; any part
proving defective in material or workmanship. All warranty repairs and service must be
performed by an authorized Cecibon Inc technician, or at an authorized Cecibon Inc service
facility.
All expenses related to replacing or repairing a defective part under this warranty shall be
assumed by Cecibon Inc except for the following expenses, which shall be assumed by the
buyer:
Shipping charges:
Buyer will be responsible for any initial shipping and insurance charges if the defective
product(s) must be shipped for warranty service or warranty evaluation; however, Cecibon Inc or
Cecibon Inc Authorized Warranty Station will pay the return shipping charges if repairs are
covered by the warranty. When returning parts for repair, you must include the model, type and
serial number located on the on the vacuum. If any product submitted for warranty service is
found to be ineligible, an estimate of repair cost will be furnished, and the repair performed only
if requested by the owner and upon receipt of payment or acceptable arrangements for payment.
Warranty Exclusions
This warranty does not apply to any costs, repairs, or services for the following:
1. Service calls to correct the installation of the Covered Product, or to explain the usage of
the product to the buyer.
2. Repairs necessitated by use other than normal home use.
3. Damage resulting from misuse, abuse, accidents, alterations, or improper installation.
4. Corrective work necessitated by repairs made by anyone other than a Cecibon Inc
authorized service technician.
Further limitations and exclusions:
Any warranty that may be implied in connection with your purchase or use of the
vacuum, including any warranty of Merchantability or any warranty of Fitness For a
Particular Purpose is limited to the duration of this limited warranty. Some states do not
allow limitations.
How to Obtain Warranty Service
b. If warranty repairs are to be made at an authorized service center:
The buyer should carefully pack the Covered Product, preferably in the original packing
materials, and deliver it, together with a copy of the original purchase receipt and a description of
the problem, to the following address:
22
Cecibon Inc
1 Blue Hill Plaza #1682
10th Floor
Pearl River, NY 10965
If the buyer sends the product by U.S. mail, we recommend that the buyer insure it and send it
return receipt requested. We accept no liability for products lost or misplaced in shipment.
If Cecibon Inc does not maintain service facilities for express warranty repairs in a state and
warranty repairs will not be made in the home:
Upon discovery of any defect, malfunction, or nonconformity in the Covered Product, the buyer
may choose one of the following options for obtaining warranty service and repairs:
(a) The buyer should carefully pack the Covered Product, preferably in the original packing
materials, and deliver it, together with a copy of the original purchase receipt and a description of
the problem, to:
Cecibon Inc
1 Blue Hill Plaza #1682
10th Floor
Pearl River, NY 10965
If the buyer sends the product by U.S. mail, we recommend that the buyer insure it and send it
return receipt requested. We accept no liability for products lost or misplaced in shipment.
(b) The buyer may return the Covered Product to the retail seller, who will do one of the
following:
1. Service or repair the Covered Product to conform to the applicable warranty.
2. Direct the buyer to a reasonably close independent repair or service facility.
3. Replace the Covered Product with goods those are identical or reasonably equivalent to the
warranted goods.
4. Refund to the buyer the original purchase price less that amount directly attributable to use
by the buyer prior to the discovery of the nonconformity.
(c) The buyer may secure the services of an independent repair or service facility for the service
or repair of the Covered Product, when service or repair of the goods can be economically
accomplished and when the buyer is not furnished appropriate relief the provisions of
subparagraph (b). In that event, Cecibon Inc will reimburse the independent repair or service
facility for the reasonable cost of service and repair, including any cost for parts and any
reasonable cost of transporting the goods or parts, plus a reasonable profit.
Notice to Buyer
This warranty gives you specific legal rights, and you may also have other rights which vary
from state to state. You have the right to bring any action at law or equity to resolve disputes
concerning or to enforce the provisions of this warranty.
If the buyer disagrees over either's performance under the terms of this warranty, the buyer may
submit the matter for resolution to Cecibon Inc. The buyer shall not be responsible for expenses
incurred in submitting a dispute for resolution under the terms of this paragraph. The buyer is
required to submit any dispute for resolution under this paragraph before pursuing any legal
remedies to which he or she may be entitled.
Cecibon Inc
1 Blue Hill Plaza #1682, 10th Floor, Pearl River, NY 10965
Toll Free
1.888.593.9254
Email

23
PRODUCT PARAMETERS
Product Technical Parameters
Model Rated voltage Rated PowerRated Charging Voltage
MV303 14.4 V100-240 V 20 W
This manual suits for next models
3
Table of contents