Modena GT 6931GC Owner's manual

User
Manual Book
Grill Top
GT 6931GC, GT 6621GC

2
Thank you for your trust in choosing MODENA products for your household needs. With your
satisfaction as our priority, we constantly aim to deliver stylishly designed products equipped
with state-of-the-art technology to assist you in your daily activities.
This is your guidebook containing everything you need to know about our product. Please reach
out to us if you need further assistance or other information via our Customer Care or our
official website www.modena.com.

3
CONTENTS
Page
INTRODUCTION
2
-
Part 1
: Name of Parts
4
-
Part 2
: Installation
6
-
Part 3
: How to Use
10
-
Part 5
: Cleaning & Maintenance
12
-
Part 6
: Troubleshooting
14
-
Part 7
: Specification
15

4
The picture is a general overview and is not necessarily the same a sthe product you receive.
Features and completeness depends on the type of the products.
Part 1: Name of Parts

5
GT 6931GC
GT 6621GC
Part 2: Installation

6
For your safety
Do not store or use gasoline, or other flammable vapors and liquids near the appliance.
Instructions to be followed in the event of the users smell gas fumes must be posted in a prominent location in
kitchen area. The instructions shall be obtained from a local gas supplier.
Warning:
Any self-modification, wrong installation, adjustment or maintenance can lead ti properly loss or casualty.
Read the installation, operating and maintenance instructions carefully before installing or repairing this
equipment.
This appliance is intended for commercial use only.
This appliance is intended to prepare food for human consumption. No other use is recommended or
authorized by the manufacturer or agents.
This appliance must be handled by authorized technicians for installing gas-fired equipment.
Authorized technicians must perform the initial start-up and adjustment of the appliance. The operator
must be familiar with the appliance use, limitations and other restrictions.
Operating instructions must be read and understood by all persons using or installing this appliance.
Cleanliness of this appliance is important. Read and follow the cleaning instructions and schedules to ensure
the safety of the food product.
DO NOT immerse the appliance or burners.
DO NOT spray the water or steam jet directly at this appliance.
DO NOT splash or pour water to any controls.
DO NOT wash counter around this appliance with water jet. Burners must be thoroughly dried before use.
Burner and grate surfaces will be very hot when in use. DO NOT touch to avoid injury.
This appliance must be operated with the supplied 4”legs properly installed.
DO NOT operate this appliance if the smell of gas occurs. Turn off all gas supply valves and move to a
remote location and contact MODENA Call Center.
The technical content of this manual, including any parts pictures and/or adjustment procedures, is intended for
use by authorized technicians only.
Any procedure which requires the use of tools must be performed by authorized technicians.
Preserve this manual safely. When passing on/sellng the appliance to a third party, the manual book must
be handed along with the appliance. All users operate the appliance complying with the manual and related
safety guidelines..
Unpacking & Inspection
Carefully remove the appliance from the carton. Remove all protective plastic film, packing materials and
accessories from the appliance before performing any installation procedure. Carefully read all instructions in
this manual and the Installation Instruction packed with the appliance before starting any installation.
Read and understand all labels and diagrams attached to the appliance.
Carefully account for all components and accessories before discarding packing materials. Store all accessories
in a convenient place for later use.
Components:
Adjustable Legs (set of 4)
Drip Pan Tray
Setup
This appliance is intended for certain type of gas. If you want to switch to different types of gases, you have to
change the nozzles of the main burner and adjust the regulator valve for pilot. Please consult the authorized
gas technicians. All modifications must be performed by authorized gas technicians.
Warning:

7
FIRE HAZARD: All maintenance of the gas supply and combustion components of this appliance must be perfromed
by authorized technicians. Wrong maintenance will cause fire and explosion.
CAUTION:
HOT SURFACE, Exposed surfaces can be hot to the touch and may cause burns.
The appliance must be installed 18" away from any combustible material.
This appliance is designed for use in non-combustible locations only. Install the appliance on a firm, flat, non-
combustible surface.
Verify local codes for requirements. Concrete, tile, terrazzo or metal surfaces are recommended. Metal or tile
over combustible material may not meet code for non-combustible surfaces.
Clearances to non-combustible surfaces must be maintained. Maintain 0” from side and rear to non-combustible
walls, and 4” from non-combustible counter as established by provided 4” legs. Maintain adequate clearances
for cleaning and proper operation.
The appliance must be installed in an area with sufficient ventilation for proper combustion, and must be
installed in such way for combustion and ventilation air will not be obstructed.
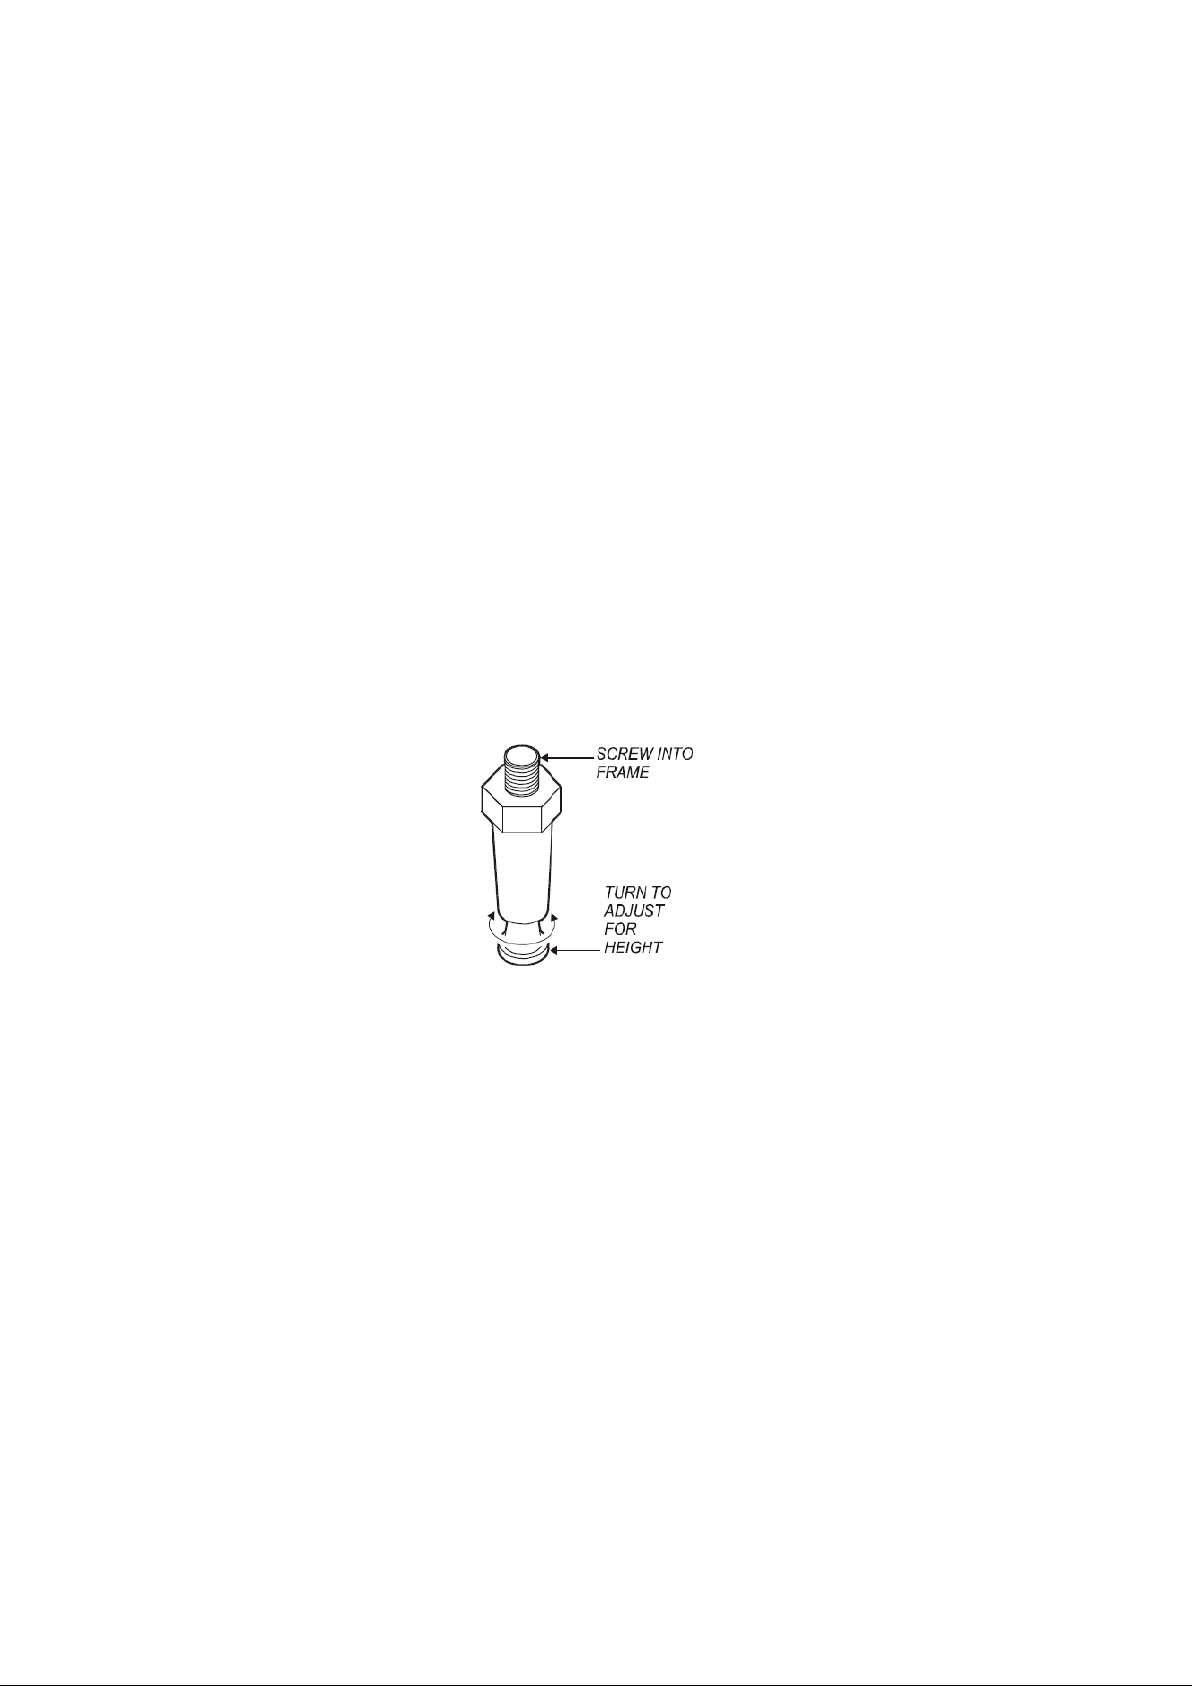
For maintaining, manufacturer recommends 6” clearance from rear of the appliance to wall. Install adjustable legs
in the holes provided. Verify that the unit attached firmly ON ALL FOUR LEGS. With the adjustable legs, adjust
as required to level the appliance. All four legs must be adjusted to firmly contact the floor in order to prevent
tipping.
When used with an exhaust fan, special precautions must be followed to avoid interruption with the operation of
the appliance, such as the air flow and the lack of air.
Note: DO NOT discard the carton or other packing materials until you have inspected the appliance for hidden
damage and tested it for proper operation.
Danger: HEALTH HAZARD: This appliance must be properly ventilated. No proper ventilation of exhaust gasses
will cause severe injury or death.
Warning; FIRE HAZARD: Do not store gasoline or any other flammable or combustible material near this
appliance. The open flame can cause such materials to ignite.
The area where the appliance is installed must be kept clear of combustibles and flammables, including mops,
rags, grease, wrapping paper and electric cords.
Notice: The warranty on this appliance is in effect only when the appliance is installed in accordance with
these instructions and local codes and ordinances. MODENA declares of no liability for any damage or
injury resulting from failure to comply with this notice.
Gas appliance code compliance
The installation of gas piping from the outlet side of the gas meter or service regulator to the appliance
must be performed by authorized technicians.
Authorized technicians must perform the initial startup and adjustment of this appliance.
The installation of this gas-fired appliance must conform to local codes.
The venting of this appliance must not be obstructed, nor may such venting interfere with the flow of
combustion air required for proper operation of the gas burners.
Additional Information:

8
1. The gas supply line used to connect the appliance to the gas supply system must be black iron pipe, or
other material as approved by local ordinance for gas piping.
2. Gas s upply piping mus t be inside 3/ 4” diameter or greater.
3. Use pipe specific sealant for gas piping on all pipe joints. Apply enough sealant to the male threads only.
Sealant must be resistant to the action of liquified petroleum gas (LPG).
4. Ensure all supply piping is clean and free of obstructions, dirt, chips/flakes and pipe sealant compound
prior to installation.
5. All pipe joints must be checked for leaks before lighting. Leak checks should be performed with a soap and
water solution. NEVER CHECK FOR LEAKS WITH AN OPEN FLAME.
Danger: FIRE AND EXPLOSION HAZARD, NEVER use an open flame to check for gas leaks. Fire and explosion
may occur.
Warning: RISK OF INJURY, Installation procedures must be performed by authorized technicians with full
knowledge of all applicable gas-fired appliance codes. Failure can lead to personal injury and property damage.
Important: All pipe joints must be checked for leaks before lighting. Leak checks should be performed
with a soap and water solution.
Installing the appliance
Refer to the nameplate: ensure the fuel type and pressure correspond with the nameplate. Do not
connect the appliance to the wrong fuel type and/or pressure.
BE SURE TO MAINTAIN REQUIRED CLEARANCES TO COMBUSTIBLE SURFACES.
The appliance must be placed in its final operational position and leveled front-to-back and side-to-side,
with a waterpass prior to the gas piping installation. Re-check the appliance level after installing the gas
pipe.
Each gas appliance is equipped with a separate gas pressure regulator, which must be installed on the
manifold pipe protruding from the rear of the griddle. Ensure that the regulator is installed in such a way
for the flow arrow stamped on the body of the regulator points toward the griddle. Wrong installation of
the regulator will result in an extremely hazardous condition.
A moisture trap (drip leg) consisting of a tee, 4” nipple pointing down, and cap must be installed upstream
of the gas pressure regulator.
A manual gas shut-off valve may be required by local codes and is, in any case, strongly recommended.
The shut-off valve must be installed between the gas supply piping and the gas pressure regulator.
It is the responsibility of the gas piping installer to identify the code requirement for a shut-off valve.
Shut-off valves, moisture trap and all associated piping must be supplied by the gas piping installer.
Picture 2. Gas Supply Piping
Danger: FIRE AND EXPLOSION HAZARD, NEVER use an open flame to check for gas leaks. Fire and explosion
may result.

9
Important: All pipe joints must be checked for leaks before lighting. Leak checks should be performed with a
soap and water solution.
Warning: FIRE HAZARD, This appliance is supplied with a gas pressure regulator.
Failure to properly install the supplied regulator will result in an extremely hazardous condition.
Flow arrow stamped on body of regulator must point toward the appliance.
Vent hole must point UP.
Important: Ensure the fuel is the gas type. If the available fuel does not match the nameplate
specification, exchange the appliance for the correct type.
Gas pressure setting:
Gas pressure regulator is factory set.
Pilot flame setting:
The pilot adjustments are located between the control valves for each set of burners. The right valve
controls the front pilot; the left valve controls the rear pilot.
Using a small, flat-blade screwdriver, turn the screw clockwise to decrease the flame size, or counter-
clockwise to increase the flame size.
Adjust the pilot flame to 1/4” high. Test for operation: inside and outside sections of the burner must light
without undue delay. Windy conditions may require a higher flame to allow the pilot to remain ignited.
Adjust burner flame:
Remove all burner control knobs, remove the front panel. Turn on the individual burner. The right knob
controls the front burner; the left knob controls the rear burner.
Loosen the locking screw on the shutter.
Turn the shutter to admit more or less air as required. Adjust the air shutter until the flame is mostly blue in
color.
Tighten the locking screw when finished. Replace the front panel and all knobs before returning the unit
to service.
Picture 3. Adjustment
IMPORTANT:
Adjustments must be performed by authorized technicians only.
This appliance is shipped from the factory equipped for pre-set gas pressure of specified gas.
For operation other than listed above, contact MODENA Call Center.

10
Read the description of the appliance operation on the specification sheet carefully.
DO NOT use this appliance if it has been submerged in water.
Contact MODENA Call Center to examine the appliance and to service or replace any component
which has been submerged.
Burners which become wet must be thoroughly dried before use.
For initial startup, and any time the gas supply has been shut-off, it may take several minutes to light the
pilot while air in the piping and manifolds is cleaned.
The burner control knobs must be turned by hand only. Do not use tools to turn the control knob. If the
knob will not turn by hand, DO NOT attempt to force or repair it. Contact MODENA Call Center for
repairs. Forced or improperly repaired valves pose the risk of fire and or explosion.
Ensure the sure burners, pilot burner and drip tray are properly installed before attempting to operate.
Lighting the pilot flame
Before lighting the pilot light, smell all around the appliance area for gas. Be sure to smell near floor level
because some gas is heavier than air and will settle to the floor.
For initial startup, and any time the gas supply has been shut-off, it may take several minutes to light the pilot
while air in the piping and manifolds is purged.
The pilot light must be lighted by hand:
Remove grates. Turn all control knobs to the full OFF position. Wait for 5 minutes.
The pilot is located close to the burner, and is accessible from the top of the appliance.
Be sure the gas shut-off valve is ON and the appliance has had time for the air to be purged from the lines.
Attempt to light the pilot every 15 seconds after the gas valve is turned on.
Light the pilot with a long match or fireplace lighter.
DO NOT use a cigarette lighter.
Reinstall grates.
Shut down instructions:
Turn all burner knobs to OFF.
Turn all pilots OFF.
Turn the main gas supply OFF.
WARNING:
FIRE HAZARD, IF YOU SMELL GAS:
DO NOT try to light any appliance.
DO NOT touch any electrical switch
DO NOT use any telephone in your building.
In the event a gas odor is detected, shut down the unit at the main gas shutoff valve and contact your
local gas supplier.
Follow the instructions from the gas supplier immediately.
Inspect the unit for cleanliness before use. Clean as necessary: See Cleaning Instructions page.
Be sure the pilot light is lit before operation. See Lighting the Pilot Light page.
The burner control knobs must be turned by hand only. Never use tools to turn the control knob.
The control used in this gas appliance provides a continuous range of settings from OFF to ON.
The right knob controls the front burner
The left knob controls the rear burner
Light the burner by turning the control knob to the ON position until fire forms completely around the inner
Part 3: How to Use

11
and outer sections of the burner.
Set the control knob to the desired position. The setting can be readjusted at any time.
Picture 4. Burner Control
WARNING:
FIRE HAZARD, NEVER attempt to force or repair a stuck control valve.
Contact MODENA Call Center for repairs.
Forced or improperly repaired valves can lead to fire and/or explosion.
FIRE AND EXPLOSION HAZARD, If the pilot light should be extinguished, turn off the gas shut-off valve
and remove the grate and drip pan. Allow the appliance to vent for five minutes before attempting to
re-light.
Caution: HOT SURFACE, Exposed surfaces can be hot to the touch and may cause burns.
Gas Conversion
For gas conversion, please call for authorized technicians for change of nozzles for main burner. Pilot also must
be adjusted as following procedure.
Important:
Adjustments must be performed by authorized technicians only.
DO NOT use a metal blade to pry a OFF knob. If necessary, wrap the folds of a cloth towel around the knob
and pull towards yourself with steady pressure.
Set pilot flame (See fig. 3 below):
Remove all burner control knobs. For Griddle, remove the front panel.
The pilot adjustments are near the control valve for each set of burners.
Griddle:
Adjust the pilot flame to ¼” high. Test for operation: all sections of the burner must light without undue delay.
Windy conditions may require a higher flame to allow the pilot to remain lit.
Replace the front panel and all knobs before returning the appliance to service.
Adjust burner flame (See picture 3 below):
Remove all burner control knobs. For Griddle, remove the front panel.
Turn an individual burner on. For hotplates, the right knob controls the front burner; the left knob controls the
rear burner.
Loosen the locking screw on the shutter.
Turn the shutter to admit more or less air as required. Adjust the air shutter until the flame is mostly blue in
color.
Tighten the locking screw when finished. Replace the front panel and all knobs before returning the unit to
service.

12
Picture 3. Adjustment
Important:
Use only factory authorized service parts and replacement filters.
For factory authorized service, or to order factory authorized replacement parts, contact MODENA Call Center.
A. Cleaning Appliance
Preparation:
Turn gas shut-off valve OFF before cleaning.
Allow appliance to cool completely before cleaning.
Frequency: Daily
Tools:
Steel Brush with scraper
Plastic Scouring Pad, Soft-Bristled Fiber Brush, Mild Detergent, Non-Abrasive Cleanser
Clean Soft Cloth / Sponge
Cleaning instructions:
1. Remove the grates from the appliance. Clean grates:
Use the supplied steel brush with scraper to remove food particles and residue from grate surfaces.
Grate may be washed in sink or dishwasher.
Dry the grate and apply a light coating of cooking oil.
2. Remove and clean the drip pan:
Stubborn food particles maybe removed with a plastic scouring pad.
Drip pan may be washed in a sink or dishwasher.
3. Clean broiler cabinet:
Use a plastic scouring pad to remove any remaining food particles from the cabinet.
Clean the cabinet with a soft damp cloth or sponge with mild detergent. Rinse by wiping with a soft
cloth moistened with clean water. Dry with a soft cloth.
4. Reassemble broiler:
Reinstall drip pan.
Reinstall grates.
5. Procedure complete
Warning: FIRE HAZARD, Shut off the gas supply valve before cleaning.
Caution: BURN HAZARD, Allow appliance to cool completely before cleaning.
Important:
Part 4: Cleaning & Maintenance

13
DO NOT spill or pour water into the controls,
DO NOT submerge Appliance cabinet in water. Damage to internal components will occur.
Damage to internal components from water damage is NOT covered by warranty.
DO NOT use steel wool or metal scouring pads to clean cabinet, drip tray or crumb tray.
Good sanitation is vital to the quality of the final food product. Be sure to clean in all corners and
crevices where grease and other cooking debris can accumulate.
B. Cleaning Burner
Preparation:
Turn gas shut-off valve OFF.
Allow the appliance to cool before cleaning.
Frequency: As Needed
Tools:
Plastic Scouring Pad, Soft-Bristled Fiber Brush, Clean Cloth or Sponge, Mild Detergent
Cleaner Formulated for Stainless Steel Warm Water
Warning: FIRE HAZARD, Shut off the gas supply valve before cleaning.
Cleaning instructions:
If one or more individual flame openings do not light, or if the flame is intermittent or uneven, the burner may
need to be cleaned.
Turn shut-off valve OFF. Remove all control knobs and remove front panel.
Note position of burner assemblies in cabinet. Remove radiant and main burners. Examine burner
assemblies. Note position of air shutters before cleaning.
Clean food particles from burners with warm water, mild detergent and a bristle brush. If necessary,
reflectors may be removed from burners for cleaning by removing the retaining wire. Cleaned with a plastic
scouring pad and mild detergent. Dry thoroughly before reinstalling on burners.
Rinse by wiping with a soft cloth dampened with clean water. Wipe exterior surfaces dry with a soft clean
cloth. Allow burners to air dry so that interior passages are completely free of water.
Examine burners to be sure the air shutters are in their proper position. Reinstall burners with flame
openings “up”. Slides the air shutter over the nozzle of the control valve. The pegs on the rear of the
burner set in corresponding notches in the rear burner support rail. Turn shut-off valve ON and light
pilot light.
Reinstall front panel, radiant and grates and all control knobs. Test all burners for proper operation.
Procedure is complete.
Important:
DO NOT spill or pour water into burners or controls,
DO NOT immerse cabinet in water. Damage to internal components will occur.
Damage to internal components from water damage is NOT covered by warranty.
Please perform checking procedure on the following things before contacting MODENA Call Center when
problems occurs:
Part 5: Troubleshooting

14
Problems
Possible Causes
Recommended Action
Portions of a burner do not
light
Burner wet or flame
opening(s) clogged
Clean and dry burner
Burners does not light
1. Gas supply is off
2. Air in lines
3. Pilot valve is not
igniting
1. Check main / unit gas valves.
2. Turn gas valve on. Try to light
pilot every 15 sec.
3. Turn off gas - allow unit to vent
for 5 minutes. Turn gas back on
and light pilot.
One burner assembly does
not light
1. Control is not on
2. Water in burner
3. Damaged temperature
control, burner or other
internal component
1. Turn temperature control ON Set
to desired setting when lit
2. Remove burner and dry
thoroughly
3. Contact Modena Call Center
for repairs
Pilot does not light
1. Gas supply is off
2. Air in lines
3. Pilot valve is not lit
1. Check main / unit gas valves
2. Turn gas valve on. Try to light
pilot every 15 sec.
3. Turn pilot valve on / adjust
Burner is not hot enough
1. Temperature control is
not set
2. Shutter or nozzle out of
adjustment
3. Damaged temperature
control, burner or other
internal component
1. Adjust for desired temperature
2. Contact authorized technicians
for adjustment
3. Contact Modena Call Center for
repairs
Note: There are no user serviceable components in the burner assemblies or in the control valves. In all cases
of damage or malfunction, contact MODENA Call Center for repairs.
Mentioned troubles are just for reference. If any failure occurs, please stop using, and inform contacting MODENA
Call Center or the authorized technicians to check and repair.
Safety first! Please cut off the electric and gas source before maintenance.
MODEL
GT 6931GC
GT 6621GC
Part 6: Specification

15
Type
Gas Char-Grill Top
Gas Char-Grill Top
Numbers of burner
3 Gas
2 Gas
Color
Stainless
Stainless
Gas type
LPG or NG
LPG or NG
Power (BTU/hr)
90000
60000
Product Dimension
Length (mm)
904
604
Width (mm)
640
640
Height (mm)
390
390
Specifications of this appliance may change without notice to improve the quality of the product.
Pictures in this manual are schematic and may not match your product exactly. Values stated on the machine
labels or in the documentation accompanying it are obtained in laboratory in accordance with the relevant
standards. Depending on operational and environmental conditions of the appliance, values may vary.

11/20
This manual suits for next models
1
Table of contents
Other Modena Grill manuals