MOMCOZY S12 User manual

Read this user manual carefully before using your electric
breast pump and keep this manual for future reference.
S12
USER MANUAL

CONTENTS
EN 01
DE 12
FR 24
IT 36
ES 48

OVERVIEW
Parts list
Silicone ange
Silicone diaphragm
Type-c cable
Milk collector
Linker
Pump motor
Silicone valve
Bra adjustment buckle
01
EN
1
2
3
4
5
6
7
8

Expression mode display
Timing display
Power button
Increase internsity
Note
CONTROL PANEL
02
This product has a built-in lithium batte. When the batte indicator
ashes in red, we recommend that you use a ceied 5V 1A adapter
to charge the Pump Motor as soon as possible.
1
2
3
4
5
6
7
8
9
1
2
3
4
5
6
7
8
9
Massage mode display
Level display
Batta power display
Mode selection button
Decrease internsity

* For rst time and before each use, you must disassemble, wash and
sterilize all the breast pump pas that come into contact with breast
milk.
* Never wash or sterilize the pump motor, this component does not come
into contact with your breast milk. You can wipe this pa clean with a
soft cloth.
* Please use hot water/steam/sterilization pot for sterilization, temperature
shall not exceed 100 degrees.
* Drinking water is recommended to use for cleaning.
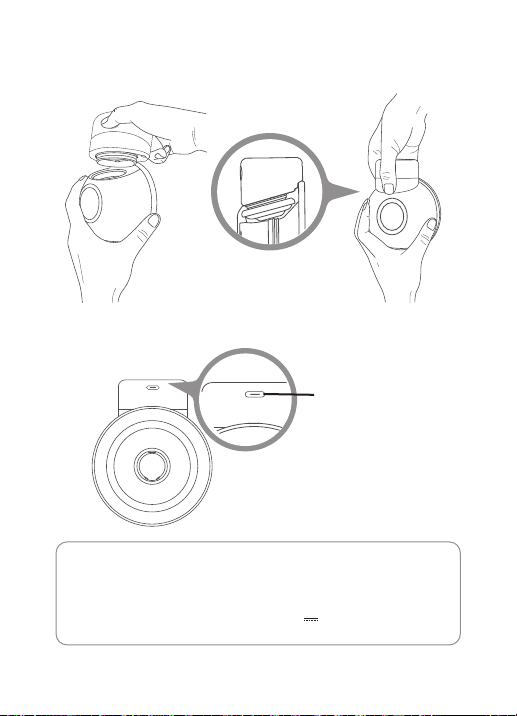
* Take care when cleaning the valve and silicone diaphragm, if it gets
damaged, your breast pump will not function properly.
* To clean the Silicone Valve, tub it gently between your ngers in warm
soapy water. Do not inse objects as this may cause damage.
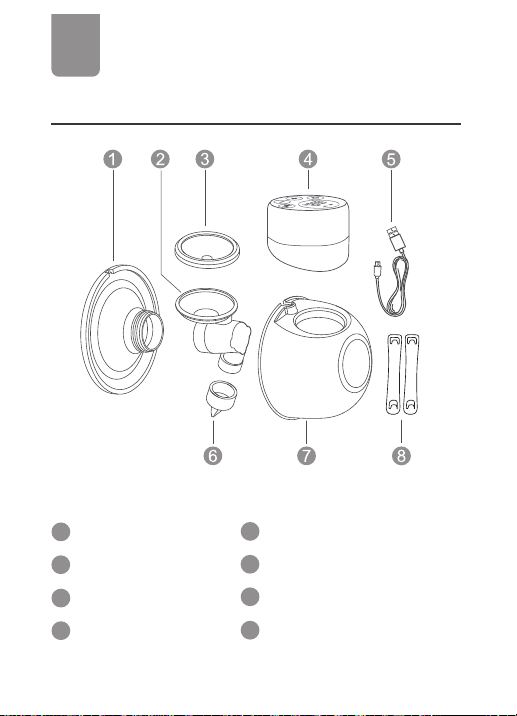
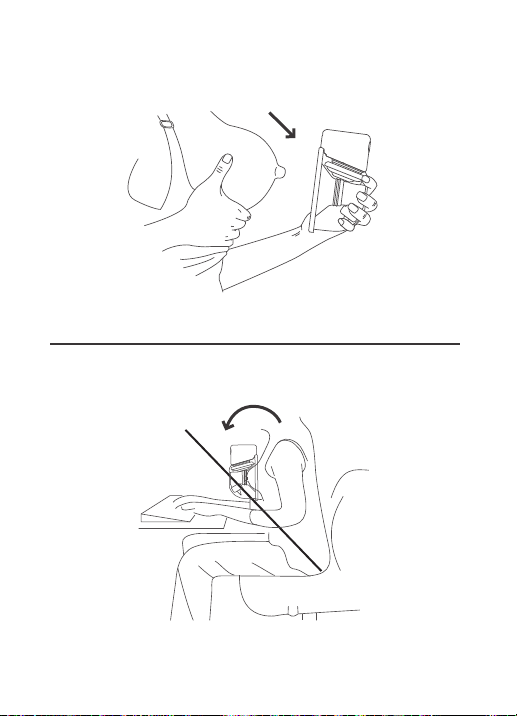
ASSEMBLING
1. Put the Silicone Diaphragm into the
linker, and press it with your hands to
make the edges fasten tightly to
ensure a peect seal.
2. Install the Silicone Valve into the bottom of the linker, make sure it
is installed in the correct direction.
03
CLEANING AND STERILIZING

3. Put the assembled linker into the Milk Collector, with the "ear" pa of the
linker aligned with the internal slot of the Milk Collector, and press the linker
disc pa with both hands to fasten the edges rmly to ensure complete
sealing.
4. Install the Silicone Flange on the Milk Collector, align the deector on the
horn with the deector on the Milk Collector, align the groove on Silicone
Flange in the Milk Collector groove position.
04

5. Press the Pump Motor onto the Milk Collector to ensure that it ts peectly.
6. Unplug the dust plug and connect the type-c cable to charge the Pump
Motor.
05
Note
The power adapter is a common standard accesso on the market.
This product is not provided and can be purchased separately if
necessa. Power adapter specication: 5V 1A.
Type-c Charging port

TO BEGIN PUMPING
1. Press the Silicone Flange rmly against the breast, leave no gaps and
make sure your nipples are centered. Keep it upright. Be careful not to
disto the position of the product and the chest, otherwise, the breast
pump will not have suction.
2. Lightly press the power button to sta the breast pump, and the timing
display turns on. (Figure 1)
06
( Figure 1 )

3. Lightly press the" " key to switch the mode, the display shows" " for the
breast pumping mode. There are 9 levels in this mode. You can select the
suction power that makes you comfoable by touching the " " and " " keys.
During postpaum breastfeeding, breast discomfo such as swelling and
lumps are prone to occur. Using this mode can alleviate breast problems.
07
( Figure 2 )
4. Press the" " key again to switch to the massage mode, the display
shows " " for the massage mode. There are 9 levels in this mode. Each level
has 9 sho suction and sho release plus 1 long suction and long release as
a cycle. You can press the " " and " " keys to select the suction power that
makes you comfoable. In the early postpaum period, the breast duct is
not easy to conduct, and the breast can be stimulated by changing the
mode to promote breast milk secretion.
( Figure 3 )

5. When you have nished pumping, press the power button to turn o the
breast pump, then carefully remove the breast pump from the breast.
SITTING POSITION FOR SUCTION
Relax the body, sit in a comfoable chair and lean slightly forward (use a
cushion to suppo back). Make sure to keep the breast pump and Milk
Collector upright.
08

Adjusting the length of bra straps will make suction more comfoable.
One end of the bra adjustment buckle hung on the inside buckle of the
nursing bra. The length of the bra strap can be adjusted by changing the
nursing bra buckle on the other end of the bra adjustment buckle.
( Picture 1 )
( Picture 2 )
( Picture 3 )
BRA ADJUSTMENT BUCKLE
09

POURING MILK
( Picture 1 ) ( Picture 2 )
( Picture 3 )
Please keep the breast pump upright, and remove the Pump Motor from the
pump body carefully, to pour the milk into the bottle, make sure the gap of
the Milk Collector is against the bottle mouth.
10
Milk collector gap

Tips 1
* Only store the breast milk collected by a sterilized breast pump.
* Do not freeze the breast milk repeatedly
* Do not mix fresh breast milk with frozen breast milk
* Be sure to discard the remaining breast milk after feeding
Unfreeze breast milk
Put the frozen breast milk in the fridge to unfreeze overnight. In case of any
emergency, you can defrost the milk in a bowl of hot water with the bottle
standing upright, or bottle warmer to heat the milk quickly.
Storing breast milk
Store the breast milk in a clean and sterilized storage bag or sealed bottle,
and put them in the freezer immediately.
STORING YOUR BREAST MILK
11
Tips 2
* Remember! Always check the milk temperature before feeding.
* Never heat breast milk in the microwave as this may destroy valuable
nutrients and antibodies.
* Uneven heating may lead to local overheating of the milk, which may
cause burns.
* Do not immerse a frozen bottle in boiling water to avoid cracking or split.

12
FCC Statement: This device complies with Pa 15 of the FCC Rules.
Operation is subject to the following two conditions: (1) This device
may not cause harmful inteerence, and (2) This device must accept
any inteerence received, including inteerence that may cause
undesired operation.
Warning: Changes or modication to this unit not expressly approved
by the pay responsible for compliance could void the user’s
authority to operate the equipment.
NOTE: This equipment has been tested and found to comply with the
limited for Class B digital device, pursuant to Pa 15 of the FCC
Rules.Their limits are designed to provide reasonable protection
against harmful inteerence in a residential installation.
This equipment generates, uses and can radiate radio frequency
energy and, if not installed and used in accordance with the
instructions, may cause harmful inteerence to radio
communications. However, there is no guarantee that inteerence
will not occur in a paicular installation. If the equipment does cause
harmful inteerence to radio or television reception, which can be
determined by turning the equipment o and on, the user is
encouraged to t to correct the inteerence by one or more of the
following measures:
*Reorient or relocate the receiving antenna.
*Increase the separation between the equipment and the receiver.
*Connect the equipment into an outlet on a circuit dierent from that
to which the receiver is connected.
*Consult the dealer or an experienced radio/TV technician for help.

ÜBERSICHT
Teileliste
Flansch aus Silikon
Silikon-Membran
Typ-c-Kabel
Milchsammler
Linker
Pumpenmotor
Silikon-Ventil
BH-Verstellschnalle
13
DE
1
2
3
4
5
6
7
8

Die anzeige des
ausdrucksmodus
Die power-taste
Erhöhen sie die internsität
Hinweis
BEDIENFELD
14
Dieses Produkt hat eine eingebaute Lithium-Batterie. Wenn die
Batterieanzeige rot blinkt, empfehlen wir Ihnen, einen zeizieen
5V 1A-Adapter zu verwenden, um den Pumpenmotor so schnell wie
mglich zu laden.
1
2
3
4
5
6
7
8
9
1
Zeitliche anzeige
2
3
4
5
6
7
8
9
Massagemodus-anzeige
Level anzeige
Batta power anzeige
Moduswahltaste
Verringern der inteallzeit

* Beim ersten Mal und vor jedem Gebrauch müssen Sie alle Teile der
Milchpumpe, die mit der Muttermilch in Berührung kommen,
auseinandernehmen, waschen und sterilisieren.
* Waschen oder sterilisieren Sie niemals den Pumpenmotor, da dieses Teil
nicht mit Ihrer Muttermilch in Berührung kommt. Sie können dieses Teil mit
einem weichen Tuch abwischen.
* Verwenden Sie zur Sterilisation einen
Heißwasser-/Dampf-/Sterilisationstopf mit einer Temperatur von höchstens
100 °C/212°F.
* Für die Reinigung wird Trinkwasser empfohlen.
* Seien Sie vorsichtig bei der Reinigung des Silikonventils und der
Silikonmembran, wenn diese beschädigt werden, wird Ihre Milchpumpe
nicht richtig funktionieren.
* Um das Silikonventil zu reinigen, nehmen Sie es vorsichtig zwischen die
Finger in warmes Seifenwasser. Führen Sie keine Gegenstände ein, da dies
zu Schäden führen kann.
Zusammenbau
1. PLegen Sie die Silikonmembran in das
Verbindungsstück und drücken Sie sie
mit den drücken Sie sie mit den Händen
an, damit sich die Ränder fest schließen
und eine peekte Abdichtung.
2. Setzen Sie das Silikonventil in den Boden des Linkers ein und stellen Sie
sicher, dass es dass es in der richtigen Richtung eingebaut wird.
15
REINIGUNG UND STERILISATION

3. Setzen Sie den zusammengebauten Linker in den Milchsammler ein,
wobei der "Ohr"-Teil des Linkers mit dem inneren Schlitz des Milchsammlers
ausgerichtet sein muss, und drücken Sie den Linker-Scheibenteil mit beiden
Händen, um die Kanten fest zu befestigen und eine vollständige Abdichtung
sicherzustellen.
4. Bringen Sie den Silikonansch am Milchsammler an, richten Sie den
Abweiser an der Sonotrode mit dem Abweiser am Milchsammler aus, und
richten Sie die Nut am Silikonansch an der Nutposition des Milchsammlers
aus.
16

5. Drücken Sie den Pumpenmotor auf den Milchsammler, um sicherzustellen,
dass er peekt sitzt
6. Ziehen Sie den Staubstecker ab und schließen Sie das Typ-C-Kabel an,
um den Pumpenmotor zu laden.
17
Hinweis
Der Netzadapter ist ein marktübliches Standardzubehör. Dieses
Produkt ist nicht im Lieferumfang enthalten und kann bei Beda
separat erworben werden. Spezikation des Netzteils: 5V 1A.
Typ-c
Anschluss zum Aufladen

UM MIT DEM PUMPEN ZU BEGINNEN
1. Drücken Sie den Silikonansch fest gegen die Brust, lassen Sie keine
Lücken und achten Sie darauf, dass Ihre Brustwarzen zentrie sind. Halten
Sie ihn aufrecht. Achten Sie darauf, dass Sie die Position des Produkts und
der Brust nicht verzerren, Andernfalls kann die Milchpumpe nicht saugen.
2. Drücken Sie leicht auf die Einschalttaste, um die Milchpumpe zu staen, und
die Zeitanzeige schaltet sich ein Mit dem Abpumpen Beginnen. (Zahl 1)
18
( Zahl 1 )
Table of contents
Languages: