Monoprice 606606 User manual


CONTENTS
1 INTRODUCTION ..............................................................................................................2
1.1 WELCOME ........................................................................................................................2
1.2 BOX CONTENTS .............................................................................................................. 2
2 FEATURES .......................................................................................................................2
3 ABOUT MIDI CONTROL ..................................................................................................3
4 PANEL...............................................................................................................................3
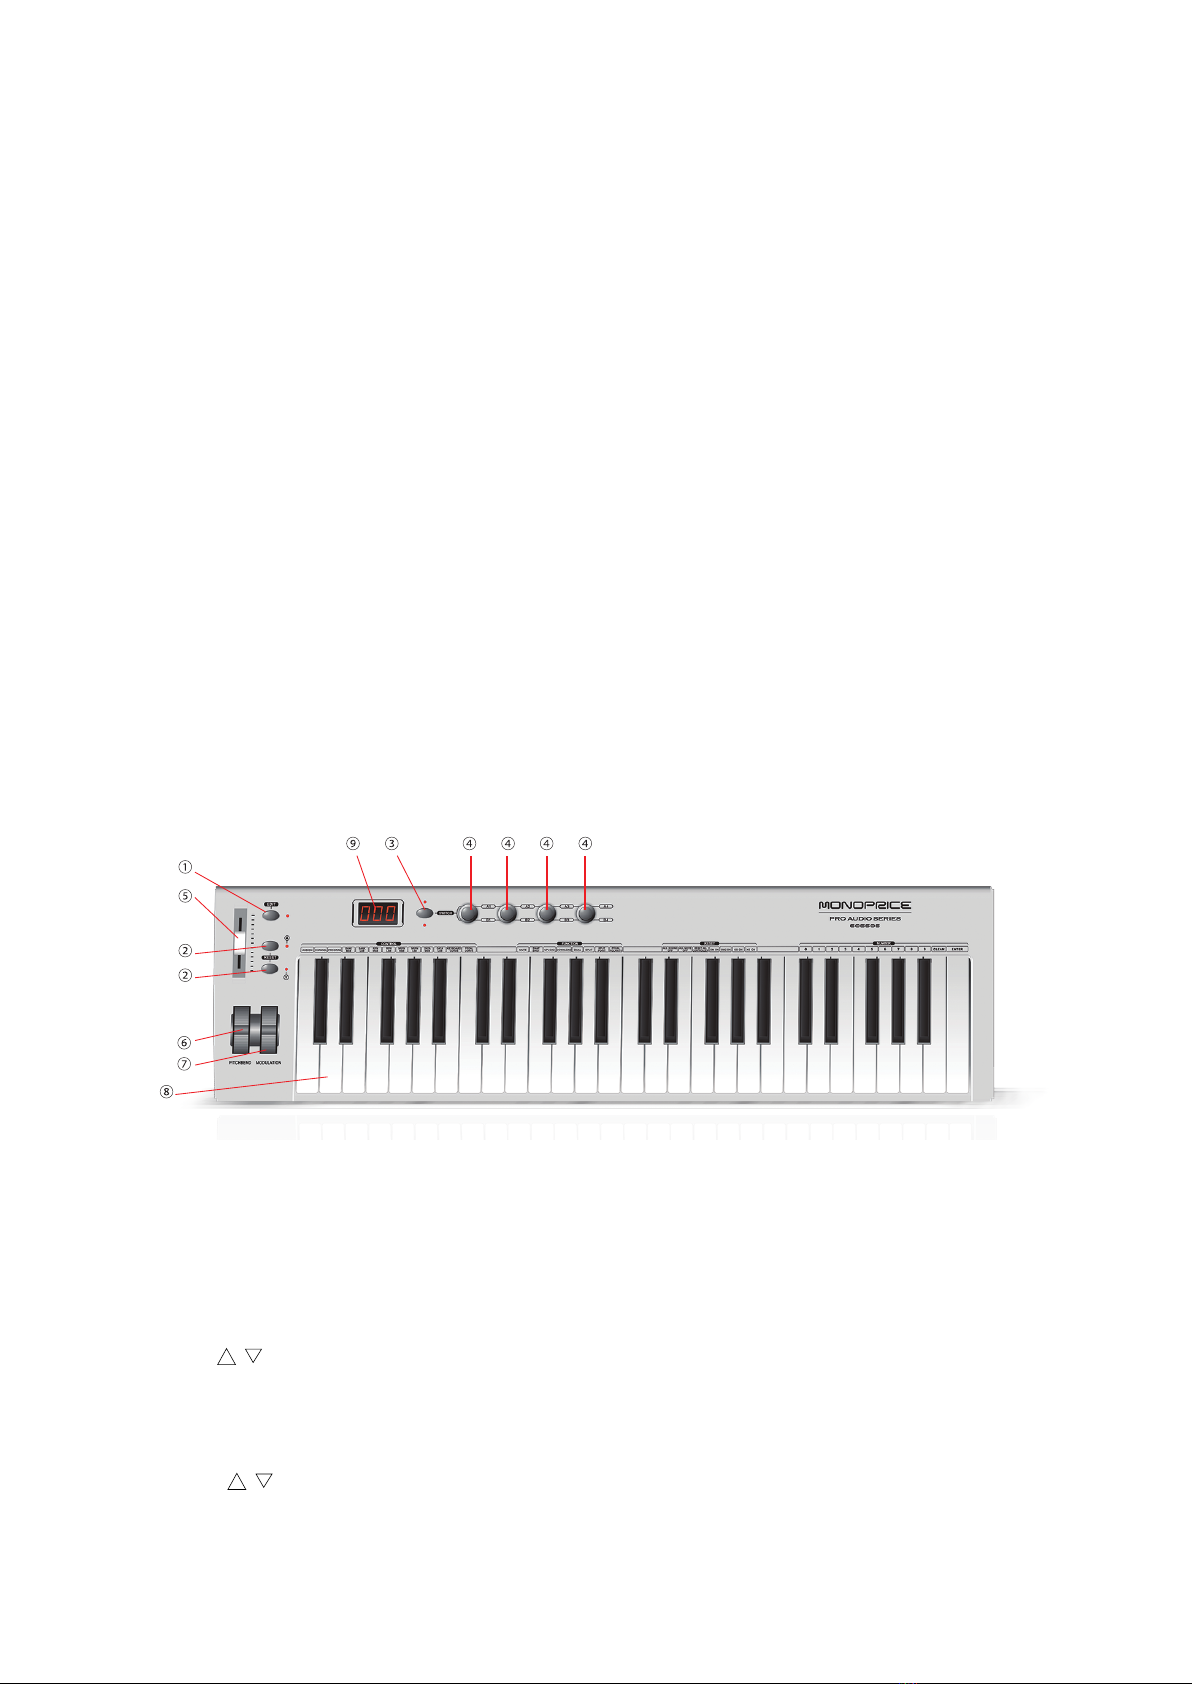
4.1 FRONT PANEL ..................................................................................................................3
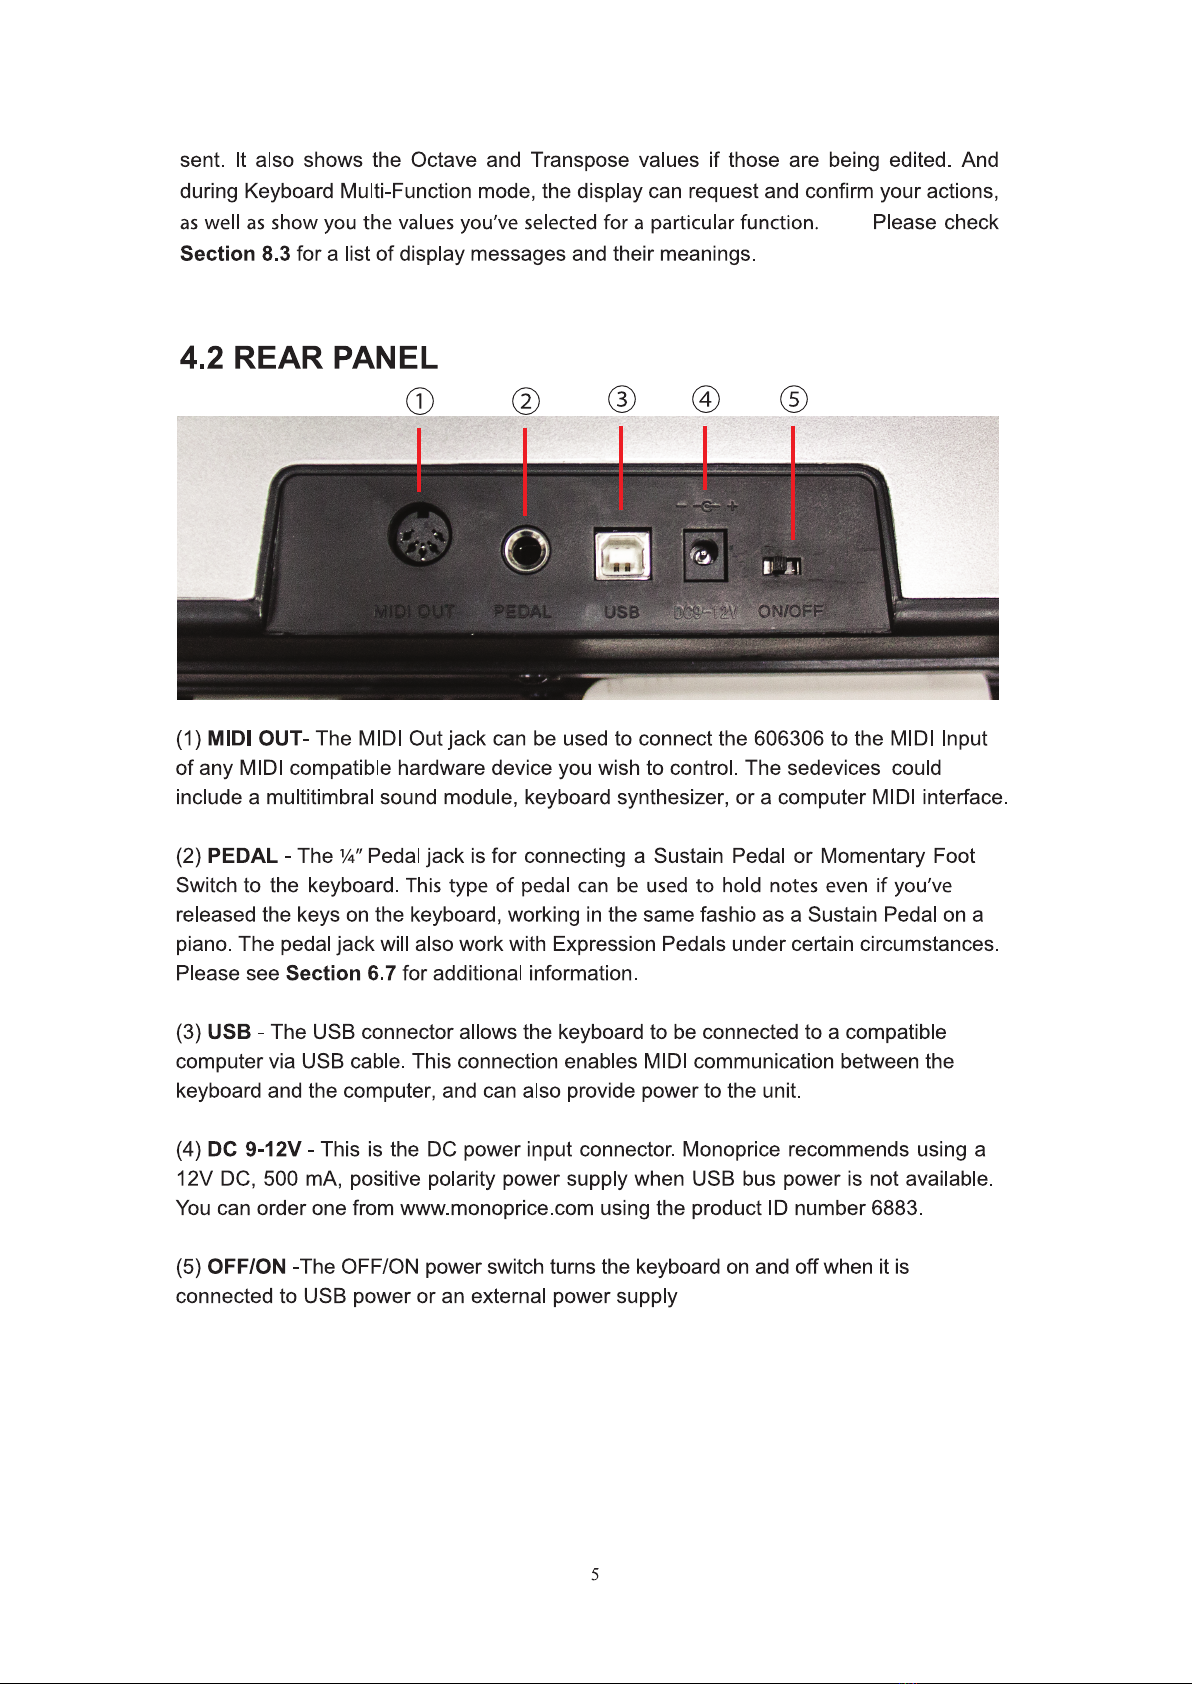
4.2 REAR PANEL.....................................................................................................................5
5 SETUP AND INSTALLATION ...........................................................................................6
5.1 HARDWARE SETUP DIAGRAM ....................................................................................6
5.2 WINDOWS PC SETUP ......................................................................................................6
5.3 MAC OS SETUP ................................................................................................................8
5.4 STANDALONE HARDWARE OPERATION .................................................................. 9
6 FUNCTIONS .....................................................................................................................9
6.1 KEYBOARD MULTI-FUNCTION MODE.......................................................................9
6.2 CONTROLLER ASSIGNMENTS .....................................................................................9
6.3 MIDI CHANNEL..............................................................................................................10
6.4 PROGRAM CHANGE ..................................................................................................... 11
6.5 BANK MSB & BANK LSB .............................................................................................12
6.6 KEYBOARD CURVE ......................................................................................................12
6.7 PEDAL CURVE ...............................................................................................................13
6.8 RPN & NRPN ...................................................................................................................14
6.9 DUAL................................................................................................................................16
6.10 SPLIT ..............................................................................................................................16
6.11 SPLIT POINT .................................................................................................................17
6.12 MUTE .............................................................................................................................17
6.13 SNAP SHOT ...................................................................................................................18
6.14 UPLOAD & DOWNLOAD ............................................................................................18
6.15 PEDAL POLARITY .......................................................................................................19
6.16 ALL NOTES OFF...........................................................................................................19
6.17 ALL SOUND OFF..........................................................................................................19
6.18 RESET ALL CONTROLLERS ......................................................................................20
6.19 GM ON ...........................................................................................................................20
6.20 GM2 ON .........................................................................................................................20
6.21 GS ON.............................................................................................................................21
6.22 XG ON ............................................................................................................................ 21
7 OCTAVE AND TRANSPOSE..........................................................................................21
7.1 OCTAVE ..........................................................................................................................21
7.2 TRANSPOSE....................................................................................................................22
8 APPENDIX ......................................................................................................................22
8.1 APPENDIX 1 ASSIGNABLE CONTROLLER LIST ......................................................22
8.2 APPENDIX 2 CONTROLLER LIST ...............................................................................23

2
8.3 APPENDIX 3 LED STATUS LIST...................................................................................26
9 TECHNICAL SUPPORT .................................................................................................27
9.1 CUSTOMER SERVICE LIVE CHAT .............................................................................27
9.2 TECH SUPPORT LIVE CHAT........................................................................................27
9.3 WARRANTY....................................................................................................................27
1 INTRODUCTION
1.1 WELCOME
Congratulations on your purchase of the Monoprice 606606 keyboard, which provides
quick and easy control over your music creation software. The keyboard connects to
your computer via USB, which enables MIDI communication and provides power to the
keyboard. Since the 606606 is class-compliant, there is no need to download any drivers.
You can just plug your keyboard in, turn it on, and you’re ready to get started!
1.2 BOX CONTENTS
Monoprice 606606 49-Key Controller Keyboard
Monoprice 606606 Owners Manual
Monoprice Pro Audio Series - Software Bundle DVD
2 FEATURES
49 Keys to trigger your MIDI hardware & software
4 rotary encoder Knobs
1 Slider
Pitch-Bend & Modulation Wheels
MIDI Out Port for standalone use
Pedal Input
Driverless Plug-N-Play on PC & Mac
USB Bus-Power or 9-12 Volt DC Power Port

3
Includes DVD-ROM of audio software, so you can play music right away
3 ABOUT MIDI CONTROL
MIDI is a communication standard that allows MIDI enabled devices to “talk” to each
other. (MIDI stands for “Musical Instrument Digital Interface”.) The 606606 keyboard
doesn’t make sounds on its own, so it uses MIDI to tell an external sound source what to
play. You can connect the 606606 to a USB compatible computer in order to control
music creation software, or you can connect it to hardware sound modules and
synthesizers via MIDI cable.
4 PANEL
4.1 FRONT PANEL
(1) EDIT - Enters and exits the Keyboard Multi-Function mode where additional features
and capabilities of the keyboard may be accessed. The LED next to the Edit button
indicates whether or not Keyboard Multi-Function mode is active. Please see Section 6
for more details on using Keyboard Multi-Function mode.
(2) ▲/▼Octave / Assignable Data Buttons - These buttons default to adjusting the
keyboard octave range, but they can be reassigned to other useful functions. When
assigned to MIDI controllers, the messages are sent out on the Global MIDI Channel.
The ▲/▼Octave / Assignable Data Buttons behave differently depending on how you
press them. A single button press changes the value by one increment, while holding a

4
button down changes the values quickly. If you press both buttons at the same time, it will
reset the value back to 0. Pressing both buttons and EDIT at the same time will reset any
Transpose value back to 0. Please see Section 7.1 for more details on using the Octave
buttons, and Section 7.2 for more information on using the Transpose feature.
(3) SWITCH - This button allows you to alternate between two banks of Knob controller
assignments. This means that you can actually assign eight different controllers to the
knobs rather than just four, and they will all be readily available to you during
performance by toggling the SWITCH button. The LEDs above and below the button
indicate the currently selected controller group, either A1-A4 or B1-B4.
(4) A1-A4 and B1-B4 KNOBS - The Knobs have useful default assignments, but they
can be assigned to any MIDI CC (controller message) that you choose. You can even
assign an independent MIDI channel for each knob. This allows you to get more
expressive with your sounds during performance. For example, with a knob assigned to
a synthesizer’s filter, it’s possible to make the sound brighter or darker as you play. For
more details on KNOB assignments, see Section 6.2.
(5) SLIDER - By default, the SLIDER is set to control Volume (MIDI CC #7), which is
used to make your sound louder or softer. However, it can be assigned to any MIDI
controller message that you choose, transmitting on the Global MIDI Channel. For more
details on SLIDER assignment, see Section 6.2.
(6) PITCH BEND - The Pitch Bend Wheel sends MIDI pitch bend messages by default,
which are used to add pitch expressions to your sound (think of a guitar player making
the notes swoop higher or lower). However, it can be reassigned to any MIDI CC you
choose, transmitting on the keyboard’s Global MIDI Channel. For more details on PITCH
BEND wheel assignment, see Section 6.2.
(7) MODULATION - The Modulation Wheel transmits a Modulation message (MIDI CC
#1) by default, which is normally used to add vibrato to a sound (think of a violinist
wiggling the pitch of a note). However, it can be reassigned to any MIDI CC you choose,
transmitting on the keyboard’s Global MIDI Channel. For more details on MODULATION
wheel assignment, see Section 6.2.
(8) KEYBOARD AND MULTI-FUNCTION SELECTION - The keyboard allows you to
play MIDI notes, which are sent via USB to your music creation software in order to
make sound. However, in Keyboard Multi-Function mode, the keyboard is also used to
select various features and parameter values available in the 606606. Please see
Section 6 for more details on using Keyboard Multi-Function mode.
(9) LED D I S P L AY - The display shows information about the current status of the
keyboard. When the keyboard is at rest, it shows the currently selected MIDI Program
number. If you use the KNOBS or SLIDER, the display shows the controller values being


7
the MAGIX registration web page. Upon completing registration, MAGIX will send you an
individual activation code that you can use to fully unlock your software. (The trial version
expires in 7 days, at which point you need to register if you want to continue using
Samplitude.)
Now you’re ready to use MAGIX Samplitude Pro X Silver! If you need further help, please
refer to the manual included with the Samplitude software, or contact the friendly experts
at MAGIX customer support.
Samplitude is a registered trademark of MAGIX AG.
Sound Magic BlueStone Piano - The BlueStone Piano is a Virtual Instrument or VI,
which is a software sound source that can be controlled via MIDI. You can run it as a
standalone application or as a VST® plug-in within a compatible DAW such as
Samplitude.
Before installation, be sure to first fully review this section in the manual, and any
installation documentation included on the DVD. To install the standalone software, copy
the Sound Magic folder to your hard drive. Double click on the “BlueStone Piano.exe” file
in order to run the application. To install the VST plug-in version, copy the entire Sound
Magic folder into the VST plug-in directory preferred by your VST compatible applications.
For more information on the VST plug-in folder, consult the manual of your VST hosting
software.
When you open the BlueStone Piano, you will see a small text box above the virtual
keyboard that says, “Enter Your KeyCode Here”. Open the text file named “BlueStone
KeyCode” that is provided for you on the disc and copy the code to your clipboard. Click in
the KeyCode entry box and make sure all the text in the box is highlighted, then paste in
the KeyCode you copied. To activate the code, click on the virtual keyboard, or anywhere
on the application outside of the KeyCode box. The text in the box will then change to read,
“Authorised to Sound Magic Customer”.
Now you’re ready to use the BlueStone Piano! If you need further help, please refer to the
manual included with your Sound Magic software.
VST is a registered trademark of Steinberg® Media Technologies GMBH.
Platonic World VSTs - oKo virtual instrument and Bi-Polar effect - The oKo plug-in is
a virtual version of an analog synthesizer while Bi-Polar is a distortion effect. To install
these plug-ins, simply copy their .dll files to the VST Plug-In folder on your computer. Then
they will be available to all your VST compatible applications.
Platonic World –War Drumz –War Drumz is a modern drum sample library with loops
and individual drum hits in .wav format. They can be used in any application that is

8
compatible with this common file format.
Windows is a registered trademark of Microsoft.
5.3 MAC OS SETUP
Connect the keyboard to your Mac® using a USB cable and turn the keyboard’s power
switch to On. The keyboard will appear as a new USB Audio Device “MidiKeyboard”,
available for use in your MIDI compatible applications.
Monoprice wants you to be able to start playing right away, so we’ve included free music
creation software on the disc that came with your keyboard.
Sound Magic BlueStone Piano - The BlueStone Piano is a Virtual Instrument or VI,
which is a software sound source that can be controlled via MIDI. You can run it as an
Audio Unit plug-in within a compatible DAW such as Logic®.
Before installation, be sure to first fully review this section in the manual, and any
installation documentation included on the DVD.
To install the BlueStone Piano AU plug-in, first double-click the SPRuntime.pkg file and
follow the onscreen prompts to install the Maize sample engine, then copy the AU
component file into the Mac HD\Library\Components directory on your Mac hard drive. For
more information on the AU Component plug-in folder, consult the manual of your AU
hosting software.
When you open the BlueStone Piano, you will see a small text box above the virtual
keyboard that says, “Enter Your KeyCode Here”. Open the text file named “BlueStone
KeyCode AU” that is provided for you on the disc and copy the code to your clipboard.
Click in the KeyCode entry box and make sure all the text in the box is highlighted, then
paste in the KeyCode you copied. To activate the code, click “OK”. The text in the box will
then change to read, “Authorised to Sound Magic Customer”.
Now you’re ready to use the BlueStone Piano! If you need further help, please refer to the
manual included with your Sound Magic software.
Platonic World –War Drumz –War Drumz is a modern drum sample library with loops
and individual drum hits in .wav format. They can be used in any application that is
compatible with this common file format. For example, GarageBand® can import .wav
files for use in song creation.
Logic and GarageBand are registered trademarks of Apple®.

9
5.4 STANDALONE HARDWARE OPERATION
You can connect the keyboard to other MIDI compatible devices, such as a multitimbral
sound module via the MIDI Out jack on the back. Use a 5-pin din MIDI cable to connect
the keyboard’s MIDI Out to the MIDI In of the device you want to control.
MIDI communication occurs over Channels, so you need to make sure the 606606 and
the device you want to control are both set to the same MIDI Channel. There are normally
16 channels to choose from, and other manufacturers sometime support an “Omni” setting,
which transmits or receives over all channels at once.
Please note that in standalone operation, the keyboard can be powered by an optional
9V-12V DC power supply if USB power is not available or convenient.
6 FUNCTIONS
6.1 KEYBOARD MULTI-FUNCTION MODE
The KEYBOARD MULTI-FUNCTION mode allows you to change the various parameter
settings in your 606606 keyboard, altering how the keyboard behaves. Press the EDIT
button to enter KEYBOARD MULTI-FUNCTION mode. (Pressing the EDIT button again
will exit the mode.)
While in KEYBOARD MULTI-FUNCTION mode, press a Function key on the keyboard to
select the action you want. The list of available Functions is written just above the keys
on the 606606 top panel.
You can then use the NUMERIC keys 0-9 to enter a new parameter value, if needed. Or,
you can use the CLEAN key to set the parameter value to 0. Once the new parameter
setting is input, press the ENTER key to confirm the operation.
6.2 CONTROLLER ASSIGNMENTS
The Monoprice 606606 allows you to assign many different useful controller messages to
the KNOBS, SLIDER, WHEELS, and BUTTONS of the keyboard. The controller
messages consist of standard MIDI CCs, or “Control Change” messages, and advanced
controller message assignments. All of these controller messages allow you to add more
expression to your performances, enable quick editing of your favorite sound parameters,
or perform other useful functions. For a list of all the available controller messages, see

10
Section 8.2.
To assign a new MIDI CC or advanced controller message to the SLIDER, WHEELS, ▲/
▼BUTTONS or KNOBS, enter the KEYBOARD MULTI-FUNCTION mode by pressing
EDIT and then follow these steps:
1. Press the ASSIGN key on the keyboard. The LED will display CHO, asking you to
“choose” the physical control you want to edit.
2. Just move the desired physical controller (For example, if you want to assign a
new MIDI CC to the SLIDER, move the SLIDER), and then the LED will show the
current MIDI Control Number of the selected controller.
3. Next, input the desired CC or advanced controller number with the NUMERIC
keys, and press ENTER. (MIDI CCs are numbered from 0-127 and their
functionality follows the MIDI specification, while the advanced controller functions
are numbered from 128 to 159.) Lastly, the LED will show “don” (done) to confirm
that the new assignment has been set.
Please refer to Section 8.1 for a list of assignable controls, and Section 8.2 for a list of all
available MIDI CC and advanced controller assignments.
6.3 MIDI CHANNEL
MIDI is a channelized communication protocol, which allows you to keep messages
separate if you have multiple MIDI compatible devices. When using the 606606 with a
computer, you’ll probably just keep the MIDI Channel set to 1 and allow your software to
do the routing for you. However, if you want to use the 606606 with external sound
modules, you may want to change the MIDI channel to arrange how your devices will
respond to each other. For either application, this section will tell you how to set the MIDI
Channel on your 606606.
The Global Channel is the main MIDI channel used by your 606606. The SLIDER,
PEDAL, WHEELS, ▲/▼BUTTONS and KEYBOARD all use the Global MIDI channel.
To assign the Global Channel, enter KEYBOARD MULTI FUNCTION mode by pressing
EDIT, then complete the following steps:
1. Press the CHANNEL key on the keyboard. The LED will show the currently
selected MIDI Channel.
2. Next, input the desired Global MIDI Channel number (1-16) with the NUMERIC
keys, and press ENTER. The LED will show “don” (done) to confirm that the new
channel has been set.
For added flexibility, the KNOBS of your 606606 can each be assigned to an
independent MIDI Channel. This allows you to keep the MIDI messages originating from

11
the KNOBS separate from the rest of the keyboard, and from each other, if so desired.
To set an independent MIDI Channel for a KNOB, enter KEYBOARD MULTI FUNCTION
mode by pressing EDIT, then complete the following steps:
1. Press the CHANNEL key on the keyboard.
2. Next, move the KNOB that you want to assign.
3. Then input the desired MIDI Channel number (0-16) with the NUMERIC keys, and
press ENTER. The LED will show “don” (done) to confirm that the new channel
has been set. Note that a selection of 0 assigns the KNOB to use the Global MIDI
Channel.
6.4 PROGRAM CHANGE
Program Change messages are used to tell hardware MIDI devices to load a specific
sound for you to play. Software instruments normally don’t need Program Change
messages since the sound can usually be selected and saved in the session file of your
DAW. However, if you need to send Program Change messages, there are two easy
ways to do it in the 606606.
By default, KNOB A1 is set to send Program Change messages (advanced controller
#154), which allows you to scroll through sound programs quickly and easily. However,
you can assign other physical controls to perform this function, such as the ▲/▼
BUTTONS.
To send a single specific Program Change message, enter KEYBOARD MULTI
FUNCTION mode by pressing EDIT, then complete the following steps:
1. Press the PROGRAM key on the keyboard. The LED will show the currently
selected Program. (The display may not register a change because it normally
shows the currently selected program number when no other operation is in
progress.)
2. Next, input the desired Program Change number (0-127) with the NUMERIC keys,
and press ENTER. The LED will show “don” (done) to confirm that the Program
Change message has been sent.
According to the MIDI specification, sound program banks are arranged in groups of 128.
You can access any sound in a bank by sending its corresponding Program Change
number. Changing to a different program bank can be achieved by sending Bank MSB
and Bank LSB messages. This function is described below in Section 6.5.
It’s expected that most of the time you’ll be working within Program Bank 0, so within this
bank, only the Program Change message is sent. However, if a different bank is
selected, the 606606 will send the corresponding Bank MSB and Bank LSB messages

12
for the bank, along with the Program Change message.This helps ensure that the
Program Change occurs in the correct sound bank.
6.5 BANK MSB & BANK LSB
MSB and LSB are computing terms used to refer to the “Most Significant Bit” and “Least
Significant Bit” respectively. Essentially, these are two values that, when combined, offer
more possible choices than either one by itself. In this instance, the Bank MSB and Bank
LSB are used to select between many different sound Program Banks by forming Bank
Change messages.
To send a specific Bank Change message, enter KEYBOARD MULTI FUNCTION mode
by pressing EDIT, then complete the following steps:
1. Press either the BANK MSB or BANK LSB key on the keyboard. (A Bank Change
message may consist of a Bank MSB message, a Bank LSB message, or both.)
The LED will show the currently selected value.
2. Next, input the desired Bank Change number (0-127) with NUMERIC keys, and
press ENTER. The LED will show “don” (done) to confirm that the Bank Change
message has been sent.
Bank MSB and Bank LSB can also be transmitted by the physical controls of the
keyboard, such as the KNOBS. Just follow the same procedure outlined in Section 6.2
for controller assignments. Bank MSB is controller #0 and Bank LSB is controller #32.
6.6 KEYBOARD CURVE
There are 5 Keyboard Curves that adjust how the keyboard feels when you play. The
606606 allows you to select your preferred Keyboard Curve either in KEYBOARD MULTI
FUNCTION mode, or via advanced controller assignment. To select a curve via
KEYBOARD MULTI FUNCTION mode, press EDIT, and then complete the following
steps:
1. Press the KEYBOARD CURVE key on the keyboard. The LED will show the
currently selected curve.
2. Next, input the desired curve number (1-5) with the NUMERIC keys, and press
ENTER. The LED will show “don” (done) to confirm that the new curve has been
selected.
3. Now try playing the keyboard to see what the selected Keyboard Curve feels like.
If you want to audition additional curves, enter KEYBOARD MULTI FUNCTION
mode again and repeat from step 1.
You can also select new Keyboard Curves by assigning advanced controller #158

13
(Keyboard Curve) to one of the keyboard’s physical controls, such as the ▲/▼
BUTTONS, a KNOB or the SLIDER.
To enable Keyboard Curve selection from a physical control, enter KEYBOARD MULTI
FUNCTION mode by pressing EDIT, then complete the following steps:
1. Press the ASSIGN key on the keyboard. The LED will display CHO, asking you to
“choose” the physical control you want to use.
2. Move the desired physical controller (For example, if you want to assign Keyboard
Curve selection to a KNOB, move the desired KNOB), and then the LED will show
the current MIDI Control Number of the selected controller.
3. Next, input the advanced controller #158 (Keyboard Curve) with the NUMERIC
keys, and press ENTER. The LED will show “don” (done) to confirm that the
Keyboard Curve selection has been enabled.
4. Now, adjust the Keyboard Curve values (1-5) while you play the keyboard. When
you have selected the curve that you like, you can reassign the physical controller
to do something else.
When selecting your preferred Keyboard Curve, it’s a good idea to use a familiar velocity
sensitive instrument, such as a piano sound, so you can hear how it reacts to your
playing. (Velocity sensitivity means that it follows how hard you play the keyboard.) For
each Curve, try playing loudly, softly, and in-between, and then select the curve that is
most comfortable for your playing style.
6.7 PEDAL CURVE
You can use several different kinds of foot pedals with your 606606 in order to perform
different functions. The most common pedal is a Sustain Pedal, which is just a switch
that turns on and off. However, you may also use an Expression Pedal that can send a
range of controller values. An Expression Pedal works in a way that’s similar to a gas
pedal, except it doesn’t spring back to zero when you release it.
Since there are several different kinds of Expression Pedal available, you can adjust the
Pedal Curve to work better with the one you have. The default value of 64 is optimized
for most pedals, but as a general rule, if the pedal’s active range is short, you should try
turning the Pedal Curve up. (In other words, if the gas pedal goes from 0 MPH to 100
MPH by barely touching it, the Pedal Curve should be turned up.) Conversely, if the
pedal can never reach maximum or minimum values, you should try turning the Pedal
Curve down.
To select a curve via KEYBOARD MULTI FUNCTION mode, press EDIT, and then
complete the following steps:

14
1. Press the PEDAL CURVE key on the keyboard. The LED will show the currently
selected curve value.
2. Next, input the desired curve value (1-127) with the NUMERIC keys, and press
ENTER. The LED will show “don” (done) to confirm that the new curve value has
been selected.
3. Now try playing the keyboard while using the pedal in order to see what the
selected Pedal Curve value feels like. If you want to audition additional curve
values, enter KEYBOARD MULTI FUNCTION mode again and repeat from step 1.
You can also select new Pedal Curve values by assigning advanced controller #159
(Pedal Curve) to one of the keyboard’s physical controls, such as the ▲/▼BUTTONS, a
KNOB or the SLIDER.
To enable Pedal Curve value selection from a physical control, enter KEYBOARD
MULTI FUNCTION mode by pressing EDIT, then complete the following steps:
1. Press the ASSIGN key on the keyboard. The LED will display CHO, asking you to
“choose” the physical control you want to use.
2. Move the desired physical controller (For example, if you want to assign the Pedal
Curve adjustment to the SLIDER, move the SLIDER), and then the LED will show
the current MIDI Control Number of the selected controller.
3. Next, input the advanced controller #159 (Pedal Curve) with the NUMERIC keys,
and press ENTER. The LED will show “don” (done) to confirm that the Pedal
Curve selection has been enabled.
4. Now, adjust the Pedal Curve values (0-127) while you play a sound from the
keyboard. When you have finished adjusting the curve, you can reassign the
physical controller to do something else.
When adjusting the Pedal Curve, it’s a good idea to use a familiar sound that responds to
pedal control, so you can hear how it reacts to your playing. The pedal should be
assigned to an easily audible sound modulation such as Pitch or Volume, and then you
can make your adjustments. The Pedal MIDI CC is fixed to #64 (Sustain), but it may be
possible to reassign this controller message in your music creation software. Please
consult your software’s instruction manual for more information on this subject.
6.8 RPN & NRPN
RPN and NRPN messages help expand the MIDI universe, allowing the implementation
of new MIDI controllers. RPN stands for “Registered Parameter Number” and
conforms to the MIDI specification, while NRPN stands for “Non-Registered Parameter
Number” and is defined by each manufacturer. Therefore, how an NRPN behaves can
be different for each manufacturer, or even for each device. Either way, these controllers
are your gateways to access whole new ranges of MIDI controls, provided those

15
functions are implemented in the target MIDI device.
RPNs and NRPNs work in a similar fashion. Each requires a pair of MIDI controller
messages and values that are used to define the RPN or NRPN to be sent. For RPNs,
the controllers are #100 (LSB) and #101 (MSB), while for NRPNs, the controllers are
#98 (LSB) and #99 (MSB). The values sent via these MIDI CCs define which RPN, or
NRPN respectively, is selected for control.
Once the RPN or NRPN is defined, another pair of controller messages is used to send
the value associated with the RPN or NRPN message. MIDI CC #6 is used to send a
“coarse” value, or MSB, while MIDI CC #38 is used to send a “fine” value, or LSB
(although the LSB is not always necessary).
On the 606606, you can use ASSIGN in KEYBOARD MULTI-FUNCTION mode to set
each of the required MIDI controllers for sending RPN and NRPN messages to the
available physical controls, such as the KNOBS. Then you can use those controls in the
correct order to define the RPN or NRPN, and then send the associated value.
You can also use the KEYBOARD MULTI-FUNCTION mode RPN MSB, RPN LSB,
DATA MSB and DATA LSB keys to send RPN messages, or NRPN MSB, NRPN LSB,
DATA MSB and DATA LSB keys to send NRPN messages. For example, to send an
NRPN message, enter KEYBOARD MULTI FUNCTION mode by pressing EDIT, then
complete the following steps:
1. Press the NRPN MSB key on the keyboard. The LED will display the currently
selected value.
2. Next, input the desired NRPN MSB value (0-127) with the NUMERIC keys, and
press ENTER. The LED will show “don” (done) to confirm that the new value has
been selected.
3. Press EDIT again and then press the NRPN LSB key on the keyboard. The LED
will display the currently selected value.
4. Next, input the desired NRPN LSB value (0-127) with the NUMERIC keys, and
press ENTER. The LED will show “don” (done) to confirm that the new value has
been selected. This defines the NRPN being sent. Now it’s primed to send the
NRPN value.
5. Press EDIT again and then press the DATA MSB key on the keyboard. The LED
will display the currently selected value.
6. Next, input the desired DATA MSB value (0-127) with the NUMERIC keys, and
press ENTER. The LED will show “don” (done) to confirm that the new value has
been sent. Depending on how the NRPN has been implemented by the
manufacturer of your target MIDI device or software, the DATA MSB value may be
all that you need (please refer to that target manufacturer’s MIDI documentation).
If the LSB is required, continue through steps 7 and 8.
7. Press EDIT again and then press DATA LSB key on the keyboard. The LED will

16
display the currently selected value.
8. Next, input the desired NRPN LSB value (0-127) with the NUMERIC keys, and
press ENTER. The LED will show “don” (done) to confirm that the new value has
been selected. This action fully defines and sends the NRPN value.
To send an RPN message, follow the steps above, but use the “RPN” labeled keys rather
than the “NRPN” keys.
It’s also possible to use a combination of the aforementioned techniques. You can use the
KEYBOARD MULTI-FUNCTION keys to define the RPNs and/or NRPNs, and then assign
the data portion of the message to be performed by a KNOB, SLIDER or WHEEL.
6.9 DUAL
There may be times when you want your MIDI messages to go two places at once, while
still maintaining independent MIDI channels on your target devices. If DUAL is turned on,
the 606606 can send MIDI message out on two channels simultaneously. MIDI
transmission on two channels will continue until DUAL mode is turned off.
To turn on DUAL, enter KEYBOARD MULTI FUNCTION mode by pressing EDIT, and
then press the DUAL key on the keyboard. The LED will show “on” to confirm that DUAL
mode is engaged. To turn it off, re-enter KEYBOARD MULTI FUNCTION mode by
pressing EDIT, and then press the DUAL key on the keyboard. At that point, the LED will
display “off” to confirm that DUAL mode is disengaged.
When DUAL is first activated, MIDI channels 1 and 2 are used. You can define which MIDI
channels are being sent by entering KEYBOARD MULTI-FUNCTION mode to set a new
MIDI channel (Press EDIT, then CHANNEL, then enter the desired channel number using
the numeric keys). When DUAL mode is active, you will set the DUAL mode MIDI channel.
When DUAL mode is off, you will set the Global MIDI channel.
Note that the DUAL and SPLIT functions cannot be used simultaneously. Engaging DUAL
mode will turn off the SPLIT function. Additionally, if new MIDI channels have been set in
DUAL mode, those channels will be used in SPLIT mode, and vice versa.
6.10 SPLIT
There may be times when you want to divide your keyboard into two playing areas for
addressing different target instruments on separate MIDI channels. For instance, you may
want to perform on a piano sound with your right hand while playing a bass sound with
your left hand. SPLIT mode will allow you to do this.
To turn on SPLIT, enter KEYBOARD MULTI FUNCTION mode by pressing EDIT, and

17
then press the SPLIT key on the keyboard. The LED will show “on” to confirm that SPLIT
mode is engaged. To turn it off, re-enter KEYBOARD MULTI FUNCTION mode by
pressing EDIT, and then press the SPLIT key on the keyboard. At that point, the LED will
display “off” to confirm that SPLIT mode is disengaged.
When SPLIT is first activated, MIDI channels 1 and 2 are used for the left and right sides
of the split respectively. You can define which MIDI channels are being sent by entering
KEYBOARD MULTI-FUNCTION mode to set a new MIDI channel (Press EDIT, then
CHANNEL, then enter the desired channel number using the numeric keys). When SPLIT
mode is active, you will set the MIDI channel for the right side of the split. When SPLIT
mode is off, you will set the MIDI channel for the left side of the split (which follows the
Global MIDI Channel).
Note that the SPLIT and DUAL functions cannot be used simultaneously. Engaging SPLIT
mode will turn off the DUAL function. Additionally, if new MIDI channels have been set in
SPLIT mode, those channels will be used in DUAL mode, and vice versa.
6.11 SPLIT POINT
When SPLIT is first activated, the keyboard is divided just below “middle C”, or C3, on the
keyboard. However, you may want to change the place where the keyboard is split in
order to better suit your playing.
To select a new Split Point, enter the KEYBOARD MULTI-FUNCTION mode by pressing
EDIT and then follow these steps:
1. Press the SPLIT POINT key on the keyboard. The LED will display CHO, asking
you to “choose” the place you want the keyboard to divide.
2. Just play the key on the keyboard that you want as the first note on the right side
of the split. (The key just to the left of the note you chose will be the last note of the
left side of the split.) The LED will display “don” (done) to confirm that the new Split
Point has been set.
6.12 MUTE
There are times when you might want to move a controller on the 606606 and not send
out any MIDI messages. For example, you might turn up the SLIDER in order to control
volume on one virtual instrument, then change MIDI channels in order to fade in the
volume on an external MIDI module, but the problem is that the SLIDER is already up. If
you move the slider at this point, the volume on the external MIDI module will jump to the
current volume value instead of fading in gradually. The MUTE function can help in this
situation by muting the keyboard’s MIDI output so you can reset the SLIDER position.

18
When MUTE mode is active, no messages will be transmitted. To turn on MUTE, enter
KEYBOARD MULTI FUNCTION mode by pressing EDIT, and then press the MUTE key
on the keyboard. The LED will show “on” to confirm that MUTE mode is engaged. To turn
it off, re-enter KEYBOARD MULTI FUNCTION mode by pressing EDIT, and then press
the MUTE key on the keyboard. At that point, the LED will display “off” to confirm that
MUTE mode is disengaged.
6.13 SNAP SHOT
It’s possible for the controls on the 606606 to become out of sync with an instrument it is
controlling. This can happen when you control multiple different instruments, one after
another, and move the SLIDER, PEDAL, WHEELS and/or KNOBS. You may find that the
physical position of the control doesn’t match the value of the parameter that you’re
controlling, and when you move that control, the parameter will jump to the current value
with possible unexpected affects on the audio. SNAP SHOT allows you to force your
target MIDI instrument into sync with the 606606 controls by sending a “picture” of all the
current controller positions and states at once.
To perform a SNAP SHOT, enter KEYBOARD MULTI FUNCTION mode by pressing EDIT,
and then press the SNAP SHOT key on the keyboard. The LED will show “don” to confirm
that the SNAP SHOT has been sent.
6.14 UPLOAD & DOWNLOAD
When you’ve configured your keyboard the way you like, you can save those settings via
a System Exclusive Upload. System Exclusive, or SysEx, consists of a string of data
describing the MIDI device that generated it, and this data can be recorded to a SysEx
compatible sequencer for storage and Download back to the keyboard later on.
(A sequencer is a software or hardware MIDI recorder. Once MIDI data is captured, the
sequencer allows you to edit and play back the MIDI events in a sequence.)
When you’re ready to capture SysEx data from the 606606, you should make sure that
SysEx data is not being filtered out by your sequencing software. You may need to consult
the manual for your sequencer in order to find out if there are MIDI filters that could
impede SysEx reception.
To Upload the SysEx data from the 606606, first start your sequencer recording. Then
press the EDIT button to enter KEYBOARD MULTI-FUNCTION mode, and hit the
UPLOAD key in order to transmit the data. The display should read “SEu”, signifying the
keyboard is performing the System Exclusive Upload. When it is complete, the display will
return to its original state.

19
To Download the data from your sequencer to the 606606, make sure that your sequencer
is ready to play the data back. Then press the EDIT button to enter KEYBOARD
MULTI-FUNCTION mode, and press the DOWNLOAD key to ready the 606606 for SysEx
reception. The display should read “SEd”, signifying the keyboard is primed for System
Exclusive Download. Now begin playback of the SysEx data from your sequencer. When
it is complete, the display will return to its original state.
6.15 PEDAL POLARITY
Sustain Pedals are switches that can be either on or off. Depending on the manufacturer,
the pedal’s switch might be normally open or normally closed when it’s at rest. When you
turn on the keyboard, it automatically detects the position of the Sustain Pedal and sets
the appropriate pedal polarity. If you want to change the pedal polarity, you can press
down the pedal while turning on the unit and the normal behavior of the pedal will be
reversed.
You can also switch the Pedal Polarity manually. To reverse the Pedal Polarity, enter
KEYBOARD MULTI FUNCTION mode by pressing EDIT, and then press the PEDAL
POLARITY key on the keyboard. The LED will show “on” to confirm that the Pedal
Polarity is reversed. To return to normal polarity, re-enter KEYBOARD MULTI
FUNCTION mode by pressing EDIT, and then press the PEDAL POLARITY key on the
keyboard. At that point, the LED will display “off” to confirm that reversed Pedal Polarity
is no longer in effect.
6.16 ALL NOTES OFF
MIDI communication sometimes gets quite complex, and mistakes in transmission or
reception can occur. It’s not common, but when there’s a miscommunication, it’s
possible for notes to get stuck. For example, the “note on” messages might get received,
but no “note off” messages make it through.
If this ever occurs, you can send an “All Notes Off”command that will release any stuck
MIDI notes. To transmit the All Notes Off message, enter KEYBOARD MULTI
FUNCTION mode by pressing EDIT, and then press the ALL NOTE OFF key on the
keyboard. The LED will show “don” to confirm that the All Notes Off command has been
sent.
6.17 ALL SOUND OFF
The All Sound Off message is similar to the All Notes Off message, detailed in Section
6.16 above. However, the All Sound Off message mutes all audio immediately, while All
Table of contents