Monoprice 18801 User manual

User’s Manual
P/N 18801
WARNING:
DO NOT EXPOSE THIS EQUIPMENT TO RAIN OR MOISTURE.
TO REDUCE THE RISK OF ELECTRIC SHOCK DO NOT REMOVE COVER.
NO USER SERVICEABLE PARTS INSIDE. REFER SERVICING TO QUALIFIED SERVICE PERSONNEL
SN:
P/N
18801
Made in China
MONO
STEREO
WolfPack 2 - Channel 120W Mixer Amp with Microphone Input

2
CONTENTS
SAFETY WARNINGS AND GUIDELINES ......................................................................................................................................................................... 3
INTRODUCTION.................................................................................................................................................................................................................................4
FEATURES...............................................................................................................................................................................................................................................5
CUSTOMER SERVICE.....................................................................................................................................................................................................................5
PACKAGE CONTENTS...................................................................................................................................................................................................................5
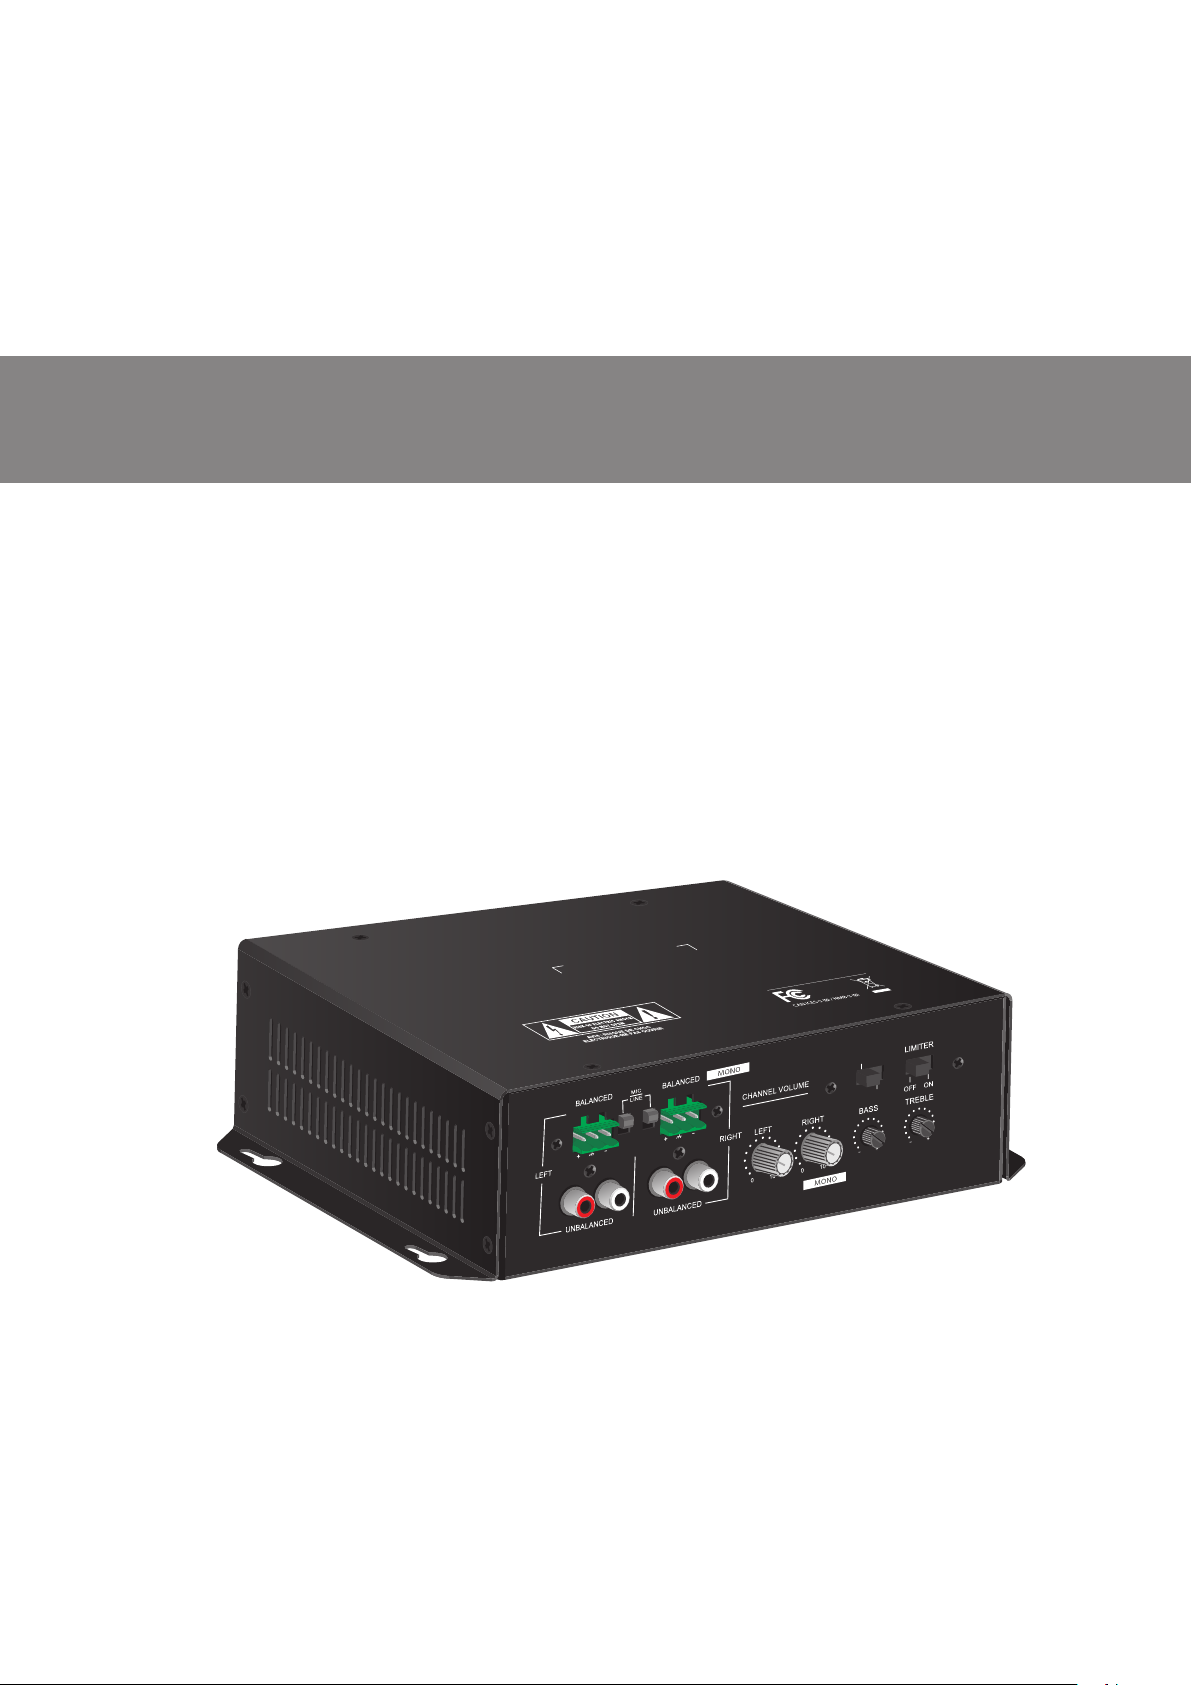
PRODUCT OVERVIEW ..................................................................................................................................................................................................................6
Front Panel.....................................................................................................................................................................................................................................6
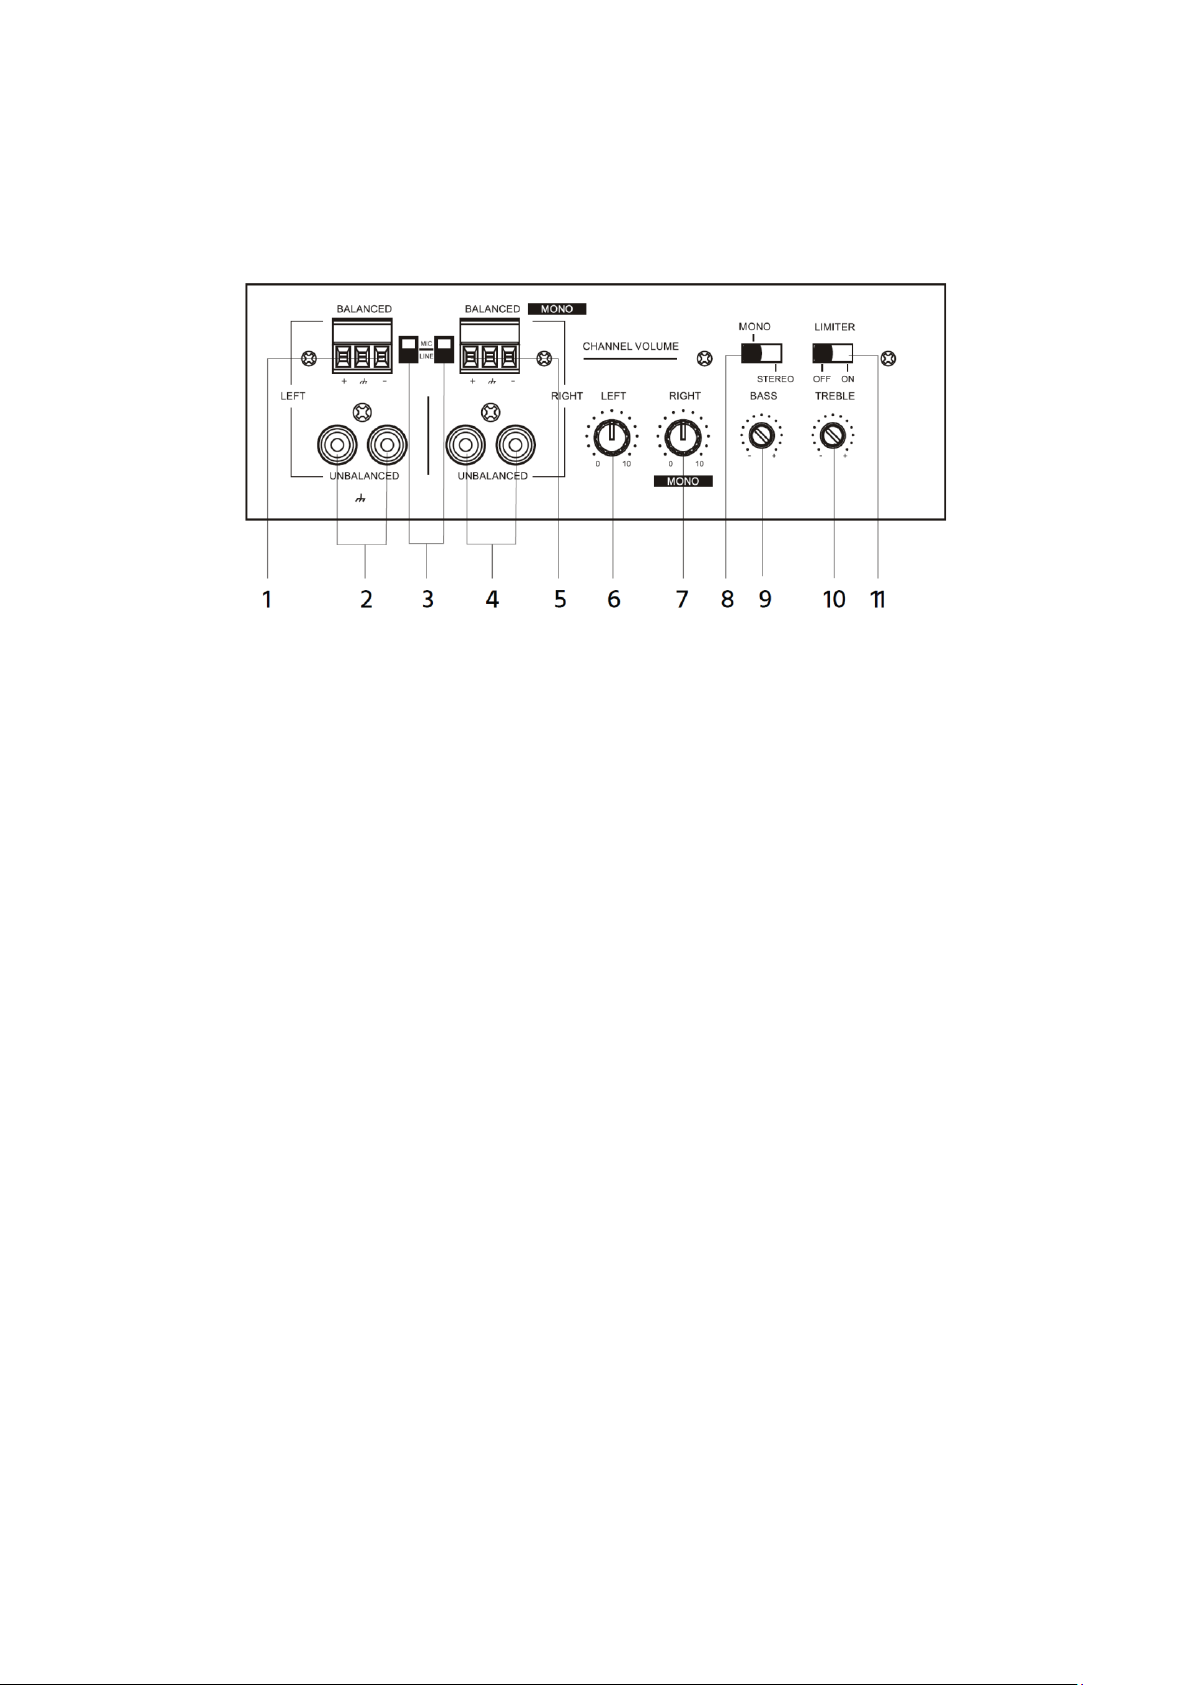
Rear Panel....................................................................................................................................................................................................................................... 7
INPUT CONNECTIONS.................................................................................................................................................................................................................. 7
Single Mono Balanced Microphone or Line Level Input........................................................................................................................ 7
Single Mono Unbalanced Line Level Input........................................................................................................................................................8
Dual Mono Balanced Inputs............................................................................................................................................................................................8
Dual Mono Unbalanced Line Level Inputs..........................................................................................................................................................9
Stereo Unbalanced Line Level Input .......................................................................................................................................................................9
OUTPUT CONNECTIONS ..........................................................................................................................................................................................................10
Two Speakers ............................................................................................................................................................................................................................10
Single Bridged Speaker.....................................................................................................................................................................................................10
OPERATION.......................................................................................................................................................................................................................................... 11
General............................................................................................................................................................................................................................................. 11
Single Mono Input or Bridged Output.................................................................................................................................................................. 11
Dual Mono or Stereo Input.............................................................................................................................................................................................11
TECHNICAL SUPPORT ................................................................................................................................................................................................................12
SPECIFICATIONS............................................................................................................................................................................................................................. 12
REGULATORY COMPLIANCE................................................................................................................................................................................................ 13
Notice for FCC .......................................................................................................................................................................................................................... 13
Notice for Industry Canada........................................................................................................................................................................................... 13

3
SAFETY WARNINGS AND GUIDELINES
Please read this entire manual before using this device, paying extra attention to these
safety warnings and guidelines. Please keep this manual in a safe place for future
reference.
This device is intended for indoor use only.
Do not expose this device to water or moisture of any kind. Do not place drinks
or other containers with moisture on or near the device. If moisture does get in
or on the device, immediately unplug it from the power outlet and allow it to
fully dry before reapplying power.
Do not touch the device, the power cord, or any other connected cables with
wet hands.
Do not expose this device to excessively high temperatures. Do not place it in,
on, or near heat sources, such as a fireplace, stove, radiator, etc. Do not leave it
in direct sunlight.
This device ventilates excessive heat through the slots and openings in the case.
Do not block or cover these openings. Ensure that the device is in an open area
where it can get sufficient airflow to keep from overheating.
Do not expose this device to excessive vibration.
Do not place or install this device in an area where it can be exposed to
excessive amounts of dust, humidity, oil, smoke, or combustible vapors.
Use only in a well-ventilated area. Do not use in close, confined spaces.
Prior to operation, check the unit and power cord for physical damage. Do not
use if physical damage has occurred.
Before plugging the unit into a power outlet, ensure that the outlet provides the
same type and level of power required by the device.
This device uses a grounded power cord and requires a ground connection for
safe operation. Ensure that the power source has a proper ground connection.
Do not modify the plug or use a "cheater" plug to bypass the ground connection.
Unplug this device from the power source when not in use.

4
Take care to prevent damage to the power cord. Do not allow it to become
crimped, pinched, walked on, or become tangled with other cords. Ensure that
the power cord does not present a tripping hazard.
Never unplug the unit by pulling on the power cord. Always grasp the connector
head.
Ensure that power is turned off and disconnected before making any electrical
connections.
Clean using a soft, dry cloth only. Do not use chemical cleaners, solvents, or
detergents. For stubborn deposits, moisten the cloth with warm water.
This device has no user serviceable parts. Do not attempt to open, service, or
modify this device.
Always set the Volume knobs to the minimum position before applying power
to the amplifier. Transient voltage spikes during power on can cause loud
popping in the speakers, which can damage the speakers.
Do not operate this amplifier for extended periods of time with audio distortion
present. Audio distortion can cause excessive heat and can damage the amplifier
and/or speakers.
INTRODUCTION
Thank you for purchasing this Commercial Audio Mixer Amplifier! This amplifier features
two 60-watt channels and offers several configuration options. You can use it as a
normal 60-watts/channel stereo amplifier, as two separate 60-watt mono amplifiers, or
as a single bridged 120-watt mono amplifier. It includes both unbalanced line level
stereo RCA inputs as well as balanced Euroblock connector inputs for use as line or
microphone inputs. It has independent volume controls for each channel, as well as
bass and treble tone controls and an optional amplifier limiter circuit. In stereo or dual
mono mode it supports 4-ohm and 8-ohm loads, or an 8-ohm load for bridged mono
operation.

5
FEATURES
Can be configured for 60-watts/channel stereo, dual 60-watt mono, or bridged
120-watt mono modes
Two balanced mono inputs using Euroblock connectors
Two unbalanced line level stereo RCA inputs
Mic/Line switch for the balanced inputs
Separate volume controls for each input
Optional amplifier limiter to prevent clipping
CUSTOMER SERVICE
PACKAGE CONTENTS
Please take an inventory of the package contents to ensure you have all the items listed
for a replacement.
1x Commercial Audio 120-Watt 2-Channel Mixer Amplifier
1x AC Power Cord
1x User's Manual
The HDTVSupply Customer Service department is dedicated to ensuring that your
ordering, purchasing, and delivery experience is second to none. If you have any
problem with your order, please give us an opportunity to make it right
below. If anything is missing or damaged, please contact HDTVSupply Customer Service

6
PRODUCT OVERVIEW
Front Panel
1. Left Channel Balanced Euroblock Input
2. Left Channel Unbalanced Stereo RCA Input
3. Mic/Line Selector Switches for the Balanced Inputs
4. Right Channel Unbalanced Stereo RCA Input
5. Right Channel Balanced Euroblock Input
6. Left Channel Volume Control
7. Right Channel Volume Control
8. Mono/Dual Mode Selector Switch
9. Bass Tone Control
10. Treble Tone Control
11. Amplifier Limiter Switch

7
Rear Panel
12. AC Power Input Connector
13. Power Switch
14. Power LED Indicator
15. Speaker Output Euroblock Connector
INPUT CONNECTIONS
Single Mono Balanced Microphone or Line Level Input
Perform the following steps to connect a single, balanced microphone or line level
input:
1. Ensure that all equipment to be connected is powered off and unplugged from
its power source.
2. Using a small flat head screwdriver, loosen the three screws in the RIGHT
channel Euroblock.
3. Insert the ground lead from your balanced input into the ground terminal, then
tighten the screws.
4. Insert the negative lead from your balanced input into the -terminal, then
tighten the screws.
5. Insert the positive lead from your balanced input into the +terminal, then
tighten the screw.
6. If the input is from a microphone, set the right channel MIC/LINE switch to the
MIC position, otherwise set it to the LINE position.

8
7. Set the MONO/DUAL switch to the MONO position.
8. Continue with the instruction steps in either the
Two Speakers
section or the
Single Bridged Speaker
section.
Single Mono Unbalanced Line Level Input
Perform the following steps to connect a single, unbalanced line level source in mono
mode.
1. Ensure that all equipment to be connected is powered off and unplugged from
its power source.
2. Insert the left channel RCA plug from your unbalanced stereo source into the
RIGHT channel's White RCA jack, then insert the right channel RCA plug from
your unbalanced stereo source into the right channel's Red RCA jack.
3. Set the MONO/DUAL switch to the MONO position.
4. Continue with the instruction steps in either the
Two Speakers
section or the
Single Bridged Speaker
section.
Dual Mono Balanced Inputs
Perform the following steps to connect two balanced microphone or line level inputs.
1. Ensure all equipment to be connected is powered off and unplugged from its
power source.
2. Using a small flat head screwdriver, loosen the screws in the LEFT and RIGHT
balanced input Euroblock connectors.
3. Insert the ground lead from your first balanced input into the RIGHT channel
ground terminal, then tighten the screws.
4. Insert the negative lead from your first balanced input into the RIGHT channel -
terminal, then tighten the screws.
5. Insert the positive lead from your first balanced input into the RIGHT channel +
terminal, then tighten the screw.
6. If the input is from a microphone, set the RIGHT channel MIC/LINE switch to the
MIC position, otherwise set it to the LINE position.

9
7. Repeat steps 3-6 on the LEFT channel balanced input for your second balanced
input.
8. Set the MONO/DUAL switch to the DUAL position.
9. Continue with the instruction steps in the
Two Speakers
section.
Dual Mono Unbalanced Line Level Inputs
Perform the following steps to connect two line stereo level sources in dual mono
mode.
1. Ensure that all equipment to be connected is powered off and unplugged from
its power source.
2. Insert the left channel RCA plug from your first unbalanced stereo source into
the RIGHT channel's White RCA jack, then insert the right channel RCA plug from
your unbalanced stereo source into the RIGHT channel's Red RCA jack.
3. Repeat step 2 for the LEFT channel input and the second unbalanced source.
4. Set the MONO/DUAL switch to the DUAL position.
5. Continue with the instruction steps in the
Two Speakers
section.
Stereo Unbalanced Line Level Input
Perform the following steps to connect a stereo line level source in stereo mode.
1. Ensure that all equipment to be connected is powered off and unplugged from
its power source.
2. Insert the left channel RCA plug from your unbalanced stereo source into the
LEFT channel's Red RCA jack, then insert the right channel RCA plug from your
unbalanced stereo source into the RIGHT channel's White RCA jack.
3. Set the MONO/DUAL switch to the DUAL position.
4. Continue with the instruction steps in the
Two Speakers
section.

10
OUTPUT CONNECTIONS
Two Speakers
The amplifier can be connected to two speakers for either dual mono or stereo
operation. In this configuration each speaker is driven by a dedicated 60-watt amplifier.
In this configuration the amp can drive 4-8 ohm speaker loads. For dual mono
operation, the speakers should be located in different zones, while for stereo operation,
the speakers should be located in the same zone.
1. Ensure that all equipment to be connected is powered off and unplugged from
its power source.
2. Using a small flat head screwdriver, loosen the four screws on the output
Euroblock connector.
3. Insert the negative lead from the first/left channel speaker into the LEFT -
connector, then tighten the screw.
4. Insert the positive lead from the first/left channel speaker into the LEFT +
connector, then tighten the screw.
5. Insert the negative lead from the second/right channel speaker into the RIGHT -
connector, then tighten the screw.
6. Insert the positive lead from the second/right channel speaker into the RIGHT +
connector, then tighten the screw.
Single Bridged Speaker
When using a single microphone or unbalanced input, you can either connect two
speakers, with each outputting the same audio signal, or you can connect a single
speaker in bridged mono mode. In this configuration, the two amplifiers will be bridged
to produce a single 120-watt output. In this configuration, the amp can drive an 8-ohm
load ONLY. Do not connect loads less than 8 ohms!
1. Ensure that all equipment to be connected is powered off and unplugged from
its power source.
2. Using a small flat head screwdriver, loosen the LEFT + and RIGHT + screws on the
output Euroblock connector.

11
3. Insert the negative lead from the speaker into the LEFT + connector, then
tighten the screw.
4. Insert the positive lead from the speaker into the RIGHT + connector, then
tighten the screw.
OPERATION
General
Set the LIMITER switch to the ON position to reduce the output signal to
prevent clipping.
Use the BASS and TREBLE knobs to affect the tone of the output signal on both
channels, if applicable.
Single Mono Input or Bridged Output
When using a single mono input to the RIGHT channel or when the amplifier is
driving a single bridged speaker, the LEFT VOLUME knob is inactive. Use the
RIGHT VOLUME knob to control the output level.
Dual Mono or Stereo Input
When using dual mono inputs or a single stereo input, use the LEFT VOLUME
knob to control the output level of the speaker connected to the LEFT output
and use the RIGHT VOLUME knob to control the output level of the speaker
connected to the RIGHT output.

12
TECHNICAL SUPPORT
any questions you may have about installation, setup, troubleshooting, or product
recommendations. If you ever need assistance with your new product, please come
online to talk to one of our friendly and knowledgeable Tech Support Associates.
Technical support is available through the online chat button on our website
SPECIFICATIONS
Model
18801
Power Output
1x 60 watts, 2x 60 watts, or 1x 120 watts
Frequency Response
50 Hz ~ 18 kHz
Total Harmonic Distortion
less than 0.5% @ 1kHz at 1/3 full power
Microphone Signal-to-Noise Ratio
> 66dB
Line Signal-to-Noise Ratio
> 80dB
Output Impedance
4-8 ohms, 8 ohms only in bridged mode
Microphone Input Sensitivity/Impedance
5mV/600 ohms
Line Input Sensitivity/Impedance
350mV/10 kilohms
Input Power
120 VAC, 50/60 Hz
Dimensions
9.1" x 4.5" x 2.2" (230 x 115 x 56 mm)
Weight
3.6 lbs. (1.65 kg)
HDTVSupply is pleased to provide free, live, online technical support to assist you with
HDTVSupply during regular business hours, 7 days a week. You can also get
assistance through email by sending a message to support@hdtvsupplycom

13
REGULATORY COMPLIANCE
Notice for FCC
This device complies with Part 15 of the FCC rules. Operation is subject to the following two
conditions: (1) this device may not cause harmful interference, and (2) this device must accept
any interference received, including interference that may cause undesired operation.
interference to radio or television communications at your own expense.
This equipment has been tested and found to comply with the limits for a Class B digital device,
pursuant to Part 15 of the FCC Rules. These limits are designed to provide reasonable protection
against harmful interference in a residential installation. This equipment generates, uses and can
radiate radio frequency energy and, if not installed and used in accordance with the
instructions, may cause harmful interference to radio communications. However, there is no
guarantee that interference will not occur in a particular installation. If this equipment does
cause harmful interference to radio or television reception, which can be determined by turning
the equipment off and on, the user is encouraged to try to correct the interference by one or
more of the following measures:
Reorient or relocate the receiving antenna.
Increase the separation between the equipment and receiver.
Connect the equipment into an outlet on a circuit different from that to which the
receiver is connected.
Consult the dealer or an experienced radio/TV technician for help.
Notice for Industry Canada
This Class B digital apparatus complies with Canadian ICES-003.
Cet appareil numérique de la classe B est conforme à la norme NMB-003 du Canada.
Modifying the equipment without upply’s authorization may result in the equipment no
longer complying with FCC requirements for Class B digital devices. In that event, your right to
use the equipment may be limited by FCC regulations, and you may be required to correct any
Table of contents
Other Monoprice Music Mixer manuals