Montarbo fiveo T4 User manual

ENGLISH
T4
ENGLISHITALIANO
[EN] owNEr’s maNual
[IT]
Manuale d’uso
(pag. 2)
(pag. 9)
usb CoNdENsEr mICrophoNE
Microfono usB a condensatore

Owner’s manual | T4
2
T4
WARNING
In order to protect your own and others’ safety
and to avoid invalidation of the warranty of
this product, please read this section carefully
before operating this product.
∙ Read all documentation before operating your equipment.
∙ Retain all documentation for further reference.
∙ Do not connect/disconnect any microphone when the Phantom
is already activated.
∙ The diaphragm is the most sensible part of the microphone and it
must be left untouched to preserve its original performances. Do
notsprayanysubstance,likehairspray, directlyinto the microphone
and avoid getting make-up or paint on the microphone element
and its housing.
∙ Keepyour microphonesaway fromanykindof unnecessary exposure
to water and high humidity, moisture and sweat.
∙ Keep the microphone element dry at all times. The protection grid
may cleaned with distilled water. Avoid all kinds of spray or fluids,
which contain chemical components to remove static electricity
on or close to the microphone as this could cause damage to the
electret layer.
∙ Mounting the microphone close or directly on the skin of a
performer, be careful to avoid sweat from running directly into
the microphone. If the microphone has been exposed to sweat it
must be rinsed out in distilled water and left to dry out to recover
its original specifications. Drying out your microphone between
exposures to humidity will also help to extend its lifetime.
∙ Some drops of water will not damage the microphone, but possibly
turn deaf while the water is capturedinsidethemicrophone,behind
the protection grid. Remove the water by shaking the microphone
or drying it with a piece of lint free cloth.
∙ Use of windscreen is recommended also using your microphone
in dirty or dusty environments.
∙ Exposing the microphone to make-up or dusty materials, the
grid could get clogged. Remove the microphone grid from the
microphone body and clean the grid using a soft cloth with few
drops of distilled water only. Make sure the grid is dry before
remounting it on the microphone element.
∙ When not in use, the microphone should be disconnected and
stored in the supplied case.
∙ The cable is usually longer than required for its actual purpose.
Ensure that superfluous cable is wound up in large soft loops.
Residue from dust, glue or tape on the cable must be removed
after use. The cable can easily be cleaned using organic oil (i.e.
olive oil) or distilled water. Do not bend the cable or rub it harshly
since this may stress the strands of the cable and cause them to
break over time.
∙ Refer all servicing to qualified service personnel. Servicing is
required when the microphone has been damaged in any way,
such as when liquid has been spilled or objects have fallen into
the unit; the microphone has been dropped or when the unit does
not operate normally.
CAUTION
This product does not contain user serviceable parts. In order
to prevent fire and/or electrical shock, never disassemble it.
For maintenance and servicing always refer to the official
FiveO by Montarbo®Distributor in your Country or to qualified
personnel specifically authorised by the Distributor.
WEEE | Waste from Electrical and Electronic Equipment
ATTENTION!
The crossed out wheeled bin symbol that can be found
on this product means that the product is covered by the
Waste from Electrical and Electronic Equipment Directive.
The symbol is intended to indicate that waste from
electrical and electronic equipment must be subject to a selective
collection. For more details on available collection facilities please
contact your local government office or the retailer where you pur-
chased this product. The solid bar underneath indicates that the
product has been put on the market after 13th August 2005.
INFORMATION ON PROPER DISPOSAL
Information on Disposal for Users (private households)
In the European Union | Attention: If you want to dispose of
this equipment, please do not use the ordinary dust bin! Used
electrical and electronic equipment should not be disposed of via
the normal household waste stream but must be treated separa-
tely and in accordance with legislation that requires proper tre-
atment, recovery and recycling of used electrical and electronic
equipment. Following the implementation by member states, pri-
vate households within the EU states may return their used elec-
trical and electronic equipment to designated collection facilities
free of charge*. In some countries* your local retailer may also
take back your old product free of charge if you purchase a similar
new one. *Please contact your local authority for further details.
In other Countries outside the EU | If you wish to dispose of
this product, please contact your local authorities and ask for the
correct method of disposal.
In Switzerland | Used electrical or electronic equipment can be
returned free of charge to the dealer, even if you don’t purchase
a new product. Further collection facilities are listed on the home-
page of www.swico.ch or www.sens.ch.
Information on Disposal for Professional Users
In the European Union | If the product is used for business pur-
poses and you want to discard it: please contact your FiveO by
Montarbo®dealer who will inform you about the take-back of the
product. You might be charged for the costs arising from take-
back and recycling. Small products (and small amounts) might be
taken back by your local collection facilities.
In Spain | Please contact the established collection system or your
local authority for takeback of your used products.
In other Countries outside the EU | Please contact your local
authorities and ask for the correct method of disposal.
ImporTanT precauTIons

T4 |Owner’s manual
3
ENGLISH
conTenTs
Important precautions 2
Contents 3
Introduction 4
Features 4
USB port 4
Description 5
Installation 6
Quick start 6
Applications 7
Technical specifications 8
pacKaGe conTenTs
USB condenser mic
USB cable
Table mic stand
Velvet pouch
Owner’s manual
Warranty certificate

Owner’s manual | T4
4
T4
InTroDucTIon
First of all, thank you for choosing a product FiveO by Montarbo®.
T4 USB microphone has been designed for those who want to make recordings with excellent performances and outstanding
value, even without a mixer or an expensive audio board!
To achieve such goals, our engineers embedded in this microphone a useful USB I/O audio board. Therefore T4 can be used
to record and to listen your computer stereo audio files, thus perfectly suiting the needs of anyone who needs to record,
including solo singers, speakers and solo musicians.
Please, in order to enjoy each feature of your T4 USB microphone, to achieve the best sonic results, take a few moments to
carefully read these instructions.
For further information please check our website www.fiveo.it, or send an email to: mail@fiveo.it
FeaTures
Your T4 USB microphone has been designed to successfully work in most home and personal studio applications, for solo
players and singers, as well as for Pod-casting and voice-over. The microphone is equipped with 44.1/48kHz 16bit A/D and D/A
converters, providing a professional CD quality signal-to-noise ratio and headroom. In order to make microphone positioning
easier, even in noisy environment, we chose a cardioid pattern diaphragm focusing in front of the mic itself.
Reliability and quality will make T4 USB microphone your faithful sound mates for years.
∙
Professional, large diaphragm, studio condenser USB microphone
∙
32 mm (1.25”) microphone capsule
∙
Wide bandwidth, allowing quality recordings and natural reproduction of the finest nuances.
∙
Distortion-free circuitry providing you pristine signal reproduction.
∙
3.2 mm (1/8”) headphone output with volume control for zero latency direct monitoring
∙
High-quality A/D and D/A converters
∙
Compatible with Mac and PC computers; no special drivers or external power supplies are required
∙
Microphone mute switch for privacy, and to silence noise during recording and playback
∙
Computer-controlled analogue Input Gain
∙
ON, Peak, and Mute 3-colour LED
∙
Supplied table mic stand for easy use
∙
USB cable and carry pouch included
usB porT
T4 is featured with a mini-B size USB connector (please refer to of following page).
By connecting your microphone to a computer’s USB port, the I/O USB port of the
microphone is recognized by the computer as “FIVEO T4”, allowing the functions of
recording and playback.
T4 can be successfully used also with a tablet, provided with, eventually optional,
USB connection, using it with appropriate recording app.
7
T4 |Owner’s manual
5
ENGLISH
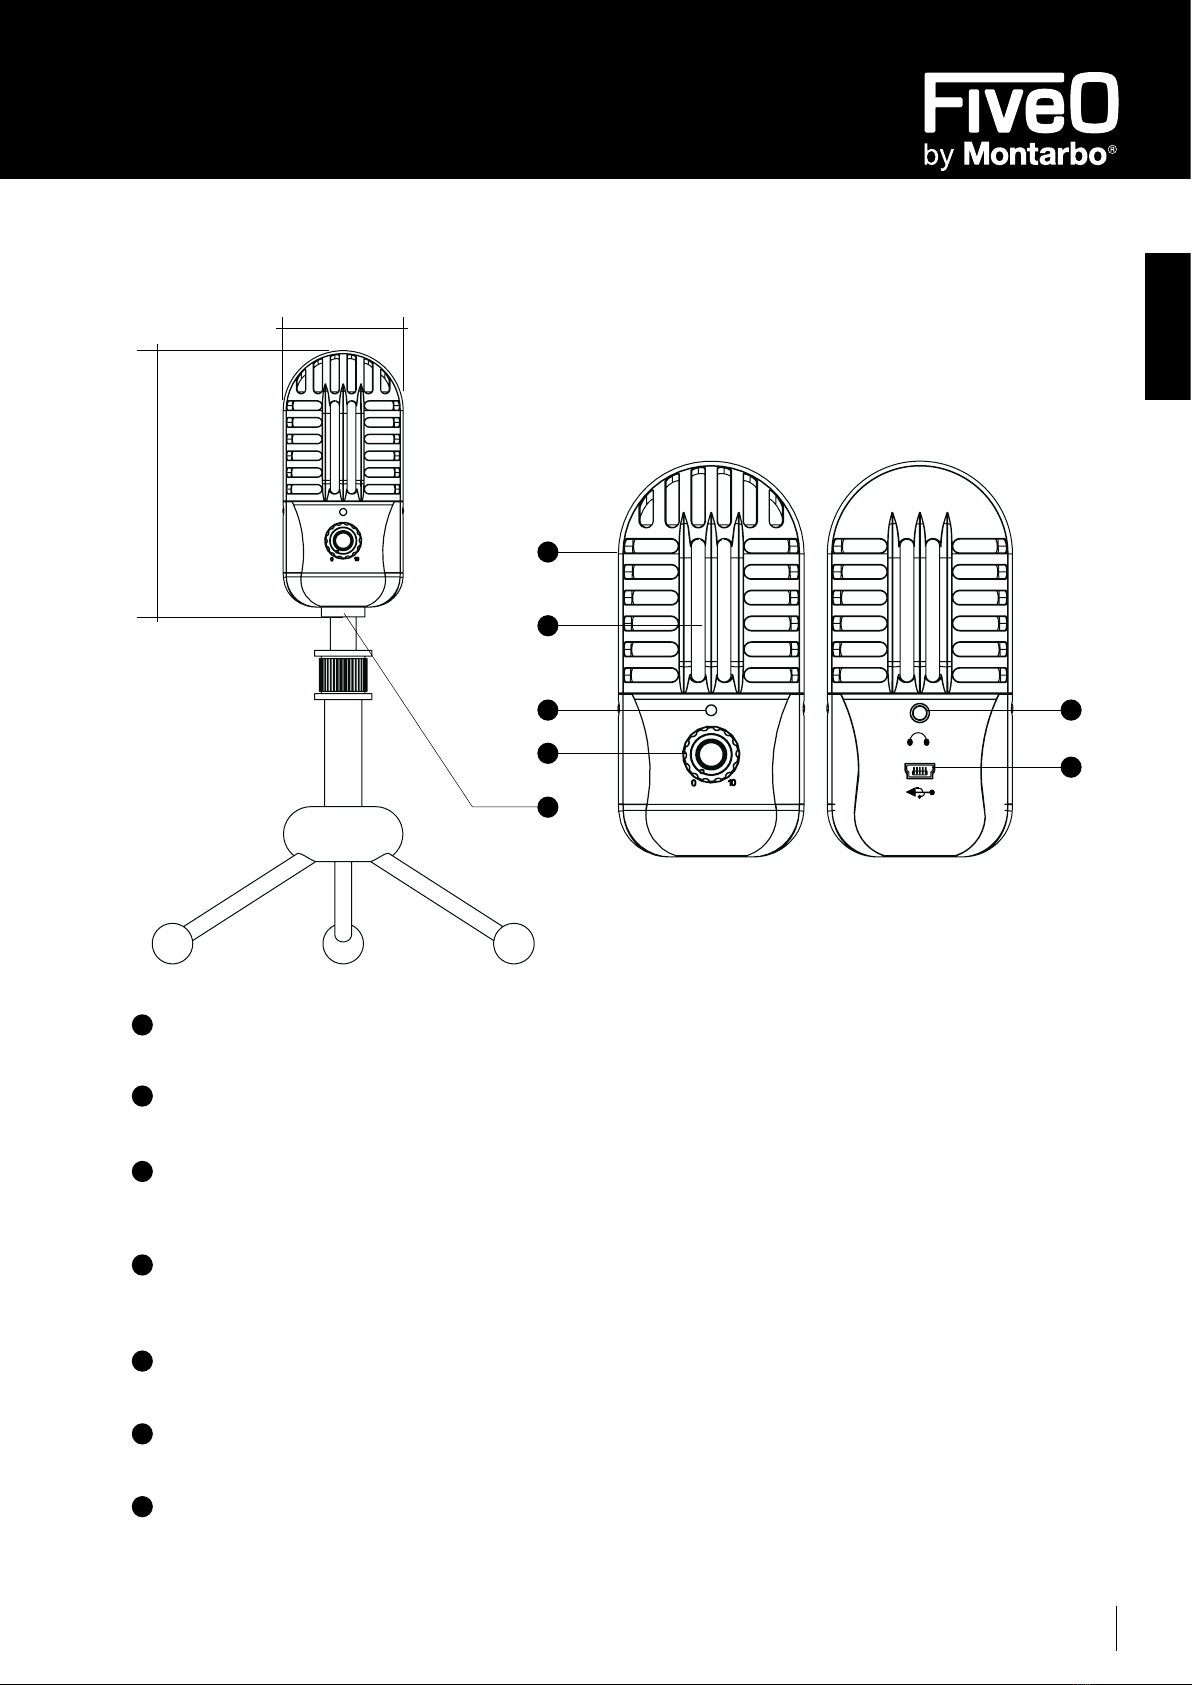
DescrIpTIon
WINDSCREEN
Dual stage grille protects the capsule and helps reducing breath noise and explosive labials.
CAPSULE
32 mm (1.25”) diaphragm with cardioid polar pattern.
LED
Three-colour LED illuminates blue to indicate power, green to indicate that the microphone is muted, and flashes red when the input
signal is clipping.
HEADPHONE VOLUME/MUTE BUTTON
Pressed during a session, it mutes the microphone signal; the LED becomes green. By rotating it, you can control the overall level of
the T4 Mic’s headphone output.
STAND MOUNT
Standard 16mm (5/8-inch) thread mount to attach your T4 to the provided microphone table stand, as well as on mic boom stands.
HEADPHONE JACK
3.2 mm (0.13-inch) stereo mini-jack for connecting headphones or studio monitors.
USB
Mini-B size USB connector for your PC or Mac interfacing.
1
2
3
4
5
6
7
1
50.3 mm [2”]
3
4
5
6
7
107.4 mm [4.2”]
2

Owner’s manual | T4
6
T4
InsTaLLaTIon
Installing the T4 is a simple procedure that takes just a few minutes.
The following sections of this manual provide detailed instructions on setting up your T4 in MAC OS and Windows.
In following descriptions words in double quotes (i.e. “Word”) are related to computer texts.
Windows 7 & Windows Vista
1. The first time you plug your T4 mic into a USB port, Windows 7 or Vista will install the universal drivers for that port.
A balloon will pop up, informing you the computer has found a new device.
2. When drivers installation is finished, a balloon pop up will say “Your device is installed and ready to use”.
Note: This balloon will only pop up when you plug for the first time, not every time, the device into your computer.
3. To check if the procedure is right, click the “Start” button, click “Control Panel” and then click “Sound”. Under the
“Playback” tab, check that your FIVEO T4 has been set as the default device. Otherwise in that page, use the “Set
Default” button to set it as the default device.
4. To set the gain of the microphone, click the “Properties” button, and then select the “Level” tabs. You can choose to
view the Microphone volume level as either a percentage or in dB, by right clicking on the number box. If you find that
the microphone red clip LED is frequently flashing, turn this control down until the LED flashes red just on music peaks.
If the input signal is still clipping, lower again the microphone gain.
5. Select the “Playback” tab, to check if your FIVEO T4 has been set as the default device, otherwise do it manually, then
select the “Level” tab and set the computer’s Master Volume to 100%. Use the T4 front panel volume knob to control
the overall output from the headphones or monitors.
6. Adjust the direct monitoring level in the “Playback” tab by moving the fader labelled Microphone. A good starting
point is to set the monitoring level equal to the microphone gain. Please note that the monitoring level is different from
microphone gain.
Apple MAC OSX
1. To start using your T4 mic simply plug it in. The LED will illuminate to indicate it is receiving USB power. The MAC will
recognize the USB audio device and automatically install a universal driver.
2. To select the T4 as the computer’s audio input, open “System Preferences” from the dock or the main “Apple Menu”.
3. Next, open the “Sound preferences”, choose the “Input” tab and select T4 Mic. To set the gain of the microphone,
adjust the “Input” volume slider at the bottom of the “Sound” dialog box. The “Input Level meter” will show the level.
4. To set the playback volume, click in the “Output” tab and select T4, adjust the “Output” volume slider at the bottom
of the Sound dialog box to the maximum setting and use the T4 front panel volume knob to control the overall output
from the headphones or monitors.
5. To turn direct monitoring on or off, open the “Audio/MIDI Setup” utility located in the “Utility” folder inside the
“Applications” folder. To turn off the monitoring, please click the check box in the “Thru” column in Audio/MIDI Setup.
QuIcK sTarT
There are many ways to use the microphone, and our quick start example is a typical set-up for recording vocals. Just
follow the simple steps below to begin recording.
1. Unfold the legs of your T4, and position the microphone on your desktop/table. The legs can be adjusted to set the
angle of the microphone.
2. Next, connect your headphones to the Headphone output located on the rear of your T4.
3. Plug the mini-B size end of the provided USB cable into T4 rear USB socket.
4. Plug the other end of the USB cable into an available USB port on your computer.
Note: Be sure to check the installation guide for Windows and Mac OS in this manual to confirm your computer has recognized
your device. Also, make sure your computer’s output level is set to maximum for full volume in your T4 headphone monitor.
5. Launch your DAW, turn the microphone’s Volume knob down, and select your T4 for the input and output.
6. Set up a mono record track in your DAW for the vocal track.
7. Next, set the level of your T4 .There are some ways to do this depending on your preference and computer set-up.
One way to control the gain is to set the microphone’s input level in the “Sound playback” page in Windows, or in the
“Sound” dialog box in System Preferences, if you are using a MAC OS. You may also set the gain of the microphone
by raising the Input level control in your DAW. If you see the Power/Peak LED illuminating red, your signal could be
distorted. Turn the MIC level control down until it flashes red on peaks only.
8. Speak or sing into the microphone and raise the volume knob until you reach a comfortable listening level.

T4 |Owner’s manual
7
ENGLISH
appLIcaTIons
T4 is a great microphone choice for your voice and most acoustic instruments. Below is a brief guide on using your T4 in
some typical applications.
Vocals
Position the microphone directly in front of the singer/speaker so that the microphone grille is between 10cm (4”) to 30cm
(1 ft) away. Due to proximity effect, the closer the artist moves to the microphone, the more the bass frequencies response
increases. To achieve the fullest sound, the vocalists should aim the microphone centre line towards their mouth. If explosive
labials (turbulent bursts of air produced when uttering consonants) is occurring, rotate the microphone a little bit away
from the artist so that sound arrives at the microphone slightly off-axis. If space allows, it is preferable to prevent explosive
labials through the use of an external pop filter. If recording a group of singers, ensure that they position themselves around
the front of the microphone close to one another.
Acoustic Guitar
There are a variety of ways that your T4 can be used to mike an acoustic guitar. Optimal microphone placement will depend
on the type of instrument, musical genres and what kind of sound you’re looking to capture. It is necessary - and useful
- to experiment with various positions to achieve full and balanced tone. When miking a steel string acoustic guitar, we
suggest to begin with the microphone at a distance of 20 cm (8”) from the sound hole, positioned slightly off-axis, and
pointing towards the bridge. From this position, moving the microphone towards the sound hole will cause the mic to
capture more low frequencies. If you wish to pick-up more high-end, or to remove any unwanted boominess, move the
microphone toward the fingerboard. The sound of a nylon string acoustic guitar that is played by finger picking is usually
naturally warmer. To record an even, full tone, it is suggested that you begin by positioning the microphone 15 cm (6”)
above the centre of the bridge. This will help emphasize the higher frequencies and pick up the attack sound of the finger
picking. If the microphone is picking up too much low frequency from the sound hole, move the microphone so that it is
slightly off-axis from the guitar. If you have a pair of T4s, try one positioned at the fingerboard and the second under the
bridge of the guitar, or have one microphone positioned close to the guitar and the second a 60 cm (2 feet) away to pick
up the sound of the room, blending the two sources together.
Piano
The grand piano is a very challenging instrument to capture, and can be miked in a variety of ways. For close miking the
piano, position your T4 just inside the piano, centred between the soundboard and the open lid. The closer you move
the microphone toward the instrument the more low frequencies the microphone will pick up. For an ambient recording
like that used in a classical performance, position the microphone outside the piano, facing into the open lid. For a more
contemporary ensemble sound, place two T4s in the piano, positioning one over the low strings and one over the high strings
at a distance of 60cm (2 feet) apart. When miking an upright piano with a single microphone, position the microphone
just above and in front of the piano with the top open, centred over the instrument. If you have a pair of T4, position one
microphone over the bass strings and one over the high strings. You can also position two mics in front of the keyboard
area approximately 20 cm (8”) over the bass and high strings .
Guitar Amp
Placement of the microphone when recording an electric guitar can impact the tone as much as the choice of instrument
and amplifier. Guitar amps are usually close-miked but consideration must be made for the type of signal the amp will
produce. While condenser microphones like your T4 have fast transient response, they cannot handle extreme high SPL.
Your T4 should be placed approximately 10 cm (4”) from the grill of the amp. For a brighter sound, the microphone should
face the centre of the amplifier’s speaker cone. By moving the microphone off of the centre of the speaker, the sound
becomes mellow, rolling off some of the high frequencies. To add more of the room sound, the microphone can be angled
away from the amplifier, or placed further away from the speaker.
Overhead Drum Kit
Because of its extended high frequency response and fast transient response, your T4 performs exceptionally well when
used as an overhead drum set microphone. You can position the microphone approximately centred 150 cm (5 feet) in
front of the drum kit 60 cm (2 feet) above the kit. For stereo miking, use two microphones placed over the drum set at a
distance of, at least, 90 cm (3 feet). Even though overhead mics are mostly for the cymbals, you can get the entire kit to
sound great with just two microphones. You should experiment with the exact placement depending on the size of the
room and whether you’re looking for an ambient or close-miked sound.

Owner’s manual | T4
8
T4
Type Large Diaphragm Condenser Microphone
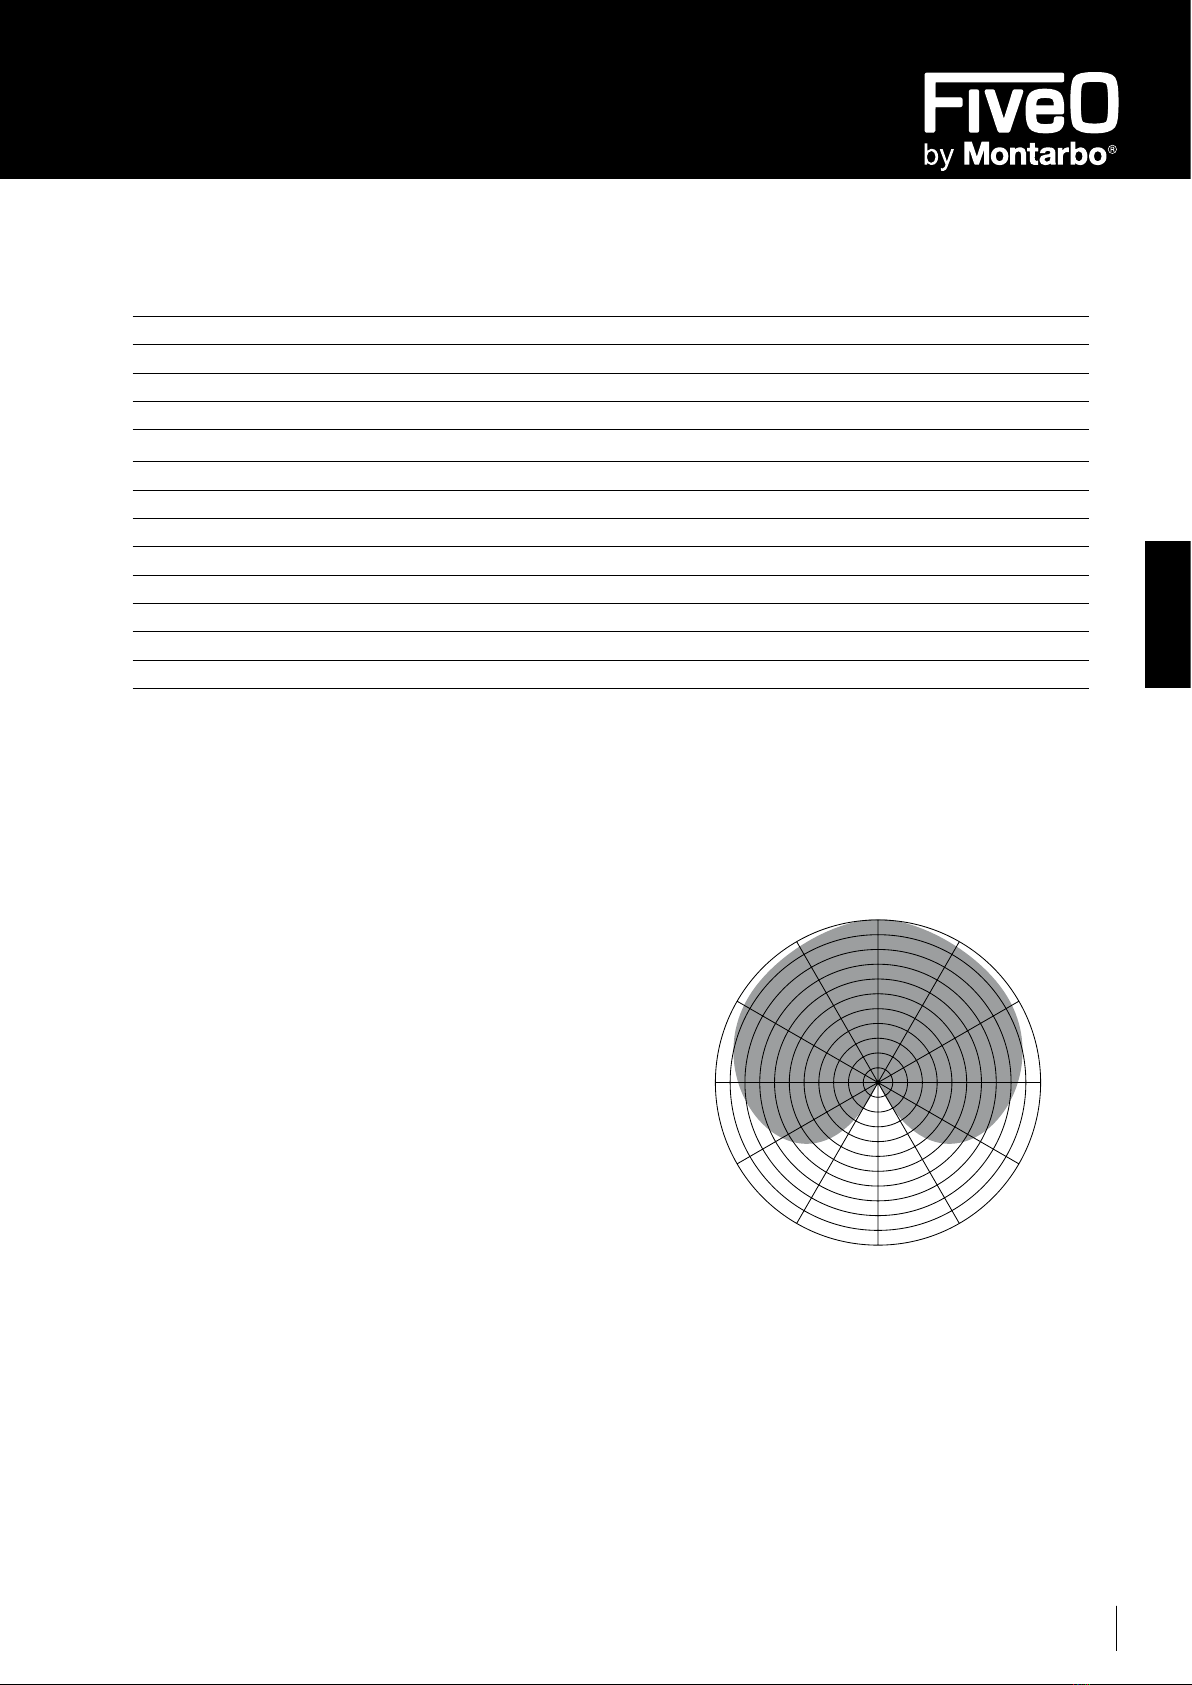
Polar Pattern Cardioid
CAPSULE Ø 32 mm (1.25”)
Frequency response 20 Hz ÷ 20 kHz ± 3 dB
Bit Rate 16 bit
Sample Rate 44.1 / 48 kHz
MAX. SPL 120 dB
Signal-to noise ratio 94 dB A-weighted
Controls Headphones level, Mute on/off, microphone On, Peak and Mute 3-colour LED
Headphones output 3.5 mm (1/8") stereo connector, unbalanced
Headphones output impedance 16 Ω, suggested
Dimensions (WxH) 50.3 x 107.4 mm (2” x 4.2”)
Weight 270 g (9.5 oz.)
TecHnIcaL specIFIcaTIons
poLar paTTern
Cardioid
180°
0°
270°
90°
330°
300°
30°
60°
210°150°
240°120°
T4 |Manuale d’uso
9
ITALIANO
Manuale d’uso | T4
10
T4
ATTENZIONE
Nell’interesse della propria e della altrui
sicurezza, e per non invalidare la garanzia,
si raccomanda una attenta lettura di questa
sezione prima di utilizzare il prodotto.
∙ Leggetetuttaladocumentazioneprimadiutilizzarel’apparecchiatura.
∙ Conservate tutta la documentazione per ulteriori riferimenti.
∙ Non collegate / scollegate il microfono quando l’alimentazione
Phantom è attivata.
∙ Il diaframma è la parte più sensibile del microfono e deve rimanere
intatta per preservare le prestazioni originali. Evitate di spruzzare
sostanze, come spray per capelli, verso il microfono ed evitate il
contatto del microfono con trucchi e smalti, o vernici.
∙ Tenete i microfoni lontano da qualsiasi tipo di esposizione ad
umidità elevata, acqua e sudore.
∙ Mantenete il microfono asciutto in ogni momento. La griglia di
protezione può essere pulita con acqua distillata. Evitate di usare
tutti i tipi di spray o fluidi, che contengono componenti chimici,
per rimuovere elettricità statica o vicino al microfono in quanto
ciò potrebbe causare danni alla membrana.
∙ Usando il microfono vicino o direttamente sulla pelle di un artista,
fate attenzione per evitare che il sudore finisca direttamente nel
microfono.Teneteil microfonoalriparodall’esposizioneall’umidità,
ciò contribuirà anche a prolungare la sua durata.
∙ Il microfono non sarà danneggiato da poche gocce di acqua, ma
potrebbe perdere la sua funzionalità se l’acqua rimane dentro
il microfono, dietro la griglia di protezione. Rimuovete l’acqua
scuotendo il microfono o asciugatelo con un panno che non lasci
residui.
∙ Si raccomanda inoltre di utilizzare un piccolo anti-vento nel caso
di uso del microfono in ambienti sporchi o polverosi.
∙ Esponendo il microfono a fard o a materiali polverosi, la griglia
potrebbe intasarsi. Rimuovete la griglia dal corpo del microfono e
pulite la griglia con un panno morbido inumidito con poche gocce
di acqua distillata. Assicuratevi che la griglia sia asciutta prima di
rimontarla sul microfono.
∙ Quando non è utilizzato il microfono deve essere scollegato e
riposto nella custodia (o scatola) in dotazione.
∙ Il cavo è di solito più lungo di quanto richiesto per il suo utilizzo
reale. Accertatevi che il cavo superfluo sia avvolto in ampie
anse morbide. Residui di polvere, colla o nastro adesivo sul cavo
devono essere rimossi dopo l’uso. Il cavo può essere facilmente
pulito utilizzando olio biologico (ad esempio olio di oliva) o acqua
distillata. Non piegare il cavo o strofinare duramente in quanto
potreste stressare i fili del cavo e provocarne la rottura nel tempo
∙ Per l’assistenza rivolgetevi a personale qualificato. L’assistenza è
necessaria quando il microfono è stato danneggiato in qualsiasi
modo, come ad esempio quando è stato versato del liquido o
sono caduti degli oggetti all’interno, il microfono è caduto o non
funziona normalmente.
NOTA BENE
Per qualsiasi intervento di manutenzione
o riparazione, rivolgetevi alla Elettronica
Montarbo srl e/o a personale altamente qua-
lificato specificamente segnalato da questa.
Direttiva RAEE
ATTENZIONE!
Il prodotto è contrassegnato da questo simbolo che
segnala di non smaltire le apparecchiature elettriche ed
elettroniche tramite la normale procedura di smaltimento
dei rifiuti domestici. Per questi prodotti è previsto un sistema
di raccolta differenziato in conformità alla legislazione che richiede
il trattamento, il recupero e il riciclaggio adeguato dei suddetti
prodotti. Per maggiori informazioni si prega di contattare l’autorità
locale competente. La barra nera sotto il simbolo indica che il
prodotto è stato immesso sul mercato dopo il 13 agosto 2005.
INFORMAZIONI PER UN CORRETTO SMALTIMENTO
Per gli utenti privati
Nell’Unione europea | Attenzione: Per smaltire il presente
dispositivo, non utilizzare il normale bidone della spazzatura! Le
apparecchiature elettriche ed elettroniche usate devono essere
gestite a parte e in conformità alla legislazione che richiede il
trattamento, il recupero e il riciclaggio adeguato dei suddetti
prodotti. In seguito alle disposizioni attuate dagli Stati membri,
i privati residenti nella UE possono conferire gratuitamente
le apparecchiature elettriche ed elettroniche usate a centri di
raccolta designati*. In alcuni paesi (*), anche il rivenditore locale
può ritirare gratuitamente il vecchio prodotto se l’utente acquista
un altro nuovo di tipologia simile. *Per maggiori informazioni si
prega di contattare l’autorità locale competente.
In paesi che non fanno parte dell’UE | Contattare le autorità
locali e informarsi sul metodo di smaltimento corretto.
In Svizzera | Le apparecchiature elettriche o elettroniche usate
possono essere restituite gratuitamente al rivenditore, anche se
non si acquista un prodotto nuovo. Altri centri di raccolta sono
elencati sulle homepage di www.swico.ch o di www.sens.ch.
Per gli utenti professionali
Nell’Unione europea | Attenzione: Se il prodotto è impiegato
a scopi professionali, procedere come segue per eliminarlo:
contattare il proprio rivenditore FiveO by Montarbo®che fornirà
informazioni circa il ritiro del prodotto. Potrebbero essere
addebitate le spese di ritiro e riciclaggio. Prodotti piccoli (e
quantitativi ridotti) potranno essere ritirati anche dai centri di
raccolta locali.
In Spagna | Contattare il sistema di raccolta ufficiale o l’ente
locale preposto al ritiro dei prodotti usati.
In paesi che non fanno parte dell’UE | Contattare le autorità
locali e informarsi sul metodo di smaltimento corretto.
aVVerTenZe

T4 |Manuale d’uso
11
ITALIANO
InDIce
Avvertenze 10
Indice 11
Introduzione 12
Caratteristiche 12
Porta USB 12
Descrizione 13
Installazione 14
Inizio 15
Applicazioni 16
Caratteristiche tecniche 17
conTenuTo ImBaLLo
Microfono USB a condensatore
Cavo USB
Astuccio di velluto
Supporto da tavolo
Manuale utente
Certificato di garanzia

Manuale d’uso | T4
12
T4
InTroDuZIone
Vi ringraziamo per aver scelto un prodotto della linea FiveO by Montarbo®.
T4 combina la pratica connessione USB con l’alta qualità di un microfono a condensatore, per ottenere un suono caldo
e presente, perfetto per la voce e per le registrazioni musicali in genere. Il microfono è stato progettato per coloro che
vogliono realizzare registrazioni audio con il proprio computer, fisso o portatile, senza dover acquistare anche un mixer o
una scheda audio.
Dal punto di vista funzionale, T4 unisce qualità e praticità, grazie soprattutto alle dimensioni contenute, l’interfaccia
di ingresso/uscita USB e l’estrema semplicità di utilizzo.
Al fine di sfruttare tutte le caratteristiche del vostro T4 e per ottenere i migliori risultati sonori, dedicate qualche minuto
a leggere attentamente queste istruzioni.
Per ulteriori informazioni consultate il nostro sito www.fiveo.it, o inviate una mail a: mail@fiveo.it
caraTTerIsTIcHe
T4 è stato progettato per lavorare con successo nella maggior parte delle applicazioni di registrazione personale per musicisti
e cantanti solisti, così come per il Pod-casting, il voice-over fino all’utilizzo per videochiamate attraverso i programmi di
conversazione e messaggistica istantanea.
Tecnicamente, T4 garantisce una qualità di registrazione paragonabile a quella dei CD audio, in quanto i suoi convertitori
AD/DA permettono di ottenere una risoluzione dinamica caratterizzata da un eccellente rapporto segnale/rumore.
Il microfono è caratterizzato da un diagramma polare cardioide che consente di ridurre i rumori ambientali isolando la fonte
sonora in modo efficiente.
Ispirato esteticamente allo stile dei microfoni vintage degli anni cinquanta e sessanta, T4 dispone di un utile supporto da
tavolo ripiegabile che consente di sostenere il microfono con sicurezza su qualsiasi superficie.
Affidabilità e qualità renderanno il vostro T4 USB un fedele compagno sonoro per anni.
∙
Microfono USB professionale a condensatore con diaframma grande
∙
Capsula microfonica da 32 mm (1,25 pollici)
∙
Banda audio molto ampia, per registrazioni di qualità e una riproduzione naturale delle più sottili sfumature.
∙
Circuiti senza distorsione, per fornire una riproduzione del segnale pura.
∙
Uscita per cuffia da 3,2 mm (1/8 di pollice) con controllo del volume per monitoraggio diretto a latenza zero.
∙
Convertitori A/D e D/A, 16-bit, 44.1 / 48 kHz.
∙
Compatibile con i computer Mac e PC: non sono necessari driver speciali o alimentatori esterni.
∙
Interruttore di MUTE del microfono per la privacy e per l’esclusione del rumore durante la registrazione e la riproduzione.
∙
Guadagno di ingresso analogico controllato dal computer.
∙
LED a tre colori di attivazione, picco e mute.
∙
Fornito di supporto da tavolo per semplificare l’utilizzo su qualsiasi superficie piana.
∙
Fornito di cavo USB e involucro morbido da trasporto.
porTa usB
T4 è dotato di connettore formato USB mini-B (vedi punto della pagina seguente).
La porta USB I/O del microfono è riconosciuta dal computer come “FIVEO T4”, con-
sentendo le funzioni di registrazione e riproduzione.
Ovviamente è possibile collegarlo anche ad un tablet tramite la sua connessione,
eventualmente opzionale, USB ed utilizzarlo con le app specifiche per la registrazione.
7

T4 |Manuale d’uso
13
ITALIANO
DescrIZIone
SCHERMO ANTISOFFIO
Griglia a doppio stadio per proteggere la capsula e ridurre il rumore del respiro e delle labiali.
CAPSULA
Diaframma da 32 mm (1,25 pollici) con caratteristica polare cardioide.
LED
LED a tre colori; si illumina in blu per indicare l’accensione, verde per indicare che il microfono è disattivato, e lampeggia in rosso quando
il segnale di ingresso raggiunge il picco.
TASTO MUTE/VOLUME CUFFIA
Premuto durante il funzionamento, mette in Mute il microfono, il LED diventa verde. Ruotandolo potete controllare il livello generale
di uscita delle cuffie Mic del T4.
FORO PER IL SUPPORTO DA TAVOLO/ASTA MICROFONICA
Foro standard filettato da 16 mm (5/8 di pollice) per connettere il T4 al treppiede in dotazione o ad un’asta microfonica.
JACK PER CUFFIA
Mini-jack stereo da 3,2 mm (0,14 pollici) per collegare cuffie o monitor da studio.
USB
Connettore formato USB mini-B per il collegamento del vostro PC o Mac o tablet.
1
2
3
4
5
6
7
1
50.3 mm [2”]
3
4
5
6
7
107.4 mm [4.2”]
2

Manuale d’uso | T4
14
T4
InsTaLLaZIone
L’installazione del T4 è una procedura semplice che richiede solo pochi minuti.
Le sezioni che seguono forniscono istruzioni dettagliate sulla configurazione del T4 con i sistemi operativi Mac e Windows.
Nella descrizione seguente le parole tra virgolette (“Parola”) sono legate a termini informatici.
Windows 7 & Windows Vista
1. La prima volta che collegate il microfono T4 ad una porta USB, Windows 7 o Vista installerà i driver universali per quella
porta. Apparirà un pop-up per informarvi che il computer ha trovato un nuovo dispositivo.
2. Quando l’installazione automatica dei driver è terminata, apparirà un nuovo pop-up: “Il dispositivo è installato e pronto
per l’uso”
Nota: Questo pop-up apparirà solo quando si collega il dispositivo al computer per la prima volta, non ogni volta.
3. Per verificare se la procedura è giusta cliccate sul pulsante “Start”, poi su “Pannello di controllo” ed infine su “Audio”.
Sotto l’etichetta “Riproduzione” controllate che il vostro T4 FIVEO sia stato impostato come dispositivo predefinito. In
caso contrario in quella pagina utilizzate il pulsante “Set Default” per impostarlo come dispositivo predefinito.
4. Per impostare il guadagno del microfono fate clic sul pulsante “Proprietà” quindi selezionare l’etichetta “Livelli”. Potete
scegliere di visualizzare il livello del volume del microfono in percentuale o in dB, cliccando a destra della casella del
numero. Se scoprite che il LED rosso del microfono si illumina spesso, attenuate questo controllo fino a quando il LED
lampeggia solo sui picchi musicali. Se il segnale di ingresso è ancora saturo, abbassate di nuovo il guadagno del microfono.
5. Selezionate l’etichetta “Riproduzione” per controllare se il vostro FIVEO T4 è stato impostato come dispositivo predefinito
per l’ascolto, altrimenti fatelo manualmente, quindi selezionate l’etichetta “Livelli” ed impostate il volume del master
del computer al 100%. Utilizzate la manopola frontale del T4 per controllare il livello generale d’uscita delle cuffie o
dei monitor da studio.
6. Regolate il livello di monitoraggio diretto nella pagina “Riproduzione” spostando il fader etichettato “Microfono”. Un
buon punto di partenza consiste nell’impostare il livello di monitoraggio pari al guadagno del microfono. Notate che il
livello di monitoraggio è diverso dal guadagno del microfono.
Apple MAC OSX
1. Per iniziare a utilizzare il microfono T4 basta semplicemente collegarlo. Il LED si illumina per indicare che sta ricevendo
l’alimentazione tramite la porta USB. Il MAC riconoscerà la periferica audio USB e installerà automaticamente un driver
universale.
2. Per selezionare il T4 come ingresso audio del computer, aprite “Preferenze di Sistema” dal Dock o il “Menu Apple”
principale.
3. Quindi, aprite le “Preferenze Audio”, scegliete l’etichetta “Ingresso” e selezionate microfono su FIVEO T4, impostate il
guadagno del microfono, regolare il cursore del volume di ingresso, nella parte inferiore del box di dialogo “Suono”.
L’indicatore del livello di ingresso mostrerà il livello.
4. Perimpostareil volume diriproduzione,cliccate sull’etichetta “Uscita”e selezionate FIVEOT4, regolate ilcursoredelvolume
di uscita nella parte inferiore della finestra di dialogo “Suono” per l’impostazione di massima e utilizzare la manopola
del volume del pannello frontale T4 per controllare il livello di uscita complessivo dalle cuffie o dai diffusori monitor.
5. Per attivare il monitoraggio diretto o disattivarlo, aprire l’utilità “Audio/MIDI Setup” che si trova nella cartella “Utility”
all’interno della cartella “Applications”. Per escludere il monitor cliccate sulla casella di spunta “Thru” nella colonna
Setup Audio/MIDI.

T4 |Manuale d’uso
15
ITALIANO
InIZIo
Ci sono molti modi per utilizzare il microfono e il nostro esempio di avvio rapido è un tipico set-up per la registrazione della
voce. Basta seguire i semplici passi qui sotto per iniziare la registrazione.
1. Aprite le zampe del supporto e posizionate il microfono sul vostro tavolo/piano di lavoro. Le zampe possono essere
regolate per impostare l’angolazione del microfono.
2. Quindi collegate la cuffia dedicata all’uscita cuffia posta sul retro del vostro T4.
3. Collegate il connettore tipo mini-B (piccolo) del cavo USB nella presa USB presente nel retro del vostro T4.
4. Collegate l’altra estremità del cavo USB alla porta USB del computer disponibile. Nota: Controllate che la guida
all’installazione per Windows e Mac OS per assicurarvi che il computer abbia riconosciuto il vostro microfono
T4. Inoltre assicuratevi che il livello di uscita del computer sia impostato al massimo per l’ascolto a tutto volume.
5. Avviate il software di registrazione ed abbassate la manopola del volume del microfono e selezionate il vostro T4 come
principale apparecchio per l’ingresso e l’uscita del segnale audio.
6. Impostate la registrazione di una traccia mono nel DAW per la traccia vocale.
7. Successivamente impostate il livello del vostro T4. Ci sono vari modi per farlo secondo le vostre preferenze ed il set-up del
computer.Un modo percontrollare il guadagnoè impostareil livello diingressodelmicrofononellapagina “Riproduzione”
di Windows o, se utilizzate un sistema operativo MAC, nella finestra di dialogo “Suono” in “Preferenze di Sistema”. È
inoltre possibile impostare il guadagno del microfono aumentando il controllo del livello di ingresso nella vostra DAW.
Se vedete il LED di accensione/picco illuminato in rosso, il segnale potrebbe essere distorto. Ruotate il controllo di livello
MIC verso il basso finché lampeggi in rosso solo sui picchi.
8. Parlate o cantate nel microfono alzando la manopola del microfono fino a raggiungere un livello di ascolto confortevole.

Manuale d’uso | T4
16
T4
appLIcaZIonI
T4 rappresenta un’ottima scelta per la ripresa della voce e degli strumenti acustici. Di seguito trovate una breve guida
sull’utilizzo del microfono in alcune applicazioni tipiche.
Voce
Posizionate il microfono direttamente di fronte al cantante/oratore in modo che la distanza tra la griglia del microfono sia
fra 10 cm (4”) e 30 cm (1’). A causa dell’effetto di prossimità più l’artista è vicino al microfono più le frequenze basse sono
esaltate. Per ottenere un suono più pieno, la bocca dei cantanti deve essere verso la linea centrale del microfono. Se le
labiali risultano esplosive (raffiche di turbolenza d’aria prodotte pronunciando le “p” e le “b”) ruotate il microfono un po’
lontano da chi canta/parla in modo che la sorgente arrivi al microfono leggermente fuori asse. Se c’è abbastanza spazio,
è preferibile prevenire le labiali esplosive utilizzando un filtro pop esterno. Registrando un gruppo di cantanti, assicuratevi
che si posizionino intorno alla parte anteriore del microfono uno vicino all’altro.
Chitarra acustica
Ci sono diversi modi in cui potete utilizzare il vostro microfono T4 con una chitarra acustica. Il posizionamento ottimale del
microfono dipende dal tipo di strumento, genere musicale e tipo di suono che state cercando di ottenere. È necessario (ed
utile) sperimentare diverse posizioni per raggiungere un suono pieno ed equilibrato. Per la ripresa di una chitarra acustica
con corde d‘acciaio cominciamo posizionando il microfono ad una distanza di 20 cm (8”) dalla buca, leggermente fuori
asse puntando verso il ponte. Da questa posizione, spostando il microfono verso la buca si catturano più frequenze basse.
Se desiderate catturare più alti o eliminare effetti indesiderati come rimbombi, spostate il microfono verso la tastiera. Il
suono di una chitarra acustica con corde in nylon, suonata di solito con le dita, è naturalmente più caldo. Per registrare il
tono pieno consigliamo di iniziare posizionando il microfono 15 centimetri (6”) sopra il centro del ponte. Ciò contribuirà
a sottolineare la frequenze più alte e raccogliere il suono di attacco del dito che pizzica le corde. Se il microfono riprende
troppe frequenze basse dal foro, spostate il microfono in modo che sia leggermente fuori asse rispetto alla chitarra. Se avete
un paio di T4, provate con uno verso la tastiera ed il secondo sotto il ponte della chitarra o posizionate un microfono vicino
alla chitarra e il secondo a 60 cm (2’) di distanza per riprendere il suono della stanza, miscelando insieme le due sorgenti.
Pianoforte
Il pianoforte è uno strumento molto difficile da riprendere e può essere microfonato in una grande varietà di modi. Per la
ripresa ravvicinata del pianoforte, posizionate il T4 appena dentro il pianoforte, a metà strada tra la tavola armonica e il
coperchio aperto. Più avvicinate il microfono verso lo strumento, maggiore è la ripresa delle frequenze più basse. Per una
registrazione ambientale come quella utilizzata per la musica classica, posizionate il microfono fuori del piano rivolto verso
il coperchio aperto. Per un suono più contemporaneo usate insieme due T4 per il pianoforte, posizionandone uno sulle
corde basse e uno sulle corde alte ad una distanza di 60 cm (2’). Per la ripresa di un pianoforte verticale con un singolo
microfono, la posizione del microfono è appena sopra e nella parte anteriore del pianoforte con la parte superiore aperta,
centrando il T4 verso lo strumento. Se avete un paio di T4 posizionatene uno verso le corde basse e uno verso le corde
alte. Potete anche collocare due microfoni davanti alla zona della tastiera circa 20 cm (8”) sopra le corde basse e quelle alte.
Amplificatore per chitarra
Il posizionamento del microfono per la registrazione di una chitarra elettrica è in grado di influenzare il tono tanto quanto
la scelta dello strumento e dell’amplificatore. Generalmente gli amplificatori per chitarra sono ripresi da vicino, ma bisogna
prendere in considerazione il tipo di segnale che l’amplificatore produce. I microfoni a condensatore, come il T4, hanno
una risposta ai transienti veloce, ma non possono gestire un SPL estremamente elevato. Il vostro T4 deve essere posizionato
a circa 10 cm (4”) dalla griglia dell’amplificatore. Per un suono più brillante, i microfoni devono essere di fronte al centro
del cono dell’altoparlante. Spostando il microfono dal centro dell’altoparlante, il suono diventa morbido, attenuando
alcune delle frequenze superiori. Per aggiungere maggior suono della stanza, il microfono può essere angolato lontano
dall’amplificatore o posto più lontano dal diffusore.
Panoramici della batteria
Grazie alla sua estesa risposta alle frequenze superiori e alla veloce risposta ai transienti, il vostro T4 fornisce una ripresa
eccezionale quando è utilizzato come panoramico per la batteria. È possibile posizionare il microfono centrale a circa 150
cm (5’) di fronte alla batteria e 60 cm (2’) sopra la stessa. Per una ripresa stereo, utilizzate due microfoni posizionati sopra la
cassa ad una distanza di almeno 90 cm (3’). Anche se i microfoni panoramici sono ottimali per i piatti, è possibile ottenere
un grande suono dell’intero set con due soli microfoni. Dovrete sperimentare per ottenere il posizionamento esatto, secondo
le dimensioni della stanza e se siete alla ricerca di un suono ambientale o ravvicinato.
T4 |Manuale d’uso
17
ITALIANO
Tipo Microfono a condensatore a diaframma grande
Caratteristica polare Cardioide
CAPSULA Ø 32 mm (1,25”)
Risposta in frequenza 20 Hz ÷ 20 kHz ± 3 dB
Risoluzione del campionamento 16 bit
Frequenze di campionamento 44.1 / 48 kHz
SPL max 120 dB
Rapporto segnale/rumore 94 dB pesato A
Controlli Livello della cuffia, Mute on/off, LED a tre colori: On/Mute/picco
Uscita cuffia Connettore stereo sbilanciato da 3,5 mm (1/8”)
Impedenza di uscita della cuffia 16 Ω, consigliata
Dimensioni (LxA) 50.3 x 107.4 mm (2” x 4.2”)
Peso 270 g (9.5 oz.)
caraTTerIsTIcHe TecnIcHe
DIaGramma poLare
Cardioide
180°
0°
270°
90°
330°
300°
30°
60°
210°150°
240°120°

Note | T4
18
T4

T4 |note
19
T4
Elettronica Montarbo srl
via G. di Vittorio 13 | 40057 Cadriano Granarolo Emilia (BO) ITALY
T+39 051 6047711
F+39 051 765226
@mail@fiveo.it
www.fiveo.it
Company under the control of EKO Music Group SpA
©2013 Elettronica Montarbo srl | Printed in China
The information contained in this manual have been carefully drawn up and checked. However no responsibility will be assumed
for any incorrectness. This manual cannot cover all the possible contingencies which may arise during the product installation and
use. Should further information be desired, please contact us or our local distributor. Elettronica Montarbo srl can not be considered
responsible for damages which may be caused to people and things when using this product. Specifications and features are subject to
change without prior notice.
The product is made in China under license of Elettronica Montarbo srl.
The product is compliant with the EU legislation.
Le informazioni contenute in questo manuale sono state attentamente redatte e controllate. Tuttavia non si assume alcuna responsabilità per
eventuali inesattezze. Questo manuale non può contenere una risposta a tutti i singoli problemi che possono presentarsi durante l’installazione e l’uso
dell’apparecchio. Siamo a vostra disposizione per fornirvi eventuali ulteriori informazioni e consigli. Elettronica Montarbo srl non può essere ritenuta
responsabile per danni o incidenti a cose o persone, causati o connessi all’utilizzazione o malfunzionamento dell’apparecchio.
Prodotto in Cina per conto di Elettronica Montarbo srl.
Prodotto conforme alle normative della Comunità Europea.
Table of contents
Languages:
Other Montarbo Microphone manuals


