Montgomery Ward 769117 User manual

Instruction Manual
Item: 769117
Wards.com 1•888•557•3848
Montgomery Ward Customer Service
3650 Milwaukee Street, Madison, WI 53714
8:00 am to Midnight, Monday through Friday
Cool,
comfortable
air!
Wards.com 1•888•557•3848
10,000 BTU Portable Air Conditioner
®
®

Thank you for purchasing your Montgomery Ward
Portable Air Conditioner. Put through the paces by the experts, we
guarantee that it will perform to the highest standard, time after time,
with all the convenience and durability you rely on from Wards.
3
Important Safeguards ................... 3
Electrical Safety ...............................4
Specications.................................... 4
Parts & Features.......................... 4–6
Installation.....................................7–10
How to Use......................................... 11
Maintenance & Storage................12
Troubleshooting..............................13
Return Information ........................14
Warranty..............................................15
Table of Contents
21•888•557•3848
Wards.com
Important Safeguards
READ CAREFULLY BEFORE USING AND SAVE THESE INSTRUCTIONS!
• FOR HOUSEHOLD USE ONLY. DO NOT use this appliance for other than its
intended use.
• Remove all packaging materials and labels before rst use. Save the carton—
it is the best way to store this unit during winter, or when not in use.
• DO NOT drape the cord over the counter or tabletop, where it can be pulled on
or tripped over. Never wrap the cord tightly around the appliance as this could
cause the cord to fray or break. DO NOT set heavy objects on cord.
• We DO NOT recommend using an extension cord with this appliance.
• Close supervision is necessary when using this appliance near children.
• A re may occur if this appliance is used near ammable materials.
• DO NOT place the appliance or its cord on or near a heated surface.
• DO NOT use near water or operate in a damp room, such as a laundry room or
bathroom. DO NOT touch the unit with wet hands or when barefoot.
• DO NOT use an accessory or attachment not recommended by Montgomery
Ward, as this may cause injury, or damage the appliance.
• Keep hands, hair and clothing away from all moving parts.
• DO NOT use outdoors.
• DO NOT position the unit so the cold air blows directly at a person, pet or plant.
• DO NOT drink water drained from this air conditioner.
• Unplug the unit if it begins to make strange sounds or produces odor.
• Turn off and unplug this appliance when not in use.
• NO SERVICEABLE PARTS INSIDE THIS APPLIANCE.
• DO NOT USE AN APPLIANCE WITH A DAMAGED CORD OR PLUG, OR AFTER
THE APPLIANCE MALFUNCTIONS, OR HAS BEEN DAMAGED IN ANY MANNER.
• Appliances/tools contain valuable materials that can be recycled. Dispose of
old items using appropriate collection systems in accordance with local and
federal regulations.
• The power cord contains a current device (LCDI) that senses damage to the
power cord. To check the TEST and RESET buttons:
1. Plug in the air conditioner. Press TEST and you will notice a click as the
RESET button pops out.
2. Press RESET and you will notice a click as the button engages.
3. The cord is now supplying electricity to the unit.
4. DO NOT use this device to turn the unit on or off.
5. If this device fails to reset, DO NOT use the air conditioner.
• DO NOT open the unit during operation.
• DO NOT cover or obstruct air inlets or outlets.
• Always transport your air conditioner in a vertical position and stand on a
stable, level surface during use. If unit is knocked over during use, turn off and
unplug immediately.
Thank you
for your
purchase!
®

Parts & Features (cont.)
Specications
Electrical Safety
41•888•557•3848
Wards.com
45
This appliance is equipped with a 3-prong grounding plug with LCDI (Leakage
Current Detection and Interrupter). This is a safety feature to reduce the risk of
electrical shock. USING AN EXTENSION CORD OR ADAPTER PLUG IS NOT
RECOMMENDED WITH THIS APPLIANCE. IT IS RECOMMENDED THAT AN
ELECTRICAL OUTLET SERVING ONLY THIS APPLIANCE BE USED. This outlet must
be properly installed and grounded. If you have any questions about the grounding
or electrical instructions, contact a qualied electrician. Do not attempt to modify
the plug in any way. Montgomery Ward cannot accept any liability for damage or
injury resulting from failure to observe these safety procedures.
POWER RATING 900W, 8.8A, 115V, 60Hz
COOLING AREA 350 sq. ft.
CORD LENGTH 96"
DIMENSIONS 15"W x 29½" H x 13¾" D
WEIGHT 49 lbs.
MODEL ACP1010MW (10,000 BTU)
1
2
Parts & Features
9
8
7
6
5
4
3
13
12
11
10
Control Panel
1. Control Panel
2. Remote Control Receptor
3. Horizontal Louver Control
4. Vertical Louver Control
5. Front Panel
6. Casters (4)
7. Handle (2)
8. Air Filter
9. Upper Air Intake
10. Drain Outlet
11. Air Outlet
12. Lower Air Intake
13. Bottom Tray Drain Outlet
14. Remote Controller & 2 AAA Batteries (see page 6)
Front Back
A. Mode Button
B. Decrease Temperature Button
C. Mode Indicator Lights
D. LED Display
E. Increase Temperature Button
F. Power Button
AFED
CB

1•888•557•3848
Wards.com 7
6
Parts & Features (cont.) Installation
WARNING: Product failure due to improper installation is not covered under the
warranty. You MUST use proper installation procedures as described
in these instructions.
Tools you will need: Phillips screwdriver, tape measure and knife or scissors
Tools you may need: pencil or saw
WINDOW SLIDER KIT
The window slider kit has been designed to t most standard windows. It will be
used to properly vent the exhaust pipe to the outside.
LOCATION
1. The air conditioner should be placed on a rm surface to minimize noise and
vibration. Place the unit on a smooth, level oor.
2. The unit has casters, but it should only be rolled on smooth surfaces. Use caution
when rolling on carpet. DO NOT attempt to roll the unit over objects.
3. The unit must be placed within reach of a window and a properly rated electrical
outlet.
4. Never place any obstacles around the unit air inlets or outlets.
5. Allow 10–40" of space between the unit and walls for efcient air-conditioning.
slider kit pieces (2)
boltexhaust hole
Remote Controller
Controller appearance and/or conguration may differ from the example shown.
If the unit does not have a particular function, pressing that button on the remote
controller will have no effect.
Power
Sleep
LED
Fan
Mode
Timer Off
Timer On
Short Cut
Temperature
Up/Down
Note: The remote control must be used within 9 yards of the unit. The unit will
beep when a remote signal is received. Curtains, other materials and direct
sunlight can interfere with the signal.

1•888•557•3848
Wards.com
89
Installation (cont.)Installation (cont.)
A. Installation in a double-hung window
1. Open the window and cut the foam seal (with
adhesive) to length and attach it to the bottom
and sides of the window opening.
2. Set the window slider kit on the bottom of the
window opening. Adjust the length of the slider
kit according to the width of window and
secure the length with a bolt (see page 6).
3. If the window opening is less than 26½" wide,
use a saw to cut the slider kit (piece with the
exhaust hole) to t the window opening.
4. Cut the foam seal (with adhesive) to length and
attach it to the window sash.
5. Close the window securely on the window kit
and secure with the security bracket, if desired.
6. Cut the foam (without adhesive) to length and
attach it to seal the open gap between the
inside window and outer window.
foam seal
slider
kit
foam seal
foam
seal
slider
kit
foam seal
3. Insert the other end of the exhaust hose into the hole in the window slider kit.
INSTALL THE EXHAUST HOSE
The exhaust hose and adapter must be installed or removed in accordance with
the usage mode (install for COOL and remove for FAN or DRY).
foam
seal
1. Snap the adapters onto the ends of
the exhaust hose.
2. Push the unit adapter end into the air
outlet opening on the back of the unit.
unit adapter
exhaust hose
window slider adapter
2
screws
security
bracket
foam seal
B. Installation in a sliding window
1. Open the window and cut the foam seal (with
adhesive) to length and attach it to the window
frame.
2. Set the window slider kit vertically on the
bottom of the window, against the frame.
Adjust the length of the slider kit according
to the height of the window and secure the
length with a bolt (see page 6).
3. If the window opening is less than 26½" tall, use
a saw to cut the slider kit (piece with the
exhaust hole) to t the window opening.
4. Cut the foam seal (with adhesive) to length and
attach it to the window sash.
5. Close the window securely on the window kit
secure with the security bracket, if desired.
6. Cut the foam (without adhesive) to length and
attach it to seal the open gap between the
inside window and outer window.
WARNING: DO NOT over extend, bend or twist
the exhaust hose!

1•888•557•3848
Wards.com
10 11
How to Use
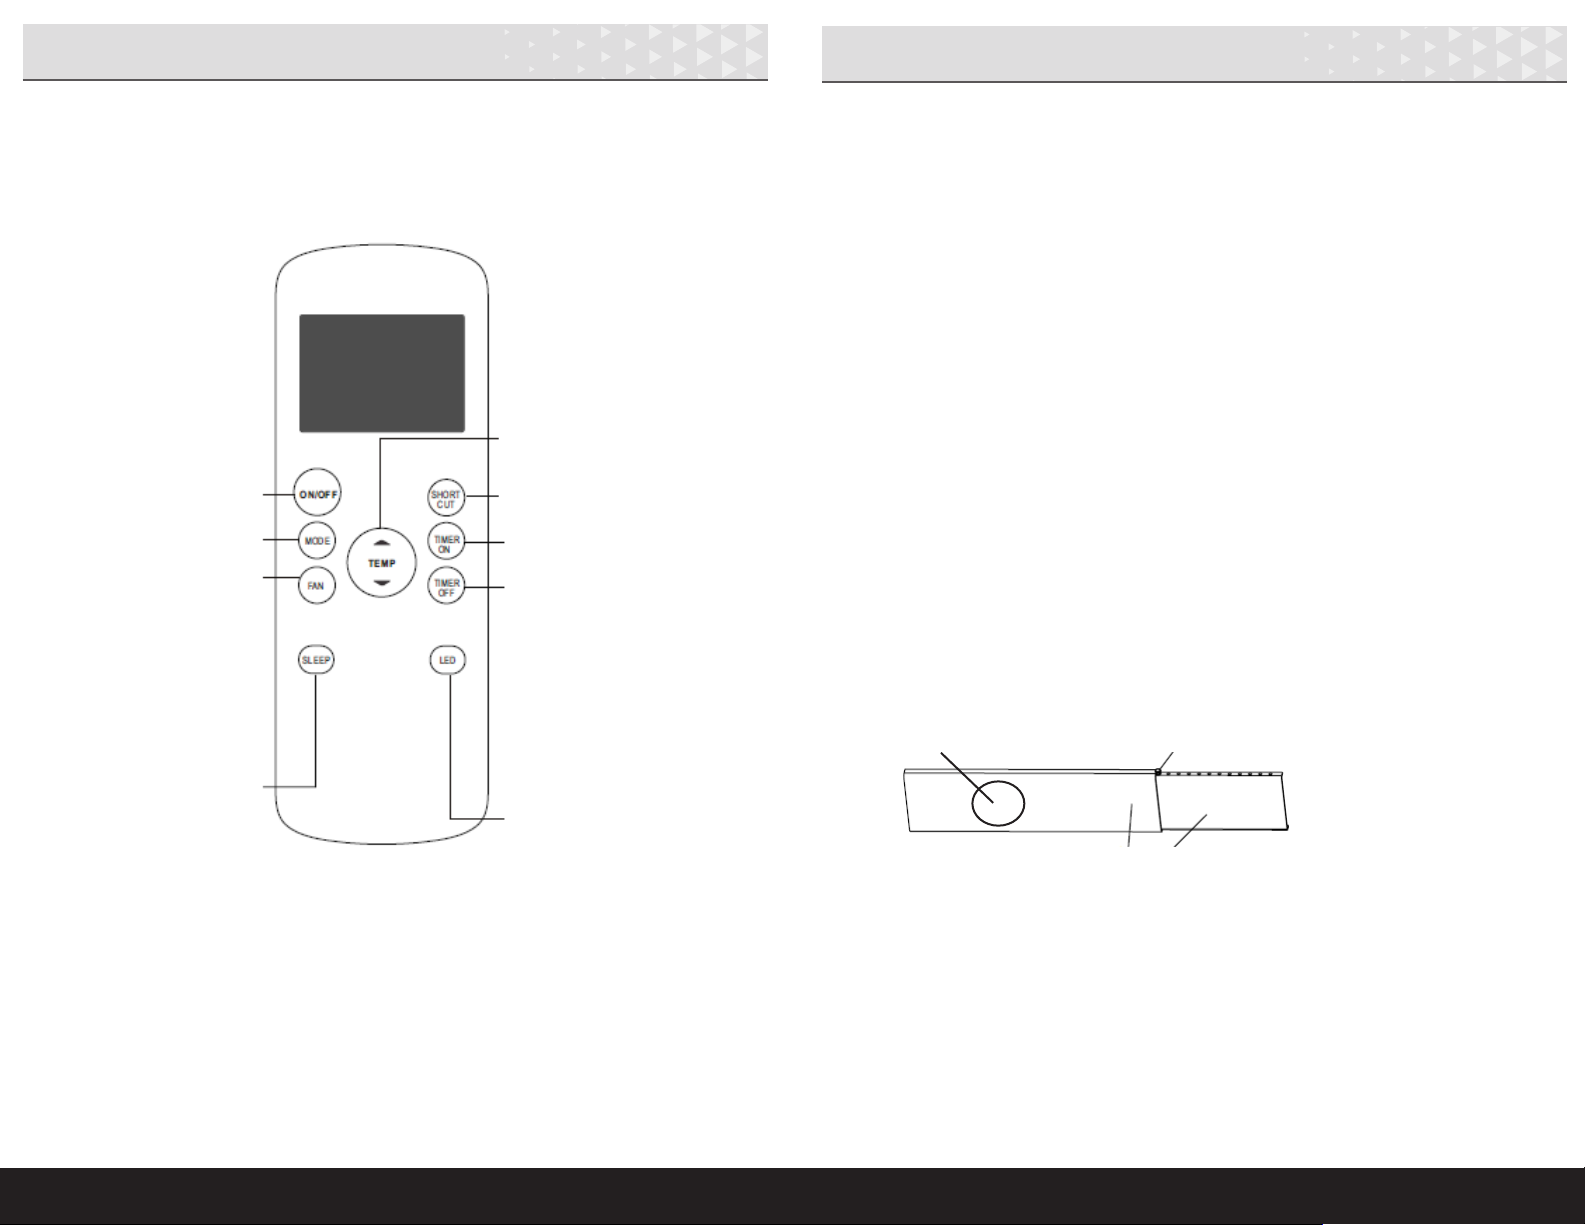
POWER turns the unit ON/OFF.
UP ( + ) and DOWN ( - ) increases/decreases temperature settings.
MODE
1. COOL: press UP and DOWN to select desired temperature (62˚ F–86˚ F). To
convert from C to F on the display, press and hold UP and DOWN at the same
time, for 3 seconds. Press FAN speed button on the remote controller to choose
the fan speed (auto, low, high or medium). The exhaust hose should be vented
out the window. Press POWER to start.
2. DRY (dehumidify): press UP and DOWN to select desired temperature (62˚–
86˚ F). The fan speed operates at low (and cannot be changed). Keep windows
and doors closed for the best results. Remove exhaust hose from window. Attach
the drain hose (see page 8). Press POWER to start.
3. FAN: Selects the fan only (no cooling). Press the FAN speed button on the
remote controller to choose the speed. The temperature cannot be adjusted.
Remove the exhaust hose from the window. Press POWER to start.
FAN controls the fan speed in COOL and FAN MODES. Press FAN to select low,
medium, high or auto.
LED DISPLAY shows the set temperature on COOL mode. While on DRY and FAN
modes, the room temperature is shown.
SLEEP/ECO: (on remote control only)
The set temperature will increase by 2° F in 30 minutes. The set temperature
will then increase by another 2° F after an additional 30 minutes. This new
temperature will be maintained for 7 hours before it returns to the original setting.
The unit will then operate as originally programmed. This feature is not available
under FAN or DRY modes.
SHORT CUT BUTTON (on remote control only)
1. Press SHORT CUT when the unit is ON, and the settings will revert to the
previously set options, including mode, temperature setting, fan speed and sleep.
2. Press SHORT CUT more than 2 seconds, and the current settings will be restored.
TIMER ON/OFF (on remote control only)
1. Press TIMER ON repeatedly to select the time (in hours) you want the unit to
start.
2. Press TIMER OFF repeatedly to select the time you want the unit to turn off.
3. Turn off either function by setting to “0.0h.”
LED (on remote control only) turns the LED display (on the unit ) on and off.
AIRFLOW DIRECTION ADJUSTMENT is done manually by moving the horizontal
and vertical louver controls. Keep the louvers fully opened during operation.
AUTO-RESTART will occur if the unit breaks off unexpectedly due to power going
out. The unit will restart with the previous function setting automatically when the
power resumes.
Installation (cont.)
BOTTOM TRAY DRAIN OUTLET
1. When the water level of the bottom tray
is at maximum, the unit beeps 8 times
and the display shows P1. The air
conditioning/dehumidication process
will immediately stop, but the fan motor
will continue to operate.
2. Carefully move the unit to a drain
location, remove the bottom drain plug
and let the water drain.
3. Reinstall the bottom drain plug and
restart the machine. P1 will no longer
show on the display.
bottom tray
drain outlet
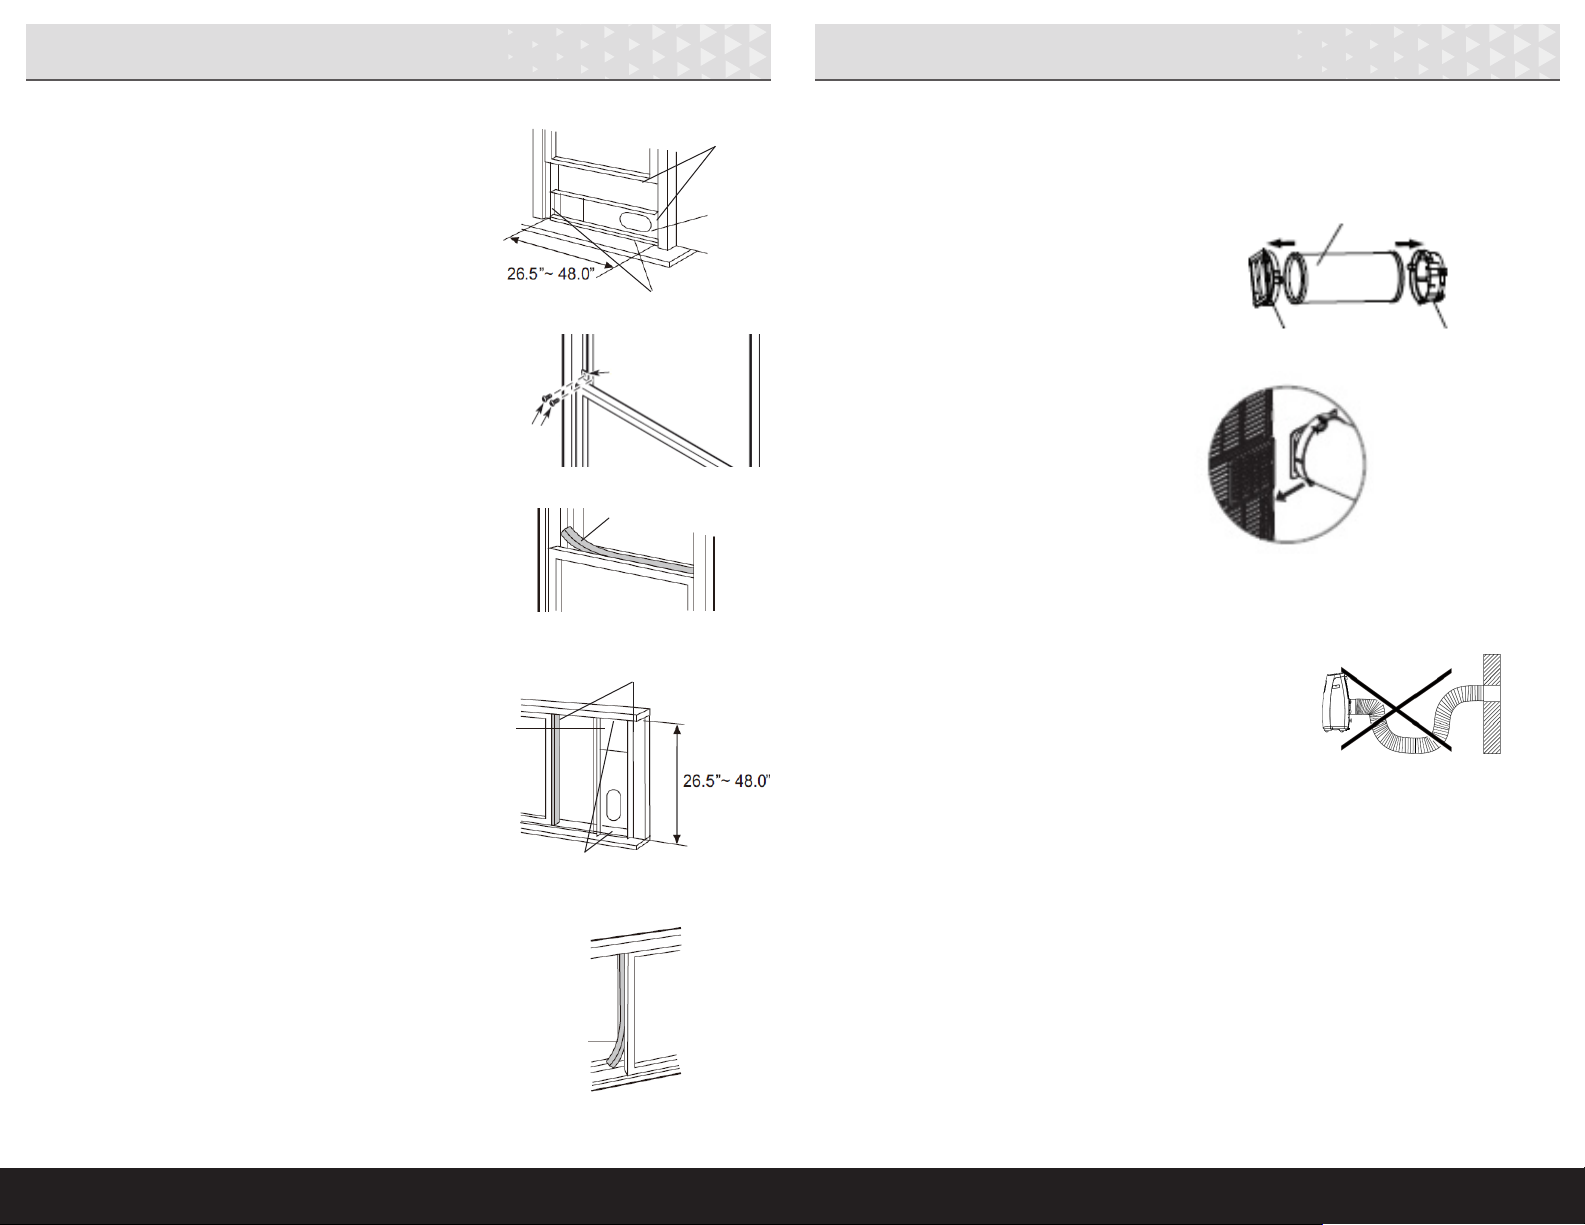
INSTALL THE DRAIN HOSE
1. During DRY (dehumidifying) mode,
connect the drain hose for proper
draining of water being removed from
the air.
2. Remove the cap from the drain outlet
on the back of the unit and securely
attach the drain hose.
3. Place the open end of the hose directly
over the drain area in your basement
oor.
drain
outlet

Maintenance & Storage Troubleshooting
1•888•557•3848
Wards.com
12 13
1. Clean your air conditioner occasionally to keep it looking new. Be sure to
unplug the unit before cleaning to prevent shock or re hazards.
2. The appliance may be dusted with an oil-free cloth or washed with a damp
cloth. Wipe dry. Never use harsh cleaners, wax or polish.
Problem Solution
Unit does not
start
Check that cord is not disconnected from outlet.
Check if house fuse is blown or circuit breaker tripped.
Check if plug current device is tripped; press reset.
Check if power is turned ON.
Check water in bottom tray and drain, if needed.
Room temperature is the same as the set temperature.
Unit not cooling
well
Check that room temperature is not below 62°F.
Set unit to lower temperature.
Ensure all the windows and doors are closed.
Remove other heat sources from room.
Ensure the exhaust hose is installed properly/not blocked.
Check air lter.
Room area is too large.
Unit is noisy or
vibrating
Place the unit on a at level surface. Ensure proper clearance
from furniture, curtains or other items.
Check air lter.
Gurgling sound The sound comes from the owing of the refrigerant inside
the air conditioner. This is normal.
Remote not
working
Check range is within 20 ft. of the unit front.
Signal obstructed; remove obstruction.
Replace remote control batteries.
Room too cold Increase temperature setting.
ERROR CODES
E1 Room temperature sensor error. Unplug the unit, wait 3 minutes and plug it
back in.
E2 Evaporator temperature sensor error. Unplug the unit, wait 3 minutes and plug
it back in.
E4 Display panel communication error. Unplug the unit, wait 3 minutes and plug it
back in.
P1 Bottom tray is full. Turn off unit and drain the collected water away
immediately (see page 9).
5. If you plan to store the air conditioner:
A. Remove the plug from the bottom drain outlet (all the water in the
bottom tray will drain out).
B. Keep the appliance running on FAN mode for half a day in a warm
room to dry the appliance inside and prevent mold from forming.
C. Turn OFF and unplug the unit. Remove the batteries from the remote
control.
D. Clean the air lter (see number 3 above) and reinstall.
E. Cover the air conditioner with plastic or in the original carton before
storing in a dry location.
6. DO NOT immerse this item or any other electrical items, cords or plugs into
water.
7. Remove remote controller batteries if the remote will not be used for more
than 2 months.
3. Clean the air lter at least once every
2 weeks for optimum performance.
Wash the air lter by immersing gently
into warm water with a mild detergent,
rinse and dry. Reinstall.
4. In households with animals, periodically
wipe down the grill to prevent blocked
airow due to animal hair.

1•888•557•3848
Wards.com
12 13
If any item, for any reason, does not meet your expectations, just
return it to us. We’ll gladly either:
• Refund your merchandise amount
• Credit your account
• Send a replacement
You can return any unused item in its original packaging within 60
days of its receipt for a full refund of the purchase price (excluding
shipping and handling charges).
Please send returns to:
Montgomery Ward, Inc.
Attn: Customer Returns
2000 Harrison Suite 100
Clinton, IA 52732-6676
When returning an item:
• Use the original packaging and pack it securely.
• Please adequately insure your item in case you need to
make a claim with the carrier you choose for returning your
item.
• Include your order number and reason for return.
• We recommend keeping the receipt for 4 weeks.
Montgomery Ward, Inc. warrants this product
to be free from defects in material and workmanship
for one year from provable date of purchase.
Within this warranty period, Montgomery Ward will repair
or
replace, at its option, defective parts of this
product at no charge, provided the product is returned,
freight prepaid with proof of purchase to
Montgomery Ward.
Allow 2–4 weeks for return shipping.
This warranty does not cover improper installation, misuse,
abuse or neglect on part of the owner. Warranty is also
invalid in any case that the product is taken apart or
serviced by an unauthorized service station.
This warranty gives you specic legal rights and they may
vary from state to state.
THE FOREGOING WARRANTIES ARE IN LIEU OF ALL
OTHER WARRANTIES AND CONDITIONS,
EXPRESS OR IMPLIED, INCLUDING
BUT NOT LIMITED TO THOSE OF MERCHANTIBILITY
OR FITNESS FOR A PARTICULAR PURPOSE.
1 Year Limited Warranty
Montgomery Ward Customer Service
8:00 am to Midnight CST, Monday through Friday
Wards.com 1•888•557•3848
Returns ®
11
1•888•557•3848
Wards.com
14 15

1514
11
15
Table of contents
Other Montgomery Ward Air Conditioner manuals

Montgomery Ward
Montgomery Ward MW8000 User manual

Montgomery Ward
Montgomery Ward Window AC 12000BTU User manual

Montgomery Ward
Montgomery Ward ACE8005MW User manual

Montgomery Ward
Montgomery Ward 718909 User manual

Montgomery Ward
Montgomery Ward MW12000 User manual

Montgomery Ward
Montgomery Ward MW-O-08C User manual

Montgomery Ward
Montgomery Ward MW-L3-10C User manual