Montgomery Ward MW-L3-10C User manual

Instruction Manual
Item No.: 735502
115V~, 60Hz
Wards.com 1•888•557•3848
Montgomery Ward Customer Service
1112 7th Avenue, Monroe, WI 53566
8:00 am to Midnight, Monday through Friday
Wards.com 1•888•557•3848
Portable AC 10,000 BTU
Energy-
Saving
Mode
Model: MW-L3-10C

Thank you for purchasing your Portable Air Conditioner by
Montgomery Ward®. It will perform to the highest standard, time after time,
with all the convenience and durability you rely on from Wards.
We guarantee it!
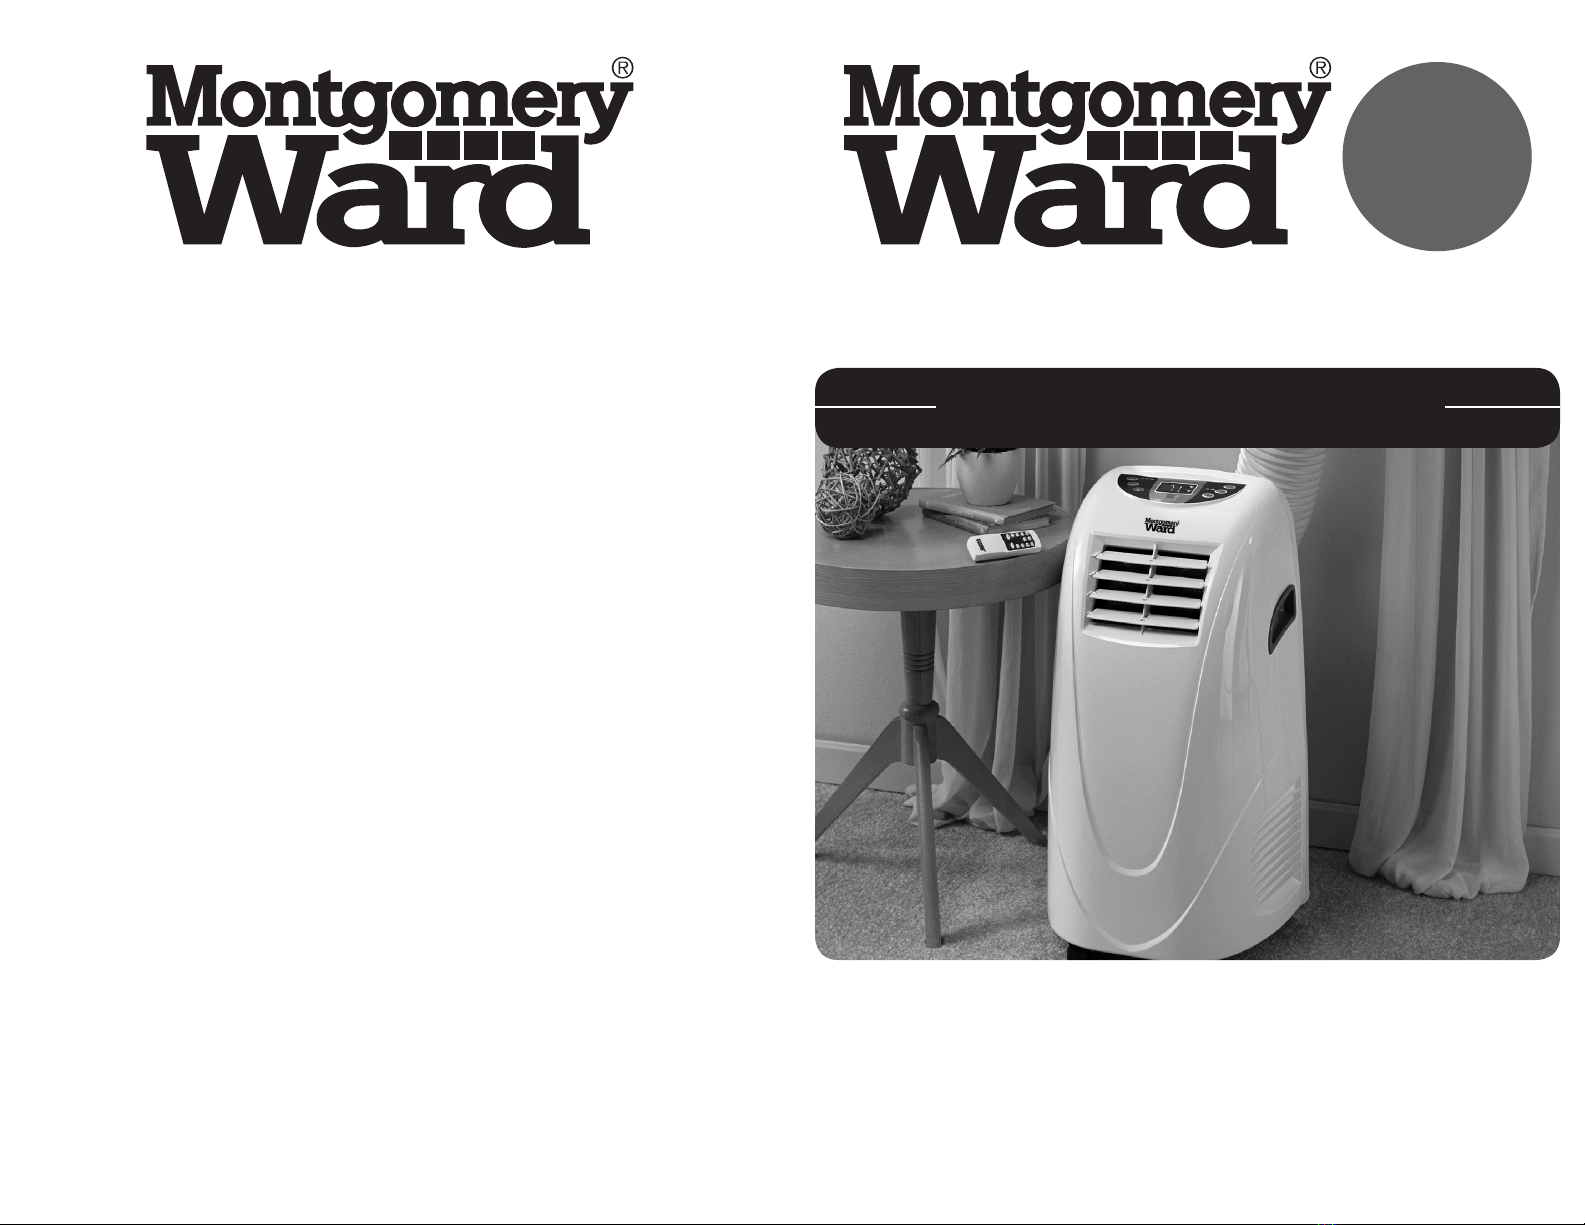
You’re going to love the ability to move your Portable 10,000 BTU Air
Conditioner to where you need it the most. No more hassles with heavy window
units, and installation is a breeze. There’s even a remote control so that you
can adjust settings comfortably and conveniently!
3
PLEASE READ THESE INSTRUCTIONS BEFORE USE
Basic safety precautions should always be followed when using this appliance.
WARNING: TO AVOID THE RISK OF ELECTRICAL SHOCK, ALWAYS MAKE
SURE THE PRODUCT IS UNPLUGGED FROM THE ELECTRICAL OUTLET
BEFORE ASSEMBLING, DISASSEMBLING OR RELOCATING. DO NOT TRY TO
SERVICE THIS PRODUCT YOURSELF.
1. Air conditioner must always be stored and transported in upright position
to avoid permanent damage to the compressor.
2. If appliance has been tilted 45°or more, let it stand 24 hours before powering on.
3. After powering off unit, wait at least 3 minutes before restarting.
4. Close supervision is necessary when any appliance is used by or near children.
5. Do NOT allow children or pets to be exposed to direct airflow for long periods of
time.
6. To protect against electrical shock, do not place cord, plug or appliance in water
or other liquid.
7. Use a dedicated circuit to avoid a power surge or overloading of the circuit.
8. Do NOT allow water to get on control panel or into any part of the unit.
9. Use the plug to disconnect from electrical outlet; never pull out by the cord.
10. Do NOT modify or alter the plug or power cord.
11. Turn power OFF before removing plug from outlet. Do not unplug air conditioner
when it is operating.
12. Never operate the appliance or remove the plug with wet hands.
13. Do NOT use an extension cord with this appliance unless it is rated for use with
this type of appliance.
14. Do NOT operate any appliance with a damaged cord or plug, or after the
appliance malfunctions or has been damaged in any manner. Call our toll-free
customer service number for information regarding replacement or returning
the product.
15. Only position on a solid, dry, level surface.
16. Do NOT use outdoors.
17. Do NOT use in laundry room, bathroom or other wet environments.
18. Do NOT remove filters when machine is in use.
Important Safeguards........................3-4
Energy Saving Tips .............................. 4
3-Prong Plug......................................... 4
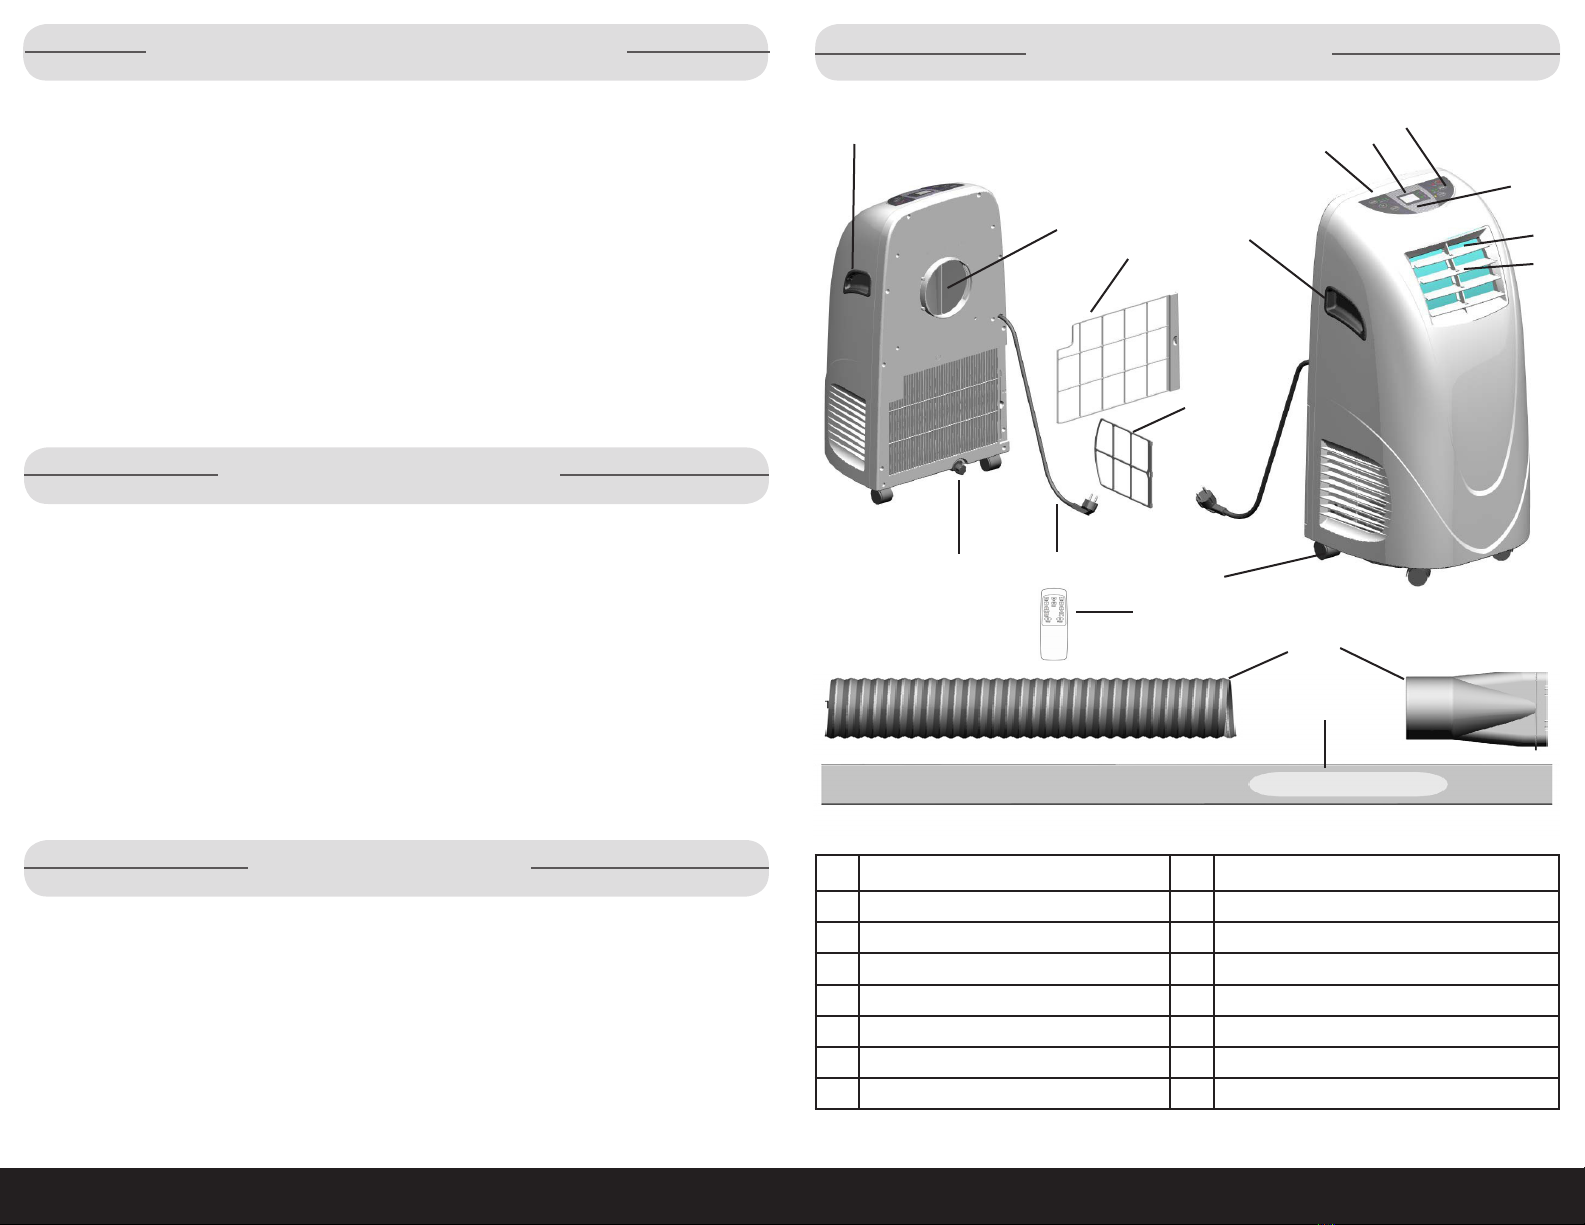
Parts & Features................................... 5
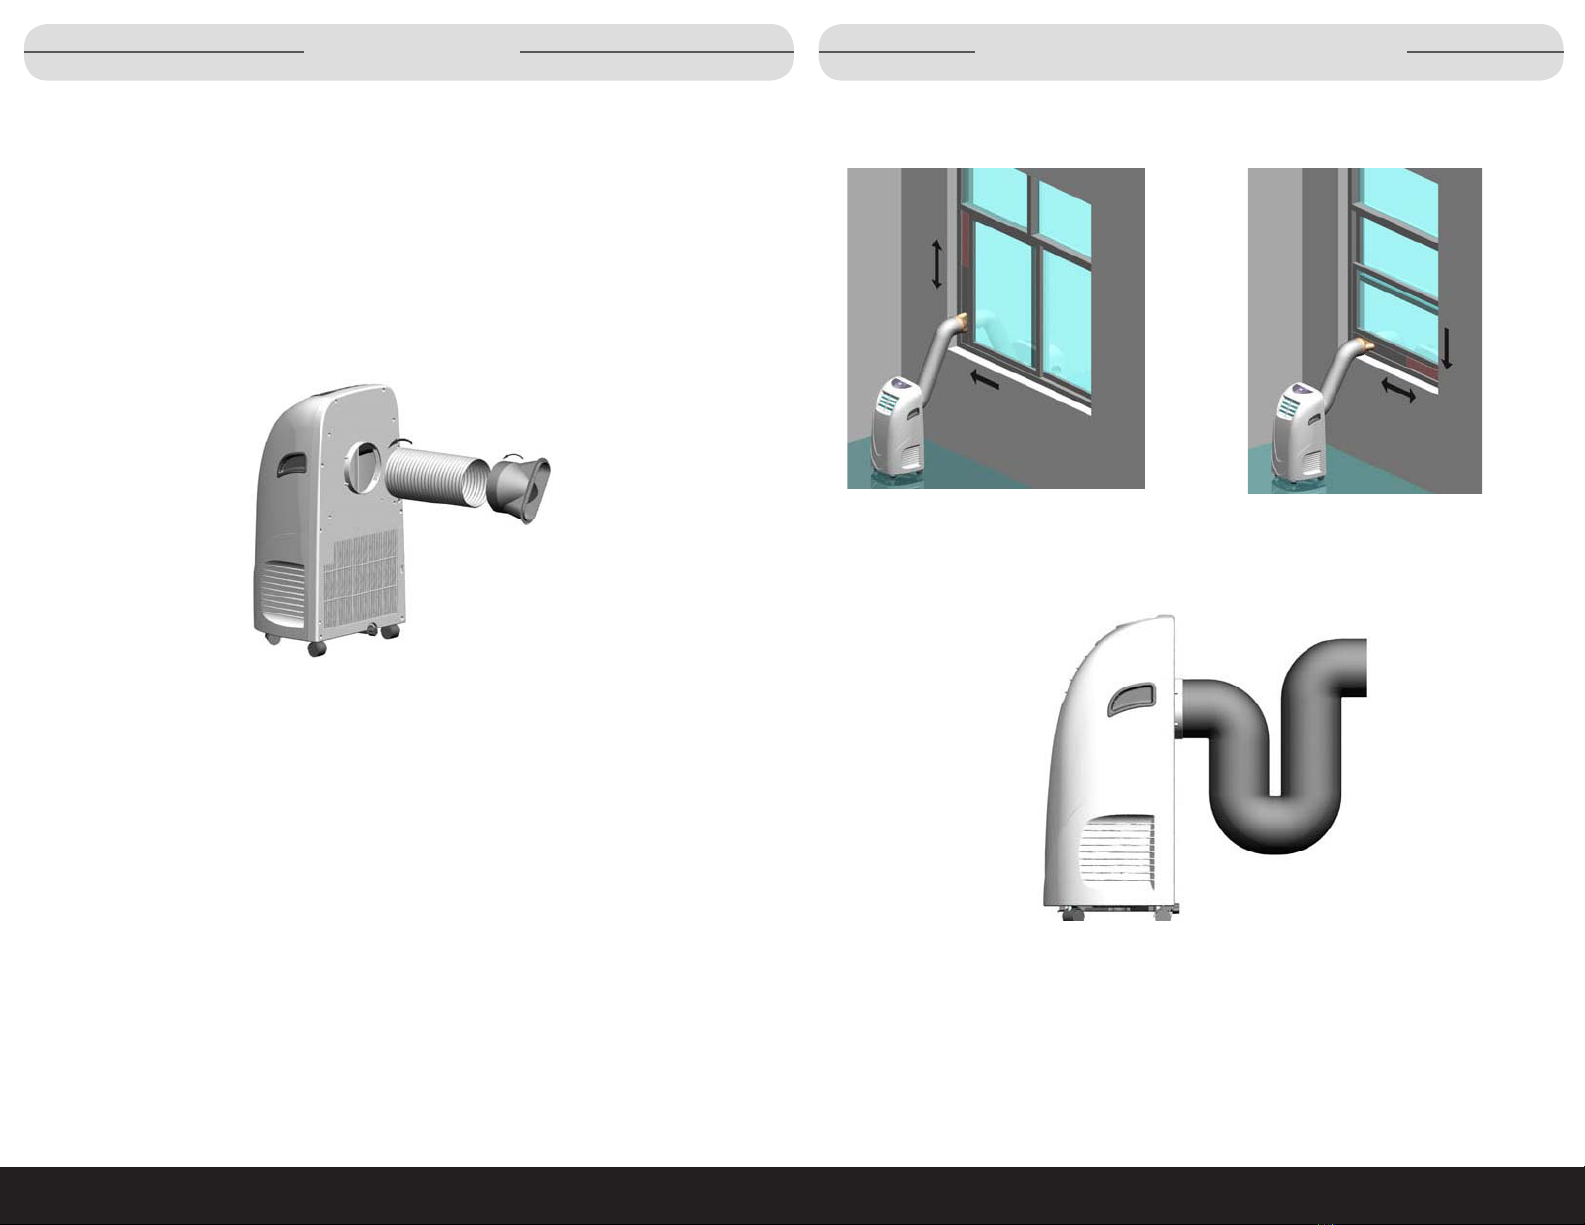
Installation .........................................6-7
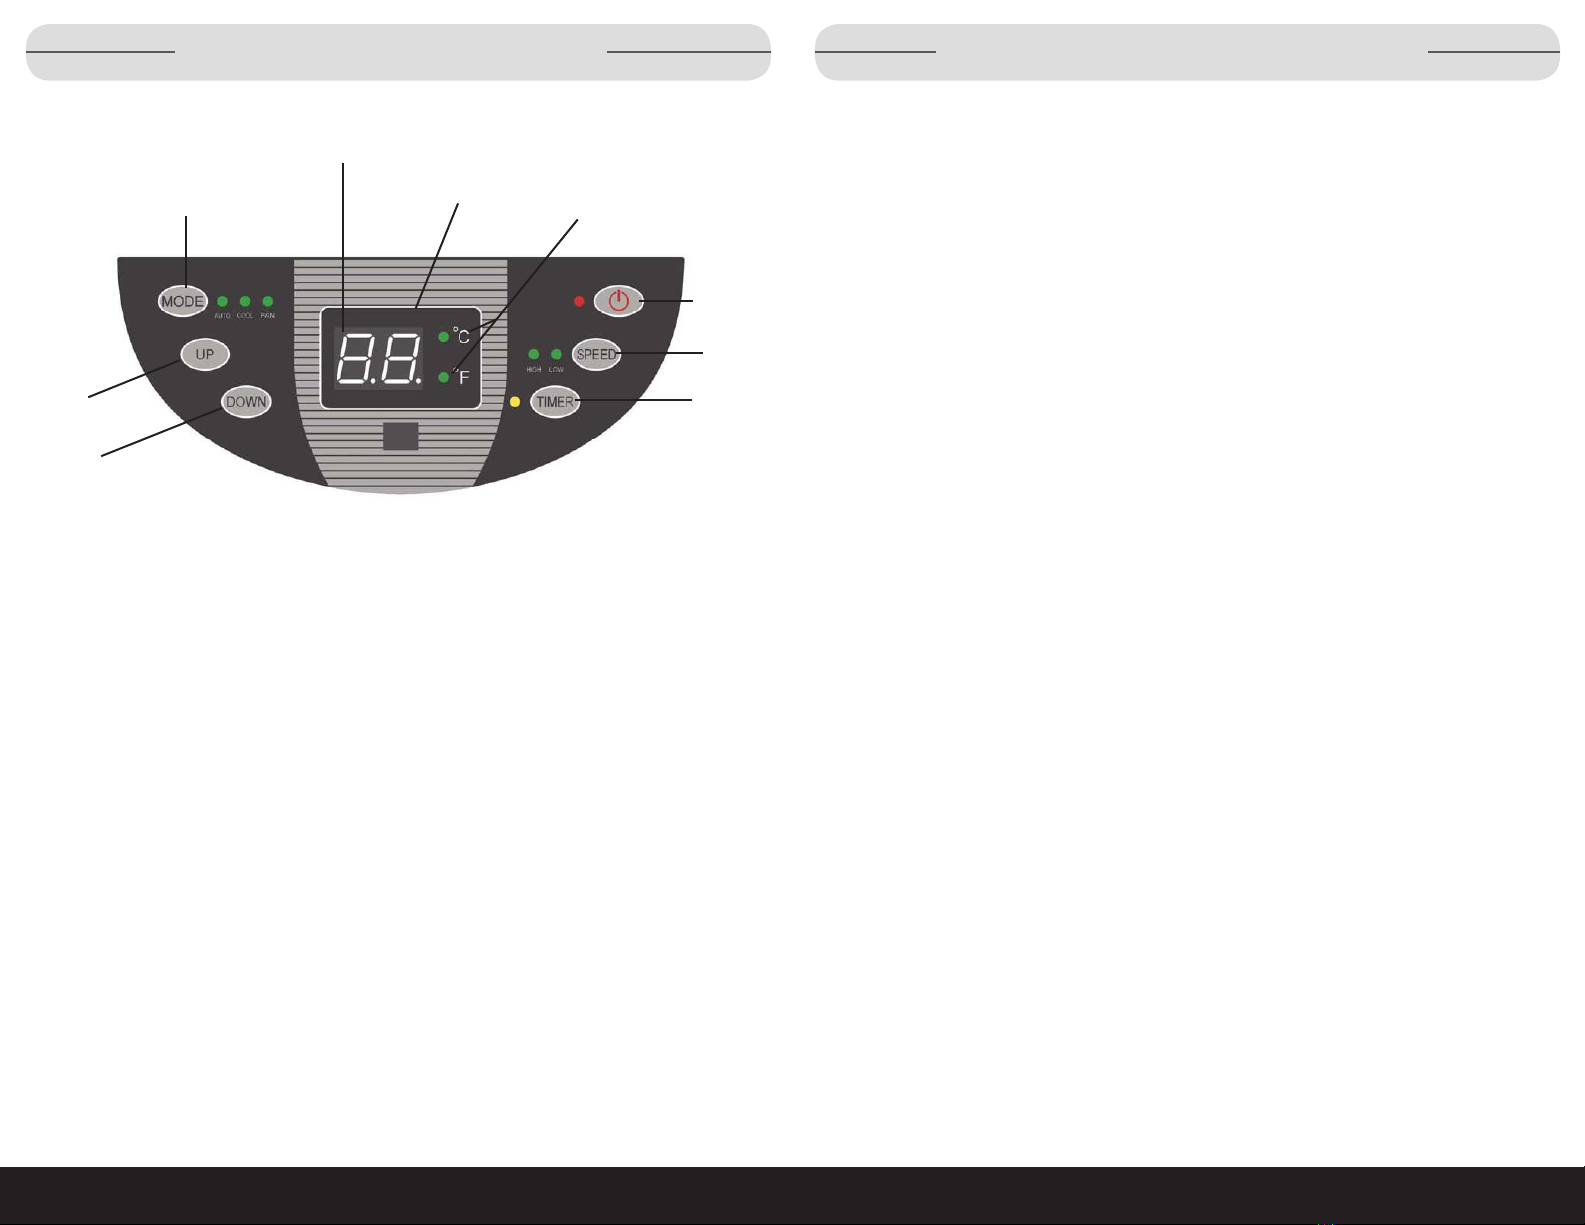
Operating Instructions .....................8-10
Water Drainage .................................. 11
Cleaning and Care.........................11-12
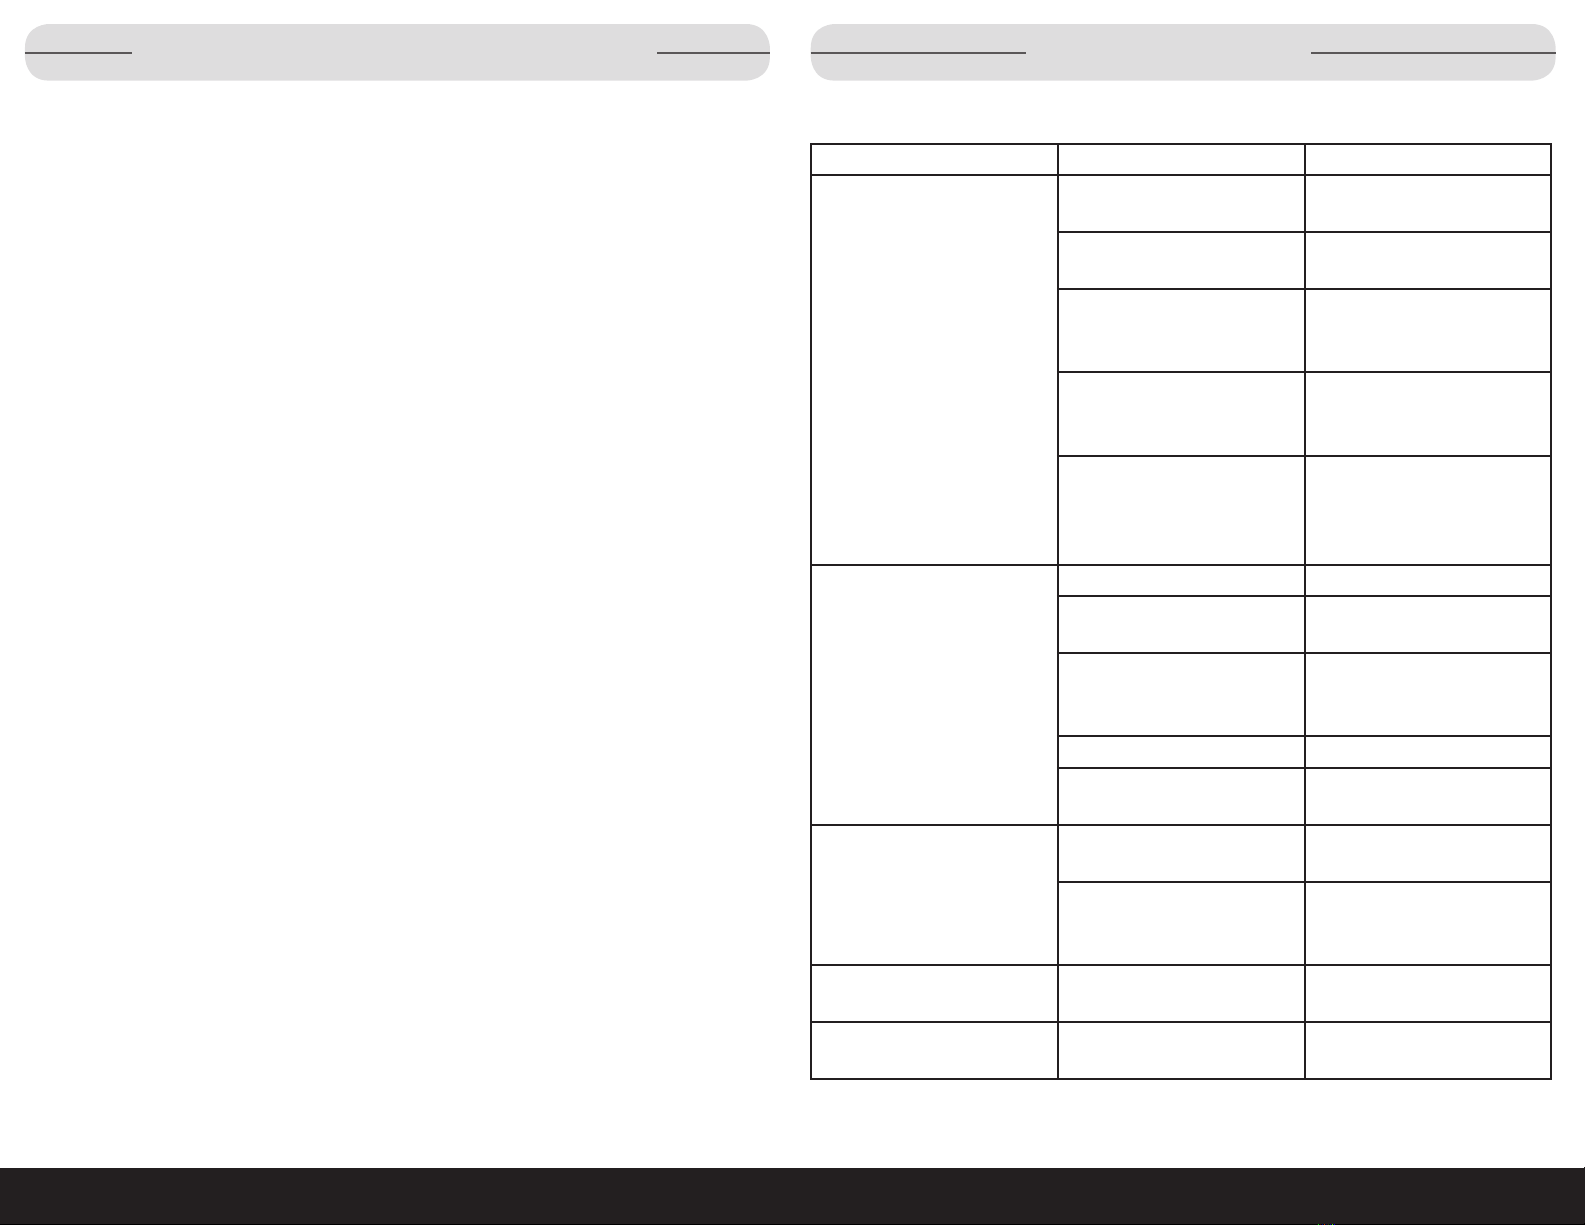
Troubleshooting .................................. 13
Warranty & Return Information......14-15
Table of Contents
21•888•557•3848
Wards.com
Important Safeguards
PLEASE SAVE THESE INSTRUCTIONS
THIS APPLIANCE IS FOR HOUSEHOLD USE ONLY
© 2016 Montgomery Ward, Inc. All rights reserved.
ank you
for your
purchase!
3102543
Conforms to UL Std. 471
Certified to CSA Std. C22.2 No. 120-13

41•888•557•3848
Wards.com
45
3-Prong Plug
This appliance has a 3-prong LCDI (Leak Current Detection and Interruption) plug
for use in a 3-prong (grounding) outlet to minimize the possibility of fire. This appli-
ance should only be used with a 115V, 60Hz grounded outlet. Failure to follow these
instructions could result in fire, electrical shock, serious injury or death.
If the plug does not fit fully in the outlet, contact a qualified electrician to install a
3-prong (grounding) outlet. Do not attempt to modify the plug in any way. Failure to
follow these instructions could result in fire, electrical shock, serious injury or death.
Important Safeguards (cont’d)
19. Do NOT insert fingers or any other objects through vent guard when unit is con-
nected to a power supply or in operation.
20. Before cleaning, turn power OFF and unplug from electrical outlet.
21. Do NOT use abrasive cleansers or pads to clean air conditioner.
22. Do NOT ingest water drained from air conditioner.
23. Do NOT store flammable or combustible liquids by unit.
24. Do NOT step or sit on air conditioner.
25. Discard appliance following local ordinances.
26. Do NOT use appliance for other than intended use.
Parts & Features
Energy Saving Tips
1. Do NOT block the air inlet or outlet, or in any way restrict airflow.
2. Maintain a ventilation clearance of at least 20 inches around all sides of
appliance.
3. Filters should be cleaned at least every 2 weeks. Because filters remove
airborne particles, more frequent cleaning may be necessary depending on
indoor air quality.
4. During initial start-up, set fan speed to high and thermostat to coolest position.
Then set fan speed to low and thermostat to desired setting.
5. For highest efficiency, do not use air conditioner when ambient temperature is
above 95°F or lower than 45°F.
1 Exhaust Outlet Vent 9 Control Buttons
2 Main Filter 10 Remote Control Receivers
3 Side Filter 11 Louvers
4 Water Outlet 12 Air Outlet
5 Power Cord with LCDI Plug 13 Caster Wheels (4)
6 Side Handles 14 Remote Control
7 Control Panel 15 Exhaust Hose and Adapter
8Digital Display 16 Two-part Window Frame Adapter
1
2
3
45
6
6789
10
11
12
13
14
15
16

7
61•888•557•3848
Wards.com
Installation Installation (cont’d)
After unpacking, dispose of all packing materials in accordance with local ordinances.
CAUTION: Risk of suffocation - keep all packaging and plastic bags out of the
reach of children.
After all parts are assembled and the portable air conditioner is in an upright
position on a level, dry surface, wait at least 2 hours before rst use.
Install Exhaust Hose
1. Insert exhaust hose into exhaust outlet and turn counter-clockwise.
2. Attach adapter to other end of exhaust hose and turn counter-clockwise.
Install Window Frame Adapter
3. Slide the two parts of the window frame adapter together to form one piece.
4. Open window and insert window frame adapter.
5. Extend the window frame adapter so that both ends come in contact with the
window frame. Fits openings 24½- 52".
6. Fasten the window frame adapter together with the screws provided.
Install Portable Air Conditioner
1. Move the unit into place, with the exhaust hose assembly closest to the window
frame adapter. Keep a 20"clearance around the unit.
2. Slowly extend the exhaust hose and snap the flat end of the connector into the
elliptical opening on the window frame adapter.
3. Plug power cord into a dedicated, grounded outlet and press the reset button
on the plug.
4. Refer to Operating Instructions section prior to powering on the unit.
NOTE: Do NOT extend the exhaust hose beyond 59"or have bends in the hose
greater than 45°.
Correct Installation
Incorrect Installation
Important! The exhaust hose is made especially for this appliance. Adding or
replacing a different hose could cause a malfunction with the unit and will void the
warranty.

81•888•557•3848
Wards.com 9
Operating Instructions
Control Panel
Time indicator
Celsius & Fahrenheit degree
indicators
Digital display
Up
Mode button –Used to select three operating modes:
• Auto: Press the Mode button until the Auto indicator light illuminates. In this mode,
the unit will automatically switch to cooling when the ambient temperature is above
77°F and to fan mode when below.
• Cooling: Press the Mode button until the COOL indicator light illuminates. Press
Up/Down buttons to set desired room temperature. The temperature can be set
within a range of 63–86°F. Press the Speed button to select high/low fan speed.
• Fan: Press the Mode button until the FAN indicator light illuminates. Press the
Speed button to adjust the speed from low to high, for which the corresponding
indicator will illuminate. In fan mode, the temperature cannot be adjusted.
Timer button –Use this button to designate the number of hours (up to 24) the unit
should run continuously until automatically shutting down
or
the number of hours until
the unit automatically starts. Each press of the button increases the time, which is
displayed on the control panel, by 1 hour. When the display reaches 24, pressing the
Timer button again will cancel the timer. When the timer is set, the timer indicator will
illuminate. When the unit starts, the indicator light will go out and the ambient
temperature is displayed.
To set number of hours for continuous operation, press Timer button when the AC is
powered ON.
Pressing the Timer button twice within 5 seconds of powering OFF the unt will cancel
the timer function.
To set the number of hours until the unit automatically powers up, press the Timer
button when the AC is OFF.
Up/Down buttons –Increases/decreases temperature setting by one degree for
each push of the button.
Speed button –Sets fan speed to High or Low.
Power button –Powers the unit ON/OFF.
Operating Instructions (cont’d)
Mode
Power
Fan
Timer
Down

11
1•888•557•3848
Wards.com
Water Drainage
10
Manual Drainage
When “FL” is illuminated on the control panel, water must be drained from the unit
before operation can resume. To drain water, follow these steps:
1. Power OFF the unit and unplug from electrical source.
2. Put a pan under the water outlet located on the back of the unit.
3. Unscrew the drain cap and pull out water plug.
4. Tilt the unit slightly backwards to ensure complete drainage.
5. After water is fully drained, insert water plug and screw on the drain cap.
6. Plug the unit back in and power ON.
Cleaning and Care
To keep your Portable Air Conditioner in good working order, it is recommended that
you clean the frames and filters every two weeks.
1. Power OFF the unit and unplug from electrical source.
2. Place finger on the indentation of the filter frame and gently pull away from unit.
3. Remove filter on the side of the unit by sliding it towards the rear and out.
4. Remove filters on the back of the unit by sliding to the right and out.
5. Wash frames and filters with warm sudsy water and rinse thoroughly. Dry
frames with soft cloth and let filters dry in the sun.
Operating Instructions (cont’d)
To use the remote control, you must be within 20 feet of the unit with a clear line of
sight. Remove batteries when control is not in use for long periods of time.
1. Power button: Turns unit ON/OFF.
2. Celsius/Fahrenheit button: Switches temperature readout between degree
types.
3. Fan button: Turns the fan on or off.
4. Cool button: Starts cooling mode.
5. Auto button: Automatically switch to cooling when the ambient temperature is
above 77°F and to fan mode when below.
6. Up/Down buttons: Increases/decreases temperature setting by one degree for
each push of the button.
7. High button: Increases fan speed.
8. Low button: Decreases fan speed.
9. Max Cool button: Switches fan to high speed during cooling mode. To lower
fan speed, switch off Max Cool.
10. Sleep button: Starts sleep function, wherein the temperature will increase one
degree after two hours and then another degree after another two hours. After
the last increase the temperature will remain unchanged and the fan speed will
change to low.
11. Timer button: When AC is off, press to program timed start. When AC is on,
press to program timed shutdown.
1
2
3
4
5
6
7
8
9
10
11
Remote Control

12 13
1•888•557•3848
Wards.com
Cleaning and Care (cont’d)
Clean the case and air outlet frame with a slightly damp, soft cloth. Take care not to
get any water inside unit or on control panel.
Storage
When the appliance will not be in use for long periods of time, follow these
instructions for storage.
1. Drain water following the instructions in the Water Drainage section.
2. After unit is drained of all water, power ON and turn the fan to low. Let the fan
run for 12 hours in order to dry out the interior and prevent mold growth.
3. Power OFF unit and unplug from outlet.
4. Clean filters and dry thoroughly before reinstalling.
5. Remove the exhaust hose from the window frame adapter.
6. Remove the exhaust hose from the rear of the unit by turning clockwise.
7. Store the exhaust hose, window frame adapter and Portable Air Conditioner in a
dry environment.
8. Remove batteries from remote control.
Moving Portable Air Conditioner
When rolling your Portable Air Conditioner, place one hand on either side of the unit
and push to desired location. The unit will roll smoothly, but take care when going
over bumps in the carpet or over door thresholds.
Important! Do not lift the unit by holding on to the horizontal louver.
NOTE: Drain water prior to lifting unit to prevent spillage.
Important! Do not tilt air conditioner more than 30°to avoid damaging the condenser.
Troubleshooting
Before calling for service, try these troubleshooting tips.
Problem Possible Cause Remedy
Air conditioner will not
operate.
Wall plug is loose or
disconnected.
Confirm that plug is firmly
pushed into socket.
Fuse is blown or circuit
breaker is tripped.
Replace fuse or reset
circuit breaker.
Illuminated water indicator
means that the water
needs to be drained.
Drain water from unit.
Room temperature is
lower than set tempera-
ture on unit.
Change the temperature
on the AC.
LCDI plug has been
tripped.
Check the cord for dam-
age and if none is found,
push the reset button on
the LCDI plug.
Air from unit is not cool
enough.
Fan speed is set too low. Increase fan speed.
Temperature on unit is too
warm.
Lower temperature.
Room temperature is
below 62˚F.
Cooling will not occur
until room temperature is
above 62˚F.
Filters are dirty. Clean filters.
Air outlet or exhaust hose
are blocked.
Remove obstruction.
AC is cooling, but room
is warm and ice formed
behind air inlet grill.
Outdoor temperature is
below 70˚F.
To defrost coil, set the AC
to fan mode.
Air filter may be dirty. Clean filter. Refer to
Cleaning and Care sec-
tion.
AC rapidly turns on and
off.
Outside temperature is
extremely hot.
Set fan speed to high.
AC is emitting noises. Unit is not on a flat or
level surface.
Place unit on flat, level
surface.

Returns
If any item, for any reason, does not meet your expectations, just return it to us. We’ll
gladly either:
• Refund your merchandise amount
• Credit your account
• Send a replacement
You may return any unused item in its original packaging within 60 days of its
receipt for a full refund of the purchase price (excluding shipping and handling
charges).
Please send returns to:
Montgomery Ward, Inc.
Attn: Customer Returns
2000 Harrison Suite 100
Clinton, IA 52732-6676
When returning an item:
• Use the original packaging and pack it securely.
• Please adequately insure your item in case you need to make a claim with
the carrier you choose for returning your item.
• Include your order number and reason for return.
• We recommend keeping the receipt for 4 weeks.
Wards.com 1•888•557•3848
Montgomery Ward Customer Service
8:00 a.m. to Midnight CT, Monday through Friday
17
16 1•888•557•3848
Wards.com
Wards.com 1•888•557•3848
14 15
Montgomery Ward, Inc. warrants this product
to be free from defects in material and workmanship
for one year from provable date of purchase.
Within this warranty period, Montgomery Ward will repair or
replace, at its option, defective parts of this
product at no charge, provided the product is returned,
freight prepaid with proof of purchase to Montgomery Ward.
Allow 2–4 weeks for return shipping.
This warranty does not cover improper installation, misuse,
abuse or neglect on part of the owner. Warranty is also
invalid in any case that the product is taken apart or
serviced by an unauthorized service station.
This warranty gives you specific legal rights and they may
vary from state to state.
THE FOREGOING WARRANTIES ARE IN LIEU OF ALL
OTHER WARRANTIES AND CONDITIONS,
EXPRESS OR IMPLIED, INCLUDING
BUT NOT LIMITED TO THOSE OF MERCHANTIBILITY
OR FITNESS FOR A PARTICULAR PURPOSE.
1 Year Limited Warranty
Table of contents
Other Montgomery Ward Air Conditioner manuals

Montgomery Ward
Montgomery Ward ACE8005MW User manual

Montgomery Ward
Montgomery Ward 718909 User manual

Montgomery Ward
Montgomery Ward MW8000 User manual

Montgomery Ward
Montgomery Ward MW-O-08C User manual

Montgomery Ward
Montgomery Ward MW12000 User manual

Montgomery Ward
Montgomery Ward Window AC 12000BTU User manual

Montgomery Ward
Montgomery Ward 769117 User manual
Popular Air Conditioner manuals by other brands

inventum
inventum AC901B instruction manual

Mitsubishi Electric
Mitsubishi Electric PURY-RP200 Service handbook

mundoclima
mundoclima MUCHR-H6A Series installation manual

Frigidaire
Frigidaire FAK123N1V Wiring diagram

Carrier
Carrier WeatherMaker 50TCQ*07 installation instructions

System air
System air VTR 200 installation instructions