Monument Grills 52101 Quick reference guide

Charcoal Grill
Note to Consumer
Leave this Owner’s Manual in a convenient
place for future reference.
Customer Service Helpline:
For parts ordering, call:
MFG No.: 52101
UPC No.:856597007263
Please make sure the cylinder valve
connection device shall properly and safely
mate with the connection device attached to
the inlet of the pressure regulator.
WARNING:
Read this Owner’s manual carefully and be
sure your grill is properly assembled, installed
and maintained. Failure to follow these
instructions could result in serious injury and/or
property damage. This gas grill is intended for
outdoor use only and is not intended to be
installed in or on recreational vehicles or boats.
Note to Installer
Leave this Owner’s Manual with the customer
after delivery and/or installation.
!
ASSEMBLY & OPERATING INSTRUCTIONS
•Parts
•Assembly
•Safety Rules
•Use and Care
1-8 - 0-9 33 003
51

2
WARNING
Your grill will get very hot. Never lean over the
cooking area while using your grill. Do not touch
cooking surfaces, grill housing, lid or any other
grill parts while the grill is in operation, or until the
grill has cooled down after use.
Failure to comply with these instructions may
result in serious bodily injury.
WARNING
WARNING
Combustion by products produced when using
this product contain chemicals known to the
State of California to cause cancer, birth defects,
or other reproductive harm.
WARNING
Failure to comply with these instructions could
result in a fire or explosion that could cause
serious bodily injury, death, or property damage.
!
!
!
Grill Warranty
Safety PrecautionsTable of Contents
Warranty ---------------------------------------------- 2
Safety Precautions--------------------------------2
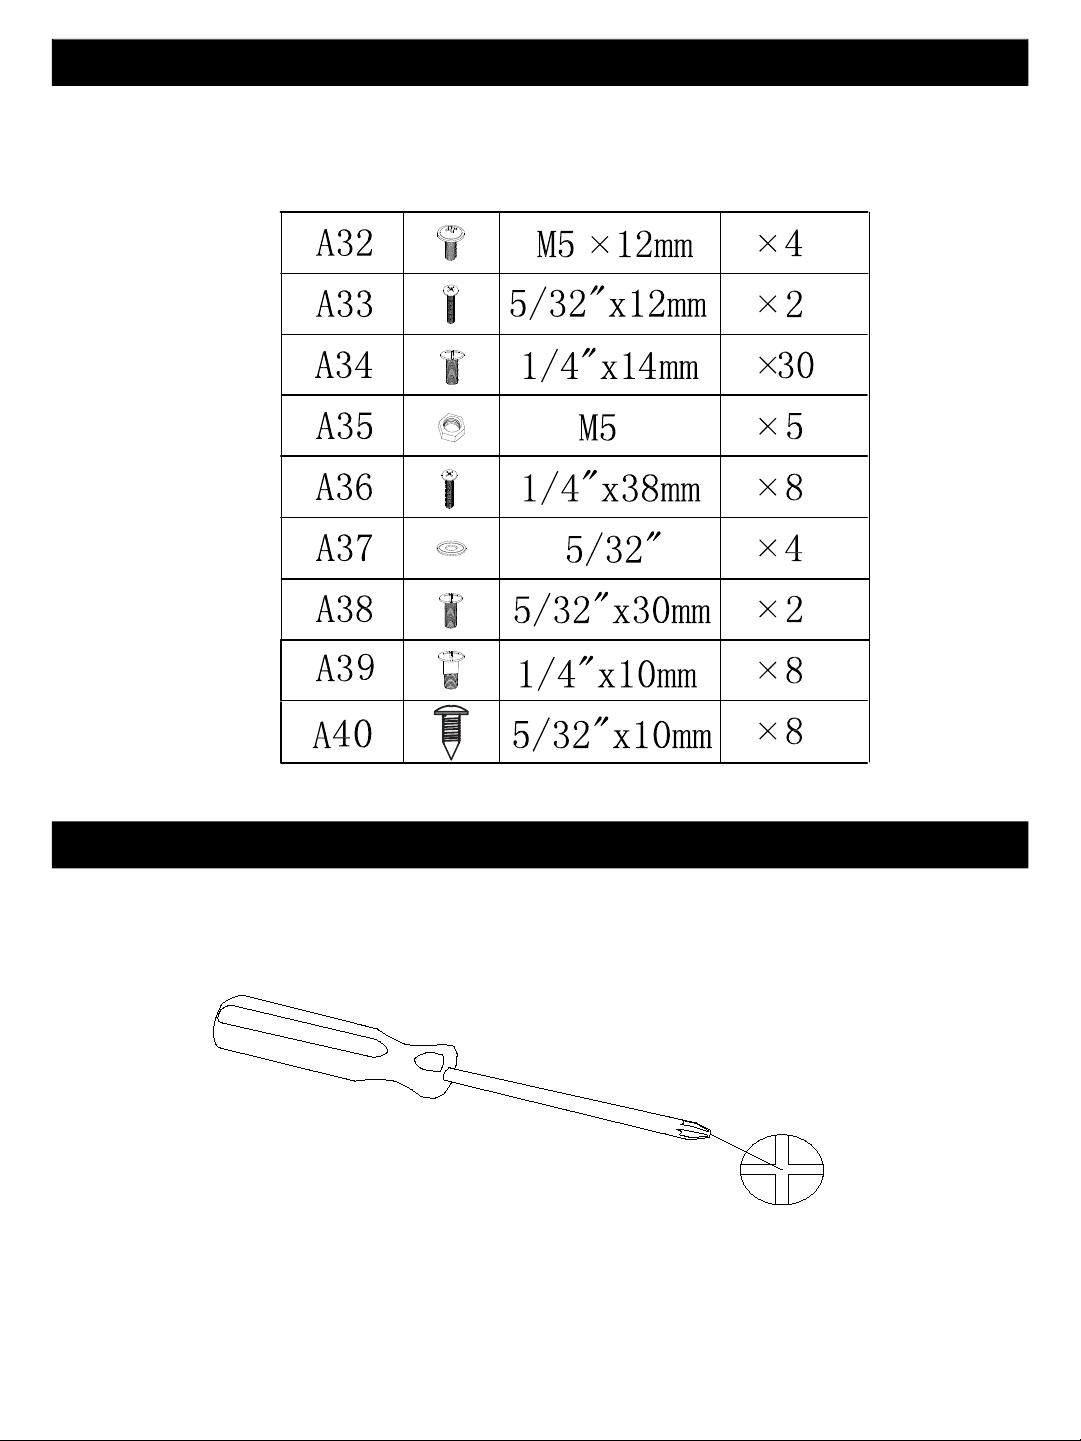
Hardware List --------------------------------------- 3
Parts Diagram --------------------------------------- 4
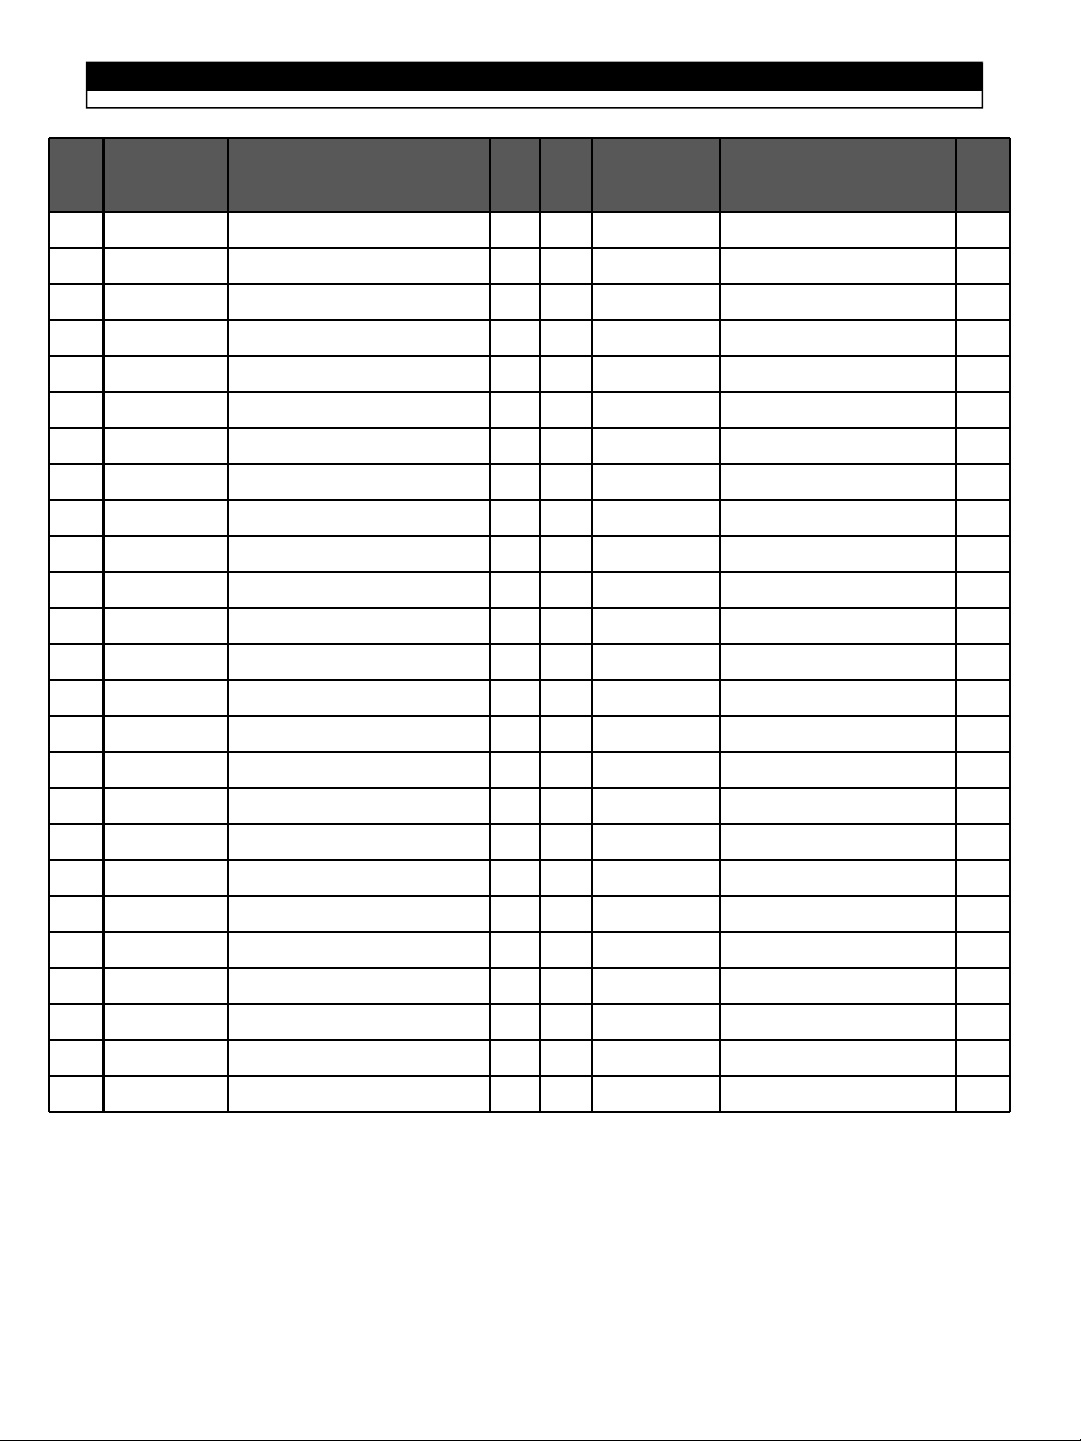
Parts List ----------------------------------------------- 5
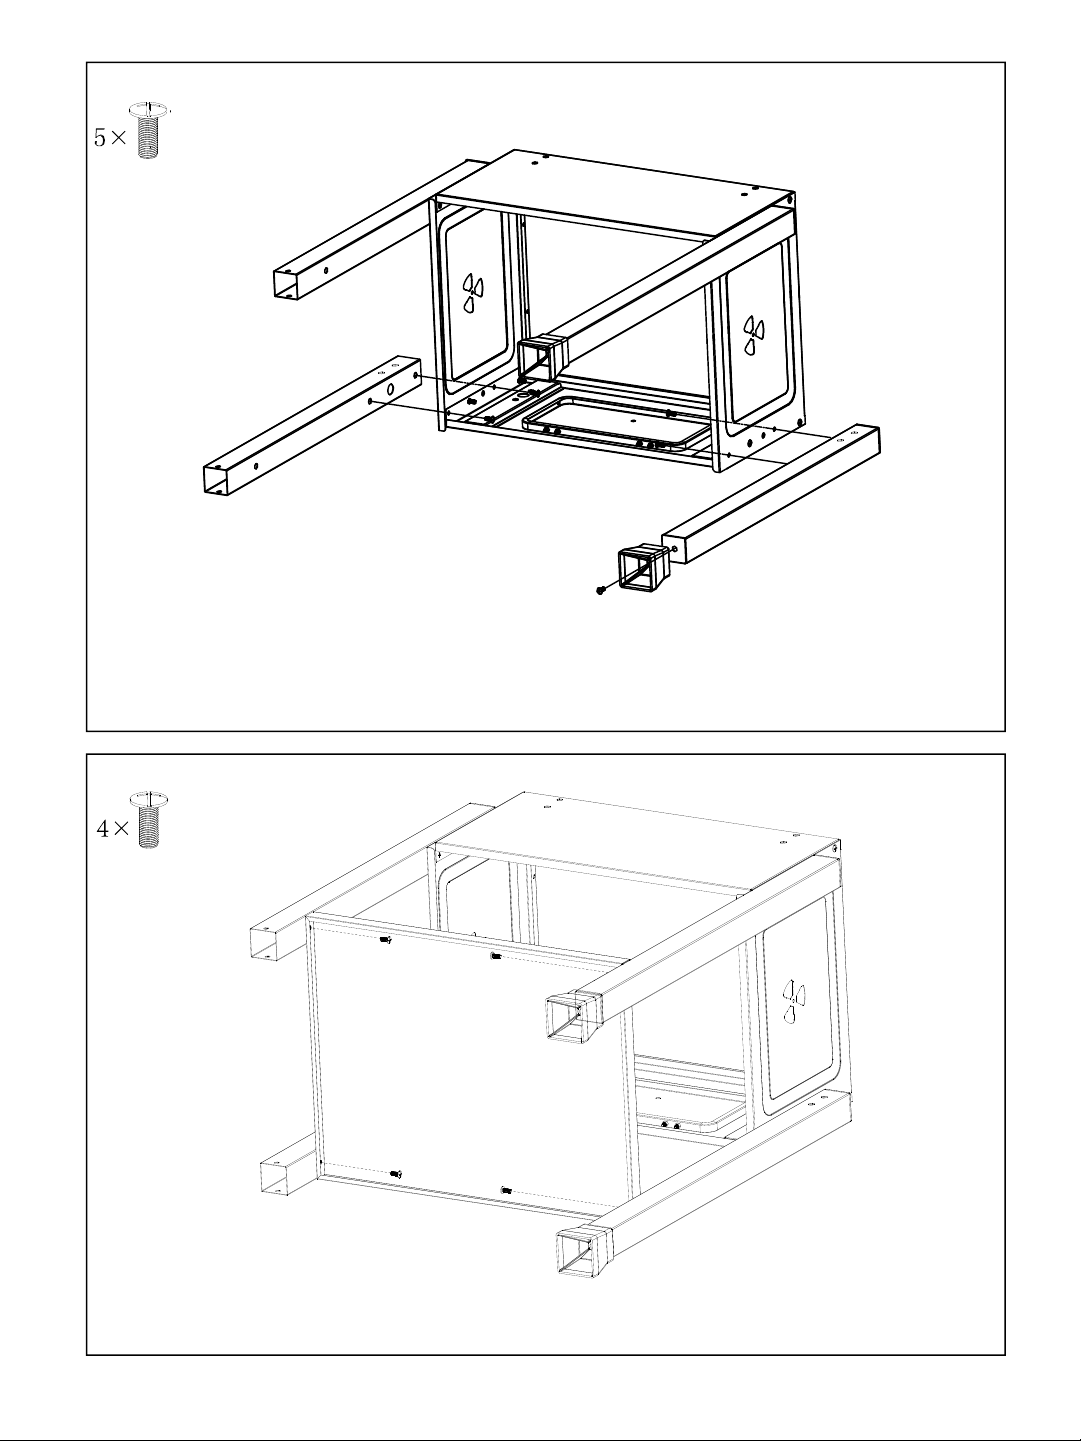
Assembly Instructions---------------------------6~16
Cleaning and Maintenance------------------------17
Cooking Chart ------------------------------------ 18
One-Year Full Warranty on Grill
If this grill fails due to defective material or
workmanship within one year from the date of
purchase, call 1-800-530-9133 to arrange for a free
repair (or replacement if repair proves impossible).
All warranty coverage excludes batteries and grill part
paint loss, discoloration or rusting, which are either
expendable parts that can wear out from normal use
within the warranty period, or are conditions that can
be the result or normal use, accident or improper
maintenance,
All warranty coverage is void if this grill is ever used
for commercial or rental purposes.
All warranty coverage applies only if this grill is used in
the North America.
This warranty gives you specific legal rights, and you
may have other right which vary from state to state.
The warranty is only valid for original purchasers with
proof of purchase from authorized retailers. Any
product bought second hand or through an
unauthorized retailer, will not be covered by warranty.
It is the duty of the purchaser to verify that a retailer is
authorized. A purchase on Amazon or other
marketplace internet retailer from any entity other than
Monument Grills is not an original purchase and will
not qualify for a warranty
Do not use the barbecue in a confined and/or
habitable space e.g. houses, tents, caravans,
motor homes, boats. Danger of carbon monoxide
poisoning fatality.
!
For your safety, PLEASE NOTE:
•Do not use indoors!
•Keep children and pets away.
Indeed, a large number of accidents are reported every
year. Burns are particularly serious with young children,
because, due to their height, their faces are nearly always
on the same level as the fi re.
•On a windy day, turn your barbecue so that the wind can
not cause sparks.
•To ensure safety, never sprinkle cold water near the cast
iron hearth.
•The barbecue has to be installed on a secure level
base prior to use.
Recommendation:
•The barbecue shall be heated up and the fuel kept
red for at least 30 minutes prior to the first cooking on
the barbecue.
•WARNING! This barbecue will become very hot, do
not move it during operation.
•CAUTION! The maximum filling capacity for charcoal
is 2.6 Lbs of charcoal or barbecue briquettes.

Philips Head Screwdriver
3
The following table illustrates a breakdown of the hardware pack. It highlights what components are used
in the various stages of assembly.
Contents for Hardware Pack
Tools required for assembly
Philips Head Screwdriver (not included).
Note: The left and right sides of the grill are on your left and right as you face the front of the grill.

4
Model 52101 Parts Diagram

For assembly questions, call:
To make sure you obtain the correct replacement
parts for your grill, please refer to the part
numbers on this page.
Important: Use only parts listed above. When
ordering parts, providing the following information:
1. Model #
2. Part Number (see PART# in chart)
3. Part Description
4. Quantity of parts needed
5
Model 52101 Parts List
Important: Keep this Owner’s Manual for
convenient reference and for part replacement.
Seq.
No.
Material
Code
Appellation Qty Seq.
No.
Material
Code
Appellation Qty
1A0212741 Temperature Gauge 1 26 D010016831 Front Right Leg 1
2D016900120 Temperature Gauge Seat 1 27 A02120256 Foot Pad 2
3D30X001997 Main Lid 1 28 D010014737 Wheel Axle 2
4D30X002001 Left arm of lifting mechanism 1 29 D010017488 Botton Panel 1
5D30X002002 Right arm of lifting mechanism 1 30 D010017116 Front Left Leg 1
6D010016779 Air vent 4 31 D30X001999 Charcoal shelf Clapboard 2
7D010014688 hinge 2
8A0212834 Main Handle 2
9D010017131 Cooking Grid 2
10 D30X002012 Lifting Shaft 1
11 D010016852 Warming Rack 1
12 D010016646 Back Panel 1
13 D010016859 Side Panel 2
14 D010016643 Front Panel 1
15 A02120251 Gearing Cover 1
16 D010017381 Gearing Handle 1
17 D010016835 Ash Colletion Pan 1
18 D010014644 Door Handle Locking Plate 1
19 D010017378 Door Handle 1
20 D010016634 Side Shelf 2
21 D010019436 Charcoal shelf 1
22 D010017119 Back Left Leg 1
23 A02120154 Wheels 2
24 D010016833 Back Right Leg 1
25 A02120155 Wheel Cover 2
1-8 - 0-9 33 003
51

Figure 2
Figure 1
A34
A34
Assembly Instructions
Install Part No.12 No.13(2pcs) & No.14 with 8 A34 screws.
Step one:
Install two back legs(Part No.22 No.24)
onto side panels(Part No.13) with 4
A34 screws.
Step Two:
Install Part No.27 foot pad onto Part No. 22 with A34 screw.
6

Figure 4
Figure 3
A34
A34
Turn over the whole grill body as shown
Step one:
Install two front legs(Part No.26 No.30)
onto side panels(Part No.13) with 4 A34 screws.
Step Two:
Install Part No.27 foot pad onto Part No. 30
with A34 screw.
Install bottom panel (Part No.29) onto four legs with 4 A34 screws.
7

Figure 5
Figure 6
A32
A35
A32
A32
A35
A35
Install the wheels(Part
No.23) onto right two legs
(No.24 & No. 26) with
wheel axle(Part No. 28)
Install the air vent(Part
No.6) onto side panels
(No.13) with two A32
& two A35
Handy wrench and Philips
screwdriver needed
8

Figure 8.1
Figure 8.3
2
1
Figure 7.1
Figure 7.2
A34
Figure 8.4
Figure 8.2
Figure 7
Figure 8
Figure 7.2
Figure 7.1
Exit the bolt from the
Lifting shaft(Part No.10)
as pictures shown
Assemble No.4 &
No.5 onto the lifting
Shaft . Fix the bolt
afterward
Step One:
Pre-install an
A34 screw onto
front panel by
leaving 2mm
space
Step two:
Install whole shifting mechanism
onto A34 screw
Step Three:
Install and fix
the second
A34 screw
Step Four:
Fix the first
Pre-install
A34 screw
9

Figure 9
Figure 10
A34
Install the gearing cover
(No. part:15) onto the
relevant place as pictures
shown with two A34
screws
10
Install the gearing handling
(Part No.16) as pictures
shown above
Step One:
Exit the bolt
Step Two:
Insert the handle
Step Three:
Install back the bolt
10

Figure 11
A35
A39
Figure 12.. 1
Figure 12.. 2Figure 12.
Figure 12.. 3
Install the door handle(Part
No.19) as pictures shown
above)
Handy wrench needed
Step One:
Pre-install four A39
Screws onto four l
Legs.
Step Two:
Put the two side
Shelves onto the
Screws and fix Step Three:
Install additional A39
screw
to each leg as shown
11

Figure 14
A34
A40
Figure 13
Install Part No.21 onto
Part No.31 with 8 A40
screws
Install charcoal shelf
Above(No.21 & No.31)
onto lifting mechanism
With four A34 screws
12

A36
A37
A38
A32
A35
A32
A32
A35
A35
A38
A38
A37
A37
Figure 15
Figure 16
Install No 7 onto the main
lid(Part No.3) with four A36
screws
Install air vent (Part No. 6)
and lid handle (Part No.8)
Onto the main lid as
Pictures shown
13

Figure 18
A36
Figure 17
A33
A37
A37
A37
A33
A33
Install the main lid onto the
grill body with four A36
screws
Install the handle(Part
No.8) onto the ash
collection pan
(Part No.17)
14

Figure 19
Figure 20
Figure 19.1
Figure 19.2
Figure 20.1
Figure 20.2
Figure 20.3
Place the warming rack
(Part No. 11) in the
relevant place
Insert the ash collection
tray into the grill body
Install the temperature
gauge(Part No.1 & No.2)
onto the maid lid
as shown
15

Figure 21
Figure 22
Place the cooking grid
(Part No. 9) in the relevant
place
16

CARE & MAINTANANCE
PREPARING TO USE YOUR GRILL
Before cooking, the following steps should be closely
followed to both cure the finish and season the
interior steel. Failure to properly follow these steps
may damage the finish and/or impart metallic
flavors to your first foods
1:Lightly coat all interior surfaces (including grates
and inside of barrel) of your grill with flaxseed or
other vegetable oil
2. Build a small fire on the fire grate or pan, being
sure not to lay coals against the walls.
Rust can appear on the inside of your smoker.
Maintaining a light coat of vegetable oil on interior
surfaces will aid in the protection of your unit.
Exterior surfaces of smoker may need occasional
touch up. We recommend the use of a commercially
available black high temperature spray paint.
NEVER PAINT THE INTERIOR OF THE UNIT !
In order to keep your grill in the best shape, it’s important
to keep it clean and maintained
1:When you are finished grilling, clean your grates and
then lightly coat your grates with flaxseed or other
vegetable oil
2:Ensure to wait until the fire is completely extinguished
and the grill is cool to the touch before emptying the ashes
3:Dump the ashes in a metal container and cover with
water to ensure there are no lit coals, then you can
dispose of the ashes
4:Extend the life of your grill by using grill cover to protect
Weather resistant polyester material protects against
birds, dust, wind, rain and snow
FIRE STARTERS
Please follow below procedures to start your
grills
1:Remove your grill grates and set them to side
2:Pour some charcoal directly on to your
charcoal grate and stack together in a pile
3:Insert fire starter into the middle of the
charcoal pile so that it is slightly covered and
light
4:After the charcoal has thoroughly ignited,
typically glowing red or gray in color, use tongs
to spread them out and replace your grill grates
SMOKING WOOD
For a more robust smoke flavor while using charcoal
briquettes or lump charcoal, try adding wood chips or
several wood chunks to the fire.
Wood chunks are available in a variety of natural flavors,
and can be used alone or in addition to charcoal.
As a general rule, any hardwood that bears a fruit or nut is
suitable for cooking.
However, different woods have very different tastes.
Experiment with different woods to determine your
personal favorite, and always use well-seasoned wood.
Green or fresh-cut wood can turn food black, and tastes
bitter.
17

COOKING RECEIPT-DIRECT HEAT
18
Table of contents
Other Monument Grills Grill manuals

Monument Grills
Monument Grills 89679 User manual

Monument Grills
Monument Grills 41847NG Quick reference guide

Monument Grills
Monument Grills 77352-MB Quick reference guide

Monument Grills
Monument Grills Mesa 405BZ Quick reference guide

Monument Grills
Monument Grills 85001 User manual

Monument Grills
Monument Grills S1251801T User manual

Monument Grills
Monument Grills 85030 Quick reference guide

Monument Grills
Monument Grills Chaparral 700 Quick reference guide

Monument Grills
Monument Grills Denali 425 Quick reference guide

Monument Grills
Monument Grills C042177 Quick reference guide