Moorwood Vulcan MV1OGP90-1T-NG User manual

Manual Part No: 931798-01 MV1 Gas GP Oven - 2 –
Manual Rev No: 1
IMPORTANT CUSTOMER INFORMATION
Please check the gas tap and thermostat will press and release
freely prior to lighting the burner, as this is part of the unit’s
safety mechanism.
It is particularly important to check this following spillage as
solidified fats and carbonized meat juices can impair the
valves correct operation.
IMPORTANT INFORMATION INSTALLATION ENGINEER
Please ensure the customer is made fully aware of how the
gas tap and thermostat operate and the importance of
checking its operation daily.

Manual Part No: 931798-01 MV1 Gas GP Oven - 3 –
Manual Rev No: 1
Model No. Product Description Rev. Date Flexible Hose
Size
MV1OGP90-1T-NG
MV1OGP90-1T-LP
MV1OGP90-2T-NG
MV1OGP90-2T-LP
MV Gas Single and Two Tier GP Ovens
900 Single Tier General Purpose Oven
900 Two Tier General Purpose Oven
1
1
1
1
01/12/05
01/12/05
01/12/05
01/12/05
½” BSP hose
½” BSP hose
½” BSP hose
½” BSP hose

Manual Part No: 931798-01 MV1 Gas GP Oven - 4 –
Manual Rev No: 1
INDEX
Page
CoverSheet: 1
ImportantInformationSheet 2
RevisionSheet: 3
Index: 4
Introduction: 5&6
GeneralIntroduction 5
ImportantNote 6
Specification: 7–10
Gas Pressure / Connection Standard Ranges 7 & 8
OverallDimensions 9&10
Installation: 11–13
ImportantNote 11
Positioning 11-13
Checking&Commissioning 13
User’sInstruction: 14–20
ImportantNote 14&15
Operation 16&17
CookingGuide 18
Cleaning 18-20
Service&Maintenance: 21–25
Routine Maintenance 21
FaultFinding 22
Instructions 23-25
SpareParts: 26&27
WarrantyCoverSheet: 28

Manual Part No: 931798-01 MV1 Gas GP Oven - 5 –
Manual Rev No: 1
INTRODUCTION
This manual contains all the required information to ensure that your new appliance is installed and
serviced correctly and that you have all the information necessary to identify and order spare parts. It
also contains comprehensive instructions for the user and for cleaning the appliance.
To maintain peak performance, it is recommended that the appliance be regularly serviced and that
when ordering spare parts, reference is made to the appropriate list quoting the Part Number and
Description contained therein. THE FITTING OF A NON STANDARD PART MAY VOID ANY GUARANTEE.
All work carried out on this appliance during installation or servicing must be performed by a competent
person and the connection of the appliance to the gas supply MUST be carried out by qualified
personnel in accordance, where applicable, with the relevant regulations.
The siting of the appliance and the connection to the gas supply must comply with the latest GAS
SAFETY (INSTALLATION & USE) REGULATIONS 2000: the requirements of the FIRE
PRECAUTIONS ACT 1971; the HEALTH & SAFETY AT WORK, ETC ACT 1974, the BUILDING
STANDARDS (SCOTLAND) CONSOLIDATION REGULATIONS 1971. Detailed recommendations are
contained in British Standards BS5440 Part 1:2000, BS5440: Part 2:2000, BS5588: Part 0:1996, BS5588:
Part 11:1997 & BS6173: 2001.
An easily accessible stopcock must be fitted in the gas supply adjacent to the appliance for use in an
emergency.
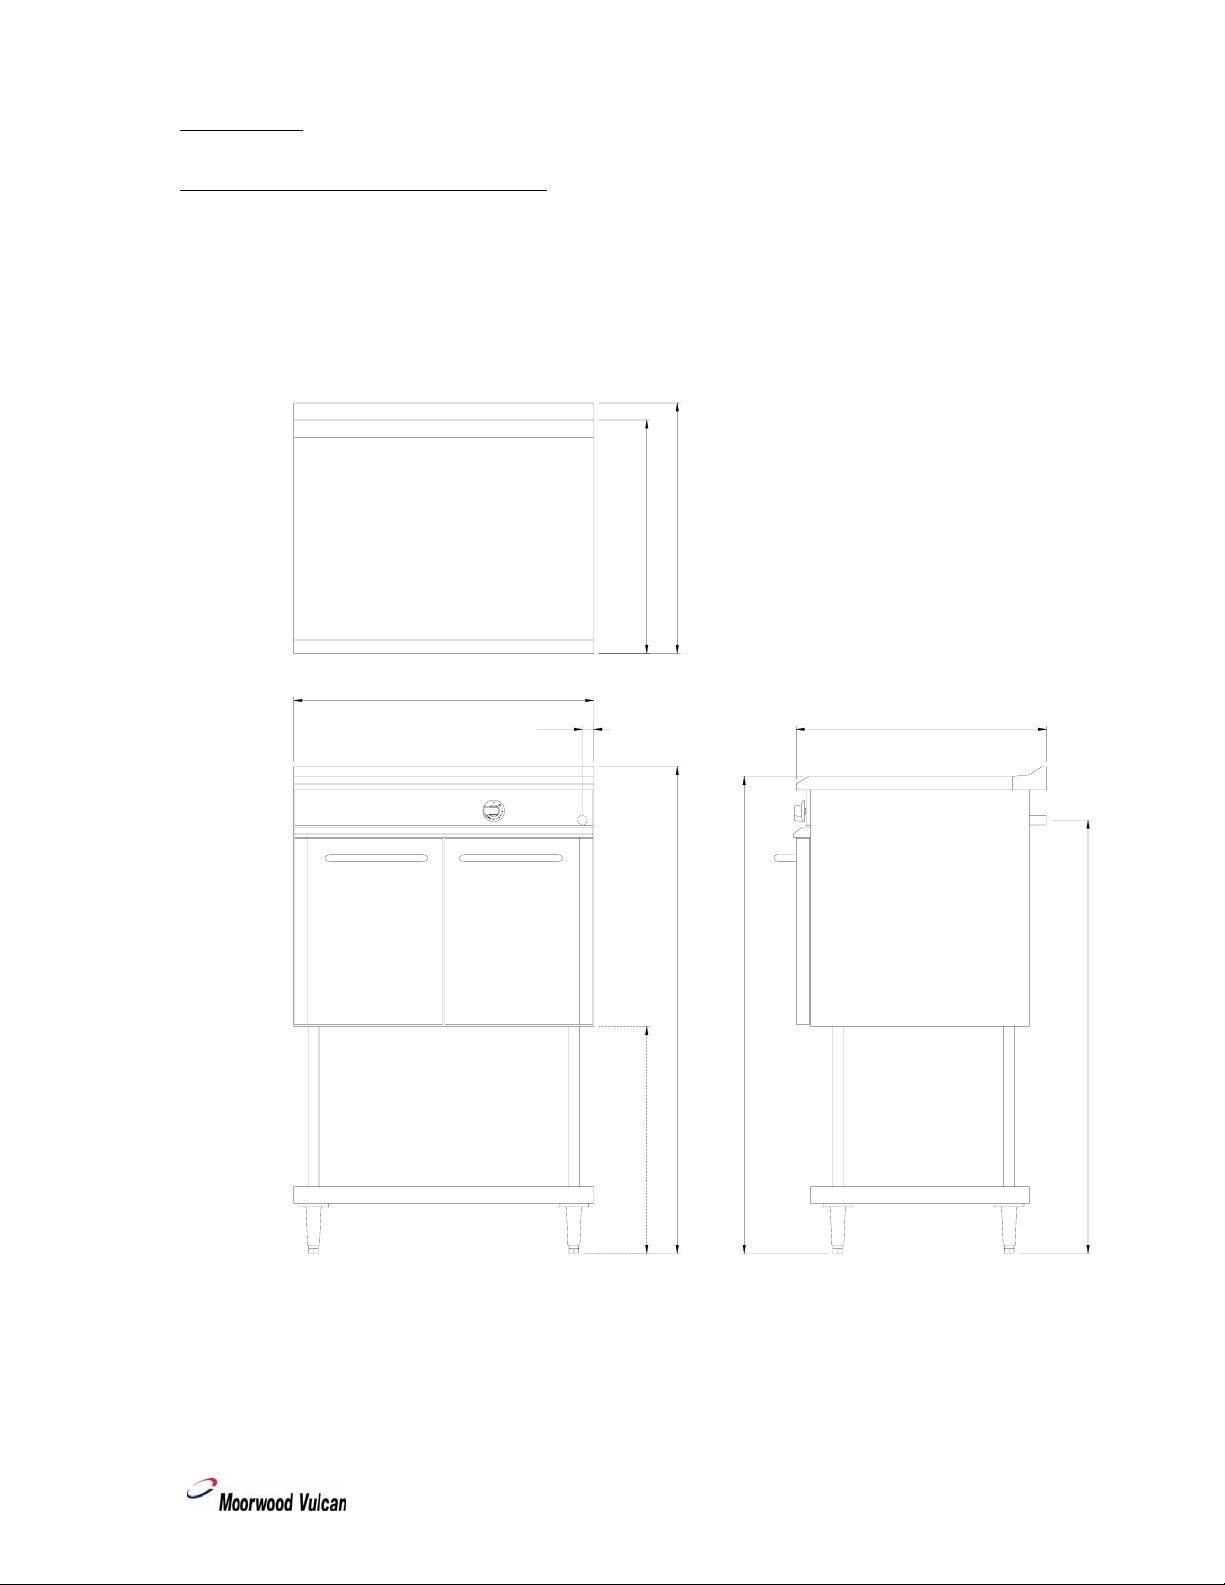
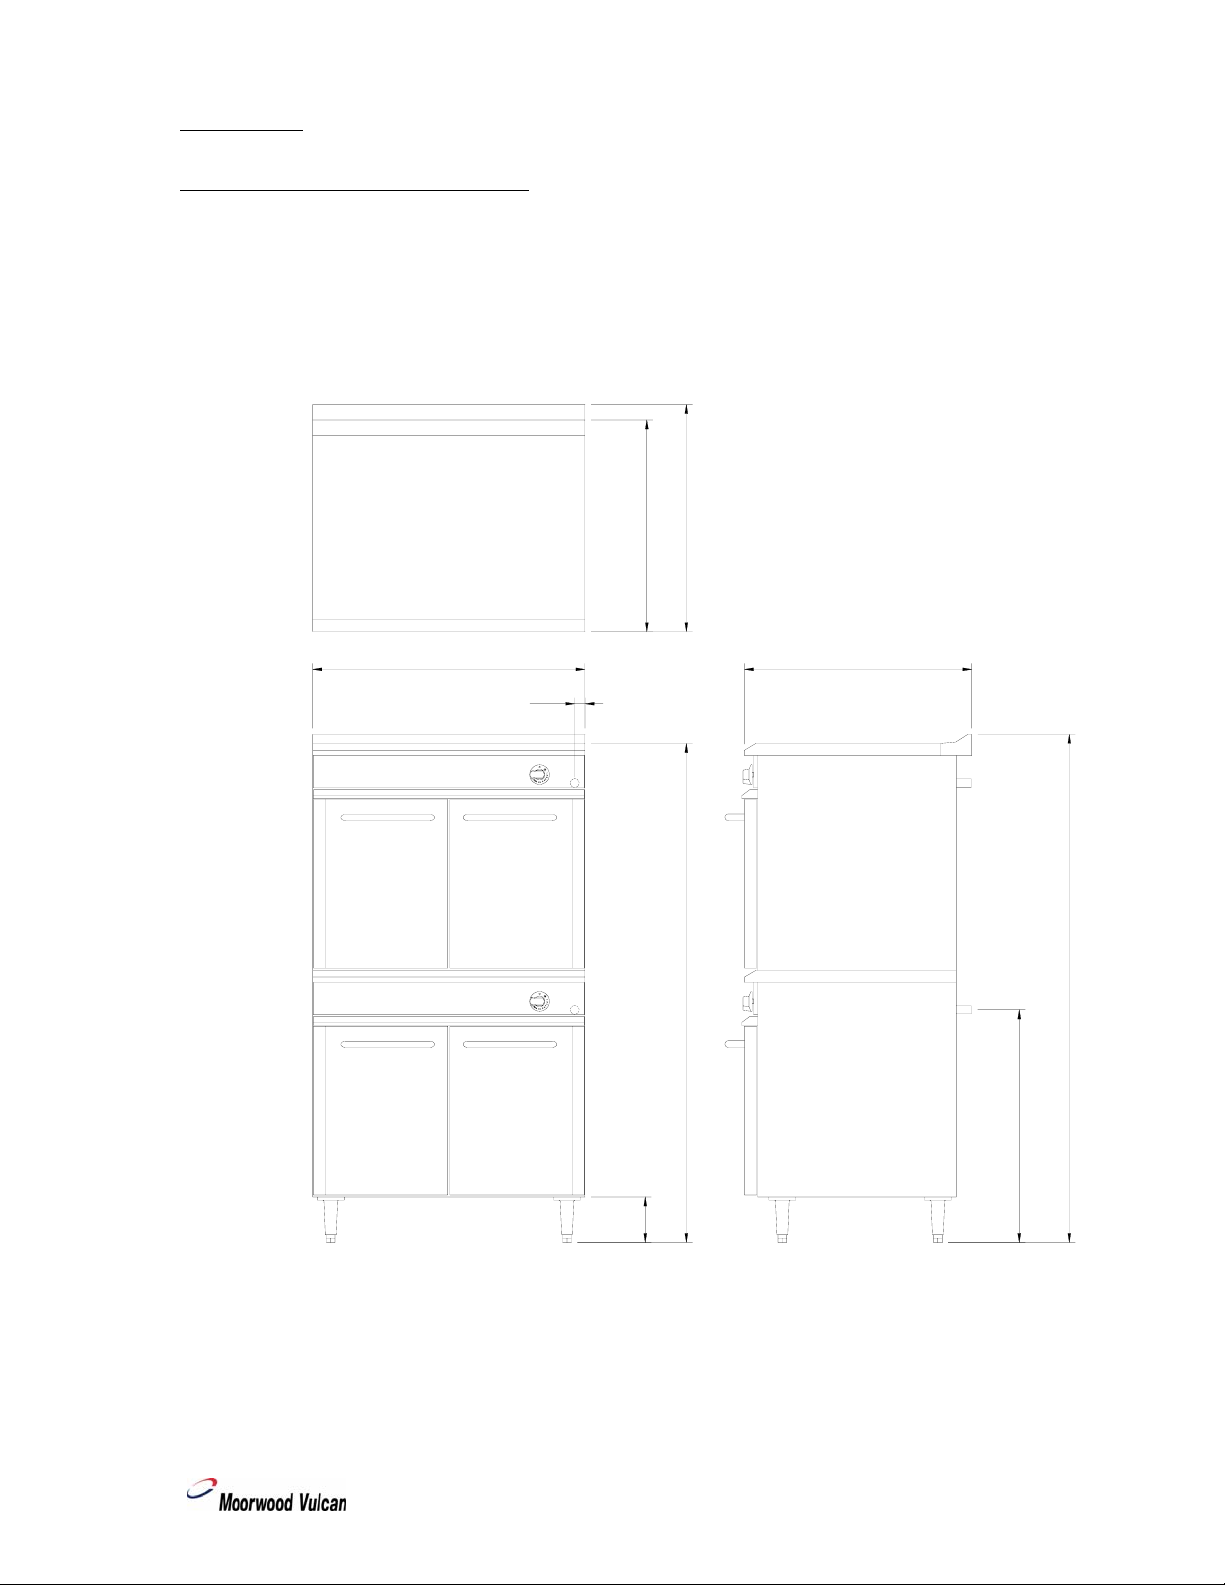
The details of the gas supply will be found on the Data Plate, which is located on the rear of the flue
upstand/splashback panel.
Improvements
The policy of Viscount Catering Ltd. is such that, each product is subject to continual development and
may, therefore, be subsequently improved. The company reserves the right to alter the design of any
appliance without prior notification and without the responsibility to update any delivered or in-service
appliance and furthermore, without incurring the responsibility for altering these instructions. In such
circumstances, it may be found that the appliance detailed herein differs in certain respects from the one
supplied.
IT IS IMPORTANT, THEREFORE, TO QUOTE THE SERIAL No. AND THE APPLIANCE MODEL No.
IN ALL COMMUNICATIONS WITH THE COMPANY.

Manual Part No: 931798-01 MV1 Gas GP Oven - 6 –
Manual Rev No: 1
Introduction (cont.)
Important
Before installing any item please refer to the installation instructions.
We recommend that all servicing other than routine cleaning be carried out by our authorised service
agents and will accept no responsibility for work carried out by other persons.
For satisfactory operation, parts of catering equipment become hot. Suitable precautions must be taken
to avoid accidental burns therefore the appliance should be positioned to minimise the possibility of
accidental touching. It is the supervisor’s responsibility to warn users to wear suitable protection and to
follow correct operation and cleaning procedures.
For the details of your nearest Service Agent for all warranty repair work, you should contact:-
The Service Manager,
Viscount Catering Limited
Provincial Park
Nether Lane
Ecclesfield
Sheffield
S35 9ZX
Tel: +44 (0) 114 2574500
Fax: +44 (0) 114 2574527
Spares can be obtained via the Spare Parts Department at the above address.
IT IS IMPORTANT, TO QUOTE THE SERIAL No. AND THE APPLIANCE MODEL No. IN ALL
COMMUNICATIONS WITH THE COMPANY.

Manual Part No: 931798-01 MV1 Gas GP Oven - 7 –
Manual Rev No: 1
SPECIFICATION
900 Single Tier General Purpose Oven
900 Two Tier General Purpose Oven
Gas Pressure
Supply Pressure Adjusted Pressure
Natural Gas
Propane Gas
20 mbar ( 8” wg)
37 mbar (14.8” wg)
15 mbar ( 6” wg)
37 mbar (14.8” wg)
Gas Connection
½” BSP Taper Male (Rp1/2)
When connecting using a flexible hose fit a ½” BSP hose-Single and Two Tier Oven
Heat Input (Nett Values)
NATURAL GAS PROPANE
INDIVIDUAL BURNERS ONLY Btu/h kW M³/HR Btu/h kW Kg/HR
900 Oven 33,437 9.8 35,143 10.3
TOTALS
900 Single Tier GP Oven 33,437 9.8 0.902 35,143 10.3 0.806
900 Two Tier GP Oven 66,874 19.6 1.804 70,286 20.6 1.613
Natural Gas Propane Gas
900 Oven Injectors 2.8 1.7
900 Oven By-Pass 0.65 Adjustable 0.65
Air Requirements
Area
900 Single Tier GP Oven 43.2cm2(6.7in2)
900 Two Tier GP Oven 86.4cm2(13.4in2)

Manual Part No: 931798-01 MV1 Gas GP Oven - 8 –
Manual Rev No: 1
Specification (cont.)
Oven Dimensions
Oven Cavity - Width 720mm
Oven Cavity - Depth 608mm
Oven Cavity - Height 480mm
Nominal Volume 0.2m3 (7.4 ft3)
Shelf sizes 685mm x 500mm
Volume of Cooking Space 0.17m3(5.9 ft3)
Weight
900 Single Tier GP Oven 98kg
900 Two Tier GP Oven 168kg

Specification (cont.)
900 Single Tier General Purpose Oven
681
1461
1431
1300
34
900
700
751
751
Manual Part No: 931798-01 MV1 Gas GP Oven - 9 –
Manual Rev No: 1

Specification (cont.)
900 Two Tier General Purpose Oven
700
751
751
769
150
1650
1680
900
34
Manual Part No: 931798-01 MV1 Gas GP Oven - 10 –
Manual Rev No: 1

Manual Part No: 931798-01 MV1 Gas GP Oven - 11 –
Manual Rev No: 1
INSTALLATION
Important
Your attention is drawn to the latest GAS SAFETY (INSTALLATION & USE) REGULATIONS 2000.
This appliance MUST be installed by a competent person in accordance with these and any other relevant
regulations. Users, too, should be aware of the regulations governing the use of gas appliances,
particularly with respect to the need for regular servicing.
Your attention is drawn to the requirement that those parts, which have been protected by the
manufacturer or his agent, are not to be adjusted by the installer.
Before Installation
Before commencing installation, remove all packaging materials from the appliance. It is suggested that
any protective film adhering to the stainless steel panels should be left on until installation is completed.
BUT THIS MUST BE REMOVED BEFORE COMMISSIONING OR OPERATING THE APPLIANCE.
Check the appliance Data Plate (located on the rear of the flue upstand/splashback panel), to ensure that
the appliance is suitable for the gas supply available.
Ensure that the floor upon which the appliance is to stand is level and capable of adequately supporting
the weight of the appliance. TO COMPENSATE FOR SOME UNEVENNESS OF THE FLOOR, THE
APPLIANCE FEET ARE ADJUSTABLE.
THE FLOOR MUST BE FIRE-PROOF. If it is not, or if any adjacent wall or surface is made of a
combustible material, then the installer MUST ensure that the requirements of the LOCAL FIRE
REGULATIONS are observed.
Positioning
Place the appliance in position allowing a minimum gap of 100mm (4”) at the rear and at least 150mm
(6”)* between the sides of the appliance and any adjacent wall. If the appliance is being suited then
please refer to the separate instructions. The minimum distance between the hotplate and any overshelf
or ceiling constructed of a combustible material must be 1525mm (60”).
Adequate ventilation is essential for safe operation of a gas appliance. A supply of fresh air is necessary
for the correct combustion of the gas and there must be a means of exhausting the heat and the
products of combustion from the kitchen. It is recommended that the appliance be sited below a
ventilating hood, one preferably connected to an extractor system incorporating a grease filter.
Appliances are to be installed with sufficient ventilation to prevent the occurrence of unacceptable
concentrations of substances harmful to health in the room in which they are installed.

Manual Part No: 931798-01 MV1 Gas GP Oven - 12 –
Manual Rev No: 1
Installation (cont.)
Important Note
The appliance MUST NOT be connected DIRECTLY to a flue or ventilating system, although the flue
products of two or more appliances may be directed into a common outlet when building a suite of
appliances (see separate instructions for suiting appliances).
Ensure that the appliance is level in two places - front to rear and side to side. To check the level it is
recommended that a spirit level be placed on a shelf in the open oven - NOT on top of the hotplate!
Level can be achieved by adjusting any or all of the screw in feet in each corner of the base. Turn anti-
clockwise to lower and clockwise to raise the corner.
Gas Connection
Natural Gas: The size of the supply pipe should be no smaller than ½” BSP and an easily accessible
stopcock must be fitted in the gas line adjacent to the appliance. The gas governor provided with the
appliance MUST be fitted in the supply line BETWEEN the stopcock and the appliance.
Although a rigid gas pipe is recommended, armoured flexible pipe of a GAS COUNCIL APPROVED
PATTERN may be used.
NOTE:
Due to the pressure loss through the snap connection fitting on flexible hoses you must fit a 3/4”
flexible hose to the following models:
MV1RGP90-1T & MV1RGP90-2T
Ensure that all the pipes to the appliance are clean and free from swarf etc, BEFORE making the final
connection.
Propane Gas: Follow the same procedure as that for Natural Gas EXCEPT that the Gas Governor MUST
NOT be fitted - the Gas Supply Tank or Cylinders are already fitted with a Gas Regulator.

Manual Part No: 931798-01 MV1 Gas GP Oven - 13 –
Manual Rev No: 1
Installation (cont.)
Leak Test
Clean off any protective film from the stainless steel panels.
AT THIS STAGE, LEAK TEST THE WHOLE SYSTEM. THE GAS SAFETY REGULATIONS require that ALL
connections in the gas supply line between the Gas Meter and the appliance is tested for gas leaks.
THIS MUST BE DONE BEFORE COMMENCING TO COMMISSION THE APPLIANCE.
Checking and Commissioning
ALTHOUGH EVERY APPLIANCE IS TESTED AND SET BEFORE IT LEAVES THE FACTORY, IT IS
IMPORTANT THAT THE INSTALLER RE-CHECKS CERTAIN FUNCTIONS BEFORE LEAVING THE SITE.
CHECK THE GAS PRESSURE AT THE APPLIANCE THUS: -
The pressure test point is located on the manifold rail behind the front control panel, which is secured
by two M5 screws.
Connect a manometer (U tube) to the test point. Turn on the gas supply and light the Oven. Check that
the pressure reading agrees with that stated on the data Plate.
SHOULD ADJUSTMENT BE NECESSARY, PROCEED AS FOLLOWS: -
FOR PROPANE GAS, REFER TO SUPPLIER.
On the gas governor: -
Remove the cap in order to gain access to the pressure adjusting screw.
Turn the pressure adjusting screw clockwise to increase the pressure or anti-clockwise to decrease it.
When the pressure reading is correct, refit the cap to the governor.
Turn the gas supply to the unit OFF at the stopcock and disconnect the manometer (U tube). Ensure that
the pressure test point screw is refitted.
Turn the gas supply to the appliance on at the stopcock and leak test the pressure test point.
Burner Aeration
The aeration of all the burners is fixed and does not need adjusting.
The parts protected by the manufacturer or his agent are not to be adjusted by the installer.
This appliance must be equipotentially earth bonded.

Manual Part No: 931798-01 MV1 Gas GP Oven - 14 –
Manual Rev No: 1
USERS INSTRCTIONS
Important Note!
The attention of the user is drawn to the requirements of the GAS SAFETY (INSTALLATION & USE)
REGULATIONS 2000. This appliance MUST be used in accordance with those, particularly so in respect
of the need for regular servicing.
The attention of the user is also drawn to the requirement that those parts, which have been protected
by the manufacturer or his agent, are not to be adjusted by the user.
See also the sections of this manual referring to Cleaning and General Maintenance.
Safety Note:
This appliance is intended for professional use and shall only be used by qualified personnel.
Parts and surfaces of this appliance get hot in use. It is the responsibility of the kitchen supervisor to
inform and warn every user and kitchen worker of this and, furthermore, to ensure those users wear and
use protective clothing when operating the appliance.
Should any adjustment or attention be necessary, you are advised to contact your nearest CORGI
(Confederation for the Registration of Gas Installers) Service Engineer immediately. The need for regular
servicing is detailed in the GAS SAFETY (INSTALLATION & USE) REGULATIONS 2000.
IF YOU THINK THAT GAS IS ESCAPING, ACT IMMEDIATELY. SHUT OFF THE GAS SUPPLY AT THE
METER OR EMERGENCY CONTROL, CONTACT THE SUPPLIER OF YOUR GAS IMMEDIATELY.
MAKE SURE THAT ALL USERS OF THIS APPLIANCE KNOW WHERE THE GAS SUPPLY STOPCOCK IS
LOCATED FOR THE USE IN AN EMERGENCY.
Those parts, which have been protected by the manufacturer or his agent, are not to be adjusted by the
user.

Manual Part No: 931798-01 MV1 Gas GP Oven - 15 –
Manual Rev No: 1
Users Instructions (cont.)
Improvements
The policy of Viscount Catering Ltd. is such that each product is subject to continual improvement. The
company reserves the right to alter the design of any appliance without prior notification and without the
responsibility to update any delivered or in-service appliance and, furthermore, without incurring the
responsibility for altering these instructions. In such circumstances, it may be found that the appliance
detailed herein differs in certain respect from the one supplied.
For further details or enquiry’s please contact:
Viscount Catering Limited,
Provincial Park,
Nether Lane
Ecclesfield
Sheffield,
S35 9ZX
Tel: +44 (0) 114 2570100
Fax: +44 (0) 114 2570251

Manual Part No: 931798-01 MV1 Gas GP Oven - 16 –
Manual Rev No: 1
Users Instructions (cont.)
Oven
Lighting Instructions:
Open the oven doors. The oven burner is visible with the spark electrode and thermocouple secured to
it.
1) Open the oven door.
2) Turn the thermostat knob (B) anti-clockwise to the ignition position Ξand at the same time press
the spark ignition button on the front of the oven base to generate a spark.
3) Keep the thermostat knob depressed for a further 20 seconds until the flame is established.
4) If the flame is extinguished on releasing knob, wait 3 minutes then repeat steps 2 & 3.
5) When the flame is established, turn the thermostat knob (B) to the required setting and note the
burner comes FULL ON. Close the oven door securely.
When setting the thermostat knob to the required temperature, turn the knob to Mark 9 (maximum)
AND THEN back to the required setting.
NOTE! When first lighting the appliance or after installation or after an extended shut-down period, it
may be necessary for gas control knob to remain pushed in for some time before burner will light, owing
to the presence of air in gas line.
To Turn Off:
Turn the thermostat knob (B) clockwise to the “OFF” position.

Manual Part No: 931798-01 MV1 Gas GP Oven - 17 –
Manual Rev No: 1
Users Instructions (cont.)
Using the Oven:
There are 6 shelf positions provided so that the two shelves can be put at different heights.
The hottest part of the oven being at the top, and the coolest at the bottom. The oven temperatures in
the following table are those at the centre of the oven.
The temperature guide given below is only intended as a guide to the gas mark settings on the
appliances thermostat knob. It is provided in order to, assist the user to adapt a temperature or a
cooking time given in a recipe. The actual temperature at the centre of the oven has been determined by
the manufacturer and it will not necessarily correspond to the guides given elsewhere. Using this guide
should produce the desired result but it is strongly recommended that the user make note of the best
results for future reference.
Mark 1 2 3 4 5 6 7 8 9
°C 140 150 160 180 190 200 220 230 250
°F 284 302 320 356 374 392 428 446 482
The temperatures will vary from the above figures by as much as 20°C hotter at the top of the oven and
30°C cooler towards the bottom of the oven. But remember these are temperatures in an empty oven.
To cook identical products on two shelves, select two shelf positions with a sufficient gap between them
to allow air movement in the oven. For example, cooking small cakes or pastry use shelf positions 2 & 5,
counting from the top of the oven. Allow the food to cook for just over half the normal time and then
change the position of the shelves.
As an alternative leave the food on the upper shelf until it is cooked, then move the food from the lower
shelf to the upper shelf, or leave on the lower shelf until cooked.
Cooking identical foods on three different shelves is seldom satisfactory and is not recommended, but
the “cool zone” at the oven bottom can be sometimes used for slow casseroles, whilst general and
specialised cooking is carried out on the two shelves.

Manual Part No: 931798-01 MV1 Gas GP Oven - 18 –
Manual Rev No: 1
Users Instructions (cont.)
The following cooking chart is for guidance on thermostat settings. Make a note of the settings you find
most acceptable.
Usage and Method Products Thermostat Setting
High Temperature Roasting Meat or Poultry 6 or 7
Low Temperature Roasting Meat or Poultry 3
High Temperature Baking Bread or Scones 8
Medium Temperature Baking Queen Cake sponge 5
Low Temperature Baking Slab Cake 2
Puff Pastry 8
Flaky Pastry 7
Hot Water Pastry (Pork Pies etc) 4
Shortcrust Pastry 6
Pastry
Plate Tarts 6
Milk Pudding 3Puddings
Baked Custard 3
Cleaning the Equipment:
It will be found that it takes less time and effort if appliances are cleaned every day, particularly while
they are still warm and before grease or spillage’s are burnt on.
PROPRIETARY OVEN CLEANER MUST BE USED WITH CARE. THEY ARE HIGHLY CORROSIVE AND MAY
CAUSE DAMAGE TO SURFACES AND COMPONENTS.
The oven shelves and the oven shelf supports can be removed for cleaning. Withdraw the shelves in the
normal way, rub them free of grease using an absorbent paper pad and wash in a hot detergent solution.
Rinse and dry before replacing.
The shelf supports are removed by lifting them free from their locating brackets and withdrawing them
from the oven interior. They, too, can be washed in a hot detergent solution and rinsed and dried before
replacing.
Clean the oven interior and the oven door-lining daily, using a hot mild detergent solution. This is
especially necessary if a spillage has occurred, meat has been roasted or fruit pies baked. Rinse with
clean water. Stubborn accumulations can be gently scraped off after soaking.

Users Instructions (cont.)
Cleaning the Equipment (cont.)
DO NOT USE CAUSTIC OR ABRASIVE CLEANING AGENTS.
Leave the oven drip tray in position while you clean the oven, it will collect all the bits and drips and can
be removed for cleaning at the sink.
Clean stainless steel with soap and hot water or a mild detergent solution. Rinse and dry thoroughly.
DO NOT USE CAUSTIC OR ABRASIVE CLEANERS. DO NOT USE ABRASIVE PADS.
Vitreous enamelled surfaces should be wiped clean of grease and Spillage’s BEFORE they are burnt on.
Use a mild solution or grease dissolving agent or a detergent as a soak and wash. Accumulated deposits
may be removed by soaking and then carefully scraping or by using a fine cleaning paste.
DO NOT USE CAUSTIC CLEANERS.
On a weekly basis, remove all the oven furniture and the oven bottom panels - the drip tray and the
bottom baffles when fitted. CLEAN OUT the bottom compartment - this is the oven burner
compartment and it must be emptied of all loose debris and carbon deposits.
DO NOT DISTURB THE OVEN BURNER OR THERMOCOUPLE PROBE.
DO NOT USE WATER OR A LIQUID CLEANER ON THE OVEN BURNER.
Brush clean using a dry bristle brush.
General Maintenance and Care.
This equipment is designed and manufactured to give you long, satisfactory service at low cost, provided
that it is given proper care and attention at all times. Frequent cleaning and regular checking of correct
adjustment will be rewarded by reduced operating and maintenance costs, minimum downtime, and
regular results from your cooking.
The flame ports of gas burners must be clean and unobstructed. The user must brush them clean, using
a dry bristle brush.
THE UNBLOCKING OF GAS BURNER PORTS IS BEST LEFT TO A QUALIFIED SERVICE ENGINEER
Manual Part No: 931798-01 MV1 Gas GP Oven - 19 –
Manual Rev No: 1

Manual Part No: 931798-01 MV1 Gas GP Oven - 20 –
Manual Rev No: 1
Users Instructions (cont.)
General Maintenance and Care (cont.)
All gas taps and gas controls must operate smoothly and freely without sticking or jerking. A QUALIFIED
SERVICE ENGINEER MUST carry out re-lubrication.
WE RECOMMEND THAT ALL EQUIPMENT IS SERVICED AT LEAST ONCE A YEAR, BUT MAY BE AS
FREQUENT AS 6 MONTHS OR LESS IF THE GAS TAPS/THERMOSTAT AND GAS CONTROLS DO NOT
OPERATE FREELY. ALL WORK MUST BE CARRIED OUT BY A QUALIFIED SERVICE ENGINEER.
SERVICE INTERVALS CAN BE AFFECTED BY SPILLAGE AND SHOULD BE ASSESSED EACH TIME THE
EQUIPMENT HAS BEEN USED.
This manual suits for next models
3
Table of contents
Other Moorwood Vulcan Oven manuals