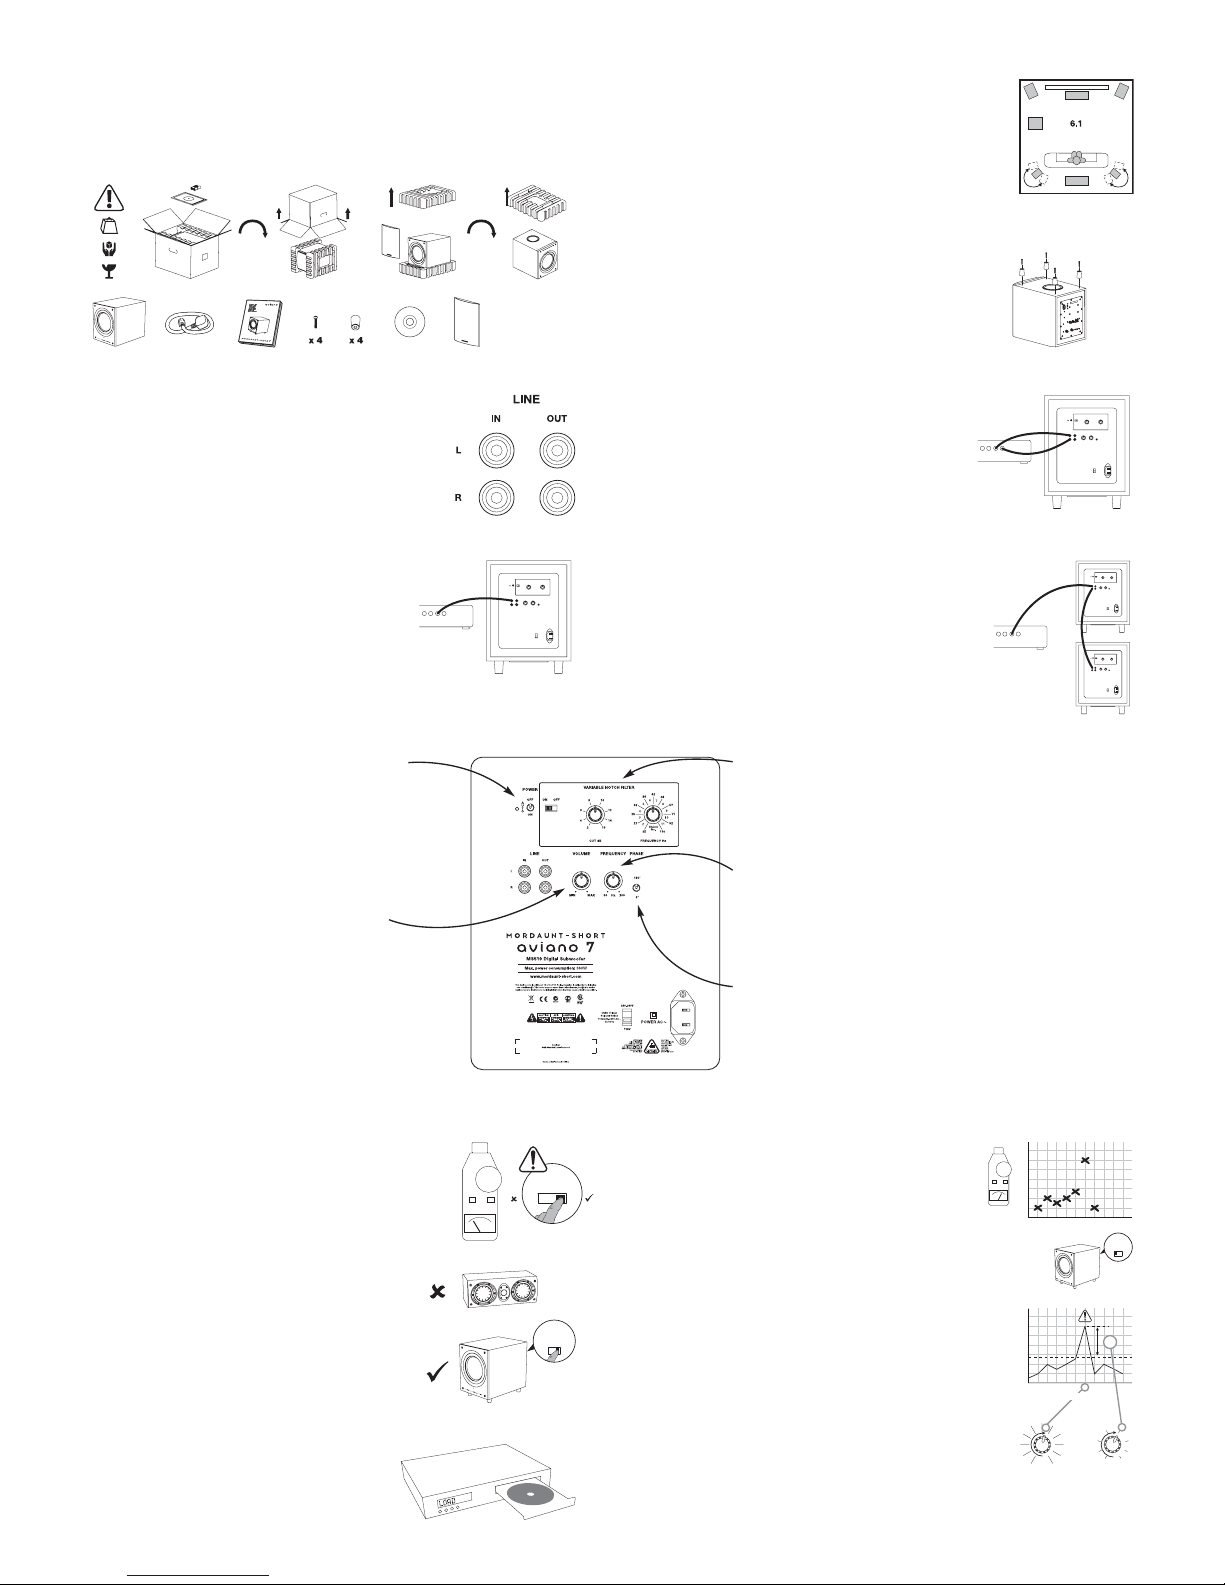
1. Unpacking / Auspacken / Déballage / Desembalaje /
Rimozione dall'imballaggio / Uit de verpakking halen / Uppackning / Распаковка
2. Positioning / Positionierung / Installation / Colocación / Disposizione /
Plaatsing / Placering / Выбор размещения
2.1 Your subwoofer can be placed almost anywhere in the room as bass
sound is largely non-directional.
2.1 Ihr Subwoofer kann praktisch überall im Raum aufgestellt werden, da Basstöne
größtenteils ungerichtet wahrgenommen werden.
2.1 Vous pouvez placer votre caisson de grave dans presque tous les coins de votre pièce
étant donné que les sons graves sont largement non directionnels.
2.1 El subwoofer puede colocarse prácticamente en cualquier lugar de la habitación ya que
los bajos, en gran medida, no tienen carácter direccional.
2.1 Il subwoofer può essere posizionato praticamente ovunque all'interno dell'ambiente
d'ascolto dal momento che le basse frequenze non sono direzionali.
2.1 U kunt uw subwoofer bijna overal in de kamer zetten: voor lage tonen maakt de
geluidsrichting grotendeels niet uit.
2.1 Subwoofern kan placeras nästan var som helst i rummet eftersom basljudet inte är riktat.
2.1 В помещении сабвуфер можно устанавливать практически в любом месте, поскольку
звук низкой частоты распространяется почти одинаково во всех направлениях.
4. Controls / Bedienelemente / Réglages / Controles / Regolazioni / Bediening / Styrningar / Органы управления
3.2 Connect to your receiver/amplifier via the left Line In socket.
3.2 Verbinden Sie den Subwoofer mit dem Subwooferausgang Ihres Receivers/
Verstärkers über die linke Buchse "Line In".
3.2 Pour le raccordement à un intégré audio-vidéo, utilisez la prise d'entrée haut
niveau (Line In) gauche.
3.2 Conecte al receptor/amplificador mediante la clavija izquierda Line In (Entrada
de línea).
3.2 Effettuare il collegamento con il ricevitore/amplifictore tramite la presa Line In
di sinistra.
3.2 Maak verbinding met uw receiver/versterker via de linker Line In aansluiting van
uw subwoofer, met de speciale subwoofer lijnuitgang van uw receiver.
3.2 Anslut din mottagare/förstärkare via det vänstra Line In-uttaget.
3.2 Подключите к вашему приемнику/усилителю, используя левый разъем
линейного входа (Line In).
3.4 To connect a second subwoofer use the Line out socket.
3.4 Verwenden Sie die Buchse "Line Out" zum Anschluss eines zweiten Subwoofers.
3.4 Pour raccorder un second caisson de grave, utilisez la prise de sortie Line Out.
3.4 Para conectar un segundo subwoofer utilice la clavija Line Out (Salida de línea).
3.4 Per collegare un secondo subwoofer, utilizzare la presa di uscita di linea (Line Out).
3.4 Om een tweede subwoofer te verbinden moet u de Line Out aansluiting gebruiken.
3.4 Om du vill ansluta ytterligare en subwoofer använder du uttaget Line out.
3.4 Для подключения второго сабвуфера используйте разъем линейного
входа (Line In).
3. Connections / Anschlüsse / Raccordements / Conexiones / Collegamenti / Aansluitingen / Anslutningar / Подключения
4.1 Auto feature will switch your subwoofer on and off automatically
when a signal is present.
4.1 Mit der Auto-Funktion wird Ihr Subwoofer automatisch ein- und ausgeschaltet, wenn ein
Signal anliegt.
4.1 Grâce à la programmation automatique, votre caisson de grave s'allume et s'éteint
automatiquement lorsqu'il détecte la présence d'un signal.
4.1 La función de automático encenderá y apagará el subwoofer cuando haya una señal presente.
4.1 Il sistema automatico provvederà ad accendere o spegnere automaticamente il subwoofer.
4.1 De automatische functie zal automatisch uw subwoofer in- en uitschakelen, wanneer er een
signaal is.
4.1 Med funktionen "Auto" sätts din subwoofer på och av automatiskt när den får signal.
4.1 Функция «авто» будет автоматически включать и выключать сабвуфер в зависимости от
наличия сигнала.
5. Variable Notch Filter / Einstellbares Notch-Filter / Filtre à bande étroite variable / Filtro de muesca variable / Filtro variabile anti-interferenze (Notch) / Variabele bandeliminatiefilter /
Variabelt notch-filter / Регулируемый узкополосный режекторный фильтр
5.1 Set-up is most easily completed with a Sound Pressure Level (SPL) Meter.
5.1 Die Einstellung wird am einfachsten mit einem Schalldruckpegelmessgerät (SPL) durchgeführt.
5.1 Le réglage s'effectue facilement à l'aide d'un instrument de mesure du niveau de pression
acoustique (sonomètre).
5.1 La configuración se realiza de forma sencilla con un medidor SPL (nivel de presión acústica).
5.1 Una migliore regolazione potrà essere ottenuta mediante l'utilizzo di uno strumento di
misurazione del livello di pressione sonora (SPL).
5.1 De instelling kan het eenvoudigst worden uitgevoerd met een SPL-meter (Sound Pressure Level).
5.1 Installationen går lättast att utföra med hjälp av en ljudtrycksnivåmätare (SPL).
5.1 Настройку легче всего проводить с помощью измерителя уровня звукового давления (УЗД).
5.2 Disable all speakers except the subwoofer. Make sure the
Notch Filter is off.
5.2 Deaktivieren Sie alle Lautsprecher des Systems, außer dem Subwoofer.
Vergewissern Sie sich, dass das Notch-Filter ausgeschaltet ist.
5.2 Désactivez toutes les enceintes acoustiques à l'exception du caisson de
grave. Veillez à ce que le filtre à bande étroite ne soit pas en fonction.
5.2 Desactive todos los altavoces excepto el subwoofer. Asegúrese de que
el filtro de muesca esté desactivado.
5.2 Disattivare tutti i diffusori, ad eccezione del subwoofer. Assicurarsi che il filtro
anti-interferenze (Notch) sia escluso.
5.2 Schakel alle luidsprekers uit, met uitzondering van de subwoofer. Zorg ervoor
dat de bandeliminatiefilter is uitgeschakeld.
5.2 Koppla bort alla högtalare utom subwoofern. Se till att notch-filtret är av.
5.2 Отключите все динамики, кроме сабвуфера. Убедитесь в том, что узкополосный
режекторный фильтр выключен.
5.3 Play the supplied CD on your CD or DVD player.
5.3 Geben Sie die mitgelieferte CD auf Ihrem CD- oder DVD-Spieler wieder.
5.3 Lancez la lecture du CD fourni sur le lecteur de CD ou de DVD.
5.3 Reproduzca el CD suministrado en el reproductor de CD o DVD.
5.3 Riprodurre il CD fornito a corredo tramite il vostro lettore CD o DVD.
5.3 Speel de geleverde CD af op uw CD- of DVD-speler.
5.3 Spela upp den medföljande CD-skivan i CD- eller DVD-spelaren.
5.3 Проиграйте прилагаемый компакт-диск на вашем плейере
компакт-дисков или DVD-дисков.
5.4 Use the SPL Meter to note the level of each track. Turn Notch filter back on.
5.4 Verwenden Sie das Schalldruckpegelmessgerät zur Messung des Pegels jedes Titels.
Schalten Sie das Notch-Filter wieder ein.
5.4 Utilisez le sonomètre pour noter le niveau de chaque plage. Mettez le filtre à bande étroite
en marche.
5.4 Utilice el medidor SPL para anotar el nivel de cada pista. Vuelva a encender el filtro
de muesca.
5.4 Utilizzare lo strumento di misurazione SPL per rilevare ed annotare il livello di pressione
sonora raggiunto per ciascun brano. Riattivare il filtro Notch.
5.4 Gebruik de SPL-meter om het niveau van iedere track vast te stellen. Zet de
bandeliminatiefilter weer aan.
5.4 Använd SPL-mätaren och anteckna varje spårs nivå. Slå på notch-filtret igen.
5.4 Используйте измеритель УЗД для замера уровня на каждом треке. Снова включите
режекторный фильтр.
5.5 Set Frequency to match the track number with the most over-emphasised level.
5.5 Stellen Sie die Frequenz entsprechend der Titelnummer mit dem am stärksten überhöhten Pegel ein.
5.5 Réglez la fréquence correspondant au numéro de plage dont le niveau mesuré était le plus fort.
5.5 Ajuste la frecuencia de modo que coincida con el número de pista con el nivel más sobre-enfatizado.
5.5 Impostare la Frequenza in modo che corrisponda al numero del brano che ha mostrato il livello di
pressione sonora maggiore.
5.5 Stel Frequency zodanig in dat deze overeenstemt met het tracknummer met de sterkste nadruk.
5.5 Ställ in frekvensen så att den matchar spårnumret med den högsta nivån.
5.5 Отрегулируйте частоту (Frequency) для выявления номера трека с наибольшим давлением.
5.6 Using the Cut control, reduce this level to be consistent with adjacent readings.
5.6 Verwenden Sie die Cut-Regelung, um diesen Pegel so zu verringern, dass er den Messwerten der
anderen Titel entspricht.
5.6 À l'aide du réglage de la coupure (Cut), réduisez ce niveau pour qu'il soit en ligne avec les
mesures adjacentes.
5.6 Utilizando el control de Corte, reduzca este nivel para que sea consistente con las lecturas adyacentes.
5.6 Utilizzare la regolazione del livello di attenuazione (Cut) per ridurre questo livello fino a
portarlo in linea con il rilevamento ottenuto per gli altri brani.
5.6 Gebruik de Cut-regeling om dit niveau te reduceren in overeenstemming met de aangrenzende metingen.
5.6 Använd styrningen Klipp och minska nivån så att den stämmer med närliggande avläsningar.
5.6 Используя регулятор среза (Cut), уменьшите этот уровень до совпадения с соседними замерами.
4.2 Set Volume to balance subwoofer output with your system.
4.2 Gleichen Sie die Wiedergabe des Subwoofers mit dem Balanceregler am System ab.
4.2 Réglez le volume de façon à ce que la sortie du caisson de grave corresponde à celle
de votre chaîne.
4.2 Fije el volumen para equilibrar la salida del subwoofer con el sistema.
4.2 Regolare il volume per equilibrare il livello d'uscita del subwoofer con il resto del sistema.
4.2 Stel het volume in om de uitvoer van de subwoofer af te stemmen op uw systeem.
4.2 Ställ in volymen för att balansera subwooferns utnivå med ditt system.
4.2 Настройте громкость для согласования выходного сигнала сабвуфера с вашей системой.
4.3 See section 5 for Notch Filter set-up.
4.3 Einzelheiten zur Einstellung des Notch-Filters finden Sie im Abschnitt 5.
4.3 Pour le réglage du filtre à bande étroite, voir la section 5.
4.3 Consulte la Sección 5 para realizar la configuración del filtro de muesca.
4.3 Consultare il Paragrafo 5 per la regolazione del filtro eliminatore di banda (Notch Filter).
4.3 Zie deel 5 voor het instellen van de bandeliminatiefilter.
4.3 I avsnitt 5 finns uppgifter om installation av notch-filtret.
4.3 См. раздел 5 для настройки узкополосного режекторного фильтра.
4.4 Adjust Frequency to integrate subwoofer with your system.
4.4 Stellen Sie die Übergangsfrequenz ein, um den Subwoofer in Ihr System zu integrieren.
4.4 Réglez la fréquence pour que le caisson de grave soit parfaitement intégré au système.
4.4 Haga el ajuste de frecuencia para integrar el subwoofer en el sistema.
4.4 Impostare la frequenza che consenta di ottenere la migliore integrazione possibile del subwoofer con il
resto del sistema.
4.4 Stel de frequentie af om de subwoofer te integreren met uw systeem.
4.4 Justera frekvensen för att integrera subwoofern i systemet.
4.4 Отрегулируйте частоту для полной интеграции сабвуфера в вашу систему.
4.5 Set Phase for best system sound (0 = normal).
4.5 Stellen Sie die Phase für den optimalen Sound des Systems ein (0 = normal).
4.5 Réglez la phase pour obtenir le meilleur son (0 = normal).
4.5 Fije la fase para obtener el sonido de máxima calidad (0 = normal).
4.5 Regolare la fase (Phase) in modo da ottenere la migliore resa sonora del sistema (0 = normale).
4.5 Stel Phase in voor het beste systeemgeluid (0 = normaal).
4.5 Ställ in Fas för bästa systemljud (0 = normal).
4.5 Настройте фазировку для наилучшего качества звука (0 = нормально).
2.2 Fix feet to cabinet using supplied screws.
2.2 Befestigen Sie die Füße am Gehäuse mithilfe der beigefügten Schrauben.
2.2 Fixez les pieds à l'enceinte à l'aide des vis fournies.
2.2 Fije el pedestal a la caja utilizando los tornillos suministrados.
2.2 Fissare i piedini al mobile impiegando le viti fornite a corredo.
2.2 Bevestig de poten aan de ombouw met de meegeleverde schroeven.
2.2 Fäst fötterna vid lådan med hjälp av de skruvar som medföljer.
2.2 Прикрепите ножки к корпусу, используя прилагаемые винты.