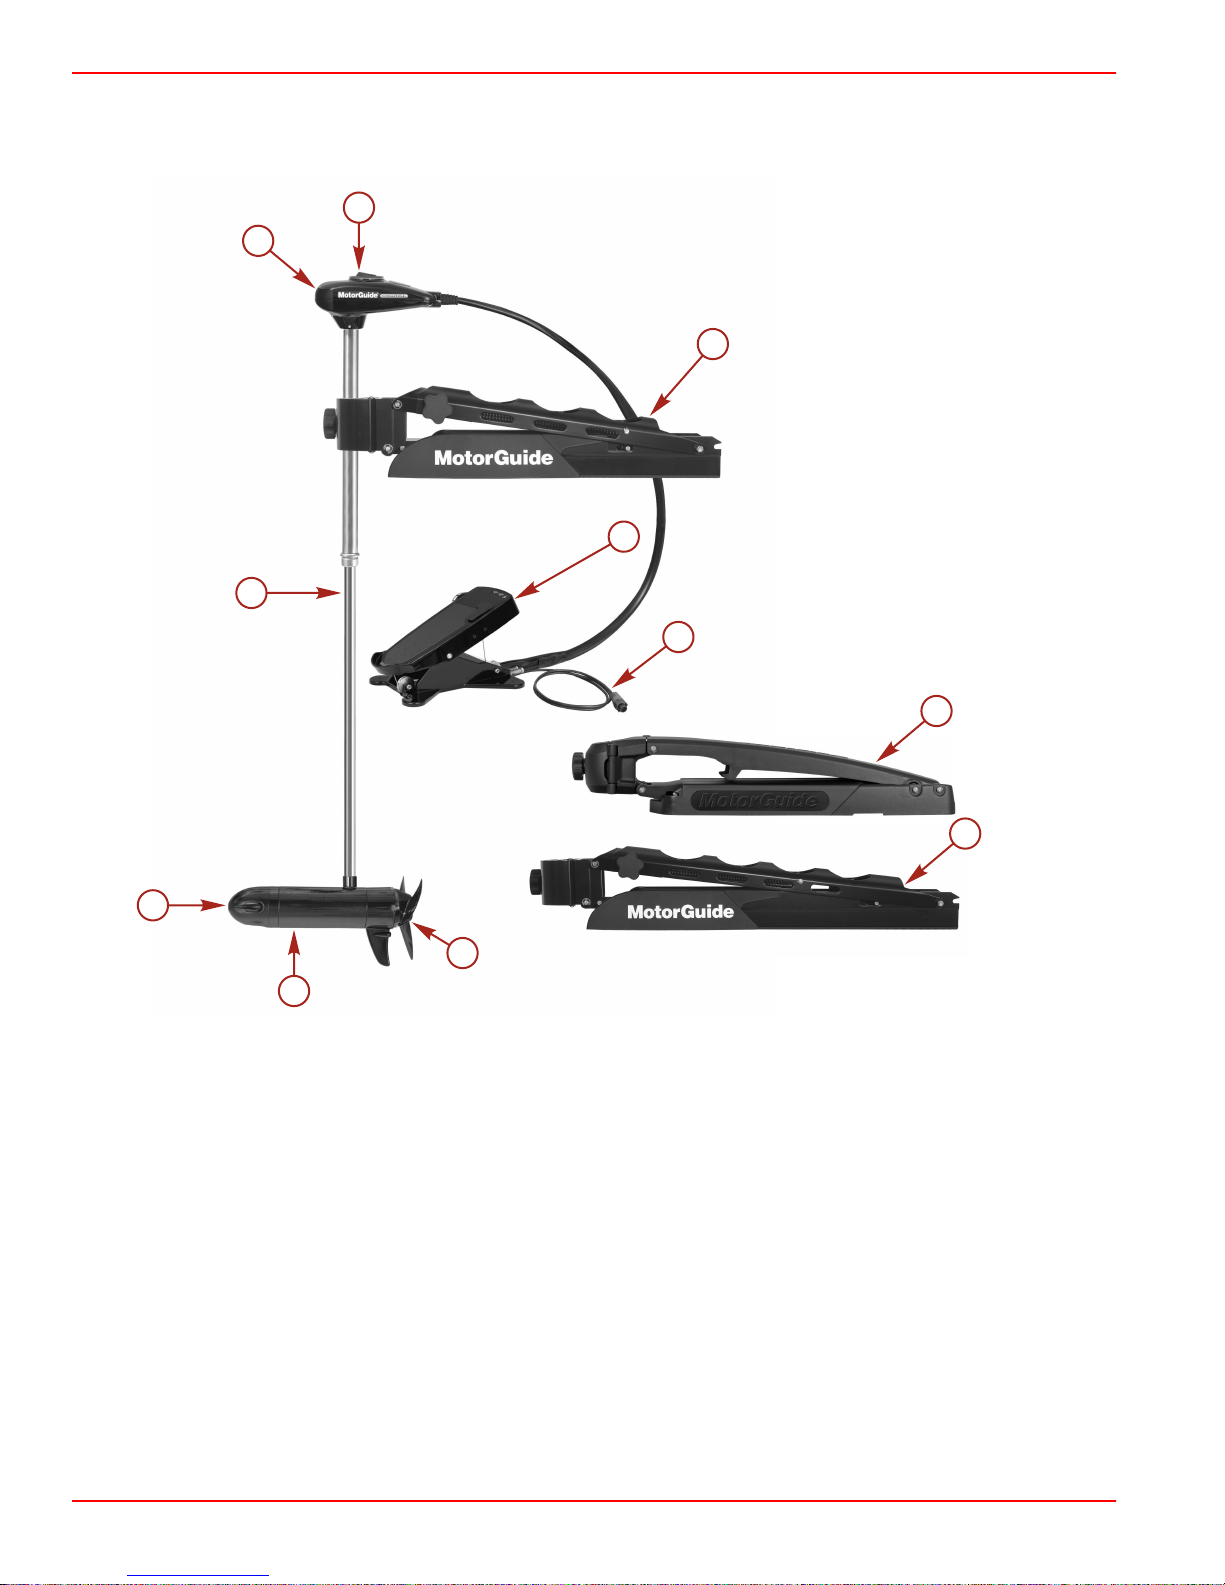
Section 1 - Warranty Information
Page 2 90-8M4002564 JANUARY 2010
MotorGuide Limited Warranty
KEEP YOUR ORIGINAL PURCHASE RECEIPT OR BILL OF SALE.
1. For recreational use customers, MotorGuide electric trolling motors are warranted to the original retail purchaser to be free
from defects in material or workmanship for the periods listed in the table below:
12 V Trolling Motors — 1 year warranty
24 V Trolling Motors — 2 year warranty
36 V Trolling Motors — 3 year warranty
2. To obtain warranty service, the purchaser should deliver or return the unit (postage prepaid and insured) to any MotorGuide
Authorized Service Dealer. DO NOT RETURN TO PLACE OF PURCHASE unless they are an authorized service center.
Products returned by mail should be carefully packaged and include a note describing the nature of the problem and/or service
requested, customer address and phone number. A copy of the receipt, Bill of Sale, registration verification or other proof of
purchase is required with the return of the product for warranty consideration. Warranty claims will not be accepted without
presentation of purchase receipt for trolling motor, other verification of registration, or Bill of Sale for boat package.
3. MotorGuide, at its discretion, will repair or replace items covered under the terms of this warranty. Neither MotorGuide nor
MotorGuide Service Dealers are responsible for damages to MotorGuide products due to repairs performed by anyone other
than an Authorized MotorGuide Service Dealer. Neither MotorGuide nor Mercury Marine is responsible for failure or damage
caused by improper installation, set‑up, preparation, or previous service or repair errors.
4. For commercial use and government use customers, MotorGuide electric trolling motors are warranted to the original retail
purchaser to be free from defects in material or workmanship for one (1) year. Commercial use is defined as any work or
employment‑related use of the product, or any use of the product which generates income, for any part of the warranty period,
even if the product is only occasionally used for such purpose such as Rental Fleets, Guides, Fish Camps or similar operations.
Warranty is not transferable to any subsequent purchaser. The Mercury Product Protection plan is not available to commercial
use or government use customers.
5. MotorGuide Composite Shaft Limited Lifetime Warranty. MotorGuide composite shafts are warranted to the original retail
purchaser to be free of defects in material or workmanship for the lifetime of the original purchaser. MotorGuide will provide
a new composite shaft at no cost for any composite shaft which contains a defect in material or workmanship. The installation
costs are the sole responsibility of the purchaser.
6. Warranty coverage is available to customers that purchase from an authorized Dealer or Retailer that is authorized by
MotorGuide Marine to distribute the product in the country in which the sale occurred. Warranty coverage and duration varies
by the country in which the owner resides. This warranty applies to MotorGuide Trolling Motors sold and used in the United
States. This Limited Warranty begins on the date the product is first sold to a purchaser or the date on which the product is
first put into service, whichever occurs first. MotorGuide Accessories are covered by this Limited Warranty for a coverage
period of one (1) year from the date of retail sale. The repair or replacement of parts, or the performance of service under this
warranty, does not extend the life of this warranty beyond its original expiration date. Promotional warranties are not included
in this statement and coverage may vary by promotion. Product either sold or put into service more than six years from date
of manufacture is excluded from warranty coverage.
7. This warranty does not apply to normal worn parts, for example, worn cables, adjustments, or product damage due to; 1)
neglect, lack of maintenance, accident, abnormal operation or improper installation or service; 2) abuse, such as, bent metal
columns, bent armature shafts, broken control cables, etc., accidents, modifications, misuse, excessive wear or damage
caused by an owner’s failure to provide reasonable and necessary installation or care; 3) use of an accessory or part not
manufactured by MotorGuide or Mercury; 4) alteration or removal of parts; 5) opening the lower unit (motor) by anyone other
than an authorized MotorGuide Service Center will void this warranty.
8. We reserve the right to improve the design of any Trolling Motor without assuming any obligation to modify any Trolling Motor
previously manufactured.
9. All Serialized "Service‑Repair" trolling motors receive a (1) one year warranty. Non‑serialized "Service‑Repair" electric trolling
motors are NOT warranted. "Service‑Repair" motor denotes a trolling motor sold by MotorGuide that may be used but has
been inspected and may have had minor repairs. Original retail purchaser of a "Service‑Repair" motor is the first purchaser
of the motor after it is denoted as "Service‑Repair". "Service Repair" motors have a blue sticker on the battery cable and box
denoting "Manufacturer Certified Service Repair Motor".
10. This warranty will not apply to 1) haul out, launch, towing and storage, transportation charges and/or travel time, telephone
or rental charges of any type, inconvenience, or loss of time or income, or other consequential damages; or 2) removal or
replacement of boat partitions or material because of boat design for necessary access to the Product; or 3) disconnection
and reconnection of hard‑wired trolling motors.
11. TERMINATION OF COVERAGE: Warranty coverage may be terminated for repossessed product, or product purchased at
auction, from a salvage yard, from a liquidator, from an insurance company, from unauthorized marine dealers or boat builders,
or other third party entities.